AWS Public Sector Blog
Getting started with a healthcare data lake
Data related to healthcare, in both volume and variety, is undergoing a tremendous expansion. According to the International Data Corporation (IDC)¹ as of 2018 global healthcare data was estimated to be at 1,218 exabytes and expected to surge very rapidly with a compound annual growth rate (CAGR) of 36%. Further noted by Hong et al.², managing this data poses significant challenges for the healthcare industry due to a myriad of issues ranging from technical heterogeneity to difficulties with maintaining proper levels of security and privacy. These are obstacles that must be overcome though. As noted by Amazon and others in the jointly issued Cloud Healthcare Pledge: “the frictionless exchange of healthcare data, with appropriate permissions and controls, will lead to better patient care, higher user satisfaction, and lower costs across the entire health ecosystem.”
One of the best ways to tackle complicated data integration is through a data lake: a centralized, curated, and secured repository that stores all your data, both in its original form and prepared for analysis. A data lake enables you to break down data silos and combine different types of analytics, such as data warehousing, big data processing, or operational analytics, to gain insights and guide better business decisions.
In healthcare, while there are some early wins in building data lakes, such as Grand River Hospital, cloud adoption is still in its nascency. When I’m helping my customers begin their cloud journey, I always share the session on “Leading Your Team Through a Cloud Transformation” which provides highly prescriptive guidance on getting started. These insights align with our Cloud Transformation Maturity Model where we identify four key stages of adoption—project, foundation, migration, and optimization—and recommends establishing a dedicated “two-pizza team” to tackle your first significant workload and lay the strong foundation for broader cloud adoption at all organizational levels.
In this post, I provide a step-by-step guide to create a first iteration of building a data lake as your organizations initial significant project. Our starting goal is to take a message in one format and automatically convert it to another. To minimize costs and ongoing administration, and ensure accessibility to everyone, we rely on open source and serverless technologies. Additionally, all of our end artifacts are deployed through infrastructure as code using AWS CloudFormation.
For our initial message conversion, we’ll reformat HL7 v2 messages from Encoding Rules 7 (ER7, aka. “Pipehat”) into JSON. HL7’s Version 2.x (V2) messaging standard is the workhorse of electronic data exchange in the clinical domain and arguably the most widely implemented standard for healthcare in the world. 95% of US healthcare organizations use HL7 V2.x and more than 35 countries have HL7 V2.x implementations.
“First sprint” architecture

For our first set up, we:
- Ingest HL7 v2.x messages in ER7 format into the “raw zone” of our data lake through a direct file upload. One of the important characteristics of a data lake is that we typically preserve data as-it-was for auditability.
- On receiving the file in the raw zone, we trigger a Lambda function to do the transformation.
- The Lambda function will do the reformatting making use of the open source “HL7apy” HL7 2.x parsing library as a Lambda Layer.
- On successful reformatting the object is placed into the “staging zone” of our data lake; on failure, we put it in the “error zone”.
- With the data now in a standard format, we can view and query it using tools such as Amazon Athena.
Walkthrough

Prerequisites
- An AWS account with adequate permissions. If you do not have an AWS account, create and activate one.
- Basic knowledge of Python scripting. The scripts used for both coding and deployment are in Python and we use “boto3“, the AWS SDK for Python.
Environment setup
For the purposes of this demo I use AWS Cloud9 as my development environment. All commands below are executed within Cloud9 and thus any terminal commands are Linux-based.
- Follow the procedure outlined in the Cloud9 documentation on “Creating an EC2 Environment”
- Clone our Git repo by running the following terminal commands:
git clone -b blog_1 https://github.com/aws-samples/hcls-data-lake.git - Run the
cloud9_init.shfile to install required Python libraries - Run the
deploy_data_lake.pyfile to deploy the stack
Files Overview
deploy_data_lake.py
This is the file that we run within our IDE in order to deploy our AWS resources. It performs the following activities:
- Prepares our Lambda Layer:
- Download the HL7apy library.
- Extract the contents from the initial “.tar.gz” package.
- Place contents into a top folder supported by the Python runtime (in our case, one named “python”).
- Compress back into a “.zip” package.
- Upload the new package to a temporary Amazon Simple Storage Service (Amazon S3) bucket.
- Prepares our Lambda function by zipping it up and putting it into the temporary Amazon S3 bucket.
- Deploys our CloudFormation stack.
- Cleans up temporary resources.
A few parts of the script worth detailing:
- Multiple constructors for boto3 objects: If a region isn’t specified, boto3 defaults to ‘us-east-1’ when creating resources; if you are using any other region, specify it in the constructor.
- Use of waiters: Many boto3 operations are performed asynchronously. Because we have dependencies (ex. completing an object upload to S3 before referencing it) we use waiters to have the script perform and complete operations in sequence.
- Use of a temporary bucket: For several resources, such as the Lambda function and Lambda Layer, CloudFormation requires them to be .zip files in an S3 bucket.
hl7_parser.py
A simple function which performs the reformatting. Some notable points:
- Expects to operate off of an S3 object reference passed to it.
- Can handle multiple HL7 v2 messages within a single object; outputs each individually.
- Only works with “happy path” strict adherence to the HL7 version specifications; anything else, such as “messy” or customized messages get placed in the error zone.
- Uses element “repetitions” as defined in the HL7 specifications to determine where to use JSON arrays.
hl7_stack.yml
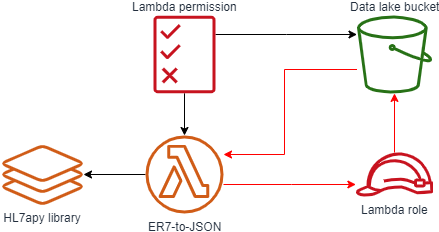
The template used for our CloudFormation. The main item to note is the use of the “!Sub” function to refer to our data lake bucket (ex. !Sub "arn:aws:s3:::${IngestBucket}"). This is required due to a circular reference within our artifacts, as shown below in red. By using the !Sub function we are able to break this loop as we are directly providing the text value of our data lake bucket’s ARN instead of asking CloudFormation to derive it from the resource.
Using the data lake
Upload a file containing an HL7v2 message
We can use our new data lake by uploading a file.
- Login to the AWS Console and navigate to Amazon S3.

- Select your data lake bucket and then press the “Create Folder” button and create a new folder called “raw”; this is where our Lambda trigger is set to look for new HL7 v2 messages. Note that in S3 objects have a flat structure and folders are really just a concept for organizational simplicity.

- Navigate to your newly created folder, select the “Upload” button, and upload a text file containing an HL7 v2 message to the raw folder of your bucket. For convenience, several samples are included with the downloaded package you imported into Cloud9 or you can use the example here:
- After your upload is complete, navigate back to the root of your bucket; you should see a new folder. If the upload was successful, its called “staging.” If so, go into your staging folder and examine the newly created file.


Catalog in AWS Glue and view in Amazon Athena
To query our data, we must first create the AWS Glue Data Catalog, which generates the schema of our data. Note that all of the artifacts listed in this section were created manually through the console temporarily for quick experimentation; in practice we would define and manage these through services like CloudFormation.
- Navigate to AWS Glue; ensure you are in the correct region (where you deployed your artifacts).
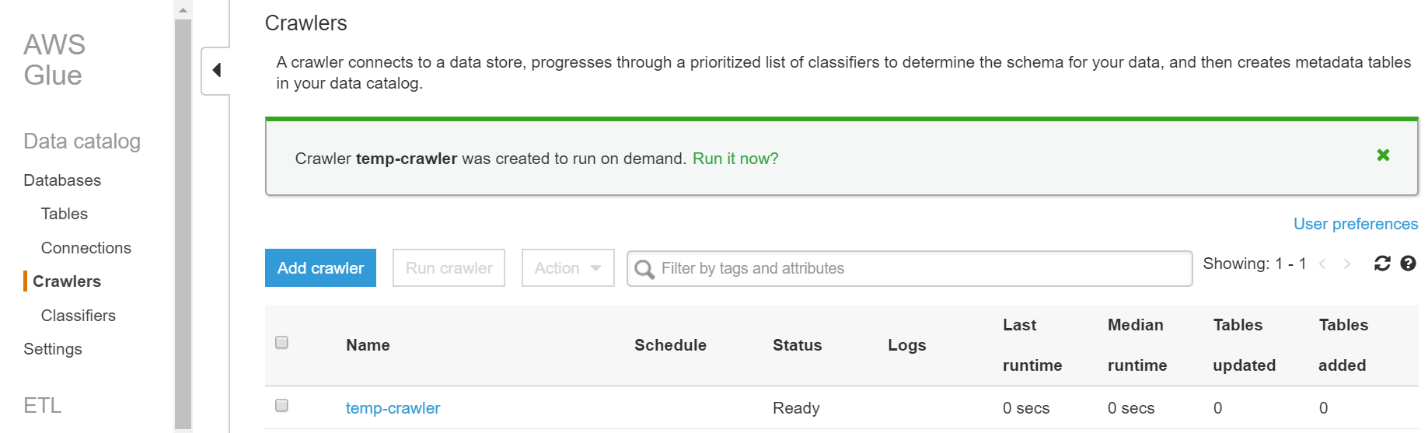
- Navigate to Crawlers (side menu) and then select “Add Crawler”.

- Provide any name you like; for now I recommend “hl7-temp-crawler”.
- For “Crawler source type” keep it the default “Data stores”.
- On “Data store” keep the data store type as “S3”; crawl data in “Specified path in my account”, and use “
s3://$bucket/staging/” as your path, replacing “$bucket” with the name of your data lake bucket (ex.s3://hl7v2-ingestion-74fd3987-56eb-4ff0-b2af-d92e290ef0e0/staging/). - Leave “add another data store” as “no”.
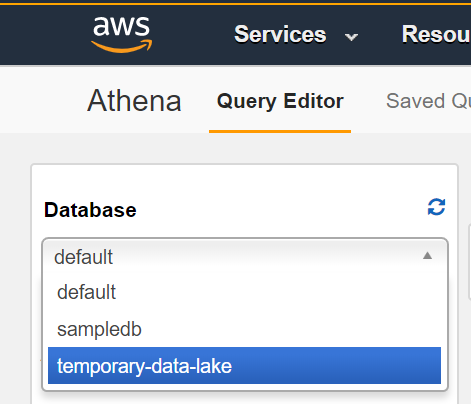
- Choose to create an IAM role. Give it a readily identifiable name like “temporary-data-lake”.
- Leave the frequency as “Run on demand”.
- For the crawler output:
- Add a database, give it a readily identifiable name like “temporary-hl7-data-lake”
- Under “Grouping behavior for S3 data (optional)” check the box beside “Create a single schema for each S3 path”. We do this to keep the different schemas each HL7v2 message is likely to have into the same table .
- Leave all other options at default.
- After you select “Finish” you are taken back to a dashboard with a pop-up asking if you would like to run your new crawler. Press “Run it now?”. The amount of time it takes to run depends on the size of your message; for the sample message above it took about a minute to fully complete (i.e. go back into a “Ready” state).

With your crawler completed, you can now query your data in Amazon Athena.
- Navigate to Amazon Athena; ensure you are in the correct region (where you deployed your bucket and ran Glue).
- Click “Get Started” if you arrive at the splash screen.
- On Query Editor dashboard start by selecting your database from the left hand side menu.
- You should see the HL7 segments, represented as JSON objects, as top level items with your database. You can query within objects by using a dot notation. For example, the following query pulls out the message ID, patient ID, given name, and family name:
Select msh.message_control_id, pid.set_id_patient_id, pid.patient_name.given_name, pid.patient_name.family_name
FROM staging
Summary and next steps
This post demonstrated the first building blocks a healthcare organization might take in building a data lake. One of the key strengths of the data lake pattern is the extensibility in many different directions. I’m interested in hearing from you in the comments what you would like to see as the next step forward. Some examples include:
- Adding the next zone which follows “staging,” “refined,” where we would start leveraging the features provided by AWS Lake Formation for improved security, optimization, accessibility, and advanced features such as record matching; from here we could further springboard into additional features such as Personal Health Information (PHI) and medical entity extraction through Amazon Comprehend Medical and data tokenization using Amazon DynamoDB.
- Adding an Amazon API Gateway HTTP API as an additional means of message ingestion.
- Converting another proprietary medical format into our data lake. A common example I see is for DICOM, where we would want to split the .dcm file into its constituent image(s) and text attributes in order to optimize how we store them and enable analytics on otherwise locked-away data.
Leave a comment in the comment section below. And learn more about healthcare in the public sector, read more stories on healthcare and data lakes.
Subscribe to the AWS Public Sector Blog newsletter to get the latest in AWS tools, solutions, and innovations from the public sector delivered to your inbox, or contact us.