Artificial Intelligence
Create Amazon SageMaker projects using third-party source control and Jenkins
Launched at AWS re:Invent 2020, Amazon SageMaker Pipelines is the first purpose-built, easy-to-use continuous integration and continuous delivery (CI/CD) service for machine learning (ML). With Pipelines, you can create, automate, and manage end-to-end ML workflows at scale.
You can integrate Pipelines with existing CI/CD tooling. This includes integration with existing source control systems such as GitHub, GitHub Enterprise, and Bitbucket. This new capability also allows you to utilize existing installations of Jenkins for orchestrating your ML pipelines. Before this new feature, Amazon SageMaker projects and pipelines were optimized for use with AWS Developer Tools including AWS CodePipeline, AWS CodeCommit, and AWS CodeBuild. This new capability allows you to take advantage of Pipelines while still using existing skill sets and tooling when building your ML CI/CD pipelines.
With the newly added MLOps project templates, you can choose between the following options:
- Model building, training, and deployment using a third-party Git repository and Jenkins
- Model building, training, and deployment using a third-party Git repository and CodePipeline
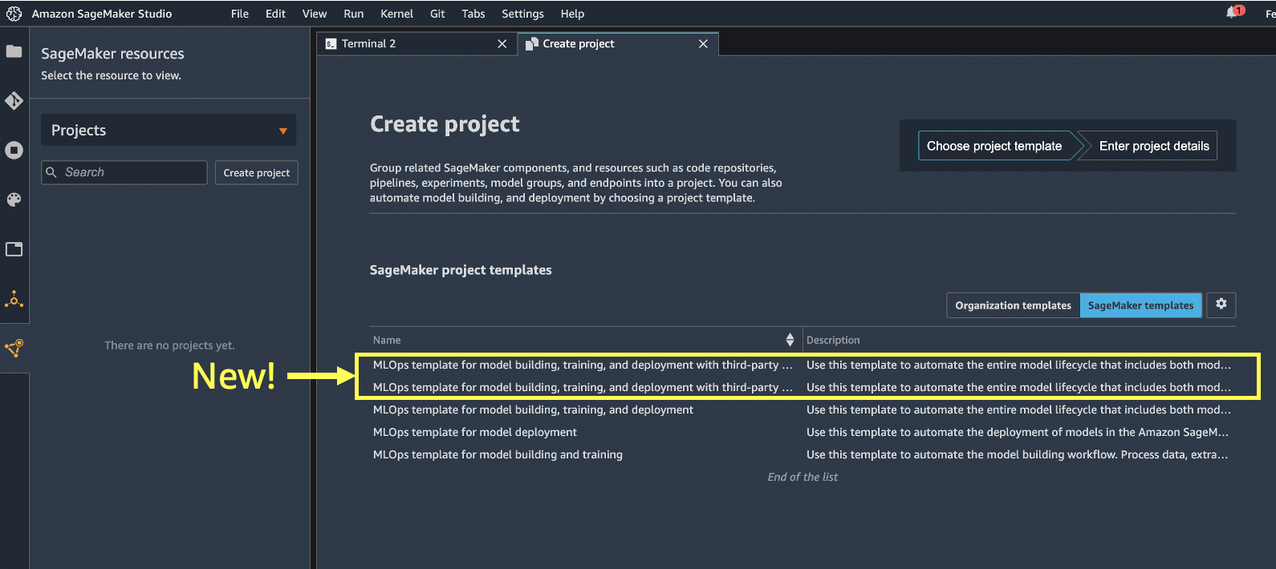
The new template options are now available via the SDK or within the Amazon SageMaker Studio IDE, as shown in the following screenshot.
In this post, we walk through an example using GitHub and Jenkins to demonstrate these new capabilities. You can perform equivalent steps using GitHub Enterprise or Bitbucket as your source code repository. The MLOps project template specifically creates a CI/CD pipeline using Jenkins to build a model using a SageMaker pipeline. The resulting trained ML model is deployed from the model registry to staging and production environments.
Prerequisites
The following are prerequisites to completing the steps in this post:
- Jenkins (we use Jenkins v2.3) installed with administrative privileges.
- A GitHub user account.
- Two GitHub repositories initialized with a README. You must create these repositories as a prerequisite because you supply the two repositories as input when creating your SageMaker project. The project templates automatically seed the code that is pushed to these repositories:
- abalone-model-build – Seeded with your model build code, which includes the code needed for data preparation, model training, model evaluation, and your SageMaker pipeline code.
- abalone-model-deploy – Seeded with your model deploy code, which includes the code needed to deploy your SageMaker endpoints using AWS CloudFormation.
- An AWS account and access to services used in this post.
We also assume some familiarity with Jenkins. For general information on Jenkins, we recommend reading the Jenkins Handbook.
Solution overview
In the following sections, we cover the one-time setup tasks and the steps required when building new pipelines using the new SageMaker MLOps project templates to build out the following high-level architecture (click on image to expand).

The model build pipeline is triggered based on changes to the model build GitHub repository based on Jenkins polling the source repository every minute. The model deploy pipeline can be triggered based on changes to the model deploy code in GitHub or when a new model version is approved in the SageMaker Model Registry.
The one-time setup tasks include:
- Establish the AWS CodeStar connection from your AWS account to your GitHub user or organization.
- Install dependencies on your Jenkins server.
- Set up permissions for communication between Jenkins and AWS.
- Create an Amazon EventBridge rule and AWS Lambda function that is triggered to run the Jenkins model deploy pipeline when approved models are registered in the model registry.
We then use the new MLOps project template for third-party GitHub and Jenkins to provision and configure the following resources, which are also discussed in more detail later in this post:
- SageMaker code repositories – Based on the existing GitHub code repository information you provide on input when creating your SageMaker project, a SageMaker code repository association with that same repository is created when you launch the project. This essentially creates an association with a GitHub repository that SageMaker is aware of using the CodeRepository AWS CloudFormation resource type.
- Model build and deploy seed code triggers –AWS CloudFormation custom resources used by SageMaker projects to seed code in your model build and model deploy code repositories. This seed code includes an example use case, abalone, which is similar to the existing project template, and also the generated code required for building your Jenkins pipeline. When you indicate that you want the repositories seeded, this triggers a Lambda function that seeds your code into the GitHub repository you supply as input.
- Lambda function – A new Lambda function called
sagemaker-p-<hash>-git-seedcodecheckin. This function is triggered by the custom resource in the CloudFormation template. It’s called along with the seed code information (what code needs to be populated), the Git repository information (where it needs to be populated), and the Git AWS CodeStar connection information. This function then triggers the CodeBuild run, which performs the population of the seed code. - CodeBuild project – A CodeBuild project using a
buildspec.ymlfile from an Amazon Simple Storage Service (Amazon S3) bucket owned and maintained by SageMaker. This CodeBuild project is responsible for checking in the initial seed code into the repository supplied as input when creating the project. - MLOps S3 bucket – An S3 bucket for the MLOps pipeline that is used for inputs and artifacts of your project and pipeline.
All of the provisioning and configuration required to set up the end-to-end CI/CD pipeline using these resources is automatically performed by SageMaker projects.
Now that we’ve covered how the new feature works, let’s walk through the one-time setup tasks followed by using the new templates.
One-time setup tasks
The tasks in this section are required as part of the one-time setup activities that must be performed for each AWS Region where you use the new SageMaker MLOps project templates. The steps to create a GitHub connection and an AWS Identity and Access Management (IAM) user for Jenkins could be incorporated into a CloudFormation template for repeatability. For this post, we explicitly define the steps.
Set up the GitHub connection
In this step, you connect to your GitHub repositories using AWS Developer Tools and, more specifically, AWS CodeStar connections. The SageMaker project uses this connection to connect to your source code repositories.
- On the CodePipeline console, under Settings in the navigation pane, choose Connections.

- Choose Create connection.
- For Select a provider, select GitHub.
- For Connection name, enter a name.
- Choose Connect to GitHub.

- If the AWS Connector GitHub app isn’t previously installed, choose Install new app.

A list of all the GitHub personal accounts and organizations you have access to is displayed.
- Choose the account where you want to establish connectivity for use with SageMaker projects and GitHub repositories.
- Choose Configure.

- You can optionally select specific repositories, but for this post we create a repository in later steps, so we choose All repositories.
- Choose Save.
When the app is installed, you’re redirected to the Connect to GitHub page and the installation ID is automatically populated.
- Choose Connect.
- Add a tag with the key
sagemakerand valuetrueto this AWS CodeStar connection. - Copy the connection ARN to save for later.
You use the ARN as a parameter in the project creation step.
Install Jenkins software dependencies
In this step, you ensure that several software dependencies are in place on the Jenkins server. If you don’t have an existing Jenkins server or need to create one for testing, you can install Jenkins.
- Make sure pip3 is installed.
On Unix or Mac, enter the following code:
On Ubuntu, enter the following code:
- Install Git on the Jenkins server if it’s not already installed.
- Install the following plugins on your Jenkins server:
Create a Jenkins user on IAM
In this step, you create an IAM user and permissions policy that allows for programmatic access to Amazon S3, SageMaker, and AWS CloudFormation. This IAM user is used by your Jenkins server to access the AWS resources needed to configure the integration with SageMaker projects and your Jenkins server. After this user is created, you configure the same on the Jenkins server using the IAM user credentials.
- On the IAM console, choose Policies in the navigation pane.
- Choose Create policy.
- On the JSON tab, enter the following policy:
- Choose Next: Tags.
- Choose Next: Review.
- Under Review policy, name your policy JenkinsExecutionPolicy.
- Choose Create policy.
We now need to create a user that the policy is attached to.
- In the navigation pane, choose Users.
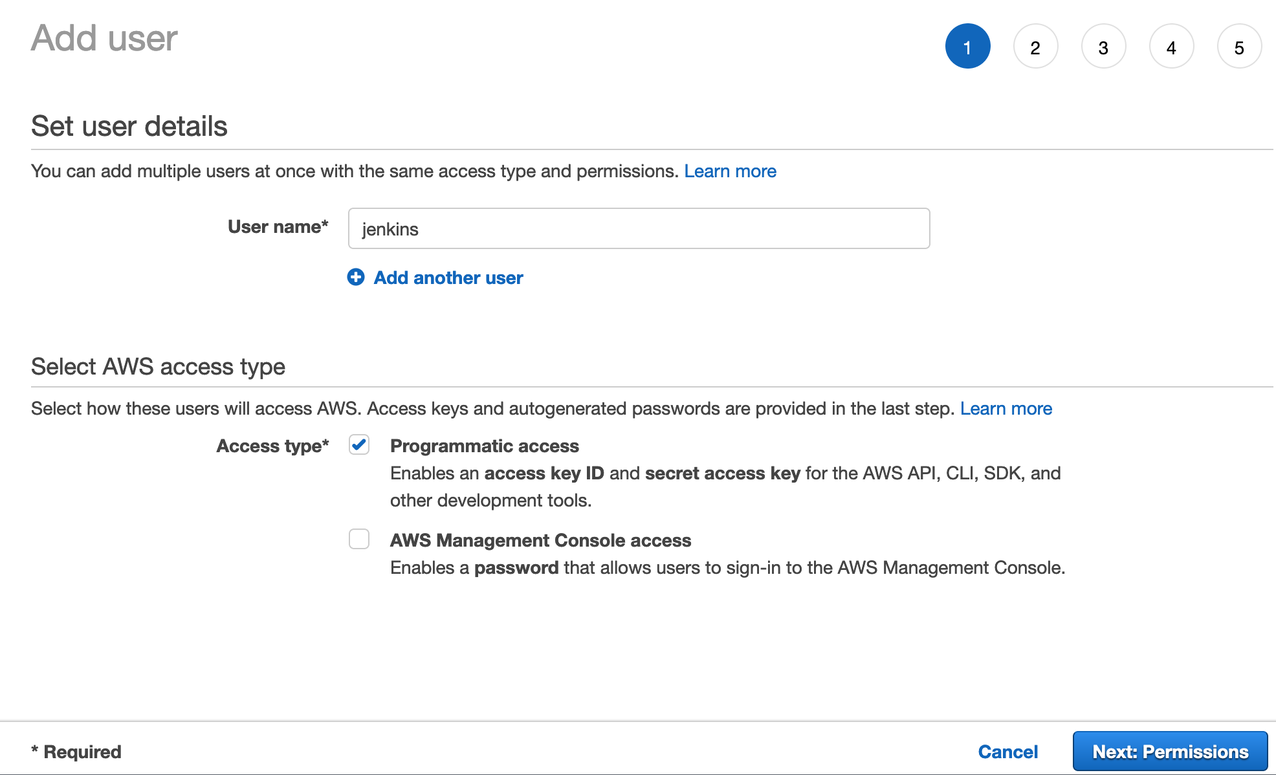
- Choose Add user.
- For User name¸ enter
jenkins. - For Access type, select Programmatic access.
- Choose Next: Permissions.
- Under Set Permissions, select Attach existing policies directly, then search for the policy you created.
- Select the policy
JenkinsExecutionPolicy. - Choose Next: Tags.

- Choose Next: Review.
- Choose Create user.
You need the access key ID and secret key for Jenkins to be able to create and run the CI/CD pipeline. The secret key is only displayed one time, so make sure to save both values in a secure place.
Configure the Jenkins IAM user on the Jenkins server
In this step, you configure the AWS credentials for the Jenkins IAM user on your Jenkins server. To do this, you need to sign in to your Jenkins server with administrative credentials. The credentials are stored in the Jenkins Credential Store.
- On the Jenkins dashboard, choose Manage Jenkins.
- Choose Manage Credentials.
- Choose the store
Jenkins.

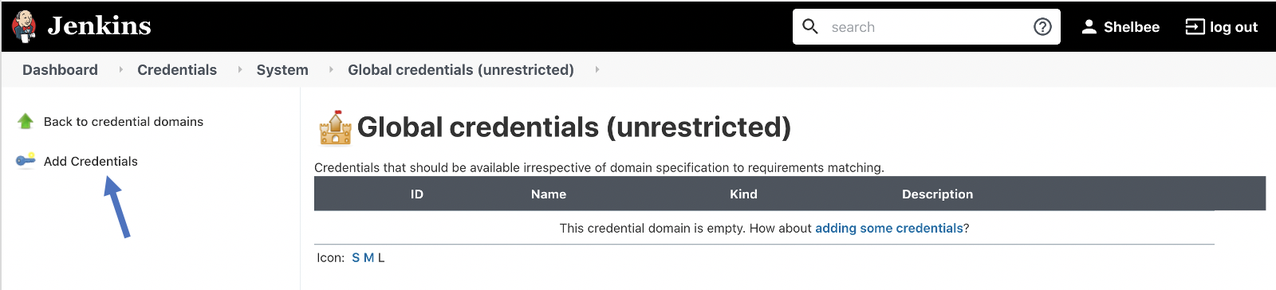
- Choose Global credentials.

- Choose Add Credentials.
- For Kind, select AWS Credentials.
- For Scope, select Global.
- For Description, enter
Jenkins AWS Credentials. - For Access Key ID, enter the access key for the IAM user you created.
- For Secret Access Key, enter the secret access key for the IAM user you created.
- Choose OK.
Your new credentials are now listed under Global credentials.

Create a model deployment Jenkins pipeline trigger
In this step, you configure the trigger to run your Jenkins model deployment pipeline whenever a new model version gets registered into a model package group in the SageMaker Model Registry. To do this, you create an API token for communication with your Jenkins server. Then you run a CloudFormation template from your AWS account that sets up a new rule in EventBridge to monitor the approval status of a model package registered in the SageMaker Model Registry. We use the model registry to catalog models and metadata about those models, as well as manage the approval status and model deployment pipelines. The CloudFormation template also creates a Lambda function that is the event target when a new model gets registered. This function gets the Jenkins API user token credentials from AWS Secrets Manager and uses that to trigger the pipeline remotely based on the trigger, as shown in the following diagram (click on the image to expand).

Create the Jenkins API token
First, you need to create an API token for the Jenkins user.
- Choose your user name on the Jenkins console.
- Choose Configure.

- Under API Token, choose Add new Token.
- Choose Generate.

- Copy the generated token value and save it somewhere to use in the next step.


Create the trigger and Lambda function
Next, you create the trigger and Lambda function. To do this, you need the provided CloudFormation template, model_trigger.yml. The template takes three parameters as input:
- JenkinsUser – Your Jenkins user with administrative privileges (for example,
Jenkins-admin) - JenkinsAPIToken – The Jenkins API token you created (for example,
11cnnnnnnnnnnnnnn) - JenkinsURL– The URL of your Jenkins server (for example,
http://ec2-nn-nn-nnn-n.eu-north-1.compute.amazonaws.com)
You can download and launch the CloudFormation template via the AWS CloudFormation Console, the AWS Command Line Interface (AWS CLI), or the SDK, or by simply choosing the following launch button:
![]()
This completes the one-time setup required to use the new MLOps SageMaker project templates for each Region. Depending on your organizational structure and roles across the ML development lifecycle, these one-time setup steps may need to be performed by your DevOps, MLOps, or system administrators.
We now move on to the steps for creating SageMaker projects using the new MLOps project template from SageMaker Studio.
Use the new MLOps project template with GitHub and Jenkins
In this section, we cover how to use one of the two new MLOps project templates released that allow you to utilize Jenkins as your orchestrator. First, we create a new SageMaker project using one of the new templates. Then we use the generated Jenkins pipeline code to create the Jenkins pipeline.
Create a new SageMaker project
To create your SageMaker project, complete the following steps:
- On the Studio console, choose SageMaker resources.
- On the drop-down menu, choose Projects.
- Choose Create project.

- For SageMaker project templates, choose MLOps template for model building, training, and deployment with third-party Git repositories using Jenkins.
- Choose Select project template.


You need to provide several parameters to configure the source code repositories for your model build and model deploy code.
- Under ModelBuild CodeRepository Info, provide the following parameters:
- For URL, enter the URL of your existing Git repository for the model build code in https:// format.
- For Branch, enter the branch to use from your existing Git repository for pipeline activities as well as for seeding code (if that option is enabled).
- For Full Repository Name, enter the Git repository name in the format of
<username>/<repository name> or <organization>/<repository name>. - For Codestar Connection ARN, enter the ARN of the AWS CodeStar connection created as part of the one-time setup steps.
- For Sample Code, choose whether the seed code should be populated in the repository identified.
The seed code includes model build code for the abalone use case that is common to SageMaker projects; however, when this is enabled, a new /jenkins folder with Jenkins pipeline code is also seeded.
It’s recommended to allow SageMaker projects to seed your repositories with the code to ensure proper structure and for automatic generation of the Jenkins DSL pipeline code. If you don’t choose this option, you need to create your own Jenkins DSL pipeline code. You can then modify the seed code specific to your model based on your use case.

- Under ModelDeploy CodeRepository Info, provide the following parameters:
- For URL, enter the URL of your existing Git repository for the model deploy code in https:// format.
- For Branch, enter the branch to use from your existing Git repository for pipeline activities as well as for seeding code (if that option is enabled).
- For Full Repository Name, enter the Git repository name in the format of
<username>/<repository name>or<organization>/<repository name>. - For Codestar Connection ARN, enter the ARN of the AWS CodeStar connection created as part of the one-time setup steps.
- For Sample Code, choose whether the seed code should be populated in the repository identified.
As we mentioned earlier, the seed code includes the model deploy code for the abalone use case that is common to SageMaker projects; however, when this is enabled, a /jenkins folder with Jenkins pipeline code is also seeded.
- Choose Create project.

A message appears indicating that SageMaker is provisioning and configuring the resources.

When the project is complete, you receive a successful message, and your project is now listed on the Projects list.

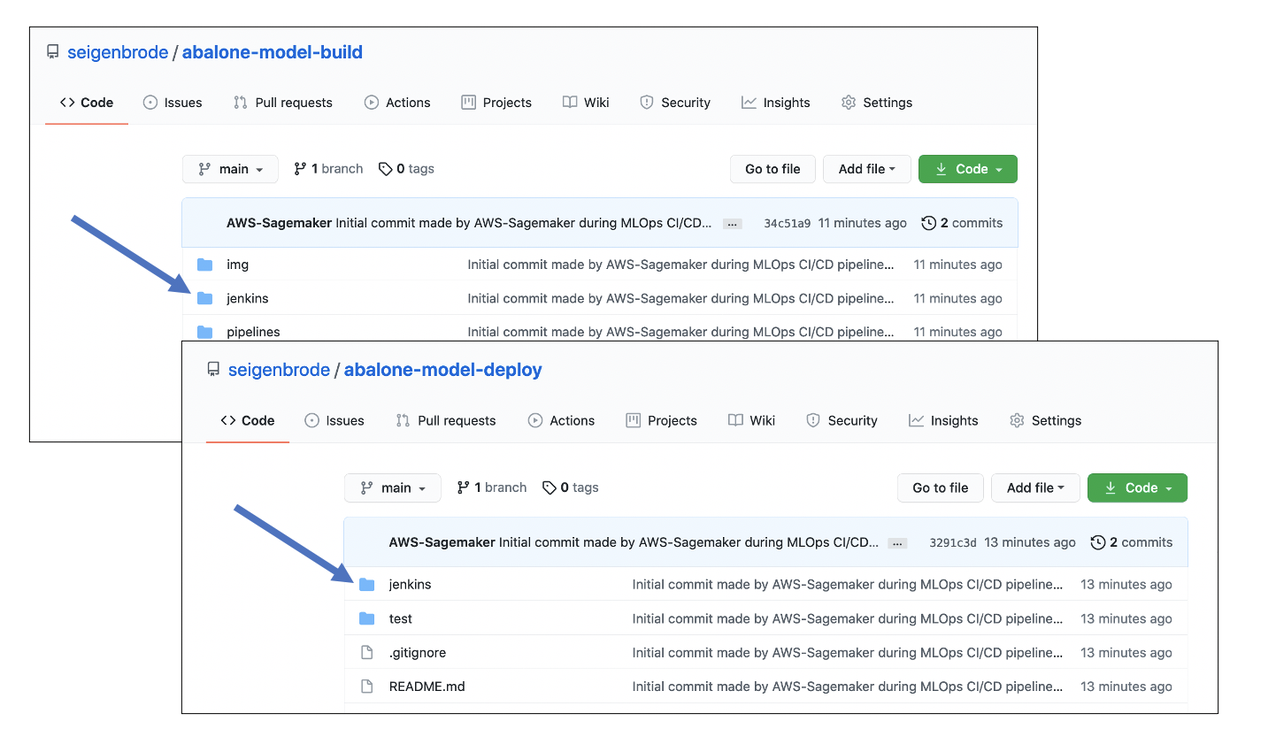
You now have seed code in your abalone-model-build and abalone-model-deploy GitHub repositories. You also have the /jenkins folders containing the Jenkins DSL to create your Jenkins pipeline.
Automatically generated Jenkins pipeline syntax
After you create the SageMaker project with seed code enabled, the code needed to create a Jenkins pipeline is automatically generated. Let’s review the code generated and push to the abalone-model-build and abalone-model-deploy GitHub repositories.
The model build pipeline contains the following:
- seed_job.groovy – A Jenkins groovy script to create a model build Jenkins pipeline using the pipeline definition from the Jenkinsfile.
- Jenkinsfile – The Jenkins pipeline definition for model build activities, including the following steps:
- Checkout SCM – Source code checkout (
abalone-model-build). - Build and install – Ensure latest version of the AWS CLI is installed.
- Update and run the SageMaker pipeline – Run the SageMaker pipeline that corresponds to the SageMaker project ID. This pipeline is visible on the Studio console but is being triggered by Jenkins in this case.
- Checkout SCM – Source code checkout (
The model deploy pipeline contains the following:
- seed_job.groovy – A Jenkins groovy script to create a model deploy Jenkins pipeline using the pipeline definition from the Jenkinsfile.
- Jenkinsfile – The Jenkins pipeline definition for model deploy activities, including the following steps:
- Checkout SCM – Source code checkout (
abalone-model-deploy). - Install – Ensure the latest version of the AWS CLI is installed.
- Build – Run a script called
build.pyfrom your seeded source code, which fetches the approved model package from the SageMaker Model Registry and generates the CloudFormation templates for creating staging and production SageMaker endpoints. - Staging deploy – Launch the CloudFormation template to create a staging SageMaker endpoint.
- Test staging – Run a script called
test.pyfrom your seeded source code. The generated code includes a test to describe the endpoint to ensure it’s showingInServiceand also includes code blocks to add your own custom testing code: - Manual approval for production – A Jenkins step to enable continuous delivery requiring manual approval being deploying to a production environment.
- Prod deploy – Launch the CloudFormation template to create a production SageMaker endpoint.
- Checkout SCM – Source code checkout (
Create a Jenkins model build pipeline
In this step, we create the Jenkins pipeline using the DSL generated in the seed code created through the SageMaker project in the previous step.
- On your Jenkins server, choose New Item on the dashboard menu.

- For Enter an item name¸ enter
CreateJenkinsPipeline. - Choose Freestyle project.

- Choose OK.
- On the General tab, select This project is parameterized.
- On the Add Parameter drop-down menu, choose Credentials Parameter.
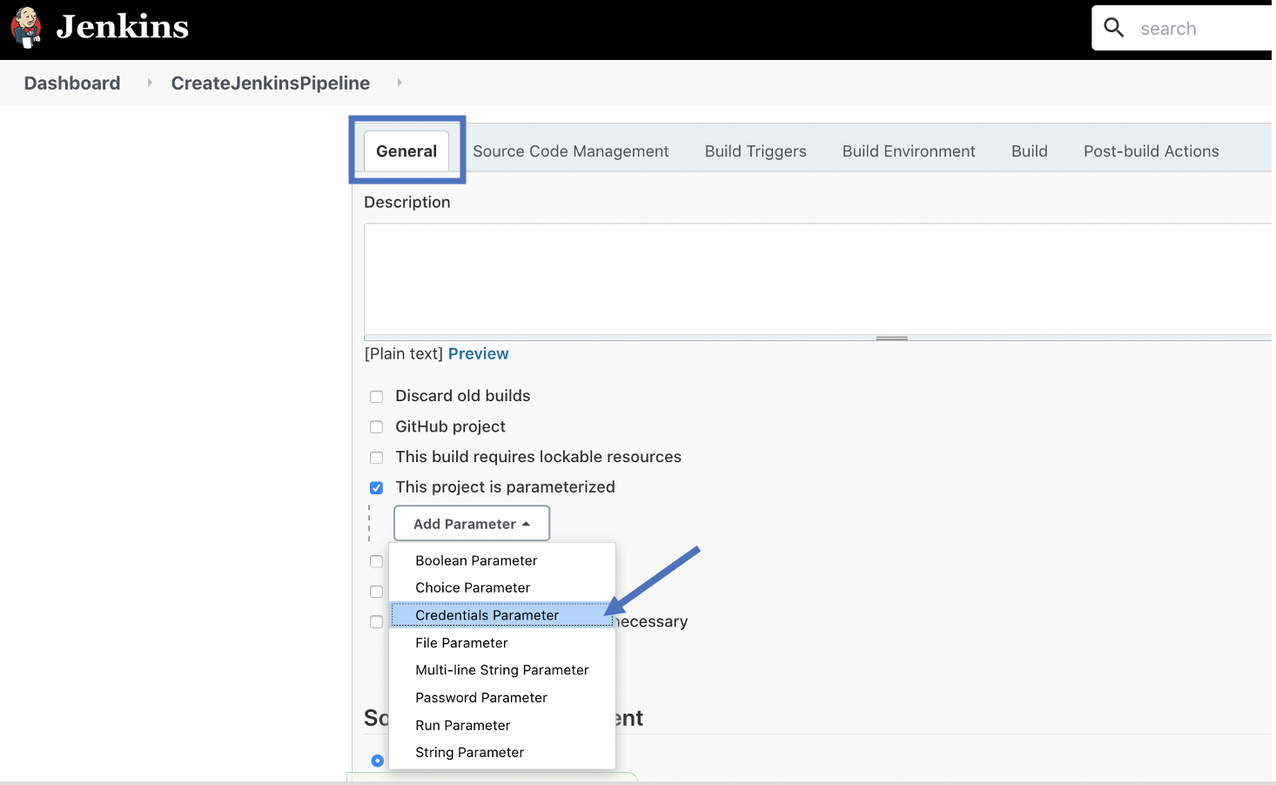

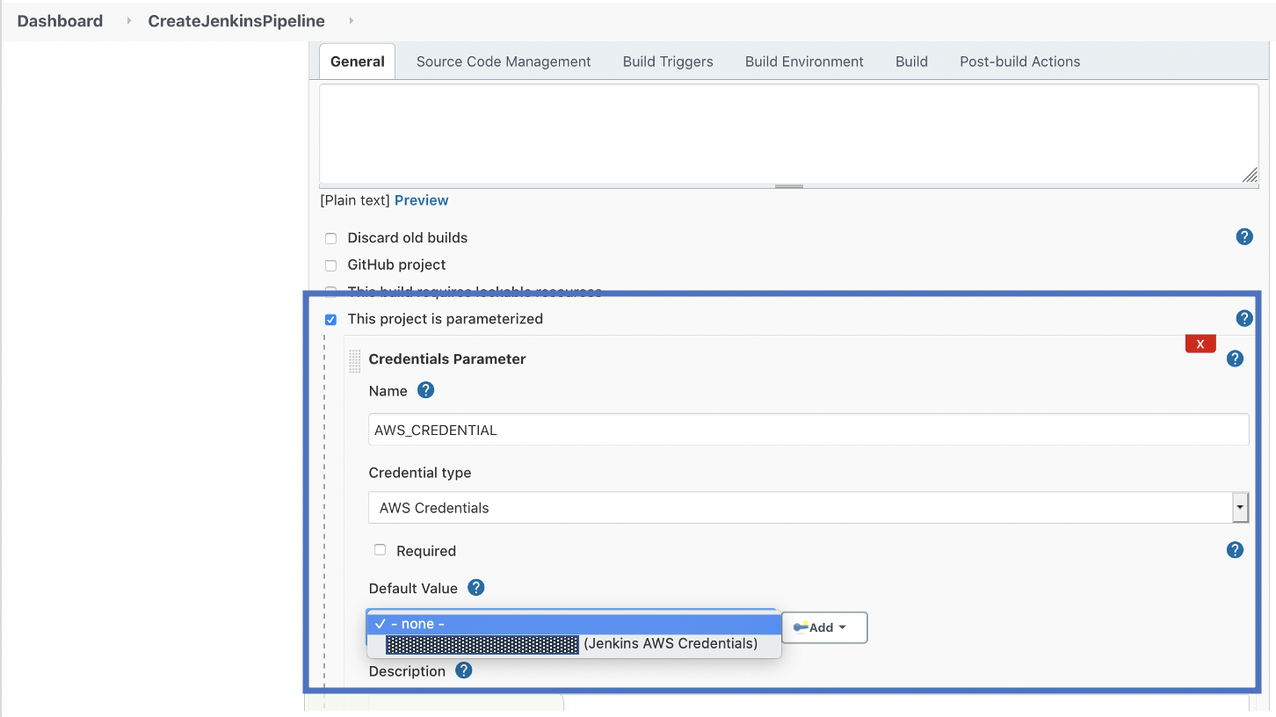
You must provide the following information for the AWS credentials that are used by your Jenkins pipeline to integrate with AWS.
- For Name, enter
AWS_CREDENTIAL. - For Credential type, choose AWS Credentials.
- For Default Value, choose the Jenkins AWS credentials that you created during the one-time setup tasks.
- On the Source Code Management tab, select Git.
- For Repository URL, enter the URL for the GitHub repository containing the model build code (for this post,
abalone-model-build). - For Branches to build, make sure to indicate the correct branch.

- On the Build Triggers tab, in the Build section, choose Process Job DSLs on the drop-down menu.

- For Process Job DSLs, select Look on Filesystem.
- For DSL Scripts, enter the value of
jenkins/seed_job.groovy.
seed_job.groovy was automatically generated by your SageMaker project and pushed to your GitHub repository when seeding was indicated.
- Choose Save.

Next, we want to run our Jenkins job to create the Jenkins pipeline.
- Choose Build with Parameters.

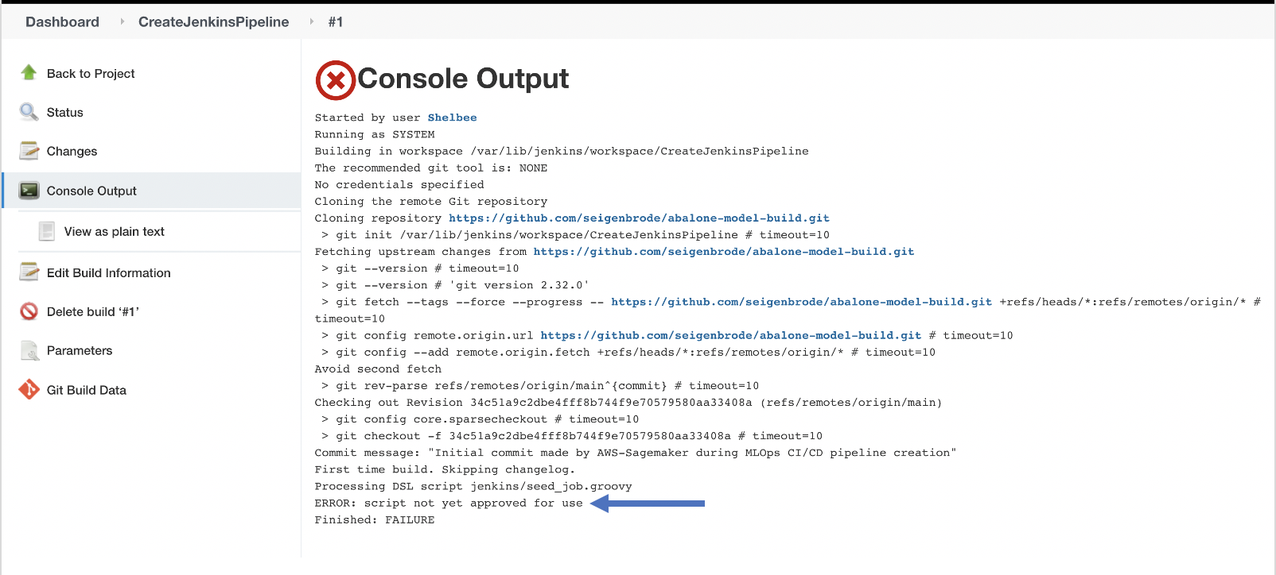
- Choose Build.

The first run of the pipeline fails with an error that the script is not approved. Jenkins implements security controls to ensure only approved user-provided groovy scripts can be run (for more information, see In-process Script Approval). As a result, we need to approve the script before running the build again.
- On the Jenkins dashboard, choose Manage Jenkins.
- Choose In-process Script Approval.
You should see a message that a script is pending approval.

- Choose Approve.

- Repeat the steps to build the pipeline again.
This time, the job should run successfully and create a new modelbuild pipeline.

- Choose your new pipeline (
sagemaker-jenkings-btd-1-p-<hash>-modelbuild) to view its details.
This is the pipeline generated by the Jenkins DSL code that was seeded in your GitHub repository. This is the actual model building pipeline.

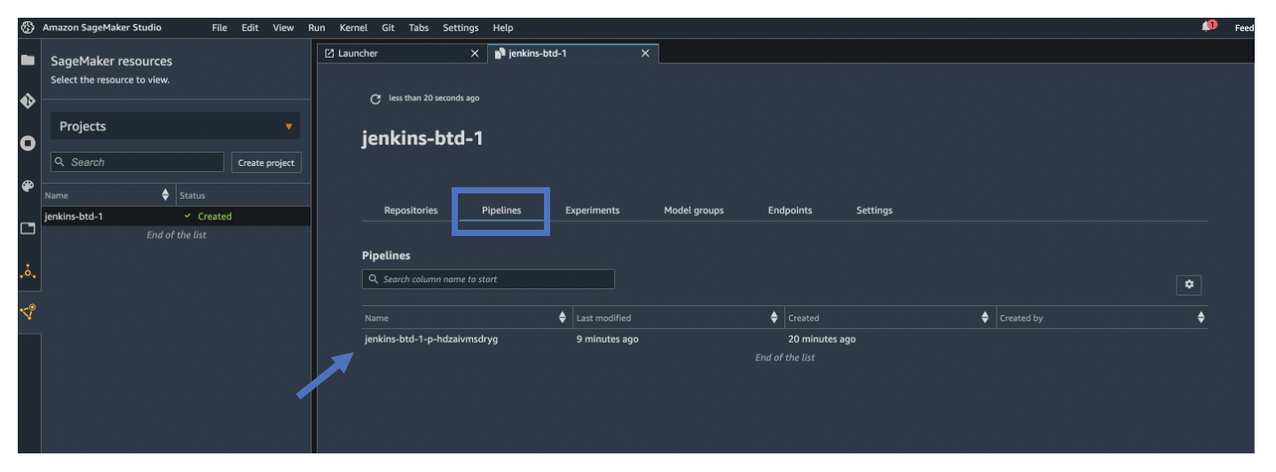
- On the Studio UI, return to your project.
- Choose the Pipelines tab.
You still have visibility to your model build pipeline, but the orchestration for the CI/CD pipeline steps is performed by Jenkins.
If a data scientist wants to update any of the model build code, they can clone the repository to their Studio environment by choosing clone repo. When new code is committed and pushed to the GitHub repository, the Jenkins model build pipeline is automatically triggered.

Create a Jenkins model deploy pipeline
In this step, we perform the same steps as we did with the model build pipeline to create a model deploy pipeline, using the model deploy GitHub repo.

You can now see a new pipeline called sagemaker-jenkings-btd-1-p-<hash>-modeldeploy. This is the pipeline generated by the Jenkins DSL code that was seeded in your model deploy GitHub repository (abalone-model-deploy).
The first time this pipeline builds, it fails. Similar to the previous steps, you need to approve the script and rebuild the pipeline.

After the two pipelines are created, two additional pipelines appear in Jenkins that are associated with the SageMaker project.

The model deploy pipeline fails because the first time it runs, there are no approved models in the model registry.
When you navigate to the model registry, you can see a model that has been trained and registered by the model build pipeline. You can approve the model by updating its status, which triggers the deploy pipeline.

You can see the deploy pipeline running and the model is deployed to a staging environment.

After the model is deployed to staging, a manual approval option is available to deploy the model into a production environment

On the SageMaker console, the endpoint deployed by Jenkins is also visible.

After you approve the Jenkins pipeline, a model is deployed to a production environment and is visible on the SageMaker console.

Summary
In this post, we walked through one of the new SageMaker MLOps project templates that you can use to build and configure a CI/CD pipeline that takes advantage of SageMaker features for model building, training, and deployment while still using your existing tooling and skillsets. For our use case, we focused on using GitHub and Jenkins, but you can also use GitHub Enterprise or Bitbucket depending on your needs. You can also utilize the other new template to combine your choice of source code repository (GitHub, GitHub Enterprise, or Bitbucket) with CodePipeline. Try it out and let us know if you have any questions in the comments section!
About the Authors
 Shelbee Eigenbrode is a Principal AI and Machine Learning Specialist Solutions Architect at Amazon Web Services (AWS). She holds 6 AWS certifications and has been in technology for 23 years spanning multiple industries, technologies, and roles. She is currently focusing on combining her DevOps and ML background to deliver and manage ML workloads at scale. With over 35 patents granted across various technology domains, she has a passion for continuous innovation and using data to drive business outcomes. Shelbee co-founded the Denver chapter of Women in Big Data.
 Saumitra Vikram is a Software Developer on the Amazon SageMaker team and is based in Chennai, India. Outside of work, he loves spending time running, trekking and motor bike riding through the Himalayas.
 Venkatesh Krishnan is a Principal Product Manager – Technical for Amazon SageMaker in AWS. He is the product owner for a portfolio of services in the MLOps space including SageMaker Pipelines, Model Registry, Projects, and Experiments. Earlier he was the Head of Product, Integrations and the lead product manager for Amazon AppFlow, a new AWS service that he helped build from the ground up. Before joining Amazon in 2018, Venkatesh served in various research, engineering, and product roles at Qualcomm, Inc. He holds a PhD in Electrical and Computer Engineering from Georgia Tech and an MBA from UCLA’s Anderson School of Management.
 Kirit Thadaka is an ML Solutions Architect working in the SageMaker Service SA team. Prior to joining AWS, Kirit spent time working in early stage AI startups followed by some time in consulting in various roles in AI research, MLOps, and technical leadership.
 Saurabh Trikande is a Senior Product Manager for Amazon SageMaker Inference. He is passionate about working with customers and is motivated by the goal of democratizing machine learning. He focuses on core challenges related to deploying complex ML applications, multi-tenant ML models, cost optimizations, and making deployment of deep learning models more accessible. In his spare time, Saurabh enjoys hiking, learning about innovative technologies, following TechCrunch, and spending time with his family.