Artificial Intelligence
Scaling Large Language Model (LLM) training with Amazon EC2 Trn1 UltraClusters
Modern model pre-training often calls for larger cluster deployment to reduce time and cost. At the server level, such training workloads demand faster compute and increased memory allocation. As models grow to hundreds of billions of parameters, they require a distributed training mechanism that spans multiple nodes (instances).
In October 2022, we launched Amazon EC2 Trn1 Instances, powered by AWS Trainium, which is the second generation machine learning accelerator designed by AWS. Trn1 instances are purpose built for high-performance deep learning model training while offering up to 50% cost-to-train savings over comparable GPU-based instances. In order to bring down training time from weeks to days, or days to hours, and distribute a large model’s training job, we can use an EC2 Trn1 UltraCluster, which consists of densely packed, co-located racks of Trn1 compute instances all interconnected by non-blocking petabyte scale networking. It is our largest UltraCluster to date, offering 6 exaflops of compute power on demand with up to 30,000 Trainium chips.
In this post, we use a Hugging Face BERT-Large model pre-training workload as a simple example to explain how to useTrn1 UltraClusters.
Trn1 UltraClusters
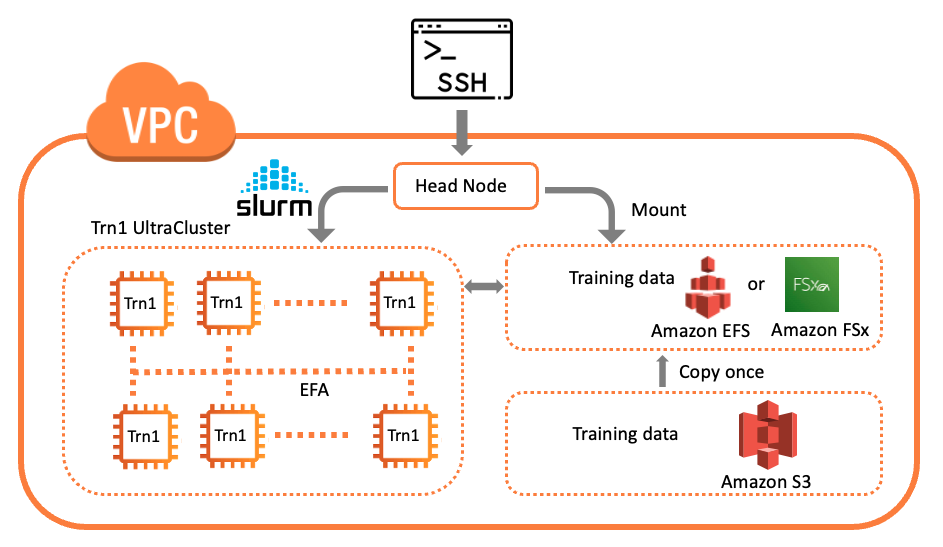
A Trn1 UltraCluster is a placement group of Trn1 instances in a data center. As part of a single cluster run, you can spin up a cluster of Trn1 instances with Trainium accelerators. The following diagram shows an example.

UltraClusters of Trn1 instances are co-located in a data center, and interconnected using Elastic Fabric Adapter (EFA), which is a petabyte scale, non-blocking network interface, with up to 800 Gbps networking bandwidth, which is twice the bandwidth supported by AWS P4d instances (1.6 Tbps, four times greater with the upcoming Trn1n instances). These EFA interfaces help run model training workloads that use Neuron Collective Communication Libraries at scale. Trn1 UltraClusters also include co-located network attached storage services like Amazon FSx for Lustre to enable high throughput access to large datasets, ensuring clusters operate efficiently. Trn1 UltraClusters can host up to 30,000 Trainium devices and deliver up to 6 exaflops of compute in a single cluster. EC2 Trn1 UltraClusters deliver up to 6 exaflops of compute, literally an on-demand supercomputer, with a pay-as-you-go usage model. In this post, we use some HPC tools like Slurm to ramp an UltraCluster and manage workloads.
Solution overview
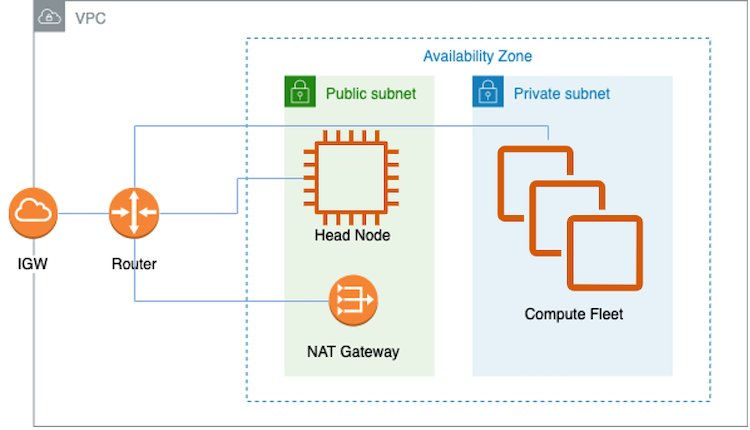
AWS offers a wide variety of services for distributed model training or inferencing workloads at scale, including AWS Batch, Amazon Elastic Kubernetes Service (Amazon EKS), and UltraClusters. This post focuses on model training in an UltraCluster. Our solution uses the AWS ParallelCluster management tool to create the necessary infrastructure and environment to spin up a Trn1 UltraCluster. The infrastructure consists of a head node and multiple Trn1 compute nodes within a virtual private cloud (VPC). We use Slurm as the cluster management and job scheduling system. The following diagram illustrates our solution architecture.
For more details and how to deploy this solution, see Train a model on AWS Trn1 ParallelCluster.
Let’s look at some important steps of this solution:
- Create a VPC and subnets.
- Configure the compute fleet.
- Create the cluster.
- Inspect the cluster.
- Launch your training job.
Prerequisites
To follow along with this post, a broad familiarity with core AWS services such as Amazon Elastic Compute Cloud (Amazon EC2) is implied, and basic familiarity with deep learning and PyTorch would be helpful.
Create VPC and subnets
An easy way to create the VPC and subnets is through the Amazon Virtual Private Cloud (Amazon VPC) console. Complete instructions can be found on GitHub. After the VPC and subnets are installed, you need to configure the instances in the compute fleet. Briefly, this is made possible by an installation script specified by CustomActions in the YAML file used for creating the ParallelCluster (see Create ParallelCluster). A ParallelCluster requires a VPC that has two subnets and a Network Address Translation (NAT) gateway, as shown in the preceding architecture diagram. This VPC has to reside in the Availability Zones where Trn1 instances are available. Also, in this VPC, you need to have a public subnet and a private subnet to hold the head node and Trn1 compute nodes, respectively. You also need a NAT gateway internet access, such that Trn1 compute nodes can download AWS Neuron packages. In general, the compute nodes will receive updates for the OS packages, Neuron driver and runtime, and EFA driver for multi-instance training.
As for the head node, in addition to the aforementioned components for the compute nodes, it also receives the PyTorch-NeuronX and NeuronX compiler, which enables the model compilation process in XLA devices such as Trainium.
Configure the compute fleet
In the YAML file for creating the Trn1 UltraCluster, InstanceType is specified as trn1.32xlarge. MaxCount and MinCount are used to indicate your compute fleet size range. You may use MinCount to keep some or all Trn1 instances available at all time. MinCount may be set to zero so that if there is no running job, the Trn1 instances are released from this cluster.
Trn1 may also be deployed in an UltraCluster with multiple queues. In the following example, there is only one queue being set up for Slurm job submission:
If you need more than one queue, you can specify multiple InstanceType, each with its own MaxCount, MinCount, and Name:
Here, two queues are set up, so that user has the flexibility to choose the resources for their Slurm job.
Create the cluster
To launch a Trn1 UltraCluster, use the following pcluster command from where your ParallelCluster tool is installed:
We use the following options in this command:
--cluster-configuration– This option expects a YAML file that describes the cluster configuration-n(or--cluster-name) – The name of this cluster
This command creates a Trn1 cluster in your AWS account. You can check the progress of cluster creation on the AWS CloudFormation console. For more information, refer to Using the AWS CloudFormation console.
Alternatively, you can use the following command to see the status of your request:
and the command will indicate the status, for example:
The following are parameters of interest from the output:
- instanceId – This is the instance ID of the head node, which will be listed on the Amazon EC2 console
- computeFleetStatus – This attribute indicates readiness of the compute nodes
- Tags – This attribute indicates the version of
pclustertool used to create this cluster
Inspect the cluster
You can use the aforementioned pcluster describe-cluster command to check the cluster. After the cluster is created, you will observe the following in the output:
At this point, you may SSH into the head node (identified by instance ID on the Amazon EC2 console). The following is a logical diagram of the cluster.
After you SSH into the head node, you can verify the compute fleet and their status with a Slurm command such as sinfo to view the node information for the system. The following is an example output:
This indicates that there is one queue as shown by a single partition. There are 16 nodes available, and resources are allocated. From the head node, you can SSH into any given compute node:
Use exit to get back to the head node.
Likewise, you can SSH into a compute node from another compute node. Each compute node has Neuron tools installed, such as neuron-top. You can invoke neuron-top during the training script run to inspect NeuronCore utilization at each node.
Launch your training job
We use the Hugging Face BERT-Large Pretraining Tutorial as an example to run on this cluster. After the training data and scripts are downloaded to the cluster, we use the Slurm controller to manage and orchestrate our workload. We submit the training job with the sbatch command. The shell script invokes the Python script via the neuron_parallel_compile API to compile the model into graphs without a full training run. See the following code:
We use the following options in this command:
--exclusive– This job will use all nodes and will not share nodes with other jobs while running the current job.--nodes– The number of nodes for this job.--wrap– This defines a command string that is run by the Slurm controller. In this case, it simply compiles the model in parallel using all nodes.
After the model is compiled successfully, you may start the full training job with the following command:
This command will launch the training job for the Hugging Face BERT-Large model. With 16 Trn1.32xlarge nodes, you can expect it to complete in less than 8 hours.
At this point, you can use a Slurm command such as squeue to inspect the submitted job. An example output is as follows:
This output shows the job is running (R) on 16 compute nodes.
As the job is running, outputs are captured and appended in a Slurm log file. From the head node‘s terminal, you can inspect it in real time.
Also, in the same directory as the Slurm log file, there is a corresponding directory for this job. This directory includes the following (for example):
This directory is accessible to all compute nodes. results.json captures the metadata of this particular job run, such as the model’s configuration, batch size, total steps, gradient accumulation steps, and training dataset name. The model checkpoint and output log per each compute node are also captured in this directory.
Consider scalability of the cluster
In a Trn1 UltraCluster, multiple interconnected Trn1 instances run a large model training workload in parallel and reduce total computation time or time to convergence. There are two measures of scalability of a cluster: strong scaling and weak scaling. Typically, for model training, the need is to speed up the training run, because usage cost is determined by sample throughput for rounds of gradient updates. Strong scaling refers to the scenario where the total problem size stays the same as the number of processors increases, strong scaling is an important measure of scalability for model training. In evaluating strong scaling, (i.e the impact of parallelization), we want to keep global batch size the same and see how much time it takes to convergence. In such scenario, we need to adjust gradient accumulation micro-step according to number of compute nodes. This is achieved with the following in the training shell script run_dp_bert_large_hf_pretrain_bf16_s128.sh:
On the other hand, if you want to evaluate how many more workloads can be run at a fixed time by adding more nodes, use weak scaling to measure scalability. In weak scaling, the problem size increases at the same rate as the number of NeuronCoress, thereby keeping the amount of work per NeuronCores the same. To evaluate weak scaling, or the effect of adding more nodes on the increased workload, simply remove the above line from the training script, and keep the number of steps for gradient accumulation constant with a default value (32) provided in the training script.
Evaluate your results
We provide some benchmark results in the Neuron performance page to demonstrate the effect of scaling. The data demonstrates the benefit of using multiple instances to parallelize the training job for many different large models to train at scale.
Clean up your infrastructure
To delete all the infrastructure of this UltraCluster, use the pcluster command to delete the cluster and its resources:
Conclusion
In this post, we discussed how scaling your training job across an Trn1-UltraCluster, which is powered by Trainium accelerators in AWS, reduces the time to train a model. We also provided a link to the Neuron samples repository, which contains instructions on how to deploy a distributed training job for a BERT-Large model. Trn1-UltraCluster runs distributed training workloads to train ultra-large deep learning models at scale. A distributed training setup results in much faster model convergence as compared to training on a single Trn1 instance.
To learn more about how to get started with Trainium-powered Trn1 instances, visit the Neuron documentation.
About the Authors
 K.C. Tung is a Senior Solution Architect in AWS Annapurna Labs. He specializes in large deep learning model training and deployment at scale in cloud. He has a Ph.D. in molecular biophysics from the University of Texas Southwestern Medical Center in Dallas. He has spoken at AWS Summits and AWS Reinvent. Today he helps customers to train and deploy large PyTorch and TensorFlow models in AWS cloud. He is the author of two books: Learn TensorFlow Enterprise and TensorFlow 2 Pocket Reference.
 Jeffrey Huynh is a Principal Engineer in AWS Annapurna Labs. He is passionate about helping customers run their training and inference workloads on Trainium and Inferentia accelerator devices using AWS Neuron SDK. He is a Caltech/Stanford alumni with degrees in Physics and EE. He enjoys running, tennis, cooking, and reading about science and technology.
 Shruti Koparkar is a Senior Product Marketing Manager at AWS. She helps customers explore, evaluate, and adopt EC2 accelerated computing infrastructure for their machine learning needs.