Artificial Intelligence
Setting up Amazon Personalize with AWS Glue
Data can be used in a variety of ways to satisfy the needs of different business units, such as marketing, sales, or product. In this post, we focus on using data to create personalized recommendations to improve end-user engagement. Most ecommerce applications consume a huge amount of customer data that can be used to provide personalized recommendations; however, that data may not be cleaned or in the right format to provide those valuable insights.
The goal of this post is to demonstrate how to use AWS Glue to extract, transform, and load your JSON data into a cleaned CSV format. We then show you how to run a recommendation engine powered by Amazon Personalize on your user interaction data to provide a tailored experience for your customers. The resulting output from Amazon Personalize is recommendations you can generate from an API.
A common use case is an ecommerce platform that collects user-item interaction data and suggests similar products or products that a customer may like. By the end of this post, you will be able to take your uncleaned JSON data and generate personalized recommendations based off of products each user has interacted with, creating a better experience for your end-users. For the purposes of this post, refer to this user-item-interaction dataset to build this solution.
The resources of this solution may incur a cost on your AWS account. For pricing information, see AWS Glue Pricing and Amazon Personalize Pricing.
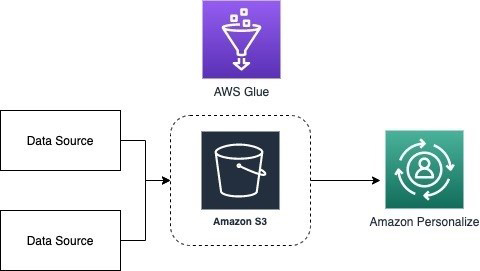
The following diagram illustrates our solution architecture.
Prerequisites
For this post, you need the following:
- An Amazon Simple Storage Service (Amazon S3) bucket containing the user-item-interaction dataset.
For instructions on creating a bucket, see Step 1: Create your first S3 bucket. Make sure to attach the Amazon Personalize access policy.
- An AWS Identity and Access Management (IAM) role for AWS Glue with the
AmazonS3FullAccessandAmazonPersonalizeFullAccess
These are very permissive policies; in practice it’s best to use least privilege and only give access where it’s needed. For instructions on creating a role, see Step 2: Create an IAM Role for AWS Glue.
Crawling your data with AWS Glue
We use AWS Glue to crawl through the JSON file to determine the schema of your data and create a metadata table in your AWS Glue Data Catalog. The Data Catalog contains references to data that is used as sources and targets of your ETL jobs in AWS Glue. AWS Glue is a serverless data preparation service that makes it easy to extract, clean, enrich, normalize, and load data. It helps prepare your data for analysis or machine learning (ML). In this section, we go through how to get your JSON data ready for Amazon Personalize, which requires a CSV file.
Your data can have different columns that you may not necessarily want or need to run through Amazon Personalize. In this post, we use the user-item-interaction.json file and clean that data using AWS Glue to only include the columns user_id, item_id, and timestamp, while also transforming it into CSV format. You can use a crawler to access your data store, extract metadata, and create table definitions in the Data Catalog. It automatically discovers new data and extracts schema definitions. This can help you gain a better understanding of your data and what you want to include while training your model.
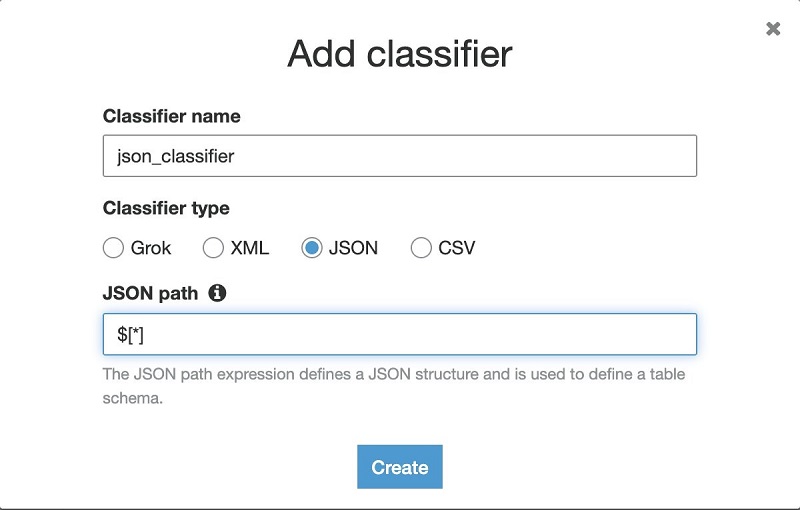
The user-item-interaction JSON data is an array of records. The crawler treats the data as one object: just an array. We create a custom classifier to create a schema that is based on each record in the JSON array. You can skip this step if your data isn’t an array of records.
- On the AWS Glue console, under Crawlers, choose Classifiers.
- Choose Add classifier.
- For Classifier name¸ enter
json_classifier. - For Classifier type, select JSON.
- For JSON path, enter
$[*]. - Choose Create.
- On the Crawlers page, choose Add crawler.
- For Crawler name, enter
json_crawler. - For Custom classifiers, add the classifier you created.
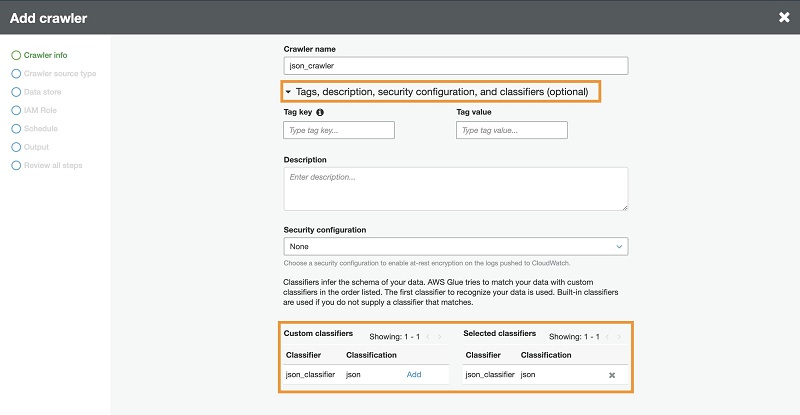
- Choose Next.
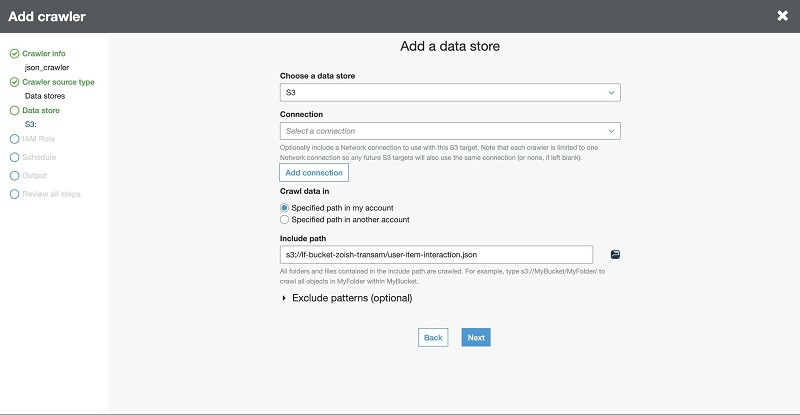
- For Crawler source type, choose Data stores.
- Leave everything else as default and choose Next.
- For Choose a data store, enter the Amazon S3 path to your JSON data file.
- Choose Next.
- Skip the section Add another data store.
- In the Choose an IAM role section, select Choose an existing IAM role.
- For IAM role, choose the role that you created earlier (
AWSGlueServiceRole-xxx). - Choose Next.
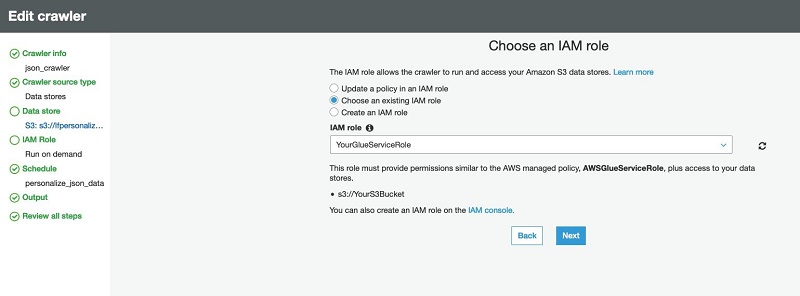
- Leave the frequency as Run on Demand.
- On the Output page, choose Add database.
- For Database name, enter
json_data. - Choose Finish.
- Choose Run it now.
You can also run your crawler by going to the Crawlers page, selecting your crawler, and choosing Run crawler.
Using AWS Glue to convert your files from CSV to JSON
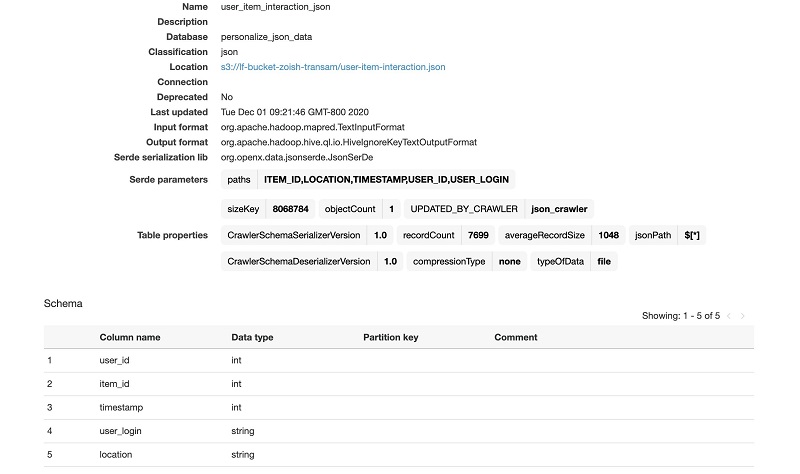
After your crawler finishes running, go to the Tables page on the AWS Glue console. Navigate to the table your crawler created. Here you can see the schema of your data. Make note of the fields you want to use with your Amazon Personalize data. For this post, we want to keep the user_id, item_id, and timestamp columns for Amazon Personalize.
At this point, you have set up your database. Amazon Personalize requires CSV files, so you have to transform the data from JSON format into three cleaned CSV files that include only the data you need in Amazon Personalize. The following table shows examples of the three CSV files you can include in Amazon Personalize. It’s important to note that interactions data is required, whereas user and item data metadata is optional.
| Dataset Type | Required Fields | Reserved Keywords |
| Users |
1 metadata field |
|
| Items |
1 metadata field |
CREATION_TIMESTAMP(long) |
| Interactions |
|
|
It’s also important to make sure that you have at least 1,000 unique combined historical and event interactions in order to train the model. For more information about quotas, see Quotas in Amazon Personalize.
To save the data as a CSV, you need to run an AWS Glue job on the data. A job is the business logic that performs the ETL work in AWS Glue. The job changes the format from JSON into CSV. For more information about data formatting, see Formatting Your Input Data.
- On the AWS Glue Dashboard, choose AWS Glue Studio.
AWS Glue Studio is an easy-to-use graphical interface for creating, running, and monitoring AWS Glue ETL jobs.
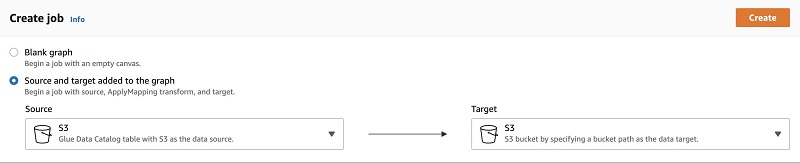
- Choose Create and manage jobs.
- Select Source and target added to the graph.
- For Source, choose S3.
- For Target, choose S3.
- Choose Create.
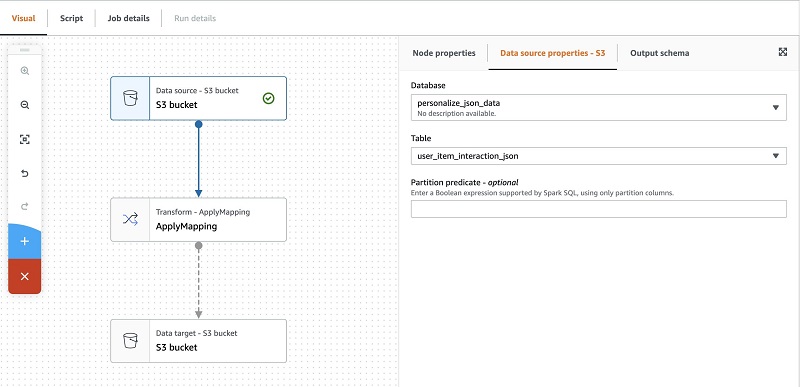
- Choose the data source S3 bucket.
- On the Data source properties – S3 tab, add the database and table we created earlier.
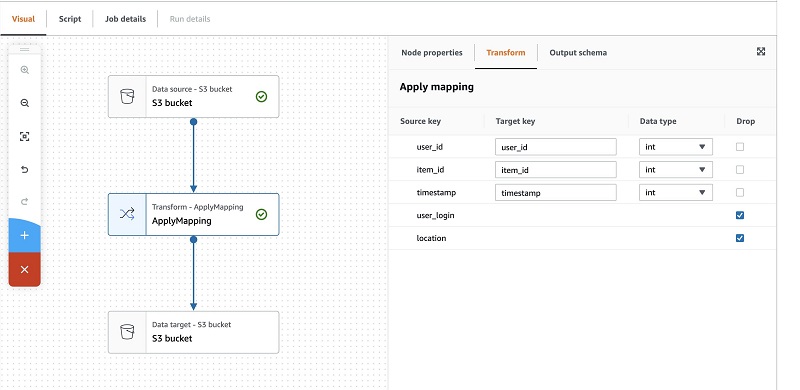
- On the Transform tab, select the boxes to drop
user_loginandlocation.
In this post, we don’t use any additional metadata to run our personalization algorithm.
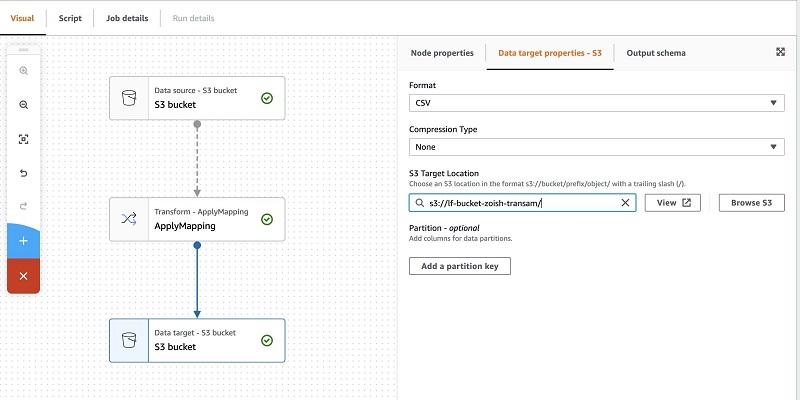
- Choose the data target S3 bucket.
- On the Data target properties – S3 tab, for Format, choose CSV.
- For S3 Target location, enter the S3 path for your target.
For this post, we use the same bucket we used for the JSON file.
- On the Job details page, for Name, enter a name for your job (for this post,
json_to_csv). - For IAM Role, choose the role you created earlier.
You should also have included the AmazonS3FullAccess policy earlier.
- Leave the rest of the fields at their default settings.
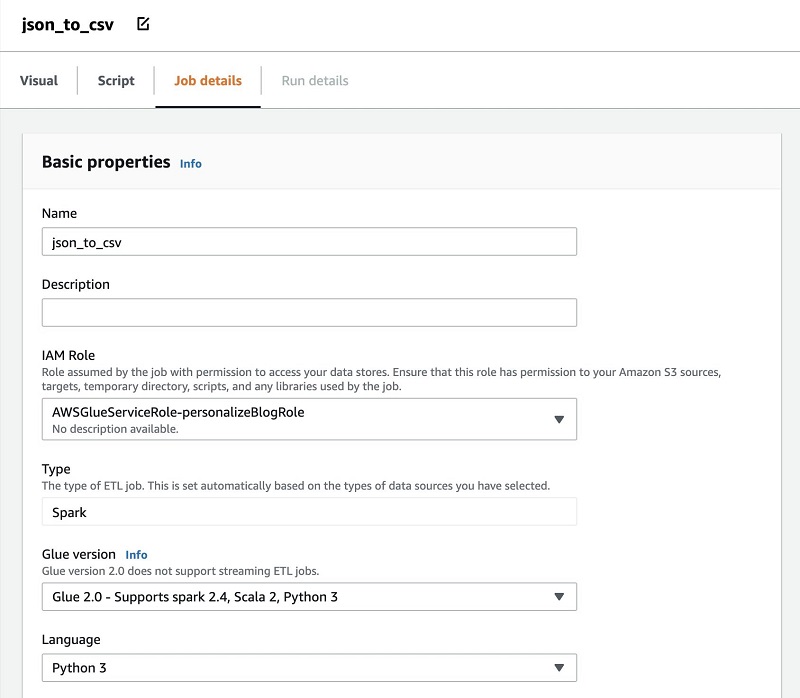
- Choose Save.
- Choose Run.
It may take a few minutes for the job to run.
In your Amazon S3 bucket, you should now see the CSV file that you use in the next section.
Setting up Amazon Personalize
At this point, you have your data formatted in a file type that Amazon Personalize can use. Amazon Personalize is a fully managed service that uses ML and over 20 years of recommendation experience at Amazon.com to enable you to improve end-user engagement by powering real-time personalized product and content recommendations, and targeted marketing promotions. In this section, we go through how to create an Amazon Personalize solution to use your data to create personalized experiences.
- On the Amazon Personalize console, under New dataset groups, choose Get started.
- Enter the name for your dataset group.
A dataset group contains the datasets, solutions, and event ingestion API.
- Enter a dataset name, and enter in the schema details based on your data.
For this dataset, we use the following schema. You can change the schema according to the values in your dataset.
- Choose Next.
- Enter your dataset import job name to import data from Amazon S3.
Make sure that your IAM service role has access to Amazon S3 and Amazon Personalize, and that your bucket has the correct bucket policy.
- Enter the path to your data (the Amazon S3 bucket from the previous section).
- On the Dashboard page for your dataset groups, under Upload datasets, import the
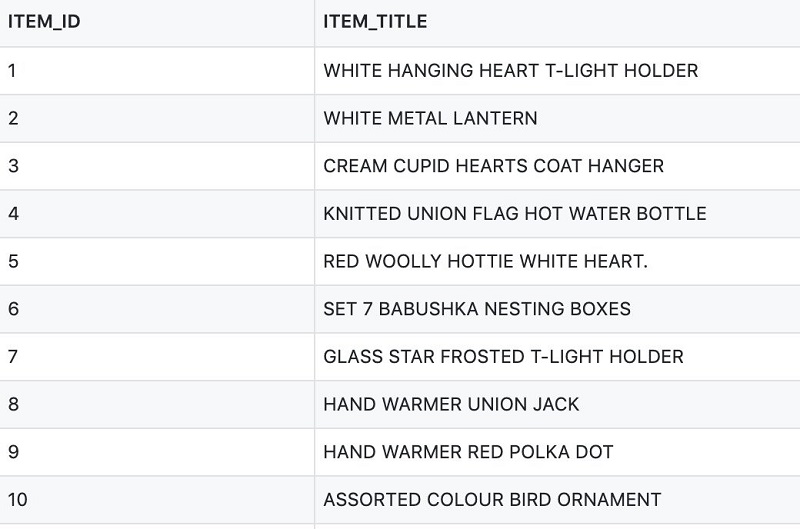
user-item-interactionsdata (user data and item data are optional but can enhance the solution).

We include an example item.csv file in the GitHub repo. The following screenshot shows an example of the item data.
- Under Create solutions, for Solutions training, choose Start.
A solution is a trained model of the data you provided with the algorithm, or recipe, that you select.
- For Solution name, enter
aws-user-personalization. - Choose Next.
- Review and choose Finish.
- On the dashboard, under Launch campaigns, for Campaign creation, choose Start.
A campaign allows your application to get recommendations from your solution version.
- For Campaign name, enter a name.
- Choose the solution you created.
- Choose Create campaign.
You have now successfully used the data from your data lake and created a recommendation model that can be used to get various recommendations. With this dataset, you can get personalized recommendations for houseware products based off the user’s interactions with other products in the dataset.
Using Amazon Personalize to get your recommendations
To test your solution, go to the campaign you created. In the Test campaign results section, under User ID, enter an ID to get recommendations for. A list of IDs shows up, along with a relative score. The item IDs correlate with specific products recommended.
The following screenshot shows a search for user ID 1. They have been recommended item ID 59, which correlates to a wooden picture frame. The score listed next to the item gives you the predicted relevance of each item to your user.
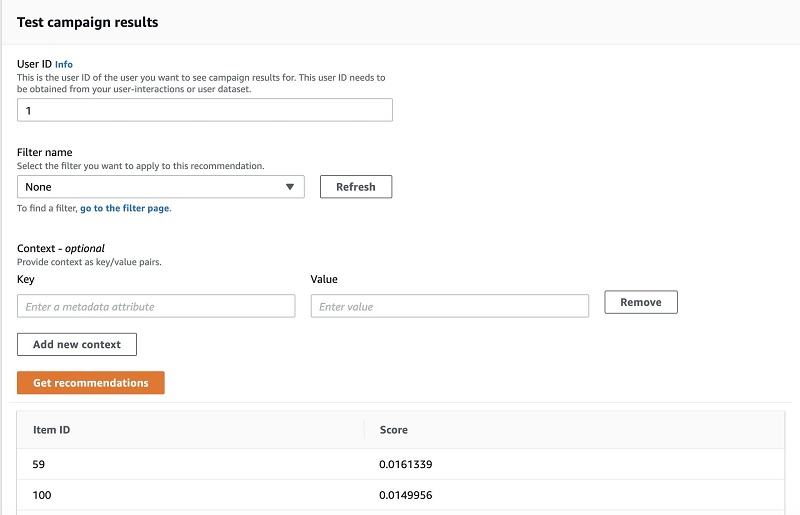
To learn more about Amazon Personalize scores, see Introducing recommendation scores in Amazon Personalize.
To generate recommendations, you can call the GetRecommendations or GetPersonalizedRanking API using the AWS Command Line Interface (AWS CLI) or a language-specific SDK. With Amazon Personalize, your recommendations can change as the user clicks on the items for more real-time use cases. For more information, see Getting Real-Time Recommendations.
Conclusion
AWS offers a wide range of AI/ML and analytics services that you can use to gain insights and guide better business decisions. In this post, you used a JSON dataset that included additional columns of data, and cleaned and transformed that data using AWS Glue. In addition, you built a custom model using Amazon Personalize to provide recommendations for your customers.
To learn more about Amazon Personalize, see the developer guide. Try this solution out and let us know if you have any questions in the comments.
About the Authors
 Zoish Pithawala is a Startup Solutions Architect at Amazon Web Services based out of San Francisco. She primarily works with startup customers to help them build secure and scalable solutions on AWS.
 Sam Tran is a Startup Solutions Architect at Amazon Web Services based out of Seattle. He focuses on helping his customers create well-architected solutions on AWS.