Networking & Content Delivery
Reduce latency for end-users with multi-region APIs with CloudFront
As organizations grow, they must often serve geographically dispersed users with low latency, prompting them to have a distributed global infrastructure in the cloud. In this article, we describe how to deploy global API endpoints to reduce latency for end-users while increasing an application’s availability.
By using the AWS Global Network and Amazon CloudFront to deploy applications into multiple AWS Regions, organizations can allow their users to connect to an API endpoint in the Region with the lowest latency to the API request’s origin, while accessing data that is automatically kept in sync across Regions in real time.
To explain the solution for GraphQL API developers, we provide an architecture using AWS AppSync. This architecture relies on a set of components to support multi-Region active/active scenarios, namely: CloudFront, Amazon Route 53, AWS Certificate Manager (ACM), and AWS Lambda@Edge.
For GraphQL, this article complements the previous post Multi Region Deployment of AWS AppSync with Amazon DynamoDB Global Tables, by explaining how to transform an active/passive AppSync global solution into an active/active one. Furthermore, it provides a CloudFront-based alternative to Custom Domain Names for AWS AppSync APIs.
If you’re a REST API developer, then you can achieve similar results by following the post Using latency-based routing with Amazon CloudFront for a multi-Region active-active architecture. There you’ll also find guidance about cost and complexity trade-offs that will help you think through architectural considerations and their impact on the functionality, resilience, and performance of your applications.
Multi-region GraphQL API with CloudFront
We see organizations increasingly choosing to build APIs with GraphQL to deliver applications faster by giving front-end developers the ability to query multiple databases, microservices, and APIs with a single endpoint.
The following architecture diagram (figure 1) describes how to reduce latency for end users while increasing your application’s availability by providing GraphQL API endpoints in multiple Regions, with active/active real-time data synchronization supported by Amazon DynamoDB global tables. A PDF version of this diagram is available at this link. For further details on how to implement Amazon DynamoDB replication, read the post Multi Region Deployment of AWS AppSync with Amazon DynamoDB Global Tables.
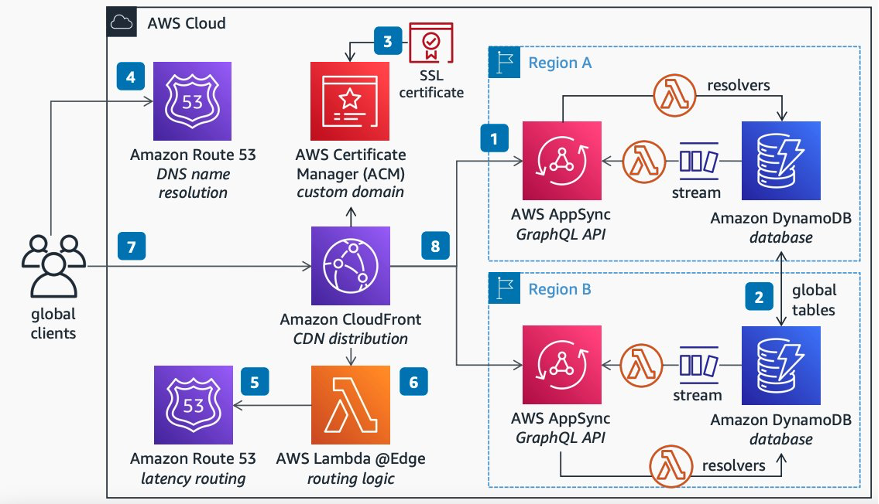
Figure 1: Diagram for Multi-Region GraphQL API with CloudFront
Follow the following steps to implement the architecture shown in the diagram:
- Deploy a GraphQL API in two or more Regions using AWS AppSync, and then handle the AppSync commands and queries using AWS Lambda resolvers connected to a DynamoDB database.
- To notify clients about data changes across all Regions, enable DynamoDB global tables to keep data in sync across Regions, then handle DynamoDB data streams with a Lambda handler, thereby triggering purpose-built GraphQL schema subscriptions. For additional information on how to do this, see the post Multi Region Deployment of AWS AppSync with Amazon DynamoDB Global Tables.
- To support custom domains, upload the domain’s SSL Certificate into ACM and attach it to a CloudFront distribution.
- Point your domain name to CloudFront by using Route 53 as your DNS name resolution service.
- Set up a routing rule on Route 53 to route your global clients to the AWS Region with less latency to their location.
- So that your clients can authenticate seamlessly to AWS AppSync endpoints in any Region, use Lambda@Edge to query Route 53 for the best Region to forward the request, and to normalize authorization by abstracting the specificities of each Regional AppSync.
- Then, clients across the globe can connect to your GraphQL API on a single endpoint available in edge locations.
- CloudFront will seamlessly route clients’ requests to the API in the Region with the lowest latency to the client’s location.
Configuring CloudFront
Here are the steps to configure CloudFront for the multi-Region active/active solution in this article:
- Start by creating one simple generic CloudFront distribution (see how here).
- The origin of the distribution isn’t relevant for the end state of our solution because it will be replaced by the API endpoints. However, it must be resolvable so that the Lambda@Edge function is invoked. For example, you can use
aws.amazon.comas your origin. - For simplicity, the solution described in this post implements a secure custom URL starting with
global-api. For example, if your custom domain isexample.com, then the active/active API is available athttps://global-api.example.com. To support it, add your alternate domain name (e.g.,global-api.example.com) to your CloudFront distribution (see how here).
On your CloudFront distribution, edit the behavior and set the following property values:
- Change “Allowed HTTP methods” to “
GET, HEAD, OPTIONS, PUT, POST, PATCH, DELETE” – this will enable the POST requests necessary to handle GraphQL queries. - Change “Cache policy” to “
CachingDisabled” – this will remove any cache to make sure that all of the requests are dynamic. - Change “Origin request policy” to “
AllViewer” – this will add the required information to the payload sent to the Lambda@Edge function.
Configuring ACM
To implement the solution described in this article, use ACM to request a public certificate to your custom domain (see how here). This solution uses subdomains, so you must request a certificate that supports wildcards. For example, if your domain is “example.com”, then request a certificate to handle both “example.com” and “*.example.com”.
Once your certificate is available and validated on ACM, attach it to your CloudFront distribution (see how here).
Configuring Amazon Route53
To implement the solution described in this article, create the following records in the Route 53 hosted zone for your domain:
- A simple CNAME record to serve as an entry point to your CloudFront distribution (see how here).
- A record with a latency-based routing policy to configure your multiple regional APIs (see how here). This improves performance for your users by serving their requests from the AWS Region that provides the lowest latency.
- A custom domain for each Region (use the same custom domain in your Lambda function that follows).
For example, if your domain is “example.com”, your CloudFront distribution is “abcdefghij.cloudfront.net”, and you have APIs in the Europe (Ireland) and Asia Pacific (Sydney) Regions, then you should end up with a Route 53 configuration similar to figure 2.

Figure 2: Table of records on Route 53
Note the following common mistakes while configuring Route 53:
- The “ireland” and “sydney” record values in the example above aren’t the URLs of the Regional API endpoints. Instead, these are the keys of the dictionary defined in the Lambda@Edge code that follows.
- The latency record names in the example above aren’t Region specific. Instead, they’re common record names that the Lambda@Edge will contact to query Route 53 for the recommended Region’s key.
For additional details on how this Route 53 configuration is used in the context of the solution, execute the steps in the test section of this article. These let you start from an empty AWS account and build your way to a fully functional multi-Regional environment that you can test with a Vue.js application.
Code for Lambda@Edge
To implement the solution in this article, create an Lambda@Edge function in Node.js using the code snippets in this section as a template (see how here).
There are multiple ways to deploy your function to CloudFront. A simple way is to select the “Actions” dropdown on the Lambda editor, then select “Deploy to Lambda@Edge”.
The following code lets you find the best AWS Region for an incoming request. It assumes that you have already set up a routing policy on your Route 53 named “latency-routing”. The possible results from this function, considering the example in the Route 53 table above, are “Ireland” and “Sydney”.
const dns = require('dns');

let bestOrigin;
let expires = 0;
let TTL = 1;
let DNS_HOST = 'latency-routing.example.com';

function getBestRegion() {
    console.log("inside resolver");
    const now = Date.now();
    if (now < expires)
        return Promise.resolve(bestOrigin);
    return new Promise((resolve, reject) => {
        dns.resolveCname(DNS_HOST, (err, addr) => {
            bestOrigin = addr[0];
            expires = now + TTL;
            resolve(bestOrigin);
        });
    });
}
The following code lets you map the best AWS Region (as judged by Route 53) to a published API. This code considers the example Route 53 settings in the table above, with two GraphQL API entries (one for Ireland and one for Sydney). You must change this code to match the settings of your regional API endpoints.
let regions = []; // use lowercase.
regions['ireland'] = { "Host": "<Ireland's API domain>" };
regions['sydney'] = { "Host": "<Sydney's API domain>" };
function getRegionalSettings(bestRegion){
    return regions[bestRegion];
}
The following code uses the getBestRegion function to find the best AWS Region (according to Route 53), then maps it to the domain and secret of an API using the getRegionalSettings function, and finally changes the request headers to forward the request to the selected API.
exports.handler = async (event, context, callback) => {
    const request = event.Records[0].cf.request;

    let bestRegion = await getBestRegion();
    let map = getRegionalSettings(bestRegion);
    let target_domain = map["Host"];

    // Forward GraphQL subscription requests for WebSockets.
    request.origin.custom.domainName = target_domain;

    // Forward REST and GraphQL query/mutation requests.
    request.headers["host"] = [{
        key: "host",
        value: target_domain
    }];

    // console.log(` Request headers set to "${JSON.stringify(request.headers)}"`)
    callback(null, request);
};
End-to-end flow
The following diagram (figure 3) shows the end-to-end communication flow between the solution’s components.
It visually describes how a request from a client is first translated by Route 53 (or any other DNS server), and then sent to the CloudFront distribution registered on the DNS. CloudFront then validates the request’s certificate using ACM, and then changes the origin into the API endpoint with the lowest latency to the client by levering Lambda@Edge. Finally, the request is sent to the best regional API endpoint, and the API’s response is delivered back to the client by CloudFront.
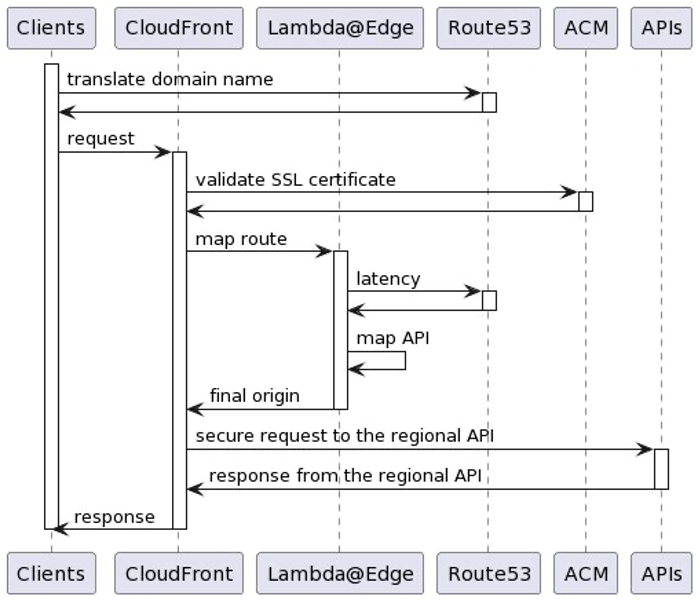
Figure 3: Message flow diagram
Testing your multi-Region active/active solution
In the test described in this article, you’ll use the same Ireland and Sydney Regions that were used in the previous Route 53 sample configuration. The test steps assume that you’ve already performed the previous steps mentioned in this article’s previous chapters to build the multi-Region solution.
To control which Region you’re hitting while testing, you’ll need a VPN proxy client or something similar. The test steps in this article were performed using Mullvad, an open-source commercial VPN service based in Sweden.
Testing your multi-Region active/active GraphQL API
Follow these steps to prepare the tests of a multi-Region solution on GraphQL API endpoints.
This section lets you build an AppSync test environment from scratch, even if you have no previous experience with AppSync. You’ll use this environment as a pre-condition to test the GraphQL queries and subscriptions in the next two sections.
- Launch a sample GraphQL API on the Ireland and Sydney Regions. This will deploy a fully-functional AppSync API endpoint with a sample schema supported by a regional DynamoDB database.
- To remove any doubts about what Region is being hit by the tests, don’t enable DynamoDB Global Tables – otherwise, follow the post Multi Region Deployment of AWS AppSync with Amazon DynamoDB Global Tables if you want to enable real-time cross-Regional data and subscription replication. The tests in this article assume that you haven’t enabled replication.
- For the next step, you need a public wildcard SSL/TLS certificate for your domain (e.g.,
*.example.com, assuming that your domain isexample.com). On the N. Virginia Region (us-east-1), use these instructions to create a new certificate, or use these instructions to import an existing one. - Enable Custom Domain Names on your AppSync APIs using the previous SSL/TLS certificate. This will simplify the discovery of AppSync’s real-time endpoint (wss://), allowing CloudFront to properly redirect WebSocket clients to AppSync’s subscriptions. By using a wildcard certificate, you can authenticate the global-API requests, while managing to have unique dedicated subdomains for each of your regional API endpoints (as required by AppSync).
- Use
ireland-appsync.example.com, for example, as Ireland’s custom domain name; - Use
sydney-appsync.example.com, for example, as Sydney’s custom domain name; - Make sure that you associate the API to the custom domain name.
- Use
- Add the newly created AppSync custom domains to your
getRegionalSettingsmethod (as explained previously), and redeploy the Lambda@Edge function. The code should be similar to the following – make sure to replace the<appsync-id>placeholders.
regions['ireland'] = {
    "Host": "<appsync-id>.cloudfront.net"
};

regions['sydney'] = {
    "Host": "<appsync-id>.cloudfront.net"
};- For testing purposes, create a simple Lambda Authorizer function for your GraphQL APIs using the following Node.js sample code, and deploy it to both Regions. This function will accept the string “
custom-authorized” as the only valid authorization token. Note that hardcoded authentication tokens aren’t a good practice, and we’re only using it here for test simplicity. Instead, consider storing your tokens on AWS Secrets Manager.
exports.handler = async (event) => {
  const { authorizationToken } = event
  return {
    isAuthorized: authorizationToken === 'custom-authorized',
    resolverContext: {}
  };
};
- Set up the Lambda authorizer function as the default authorizer for your regional AppSync API endpoints (see how here), and remove any API Keys from the AppSync configuration. This will make the API publicly available with a simple token while performing the test, making the tests easier to execute. However, unless this is precisely what you want, we recommended that you look at all of the available options to secure your AppSync APIs.
- Create a mutation in the Ireland Region to add a sample record (see this page for more information):
- Navigate to Ireland’s AWS AppSync console.
- Navigate to the Ireland’s AppSync API that you created in a previous step.
- Select the
Queriestab on the left-hand side. - On the
Authorization Tokenfield, typecustom-authorized(as in the Lambda Authorizer). - Run the following mutation command:
mutation CreateEvent { createEvent( name: "Ireland" when: "" where: "" description: "" ) { id name } }
- Repeat the previous steps for the Sydney API, replacing
"Ireland"with"Sydney"on the mutation.
Assuming that you’ve already set up your global-api.example.com redirections using the steps from this post, then that’s it! You’re ready to test your multi-Region AppSync endpoint.
Testing your multi-Region active/active GraphQL queries
Assuming that you’ve already followed the necessary steps to build a multi-Region AppSync test environment from scratch as explained in the previous section, follow these steps to test the multi-Region solution with GraphQL queries.
- On your VPN client, set up a connection to a VPN server close to Ireland (e.g., London, UK).
- Query the API with a cURL command similar to the following to show the sample data, replacing the domain name with your own, and passing the authorization token allowed by the Lambda authorizer.
$ curl -XPOST -H "Authorization:custom-authorized" -d '{ "query": "query { listEvents { items { name } } }" }' https://global-api.example.com/graphql/ - Confirm that the cURL response is
{ "data": { "listEvents": { "items": [ { "name": "Ireland" } ] } } } - On your VPN client, set up a connection to a VPN server close to Sydney (e.g., Melbourne, Australia).
- Run the cURL command again – the response should now be
{ "data": { "listEvents": { "items": [ { "name": "Sydney" } ] } } }
As you can see, running the cURL command from different locations in the world causes a different AppSync endpoint to reply, although you’re hitting the same multi-region GraphQL API endpoint.
Testing your multi-Region active/active GraphQL subscriptions
To test GraphQL subscriptions, follow these steps to test them using WebSockets.
This section also assumes that you’ve already followed the necessary steps to build a multi-Region AppSync test environment from scratch, as explained in the previous section.
The following test approach uses Postman, an application that lets you interact with APIs using POST, GET, and WebSockets. The sequence of steps used in the following test is based on the instructions from Building a real-time WebSocket client for AWS AppSync.
- Create a handshake payload to send when opening the WebSocket connection. On your command line tool, run the following command, replacing the domain name with your own, and using the token defined in the Lambda Authorizer. The result should be a base64-encrypted string – save this string in a notepad because you’ll need it later for Postman’s configuration.
$ echo '{"host":"global-api.example.com","Authorization":"custom-authorized"}' | base64 - On Postman, create a new WebSocket connection following the instructions in this page. You should be able to do it by selecting the
Newbutton, and then selecting theWebSocket Requestbutton. - In the
Server URLbox, type the following URL, making sure that you replace your domain name:
wss://global-api.example.com/graphql/realtime - In the Params section, add the following parameters:
- key:
payload, value:e30=(this is the same as empty {}) - key:
header, value: (the base64 string you created on the first step)
- key:
- In the
Headerssection, add the following headers:- key:
Sec-WebSocket-Protocol, value:graphql-ws
- key:
- On your VPN client, set up a connection to a VPN server close to Ireland (e.g., London, UK).
- Initiate a WebSocket connection to your multi-region AppSync endpoint by selecting Postman’s
Connectbutton.- Verify that the connection has been established by looking for Postman’s
CONNECTEDgreen label on theMessagessection, and by looking for theConnected to wss://...message on that same section.
- Verify that the connection has been established by looking for Postman’s
- In the
New messagetext box, add the following subscription message, making sure that you replace your domain name:
{"id":"test","payload":{"data":"{\"query\":\"subscription { subscribeToEventComments(eventId:\\\"Ireland\\\"){content}}\",\"variables\":null}","extensions":{"authorization":{"Authorization":"custom-authorized","host":"global-api.example.com"}}},"type":"start"}- Note that Postman’s message shouldn’t be beautified. To help understand how the message is structured, see the following beautified version with named parameters:
{ "id":"test", "payload": { "data": "<the-json-stringified-graphql-query>", "extensions": { "authorization": { "Authorization":"<the-lambda-authorization-token>", "host": "<the-api-multi-region-entry-point>", } } }, "type":"start" } - See the following stringified GraphQL query:
subscription {
  subscribeToEventComments(eventId: "Ireland") {
    content
  }
}
- Note that Postman’s message shouldn’t be beautified. To help understand how the message is structured, see the following beautified version with named parameters:
- Select Postman’s
Sendbutton to create the GraphQL subscription.- Verify that the subscription has been successfully created by looking for the
start_ackresponse message on Postman’sMessagessection. For the subscription message above, the response should be{"id":"test","type":"start_ack"}.
- Verify that the subscription has been successfully created by looking for the
- Create a mutation in the Ireland Region to test the subscription (see this page for more information):
- Navigate to the
Queriestab on the Ireland’s AWS AppSync console. - On the
Authorization Tokenfield, typecustom-authorized(as in the Lambda Authorizer). - Run the following mutation query:
mutation { commentOnEvent( content: "test-comment", createdAt: "2000-01-01", eventId: "Ireland" ) { commentId eventId createdAt content } } - Verify that the subscription was received on Postman by looking in the
Messagessection for a message similar to:{"id":"test","type":"data","payload":{"data":{"subscribeToEventComments":{"content":"test-comment"}}}}
- Navigate to the
As you can see, mutations performed in a Region (e.g., Ireland) trigger the subscriptions connected to that Region. For a single Regional mutation to trigger client subscriptions on all Regions (e.g., Ireland and Sydney), you must set up cross-Region replication with mutation propagation. Follow the post Multi Region Deployment of AWS AppSync with Amazon DynamoDB Global Tables to learn how to do this.
Building an Amplify application to test your multi-Region GraphQL API
Now that you’re confident that your multi-Region active/active GraphQL API is working for both queries and subscriptions, you can leverage AWS Amplify to create a test client for the API.
In this article, we use Vue.js with Amplify JavaScript to build a simple client application, but Amplify libraries also support iOS, Android, and Flutter clients, thereby providing the same capabilities in these different runtimes. The supported Amplify clients provide simple abstractions to interact with AppSync GraphQL API backends with few lines of code, including built-in WebSocket capabilities fully compatible with the AppSync WebSocket real-time protocol out of the box.
Follow this step sequence to build your test application.
- Make sure that you have Node.js installed – you need it for the next step.
- Create a Vue.js Amplify application on the Ireland Region by running these steps.
- Connect your application to the Ireland’s API.
- Run the following command to bind your application to the Ireland’s AppSync endpoint, replacing the <ireland-api-id> and the <user-profile>:
amplify add codegen --apiId <ireland-api-id> --profile <user-profile> - Run the following command to generate the associated code for queries and subscriptions:
amplify codegen
- Run the following command to bind your application to the Ireland’s AppSync endpoint, replacing the <ireland-api-id> and the <user-profile>:
- Build the application.
- Run
npm run serveon your command-line tool. - Verify that there aren’t any errors.
- Navigate to
http://localhost:8080/– you should see the default Vue.js application.
- Run
- Modify the
src/graphql/queries.jsfile to addcommentsto thelistEventsoutput, like in the following code. This will let you see the new comments added during the tests.listEvents(filter: $filter, limit: $limit, nextToken: $nextToken) { items { id name where when description comments { items { content commentId } } } nextToken } - Modify the
src/App.vuefile to list existing items on application load, to create a real-time data subscription, and to update the item list when notifications are received. Furthermore, note that hardcoded authentication tokens aren’t a good practice, and we’re only using them here for test simplicity. Instead, consider following a pattern like the one described here.<template> <div id="app"> <h1>Events</h1> <div v-for="item in items" :key="item.id"> <h3>Event: { id="{{ item.id }}", name="{{ item.name }}"" }</h3> <div v-for="comment in item?.comments?.items" :key="comment.id"> <h4>>> {{ comment.content }}</h4> </div> </div> </div> </template> <script> import { API } from 'aws-amplify'; import { listEvents } from './graphql/queries'; import { subscribeToEventComments } from './graphql/subscriptions' export default { name: 'App', async created() { this.listItems(); }, data() { return { name: '', description: '', items: [] } }, methods: { async listItems() { const items = await API.graphql({ query: listEvents, authMode: 'AWS_LAMBDA', authToken: 'custom-authorized' }); this.items = items.data.listEvents.items; this.items?.forEach?.(item => { this.subscribe(item.id); }); }, subscribe(eventId) { API.graphql({ query: subscribeToEventComments, variables: { eventId: eventId }, authMode: 'AWS_LAMBDA', authToken: 'custom-authorized' }) .subscribe({ next: (data) => { console.log(data) this.listItems(); } }); } } } </script> - Build the application again using the following command:
- Run
npm run serveon your command-line tool. - Verify that there aren’t any errors.
- Navigate to
http://localhost:8080/– you should now see listed theIrelandevent previously created in your tests, regardless of where in the world you’re running the application. This is because you’re connected directly to the Ireland’s regional endpoint. - Ahead of the next step, copy the
Irelandevent’s ID to a notepad (this is a random 36-character-lenght UUID).
- Run
- Test the subscriptions in the Ireland Region, by creating a mutation with a new comment on the existing event:
- Navigate to the
Queriestab on the Ireland’s AWS AppSync console. - On the
Authorization Tokenfield, typecustom-authorized(as in the Lambda Authorizer). - Run the following mutation command, replacing
<your-event-id>with the ID copied in the previous step. - Verify that the new comment appeared automatically on your application, right below the
Irelandevent.mutation { commentOnEvent( content: "test-comment", createdAt: "2000-01-01", eventId: "<your-event-id>" ) { commentId eventId createdAt content } }
- Navigate to the
- Change to your global API endpoint, allowing you to use the application for both the Ireland and the Sydney Regions:
- Modify the
src/aws-exports.jsfile, changing the value of theaws_appsync_graphqlEndpointparameter from the Ireland’s API endpoint to your global entry-point (e.g.,https://global-api.example.com/graphql). - The application should refresh automatically, listing either the
Irelanditem or theSydneyitem, depending on where you are in the world.
- Modify the
Testing your Amplify application against your multi-Region GraphQL API
Follow these steps to test your multi-Region GraphQL API endpoint with an Amplify application.
- On your VPN client, set up a connection to a VPN server close to Sydney (e.g., Melbourne, Australia).
- Navigate to your Amplify application in a web browser (e.g.,
http://localhost:8080). You should now see listed theSydneyevent previously created in your tests. - Run a mutation command to add a comment in the
Sydneyevent in the same way you did for Ireland. - Verify that the new comment appeared automatically on your application, right below the
Sydneyevent.
As you can see, your application seamlessly hits the closest AppSync API endpoint, both for queries and subscriptions, while being connected to a single global API endpoint.
Clean up
To clean up the infrastructure created, delete the AppSync APIs, the CloudFront distribution, the Lambda@Edge function, and the Route53 records that you created for this test.
Conclusion
In this post, we described how to reduce latency for end-users, while increasing an application’s availability, by providing API endpoints in multiple AWS Regions.
The solution leverages CloudFront, Route 53, and ACM to support your global API’s custom domain name, and uses Lambda@Edge to forward incoming requests to the best API endpoint based on the network latency to the requester.
To explain the solution to GraphQL API developers, we provided an in-depth walkthrough of the reference architecture that you can download as a PDF here. If you’re a REST API developer, then you can achieve similar results by following the post Using latency-based routing with Amazon CloudFront for a multi-Region active-active architecture.
To keep the tests simple, we didn’t enable cross-Regional data replication. If you’d like to build a multi-Region active/active GraphQL endpoint with cross-Regional data and subscription replications, then combine what you learned from this article along with the post Multi Region Deployment of AWS AppSync with Amazon DynamoDB Global Tables.

Aaron Sempf
Aaron Sempf is a Global Principal Partner Solutions Architect, in the Global Systems Integrators team. When not working with AWS GSI partners, he can be found coding prototypes for autonomous robots, IoT devices, and distributed solutions.

Fernando Ibanez
Fernando Ibanez is a North Carolina-based Solutions Architect in the Higher Education team. Fernando enjoys helping customers design and implement automation solutions to make their cloud use simpler. In his free time, Fernando enjoys going to the theater, trying new cuisines, and spending time with his family.

Jorge Fonseca
Jorge is a Solutions Architect with 20+ years in IT, holding 2 master degrees and all AWS certifications. At AWS, he helps customers through their cloud journeys by converting complex challenges into actionable roadmaps for both technical and business audiences.

Ralph Richards
Ralph is a Solutions Architect at Amazon Web Services based in London. He works with Enterprise Software & SaaS customers as a technical advisor helping them to achieve their business goals in the cloud. He is also specialised in container technologies, with a keen interest in building modern applications using a microservices approach. Outside of work, he enjoys photography, reading and exploring new places on road trips.