Artificial Intelligence
Implement a secure MLOps platform based on Terraform and GitHub
Machine learning operations (MLOps) is the combination of people, processes, and technology to productionize ML use cases efficiently. To achieve this, enterprise customers must develop MLOps platforms to support reproducibility, robustness, and end-to-end observability of the ML use case’s lifecycle. Those platforms are based on a multi-account setup by adopting strict security constraints, development best practices such as automatic deployment using continuous integration and delivery (CI/CD) technologies, and permitting users to interact only by committing changes to code repositories. For more information about MLOps best practices, refer to the MLOps foundation roadmap for enterprises with Amazon SageMaker.
Terraform by HashiCorp has been embraced by many customers as the main infrastructure as code (IaC) approach to develop, build, deploy, and standardize AWS infrastructure for multi-cloud solutions. Furthermore, development repositories and CI/CD technologies such as GitHub and GitHub Actions, respectively, have been adopted widely by the DevOps and MLOps community across the world.
In this post, we show how to implement an MLOps platform based on Terraform using GitHub and GitHub Actions for the automatic deployment of ML use cases. Specifically, we deep dive on the necessary infrastructure and show you how to utilize custom Amazon SageMaker Projects templates, which contain example repositories that help data scientists and ML engineers deploy ML services (such as an Amazon SageMaker endpoint or batch transform job) using Terraform. You can find the source code in the following GitHub repository.
Solution overview
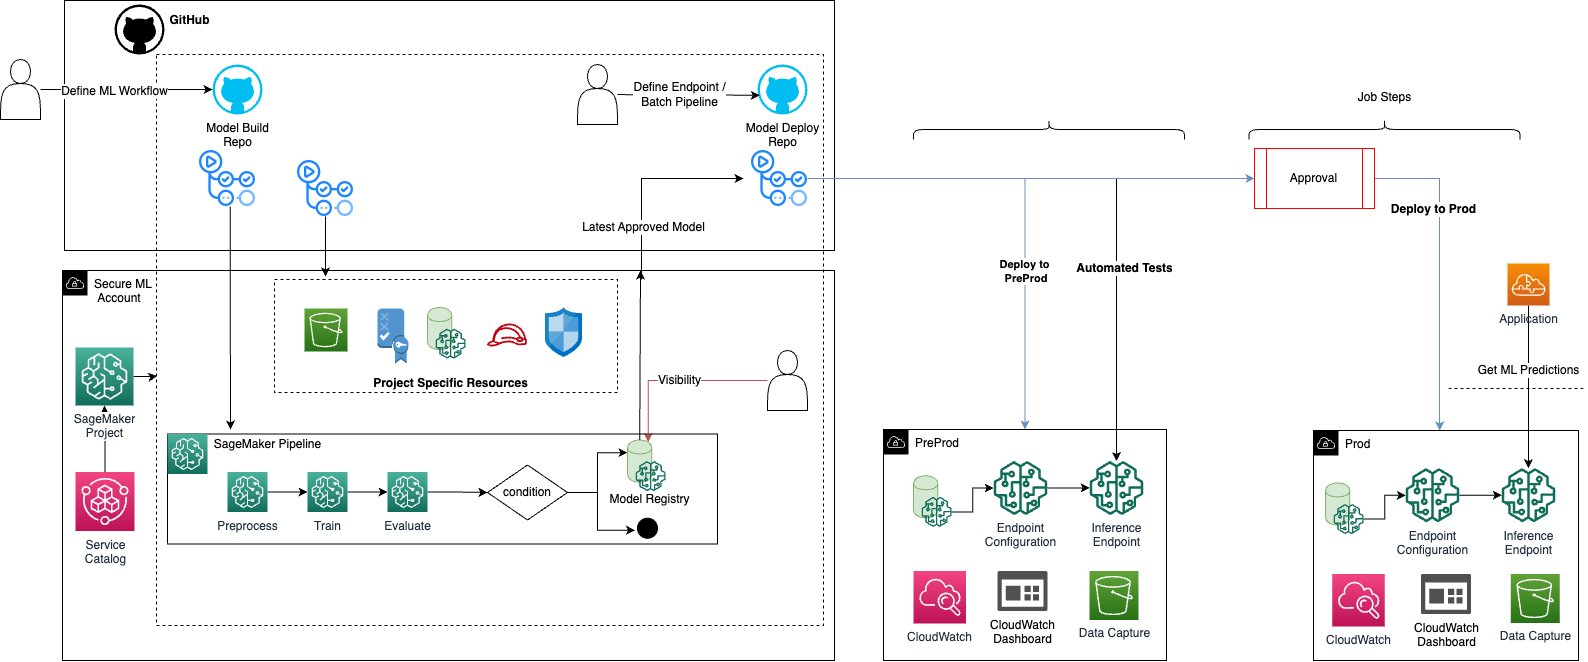
The MLOps architecture solution creates the necessary resources to build a comprehensive training pipeline, registering the models in the Amazon SageMaker Model Registry, and its deployment to preproduction and production environments. This foundational infrastructure enables a systematic approach to ML operations, providing a robust framework that streamlines the journey from model development to deployment.
The end-users (data scientists or ML engineers) will select the organization SageMaker Project template that fits their use case. SageMaker Projects helps organizations set up and standardize developer environments for data scientists and CI/CD systems for MLOps engineers. The project deployment creates, from the GitHub templates, a GitHub private repository and CI/CD resources that data scientists can customize according to their use case. Depending on the chosen SageMaker project, other project-specific resources will also be created.
Custom SageMaker Project template
SageMaker projects deploys the associated AWS CloudFormation template of the AWS Service Catalog product to provision and manage the infrastructure and resources required for your project, including the integration with a source code repository.
At the time of writing, four custom SageMaker Projects templates are available for this solution:
- MLOps template for LLM training and evaluation – An MLOps pattern that shows a simple one-account Amazon SageMaker Pipelines setup for large language models (LLMs) This template supports fine-tuning and evaluation.
- MLOps template for model building and training – An MLOps pattern that shows a simple one-account SageMaker Pipelines setup. This template supports model training and evaluation.
- MLOps template for model building, training, and deployment – An MLOps pattern to train models using SageMaker Pipelines and deploy the trained model into preproduction and production accounts. This template supports real-time inference, batch inference pipelines, and bring-your-own-containers (BYOC).
- MLOps template for promoting the full ML pipeline across environments – An MLOps pattern to show how to take the same SageMaker pipeline across environments from dev to prod. This template supports a pipeline for batch inference.
Each SageMaker project template has associated GitHub repository templates that are cloned to be used for your use case:

- MLOps template for LLM training and evaluation – Associated with the LLM training repository.
- MLOps template for model building and training – Associated with the model training repository.
- MLOps template for model building, training, and deployment – Associated with the BYOC repository (optional), model training repository, and real time inference repository or batch inference repository.
- MLOps template for promoting the full ML pipeline across environments – Associated with pipeline promotion repository.
When a custom SageMaker project is deployed by a data scientist, the associated GitHub template repositories are cloned through an invocation of the AWS Lambda function <prefix>_clone_repo_lambda, which creates a new GitHub repository for your project.

Infrastructure Terraform modules
The Terraform code, found under base-infrastructure/terraform, is structured with reusable modules that are used across different deployment environments. Their instantiation will be found for each environment under base-infrastructure/terraform/<ENV>/main.tf. There are seven key reusable modules:
- KMS – Creates an AWS Key Management Service (AWS KMS) key
- Lambda – Creates a Lambda function and Amazon CloudWatch log group
- Networking – Creates a virtual private cloud (VPC), various subnets, security group, NAT gateway, internet gateway, route table and routes, and multiple VPC endpoints for the networking setup for Amazon SageMaker Studio
- S3 – Creates an Amazon Simple Storage Service (Amazon S3) bucket
- SageMaker – Creates SageMaker Studio and SageMaker users
- SageMaker Roles – Creates AWS Identity and Access Management (IAM) roles for SageMaker Studio
- Service Catalog – Creates Service Catalog products from a CloudFormation template
There are also some environment-specific resources, which can be found directly under base-infrastructure/terraform/<ENV>.

Prerequisites
Before you start the deployment process, complete the following three steps:
- Prepare AWS accounts to deploy the platform. We recommend using three AWS accounts for three typical MLOps environments: experimentation, preproduction, and production. However, you can deploy the infrastructure to just one account for testing purposes.
- Create a GitHub organization.
- Create a personal access token (PAT). It is recommended to create a service or platform account and use its PAT.
Bootstrap your AWS accounts for GitHub and Terraform
Before we can deploy the infrastructure, the AWS accounts you have vended need to be bootstrapped. This is required so that Terraform can manage the state of the resources deployed. Terraform backends enable secure, collaborative, and scalable infrastructure management by streamlining version control, locking, and centralized state storage. Therefore, we deploy an S3 bucket and Amazon DynamoDB table for storing states and locking consistency checking.
Bootstrapping is also required so that GitHub can assume a deployment role in your account, therefore we deploy an IAM role and OpenID Connect (OIDC) identity provider (IdP). As an alternative to employing long-lived IAM user access keys, organizations can implement an OIDC IdP within your AWS account. This configuration facilitates the utilization of IAM roles and short-term credentials, enhancing security and adherence to best practices.
You can choose from two options to bootstrap your account: a bootstrap.sh Bash script and a bootstrap.yaml CloudFormation template, both stored at the root of the repository.
Bootstrap using a CloudFormation template
Complete the following steps to use the CloudFormation template:
- Make sure the AWS Command Line Interface (AWS CLI) is installed and credentials are loaded for the target account that you want to bootstrap.
- Identify the following:
- Environment type of the account:
dev,preprod, orprod. - Name of your GitHub organization.
- (Optional) Customize the S3 bucket name for Terraform state files by choosing a prefix.
- (Optional) Customize the DynamoDB table name for state locking.
- Environment type of the account:
- Run the following command, updating the details from Step 2:
Bootstrap using a Bash script
Complete the following steps to use the Bash script:
- Make sure the AWS CLI is installed and credentials are loaded for the target account that you want to bootstrap.
- Identify the following:
- Environment type of the account:
dev,preprod, orprod. - Name of your GitHub organization.
- (Optional) Customize the S3 bucket name for Terraform state files by choosing a prefix.
- (Optional) Customize the DynamoDB table name for state locking.
- Environment type of the account:
- Run the script (
bash ./bootstrap.sh) and input the details from Step 2 when prompted. You can leave most of these options as default.
If you change the TerraformStateBucketPrefix or TerraformStateLockTableName parameters, you must update the environment variables (S3_PREFIX and DYNAMODB_PREFIX) in the deploy.yml file to match.
Set up your GitHub organization
In the final step before infrastructure deployment, you must configure your GitHub organization by cloning code from this example into specific locations.
Base infrastructure
Create a new repository in your organization that will contain the base infrastructure Terraform code. Give your repository a unique name, and move the code from this example’s base-infrastructure folder into your newly created repository. Make sure the .github folder is also moved to the new repository, which stores the GitHub Actions workflow definitions. GitHub Actions make it possible to automate, customize, and execute your software development workflows right in your repository. In this example, we use GitHub Actions as our preferred CI/CD tooling.
Next, set up some GitHub secrets in your repository. Secrets are variables that you create in an organization, repository, or repository environment. The secrets that you create are available to use in our GitHub Actions workflows. Complete the following steps to create your secrets:
- Navigation to the base infrastructure repository.
- Choose Settings, Secrets and Variables, and Actions.
- Create two secrets:
AWS_ASSUME_ROLE_NAME– This is created in the bootstrap script with the default nameaws-github-oidc-role, and should be updated in the secret with whichever role name you choose.PAT_GITHUB– This is your GitHub PAT token, created in the prerequisite steps.
Template repositories
The template-repos folder of our example contains multiple folders with the seed code for our SageMaker Projects templates. Each folder should be added to your GitHub organization as a private template repository. Complete the following steps:
- Create the repository with the same name as the example folder, for every folder in the
template-reposdirectory. - Choose Settings in each newly created repository.
- Select the Private Template option.
Make sure you move all the code from the example folder to your private template, including the .github folder.
Update the configuration file
At the root of the base infrastructure folder is a config.json file. This file enables the multi-account, multi-environment mechanism. The example JSON structure is as follows:
For your MLOps environment, simply change the name of environment_name to your desired name, and update the AWS Region and account numbers accordingly. Note the account numbers will correspond to the AWS accounts you bootstrapped. This config.json permits you to vend as many MLOps platforms as you desire. To do so, simply create a new JSON object in the file with the respective environment name, Region, and bootstrapped account numbers. Then locate the GitHub Actions deployment workflow under .github/workflows/deploy.yaml and add your new environment name inside each list object in the matrix key. When we deploy our infrastructure using GitHub Actions, we use a matrix deployment to deploy to all our environments in parallel.
Deploy the infrastructure
Now that you have set up your GitHub organization, you’re ready to deploy the infrastructure into the AWS accounts. Changes to the infrastructure will deploy automatically when changes are made to the main branch, therefore when you make changes to the config file, this should trigger the infrastructure deployment. To launch your first deployment manually, complete the following steps:
- Navigate to your base infrastructure repository.
- Choose the Actions tab.
- Choose Deploy Infrastructure.
- Choose Run Workflow and choose your desired branch for deployment.
This will launch the GitHub Actions workflow for deploying the experimentation, preproduction, and production infrastructure in parallel. You can visualize these deployments on the Actions tab.
Now your AWS accounts will contain the necessary infrastructure for your MLOps platform.
End-user experience
The following demonstration illustrates the end-user experience.
Clean up
To delete the multi-account infrastructure created by this example and avoid further charges, complete the following steps:
- In the development AWS account, manually delete the SageMaker projects, SageMaker domain, SageMaker user profiles, Amazon Elastic File Service (Amazon EFS) storage, and AWS security groups created by SageMaker.
- In the development AWS account, you might need to provide additional permissions to the
launch_constraint_roleIAM role. This IAM role is used as a launch constraint. Service Catalog will use this permission to delete the provisioned products. - In the development AWS account, manually delete the resources like repositories (Git), pipelines, experiments, model groups, and endpoints created by SageMaker Projects.
- For preproduction and production AWS accounts, manually delete the S3
bucket ml-artifacts-<region>-<account-id>and the model deployed through the pipeline. - After you complete these changes, trigger the GitHub workflow for destroying.
- If the resources aren’t deleted, manually delete the pending resources.
- Delete the IAM user that you created for GitHub Actions.
- Delete the secret in AWS Secrets Manager that stores the GitHub personal access token.
Conclusion
In this post, we walked through the process of deploying an MLOps platform based on Terraform and using GitHub and GitHub Actions for the automatic deployment of ML use cases. This solution effectively integrates four custom SageMaker Projects templates for model building, training, evaluation and deployment with specific SageMaker pipelines. In our scenario, we focused on deploying a multi-account and multi-environment MLOps platform. For a comprehensive understanding of the implementation details, visit the GitHub repository.
About the authors
 Jordan Grubb is a DevOps Architect at AWS, specializing in MLOps. He enables AWS customers to achieve their business outcomes by delivering automated, scalable, and secure cloud architectures. Jordan is also an inventor, with two patents within software engineering. Outside of work, he enjoys playing most sports, traveling, and has a passion for health and wellness.
 Irene Arroyo Delgado is an AI/ML and GenAI Specialist Solution at AWS. She focuses on bringing out the potential of generative AI for each use case and productionizing ML workloads, to achieve customers’ desired business outcomes by automating end-to-end ML lifecycles. In her free time, Irene enjoys traveling and hiking.