Artificial Intelligence
Optimize blueprint extraction accuracy in Amazon Bedrock Data Automation
Extracting structured data from unstructured documents such as invoices, contracts, tax forms, and enrollment applications is a common automation goal for organizations. Achieving high extraction precision remains a key challenge. Accuracy degrades when documents diverge from expected templates, formats vary across vendors, or scan quality is poor. With Amazon Bedrock Data Automation (BDA), you can classify, extract, normalize, and validate data from documents through a single API. You use customizable blueprints that generate custom output tailored to your specific document formats and business requirements. However, optimizing blueprint extraction accuracy to handle the full variety of your production documents still requires iterative tuning.
Blueprint instruction optimization is a BDA feature that automatically refines your extraction instructions to address this challenge directly. You provide three to ten example documents with expected values, and BDA refines your blueprint instructions to improve accuracy in minutes, not weeks. No separate model fine-tuning is required.
By the end of this post, you can optimize your blueprints to improve accuracy, run the optimization workflow through the Amazon Bedrock console or the API, and apply best practices for selecting examples and ground truth.
The challenge of document field extraction
When you build intelligent document processing (IDP) pipelines with Amazon Bedrock Data Automation, you create blueprints that define which fields to extract from documents. Each field includes a natural language instruction that guides the extraction. For example:
- Field:
invoice_number→ Instruction: “The invoice number”. - Field:
total_amount→ Instruction: “The total amount due”.
These initial instructions work well for straightforward cases. Real-world documents, however, introduce additional complexity:
- Field labels vary across document variants.
- Similar-looking labels can cause confusion (for example, “subtotal” vs. “total”).
- Document layouts differ between vendors or time periods.
- Edge cases demand more specific extraction guidance.
The following is an abbreviated example of what a purchase order blueprint schema looks like. Each field has a type, an inferenceType (explicit for values that appear directly in the document, inferred for values that require reasoning), and an instruction that guides extraction:
Blueprint instruction optimization refines the instruction values for each field. The type and inferenceType remain unchanged. You can view the full purchase order schema in the GitHub repository.
You already know your documents and your data. Blueprint instruction optimization gives you a faster path to close the accuracy gap.
The traditional approach: Manual iteration
To improve extraction accuracy, you typically iterate on field instructions manually: test different phrasings, add context, and refine descriptions through trial and error. Each cycle means running extractions, comparing results against expected values, adjusting instructions, and repeating. For organizations processing documents from hundreds of vendors, this process can take weeks per document type.
The optimized approach: Automated refinement
With blueprint instruction optimization, you automate this entire refinement loop in a single workflow. BDA analyzes the differences between its extraction results and your ground truth, then refines the natural language instructions for each field, delivering optimized instructions in minutes instead of weeks.
Improve accuracy with blueprint instruction optimization
Follow these steps to refine your extraction instructions using real documents from your workload.
- Provide example documents – Upload three to ten representative documents from your production workload, including edge cases where extraction has been challenging. Additionally, cover as much diversity of your production document distribution as possible to avoid overfitting.
- Supply ground truth – Provide the correct expected values for each field in each example document. Ground truth is the verified, accurate data that serves as the benchmark for measuring extraction quality. This tells BDA what the right answers should be.
- Run optimization – Start the optimization process. BDA compares its initial extraction results against your ground truth and refines the natural language instructions for each field.
- Review results – Examine the detailed accuracy metrics along with the optimized instructions. Optimization typically completes in minutes. Metrics include F1 score (a combined measure of precision and recall) and exact match rate (the percentage of fields where the extracted value matches the ground truth exactly).
The optimized instructions incorporate patterns learned from your examples and add more detail and specificity. For instance, an initial instruction like “The invoice number” might become “The invoice number, typically found in the upper right corner of the document header, formatted as a numeric or alphanumeric code following ‘Invoice #’ or ‘Invoice No.’”
Example scenario: Purchase order extraction
To illustrate the optimization workflow, we walk through a purchase order extraction scenario using a fictional bike manufacturing company’s documents.
You create a blueprint for extracting fields from purchase orders, including order numbers, item descriptions, quantities, unit prices, and totals.
After you upload four representative purchase orders (from retailers such as Cycle Central and Bike World) with corresponding ground truth files and run optimization, accuracy improves:
| Metric | Before optimization | After optimization |
| Per-file exact match (best case) | 92% | 100% |
| Aggregate exact match | 90% | 92% |
BDA automatically refines instructions to address vendor-specific formatting, field label variations, and layout differences across the purchase order set, improving aggregate exact match from 90% to 92%.
If you’re processing high volumes, even a few percentage points of accuracy improvement translates directly into reduced manual review queues and faster processing throughput.
Getting started
You can access blueprint instruction optimization through the Amazon Bedrock console or the API. Use your own documents, or deploy the sample solution, which includes a blueprint, sample PDF documents, and ground truth JSON files.
Prerequisites
To follow along with this post, you need the following:
- An AWS account.
- Access to Amazon Bedrock with Amazon Bedrock Data Automation enabled in a supported Region.
- An AWS Identity and Access Management (AWS IAM) role with permissions to use Amazon Bedrock Data Automation and Amazon Simple Storage Service (Amazon S3).
- Between three and ten sample documents representative of your production workload.
- Ground truth JSON files with expected extraction values for each sample document, or the samples included in the deploy template. A ground truth file mirrors your blueprint’s schema, with each field populated with the correct expected value. The following is an abbreviated example for a purchase order:
Deploy the sample solution
To deploy the solution, follow these steps:
- Download the CloudFormation template from the GitHub repository.
- Open the AWS CloudFormation console.
- Choose Create stack, then choose Upload a template file.
- Upload the downloaded template file and choose Next.
- For Stack name, enter a name (for example,
blueprint-optimization-sample). - Follow the remaining prompts, acknowledge the IAM capabilities, and choose Create stack.
The stack deploys a sample blueprint, document files, ground truth files, and an Amazon SageMaker AI notebook.
The notebook walks you through the optimization workflow using the API. A complete code sample is also
available in the GitHub repository.
After the stack deploys, follow these steps:
- Open the AWS Management Console.
- Navigate to Amazon SageMaker AI.
- Choose Notebooks from the left navigation pane.
- Locate the notebook instance created by the stack.
- Choose Open JupyterLab.
- In JupyterLab, navigate to the source directory.
- Open the Purchase order optimization notebook.
- Select Python 3 as the kernel.
- Follow the instructions in the notebook to create and optimize a blueprint using the provided sample documents. The optimization takes a few minutes to run.
- When optimization completes, review the optimized blueprint and compare the updated instructions with the originals.
- Optionally, promote the optimized blueprint to live for production use.
- When you’re done, run the cleanup cell in the notebook to empty the S3 bucket before deleting the CloudFormation stack.
If you prefer to use the console instead, the sample documents and ground truth files are available in the Amazon S3 bucket created by the stack.
Using the console
From the Amazon Bedrock console, you can create a blueprint using either an auto-generated schema or one you define manually. If you’re using the sample from the deployed stack, you can paste in the provided JSON.
- Navigate to Amazon Bedrock Data Automation.
- Choose Custom output setup.
- Choose Create blueprint.
- Upload a representative sample document.
- Define your JSON schema.
- To use the sample from the deployed stack, choose Manually create new blueprint.
- Switch to the JSON view.
- Paste in the sample blueprint JSON.
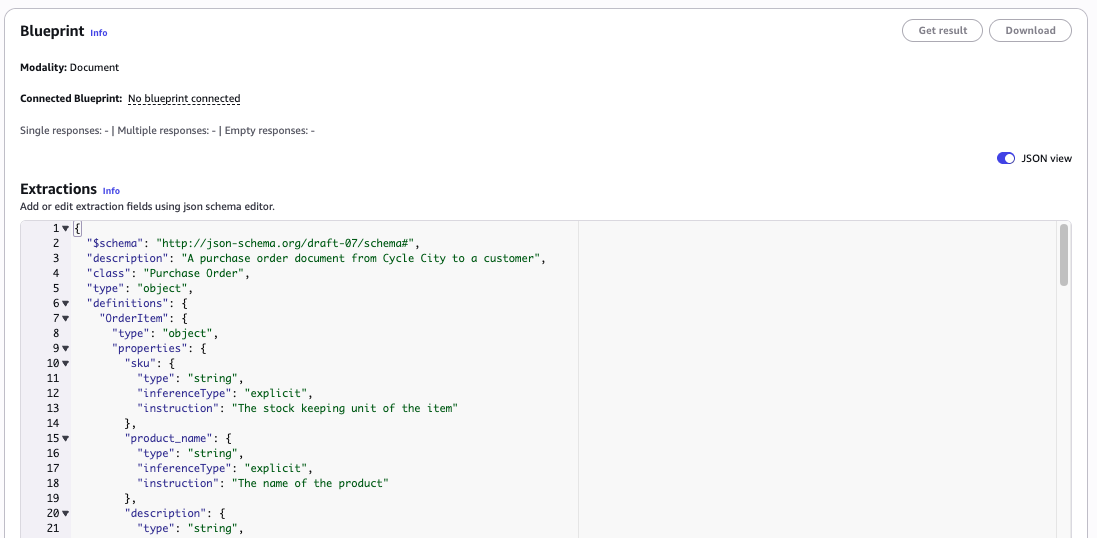 Figure 1: The Create blueprint page, showing JSON schema editor where you can paste your blueprint definition.
 - Save your blueprint.
- Choose Get result to run an initial extraction. This establishes your baseline accuracy before optimization.
- Choose Optimize blueprint from the blueprint detail page. Upload additional sample documents (three or more recommended) and provide ground truth for each file. You can upload ground truth JSON files or choose Auto-populate to seed values from the current extraction results and then edit manually.
- When optimization completes, Amazon Bedrock Data Automation displays before/after accuracy metrics for each file and in aggregate, as shown in the following image. Choose Save optimized blueprint to replace the existing blueprint with the improved version.
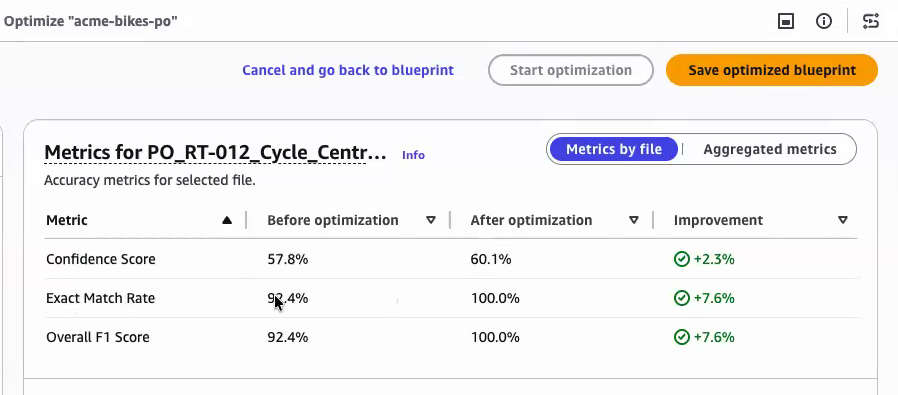 Figure 2: The optimization results page, showing before and after accuracy metrics for each file and the aggregate improvement.
Interpreting the results
The results page shows three metrics for each sample file and in aggregate. Understanding what each metric tells you helps you decide whether to save the optimized blueprint or add more examples and re-run.
Exact Match Rate is the percentage of fields where the extracted value matches your ground truth exactly, character for character. This is the strictest measure of accuracy. In the preceding example, the Cycle Central file’s exact match rate improved from 92.4% to 100%, meaning every field BDA extracted matched the expected value precisely.
Overall F1 Score combines precision (how much of what BDA extracted was correct) and recall (how much of the correct data BDA found) into a single score. F1 is particularly useful for fields with variable-length values like line item descriptions, where an exact match might be too strict but partial credit is meaningful. In this example, the F1 score also improved from 92.4% to 100%, indicating the optimized instructions captured both the right values and the right amount of content.
Confidence Score reflects how certain BDA is about each extracted value. A higher confidence score means BDA found clearer signals in the document for that field. Confidence improved from 57.8% to 60.1% for this file, a smaller gain, which is expected when the document layout is ambiguous. Higher confidence scores reduce the volume of fields routed to human review in human-in-the-loop workflows.
Use the Metrics by file tab to identify which documents still have lower scores after optimization. These are candidates for adding more targeted examples. Switch to Aggregated metrics to assess overall blueprint health across your full sample set before choosing Save optimized blueprint.
API walkthrough
The following examples show the key API calls for the optimization workflow using the AWS SDK for Python (Boto3). The full runnable notebook is available in the GitHub repository.
1. Create a blueprint
Pass your JSON schema to CreateBlueprint. Use DEVELOPMENT stage as a sandbox: it won’t affect LIVE blueprints until you explicitly promote it.
2. Start optimization
Call InvokeBlueprintOptimizationAsync with your sample documents and ground truth files. Each sample pairs an S3 URI for the document with an S3 URI for its ground truth JSON.
3. Poll for completion
The job runs asynchronously. Poll GetBlueprintOptimizationStatus until the status reaches Success.
4. Retrieve the optimized blueprint
After the job completes, GetBlueprint returns the updated schema with refined instruction values for each field.
5. Promote to LIVE (optional)
When the metrics meet your requirements, promote the optimized blueprint to production.
Integration with other Amazon Bedrock features
Optimized blueprints improve accuracy at the extraction layer, which can help strengthen downstream workflows you build on Amazon Bedrock Data Automation:
- Amazon Bedrock Knowledge Bases, a fully managed retrieval-augmented generation (RAG) capability, benefits from higher-quality extracted data through better vector embeddings for semantic search, improving the accuracy of RAG workflows.
- Amazon Bedrock Agents – Agentic workflows that depend on extracted document data (such as autonomous mortgage processing) benefit from more reliable inputs, reducing error-handling complexity.
- Amazon Bedrock Guardrails – Extracted data validated through Automated Reasoning checks benefits from cleaner inputs, improving verification accuracy.
With confidence scores and visual grounding (bounding boxes) for extracted fields, you can implement human-in-the-loop validation where needed. Blueprint instruction optimization improves both the extraction values and the associated confidence scores, giving you higher assurance in automated processing paths.
Best practices
Based on early customer feedback, we recommend the following:
- Select representative examples – Choose documents that represent the variety in your production workload, including common formats and edge cases where extraction has been challenging.
- Verify ground truth accuracy – Double-check that expected values are correct before running optimization, because ground truth quality directly impacts results.
- Start with three to five examples – Achieve significant improvements with only a few well-chosen examples, and add more if initial results don’t meet your accuracy targets.
- Include challenging cases – Add examples where extraction previously failed to help the optimization process learn to extract edge cases accurately.
- Re-optimize when needed – Run optimization again if you notice accuracy degradation over time, for example when new document formats appear in your workload.
Availability and pricing
Blueprint instruction optimization is available in AWS Regions where Amazon Bedrock Data Automation is supported. For the latest Region availability, see the Amazon Bedrock Data Automation documentation.
The optimization process incurs standard BDA inference costs based on the number of pages in your example documents. For detailed pricing, see the Amazon Bedrock pricing page.
Clean up
If you deployed the sample solution or created resources while following this post, complete the following steps to avoid incurring ongoing costs:
Warning: The following cleanup steps permanently delete resources and data, including any optimized blueprints and sample documents. Save anything you want to keep before proceeding.
- Delete the CloudFormation stack from the AWS CloudFormation console. This removes the SageMaker AI notebook, S3 bucket, and associated resources.
- Delete blueprints you created by navigating to Amazon Bedrock Data Automation in the Amazon Bedrock console, selecting the blueprint, and choosing Delete.
- Remove sample documents and ground truth files from S3 buckets you created outside the stack.
For more information about managing Amazon Bedrock Data Automation resources, refer to the Amazon Bedrock Data Automation documentation.
Conclusion
Blueprint instruction optimization can significantly reduce the manual effort required to achieve high extraction accuracy. By providing a few example documents with ground truth values, you can automatically refine your extraction instructions and improve accuracy in minutes, not weeks.
Combined with Amazon Bedrock Data Automation’s confidence scores, visual grounding, and integration with Amazon Bedrock Agents and Amazon Bedrock Knowledge Bases, this feature can accelerate the path from prototype to production IDP workflows.
As next steps, we recommend the following:
- Try the feature by deploying the sample solution into your account and running the SageMaker AI notebook.
- Run optimization on your own documents to measure accuracy improvements for your specific use case.
- Explore how optimized blueprints integrate with Amazon Bedrock Knowledge Bases for document search and retrieval, or with Amazon Bedrock Agents for automated decision-making workflows.
To get started:
- Amazon Bedrock Data Automation documentation.
- Amazon Bedrock console.
- Sample solution CloudFormation template.
- Amazon Bedrock pricing.
For expert guidance on building document processing solutions, AWS Professional Services and AWS Partners can help.