AWS Security Blog
How to perform automated incident response in a multi-account environment
How quickly you respond to security incidents is key to minimizing their impacts. Automating incident response helps you scale your capabilities, rapidly reduce the scope of compromised resources, and reduce repetitive work by security teams. But when you use automation, you also must manage exceptions to standard response procedures.
In this post, I provide a pattern and ready-made templates for a scalable multi-account setup of an automated incident response process with minimal code base, using native AWS tools. I also explain how to set up exception handling for approved deviations based on resource tags.
Because security response is a broad topic, I provide an overview of some alternative approaches to consider. Incident response is one part of an overarching governance, risk, and compliance (GRC) program that every organization should implement. For more information, see Scaling a governance, risk, and compliance program for the cloud.
Important: Use caution when introducing automation. Carefully test each of the automated responses in a non-production environment, as you should not use untested automated incident response for business-critical applications.
Solution benefits and deliverables
In the solution described below, you use AWS Systems Manager automation to execute most of the incident response steps. In general, you can either write your own or use pre-written runbooks. AWS maintains ready-made operational runbooks (automation documents) so you don’t need to maintain your own code base for them. The AWS runbooks cover many predefined use cases, such as enabling Amazon Simple Storage Service (S3) bucket encryption, opening a Jira ticket, or terminating an Amazon Elastic Compute Cloud (EC2) instance. Every execution for these is well documented and repeatable in AWS Systems Manager. For a few cases where there are no ready-made automation documents, I provide three additional AWS Lambda functions with the required response actions in the templates. The Lambda functions require minimal code, with no external dependencies outside AWS native tools.
You use a central security account to execute the incident response actions in the automation runbooks. You don’t need to do anything in the service accounts where you monitor and respond to incidents. In this post, you learn about and receive patterns for:
- Responding to an incident based on Amazon GuardDuty alerts or AWS Config findings.
- Deploying templates for a multi-account setup with a central security account and multiple service accounts. All account resources must be in the same AWS Region and part of the same AWS organization.
- AWS Systems Manager automation to execute many existing AWS managed automation runbooks (you need access to the AWS Management Console to see all documents at this link). Systems Manager automation is available in these AWS Regions.
- Prewritten Lambda functions to:
- Confine permissive (open) security groups to a more-constrained CIDR (classless interdomain routing), such as the VPC (virtual private cloud) range for that security group. This prevents knowable network configuration errors, such as too-open security groups.
- Isolate a potentially compromised EC2 instance by attaching it to a single, empty security group and removing its existing security groups.
- Block an AWS Identity and Access Management (IAM) principal (an IAM user or role) by attaching a deny all policy to that principal.
- Send notifications to the Amazon Simple Notification Service (Amazon SNS) for alerting in addition to (and in concert with) automated response actions.
- Exception handling when actions should not be executed. I suggest decentralized exception handling based on AWS resource tags.
- Integrating AWS Security Hub with custom actions for GuardDuty findings. This can be used for manual triggering of remediations that should not receive an automatic response.
- Custom AWS Config rule for detecting permissive (open) security groups on any port.
- Mapping the security finding to the response action defined in the CloudWatch Events rule pattern is extendable. I provide an example of how to extend to new findings and responses.
Out-of-scope for this solution
This post only shows you how to get started with security response automation for accounts that are part of the same AWS organization and Region. For more information on developing a comprehensive program for incident response, see How to prepare for & respond to security incidents in your AWS environment.
Understanding the difference between this solution and AWS Config remediation
The AWS Config remediation feature provides remediation of non-compliant resources using AWS Systems Manager within a single AWS account. The solution you learn in this post includes both GuardDuty alerts and AWS Config, a multi-account approach managed from a central security account, rules exception handling based on resource tags, and additional response actions using AWS Lambda functions.
Choosing the right approach for incident response
There are many technical patterns and solutions for responding to security incidents. When considering the right one for your organization, you must consider how much flexibility for response actions you need, what resources are in scope, and the skill level of your security engineers. Also consider dependencies on external code and applications, software licensing costs, and your organization’s experience level with AWS.
If you want the maximum flexibility and extensibility beyond AWS Systems Manager used in this post, I recommend AWS Step Functions as described in the session How to prepare for & respond to security incidents in your AWS environment and in DIY guide to runbooks, incident reports, and incident response. You can create workflows for your runbooks and have full control of all possible actions.
Architecture
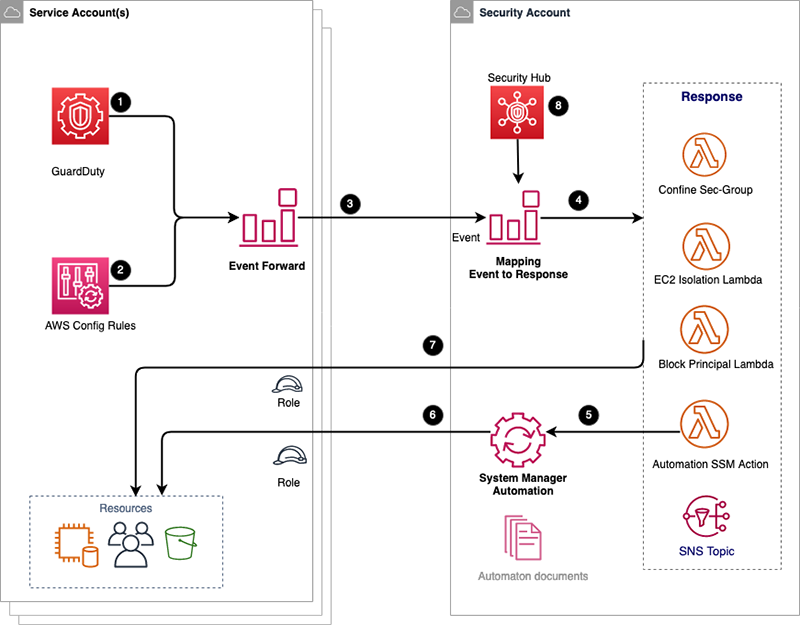
Figure 1: Architecture diagram
The architecture works as follows:
In the service account (the environment for which we want to monitor and respond to incidents):
- GuardDuty findings are forwarded to CloudWatch Events.
- Changes in the AWS Config compliance status are forwarded to CloudWatch Events.
- CloudWatch Events for GuardDuty and AWS Config are forwarded to the central security account, via a CloudWatch Events bus.
In the central security account:
- Each event from the service account is mapped to one or more response actions using CloudWatch Events rules. Every rule is an incident response action that is executed on one or more security findings, as defined in the event pattern. If there is an exception rule, the response actions are not executed.
The list of possible actions that could be taken include:
- Trigger a Systems Manager automation document, invoked by the Lambda function StratSsmAutomation within the security account.
- Isolate an EC2 instance by attaching an empty security group to it and removing any prior security groups, invoked by the Lambda function IsolateEc2. This assumes the incident response role in the target service account.
- Block the IAM principal by attaching a deny all policy, invoked by the Lambda function BlockPrincipal, by assuming the incident response role in the target service account.
- Confine security group to safe CIDR, invoked by the Lambda function ConfineSecurityGroup, by assuming the incident response role in the target service account.
- Send the finding to an SNS topic for processing outside this solution; for example, by manual evaluation or simply for information.
- Invoke AWS Systems Manager within the security account, with a target of the service account and the same AWS Region.
- The Systems Manager automation document is executed from the security account against the resources in the service account; for example, EC2, S3, or IAM resources.
- The response actions are executed directly from the security account to the service account. This is done by assuming an IAM role, for example, to isolate a potentially compromised EC2 instance.
- Manually trigger security responses using Security Hub custom actions. This can be suitable for manual handling of complex findings that need investigation before action.
Response actions decision
Your organization wants to articulate information security policy decisions and then create a list of corresponding automated security responses. Factors to consider include the classification of the resources and the technical complexity of the automation required. Start with common, less complex cases to get immediate gains, and increase complexity as you gain experience. Many stakeholders in your organization, such as business, IT operations, information security, and risk and compliance, should be involved in deciding which incident response actions should be automated. You need executive support for the political will to execute policies.
Creating exceptions to automated responses
There may be cases in which it’s unwise to take an automated response. For example, you might not want an automated response to incidents involving a core production database server that is critical to business operations. Instead, you’d want to use human judgment calls before responding. Or perhaps you know there are alarms that you don’t need for certain resources, like alerting for an open security group when you intentionally use it as a public web server. To address these exceptions, there is a carve-out. If the AWS resource has a tag with the name SecurityException, a response action isn’t executed. The tag name is defined during installation.
Table 1 provides an example of the responses implemented in this solution template. You might decide on different actions and different priorities for your organization. A current list of GuardDuty findings can be found at Active Finding Types and for AWS Config at AWS Config Managed Rules.
| N | Source | Finding | Description | Response |
| 1 | GuardDuty | Backdoor:EC2/Spambot
Backdoor:EC2/C&CActivity.B!DNS, Backdoor:EC2/DenialOfService.Tcp, Backdoor:EC2/DenialOfService.Udp, Backdoor:EC2/DenialOfService.Dns, Backdoor:EC2/DenialOfService.UdpOnTcpPorts, Backdoor:EC2/DenialOfService.UnusualProtocol, Trojan:EC2/BlackholeTraffic, Trojan:EC2/DropPoint, Trojan:EC2/BlackholeTraffic!DNS, Trojan:EC2/DriveBySourceTraffic!DNS, Trojan:EC2/DropPoint!DNS, Trojan:EC2/DGADomainRequest.B, Trojan:EC2/DGADomainRequest.C!DNS, Trojan:EC2/DNSDataExfiltration, Trojan:EC2/PhishingDomainRequest!DNS |
See Backdoor Finding Types and
Trojan Finding Types |
Isolate EC2 with empty security group.
Archive the GuardDuty finding. Send SNS notification. |
| 2 | GuardDuty | UnauthorizedAccess:IAMUser/InstanceCredentialExfiltration,
UnauthorizedAccess:IAMUser/TorIPCaller, UnauthorizedAccess:IAMUser/MaliciousIPCaller.Custom, UnauthorizedAccess:IAMUser/ConsoleLoginSuccess.B, UnauthorizedAccess:IAMUser/MaliciousIPCaller |
See Unauthorized Finding Types | Block IAM principal by attaching deny all policy.
Archive the GuardDuty finding. Send SNS notification. |
| 3 | AWS Config | S3_BUCKET_SERVER_SIDE_ENCRYPTION_ENABLED | See the documentation for s3-bucket-server-side-encryption-enabled | Enable server-side encryption with Amazon S3-Managed keys (SSE-S3) with SSM document (AWS-EnableS3BucketEncryption).
Send SNS notification. |
| 4 | AWS Config | S3_BUCKET_PUBLIC_READ_PROHIBITED | See the documentation for s3-bucket-public-read-prohibited | Disable S3 PublicRead and PublicWrite with SSM document (AWS-DisableS3BucketPublicReadWrite).
Send SNS notification. |
| 5 | AWS Config | S3_BUCKET_PUBLIC_WRITE_PROHIBITED | See the documentation for s3-bucket-public-write-prohibited | Disable S3 PublicRead and PublicWrite with SSM document (AWS-DisableS3BucketPublicReadWrite).
Send SNS notification. |
| 6 | AWS Config | SECURITY_GROUP_OPEN_PROHIBITED | See template, custom configuration. | Confine security group to safe CIDR 172.31. 0.0/16
Send SNS notification. |
| 7 | AWS Config | ENCRYPTED_VOLUMES | See the documentation for encrypted-volumes | Send SNS notification. |
| 8 | AWS Config | RDS_STORAGE_ENCRYPTED | See the documentation for rds-storage-encrypted | Send SNS notification. |
Installation
- In the security account, launch the template by selecting Launch Stack.

Additionally, you can find the latest code on GitHub, where you can also contribute to the sample code. - Provide the following parameters for the security account (see Figure 2):
- S3 bucket with sources: This bucket contains all sources, such as the Lambda function and templates. If you’re not customizing the sources, you can leave the default text.
- Prefix for S3 bucket with sources: Prefix for all objects. If you’re not customizing the sources, you can leave the default.
- Security IR-Role names: This is the role assumed for the response actions by the Lambda functions in the security account. The role is created by the stack launched in the service account.
- Security exception tag: This defines the tag name for security exceptions. Resources marked with this tag are not automatically changed in response to a security finding. For example, you could add an exception tag for a valid open security group for a public website.
- Organization ID: This is your AWS organization ID used to authorize forwarding of CloudWatch Events to the security account. Your accounts must be members of the same AWS organization.
- Allowed network range IPv4: This CIDRv4 range is used to confine all open security groups that are not tagged for exception.
- Allowed network range IPv6: This CIDRv6 range is used to confine all open security groups that are not tagged for exception.
- Isolate EC2 findings: This is a list of all GuardDuty findings that should lead to an EC2 instance being isolated. Comma delimited.
- Block principal finding: This is a list of all GuardDuty findings that should lead to blocking this role or user by attaching a deny all policy. Comma delimited.

Figure 2: Stack launch in security account
- In each service account, launch the template by selecting Launch Stack.
Additionally, you can find the latest code on GitHub, where you can also contribute to the sample code.
- Provide the following parameters for each service account:
- S3 bucket with sources: This bucket contains all sources, such as Lambda functions and templates. If you’re not customizing the sources, you can leave the default text.
- Prefix for S3 bucket with sources: Prefix for all objects. If you’re not customizing the sources, you can leave the default text.
- IR-Security role: This is the role that is created and used by the security account to execute response actions.
- Security account ID: The CloudWatch Events are forwarded to this central security account.
- Enable AWS Config: Define whether you want this stack to enable AWS Config. If you have already enabled AWS Config, then leave this value false.
- Create SNS topic: Provide the name of an SNS topic only if you enable AWS Config and want to stream the configuration change to SNS (optional). Otherwise, leave this field blank.
- SNS topic name: This is the name of the SNS topic to be created only if enabling AWS Config. The default text is Config.
- Create S3 bucket for AWS Config: If you enable AWS Config, the template creates an S3 bucket for AWS Config.
- Bucket name for AWS Config: The name of the S3 bucket created for AWS Config. The default text is config-bucket-{AccountId}.
- Enable GuardDuty: If you have not already enabled GuardDuty in the service account, then you can do it here.
Testing
After you have deployed both stacks, you can test your environment by following these example steps in one of your service accounts. Before you test, you can subscribe to the SNS topic with prefix Security_Alerts_[Your_Stack] to be notified of a security event.
- Create and open security group 0.0.0.0/0 without creating an exception tag. After several minutes, the security group will be confined to the safe CIDR that you defined in your stack.
- Create an S3 bucket without enabling encryption. After several minutes, the default encryption AES-256 will be set on the bucket.
- For GuardDuty blocking of IAM principal, you can define a list of malicious IPs under the Threat List in the GuardDuty panel. Create a test role or user. When you execute an API call from this IP with the created test role or user, a GuardDuty finding is generated that triggers blocking of the IAM role or user.
- You can deploy Amazon GuardDuty tester and generate findings such as Trojan:EC2/DNSDataExfiltration or CryptoCurrency:EC2/BitcoinTool.B!DN. The GuardDuty findings trigger isolation of an EC2 instance by removing all current security groups and attaching an empty one. This new empty group can then be configured for forensic access later.
Exceptions for response actions
If the resource has the tag name SecurityException, a response action is not executed. The tag name is a parameter of the CloudFormation stack in the security account and can be customized at installation. The value of the tag is not validated, but it is good practice for the value to refer to an approval document such as a Jira issue. In this way, you can build an auditing chain of the approval. For example:
Make sure that the security tag can only be set or modified by an appropriate role. You can do this in two ways. The first way is to attach a deny statement to all policies that do not have privileges to assign this tag. An example policy statement to deny setting, removing, and editing of this tag for IAM, EC2, and S3 services is shown below. This policy does not prohibit working with the resources, such as starting or stopping an EC2 instance with this tag. See Controlling access based on tag keys for more information.
In the above policy, you must modify the TAG-NAME-SecurityException to match your own tag name.
The second way to restrict the attachment of this tag is to use Tag policies to manage tags across multiple AWS accounts.
Centralized versus decentralized exception management
Attaching security tags is a decentralized approach in which you don’t need a centralized database to record remediation exceptions. A centralized exception database requires that you know each individual resource ID to set exceptions, and this is not always possible. Amazon EC2 Auto Scaling is a good example where you might not know the EC2 instance ID in advance. On an up-scaling event, the instance ID can’t be known in advance and preapproved. Furthermore, a central database must be kept in sync with the lifecycle of the resources, like with an instance down-scaling event. Hence, using tags on resources is a decentralized approach. If needed, the automatic scaling launch configuration can propagate the security exception tag; see Tag your auto scaled EC2 instances.
You can manage the IAM policies and roles for tagging either centrally or within an AWS CodePipeline. In this way, you can implement a centralized enforcement point for security exceptions but decentralize storing of the resource tags to the resources themselves.
Using AWS resource groups, you can always find all resources that have the Security tag for inventory and auditing proposes. For more information, see Build queries and groups in AWS resource groups.
Monitoring for security alerts
You can subscribe to the SNS topic with prefix Security_Alerts_[Your_Stack] to be notified of a security event or an execution that has failed.
Every execution is triggered from CloudWatch Events, and each of these events generates CloudWatch metrics. Under CloudWatch rules, you can see the rules for event forwarding from service accounts, or for triggering the responses in the central security account. For each CloudWatch rule, you can view the metrics by checking the box next to the rule, as shown in Figure 3, and then select Show metrics for the rule.
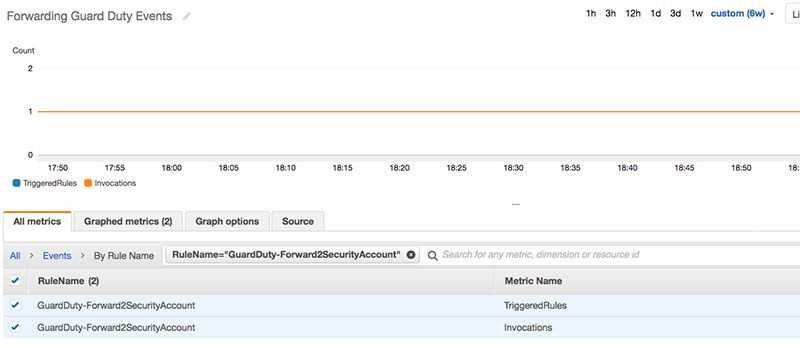
Figure 3: Metrics for Forwarding GuardDuty Events in CloudWatch
Creating new rules and customization
The mapping of findings to responses is defined in the CloudWatch Events rules in the security account. If you define new responses, you only update the central security account. You don’t adjust the settings of service accounts because they only forward events to the security account.
Here’s an example: Your team decides that a new SSM action – Terminate EC2 instance – should be triggered on the GuardDuty finding Backdoor:EC2/C&CActivity.B!DNS. In the security account, go to CloudWatch in the AWS Management Console. Create a new rule as described in the following steps (and shown in Figure 4):
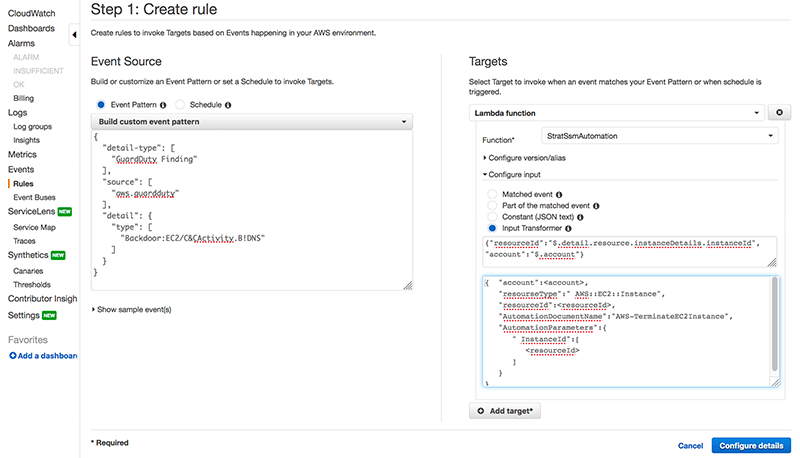
Figure 4: CloudWatch rule creation
- Go to CloudWatch Events and create a new rule. In the Event Pattern, under Build custom event pattern, define the following JSON:
- Set the target for the rule as the Lambda function for execution of SSM, StratSsmAutomation. Use Input transformer to customize the parameters in invocation of the Lambda function.
For the Input paths map:
The expression extracts the instanceId from the event as resourceId, and the Account ID as account.
For the field Input template, enter the following:
You pass the name of the SSM automation document that you want to execute as an input parameter. In this case, the document is AWS-TerminateEC2Instance and the document input parameters are a JSON structure named AutomationParameters.
You have now created a new response action that is ready to test.
Troubleshooting
The automation execution that takes place in the security account is documented in AWS Systems Manager under Automation Execution. You can also refer to the AWS Systems Manager automation documentation.
If Lambda function execution fails, then a CloudWatch alarm is triggered, and notification is sent to an SNS topic with prefix Security_Alerts_[Your_Stack]. Lambda function execution in the security account is documented in the CloudWatch log group for the Lambda function. You can use the logs to understand whether the Lambda function was executed successfully.
Security Hub integration
AWS Security Hub aggregates alarms from GuardDuty and other providers. To get Security Hub to aggregate alarms, you must first activate Security Hub before deploying this solution. Then, invite your environment accounts to the security account as master. For more information, see Master and member accounts in AWS Security Hub.
The integration with Security Hub is for manual triggering and is not part of the automated response itself. This can be useful if you have findings that require security investigation before triggering the action.
From the Security Hub console, select the finding and use the Actions drop down menu in the upper right corner to trigger a response, as shown in Figure 5. A CloudWatch event invokes the automated response, such as a Lambda function to isolate an EC2 instance. The Lambda function fetches the GuardDuty finding from the service account and executes one of the following: Isolate EC2 Instance, Block Principal, or Send SNS Notification.
Only one resource can be selected for execution. If you select multiple resources, the response is not executed, and the Lambda log message is shown in CloudWatch Logs.
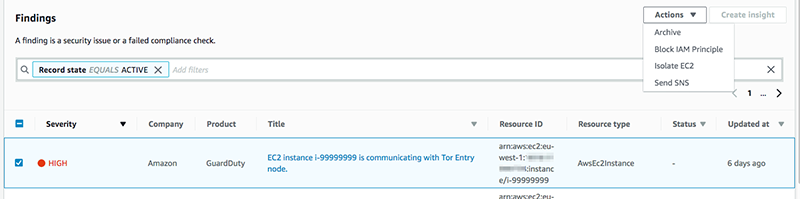
Figure 5: Security Hub integration
Cost of the solution
The cost of the solution depends on the events generated in your AWS account and chosen AWS Region. Costs might be as little as several U.S. dollars per month and per account. You can model your costs by understanding GuardDuty pricing, automation pricing in AWS system manager, and AWS Config pricing for six AWS Config rules. The costs for AWS Lambda and Amazon CloudWatch are expected to be minimal and might be included in your free tier. You can optionally use Security Hub; see AWS Security Hub pricing.
Summary
In this post, you learned how to deploy an automated incident response framework using AWS native features. You can easily extend this framework to meet your future needs. If you would like to extend it further, contact AWS professional services or an AWS partner. If you have technical questions, please use the Amazon GuardDuty or AWS Config forums. Remember, this solution is only an introduction to automated security response and is not a comprehensive solution.
If you have feedback about this post, submit comments in the Comments section below.
Want more AWS Security how-to content, news, and feature announcements? Follow us on Twitter.