AWS Machine Learning Blog
Localize content into multiple languages using AWS machine learning services
Over the last few years, online education platforms have seen an increase in adoption of and an uptick in demand for video-based learnings because it offers an effective medium to engage learners. To expand to international markets and address a culturally and linguistically diverse population, businesses are also looking at diversifying their learning offerings by localizing content into multiple languages. These businesses are looking for reliable and cost-effective ways to solve their localization use cases.
Localizing content mainly includes translating original voices into new languages and adding visual aids such as subtitles. Traditionally, this process is cost-prohibitive, manual, and takes a lot of time, including working with localization specialists. With the power of AWS machine learning (ML) services such as Amazon Transcribe, Amazon Translate, and Amazon Polly, you can create a viable and a cost-effective localization solution. You can use Amazon Transcribe to create a transcript of your existing audio and video streams, and then translate this transcript into multiple languages using Amazon Translate. You can then use Amazon Polly, a text-to speech service, to convert the translated text into natural-sounding human speech.
The next step of localization is to add subtitles to the content, which can improve accessibility and comprehension, and help viewers understand the videos better. Subtitle creation on video content can be challenging because the translated speech doesn’t match the original speech timing. This synchronization between audio and subtitles is a critical task to consider because it might disconnect the audience from your content if they’re not in sync. Amazon Polly offers a solution to this challenge through enabling speech marks, which you can use to create a subtitle file that can be synced with the generated speech output.
In this post, we review a localization solution using AWS ML services where we use an original English video and convert it into Spanish. We also focus on using speech marks to create a synced subtitle file in Spanish.
Solution overview
The following diagram illustrates the solution architecture.
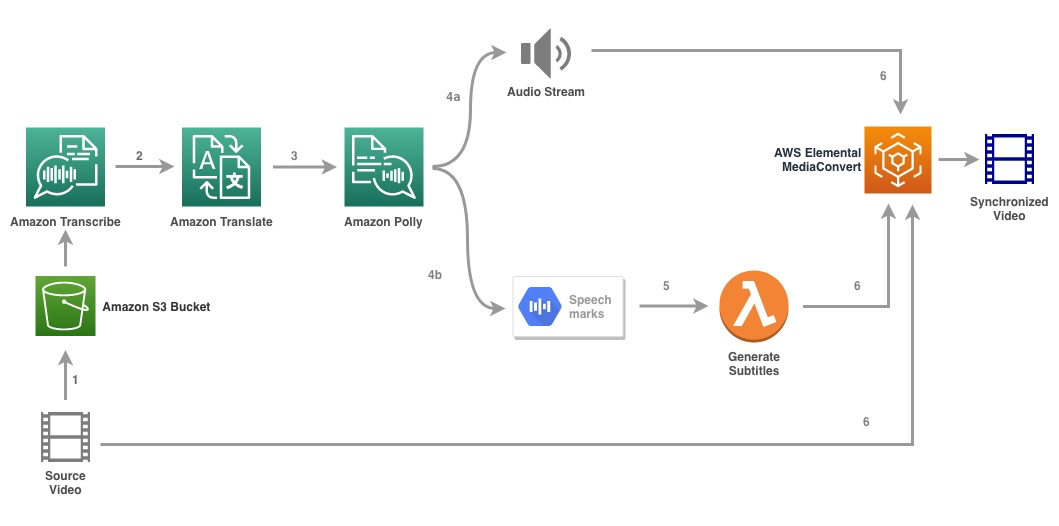
The solution takes a video file and the target language settings as input and uses Amazon Transcribe to create a transcription of the video. We then use Amazon Translate to translate the transcript to the target language. The translated text is provided as an input to Amazon Polly to generate the audio stream and speech marks in the target language. Amazon Polly returns speech mark output in a line-delimited JSON stream, which contains the fields such as time, type, start, end, and value. The value could vary depending on the type of speech mark requested in the input, such as SSML, viseme, word, or sentence. For the purpose of our example, we requested the speech mark type as word. With this option, Amazon Polly breaks a sentence into its individual words in the sentence and their start and end times in the audio stream. With this metadata, the speech marks are then processed to generate the subtitles for the corresponding audio stream generated by Amazon Polly.
Finally, we use AWS Elemental MediaConvert to render the final video with the translated audio and corresponding subtitles.
The following video demonstrates the final outcome of the solution:
AWS Step Functions workflow
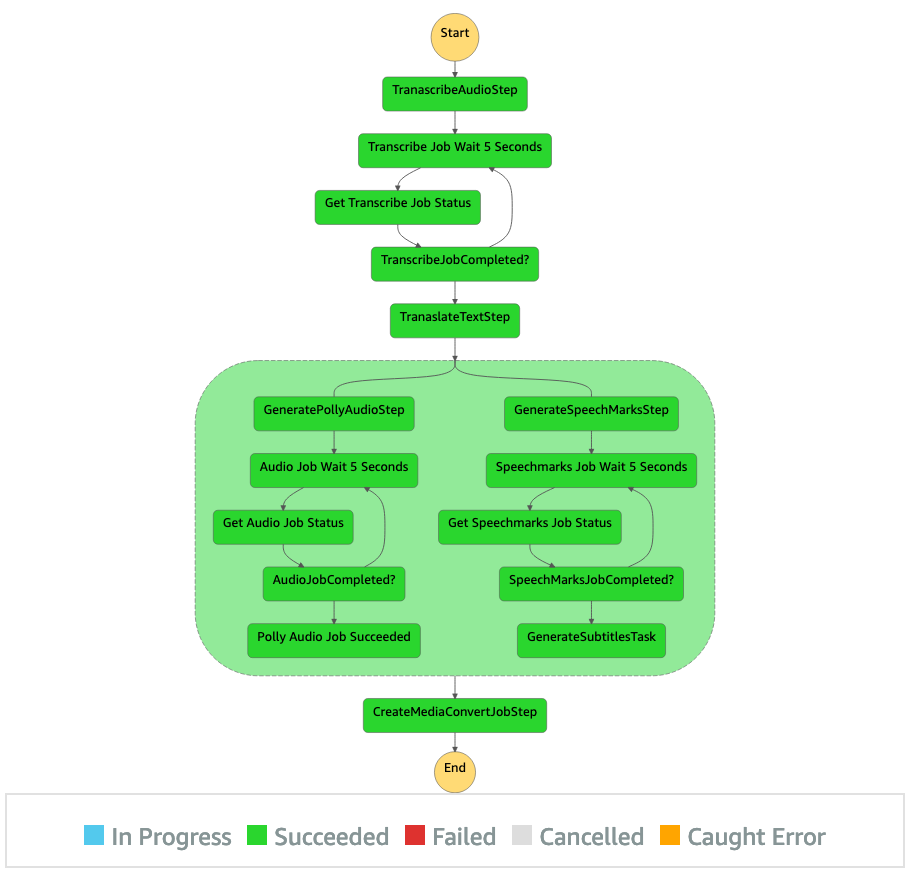
We use AWS Step Functions to orchestrate this process. The following figure shows a high-level view of the Step Functions workflow (some steps are omitted from the diagram for better clarity).

The workflow steps are as follows:
- A user uploads the source video file to an Amazon Simple Storage Service (Amazon S3) bucket.
- The S3 event notification triggers the AWS Lambda function state_machine.py (not shown in the diagram), which invokes the Step Functions state machine.
- The first step, Transcribe audio, invokes the Lambda function transcribe.py, which uses Amazon Transcribe to generate a transcript of the audio from the source video.
The following sample code demonstrates how to create a transcription job using the Amazon Transcribe Boto3 Python SDK:
After the job is complete, the output files are saved into the S3 bucket and the process continues to the next step of translating the content.
- The Translate transcription step invokes the Lambda function translate.py which uses Amazon Translate to translate the transcript to the target language. Here, we use the synchronous/real-time translation using the translate_text function:
Synchronous translation has limits on the document size it can translate; as of this writing, it’s set to 5,000 bytes. For larger document sizes, consider using an asynchronous route of creating the job using start_text_translation_job and checking the status via describe_text_translation_job.
- The next step is a Step Functions Parallel state, where we create parallel branches in our state machine.
- In the first branch, we invoke the Lambda function the Lambda function generate_polly_audio.py to generate our Amazon Polly audio stream:
Here we use the start_speech_synthesis_task method of the Amazon Polly Python SDK to trigger the speech synthesis task that creates the Amazon Polly audio. We set the
OutputFormattomp3, which tells Amazon Polly to generate an audio stream for this API call. - In the second branch, we invoke the Lambda function generate_speech_marks.py to generate speech marks output:
- In the first branch, we invoke the Lambda function the Lambda function generate_polly_audio.py to generate our Amazon Polly audio stream:
- We again use the start_speech_synthesis_task method but specify
OutputFormattojson, which tells Amazon Polly to generate speech marks for this API call.
In the next step of the second branch, we invoke the Lambda function generate_subtitles.py, which implements the logic to generate a subtitle file from the speech marks output.
It uses the Python module in the file webvtt_utils.py. This module has multiple utility functions to create the subtitle file; one such method get_phrases_from_speechmarks is responsible for parsing the speech marks file. The speech marks JSON structure provides just the start time for each word individually. To create the subtitle timing required for the SRT file, we first create phrases of about n (where n=10) words from the list of words in the speech marks file. Then we write them into the SRT file format, taking the start time from the first word in the phrase, and for the end time we use the start time of the (n+1) word and subtract it by 1 to create the sequenced entry. The following function creates the phrases in preparation for writing them to the SRT file:
- The final step, Media Convert, invokes the Lambda function create_mediaconvert_job.py to combine the audio stream from Amazon Polly and the subtitle file with the source video file to generate the final output file, which is then stored in an S3 bucket. This step uses
MediaConvert, a file-based video transcoding service with broadcast-grade features. It allows you to easily create video-on-demand content and combines advanced video and audio capabilities with a simple web interface. Here again we use the Python Boto3 SDK to create aMediaConvertjob:
Prerequisites
Before getting started, you must have the following prerequisites:
- An AWS account
- AWS Cloud Development Kit (AWS CDK)
Deploy the solution
To deploy the solution using the AWS CDK, complete the following steps:
- Clone the repository:
- To make sure the AWS CDK is bootstrapped, run the command
cdk bootstrapfrom the root of the repository: - Change the working directory to the root of the repository and run the following command:
By default, the target audio settings are set to US Spanish (es-US). If you plan to test it with a different target language, use the following command:
The process takes a few minutes to complete, after which it displays a link that you can use to view the target video file with the translated audio and translated subtitles.

Test the solution
To test this solution, we used a small portion of the following AWS re:Invent 2017 video from YouTube, where Amazon Transcribe was first introduced. You can also test the solution with your own video. The original language of our test video is English. When you deploy this solution, you can specify the target audio settings or you can use the default target audio settings, which uses Spanish for generating audio and subtitles. The solution creates an S3 bucket that can be used to upload the video file to.
- On the Amazon S3 console, navigate to the bucket
PollyBlogBucket.

- Choose the bucket, navigate to the
/inputVideodirectory, and upload the video file (the solution is tested with videos of type mp4). At this point, an S3 event notification triggers the Lambda function, which starts the state machine. - On the Step Functions console, browse to the state machine (
ProcessAudioWithSubtitles). - Choose one of the runs of the state machine to locate the Graph Inspector.
This shows the run results for each state. The Step Functions workflow takes a few minutes to complete, after which you can verify if all the steps successfully completed.
Review the output
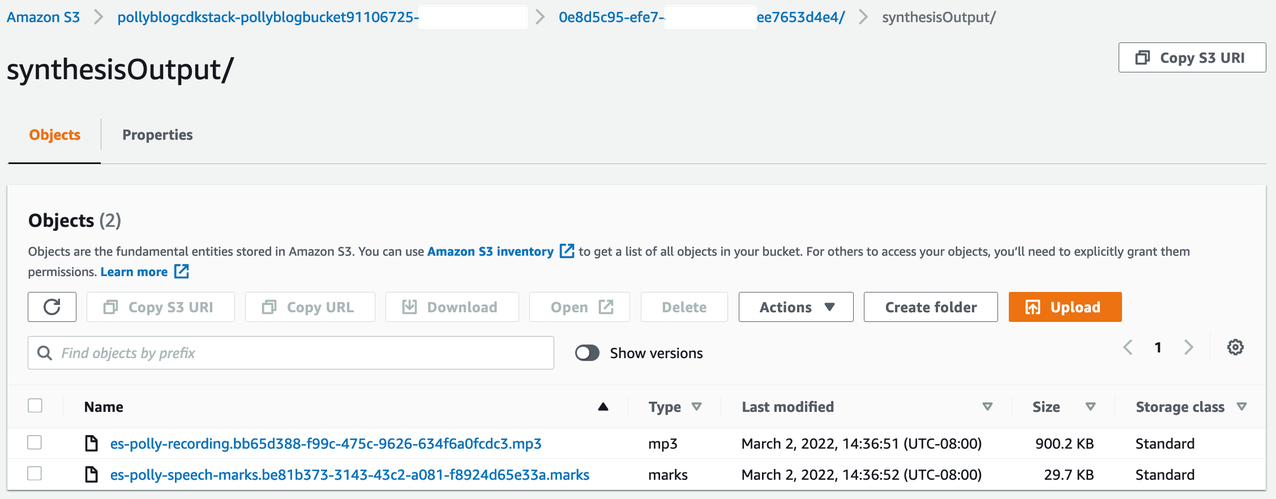
To review the output, open the Amazon S3 console and check if the audio file (.mp3) and the speech mark file (.marks) are stored in the S3 bucket under <ROOT_S3_BUCKET>/<UID>/synthesisOutput/.
The following is a sample of the speech mark file generated from the translated text:
In this output, each part of the text is broken out in terms of speech marks:
- time – The timestamp in milliseconds from the beginning of the corresponding audio stream
- type – The type of speech mark (sentence, word, viseme, or SSML)
- start – The offset in bytes (not characters) of the start of the object in the input text (not including viseme marks)
- end – The offset in bytes (not characters) of the object’s end in the input text (not including viseme marks)
- value – Individual words in the sentence
The generated subtitle file is written back to the S3 bucket. You can find the file under <ROOT_S3_BUCKET>/<UID>/subtitlesOutput/. Inspect the subtitle file; the content should be similar to the following text:
After the subtitles file and audio file are generated, the final source video file is created using MediaConvert. Check the MediaConvert console to verify if the job status is COMPLETE.
When the MediaConvert job is complete, the final video file is generated and saved back to the S3 bucket, which can be found under <ROOT_S3_BUCKET>/<UID>/convertedAV/.
As part of this deployment, the final video is distributed through an Amazon CloudFront (CDN) link and displayed in the terminal or in the AWS CloudFormation console.
Open the URL in a browser to view the original video with additional options for audio and subtitles. You can verify that the translated audio and subtitles are in sync.
Conclusion
In this post, we discussed how to create new language versions of video files without the need of manual intervention. Content creators can use this process to synchronize the audio and subtitles of their videos and reach a global audience.
You can easily integrate this approach into your own production pipelines to handle large volumes and scale according to your needs. Amazon Polly uses Neural TTS (NTTS) to produce natural and human-like text-to-speech voices. It also supports generating speech from SSML, which gives you additional control over how Amazon Polly generates speech from the text provided. Amazon Polly also provides a variety of different voices in multiple languages to support your needs.
Get started with AWS machine learning services by visiting the product page, or refer the Amazon Machine Learning Solutions Lab page where you can collaborate with experts to bring machine learning solutions to your organization.
Additional resources
For more information about the services used in this solution, refer to the following:
- Amazon Transcribe Developer Guide
- Amazon Translate Developer Guide
- AWS Polly Developer Guide
- AWS Step Functions Developer Guide
- AWS Elemental MediaConvert User Guide
- Languages Supported by Amazon Polly
- Languages Supported by Amazon Transcribe
About the authors
 Reagan Rosario works as a solutions architect at AWS focusing on education technology companies. He loves helping customers build scalable, highly available, and secure solutions in the AWS Cloud. He has more than a decade of experience working in a variety of technology roles, with a focus on software engineering and architecture.
 Anil Kodali is a Solutions Architect with Amazon Web Services. He works with AWS EdTech customers, guiding them with architectural best practices for migrating existing workloads to the cloud and designing new workloads with a cloud-first approach. Prior to joining AWS, he worked with large retailers to help them with their cloud migrations.
 Prasanna Saraswathi Krishnan is a Solutions Architect with Amazon Web Services working with EdTech customers. He helps them drive their cloud architecture and data strategy using best practices. His background is in distributed computing, big data analytics, and data engineering. He is passionate about machine learning and natural language processing.