High Availability for Amazon VPC NAT Instances (Using AWS CloudFormation Templates)
With this AWS CloudFormation Templates, you can automate bidirectional monitoring between two NAT instances and implement a high availability (HA) failover solution for network address translation (NAT) This article walksthrough deployment of the AWS CloudFormation template.
Submitted By: Jinesh Varia
AWS Products Used: Amazon EC2, AWS CloudFormation, Amazon VPC
Created On: May 16, 2013
submitted by Steve Morad, AWS Solutions Architect and Sean Senior, AWS Solutions Architect
Learn how you can leverage bidirectional monitoring between two NAT instances to implement a high availability (HA) failover solution for network address translation (NAT). This article walks through the deployment of a CloudFormation script to automate the detailed steps described in the High Availability for Amazon VPC NAT Instances: An Example article.
Overview
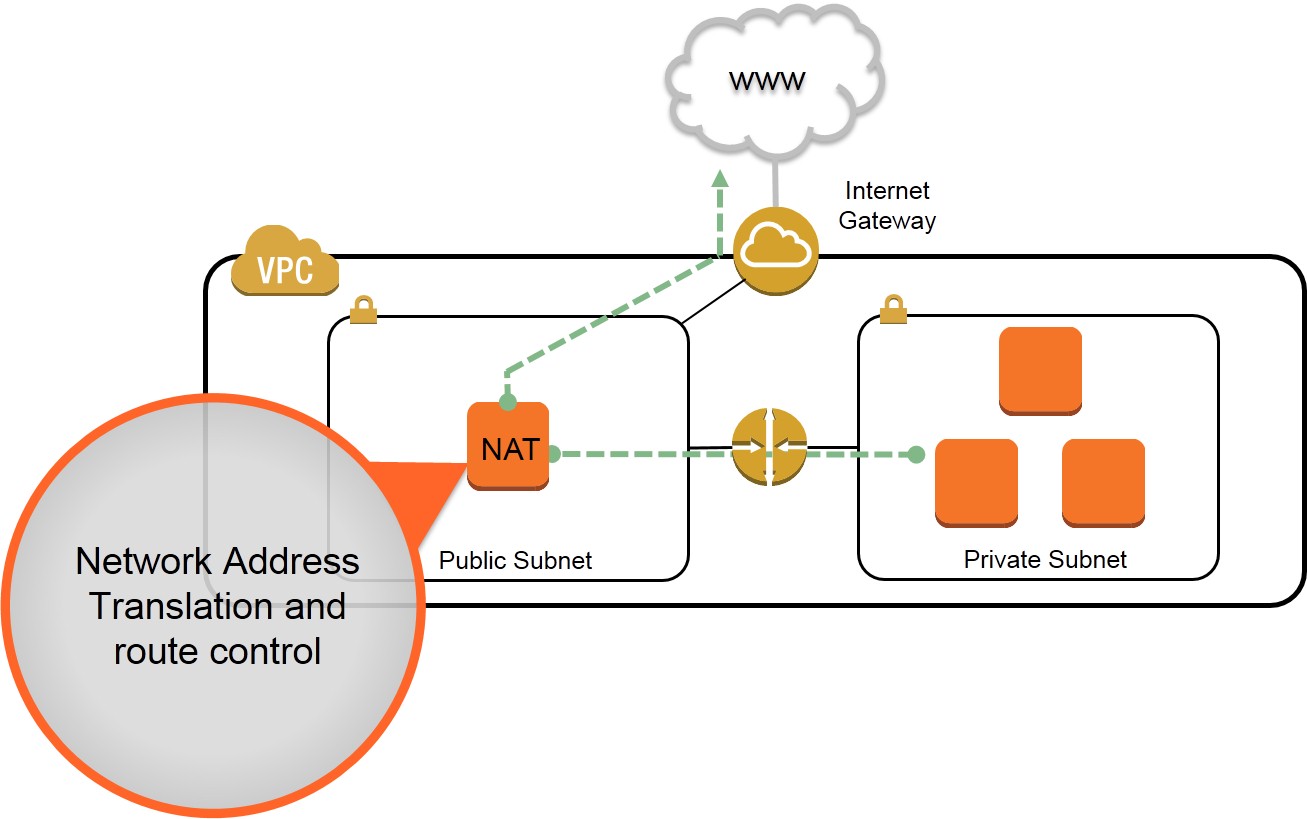
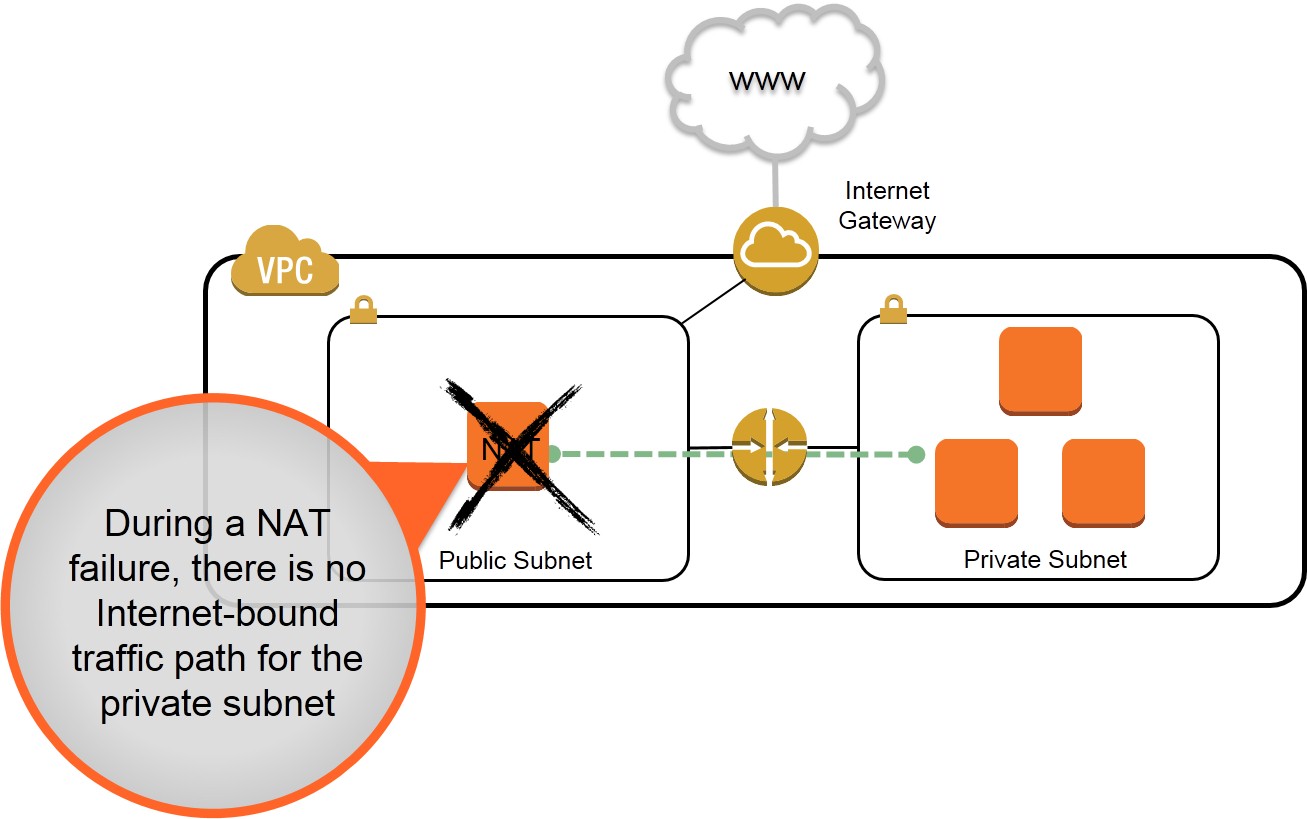
In Amazon Virtual Private Cloud (VPC), you can use private subnets for instances that you do not want to be directly addressable from the Internet. Instances in a private subnet can access the Internet without exposing their private IP address by routing their traffic through a Network Address Translation (NAT) instance in a public subnet. A NAT instance, however, can introduce a single point of failure to your VPC's outbound traffic. This situation is depicted in the diagram below.
 |
 |
|
| Figure 1a: Internet-bound traffic through a NAT instance. | Figure 1b: Internet-bound traffic interrupted during NAT failure. |
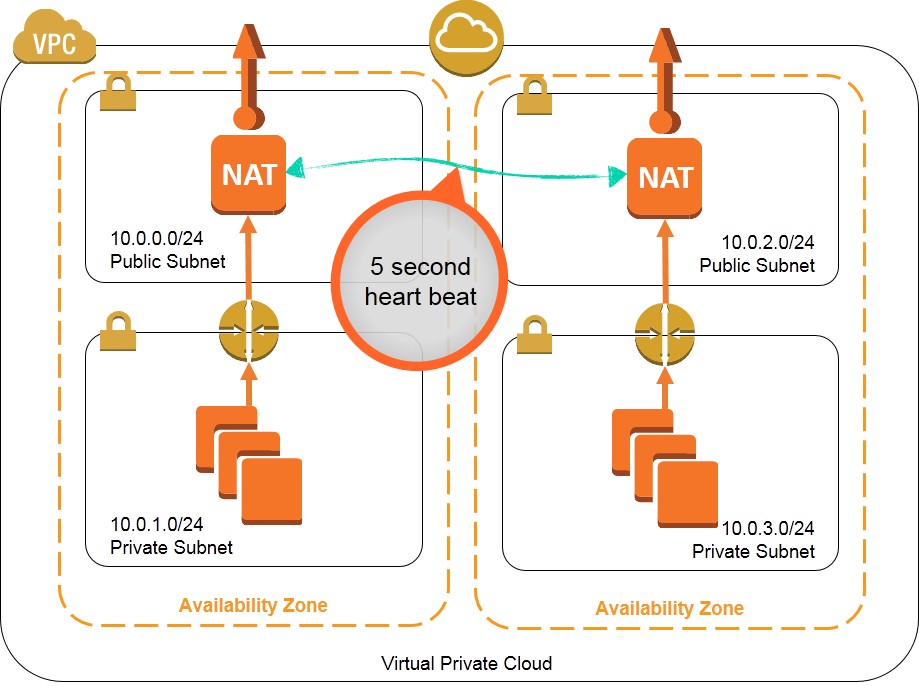
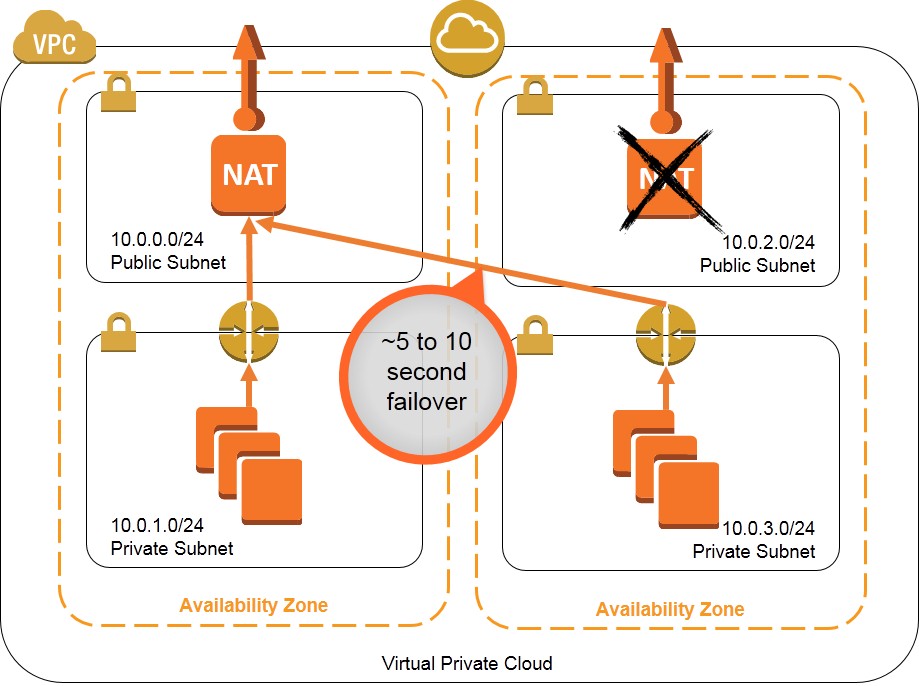
One approach to this situation is to leverage multiple NAT instances that can take over for each other if the other NAT instance should fail. This walkthrough and associated monitoring script (nat_monitor.sh) provide instructions for building a HA scenario where two NAT instances in separate Availability Zones (AZ) continuously monitor each other. If one NAT instance fails, this script enables the working NAT instance to take over outbound traffic and attempts to fix the failed instance by stopping and restarting it. This script is a modification of the virtual IP monitor and take-over script demoed during the AWS re:Invent CPN207 - Virtual Networking in the Cloud session.
This approach, where two instances independently monitor each other, has a known edge case that occurs in the unlikely event network connectivity is broken between two AZs but both instances can still communicate to the EC2 API endpoints. Please see Appendix A for more information about this edge case.
To set up a pair of self-monitoring NAT instances, follow these steps:
- Create an AWS Virtual Private Cloud
- Create an EC2 Role in AWS Identity and Access Management (IAM).
- Launch two Amazon Linux EC2 NAT instances into each of your VPC's public subnets.
- Configure Elastic IP addresses for your NAT instances.
- Create Route Tables for private subnet Internet-bound traffic
- Download and configure the nat_monitor.sh script.
- You are done! You may now test your configuration.
To assist you in the implementation of this approach, we have created two CloudFormation templates that automate deployment of this high availability solution for two scenarios:
- The nat_monitor.template CloudFormation template provisions a pair of self-monitoring NAT instances into an existing VPC, using your existing subnets and route tables.
- The nat_monitor_demo.template CloudFormation template provisions a demo VPC with public/private subnets in AZs of your choice, a pair of self-monitoring NAT instances, and route tables directing the private subnets to route through the NAT instances.
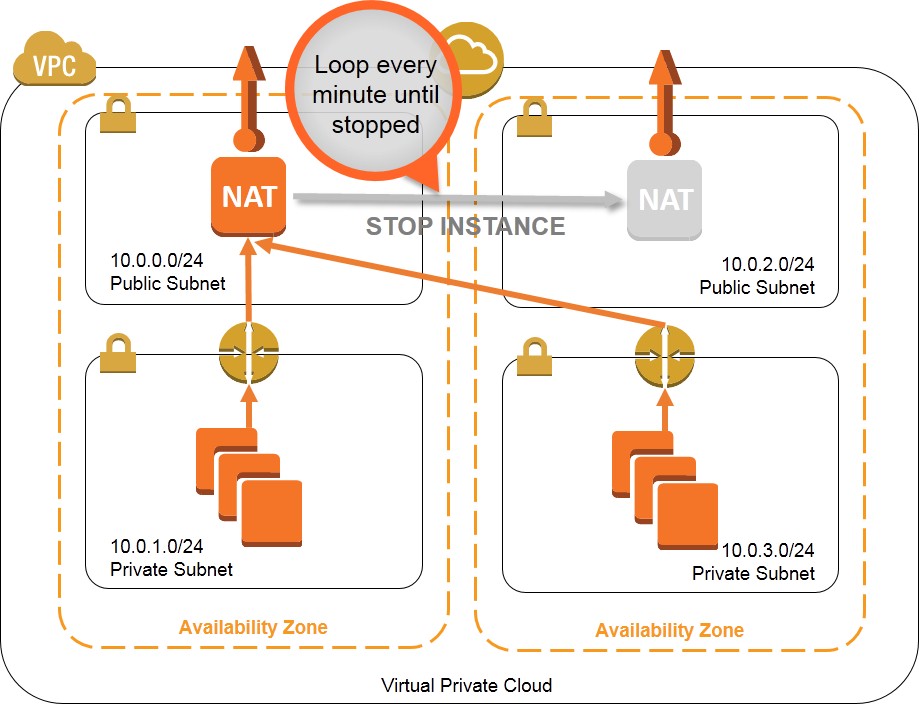
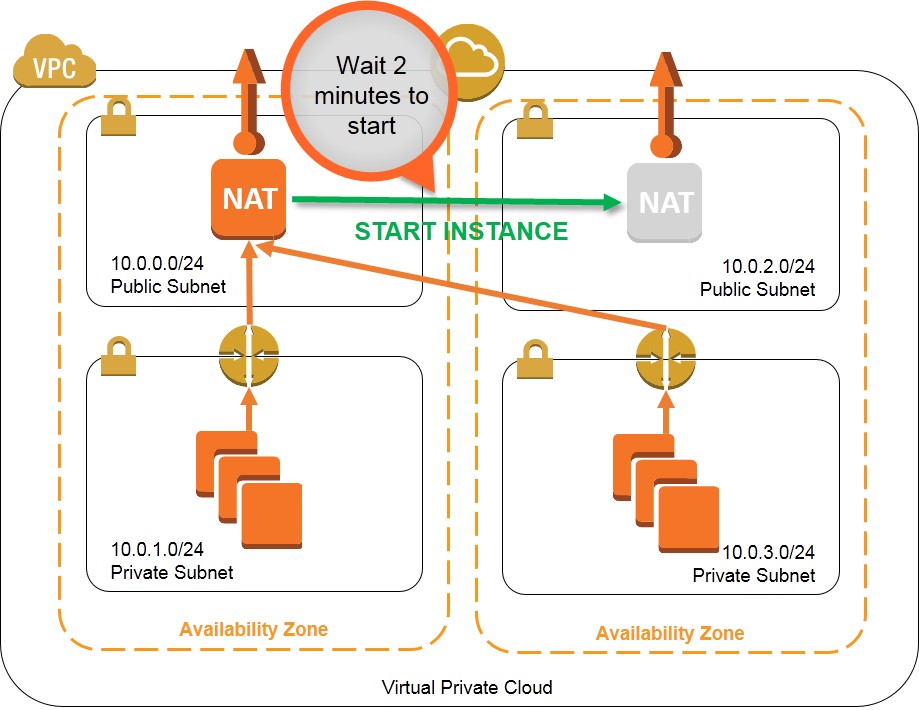
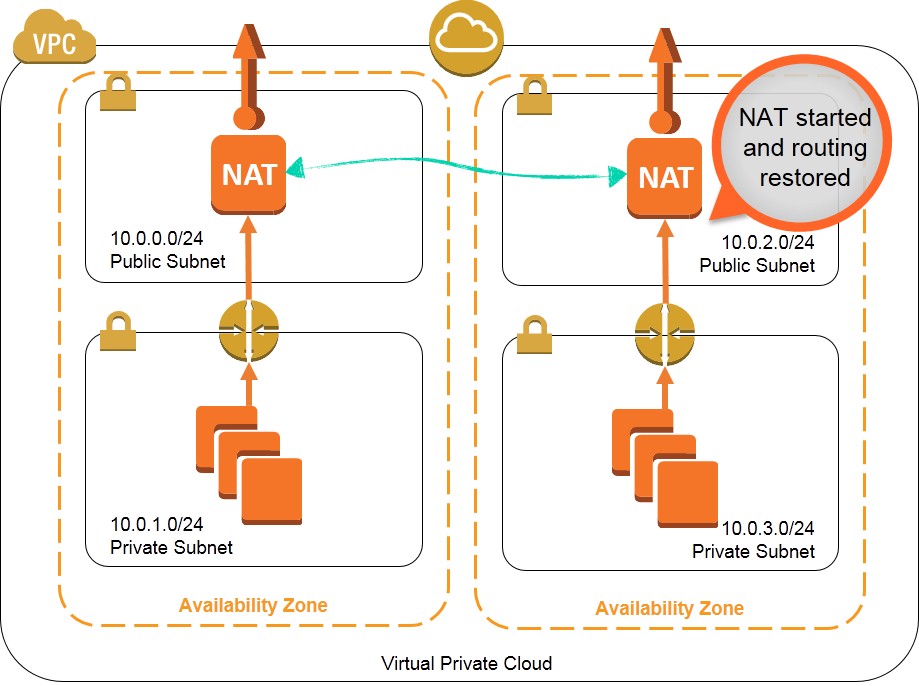
These templates create a solution to provide high availability NAT instances that function as shown in the diagrams below:
 |
 |
|
| Figure 2a: Dual, active NAT instances. | Figure 2b: Route take over on NAT failure. | |
 |
 |
|
| Figure 2c: Active instance attempts to stop the failed instance. | Figure 2d: Once stopped the active instance will restart the failed instance. | |
 |
||
| Figure 2e: Dual, active NAT instances and routing restored. |
For the purpose of this article, we will deploy the demonstration CloudFormation template nat_monitor_demo.template and walk through the implementation contained within the template.
Launching the CloudFormation Template
To launch the demonstration CloudFormation template, start by downloading the nat_monitor_demo.template file. Then navigate to the CloudFormation console in the AWS Management Console and click on Create Stack.
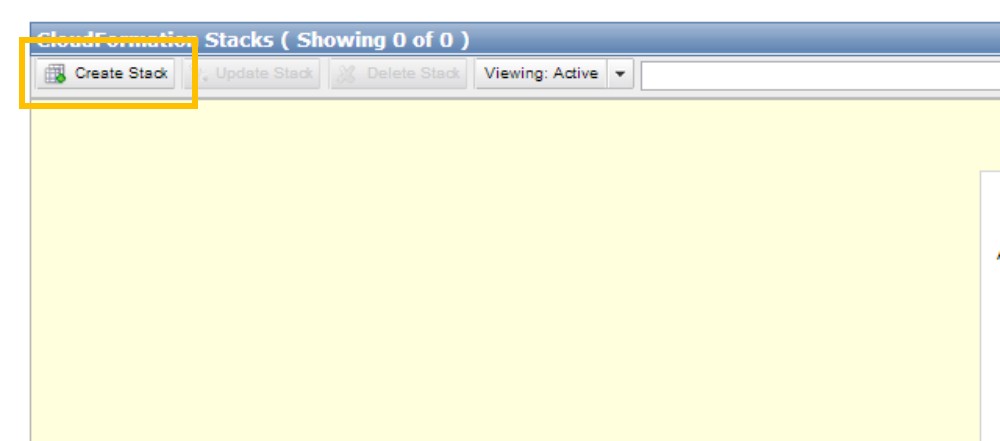
Figure 3: Create a new stack in the CloudFormation console
From the Create Stack dialog, enter the name NAT-HA-Demo and click on the Upload a Template File radio button. Now, click the Choose File button and select the nat_monitor_demo.template file downloaded above. Click Continue.
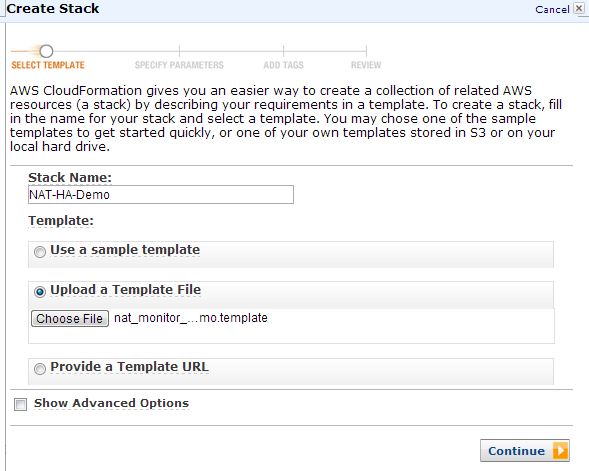
Figure 4: Selecting the template for creating a CloudFormation Stack
On the Specify Parameters step of the Create Stack dialog, make customizations to the default parameters as needed. The default parameters are listed below. Note: The KeyName parameter does not have a default value. Please ensure your provide a valid EC2 KeyPair name for the template.
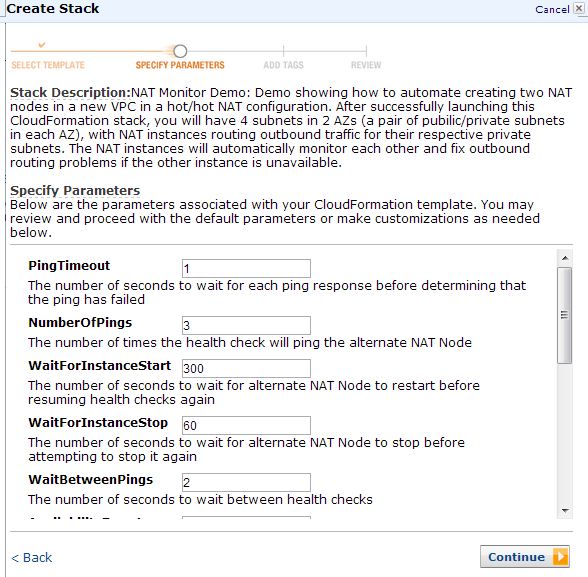
Figure 5: Specifying the template parameters for creating a CloudFormation Stack
The following list describes the parameters in the CloudFormation template along with thier default values:
- PingTimeout - The number of seconds to wait for each ping response before determining that the ping has failed. The default is one second.
- NumberOfPings - This is the number of times the health check will ping NAT Node #2. The default is 3 pings. NAT Node #2 will only be considered unhealthy if all pings fail.
- WaitForInstanceStart - The number of seconds to wait for NAT Node #2 to restart before resuming health checks again. The default is 300 seconds.
- WaitForInstanceStop - The number of seconds to wait for NAT Node #2 to stop before attempting to stop it again (if it hasn't stopped already). The default is 60 seconds.
- WaitBetweenPings - The number of seconds to wait between health checks. The default is two seconds. Therefore, by default, the health check will perfrom 3 pings with 1 second timeouts and a 2 second break between checks -- resulting in a total time of 5 seconds between each aggregete health check.
- AvailabilityZone1 - The first Availability Zone to use for provisioning Public Subnet 1 and Private Subnet 1. The default is us-east-1a.
- AvailabilityZone2 - The first Availability Zone to use for provisioning Public Subnet 2 and Private Subnet 2. The default is us-east-1b.
- VpcCidr - The CIDR block address that will be used when creating the VPC. The default is 10.0.0.0/16.
- NATNodeInstanceType - The instance type that will be used for launching each NAT Node. The default is m1.small.
- PrivateSubnet2 - The address range for the private subnet 2 create in the Availability Zone 2. The default is 10.0.3.0/24.
- PublicSubnet2 - The address range for the public subnet 2 create in the Availability Zone 2. The default is 10.0.2.0/24.
- PrivateSubnet1 - The address range for the private subnet 1 create in the Availability Zone 1. The default is 10.0.1.0/24.
- PublicSubnet1 - The address range for the public subnet 1 create in the Availability Zone 1. The default is 10.0.0.0/24.
- KeyName - The name of the EC2 KeyPair for creation of the NAT instances enabling SSH access to the instances. There is no default value for this parameter.
Click Continue to proceed. On the Add Tags step of the Create Stack dialog, click Continue.
On the Review step of the Create Stack dialog, carefully review and validate your parameters then click Continue to launch the stack. Then click Close to exit the Create Stack dialog.
Once the stack has been successfully created the status will show CREATE_COMPLETE.
You are done!
Test your CloudFormation stack.
You may now test your configuration. Connect to NAT Node #1 and NAT Node #2. Change to the root user, navigate to the root user's home directory. Watch the nat_monitor.log file on HA Node #1 while you stop NAT Node #2 and observe the script take-over the routing for Internet-bound traffic of NAT Node #2. An example output for each NAT Node is shown below.
NAT Node #1
[root@ip-10-0-0-11 ~]# tail /tmp/nat_monitor.log
Fri Feb 8 13:47:23 UTC 2013 -- Starting NAT monitor
Fri Feb 8 13:47:23 UTC 2013 -- Adding this instance to rtb-f8e35095 default route on start
ROUTE           i-f821b388              0.0.0.0/0
Fri Feb 8 14:01:08 UTC 2013 -- Other NAT heartbeat failed, taking over rtb-969a23fb default route
ROUTE           i-f821b388              0.0.0.0/0
Fri Feb 8 14:01:14 UTC 2013 -- Other NAT instance running, attempting to stop for reboot
INSTANCE        i-12990462      running stopping
Fri Feb 8 14:02:19 UTC 2013 -- Other NAT instance stopped, starting it back up
INSTANCE        i-12990462      stopped pending
NAT Node #2 shutdown
[root@ip-10-0-2-11 ~]# shutdown now
[root@ip-10-0-2-11 ~]#
Broadcast message from ec2-user@ip-10-0-2-11
        (/dev/pts/0) at 14:28 ...

The system is going down for maintenance NOW!
NAT Node #2 back up running
[root@ip-10-0-2-11 ~]# tail /tmp/nat_monitor.log
Fri Feb 8 14:03:29 UTC 2013 -- Starting NAT monitor
Fri Feb 8 14:03:29 UTC 2013 -- Adding this instance to rtb-969a23fb default route on start
ROUTE           i-12990462              0.0.0.0/0
Appendix A: Preventing False Positives
When two instances independently monitor each other, there is a possibility that a network interruption between the two instances will result in a false positive, where both instances think that the other has failed and initiate recovery. If both instances can still communicate with the EC2 API endpoints, this scenario could lead to the instances shutting each other down. The likelihood of this edge case occurring is directly related to how frequently health checks are performed. This example uses the VIP monitor defaults of health checks every five seconds, which results in extremely quick NAT recovery (typically under 10 seconds). However, these defaults make this edge case more likely than if the health checks were performed less frequently (e.g., every 5, 10, or 15 minutes or so).
Three strategies can reduce the risks associated with this edge case:
Increase the number of health checks (Num_Pings) or ping timeout (Ping_Timeout). This will mitigate the risk that temporary network congestion between the NAT instances will result in a false positive. The default is to perform three pings with one second timeout for each ping. Increasing the number of pings or timeout length increases the likelihood that at least one healthy response will be received during a particular health check.
Increase the timeout between health checks (Wait_Between_Pings). Increasing the time between health checks can mitigate the risk that both instances could shut each other down. Ideally this timeout would be greater than the time it takes to stop an instance, and the two NAT instances would be configured to perform their health checks at different intervals. For example, increasing the health check timeout to 10 minutes with NAT Node #2 monitoring starting 5 minutes after NAT Node #1 results in each node performing alternating health checks every 5 minutes but never simultaneously.
Install these scripts on a monitoring instance or "witness server" to perform the monitoring, route swapping, and NAT instance restarting. Additional quorum and recovery logic could also be incorporated into the script to reduce the risk of false positives.