AWS Storage Blog
Migrate to Amazon S3 account regional namespaces
Since its launch in 2006, Amazon S3 has used a global namespace where bucket names must be unique across all AWS accounts and AWS Regions. This design has served customers well at scale, but organizations managing multiple accounts and environments often encounter naming collisions. When a bucket is deleted, its name returns to the global pool and could be claimed by another account, which requires careful handling when applications, DNS records, or automation still reference it. To work around these constraints, teams typically add random suffixes, manually embed account identifiers, or adjust deployment workflows when a desired name is unavailable. At enterprise scale, a more structured approach to bucket naming simplifies operations and strengthens security posture.
S3 introduced account regional namespaces for general purpose buckets in March 2026, an opt-in feature that scopes bucket names to your individual AWS account and region. No more racing against a shared global namespace. Your desired bucket names are available within your account and region, and unlike the traditional global namespace, deleted account regional names can’t be claimed by another account and remain reserved for your use. This consistent naming format simplifies infrastructure as code (IaC) templates across environments.
For most customers, the recommended path forward is to create new buckets in the account regional namespace. Existing global namespace buckets continue to work exactly as they do today and migrating them is not a requirement. In this post, we walk you through how to migrate existing buckets using S3 Replication for organizations that have specific reasons to do so, and how to enforce account regional namespace adoption across your organization using AWS Organizations service control policies (SCPs).
When does migrating make sense?
From a features perspective, the account regional namespace works identically to global namespace buckets.
- Consolidate to a single namespace model – If you want every bucket in your organization to follow the same naming convention for consistency in automation, AWS Identity and Access Management (IAM) policies, and documentation, migrating existing buckets avoids the split between two naming schemes.
- Governance you can automate – With the
s3:x-amz-bucket-namespacecondition key, your security team can use SCPs to block global namespace bucket creation across the organization. A naming policy becomes an infrastructure guardrail. We cover the phased enforcement approach later in this post. - Decommission legacy buckets safely – If you need to retire workloads that use global namespaces, migrating the data to a new bucket with an account regional namespace first lets you delete the global bucket. Note that deleted global bucket names can potentially be claimed by other accounts, so only delete them after all references (DNS records, application configs, IAM policies) have been updated.
- Ownership visibility in AWS CloudTrail logs – When every bucket name embeds the account ID and Region, your security team can identify bucket ownership from the name alone in AWS CloudTrail logs, without cross-referencing account inventories.
For many organizations, the right starting point is enforcing account regional namespaces for new buckets using SCPs and only migrating existing buckets where there is a clear operational reason to do so.
Planning your migration
Because existing buckets can’t be renamed, migration requires creating a new bucket and transitioning workloads to it. A little upfront planning makes this straightforward.
Inventory buckets
Use AWS Config or S3 Storage Lens to generate a list of all existing buckets across accounts in your organization. For each bucket, capture the following information:
- The bucket name and owner account and region.
- All resources and configurations that reference the bucket. Common examples include IAM policies, bucket policies, AWS Lambda functions, Amazon SageMaker pipelines, Amazon Bedrock Knowledge Bases, AWS CloudFormation stacks, and application configs, but this will vary by workload.
- Approximate data volume and access patterns. Use Amazon CloudWatch S3 request metrics to understand how frequently each bucket is accessed.
Define naming convention
Because the suffix is fixed (accountid-region-an), define a consistent prefix standard before migrating. You can use the following recommended pattern: <appname>-<purpose>-<accountid>-<region>-an
For example: payments-logs-123456789012-us-east-1-an
Keep in mind that the bucket name prefix and account regional suffix combined must be between 3 and 63 characters long. Plan your prefix length accordingly, because longer prefixes may exceed the limit once the suffix is appended.
Prioritize by risk
Start with sandbox and dev accounts. This provides the lowest area of impact and fastest feedback. Move to staging after dev migration is validated. Address production last, with a full cutover runbook tested in lower environments.
Solution overview
Follow the steps in the next section for each bucket. Data is continuously synced to the new bucket while workloads remain live on the old one. The following diagram shows the end-to-end migration flow.
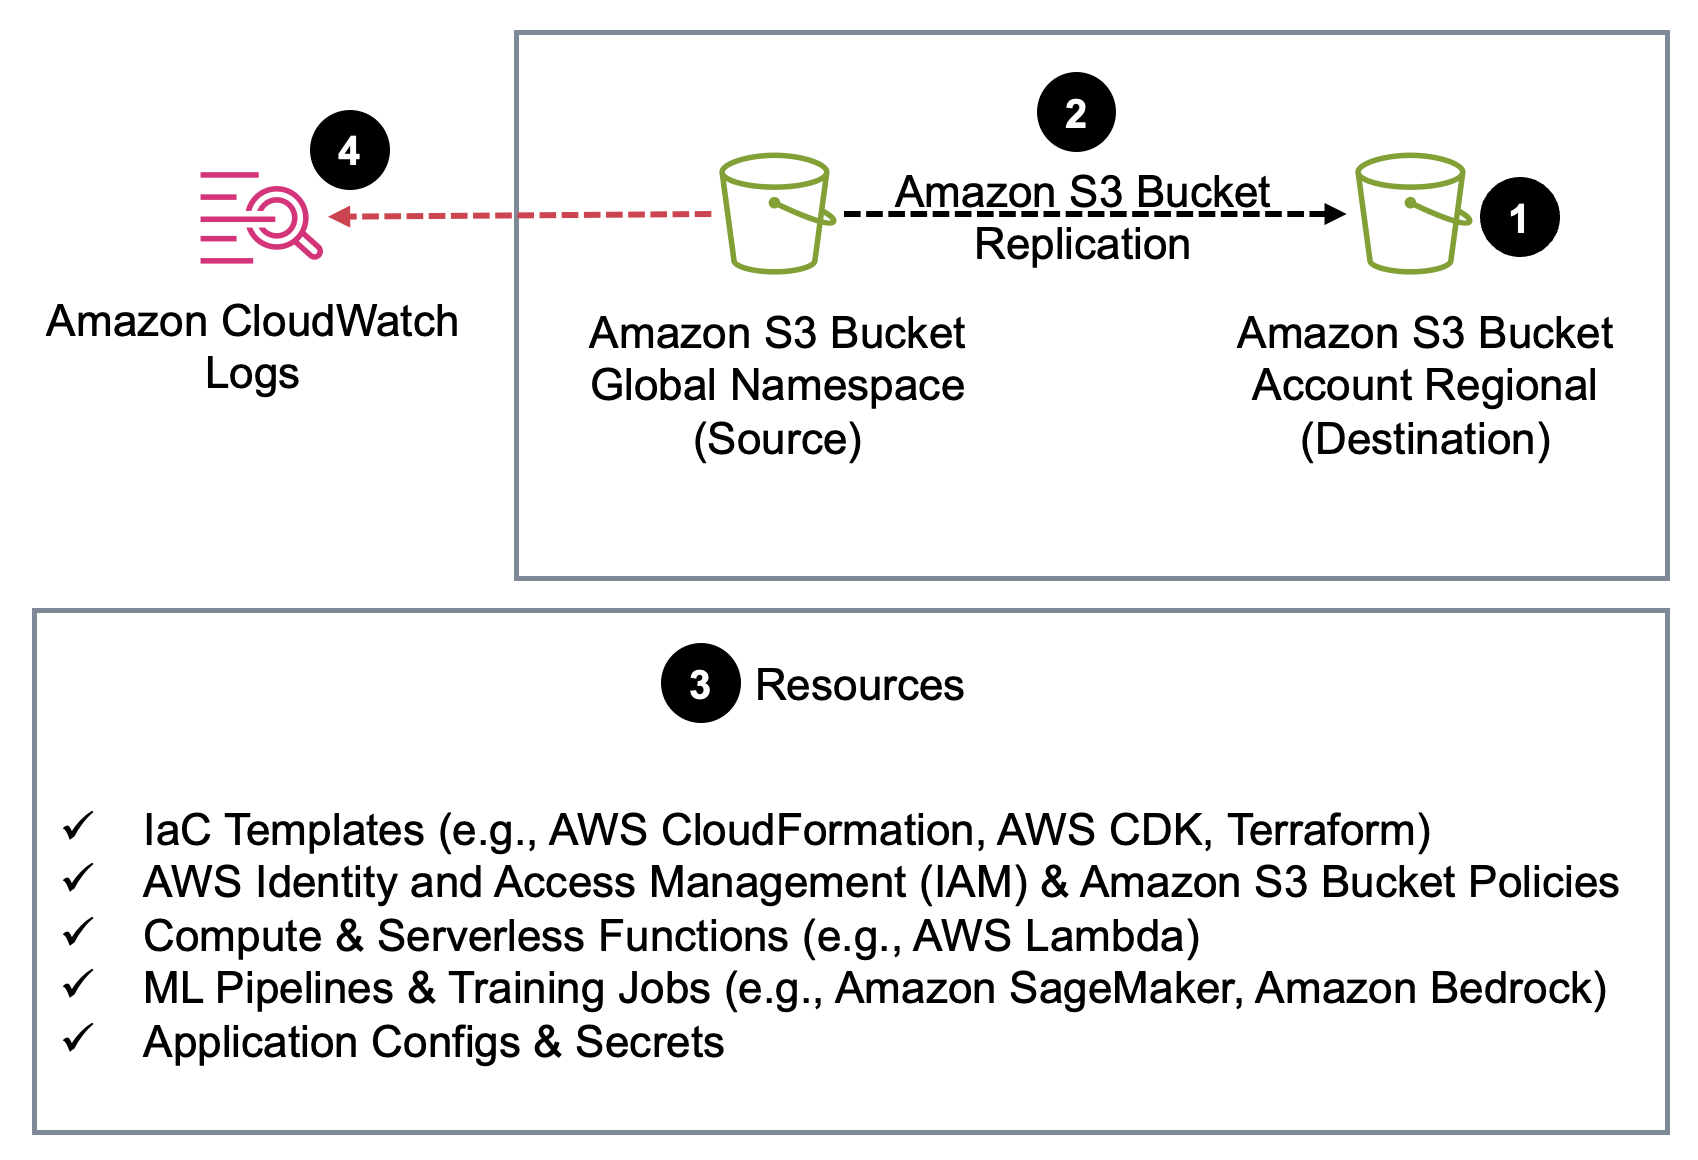
Figure 1. The migration flow from a global namespace bucket to an account regional namespace bucket.
Prerequisites
Before you begin, verify you have the following in place:
- An AWS account with an existing S3 global namespace bucket you want to migrate
- S3 Versioning enabled on the source bucket (required for replication)
- Permissions for S3 Replication
- AWS Organizations with SCPs enabled (if following the governance enforcement section)
Step 1: Create new account regional bucket
Create the new general purpose bucket using the AWS Management Console, AWS Command Line Interface (AWS CLI), SDK, or IaC tool of your choice. The AWS News Blog post, Introducing account regional namespaces for S3 general purpose buckets walks through the S3 console experience, AWS CLI, Boto3, and CloudFormation examples. For the full naming conventions, restrictions, and additional IaC patterns, refer to Namespaces for general purpose buckets.
When creating the new bucket, use the prefix you defined in your naming convention. The account regional suffix (-{accountid}-{region}-an) is appended automatically when you use BucketNamePrefix, or you can construct the full name explicitly.
Step 2: Set up S3 Replication
Configure S3 Replication from the old global bucket to the new account regional bucket. This keeps new data in sync continuously, giving you a safe window to update all consumers before cutting over. To copy historical data, create an S3 Batch Replication job, which replicates existing objects that were in the bucket before the replication rule was enabled. Enable live replication first, then run batch replication to confirm no objects are missed. Before configuring replication, confirm the destination bucket has versioning enabled. If the source bucket has S3 Object Lock enabled, S3 Object Lock must also be enabled on the destination bucket. For setup instructions, see Replicating objects within and across Regions.
Step 3: Update references
Update all resources and configurations that reference the old bucket to point to the new bucket name. This includes IaC templates, IAM and bucket policies, Lambda environment variables, pipeline and training job configs, knowledge base data source configurations, application configs, and environment secrets. The specific resources will vary by workload.
Step 4: Transition to the new bucket and retire old bucket
Turn on CloudWatch S3 request metrics on the old bucket and monitor until the request count reaches zero, confirming no active consumers remain. After traffic has stopped, keep the old bucket for a grace period (14 days is a reasonable default). After the grace period, disable replication rules after you confirm that the new bucket is the source of truth. The safest approach is to keep the old global namespace bucket indefinitely, even if empty, to prevent the name from being claimed by another account. If you choose to delete it, audit all references (application configs, DNS records, IAM policies, third-party integrations) thoroughly, because the name will return to the global pool and could be reused by anyone.
Step 5: Enforcing governance with SCPs
After your accounts are migrated, lock in the new standard. For ready-to-use policy examples for SCPs, Resource Control Policies (RCPs), and IAM policies, see Requiring the creation of buckets in your account regional namespace. These policies use the s3:x-amz-bucket-namespace condition key to deny CreateBucket calls that don’t specify the account regional namespace.
The question is not which policy to use, but when to apply it. Enforcing too early breaks teams that have not yet migrated. Enforcing too late allows new global namespace buckets to accumulate. Tie enforcement to your migration progress:
- Phase 1 – Apply to sandbox and new account organizational units (OUs) immediately. There are no existing buckets to migrate.
- Phase 2 – Apply to dev and staging OUs after migration is complete and validated.
- Phase 3 – Apply organization-wide after production migration is confirmed.
Cost considerations
The only incremental spend during migration is standard S3 storage and replication request charges while both the old and new buckets exist in parallel. This is temporary. After the old bucket is retired, your storage bill returns to baseline. For most workloads, the migration window is measured in days.
Cleaning up
If you created test buckets during the walkthrough, complete the following steps to clean up your resources:
- On the S3 console, select the test bucket you created.
- Empty the bucket, then delete it.
- If you deployed a test SCP, remove it from the OU on the Organizations console.
Conclusion
Account regional namespaces change how Amazon S3 bucket identity works. You don’t have to migrate your entire S3 data estate to benefit. You can enforce account regional namespaces for new buckets immediately using SCPs and migrate existing buckets on your own timeline. For buckets you do migrate, the process is a one-time investment. Create new buckets, replicate data, update references, transition over, and enforce with SCPs. After you complete this process, your bucket names are permanently yours, uniform across every environment, and ownership is visible directly in CloudTrail logs.
Start with your sandbox accounts today and implement the SCP enforcement through your AWS Organization as each environment is migrated.