AWS for M&E Blog
Photogrammetry reconstruction with 3Dflow on AWS
Introduction
In this post, we show how to create digital three-dimensional (3D) assets from still photographs using a technique called photogrammetry. To do so, we highlight two products created by 3Dflow dedicated to photogrammetry reconstruction: its graphical user interface application, 3DF Zephyr, and its FlowEngine container, which is available on the Amazon Web Services (AWS) Marketplace. We then demonstrate how to use AWS on-demand compute resources to automate batch processing multiple photogrammetry reconstruction tasks.
Photogrammetry is a form of 3D scanning that involves capturing photographs of an area of interest and recreating it as a digital 3D asset. This includes capturing of photos and the processing algorithms required to generate structure from motion data, depth maps, geometry meshes, and texture data. The result is a 3D mesh and texture map serialized in a common format readable by popular digital content creation (DCC) tools and 3D rendering engines. Examples of photogrammetry applications include film visual effects, animation, video games, augmented reality (AR) or virtual reality (VR) applications, and geospatial land surveying. Learn more about the photogrammetry reconstruction process and use cases here.
Reconstruction tasks can vary in resource requirements depending on the desired complexity of the result. Image datasets and resulting assets can range from single digit megabytes to tens of gigabytes of disk space. Processing time can be measured from minutes to several hours per asset. Once you move beyond processing a handful of simple 3D assets, it is beneficial to run tasks using AWS on-demand compute resources and cloud storage services. This facilitates fine-grain control over the number of resources dedicated to tasks, and you only pay for what you use. Amazon Simple Storage Service (Amazon S3), an object storage service offering industry-leading scalability, data availability, security, and performance, lets you move data between cost tiers depending on how frequently you need to access the data. This allows you the flexibility to keep as much data as you want while optimizing storage costs. 3Dflow’s AWS Marketplace offering allows for consumption-based billing, so as with the compute resources, you only pay for what you use.
This post provides an AWS CloudFormation template so you can model, provision, and manage AWS and third-party resources by treating infrastructure as code in just a few minutes. After completing the steps outlined in this post, you can automate processing photogrammetry reconstruction tasks by simply uploading digital photos. We then walk you through considerations to make when adjusting settings for your reconstruction tasks and how to address these requirements with 3DF Zephyr. Once you complete the reconstruction tasks, the resulting 3D asset is available to download. Finally, we provide the steps required to clean up AWS resources created during this walkthrough and some considerations when scaling your workload beyond just a handful of 3D assets.
The photogrammetry capturing process
To get started, we recommend you try a free image dataset provided by 3Dflow. As you develop your photogrammetry pipeline, these datasets provide you with a baseline for quality level and processing requirements. Eventually you will want to capture your own photos.
Here are some things to keep in mind during the capture process:
- You want your images to be sharp and evenly lit.
- High-resolution images provide more detail but can also impact processing time.
- The bigger the camera sensor, the higher quality the results.
- For example, a full-frame camera or an advanced photo system (APS)-C or APS-H sensor is preferred.
- The more overlap you have between the pictures—ideally 70–80 percent—the more accurate the software will be while orienting the pictures in the 3D space.
- Lighting conditions also have a big impact on the result.
- Even lighting created by an overcast sky or studio lighting can give good results. Reflective transparent surfaces can be difficult to recreate.
- It may be necessary to use a polarizing filter to reduce lighting artifacts.
For information on the capturing process, including best practices, review this tutorial published by 3Dflow.
Solution overview
Time to read: 10 minutes
Time to complete: 20 minutes
Cost to complete: Less than $5
Learning level: 200–300
Services used: Amazon S3, AWS Lambda, AWS Batch, Amazon CloudWatch, AWS Marketplace
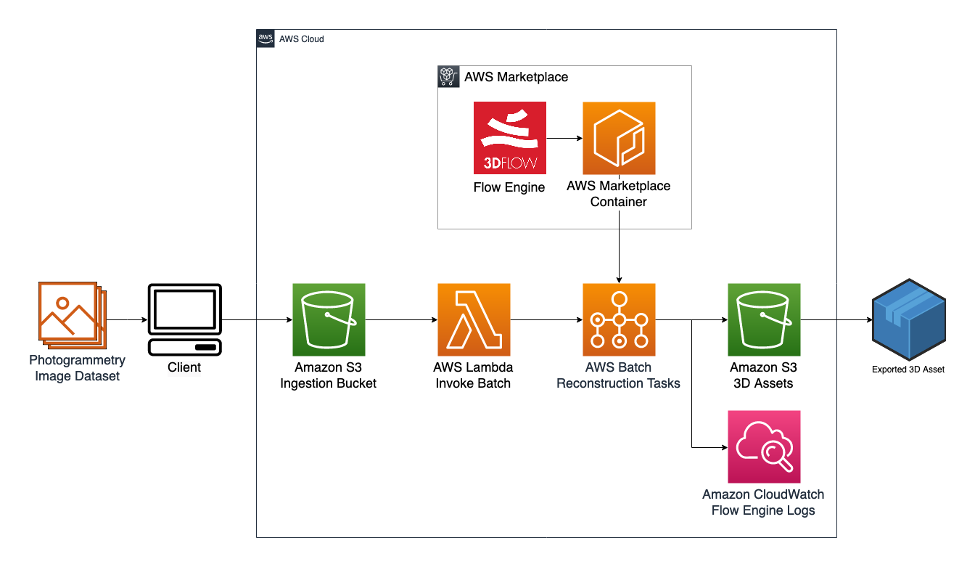
3DFlow’s Flowengine on AWS Reference architecture
Architecture
This solution facilitates ingestion of image datasets using Amazon S3. Datasets uploaded to Amazon S3 initiate an event that invokes a Docker container process through AWS Batch, a fully managed service for scheduling and orchestrating Docker containers. AWS Lambda, a serverless, event-driven compute service that lets you run code for virtually any type of application or backend service without provisioning or managing servers, is used to respond to the Amazon S3 upload event and start the AWS Batch container job. The container that is invoked is an AWS Marketplace container developed by 3Dflow. The container is run on an Amazon Elastic Compute Cloud (Amazon EC2) launch type with an NVIDIA GPU instance. Amazon EC2 is a web service that provides secure, resizable compute capacity in the cloud. This container copies uploaded datasets from Amazon S3. It then runs the photogrammetry reconstruction pipeline with 3Dflow’s FlowEngine software development kit (SDK). Finally, it writes the results back to Amazon S3. The output logs from the container are written to Amazon CloudWatch, a monitoring and observability service, for debugging purposes.
Prerequisites
- An AWS account
- A subscription to 3Dflow’s FlowEngine AWS Marketplace container
- The free version of 3Dflow’s 3DF Zephyr
- An Amazon EC2 G4dn Instances service quota. Amazon EC2 G4dn Instances, powered by NVIDIA T4 GPUs, are the lowest-cost GPU-based instances in the cloud for machine learning inference and small-scale training. 3Dflow uses a GPU with the CUDA graphics library for better performance. Confirm your account has sufficient G4dn limits for this solution. At a minimum, you will need eight virtual central processing units (vCPUs); see this guide for more details.
Deployment
- Launch a stack with the provided template.
Sign in to the AWS CloudFormation console, and create a stack with the provided template. Give it an appropriate name, such as FlowenginePipeline.
Make note of the FlowEngineImage parameter. This is the image published by 3Dflow to the AWS Marketplace. The latest version was set as the default at the time of the writing of this blog. Review the AWS Marketplace listing for the most recent version.
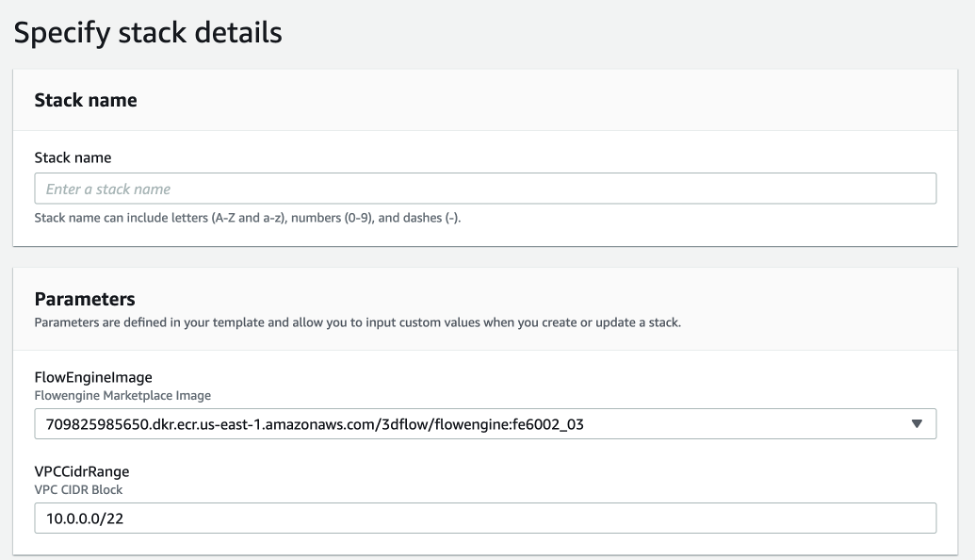
Stack Details
You can leave the remaining options as their default, but note that AWS CloudFormation might create AWS Identity and Access Management (AWS IAM) resources, which can only be accessed by specific users under certain conditions. Then, click on “Create stack.”
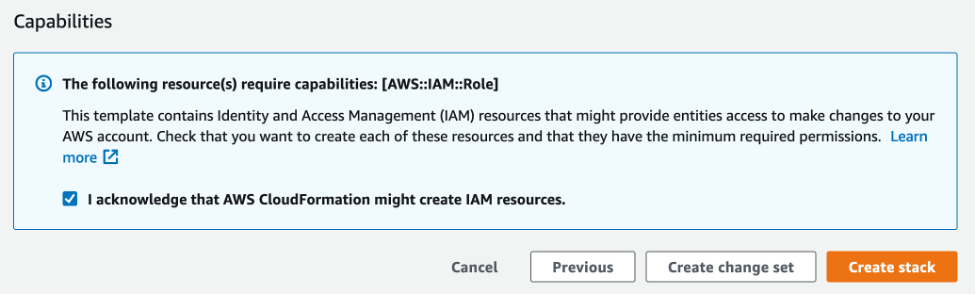
Acknowledge that CloudFormation might make IAM resources
Once the stack is deployed, review the stack’s outputs, and make note of the IngestionBucketName Amazon S3 bucket name value. This is the storage bucket that you will use to upload image datasets and to retrieve the exported results.
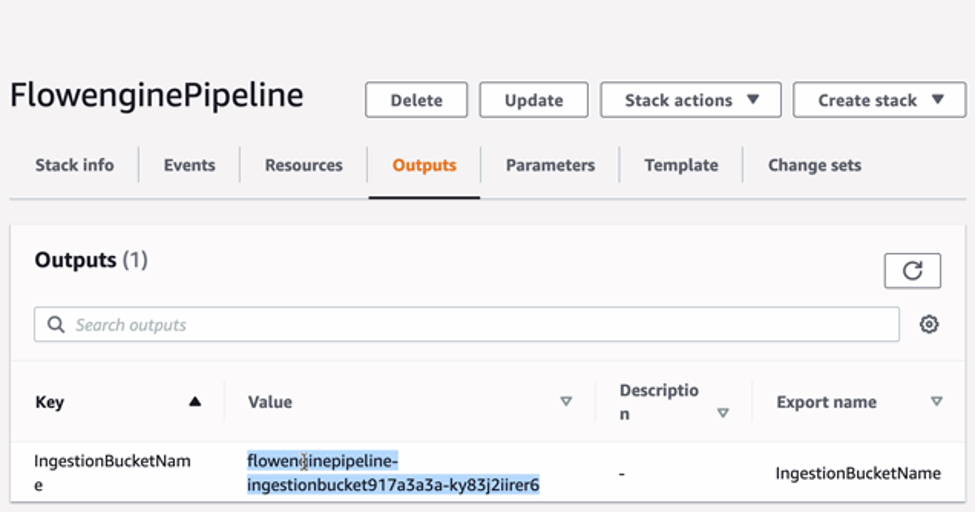
Flowengine Pipeline Stack Outputs
Usage
Step 1 – Upload image datasets
With the resources deployed to your account, you can now upload image datasets and begin creating 3D assets. The images must be archived in a zip file and contain a settings configuration (Default.xml).
- Add images and Default.xml to zip archive.
You can use the Default.xml sample provided below for processing 3Dflow tasks with default settings. Or you can use 3Dflow’s 3DF Zephyr to configure and export a settings file. Settings can be configured as named presets or with fine-tuned values. You can find more information in the following tutorial.
Example FlowEngine Default.xml settings file
<?xml version="1.0" encoding="utf-8"?>
<Settings>
<Category name="Samantha">
<Entry key="Preset" value="General;Default"/>
</Category>
<Category name="Stereo">
<Entry key="Preset" value="General;Default"/>
</Category>
<Category name="Surface">
<Entry key="Preset" value="General;Default"/>
</Category>
<Category name="Texture">
<Entry key="Preset" value="General;Default Single Texture"/>
</Category>
</Settings>
- Add the Default.xml file and images to a zip archive. In this example we use the “Cherub Statue” free dataset.
- For this example, name the archive PhotogrammetryDemo.zip.
Note: The FlowEngine container expects the contents of the zip file to be at the root level with no subfolders. You can accomplish this by using the “zip” command available in common terminal applications:
zip -r -j PhotogrammetryDemo.zip folderWithImagesAndSettingsFile/*
You can then double-check the contents of the archive with zipinfo.
zipinfo PhotogrammetryDemo.zip
Archive: PhotogrammetryDemo.zip
Zip file size: 557299283 bytes, number of entries: 66
-rw-rw-r-- 3.0 unx 470 tx defN 20-Jul-27 08:46 Default.xml
-rw-rw-r-- 3.0 unx 8258583 bx defN 14-Apr-01 18:05 IMG_0001.JPG
-rw-rw-r-- 3.0 unx 8746490 bx defN 14-Apr-01 18:05 IMG_0002.JPG
-rw-rw-r-- 3.0 unx 8769712 bx defN 14-Apr-01 18:06 IMG_0003.JPG
-rw-rw-r-- 3.0 unx 8557037 bx defN 14-Apr-01 18:06 IMG_0004.JPG
...
- Upload zip file to Amazon S3.
Here we demonstrate uploading the zip file to Amazon S3 with the AWS console, but you can also do this with the AWS command line interface (CLI), an AWS SDK, or HTTP requests.
- Browse to the Amazon S3 console.
- Locate and open the ingestion bucket from the AWS CloudFormation template.
- Create a folder with the same name as your zip file, excluding the .zip extension: “PhotogrammetryDemo.”
- Choose Upload, and either drag and drop the file on the browser window or browse to it on disk.
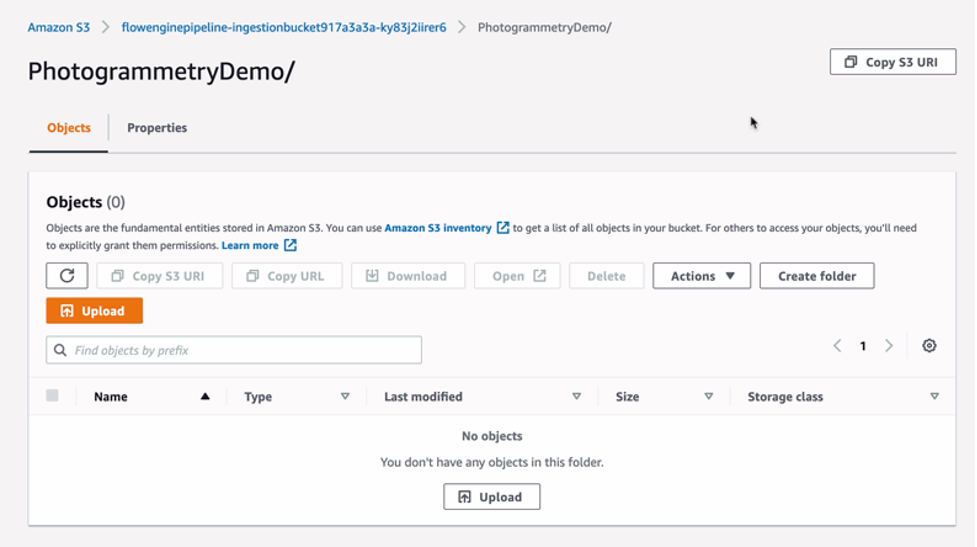
New Amazon S3 Bucket for Photogrammetry task Inputs and Outputs
The FlowEngine container expects the zip file to have the following path: PhotogrammetryDemo/PhotogrammetryDemo.zip
The container will place the generated results in the same PhotogrammetryDemo subfolder once completed.
Step 2 – Review status of the reconstruction task
Uploading an image dataset will initiate an event to invoke an AWS Batch job. You can view these jobs through the AWS Batch console. As the job runs, you can view the log output in Amazon CloudWatch.
- Browse to the AWS Batch console.
- Choose Jobs from the left menu.
- Ensure you have the 3DFlowQueue job queue selected, and then click the job corresponding to the image dataset uploaded in the previous step (e.g., “photog-3dflow-PhotogrammetryDemo”).
Here you see the status of the reconstruction task, including a link to an Amazon CloudWatch log stream.
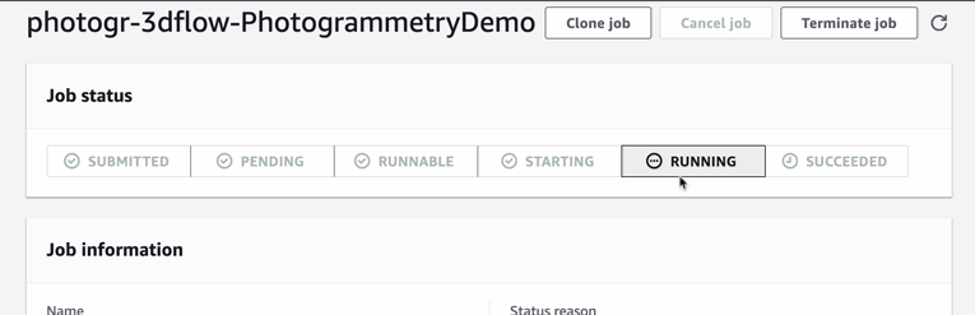
AWS Batch Job Status
The log stream is the standard output produced by the 3Dflow container task.
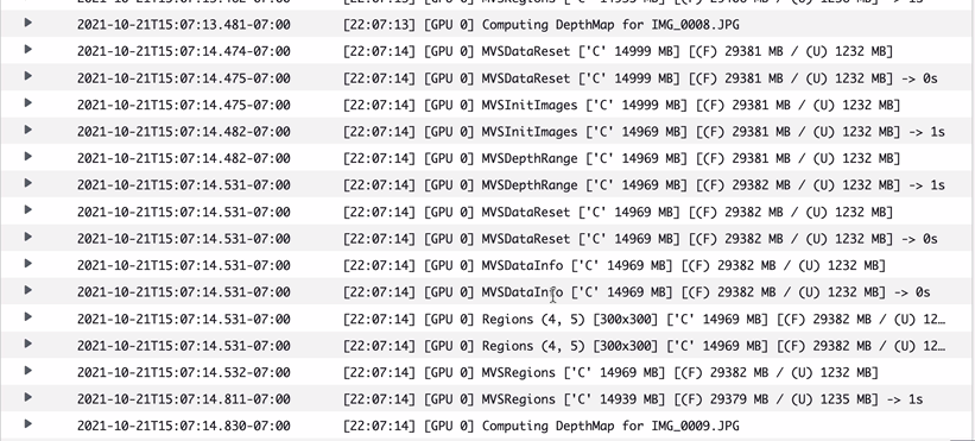
AWS Batch Job Log Stream
Note: If you do not see a new job associated with your upload, review the log stream of the Lambda function responsible for submitting the AWS Batch job. The Lambda function’s name will be STACKNAME-UploadDatasetEventUNIQUEID. Filtering the Lambda functions for “UploadDatasetEvent” should allow you to easily spot the correct function in the list of available functions. View this guide for more information of viewing Lambda function logs.
With the Cherub sample dataset, this job takes about 10–12 minutes to complete.
Step 3 – Review exported results
Once the job is complete, you can find the exported results in Amazon S3. In this setup, we configure the FlowEngine to export an OBJ and MTL file, a 3DK file, and Sparse and Dense PLY point cloud files. See 3Dflow’s guide on the FlowEngine container for more information about the exported file types.
- Download the results.
Just like uploading a file, you can download files from Amazon S3 using the web console or the AWS Command Line Interface (AWS CLI), AWS SDK, or HTTP requests.
In the Amazon S3 console, browse to the PhotogrammetryDemo subfolder from the previous step. Here you can see the exported files. Choose the file you want and download.
- Import the generated asset into your tool of choice.
OBJ files are supported in a wide range of popular 3D DCC tools. You can view and modify your 3D asset by importing the OBJ file in a tool such as Blender, a free open-source 3D modeling tool.
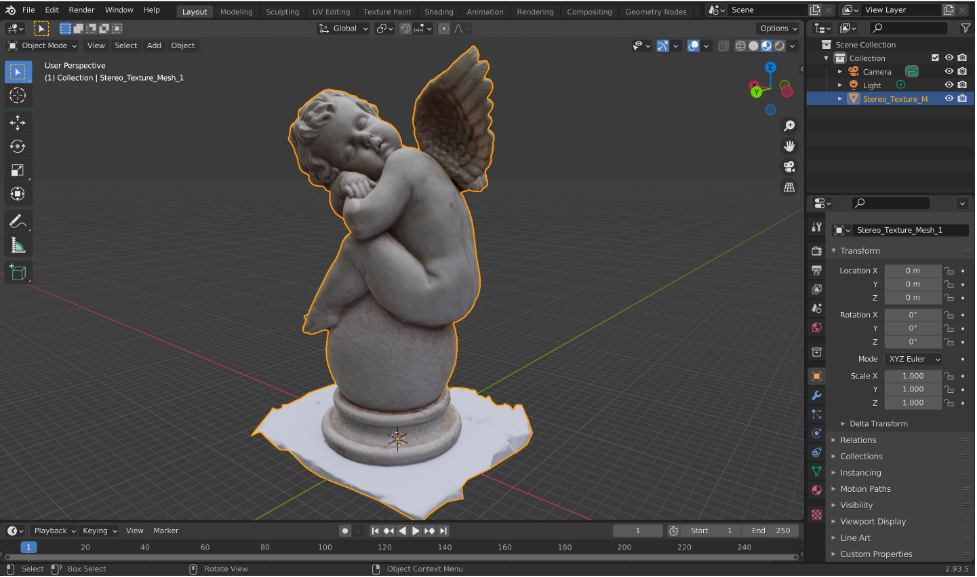
Reconstruction Task Results in Blender
Alternatively, you can load the 3DK file into 3DF Zephyr to review and tweak the settings used in the reconstruction process. For a deeper understanding of 3DF Zephyr, check out 3Dflow’s tutorial. Then, if need be, you can export an XML file with new settings for future batch reconstruction tasks.
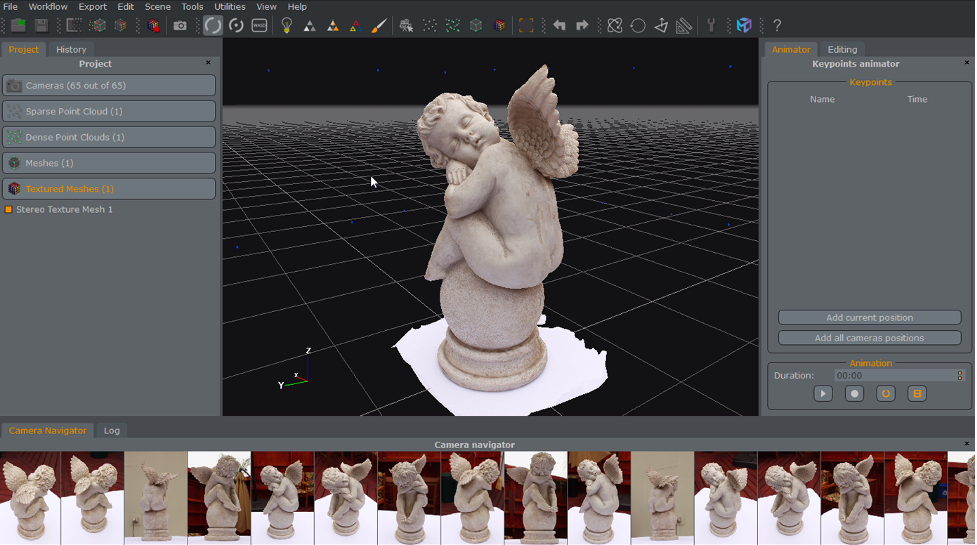
Reconstruction Task Results in 3DZephyr
Cleanup
Follow these steps to remove the resources deployed in this stack:
1. Ensure there are no jobs running in the batch 3Dflow queue.
2. Empty the contents of the ingestion bucket and the logs bucket (refer to the stack outputs to get the correct bucket names).
3. Browse to the AWS CloudFormation console, select the stack deployed in this guide, and click Delete.
Once the stack deletion is complete, all the resources deployed in this guide are removed.
Next steps
There are many topics to consider for next steps, and they depend on your use case and business requirements.
For example, does your use case require capturing from remote locations and uploading photos on the fly? Companies such as MASV have built service offerings helping customers transfer large time-sensitive files. Amazon S3 Transfer Acceleration, a bucket-level feature that facilitates fast, simple, and secure transfers of files over long distances between your client and an Amazon S3 bucket, or 5G connections using AWS Wavelength, which provides mobile edge computing infrastructure for developing, deploying, and scaling ultra-low-latency applications, could both be beneficial when working near edge locations.
As reconstruction tasks are performed, you may need to perform quality control checks during various stages. For example, the first step in the photogrammetry process, generating a sparse point cloud, is relatively quick and requires little disk space. Using services like Amazon EventBridge, a serverless event bus that makes it easier to build event-driven applications at scale; Amazon Simple Notification Service, a fully managed messaging service; and Amazon DynamoDB, a fully managed, serverless, key-value NoSQL database designed to run high-performance applications at any scale, you could orchestrate a system to generate the sparse point clouds, notify stakeholders of completed tasks, and give them a mechanism to initiate the remaining downstream processing if they approve the results. As a result, you would avoid paying for compute and storage of assets that have bad data.
It is common to perform additional cleanup, texture manipulation, and refinement on generated assets after the reconstruction process. You can incorporate other tools and libraries into a complete pipeline using Amazon Step Functions, a low-code visual workflow service used to orchestrate AWS services.
You can incorporate Amazon Rekognition, a deep learning-powered image-recognition service, into a photogrammetry pipeline to automatically tag assets based on image features.
It’s not uncommon to have a photogrammetry pipeline that requires manual cleanup for high-resolution, or “hero” assets. Virtual workstations with NICE DCV, a high-performance remote display protocol that provides customers with a secure way to deliver remote desktops and application streaming from any cloud or data center to any device, can provide an environment for content editing on the fly for distributed users. This post covers the process to set up a Windows-based virtual workstation in your AWS account. For a managed approach, Amazon Nimble Studio has built a service empowering creative studios to produce visual effects, animation, and interactive content entirely in the cloud.
Conclusion
In this post we provided an overview of the photogrammetry reconstruction process. We demonstrated how to automate photogrammetry tasks with on-demand compute resources so that you only pay for the processing time used. We did so by highlighting 3Dflow’s AWS Marketplace container with pay-as-you-go pricing and a handful of AWS services, including Amazon S3, AWS Lambda, AWS Batch, and Amazon CloudWatch.