When building a new application, it is important to plan out your data model before diving into implementation. This approach ensures that you have a solid foundation on which you can build your application. In this module, you learn about the main entities in your application, plan the data model, and prepare your database.

A common way to plan your data model is to create an entity-relationship diagram (ERD). An ERD shows the different entities in your application and their properties. It also shows how the entities relate to each other.

In your simple application, you have two entities: Users and Items. A User represents a human user in your game and has properties like Username, Height, and Weight.

An Item represents an ownable item in the game. This could be a weapon, armor, clothing, potions, or various other types of objects. An Item has Type and Weight properties, as well as type-specific properties such as Attack points for a weapon or Defense points for armor.

You can represent your two entities in an ERD as shown below.

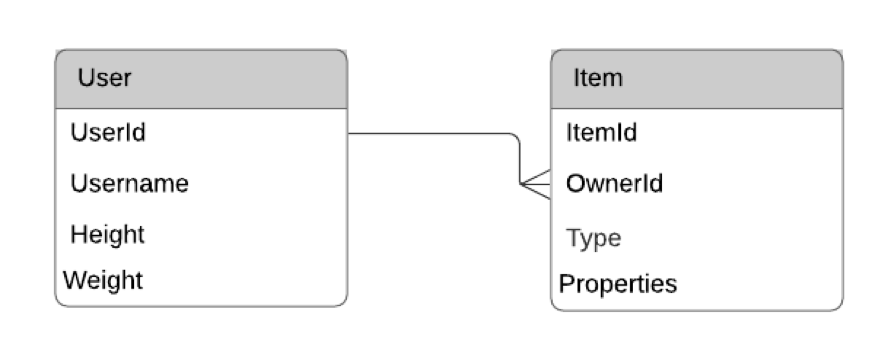
You can see you have both the User entity and the Item entity represented with the various properties. Additionally, the two entities are connected by a line. This line represents a relationship between the two entities. Each Item is owned by one and only one User, and a User can own many Items. Therefore, there is a one-to-many relationship between Users and Items.

In the following steps, you translate your ERD into database code. First, you create the tables and relationships to match your ERD. Then, you load some sample data into your database. Finally, you run some queries on your database to handle some of your use cases.

Time to Complete Module: 20 Minutes


  • Step 1. Create your database tables

    First, create your two database tables: users and items. In the scripts/ directory, there is a file named createTables.js. The contents of that file are as follows:

    const AWS = require('aws-sdk')
    
    const rdsdataservice = new AWS.RDSDataService();
    
    const params = {
      resourceArn: process.env.DATABASE_ARN,
      secretArn: process.env.SECRET_ARN,
      sql: `CREATE TABLE users (
    user_id SERIAL PRIMARY KEY,
    username VARCHAR(50) NOT NULL,
    height INTEGER NOT NULL,
    weight INTEGER NOT NULL
    );
    
    CREATE TABLE items (
    item_id SERIAL PRIMARY KEY,
    owner_id INTEGER REFERENCES users(user_id),
    type VARCHAR(20) NOT NULL,
    properties VARCHAR(256)
    );`
    }
    
    rdsdataservice.executeStatement(params, function(err, data) {
      if (err) {
        console.log(err, err.stack)
      } else {
        console.log(‘Tables created successfully!’)
      }
    })
    

    This script is similar to the testDatabase.js script you ran in the previous module. In this script, your SQL contains the Data Definition Language (DDL) statements to create your two tables. Each table has a primary key of an auto-incrementing integer. The items table also has an owner_id property that refers to the user_id in the users table.

    Note that you have a properties column on your items table that holds arbitrary data about the properties of the item. You don't query on this data directly, but it can include type-specific information about the item such as the number of attack points for weapons or defense points for armor.

    Execute the script and create your tables with the following command:

    node scripts/createTables.js

    You should see the following output in your terminal:

    Tables created successfully!
  • Step 2. Load sample data

    Now that you have created your tables, it is time to load them with some sample data.

    In the scripts/ directory, there are two files with JSON data: users.json and items.json. These contain randomized data to insert into your tables.

    Look at the file in scripts/insertUsers.js. It contains the following code:

    const AWS = require('aws-sdk')
    
    const rdsdataservice = new AWS.RDSDataService();
    const fs = require('fs');
    
    const raw = fs.readFileSync('users.json');
    const users = JSON.parse(raw)
    const values = users.map((user) => { return `('${user.username}', ${user.height}, ${user.weight})`}).join(',\n')
    const sql = `INSERT INTO users (username, height, weight) VALUES ${values}`
    
    const params = {
      resourceArn: process.env.DATABASE_ARN,
      secretArn: process.env.SECRET_ARN,
      sql
    }
    
    rdsdataservice.executeStatement(params, function(err, data) {
      if (err) {
        console.log(err, err.stack)
      } else {
        console.log('Users inserted successfully!')
      }
    })
    

    Like the createTables.js script, it uses the RDSDataService client to access the Data API. In this script, you are reading your fake users from the users.json file, then writing an INSERT statement in SQL to insert the users into your table.

    You can run the script with the following command: 

    node scripts/insertUsers.js

    You should see the following output in your terminal:

    Users inserted successfully!

    The insertItems.js script in the scripts/ directory is similar in that it loads your fake items into your table.

    You can run this script with the following command:

    node scripts/insertItems.js

    You should see the following output in your terminal:

    Items inserted successfully!

    You have now loaded 50 users and 106 items into your table. In the next step, you learn how to handle one of your common access patterns using the Data API.

  • Step 3. Test your data access

    With your data loaded, you can use the Data API to do something more complex than the Select 1 query you did in the last module.

    A common access pattern is to fetch a user. You can try that here.

    Look at the code in scripts/fetchUser.js. This code contains the internal method your application calls to fetch a user. The code looks as follows:

    const AWS = require('aws-sdk')
    
    const rdsdataservice = new AWS.RDSDataService();
    
    const fetchUser = async (userId) => {
      const params = {
        resourceArn: process.env.DATABASE_ARN,
        secretArn: process.env.SECRET_ARN,
        includeResultMetadata: true,
        sql: 'SELECT user_id, username, height, weight from users where user_id = :user_id',
        parameters: [
          {
            name: 'user_id',
            value: { longValue: userId }
          }
        ]
      }
      const results = await rdsdataservice.executeStatement(params).promise()
      return results
    }
    
    fetchUser(22).then((results) => console.log(JSON.stringify(results, null, 2)))

    Your fetchUser function takes a single argument -- the user ID of the user you want to fetch. It then makes a query using the Data API to fetch your user.

    At the bottom of the file is an example of using the fetchUser function by calling it with the userId of 22.

    Execute the script by running the following command in your terminal:

    node scripts/fetchUser.js

    You should see the following output in your terminal:

    {
      "columnMetadata": [
        {
          "arrayBaseColumnType": 0,
          "isAutoIncrement": true,
          "isCaseSensitive": false,
          "isCurrency": false,
          "isSigned": true,
          "label": "user_id",
          "name": "user_id",
          "nullable": 0,
          "precision": 10,
          "scale": 0,
          "schemaName": "",
          "tableName": "users",
          "type": 4,
          "typeName": "serial"
        },
        {
          "arrayBaseColumnType": 0,
          "isAutoIncrement": false,
          "isCaseSensitive": true,
          "isCurrency": false,
          "isSigned": false,
          "label": "username",
          "name": "username",
          "nullable": 0,
          "precision": 50,
          "scale": 0,
          "schemaName": "",
          "tableName": "users",
          "type": 12,
          "typeName": "varchar"
        },
        {
          "arrayBaseColumnType": 0,
          "isAutoIncrement": false,
          "isCaseSensitive": false,
          "isCurrency": false,
          "isSigned": true,
          "label": "height",
          "name": "height",
          "nullable": 0,
          "precision": 10,
          "scale": 0,
          "schemaName": "",
          "tableName": "users",
          "type": 4,
          "typeName": "int4"
        },
        {
          "arrayBaseColumnType": 0,
          "isAutoIncrement": false,
          "isCaseSensitive": false,
          "isCurrency": false,
          "isSigned": true,
          "label": "weight",
          "name": "weight",
          "nullable": 0,
          "precision": 10,
          "scale": 0,
          "schemaName": "",
          "tableName": "users",
          "type": 4,
          "typeName": "int4"
        }
      ],
      "numberOfRecordsUpdated": 0,
      "records": [
        [
          {
            "longValue": 22
          },
          {
            "stringValue": "tonya13"
          },
          {
            "longValue": 83
          },
          {
            "longValue": 208
          }
        ]
      ]
    }

    This output is pretty verbose. The Data API includes a lot of information about the result, including detailed column metadata for each column returned.

    This information can be hard to parse in each data access method. In the next step, you use a utility method to wrap the Data API.

  • Step 4. Parsing the Data API response

    In the previous step, you looked at an example method to fetch a single user and saw the verbose response from the Data API. In this step, you learn how to parse that response.

    In the scripts/ directory, look at the fetchUser2.js file. The contents of this file are as follows:

    const AWS = require('aws-sdk')
    
    const rdsdataservice = new AWS.RDSDataService();
    
    const parseRecords = (records, columnMetadata) => {
      // Format the results into key-value pairs with the column name and value
      const parsed = records.map((result) => {
        const obj = {}
        result.forEach((elem, idx) => {
          const columnName = columnMetadata[idx].name
          const [ columnValue, ]= Object.values(elem)
          obj[columnName] = columnValue
        })
        return obj
      })
      return parsed
    
    }
    
    const executeReadSql = async (sql, parameters) => {
      const params = {
        resourceArn: process.env.DATABASE_ARN,
        secretArn: process.env.SECRET_ARN,
        includeResultMetadata: true,
        sql
      }
      if (parameters) {
        params.parameters = parameters
      }
      const rawResults = await rdsdataservice.executeStatement(params).promise()
      let results = []
      if (rawResults.records) {
        results = parseRecords(rawResults.records, rawResults.columnMetadata)
      }
      return results
    }
    
    const fetchUser = async (userId) => {
      parameters = [
        {
          name: 'user_id',
          value: { longValue: userId }
        }
      ]
      sql = `SELECT user_id, username, height, weight from users where user_id = :user_id`
      const result = await executeReadSql(sql, parameters)
      return result[0]
    }
    
    fetchUser(22).then((result) => console.log(JSON.stringify(result, null, 2)))

    In this script, there are two helper functions: executeReadSql and parseRecords. The executeReadSql function eases some of the boilerplate around calling the Data API. It handles the extraneous parameters, like the Database ARN and Secret ARN, so that you can focus on just the SQL and parameters in your data access functions.

    The parseRecords function helps to change the returned rows into Javascript objects with key-value pairs. This result is easier to handle in your application.

    Try running the script to fetch a single user. Execute the following command in your terminal:

    node scripts/fetchUser2.js

    You should see the following output:

    {
      "user_id": 22,
      "username": "tonya13",
      "height": 83,
      "weight": 208
    }
    

    This output is much easier to read and to use in your application than your initial result.

    You use these utility functions in your data access functions in your application.


    In this module, you designed your data model using an entity-relationship diagram (ERD). Then, you used the Data API from your Amazon Aurora Serverless database to create your tables. Next, you loaded some sample data into your new tables. Finally, you ran through a few more examples of using the Data API. You saw how some utility functions can be helpful when using the Data API.

    In the next module, you configure authentication for your application using Amazon Cognito.