Artificial Intelligence
Route coding agent requests to the right model on Amazon Bedrock with NVIDIA NeMo Switchyard
Coding agents such as Claude Code and OpenAI Codex CLI work in tasks. A developer asks for a change, and the agent reads files, edits code, and runs tests until the work is done. One task can take a few model calls or dozens. What the developer pays for is the task, not one call.
The price per token alone doesn’t tell you what a whole task costs. The total depends on how many turns a model needs, how much history each turn replays, and how often a task has to be retried or never finishes. You pay for every attempt, including attempts on tasks that never finish. So when you route a coding agent’s requests between models, judge the routing by cost per solved task: the total cost of your runs divided by the number of runs whose tests pass.
NVIDIA NeMo Switchyard is an open source library that helps an AI agent choose which model handles each request. You define the models that it can use and the strategy that it follows. Its LiteLLM integration supports two strategies. Stage routing reads the recent tool activity and results in the request history, and then picks one of two candidate models. Random routing picks from the configured models, with optional weights, for traffic splits and A/B comparisons. Another option you can explore is LiteLLM, who also recently shipped a native built-in Switchyard stage router as an auto-router strategy.
In this post, you use the AWS Cloud Development Kit (AWS CDK) to deploy LiteLLM, an open source gateway for large language models (LLMs), with the Switchyard routing plugin in your AWS account. LiteLLM calls the models on Amazon Bedrock. You then use the sample’s benchmark runners to measure cost per solved task for a routed model group and for single-model baseline groups, so that you can evaluate routing against your own workloads.
Note: The sample installs
switchyard-server0.3.0 from crates.io and runs the published LiteLLM v1.102.0 image. NVIDIA documentsswitchyard-server0.3.0 as a demo and evaluation component, and its configuration can change between releases. This sample uses the experimental Switchyard LiteLLM integration and its configuration and APIs may change between releases. This is sample code, for non-production usage. Work with your security and legal teams to meet your organizational security, regulatory, and compliance requirements before deployment. Deploy the sample in a non-production account and test it before relying on it.
Solution overview
Figure 1 shows the architecture of the solution. LiteLLM and the Switchyard plugin run in one container image on Amazon Elastic Container Service (Amazon ECS) on AWS Fargate, in private subnets.
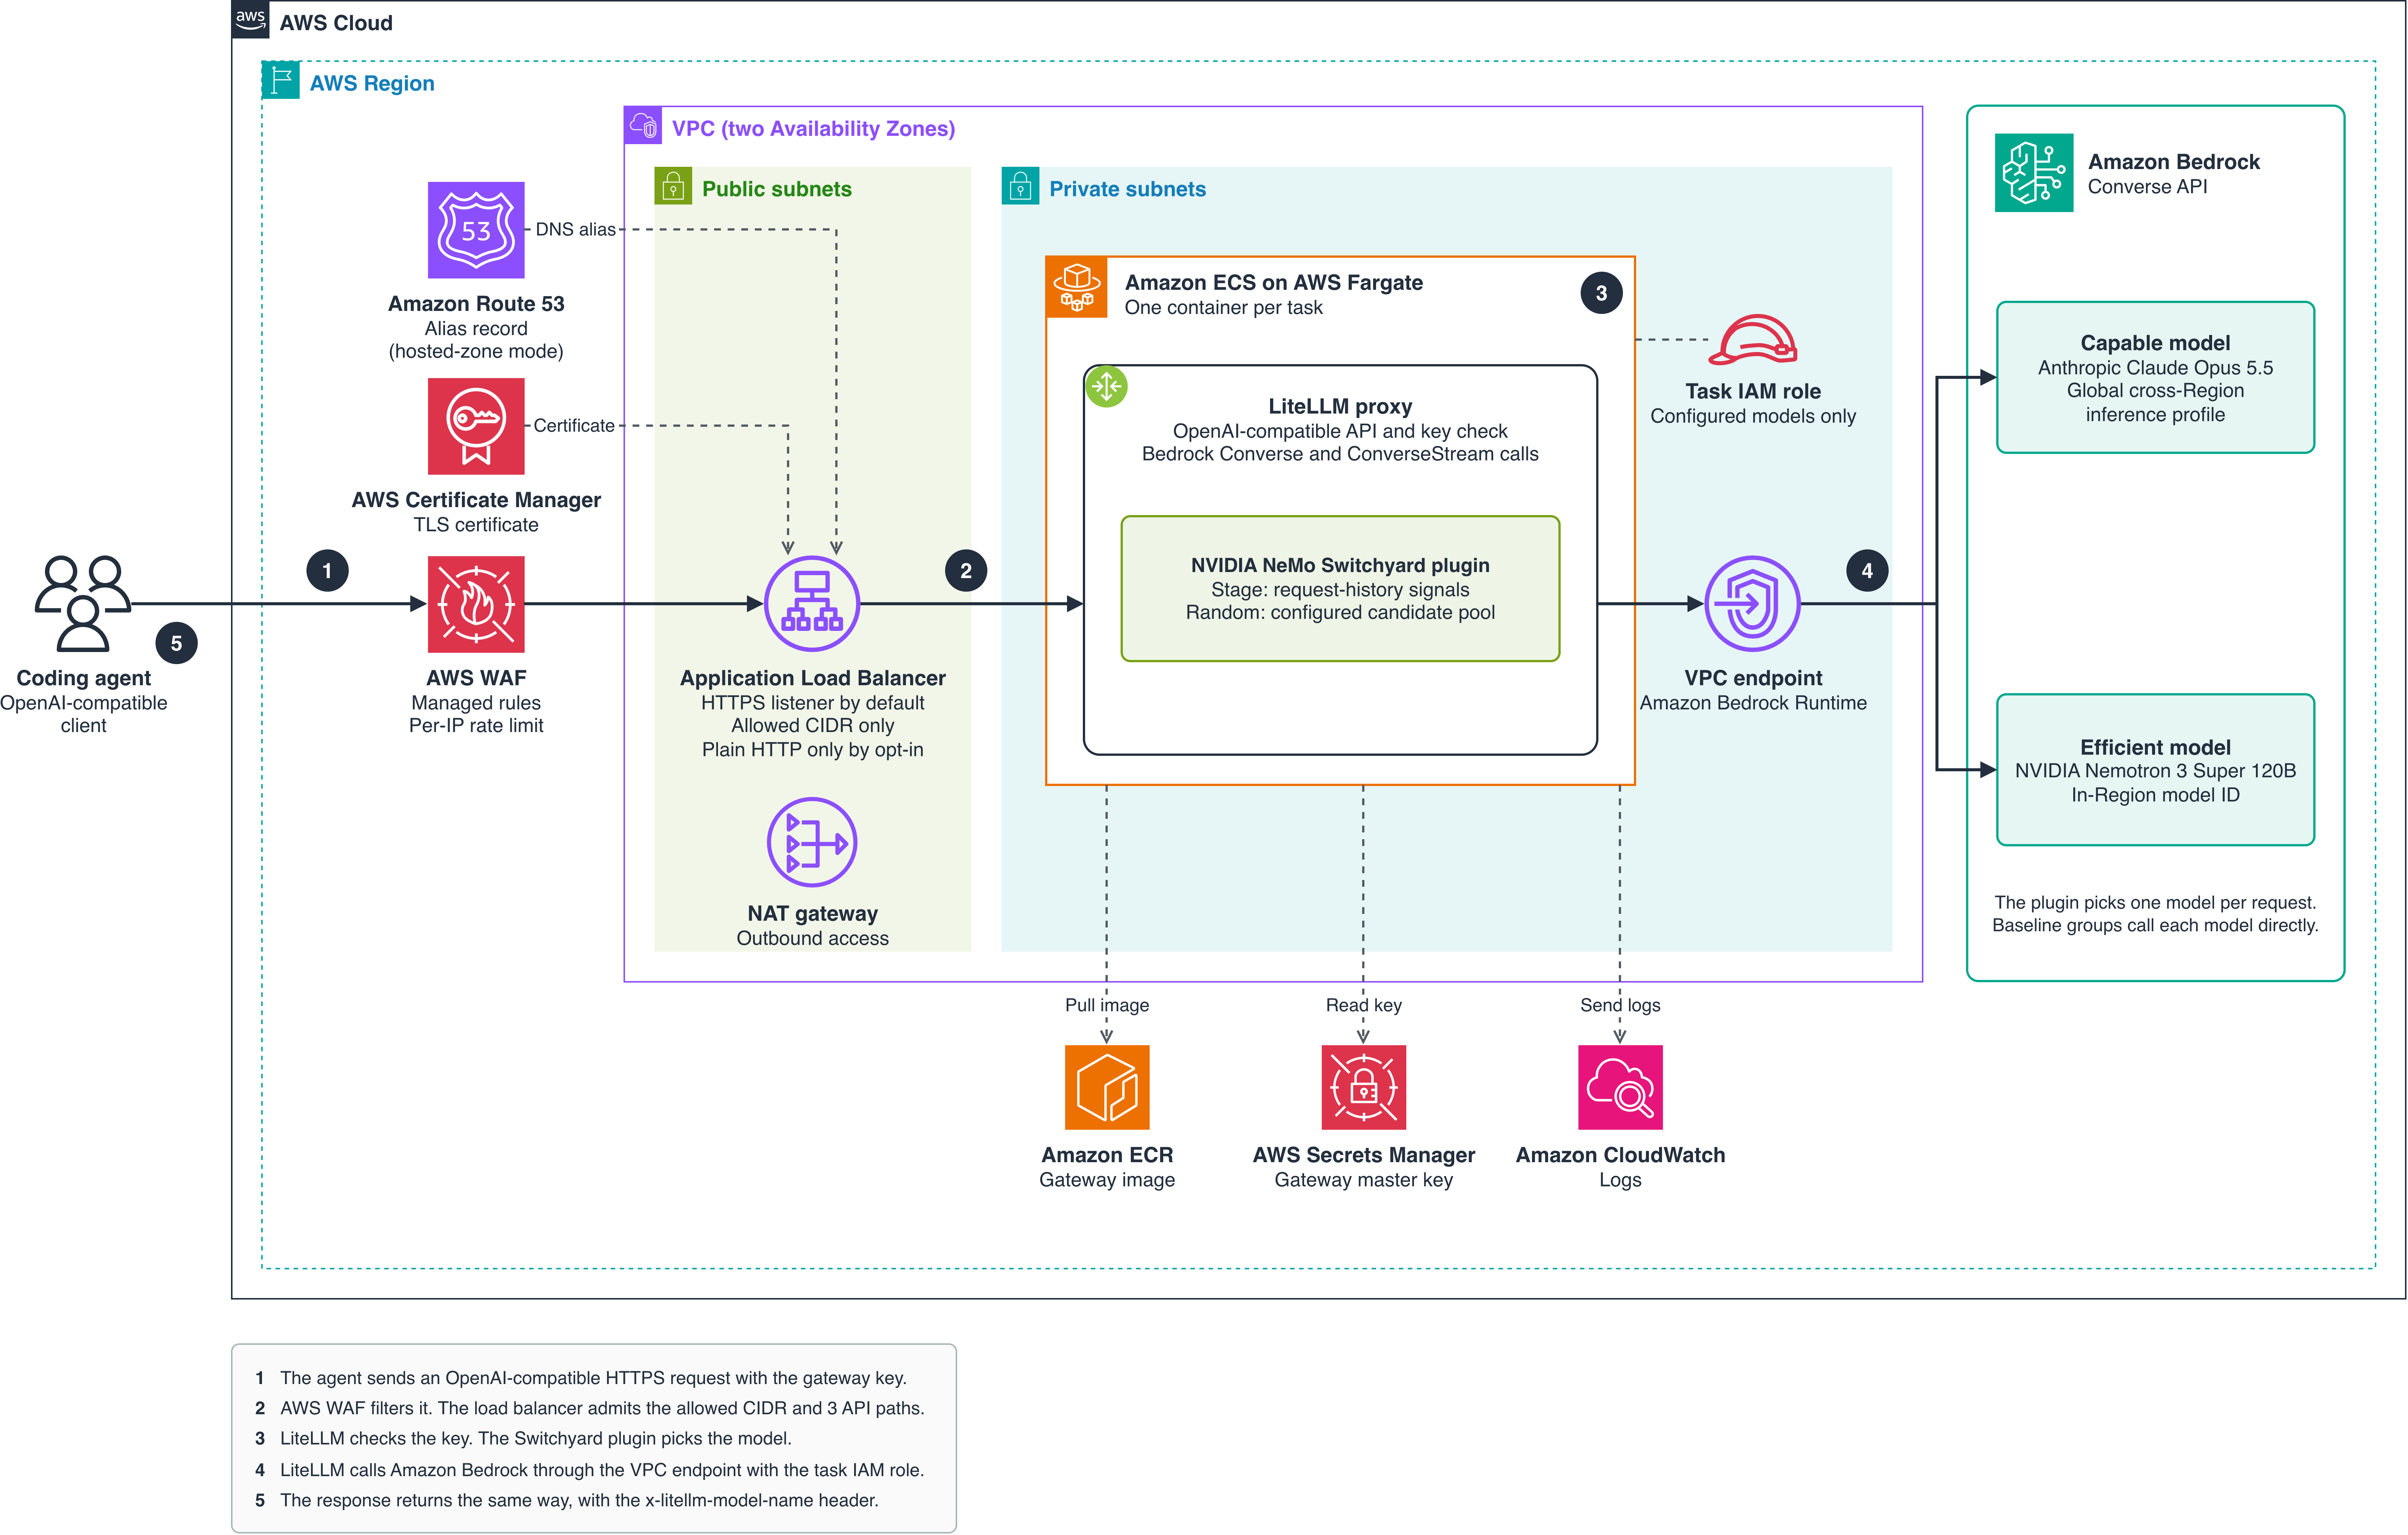
Figure 1: Solution architecture
A request flows through these steps. The numbers match the diagram.
- The coding agent sends an OpenAI-compatible request with the model field set to
switchyard, the LiteLLM model group that Switchyard routes, and the shared gateway key in theAuthorizationheader. The endpoint is your hostname over HTTPS, with an AWS Certificate Manager (ACM) certificate on the load balancer, and only the IPv4 CIDR range that you allow can reach it. With a hosted zone in Amazon Route 53, Route 53 resolves the hostname to the load balancer. - AWS WAF filters the request with IP reputation, known bad input, and per-IP rate-limit rules. The Application Load Balancer forwards only
/v1/chat/completions,/v1/models, and/health/livelinessto the ECS task in a private subnet, and answers every other path with 404. - The task runs one container: LiteLLM with the embedded Switchyard plugin. LiteLLM validates the gateway key and calls the plugin to pick a model. Stage chooses between a capable model and a lower-cost efficient model. It reads the tool activity and results in the request history, so the agent must send the full conversation history. Random chooses from a weighted pool. Neither strategy calls a judge model.
- LiteLLM calls the selected model through the Amazon Bedrock
ConverseorConverseStreamAPI, with the task’s AWS Identity and Access Management (IAM) role for credentials. The call goes through an Amazon Bedrock Runtime interface endpoint in the Amazon Virtual Private Cloud (Amazon VPC), so inference traffic stays on the AWS network. - The response or token stream returns through LiteLLM and the load balancer. The
x-litellm-model-nameresponse header names the model that answered. The response body’smodelfield staysswitchyard.
LiteLLM listens on port 4000 in the container and is the load balancer’s target, and the task’s security group admits only the load balancer. The path allowlist keeps the LiteLLM admin UI, API docs, and key management routes unreachable. Amazon Elastic Container Registry (Amazon ECR) holds the gateway image. AWS Secrets Manager generates the secret behind the gateway key, and the container adds the sk- prefix when it starts. The task definition passes the profile files in LITELLM_CONFIG_TEXT and SWITCHYARD_CONFIG_TEXT, and the startup script writes them to /tmp before it starts LiteLLM. Logs go to one Amazon CloudWatch log group, /<stack name>/litellm, which keeps them for 30 days, and Container Insights collects metrics. The VPC spans two Availability Zones, and one NAT gateway provides outbound access for image pulls and other AWS services.
The plugin supports Stage routing, which needs exactly two candidates, and Random routing, which needs at least two and splits traffic by weight for A/B tests. Classifier-backed strategies, such as Task and Composite routing, need intermediate model calls that this integration doesn’t support. See the Switchyard routing overview for the full catalog.
Prerequisites
To follow this walkthrough, you need the following:
- A non-production AWS account with Amazon Bedrock access to Claude Opus 5.5 and NVIDIA Nemotron 3 Super 120B. The pair has been tested in US East (N. Virginia). For other AWS Regions, check Regional availability by models and tool-calling support.
- The AWS Command Line Interface (AWS CLI) v2 with configured credentials and an explicit AWS Region, in an account and Region that are bootstrapped for the AWS CDK.
- Node.js 20 or later, npm, Docker with BuildKit, and Python 3.11 or later.
- A hostname that you own, with either a public Route 53 hosted zone for its domain or an ACM certificate for it in the deployment Region. A short plain-HTTP test needs neither.
Walkthrough
You define the model group, configure Stage, deploy and test the gateway, and measure cost. Start by cloning the sample repository:
Step 1: Define the model group in LiteLLM
A LiteLLM model group is one public model name with one or more deployments behind it. The sample keeps its configuration in deployment profiles under profiles/. Each profile pairs litellm.yaml, which defines the models and gateway settings, with switchyard.toml, which controls how Switchyard picks a model. The following excerpt of profiles/stage/litellm.yaml defines the routed switchyard group, two single-model baseline groups, and the plugin registration:
Both candidates share model_name: switchyard, so your client sends "model": "switchyard" and Switchyard picks a candidate. List the capable model first and the efficient model second, because Stage reads the roles from that order.
The claude-opus-5-5 and nemotron-super-3-120b groups are single-model baselines. Each one always answers with its own model, so you can compare the routed group’s cost and pass rate with each model alone in the same deployment. The Stage plugin alone rejects a group without two candidates, so the image registers a small wrapper, switchyard_gateway.configured.ROUTING_PLUGIN. It applies Switchyard to groups with two or more unique candidates and passes single-model groups through. The configuration registers the wrapper twice: to pick the model and to apply the request changes that Switchyard records.
Every model uses bedrock/converse/<id>, so every candidate goes through the Amazon Bedrock Converse API, and validation rejects any other route. The LiteLLM request_timeout of 600 seconds matches the load balancer’s 10-minute idle timeout.
The file holds no credentials. LiteLLM reads the gateway key from the environment, and the task role supplies the AWS credentials. Never add credentials such as aws_access_key_id, aws_secret_access_key, or api_key under litellm_params: the stack copies the whole litellm.yaml into the task definition and the AWS CloudFormation template in plain text.
The stack derives the task role’s Amazon Bedrock permissions from this file. For a global cross-Region inference profile, the foundation-model resource uses a * Region and a trailing *, so it also matches other model IDs with the same prefix. Review the derived policy before you deploy.
The global. prefix marks a global cross-Region inference profile, and Amazon Bedrock might process those requests in supported commercial AWS Regions worldwide. If processing location matters, use a geographic profile or an in-Region model ID instead. For Nemotron 3 Super, the profile uses the in-Region model ID nvidia.nemotron-super-3-120b, which you can switch for any model for testing.
Step 2: Configure Stage routing
Switchyard reads its algorithm and settings from switchyard.toml. The default profile, profiles/stage/switchyard.toml, configures Stage:
The settings work as follows:
picker = "efficient_first": Stage uses the efficient model when the signals in the history are inconclusive. A new request has no tool results yet, so it goes to Nemotron 3 Super.confidence_threshold: the confidence cutoff for the execution signals that Stage scores, from 0 through 1.recent_window = 3: Stage examines the three most recent tool results.only_on_wrong_signal_escalation = true: the Switchyard default. It controls when Stage adds an optional escalation note, and this profile sets no note.
Stage also accepts optional handoff notes and per-tier system prompts (escalation_note, deescalation_note, capable_system_prompt, and efficient_system_prompt). The sample profile sets none of them.
For an A/B test, the Random profile in profiles/random/ uses the same models with algorithm = "random" and weights = [0.5, 0.5], one weight per unique candidate in declaration order. To deploy it, add -c routingProfile=random to the cdk diff and cdk deploy commands in Step 3.
The stack validates both files together when it synthesizes, and the preflight script runs the same checks. To check a profile change on its own, without AWS calls, run npm run validate:profile -- stage. Invalid settings stop LiteLLM when it starts, and unsupported message shapes fail before inference.
Optional: Run the gateway locally
You can try the gateway on your machine before you deploy anything. Docker Compose builds the same image and reads the same profile files that the stack deploys to Amazon ECS. Run from the repository root:
The key that you export takes precedence over the placeholder in .env, so Compose and the smoke test use the same one. AWS credentials come only from your shell and never go in .env or the profile files. Compose publishes the gateway on 127.0.0.1 only. There’s no load balancer locally, so the smoke test skips its closed-path checks. The local gateway still calls Amazon Bedrock, and those calls are billed. When you’re finished, run docker compose down.
Step 3: Deploy the gateway
The gateway serves HTTPS on a hostname that you own. Set GATEWAY_DOMAIN to that hostname and HOSTED_ZONE to an existing Route 53 public hosted zone that contains it. The AWS CDK then creates a DNS-validated ACM certificate and the alias record. From the repository root, install the dependencies, run the read-only preflight check, and deploy:
If your domain’s DNS isn’t in Route 53, use an existing ACM certificate instead. Set CERTIFICATE_ARN to an ACM certificate for the hostname in the deployment Region, and replace -c hostedZone="$HOSTED_ZONE" with -c certificateArn="$CERTIFICATE_ARN" in both commands. The AWS CDK then creates no certificate and no DNS record. After the deployment, create a CNAME record (or a Route 53 alias) that points the hostname at the LoadBalancerDnsName output.
The required allowedCidr value limits which networks can reach the load balancer, and the command sets it to your current public IPv4 address. Keep it to your own /32: everyone who shares an allowed address, such as an office NAT or a VPN exit, can reach the endpoint. The stack refuses to synthesize without allowedCidr, with a world-open range such as 0.0.0.0/0, or with an IPv6 range.
Preflight checks the configuration, your tools, and your AWS access, including access to each model in the profile, without making inference requests. The AWS CDK builds the gateway image, publishes it to Amazon ECR, and deploys the stack. Deployment prints these outputs:
| Output | What it is |
| GatewayUrl | The base URL. The OpenAI-compatible API is under /v1. |
| MasterKeySecretArn | The Secrets Manager secret behind the gateway key. The full key is sk- followed by the secret value. |
| MasterKeyCommand | A command that prints the gateway key. |
| SmokeTestCommand | The smoke test command, with the stack name, Region, and profile filled in. |
| RoutingProfile | The active routing profile, stage by default. |
| ClusterName, ServiceName | The ECS cluster and service. The key rotation steps use them. |
| LoadBalancerDnsName | Only with certificateArn: the name to point your hostname at. |
Always give clients the https:// URL. Port 80 stays open only to redirect to HTTPS, and a client configured with http:// has already sent the key and its first request in clear text when the redirect arrives.
The load balancer idle timeout is 10 minutes, for long agent responses. The web ACL uses the Amazon IP reputation list and the known bad inputs rule group. It also limits each IP address to 2,000 requests per 5 minutes. It leaves out the generic body rules for cross-site scripting, SQL injection, and body size, which the source code in agent requests triggers. The allowedCidr range and the gateway key still apply.
Quick test over plain HTTP. Without HTTPS settings, synth stops with an error. For a short test without a domain, you can opt in to plain HTTP on the load balancer’s DNS name:
With allowPlainHttp=true, the AWS CDK prints a warning every time it synthesizes the stack. The gateway key in the Authorization header, your prompts, the tool results and source code that your agent sends, and the model responses cross the network unencrypted between your client and the load balancer. Use the opt-in only for a short test with non-sensitive code from your own /32. Then rotate the key, and run cdk destroy when you finish. To move the same stack to HTTPS later, deploy it again with the HTTPS settings and without allowPlainHttp.
Step 4: Test the gateway
In the same terminal that you used for the deployment, read the AWS CloudFormation stack outputs and build the gateway key:
Send a request to the switchyard model group:
Look for HTTP 200 and a response. The x-litellm-model-name response header shows the selected model as the full LiteLLM model string. A new request has no tool results to score, so Stage picks the efficient model, bedrock/converse/nvidia.nemotron-super-3-120b.
To check health, authentication, and routing, run the smoke test:
The smoke test checks the health endpoint, that closed paths such as /ui get the load balancer’s own 404, that a request without a key gets 401, and that /v1/models lists every model group. For Stage, it checks that an ordinary request selects the efficient model and that a recorded history of repeated failures escalates to the capable model. Then it sends one request to each baseline group. The request and the smoke test make billable Amazon Bedrock calls.
To try your own agent, use $GATEWAY_URL/v1 as its OpenAI-compatible base URL, the gateway key as its API key, and switchyard as the model. Stage needs the full supported request history with every request. The upstream adapter supports text messages, function tool calls, and text tool results, and unsupported message shapes fail before inference. The load balancer forwards the Chat Completions path but not the OpenAI Responses or Anthropic Messages paths. Clients that use those APIs get a 404 until you add the path, test it against the local container, and redeploy.
Step 5: Measure cost per solved task
The sample’s coding runner, bench/run.py, lets a small coding agent list and read files, replace source files, and run the supplied unit tests through the gateway. A task is solved when its tests pass at the end, within six model turns by default. List the tasks and start with slugify on the routed group:
The terminal shows the task, the selected models, the tool actions, the test results, and the final code diff. Each run saves its starting files, final workspace, transcript, patch, and result under bench/results/.
| Task | What the agent must do |
| slugify | Fix a short function that builds URL slugs. |
| roman | Write a function that converts integers to Roman numerals. |
| calc | Write an expression parser without eval, with precedence, a power operator, functions, and error handling. |
| lru_ttl | Write a thread-safe least recently used (LRU) cache with per-entry expiry and exact counters. |
To give the arithmetic parser task room to run tests and attempt repairs, raise the turn limit:
After the runs, the runner prints one row per model group, with RUNS, SOLVED, ERRORS, COST/TASK, and COST/SOLVED columns. Cost per solved task is the estimated cost of all runs on a group divided by the runs whose tests passed. The runner prices each turn from the model in its x-litellm-model-name header and the token usage in the response, using the PRICES table in bench/run.py. A turn with cached input, a model without a PRICES entry, or a response without the header or token counts stays unpriced instead of counting as zero. Add a PRICES entry when you add a model to a profile, and check Amazon Bedrock pricing for current prices. A few runs on two tasks demonstrate the workflow. They aren’t enough to draw conclusions about cost or quality.
A group shows n/a with the reason when any of its runs is unpriced, and COST/SOLVED shows - when no run was solved. To see where the cost went, check the turns: the terminal prints the model that served each turn, and the transcript under bench/results/ records it.
To compare whole conversations, bench/multiturn.py runs an agentic loop over each coding task, with the project files in the first prompt and the test output fed back after every edit. It also runs four scripted chats of seven turns that alternate simple turns with design, debugging, and code-writing turns, and it replays the full history on every turn. Turns with a cheap check (expected text, a word limit, bullets, or assertions against the returned function) record whether the check passed. The design responses aren’t graded.
The --max-conv-cost option (default 1 USD) caps each conversation, and --max-spend stops the runner from starting new conversations. The summary shows, for each model group, the coding conversations that passed, the chat checks that passed, and the estimated cost per coding conversation, per chat, and in total.
The runners execute model-written Python on your machine. The subprocess that runs the tests has no credentials in its environment, but it isn’t an operating system sandbox: the code can read any file that your user can read and can reach the network. Use a disposable development environment with no long-lived AWS credentials on disk, and protect the files under bench/results/, which contain prompts, model responses, tool output, and generated code.
Interpret your results
The sample’s tasks are small and illustrative. To decide whether routing fits your workload, replace or extend them with tasks that represent your own code base, and keep the following in mind as you read the runner’s output.
- Start with SOLVED, then read COST/SOLVED – A group that solves fewer tasks can show a lower COST/TASK and still cost more per solved task, because failed runs add cost without adding solved tasks. Compare the routed group’s COST/SOLVED with each baseline group’s only after you’ve compared how many tasks each group solved.
- Look at the hard tasks separately – Aggregate numbers can hide a single task that drives the result. Break results down by task. Stage decides from failures in the history, so it can’t route a hard task to the capable candidate in advance. An escalated turn also replays the whole failed attempt, which can make a recovery more expensive than a run that started on the capable candidate. If a few hard tasks dominate your cost, consider routing them to a dedicated model group, or choose an efficient candidate that solves more of them.
- Run enough repeats – Model outputs vary from run to run. With only a handful of runs per group, a difference of one or two solved tasks can be noise. Increase
--repeatsuntil the differences you care about are stable, and apply a statistical test, such as Fisher’s exact test for solve rates, before you act on a gap. - Account for the turn limit – A low
--max-turnsvalue penalizes a model that explores before it edits, because it leaves fewer turns to repair a failing edit. Set the limit to match how your agents run in practice. - Account for output caps – If a group’s replies hit
max_tokens, the measured cost is a lower bound, and the shortened replies also shorten the history that later turns replay. Check the transcripts for truncated replies before you compare chat costs. - Treat costs as estimates – The runners estimate cost from token usage and the PRICES table, not from your bill. Prompt caching, batch inference, and pricing changes all affect your actual cost. Confirm with Amazon Bedrock pricing and your AWS Cost and Usage Reports.
- Test the settings you plan to run – Results apply only to the models, profile settings, and tasks that you measured. If you change a candidate, the Stage settings, or switch to the Random profile, measure again.
Use these readings to choose among three options for each workload: the routed group, a single-model group, or a profile with different candidates or settings. Rerun the same measurement when you change models, prompts, or agent behavior.
Clean up
To avoid ongoing charges, delete the stack. The AWS CDK needs an allowedCidr value to synthesize the app, but the value doesn’t matter here:
CloudFormation deletes the master key secret with no recovery window, so copy the key first if you need it. The gateway image stays in the AWS CDK bootstrap repository in Amazon ECR.
Conclusion
In this post, we showed how to deploy LiteLLM with the NVIDIA NeMo Switchyard routing plugin on AWS, configure Stage and Random routing across models on Amazon Bedrock, and measure cost per solved task for a routed model group alongside single-model baselines. Because the total cost of an agentic task depends on turns, history, and retries, price per token alone isn’t a reliable guide. Measuring cost per solved task on your own tasks gives you the evidence to choose a configuration.
To get started, deploy the sample repository in a development account, and measure Stage routing and single-model baselines on tasks from your own workload. To learn more, see the Switchyard LiteLLM plugin guide and the Amazon Bedrock User Guide. Share your questions in the comments.