AWS Public Sector Blog
Improving constituent experience using AWS-powered generative AI chatbots

Meet Maria. A busy single mother of two, she is preparing to go back to school while working. With limited time, she has decided to explore the public assistance benefits available to support her family. Maria spends hours reading through information on websites and reviewing publicly available documents to understand the benefits she may be eligible for and the application process.
Overwhelmed by the volume of information, Maria calls the eligibility office and is directed to complete an online benefits application. However, she feels uncertain about the information she needs to provide because the applications tend to be lengthy and complicated. The application requires details about her household composition, income sources, expenses, assets, health insurance, and more. Additionally, she must provide various proof documents, such as pay stubs, bills, and identification, which may not be readily available or easily accessible.
Concerned that any unclear or incomplete information may result in repeated requests for clarification or additional documents from an eligibility caseworker, Maria does her best to complete the application. She submits the benefits application, hoping to receive the assistance she needs soon.
Maria receives a notice in the mail that she needs to provide additional proof documents for her earned income. She conducts a SNAP interview and clarifies earned income information on her application. After spending time to get the additional proof documents, she uploads everything to the customer portal. She calls the eligibility office to confirm her proof documents have been received and then anxiously waits to see if she qualifies for benefits. Finally, Maria receives her eligibility determination notice and is happy to learn she is getting the help she needs.
If you are interested in transforming Maria’s experience, read on.
Generative AI assistant
Generative artificial intelligence (AI) can transform Maria’s experience. With Amazon Lex, you can design and build sophisticated voice and text conversational interfaces, deploy omnichannel experiences with pre-built integrations to contact center solutions, and pay only for speech and text requests with no upfront costs or minimum fees. Amazon Lex integrates seamlessly with Amazon Bedrock, a fully managed service that offers a choice of high-performing foundation models (FMs) from leading AI companies through a single API, along with a broad set of capabilities you need to build generative AI applications with security, privacy, and responsible AI. With this integration, Amazon Lex through Amazon Bedrock can access state user manuals and other documents as source data to answer questions from constituents in real time rather than waiting for a human agent to respond.
Now, let’s look at the future flow Maria could have with these advancements in technology.
After doing her internet search, Maria finds a state website with a generative AI chat assistant. When she becomes confused by some of the questions and terminology on the application, Maria asks the generative AI assistant questions. The assistant is able to provide answers about available services, how to apply for benefits, and program requirements, and Maria immediately receives the answers she needs in simple, plain language. The generative AI assistant also provides Maria with information on acceptable proof documentation and encourages her to return if she has more questions. Maria completes and submits her application. She conducts a SNAP interview with no follow-ups. In much less time than in the first scenario we described, Maria receives her eligibility determination notice and is happy to learn she is getting the help she needs.
Solution overview
This post provides a solution for building a generative AI chat-based assistant like the one described in Maria’s story using AWS services. Figure 1 shows the solution workflow.
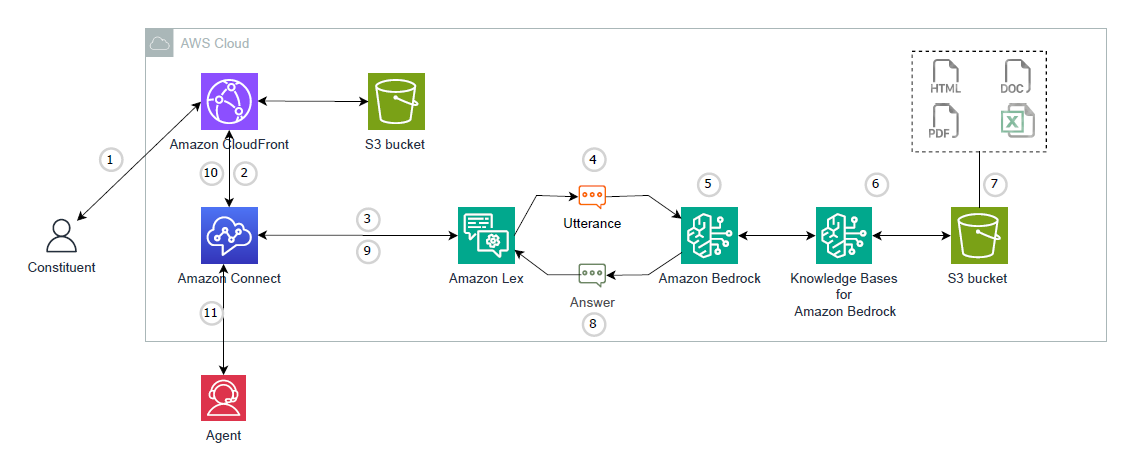
Figure 1. Architectural diagram of the solution described in this post. The major components are Amazon CloudFront, an Amazon Simple Storage Service (Amazon S3) bucket, Amazon Connect, Amazon Lex, and Amazon Bedrock.
The workflow goes as follows:
- The constituent starts a chat using the assistant integrated into the website, which is hosted on Amazon Simple Storage Service (Amazon S3) and cached on Amazon CloudFront.
- The chat is received by the Amazon Connect
- Amazon Connect passes the chat to Amazon Lex, a natural language chatbot, to understand the intent of the constituent.
- Amazon Lex processes this chat as an utterance.
- Amazon Lex uses the built-in Intent QnA-generative AI to query the knowledge base using Amazon Bedrock.
- The Amazon Bedrock knowledge base uses a connected repository in an S3 bucket to vectorize the data and store it in a vector database.
- Organizations can add content to the S3 bucket to be automatically synchronized by Amazon Bedrock.
- The generative AI large language model (LLM) returns the answer to Amazon Lex
- Upon fulfillment of the intent, the Amazon Lex bot passes the response text to Amazon Connect.
- The response is passed to the chat assistant.
- If the constituent needs to talk to an agent, they can request one, and the call will be routed to the agent queue in the Amazon Connect instance.
To deploy the solution, you can use the AWS CloudFormation console or download the CloudFormation template to deploy it on your own. You are responsible for the cost of the AWS services used while running this solution.
The solution follows these high-level steps:
- Deploy a CloudFormation stack to create an Amazon OpenSearch Serverless collection and Amazon S3 bucket to upload the documents.
- Create a vector index in OpenSearch Serverless.
- Deploy a CloudFormation stack to create a knowledge base, datasource, and AWS Lambda function to sync the documents stored in S3 to the knowledge base.
- Upload the documents to the S3 bucket.
- Create the Amazon Lex bot.
- Deploy a CloudFormation stack to create Amazon Connect resources.
- Deploy the static website.
- Perform testing.
Prerequisites
To perform the solution, you must have the following prerequisites in place:
- Have an AWS account.
- Understand Amazon Bedrock, AWS Lambda, Amazon Connect, Amazon Lex, and AWS Identity and Access Management (IAM).
- Have permissions to create and modify Lambda functions.
- You must have IAM permissions to launch CloudFormation templates that create IAM roles and to create all the AWS resources in the solution.
Solution walkthrough
To perform the solution, use the steps in the following eight sections.
Section 1: Deploy a CloudFormation stack to create an OpenSearch Serverless collection and Amazon S3 bucket
This stack will provision an OpenSearch Serverless collection and an S3 bucket. Follow these steps:
- Navigate to the GitHub repo for the template. Choose “Raw.” Open the context (right-click) menu and then choose Save as. Save the file on your local machine as opensearchserverlesscollection.yaml
- Navigate to AWS CloudFormation console and create a CloudFormation stack using the saved file. You should see a Create stack page with prepopulated fields that specify the CloudFormation template. At the bottom of the page, choose Next.
- On the Specify stack details page, enter values for the following fields
- For AOSSCollectionName, the default is rag-kb.
- For IAMUserArn, use the Amazon Resource Name (ARN) of the user or role running this stack
- After entering values, choose Next.
- On the Configure stack options page, you can optionally add tags and other stack options. When finished, choose the Next
- On the Review page, scroll down to the Capabilities Select the check box for I acknowledge that AWS CloudFormation might create IAM resources.
These capabilities allow CloudFormation to create an IAM role that allows access to the stack’s resources, and allows it to name the resources dynamically.
7. Choose Submit.
Wait for the CloudFormation stack to launch. The stack can take several minutes to finish. When it’s launched, the Status changes to CREATE_COMPLETE. Refer to the outputs section and take note of the value for the key S3BucketName.
Section 2: Create vector index in OpenSearch Serverless
This step creates a vector index in the OpenSearch Service Serverless collection. Follow these steps:
- On the OpenSearch Service console, in the navigation pane, choose Collections. The rag-kb collection created by the CloudFormation stack will be listed there, as shown in Figure 2.
- Choose the rag-kb link to create a vector index for storing the embeddings from the documents in Amazon S3.
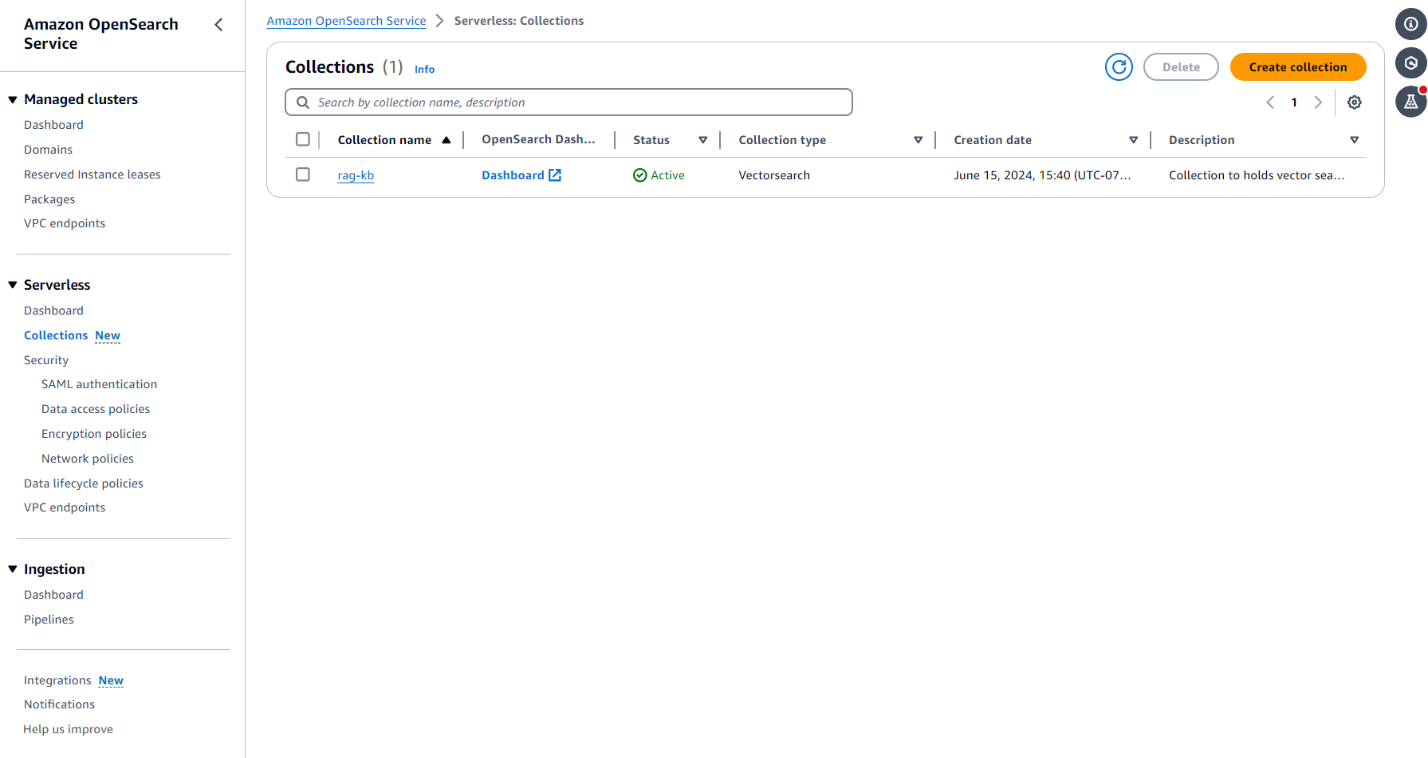
Figure 2. Screenshot showing the Collections section of the OpenSearch Service console, with rag-kb listed.
3. At the top of the screen, choose Create vector index, as shown in the following screenshot.
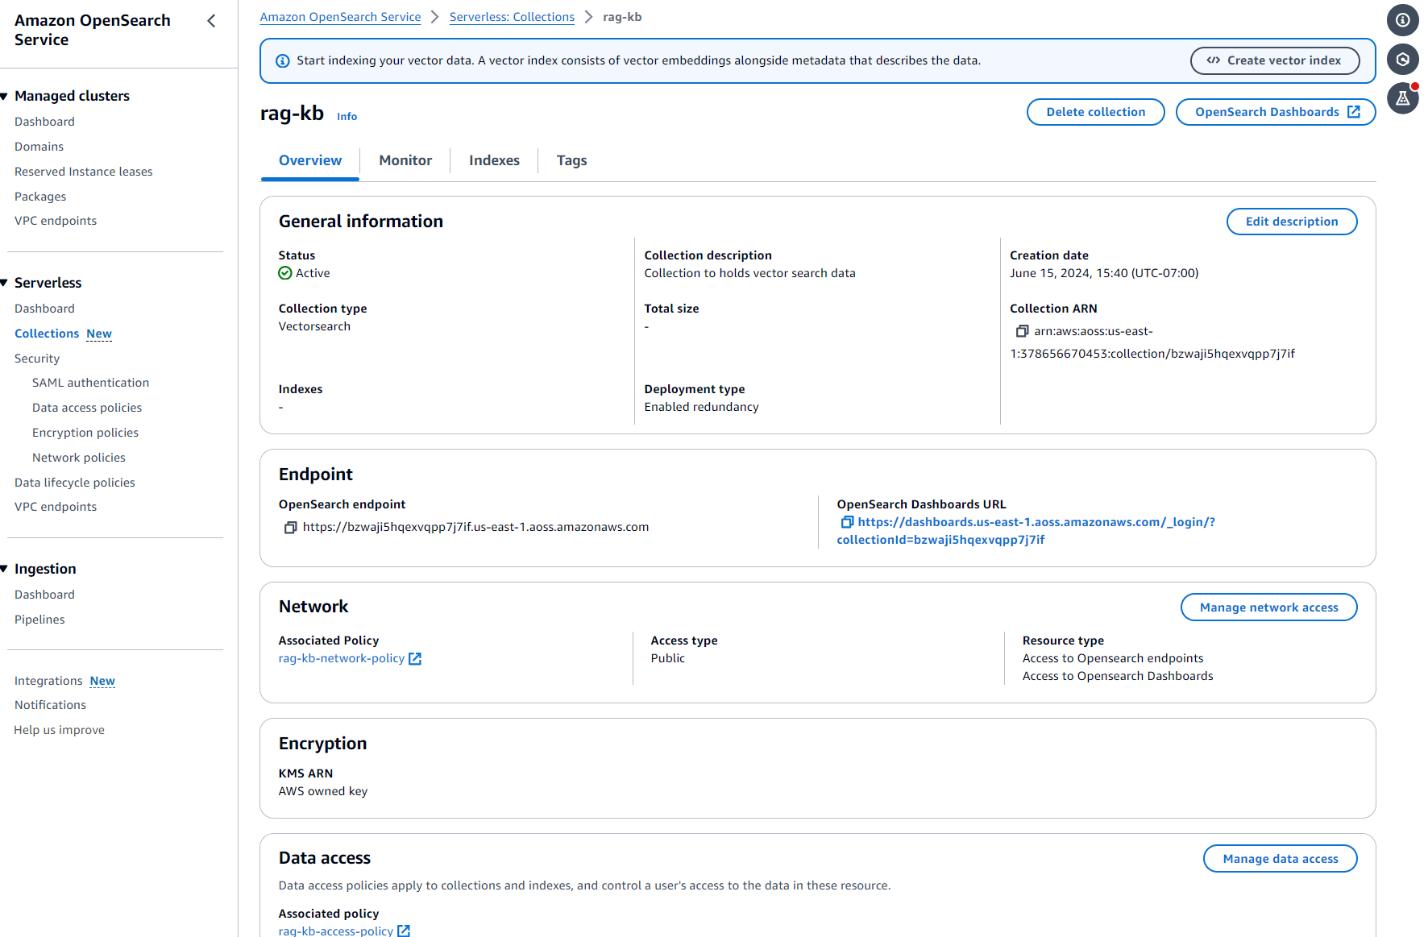
Figure 3. Screenshot showing the Create vendor index button atop the rag-kb collection.
4. On the Create vector index pane, under Vector index details, in the Vector index name field, enter rag-readthedocs-io. Choose Add vector field, as shown in the following screenshot.
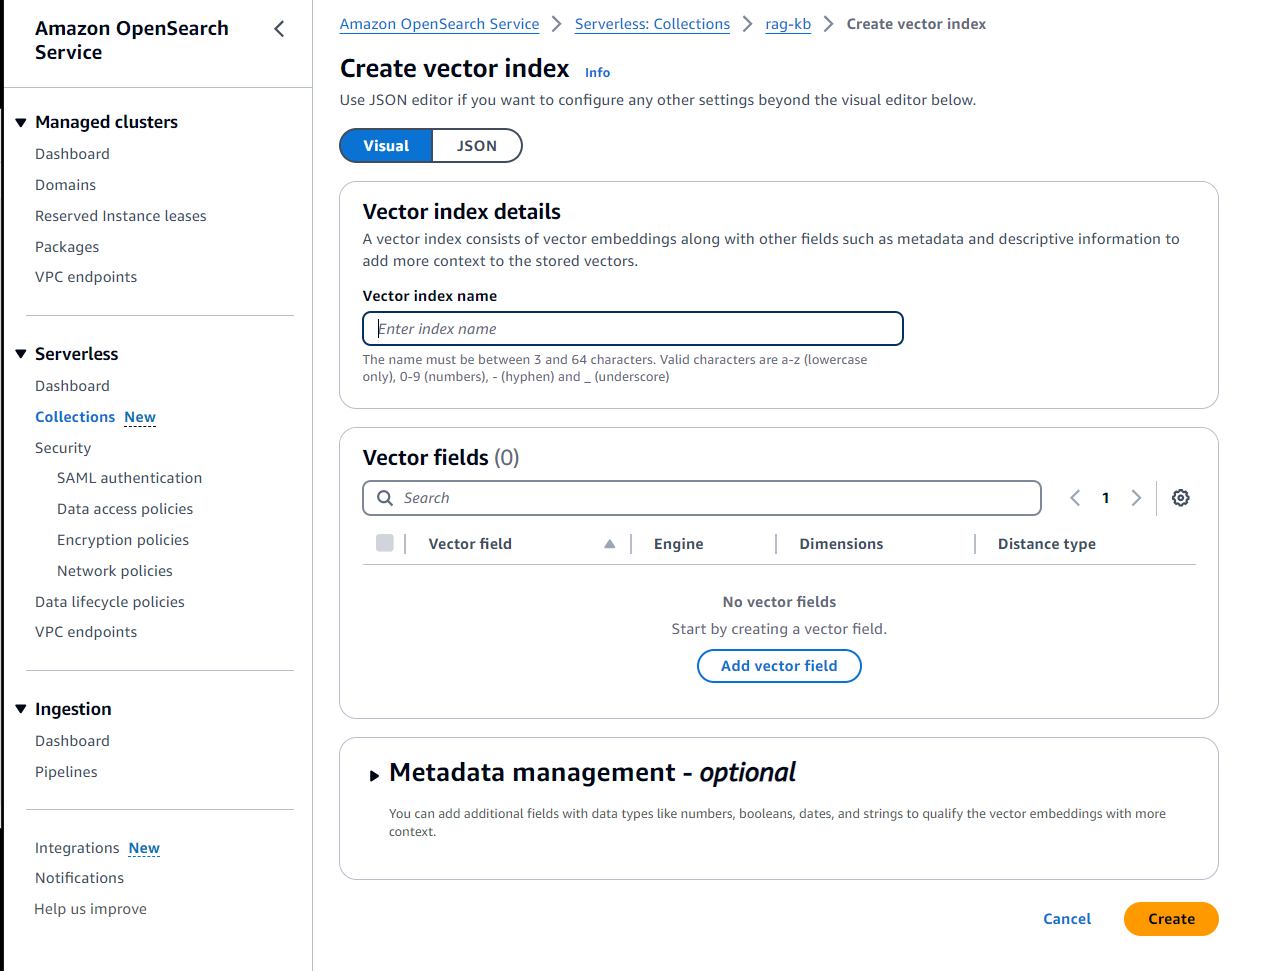
Figure 4. Screenshot of the Create vector index page in the OpenSearch Service console with the Add vector field button.
5. Shown in the following screenshot, in the Add vector field pop-up, enter the Vector field name as vector and the Dimensions as 1536. For Engine, choose FAISS and for the Distance metric, choose Euclidean. Choose Confirm and then choose Create.
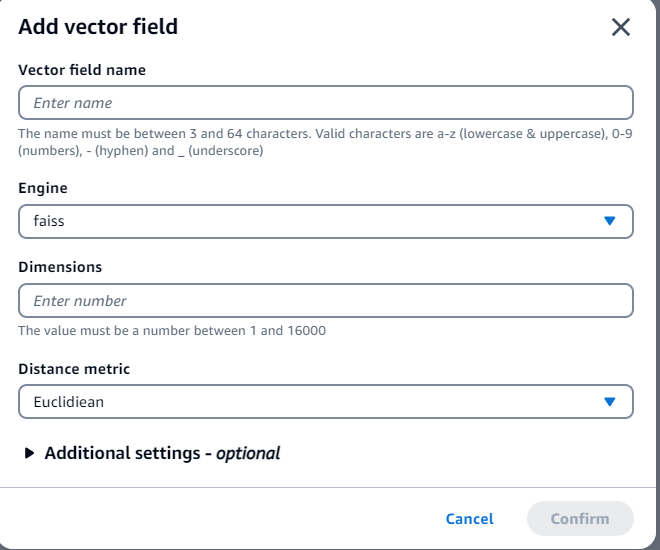
Figure 5. Screenshot of the Add vector field pop-up.
When the vector index is successfully created, a green banner with a success message appears at the top of the pane, as shown in the following screenshot.
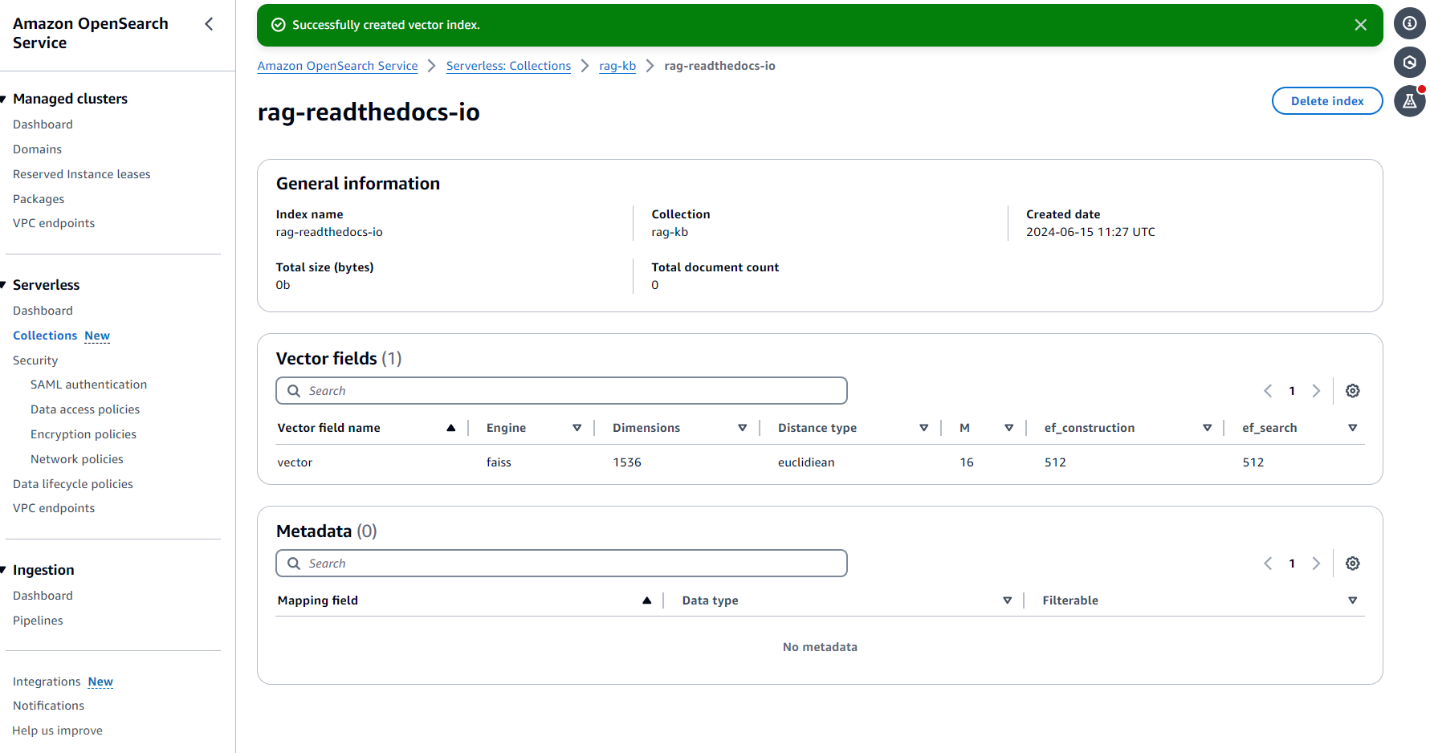
Figure 6. Screenshot showing a green banner atop the pane to signify successful creation of the vector index.
Section 3: Deploy a CloudFormation stack to create an Amazon Bedrock knowledge base, datasource, and Lambda function
This stack will provision Amazon Bedrock knowledge bases and the Lambda function to embed the documents once they are uploaded to the S3 bucket. Follow these steps:
- Navigate to the GitHub repo for the template. Choose “Raw.” Open the context (right-click) menu and then choose Save as. Save the file on your local machine as amazonbedrockknowledgebase.yaml
- Navigate to AWS CloudFormation console and create a CloudFormation stack using the saved file. You should see a Create stack page with prepopulated fields that specify the CloudFormation template. At the bottom of the page, choose Next.
- On the Specify stack details page, leave the defaults for the following fields:
- For AOSSIndexName, leave it as
rag-readthedocs-io. - For KnowledgeBaseDescription, answer based only on information contained in the knowledge base.
- For AOSSIndexName, leave it as
-
- For KnowledgeBaseName, leave it as rag-kb.
- After entering the values, choose Next.
- On the Configure stack options page, you can optionally add tags and other stack options. When finished, choose the Next
- On the Review page, scroll down to Capabilities Select the check box for I acknowledge that AWS CloudFormation might create IAM resources.
These capabilities allow CloudFormation to create an IAM role that allows access to the stack’s resources and allow it to name the resources dynamically.
7. Choose Submit.
Wait for the CloudFormation stack to launch. The stack can take several minutes to finish. When it’s launched, the Status changes to CREATE_COMPLETE.
Section 4: Upload the documents to the Amazon S3 bucket
Upload the documents to the S3 bucket whose name you noted in the output of opensearch.yml cloudformation execution. For guidance, refer to Uploading objects. Once the document is uploaded, the Lambda function will be triggered and start the knowledge base sync job to embed the documents in the OpenSearch Serverless collection
Section 5: Create the Amazon Lex bot
Use Amazon Lex to create a chat-based assistant. Follow these steps:
1. On the Amazon Lex console, choose Create bot, as shown in the following screenshot.

Figure 7. Screenshot of the Amazon Lex console and the Create bot choices.
2. On the Configure bot settings pane, enter the Bot name as medicaidchatbot, as shown in the following screenshot.
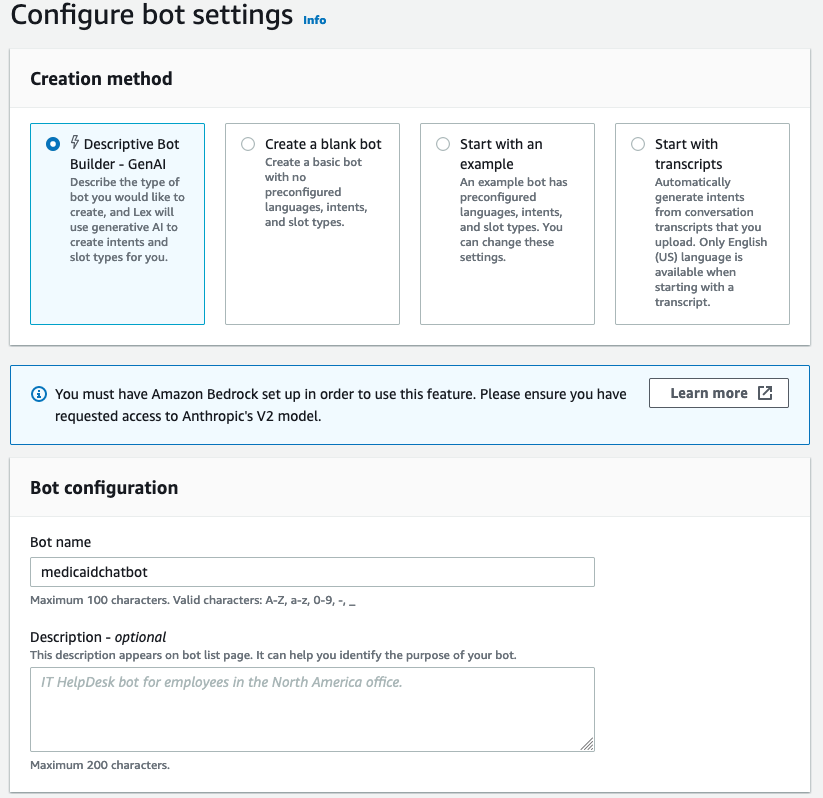
Figure 8. Screenshot of the Configure bot settings pane with “medicaidchatbot” entered in the Bot name field.
3. On the Add Languages page, select the best options for your use case for Select language, Voice interaction, and Intent classification confidence score threshold, as shown in the following screenshot. Choose Done.
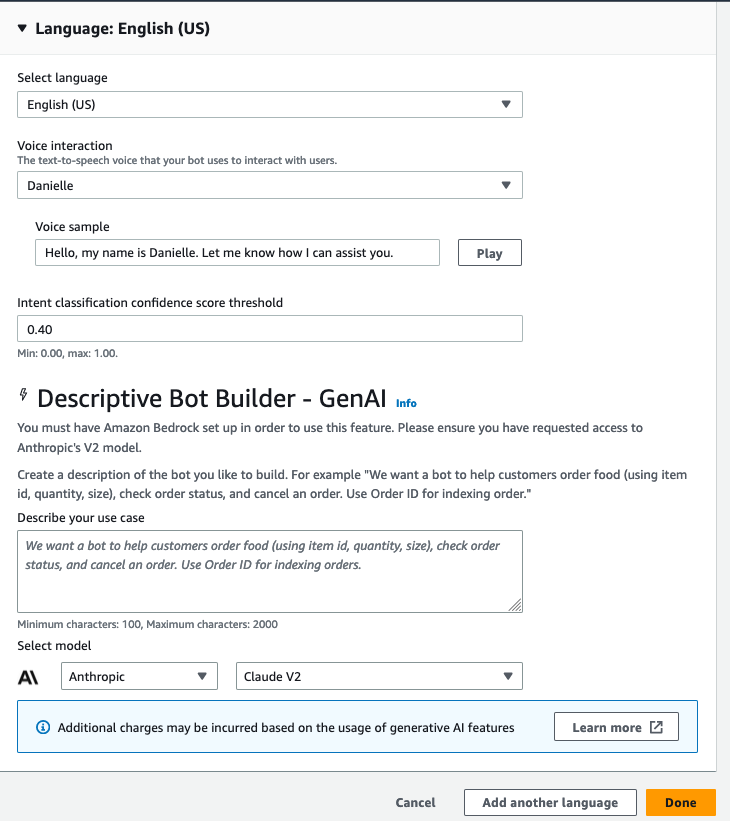
Figure 9. Screenshot of the Add languages pane and its fields.
4. On Import Language screen, choose All languages and import the .zip file for the Amazon Lex configuration, as shown in the following screenshot.
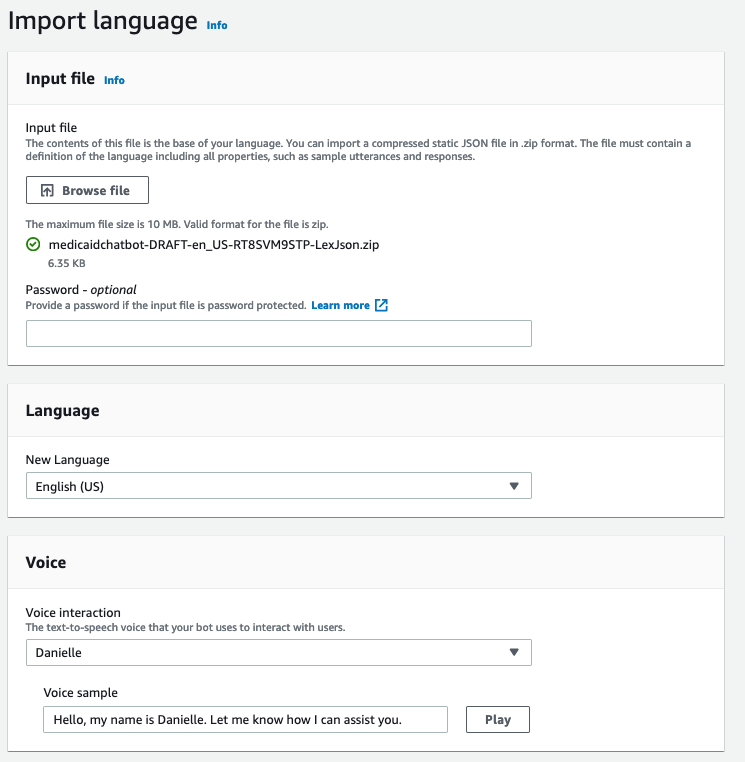
Figure 10. Screenshot of the Import language screen.
5. On the navigation pane, choose Intents. On the right of the Intents pane, choose Add intent and then choose Use built-in intent, as shown in the following screenshot.
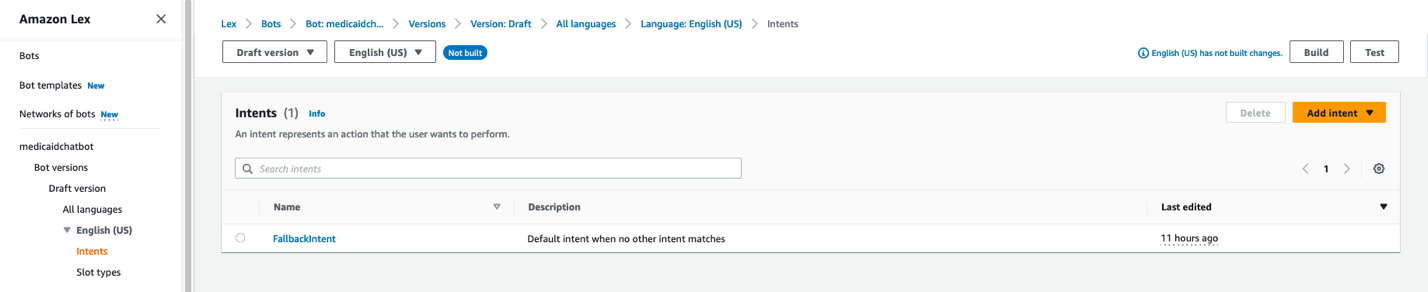
Figure 11. Screenshot of the Intents pane with the Add intent button in the top right.
6. In the Use built-in intent pop-up shown in the following screenshot, choose AMAZON.QnAIntent – GenAI feature. Enter a name in Intent name. Choose Add.
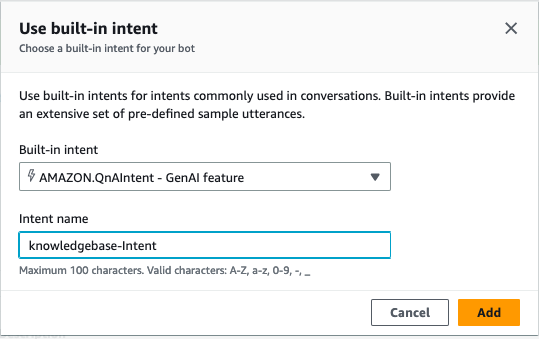
Figure 12. Screenshot of the Use built-in intent pop-up.
7. On the QnA Configuration pane, choose the knowledge base you created. Choose Save intent.

Figure 13. Screenshot of the QnA configuration pane, which shows the available knowledge stores.
8. Disable “Closing response” by clicking on the toggle button next to “Active.”
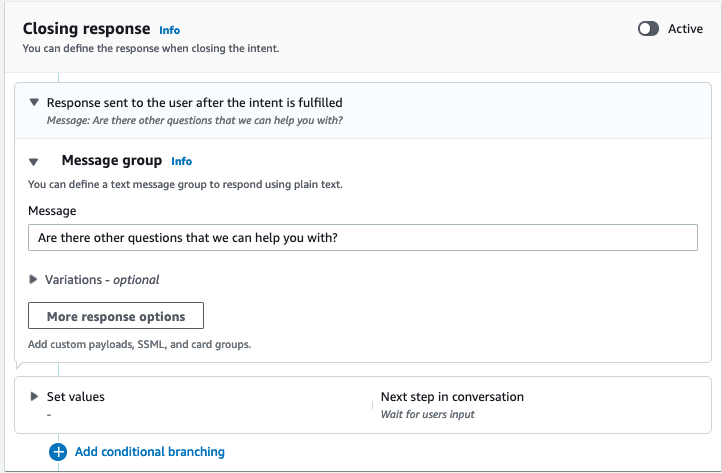
Figure 14. Screenshot of the Closing response pop-up with the Active toggle button in the top right.
9. As shown in the following screenshot, choose Build. Wait for build to be successful.

Figure 15. Screenshot of the Intent pane with Build button in the top right.
Section 6: Deploy a CloudFormation stack to create Amazon Connect resources
This stack creates Amazon Connect resources. Follow these steps:
- Navigate to the GitHub repo for the template. Choose “Raw.” Open the context (right-click) menu and then choose Save as. Save the file on your local machine as amazonconnectresources.yaml
- Navigate to AWS CloudFormation console and create a CloudFormation stack using the saved file. You should see a Create stack page with prepopulated fields that specify the CloudFormation template. Choose Next at the bottom of the page.
- On the Specify stack details page, for the fields Environment field, enter dev. For LetBotAliasID, enter the ID of the Amazon Lex bot alias you created in the fifth step. For LexBotID, enter the ID of the Amazon Lex bot you created in the fifth step.
- After entering the values, choose Next.
- On the Configure stack options page, you can optionally add tags and other stack options. When finished, choose Next.
- On the Review page, scroll down to the Capabilities section. Select the check box for I acknowledge that AWS CloudFormation might create IAM resources.
These capabilities allow CloudFormation to create an IAM role that allows access to the stack’s resources and allow it to name the resources dynamically.
7. Choose Submit.
Wait for the CloudFormation stack to launch. The stack can take several minutes to finish. When it’s launched, the Status changes to CREATE_COMPLETE. This stack will provision Amazon Connect instance, contact flow, phone number, admin, and agent users.
Section 7: Deploy the static website
- To deploy the static website, follow the instructions in the amazon-cloudfront-secure-static-site repo.
- Follow the steps mentioned in Amazon Connect documentation to create the chat user interface snipped code that you can add to the website.
- Download the index.html to your local machine and replace the javascript code from line 313 to 326 with the code snipped from step2.
- Once the html code is updated, replace the website’s default content in the Amazon S3 bucket.
Section 8: Perform testing
To verify the chat assistant deployed successfully, follow these steps:
- Access the URL of your static website and converse with the chat assistant.
- To initiate a phone call through Amazon Connect, choose Start call.
Conclusion
As our customers are beginning their generative AI transitions, they are making sure they carefully address the challenges of accuracy, compliance, security, cost, and bias mitigation before they integrate these technologies into high-stakes use cases. It’s important for companies to build in appropriate safeguards so they can use this technology responsibly. At the same time, generative AI has the potential to vastly improve the constituent experience of many government interactions. The solution shared in this post is an approach to deploy a chat-based assistant on a state website to transform constituent’s experience.
AWS is ready to support state health and human agencies. Contact the AWS Public Sector Team to learn more.
Health and human services agencies across the country are using the power of AWS to unlock their data, improve citizen experience, and deliver better outcomes. Learn more at Health and Human Services Cloud Resources. Learn how governments use AWS to innovate for their constituents, design engaging constituent experiences, and more by visiting the AWS Cloud for State and Local Governments hub.