Create object storage buckets
Amazon Lightsail is an easy-to-use virtual private server provider. Lightsail now offers object storage for storing static content starting at $1 /month and is Free Tier eligible for one year.
You to store your data securely, by providing you the ability to manage the public access permissions of your objects with three simple configuration options. It also offers you the flexibility of using access keys or roles for programmatic access to your website and application content. With Lighsail's friendly and intuitive console, you can easily share content with other AWS accounts, organize your data, backup objects and create monitoring alerts to meet your needs.
Follow along this tutorial to learn how to create an object storage bucket in Amazon Lightsail.
| About this Tutorial | |
|---|---|
| Time | 10 minutes |
| Cost | Free |
| Use Case | Compute |
| Products | Amazon Lightsail |
| Level | 100 |
| Last Updated | July 14, 2021 |
Step 1: Prerequisites
1.1 — Create an AWS account and navigate to the Lightsail console.
Already have an account? Log in to your account
Step 2: Create a bucket
Complete the following steps to create a Lightsail bucket.
2.1 — On the Lightsail home page, choose the Storage tab.

2.2 — Choose Create bucket.

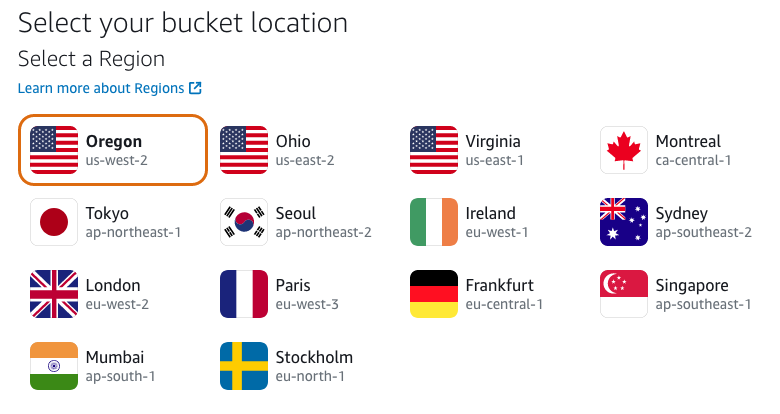
2.3 — Choose Change AWS Region to choose the Region in which to create your bucket.
We recommend that you create your bucket in the same AWS Region as the resources that you plan to use with your bucket. You cannot change the Region of your bucket after you create it
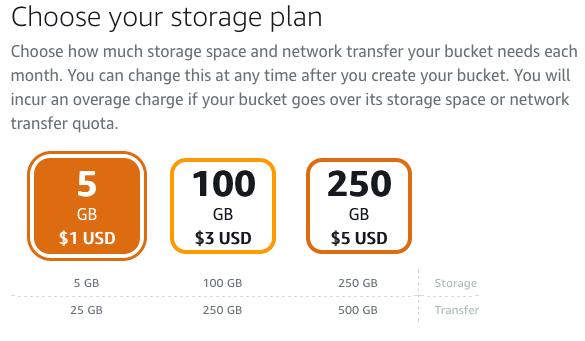
2.4 — Choose a storage plan for your bucket.
The storage plan specifies the monthly cost, storage space quota, and data transfer quota for your bucket.
ou can change your bucket's plan only one time within your monthly AWS billing cycle. Change your bucket's plan if it's consistently going over its storage space or data transfer quota, or if your bucket's usage is consistently in the lower range of its storage space or data transfer quota. For more information see Changing the plan of your bucket in Amazon Lightsail.
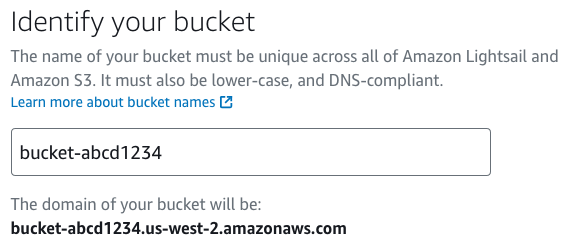
2.5 — Enter a name for your bucket.
Bucket names must be DNS-compliant. Because of this, the following rules apply for naming buckets in Lightsail:
- Bucket names must be between 3 and 56 characters long.
- Bucket names can consist only of lowercase letters, numbers, and hyphens (-).
- Bucket names must begin and end with a letter or number.Hyphens (-) can separate words, but cannot be specified consecutively. For example, doc-example-bucket is allowed but doc--example--bucket is not allowed.
- Bucket names must be unique within the aws (Standard Regions) partition, including buckets in Amazon Simple Storage Service (Amazon S3).
2.6 — Choose Create bucket.

You are redirected to the management page of your new bucket. Continue for additional documentation to use and manage your bucket.
Step 3: Additional Resources for managing buckets
3.1 —Learn about the access permissions that you can configure for your bucket. You can make all objects in your bucket public or private, or you can choose to make individual objects public. You can also grant access to your bucket by creating access keys, attaching instances to your bucket, and granting access to other AWS accounts. For more information, see Understanding bucket permissions in Amazon Lightsail
.After learning about bucket access permissions, see the following guides to grant access to your bucket:
- Configuring bucket access permissions in Amazon Lightsail
- Configuring access permissions for individual objects in a bucket in Amazon Lightsail
- Creating access keys for a bucket in Amazon Lightsail
- Configuring resource access for a bucket in Amazon Lightsail
- Configuring cross-account access for a bucket in Amazon Lightsail
3.2 — Learn how to upload files and manage objects in your buckets.
For more information, see the following guides:
- Uploading files to a bucket in Amazon Lightsail
- Uploading files to a bucket in Amazon Lightsail using multipart upload
- Viewing objects in a bucket in Amazon Lightsail
- Copying or moving objects in a bucket in Amazon Lightsail
- Downloading objects from a bucket in Amazon Lightsail
- Filtering objects in a bucket in Amazon Lightsail
- Tagging objects in a bucket in Amazon Lightsail
- Deleting objects in a bucket in Amazon Lightsail
3.3 — Learn how to connect your bucket to other resources. For more information, see the following tutorials.
Congratulations
Congratulations. You have successfully created a bucket in Amazon Lightsail.
Amazon Lightsail is a great choice to develop, build, and deploy a variety of applications like WordPress, websites, and blog platforms.
Recommended next steps
Read about the launch
Read the What's New post for the launch.
Connect to a WordPress instance
Connect your bucket to a WordPress instance.
Learn more
Learn more about virtual private servers and Amazon Lightsail.