Run Kubernetes clusters for less
Amazon Elastic Kubernetes Service (Amazon EKS) is a fully managed Kubernetes service and is certified Kubernetes conformant so you can leverage all the benefits of open source tooling from the community. You can also easily migrate any standard Kubernetes application to EKS without needing to refactor your code.
Amazon EC2 Spot Instances let you take advantage of unused EC2 capacity in the AWS cloud. Spot Instances are available at steep discounts compared to On-Demand prices.
Spot Instances are a great fit for your stateless containerized workloads running on your Kubernetes clusters because the approach to containers and Spot Instances are similar – ephemeral and autoscaled capacity. This means they both can be added and removed while adhering to SLAs and without impacting performance or availability of your applications.
Amazon EKS managed node groups automate the provisioning and lifecycle management of nodes (Amazon EC2 instances) for Amazon EKS Kubernetes clusters.
With Amazon EKS managed node groups, you don’t need to separately provision or register the Amazon EC2 instances that provide compute capacity to run your Kubernetes applications. You can create, automatically update, or terminate nodes for your cluster with a single operation. Nodes run using the latest Amazon EKS optimized AMIs in your AWS account. Amazon EKS automatically drains nodes using the Kubernetes API during terminations or updates.
Amazon EKS Spot managed node groups follow Spot best practices by using Capacity Optimized allocation strategy to provision Spot instances from the deepest Spot pools. Amazon EKS Spot managed node groups use Capacity Rebalancing to ensure Amazon EKS can gracefully drain and rebalance your Spot nodes automatically when a Spot node is at elevated risk of interruption.
In this tutorial you will learn how to add Spot Instances to your EKS clusters using Spot Managed node groups. You will also run a sample Kubernetes deployment and autoscale it on your Spot Instance nodes by using Kubernetes Cluster Autoscaler.
| About this Tutorial | |
|---|---|
| Time | 30 minutes |
| Cost | Less than $5 |
| Use Case | Containers, Compute |
| Products | Elastic Kubernetes Service, EC2 Spot Instances |
| Level | 300 |
| Last Updated | May 13, 2021 |
Already have an account? Log in to your account
Step 1: Set up Permissions if you are on Cloud9
If you already have an EKS cluster that was started using eksctl, jump to Step 4 to add Spot Instances to your existing cluster.
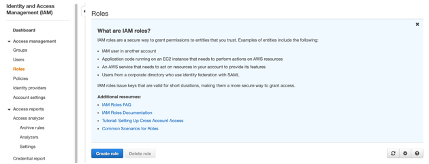
1.1 — Log on to AWS Console. Click on IAM, then Roles, and click Create Role.
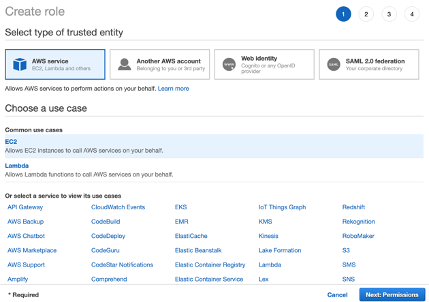
1.2 — Select AWS Service, then EC2 under Common use cases, and click Next: Permission.
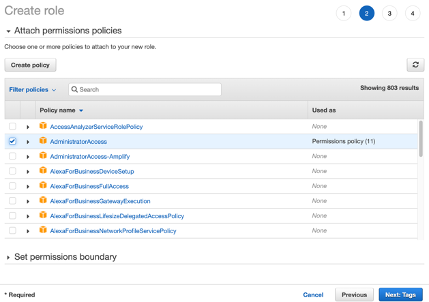
1.3 — Select AdministratorAccess and click Next: Tags.
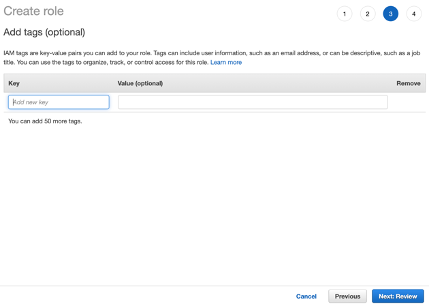
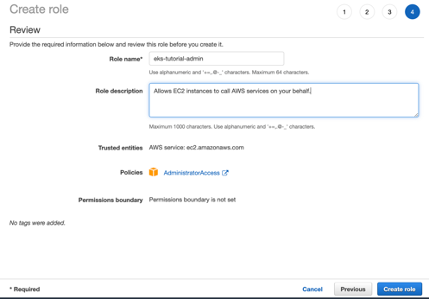
1.4 — Click Next: Review.
1.5 — Enter eks-tutorial-admin in the Role name and click Create Role.
1.6 — Select the Cloud9 service, select the Cloud9 instance and click on Open IDE. Click on the grey circle button (in top right corner) and select Manage EC2 Instance.

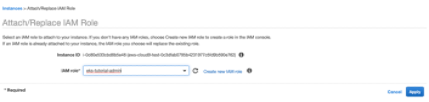
1.7 — Assign administrative role to Cloud9 EC2 instance. Click on Actions, then Security and select Modify IAM Role.

1.8 — Assign eks-tutorial-admin role to the instance.
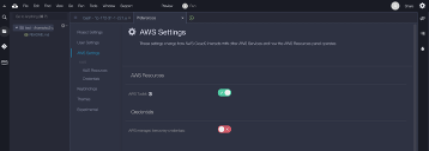
1.9 — Click Settings (gear icon on the top right) and select AWS Settings. Turn off AWS managed temporary credentials and click close (x on the settings page).
1.10 — Enter the following command in the terminal window in Cloud9:
rm -vf ${HOME}/.aws/credentialsStep 2: Set up AWS CLI, kubectl, and eksctl
If you already have an EKS cluster that was started using eksctl, jump to Step 4 to add Spot Instances to your existing cluster.
2.1 — Install version 2 of the AWS CLI by running the following commands.
If you’re using Linux, follow the instructions in the AWS CLI installation guide for different operating systems.
sudo curl --silent --location -o "awscliv2.zip" "https://awscli.amazonaws.com/awscli-exe-linux-x86_64.zip"

sudo unzip awscliv2.zip && sudo ./aws/install
2.2 —Install kubectl, the Kubernetes command line tool.
Follow the instructions in the official Kubernetes docs to get the latest version of kubectl here.
sudo curl -o /usr/local/bin/kubectl -LO "https://dl.k8s.io/release/$(curl -L -s https://dl.k8s.io/release/stable.txt)/bin/linux/amd64/kubectl"

sudo chmod +x /usr/local/bin/kubectl
2.3 — Install eksctl, the official EKS command line tool, which you will use to deploy your EKS cluster and node groups.
Download and extract the latest release of eksctl with the following command.
curl --silent --location "https://github.com/weaveworks/eksctl/releases/latest/download/eksctl_$(uname -s)_amd64.tar.gz" | tar xz -C /tmp

sudo mv -v /tmp/eksctl /usr/local/bin
2.4 — Test that your installation was successful with the following commands.
aws --version
kubectl version
eksctl version
Step 3: Create Amazon EKS cluster with an On-Demand node group
In this step you will create an Amazon EKS cluster using the eksctl command line tool. This will create an EKS control plane, and one node group which will include two t3.medium instances.
3.1 — Eksctl automatically creates your kube config file, so after the cluster deployment step is complete, you can use kubectl with your cluster without any further configurations. Update the command with your region parameters before executing:
This step will take approximately 15-20 minutes
eksctl create cluster --version=1.20 --name=eksspottutorial --nodes=2 --managed --region=<your-desired-region> --node-type t3.medium --asg-access3.2 — Once complete, run the following command to verify that the cluster was started, the On-Demand node group with two instances was deployed, and that kubectl tool installed is able to reach the cluster.
kubectl get nodesStep 4: Add Spot Managed node groups to your EKS cluster
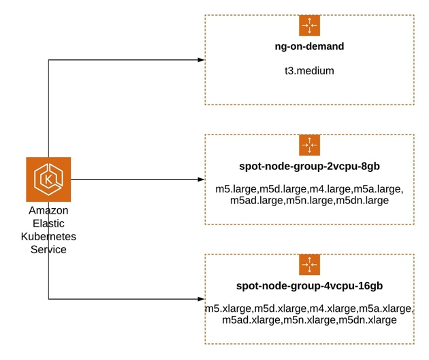
In order to tap into multiple Spot capacity pools, which will increase the chances of maintaining the capacity if there are any interruptions (when EC2 needs the capacity back), you will create two node groups, with each node group containing multiple instance types. Each node group (EC2 Auto Scaling group) will launch instances using Spot pools that are optimally chosen based on the available Spot capacity.
4.1 — Create two Spot Managed node groups after updating the command with your region parameters as needed using eksctl.
This step will take approximately 3 minutes for each nodegroup.
Note the instance type selection – each node group includes instance types with the same amount of vCPU and memory, and although some will have performance variability, this is normally ok for many containerized applications.
eksctl create nodegroup --cluster=eksspottutorial --region=<AWS Region where you started your EKS cluster> --managed --spot --name=spot-node-group-2vcpu-8gb --instance-types=m5.large,m5d.large,m4.large,m5a.large,m5ad.large,m5n.large,m5dn.large --nodes-min=2 --nodes-max=5 --asg-access

eksctl create nodegroup --cluster=eksspottutorial --region=<AWS Region where you started your EKS cluster> --managed --spot --name=spot-node-group-4vcpu-16gb --instance-types=m5.xlarge,m5d.xlarge,m4.xlarge,m5a.xlarge,m5ad.xlarge,m5n.xlarge,m5dn.xlarge --nodes-min=2 --nodes-max=5 --asg-access4.2 — After the previous step was completed, confirm that the new nodes were added to the cluster.
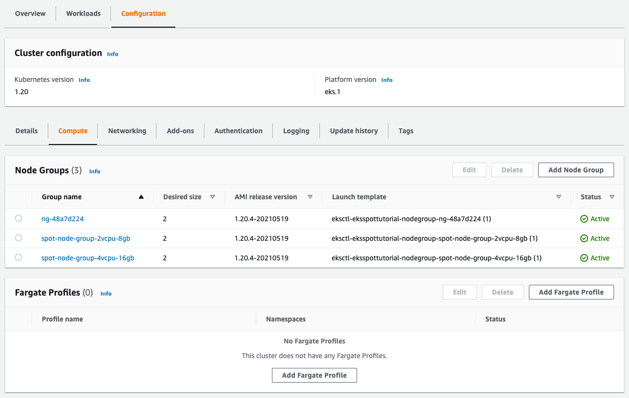
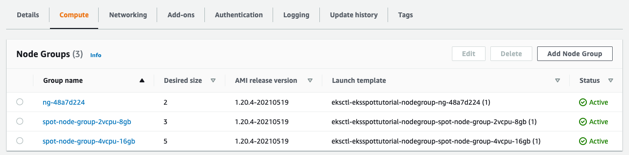
kubectl get nodes --show-labels --selector=eks.amazonaws.com/capacityType=SPOT | grep SPOT4.3 — Use the AWS Management Console to inspect your newly deployed Kubernetes cluster. Select Elastic Kubernetes Service, click on Clusters, and then on eksspottutorial cluster. Select the Configuration tab and Compute sub tab.
You can see the node groups created in the earlier steps: one On-Demand node group and two Spot node groups.
4.4 — Click on spot-node-group-2vcpu-8gb group and you can see the instance types set from the create command.
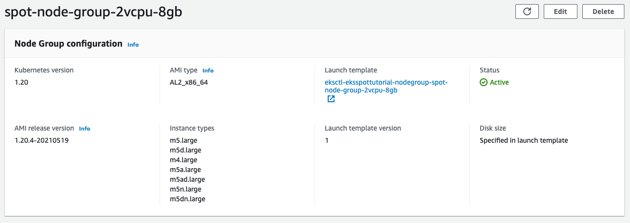
4.5 — Click on the Auto Scaling group name in the Details tab. Scroll to the Purchase options and instance types settings. Note how Spot best practices are applied out of the box: the Auto Scaling group uses the Capacity Optimized allocation strategy, which will launch Spot Instances from the deepest capacity pools. Capacity Rebalance is also enabled on the cluster, helping EKS Managed node groups manage the lifecycle of the Spot Instance by proactively replacing instances that are at higher risk of being interrupted.

4.6 — Congratulations! You now have Spot Instances connected to your EKS cluster, ready to run your containerized workloads at steep discounts compared to the On-Demand price.
Step 5: (Optional) Deploy the Kubernetes Cluster Autoscaler
The Kubernetes Cluster-Autoscaler automatically adjusts the number of nodes in your cluster when pods fail to launch due to lack of resources or when nodes in the cluster are underutilized and their pods can be rescheduled onto other nodes in the cluster.
5.1 — Deploy the latest version of Kubernetes Cluster Autoscaler.
First download the yaml file
curl -LO https://raw.githubusercontent.com/kubernetes/autoscaler/master/cluster-autoscaler/cloudprovider/aws/examples/cluster-autoscaler-autodiscover.yaml5.2 — In order to instruct cluster-autoscaler to use our newly deployed node groups (EC2 Auto Scaling groups), we will use the auto discovery mode of Cluster Autoscaler. Cluster Autoscaler will identify our EC2 Auto Scaling groups via the following tags:
tag=k8s.io/cluster-autoscaler/enabled and
k8s.io/cluster-autoscaler/eksspottutorial
Run the following command to update these tags to the Cluster Autoscaler and update the version of Cluster Autoscaler to 1.20.0.
sed -i 's/<YOUR CLUSTER NAME>/eksspottutorial/g' cluster-autoscaler-autodiscover.yaml
sed -i 's/v1.17.3/v1.20.0/g' cluster-autoscaler-autodiscover.yaml5.3 — Deploy the Cluster Autoscaler.
kubectl apply -f cluster-autoscaler-autodiscover.yaml5.4 — Here is a visual representation of multiple node groups, each with similarly sized instance types, and using the capacity-optimized allocation strategy for Spot Instances. This configuration focuses on increasing the resilience of your Spot worker nodes by tapping into multiple spare capacity pools, and allowing Kubernetes Cluster Autoscaler to make the right scaling decisions.
Step 6: Deploy sample app
6.1 — Create a new file nginx-to-scaleout.yaml, paste the following specification into it and save the file:
Note that we will prefer to deploy this application on EKS Spot managed node groups using Node Affinity: preferredDuringSchedulingIgnoredDuringExecution
apiVersion: apps/v1
kind: Deployment
metadata:
  name: nginx-to-scaleout
spec:
  replicas: 1
  selector:
    matchLabels:
      app: nginx
  template:
    metadata:
      labels:
        service: nginx
        app: nginx
    spec:
      affinity:
        nodeAffinity:
          preferredDuringSchedulingIgnoredDuringExecution:
          - weight: 1
            preference:
              matchExpressions:
              - key:  eks.amazonaws.com/capacityType
                operator: In
                values:
                - SPOT
      containers:
      - image: nginx
        name: nginx-to-scaleout
        resources:
          limits:
            cpu: 1000m
            memory: 1024Mi
          requests:
            cpu: 1000m
            memory: 1024Mi
6.2 — Deploy the deployment file and confirm that it is deployed and running one replica of the Nginx web server.
kubectl apply -f nginx-to-scaleout.yaml
kubectl get deployment/nginx-to-scaleout6.3 — Scale the deployment (increase the number of replicas).
kubectl scale --replicas=20 deployment/nginx-to-scaleout6.4 — Check that some pods are in Status=Pending, since there’s no free vCPUs or RAM on your existing worker nodes.
kubectl get pods6.5 — Check in the Cluster-Autoscaler logs that it has discovered the pending pods, and it is taking a scale up activity by increasing the size of a node group.
[scale_up.go:263] Pod default/nginx-to-scaleout-84f9cdbd84-vn7px is unschedulable
Possible scale-up plan:
[Final scale-up plan: [{eks-98bcc7e7-0457-f6a3-98dc-292ebc980547 2->5 (max: 5)}]
[Final scale-up plan: [{eks-fcbcc7e4-0c28-df1a-9669-8260c526d237 2->3 (max: 5)}]
kubectl logs -f deployment/cluster-autoscaler -n kube-system | grep -i scale_up6.6 — Use the AWS Management Console to confirm that Spot node groups have launched more instances. Select Elastic Kubernetes Service, click on Clusters, and then on eksspottutorial cluster. Select the Configuration tab and Compute sub tab.
6.7 — Confirm in the AWS Management Console that one or more of the EC2 Auto Scaling groups have launched more Spot Instances.
6.8 — Confirm that all the pending pods have been scheduled, this will take 1-3 minutes.
kubectl get podsStep 7: Cleanup
7.1 — Delete the Nginx web server deployment.
kubectl delete -f nginx-to-scaleout.yaml7.2 — Remove the two EKS Spot managed node groups that you deployed in the tutorial.
eksctl delete nodegroup --cluster=eksspottutorial --name=spot-node-group-2vcpu-8gb
eksctl delete nodegroup --cluster=eksspottutorial --name=spot-node-group-4vcpu-16gb
7.3 — If you used a new cluster for the tutorial and not your existing cluster, delete the EKS cluster.
eksctl will confirm the deletion of the cluster’s CloudFormation stack immediately but the deletion could take up to 15 minutes. You can optionally track it in the CloudFormation Console.
eksctl delete cluster --name eksspottutorialCongratulations
Congratulations! In this tutorial you learned how to deploy an Amazon EKS cluster and run Kuberentes deployments and services on Spot Instances using Spot Managed node group while adhering to Spot Instance best practices. By creating multiple node groups with multiple similarly performant instance types, you can increase the resilience of your applications running on Spot worker nodes while meeting your application's SLA without compromising performance or availability.
Recommended next steps
Learn about Spot managed node groups
Learn about how Amazon EKS supports provisioning and managing EC2 Spot Instances in managed node groups applying Spot Instances best practices.
Deep dive to use Spot Instances with Amazon EKS
Deep dive using hands-on workshop to provision, manage, and maintain your Kubernetes clusters with Amazon EKS at any scale on Spot Instances.
Learn about Amazon EC2 Spot Instances
Learn more about how Amazon EC2 Spot Instances lets you take advantage of unused EC2 capacity in the AWS at up to a 90% discount compared to On-Demand prices.