Modul 2: Sichern Ihres AWS-Kontos
TUTORIAL


Benutzer konfigurieren
In diesem Modul lernen Sie bewährte Methoden zur Sicherung Ihres AWS-Kontos kennen
Was Sie erreichen werden
- Anmeldung als Root-Benutzer
- Zusätzliche Sicherheit für den Root-Benutzer aktivieren
- Zusätzliche Benutzer von AWS IAM Identity Center (Nachfolger von AWS SSO) einrichten
- Anmeldung beim AWS-Zugriffsportal
- MFA für den Identity-Center-Benutzer einrichten
Implementierung
Wenn Sie ein AWS-Konto erstellen, wird automatisch ein Root-Benutzer für Ihr Konto erstellt. Der Root-Benutzer ist eine besondere Entität, die vollständigen Zugriff auf das Konto hat und alle Aktionen durchführen kann, einschließlich der Änderung der Zahlungsarten oder der Schließung des Kontos. Wenn Sie sich mit dem Root-Benutzer anmelden, haben Sie vollständigen Zugriff auf alle AWS-Services und -Ressourcen im Konto. Aufgrund dieser Berechtigungsstufe empfehlen wir Ihnen:
- Aktivierung zusätzlicher Sicherheit für den Root-Benutzer mit Multi-Faktor-Authentifizierung
- Einrichtung zusätzlicher Benutzer zur Ausführung täglicher Aufgaben im Zusammenhang mit Ihrem Konto
AWS bietet zwei Identitäts-Services:
- AWS Identity und Access Management (IAM). Dieser Service stellt Zugriffskontrollrichtlinien bereit und verwaltet Langzeitbenutzer wie den Root-Benutzer. Wenn Sie Benutzer in IAM erstellen, verfügen diese Benutzer über Anmeldeinformationen für den langfristigen Zugriff. Als bewährte Sicherheitsmethode wird empfohlen, die Verwendung langfristiger Anmeldeinformationen in AWS zu minimieren. In diesem Tutorial werden Sie keinen IAM-Benutzer erstellen.
- AWS IAM Identity Center (Nachfolger von AWS Single Sign-On). Dieser Service stellt temporäre Anmeldeinformationen bereit, die jedes Mal gewährt werden, wenn sich ein Benutzer für eine Sitzung anmeldet. Es kann in alle vorhandenen Identitätsanbieter integriert werden, über die Sie möglicherweise bereits verfügen, wie Microsoft Active Directory oder Okta. Auf diese Weise können Ihre Benutzer für AWS dieselbe Anmeldung verwenden, die sie für andere Services in Ihrem Unternehmen verwenden. Wenn Sie über keinen anderen Identitätsanbieter verfügen, können Sie Benutzer in IAM Identity Center erstellen. Dies ist die empfohlene Methode zum Erstellen zusätzlicher Benutzer für Ihr AWS-Konto und wird in diesem Tutorial erläutert.
Benötigte Zeit
15 Minuten
Modul erfordert
- Einen Internet-Browser
- Ein AWS-Konto
Hilfe anfordern
Anmeldung als Root-Benutzer
Sie können auf den Root-Benutzer des AWS-Kontos zugreifen, indem Sie sich mit der E-Mail-Adresse und dem Passwort anmelden, die Sie zum Erstellen des Kontos verwendet haben.
1. Melden Sie sich bei der AWS-Managementkonsole an.
2. Wählen Sie Root-Benutzer aus, geben Sie die E-Mail-Adresse ein, die Sie bei der Erstellung Ihres Kontos angegeben haben, und wählen Sie dann Weiter aus.

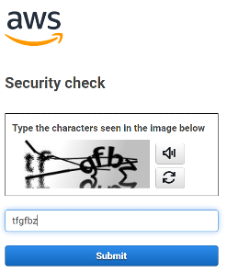
3. Möglicherweise werden Sie aufgefordert, eine Sicherheitsüberprüfung durchzuführen. Geben Sie die Zeichen aus dem Bild in das dafür vorgesehene Feld ein und wählen Sie dann Absenden aus. Sie müssen diese Prüfung abschließen, um mit dem nächsten Schritt fortzufahren.
Tipp: Wählen Sie die Schaltfläche Ton, um eine Reihe von Zahlen und Buchstaben zum Eingeben zu hören. Wählen Sie die Schaltfläche Aktualisieren, um das Bild zu ändern, wenn Sie die Zeichen im Originalbild nicht erkennen können.
4. Geben Sie auf der Anmeldeseite Ihr Passwort ein und wählen Sie Anmelden.
.837018f8d02415fc134f577aeb6ba1e3a8a78231.png)
Herzlichen Glückwunsch, Sie haben sich soeben als Root-Benutzer bei der AWS-Managementkonsole angemeldet. Sie möchten Ihren Root-Benutzer jedoch nicht für alltägliche Aufgaben verwenden. Der Root-Benutzer sollte nur für bestimmte Kontoverwaltungsaufgaben verwendet werden. Zwei davon werden wir im nächsten Teil dieses Tutorials ausführen.
- MFA für den Root-Benutzer aktivieren
- Einen Administratorbenutzer in IAM Identity Center erstellen
Die vollständige Liste der Aufgaben, bei denen Sie sich als Root-Benutzer anmelden müssen, finden Sie unter Aufgaben, die Anmeldeinformationen eines Root-Benutzers erfordern.
Mehr Sicherheit der Root-Benutzeranmeldung hinzufügen
Um die Sicherheit Ihrer Root-Benutzer-Anmeldeinformationen zu gewährleisten, empfehlen wir Ihnen dringend, die Multi-Faktor-Authentifizierung (MFA) für die Root-Benutzer-Anmeldung zu aktivieren. Wenn Sie MFA aktivieren, geben Sie neben der E-Mail-Adresse und dem Passwort für den Root-Benutzer auch die Anmeldedaten eines anderen Authentifikators an. Dadurch wird es für jemanden sehr viel schwieriger, Ihre Root-Benutzerdaten ohne Ihre Zustimmung zu verwenden.
Lassen Sie uns der Root-Benutzeranmeldung mehr Sicherheit hinzufügen. Dazu verwenden wir den AWS Identity und Access Management (IAM)-Service. Weitere Informationen finden Sie unter Was ist IAM?.
1. Melden Sie sich bei Ihrem neu erstellten AWS-Konto mit den Anmeldeinformationen des Root-Benutzers an.
2. Geben Sie in der Suchleiste der AWS-Managementkonsole die Option IAM ein und wählen Sie dann IAM aus.

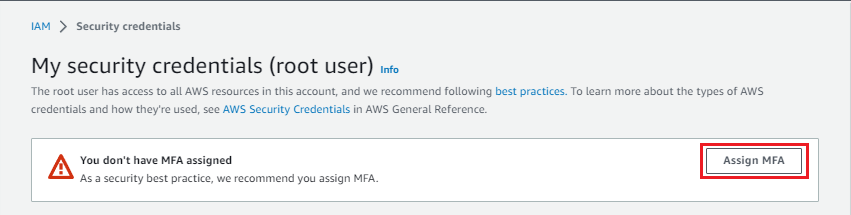
3. Unter Sicherheitsempfehlungen gibt es einen Hinweis zum Hinzufügen von MFA für Root-Benutzer.
4. Wählen Sie MFA hinzufügen.

5. Die Seite Meine Sicherheitsanmeldeinformationen (Root-Benutzer) wird geöffnet. Es wird eine Warnung angezeigt, die Folgendes besagt Ihnen wurde kein MFA zugewiesen. Wählen Sie MFA zuweisen.
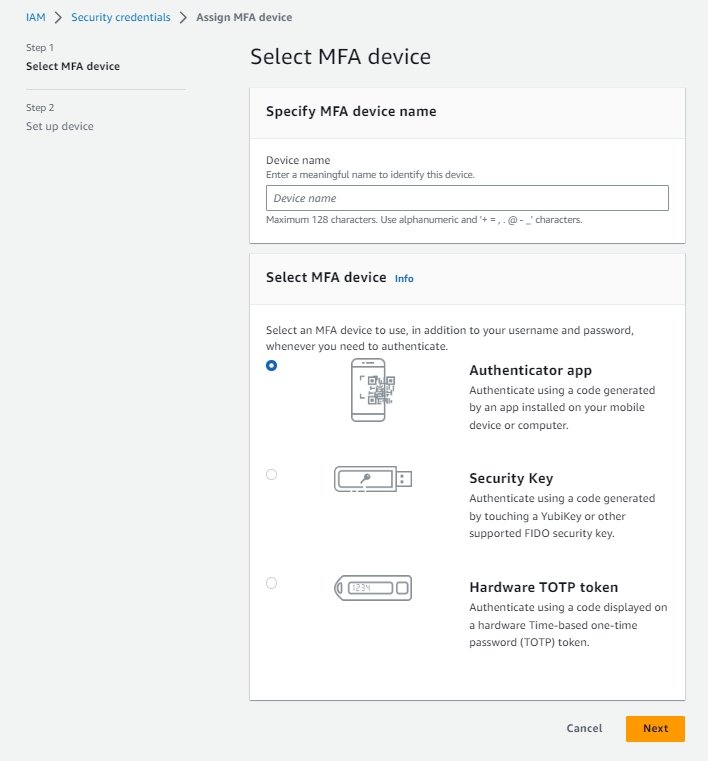
6. Die Seite MFA-Gerät auswählen wird geöffnet. Geben Sie unter MFA-Gerätenamen angeben einen Namen für Ihr MFA-Gerät ein. Wir empfehlen, einen Namen zu verwenden, der Ihnen hilft, sich daran zu erinnern, welchem Gerät und welchem Benutzer diese Anmeldeinformationen zugewiesen sind.
7. In diesem Tutorial verwenden wir eine Authentifizierungs-App auf einem mobilen Gerät. Geben Sie den Gerätenamen phone-root ein.
8. Wählen Sie unter MFA-Gerät auswählen die Option Authentifizierungs-App und dann Weiter aus.
Tipp: Wenn Sie keinen Zugriff auf ein Mobilgerät oder ein Hardwaregerät haben, können Sie MFA nicht aktivieren. Erfahren Sie, wie Sie einen kostenlosen MFA-Sicherheitsschlüssel von AWS erhalten.
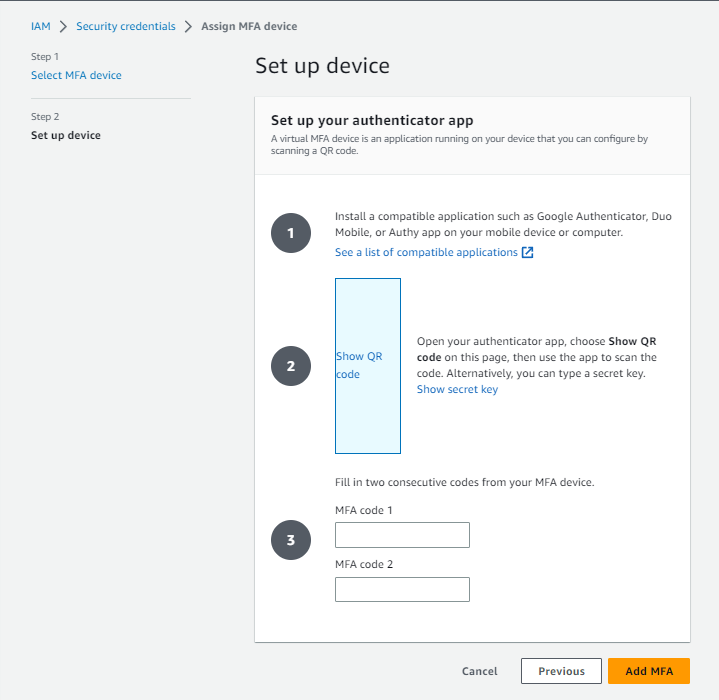
Die Seite Gerät einrichten wird geöffnet. Auf dieser Seite müssen drei Schritte ausgeführt werden.
9. Richten Sie die Authentifizierungs-App auf Ihrem Mobilgerät ein. Für Android- und iOS-Geräte werden verschiedene Authentifizierungs-Apps unterstützt. Eine Liste der unterstützten Apps und Links zu ihren Download-Speicherorten finden Sie im Abschnitt Virtuelle Authentifizierungs-Apps auf der Seite Multi-Faktor-Authentifizierung (MFA) für IAM.
10. Öffnen Sie die Authentifizierungs-App auf Ihrem Mobilgerät.
11. Wählen Sie den Link QR-Code anzeigen, um einen eindeutigen QR-Code für Ihr Konto anzuzeigen. Wenn Sie den QR-Code nicht scannen können, wählen Sie den Link Geheimen Schlüssel anzeigen, um einen Textschlüssel anzuzeigen, den Sie in der Authentifizierungs-App zur Identifizierung Ihres Kontos eingeben können.
12. Scannen Sie entweder den QR-Code mit Ihrer Authentifizierungs-App oder geben Sie den Code in Ihre Authentifizierungs-App ein, um Ihr Authentifizierungsgerät mit Ihrem Konto zu verknüpfen.
13. Nachdem Ihr Authentifizierer die Verbindung zu Ihrem Konto hergestellt hat, generiert er geheime Codes, die für eine begrenzte Anzahl von Sekunden gültig sind. Geben Sie unter MFA-Code 1 den Code ein, den Sie in der App sehen. Warten Sie, bis sich dieser Code in den nächsten Code ändert, geben Sie dann diesen Code in MFA-Code 2 ein und wählen Sie dann MFA hinzufügen, bevor der zweite Code abgelaufen ist.
Sie kehren zur Seite Meine Sicherheitsanmeldeinformationen (Root-Benutzer) zurück. Oben wird eine Benachrichtigung angezeigt, die besagt, dass das MFA-Gerät zugewiesen ist.
Ihre Root-Benutzeranmeldeinformationen sind jetzt sicherer.
14. Melden Sie sich von der Konsole ab. Wenn Sie sich das nächste Mal mit den Anmeldeinformationen des Root-Benutzers anmelden, geben Sie die Anmeldeinformationen Ihres MFA-Geräts sowie Ihre E-Mail-Adresse und Ihr Passwort ein.


Benutzer in IAM Identity Center einrichten
Es gilt als bewährte Sicherheitsmethode, Ihr Root-Konto nicht für alltägliche Aufgaben zu verwenden, doch im Moment haben Sie nur einen Root-Benutzer. In diesem Tutorial verwenden wir IAM Identity Center, um einen Administratorbenutzer zu erstellen. Wir verwenden IAM Identity Center, weil es Benutzern eindeutige Anmeldeinformationen für jede Sitzung bereitstellt, auch als temporäre Anmeldeinformationen bekannt. Die Bereitstellung dieser Anmeldeinformationen für Benutzer erhöht die Sicherheit Ihres AWS-Kontos, da diese bei jeder Benutzeranmeldung generiert werden. Sobald Sie über einen Administratorbenutzer verfügen, können Sie sich mit diesem Benutzer anmelden, um weitere Identity-Center-Benutzer zu erstellen und diese Gruppen mit Berechtigungen zur Ausführung bestimmter Auftragsfunktionen zuzuweisen. Ein weiterer Vorteil der Erstellung von Benutzern im IAM Identity Center ist, dass den Benutzern automatisch Zugriff auf die AWS-Fakturierungs- und Kostenmanagement-Konsole gewährt wird.
Weitere Informationen zur Fakturierung finden Sie im Benutzerhandbuch zu AWS Fakturierung.
Dieser Abschnitt des Tutorials beinhaltet die folgenden Schritte:
- IAM Identity Center aktivieren
- Benutzer hinzufügen
- Benutzer zu Gruppen hinzufügen
- Konfiguration Ihrer Identitätsquelle
- Einen Administratorberechtigungssatz erstellen
- Anmeldung beim AWS-Zugriffsportal mit Ihren Administratoranmeldeinformationen
IAM Identity Center aktivieren
1. Melden Sie sich mit den Anmeldeinformationen des Root-Benutzers bei Ihrem AWS-Konto an.
2. Geben Sie in der Suchleiste der AWS-Managementkonsole IAM Identity Center ein und wählen Sie dann IAM Identity Center aus.

3. Die Seite mit der Übersicht über den IAM-Identity-Center-Service wird geöffnet. Lesen Sie die Informationen, um mehr über die Features des IAM Identity Center Service zu erfahren, und wählen Sie dann unter IAM Identity Center aktivieren die Option Aktivieren aus.


Konfiguration Ihrer Identitätsquelle
Ihre Identitätsquelle ist der Ort, an dem Ihre Benutzer und Gruppen verwaltet werden. Nachdem Sie Ihre Identitätsquelle konfiguriert haben, können Sie nach Benutzern oder Gruppen suchen, um ihnen Single-Sign-On-Zugriff auf AWS-Konten, Cloud-Anwendungen oder beides zu gewähren.
Sie können nur eine Identitätsquelle pro Organisation haben. Sie können Folgendes verwenden:
- Identity Center-Verzeichnis – Wenn Sie IAM Identity Center zum ersten Mal aktivieren, wird es automatisch mit einem Identity-Center-Verzeichnis als Ihre Standardidentitätsquelle konfiguriert, in der Sie Ihre Benutzer und Gruppen verwalten.
- Active Directory – Benutzer und Gruppen werden entweder in Ihrem Verzeichnis zu AWS Managed Microsoft AD mithilfe des AWS Directory Service oder in Ihrem selbstverwalteten Verzeichnis in Active Directory (AD) verwaltet.
- Externer Identitätsanbieter – Benutzer und Gruppen werden in einem externen Identitätsanbieter (IdP) wie Okta oder Azure Active Directory verwaltet.
In diesem Tutorial verwenden wir das Identity Center-Verzeichnis.
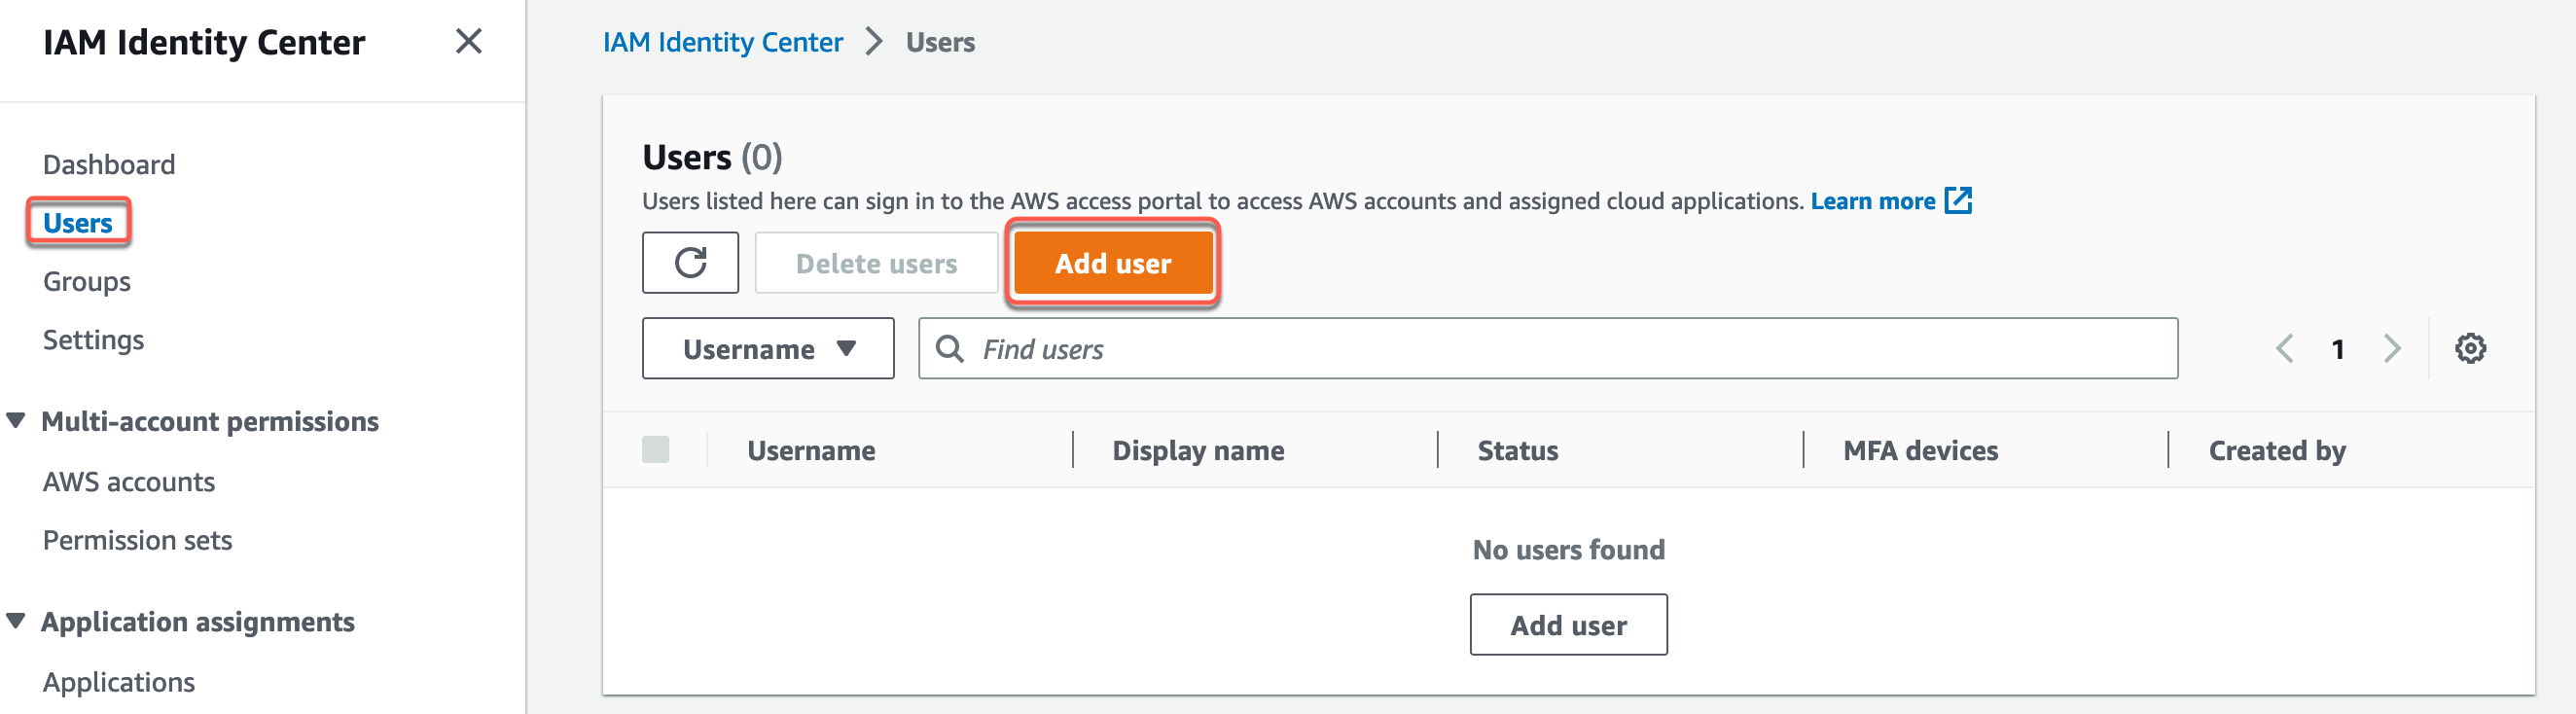
1. Navigieren Sie zur IAM-Identity-Center-Konsole und wählen Sie Benutzer aus. Wählen Sie dann Benutzer hinzufügen aus.
- Benutzername – Der Benutzername wird für die Anmeldung beim AWS-Zugriffsportal verwendet und kann später nicht geändert werden. Wählen Sie einen Namen, den Sie sich leicht merken können. Für dieses Tutorial fügen wir den Benutzer John hinzu.
- Passwort – Wählen Sie Eine E-Mail mit Anweisungen zur Passworteinrichtung an diesen Benutzer senden (empfohlen). Diese Option sendet dem Benutzer eine E-Mail von Amazon Web Services mit der Betreffzeile Einladung zur Teilnahme am IAM Identity Center (Nachfolger von AWS Single Sign-On). Die E-Mail wird entweder von no-reply@signin.aws oder von no-reply@login.awsapps.com gesendet. Fügen Sie diese E-Mail-Adressen Ihrer Liste der zugelassenen Absender hinzu, damit sie nicht als Junk oder Spam behandelt werden.
3. Geben Sie im Abschnitt Primäre Informationen die erforderlichen Benutzerdetails ein:
- E-Mail-Adresse – Geben Sie eine E-Mail-Adresse für den Benutzer ein, unter der Sie die E-Mail erhalten können. Geben Sie es dann erneut ein, um es zu bestätigen. Jeder Benutzer muss über eine einzigartige E-Mail-Adresse verfügen.
Tipp: Während des Tests können Sie mithilfe der E-Mail-Subadressierung möglicherweise gültige E-Mail-Adressen für mehrere fiktive Benutzer erstellen. Wenn Ihr E-Mail-Anbieter dies unterstützt, können Sie eine neue E-Mail-Adresse erstellen, indem Sie das Pluszeichen (+) und dann Zahlen oder Zeichen an Ihre aktuelle E-Mail-Adresse anhängen, z. B. jemand@muster.com, jemand+1@muster.com und jemand+test@muster.com. Alle diese E-Mail-Adressen würden dazu führen, dass eine E-Mail unter derselben E-Mail-Adresse empfangen würde.
- Vorname – Geben Sie den Vornamen des Benutzers ein.
- Nachname – Geben Sie den Nachnamen des Benutzers ein.
- Anzeigename – Dies wird automatisch mit dem Vor- und Nachnamen des Benutzers ausgefüllt. Wenn Sie den Anzeigenamen ändern möchten, können Sie einen anderen Namen eingeben. Der Anzeigename wird im Anmeldeportal und in der Benutzerliste angezeigt.
- Füllen Sie die optionalen Informationen aus, falls gewünscht. Dies wird in diesem Tutorial nicht verwendet und kann später hinzugefügt werden.
4. Klicken Sie auf Weiter.

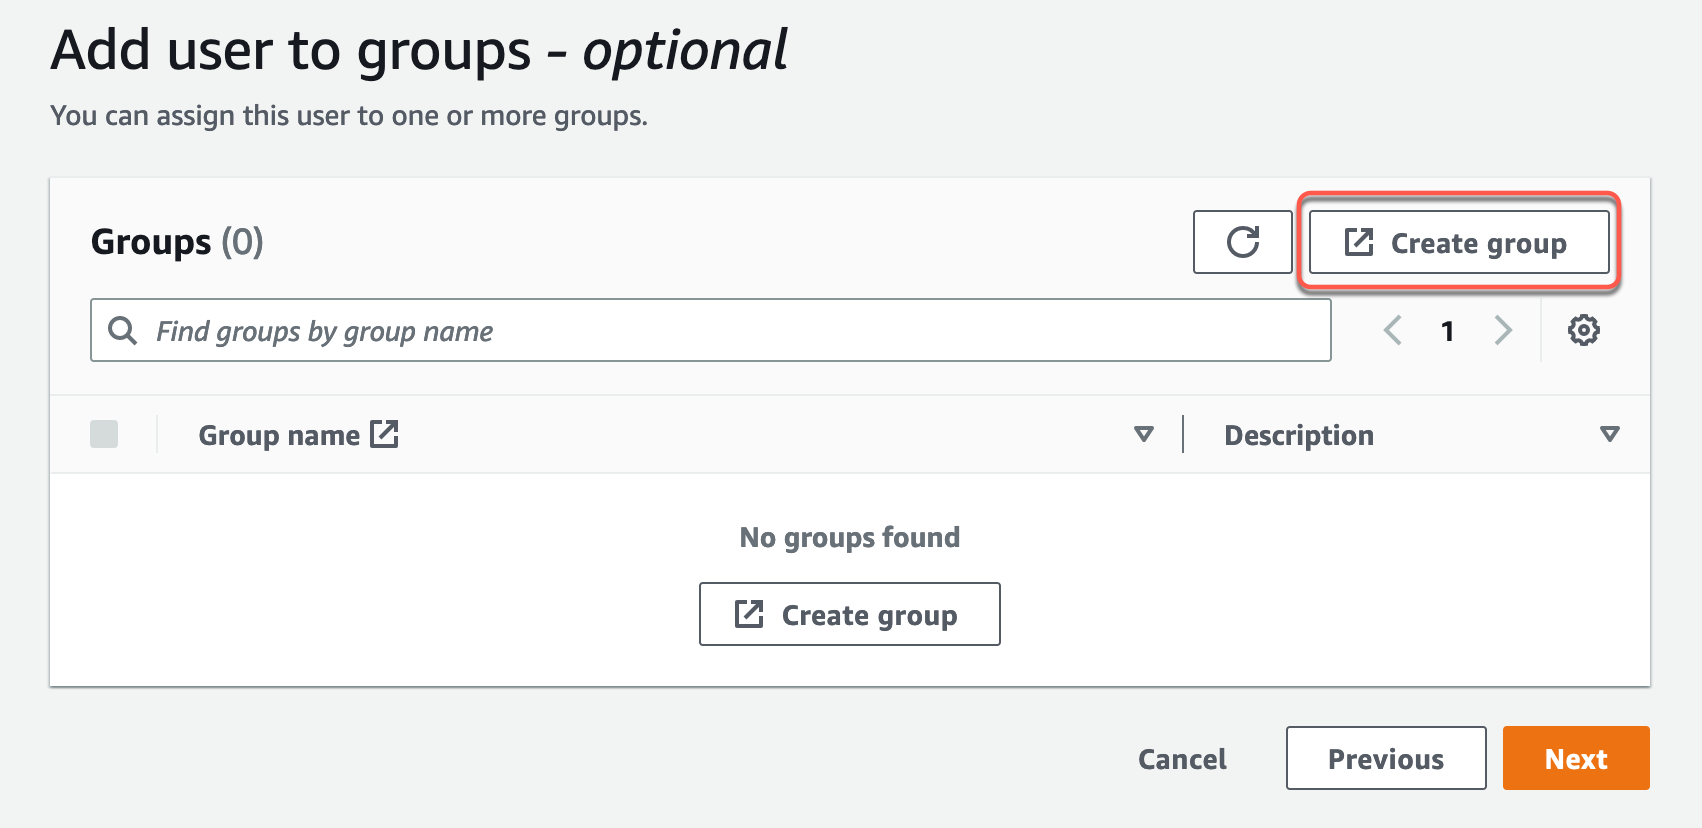
Benutzer zu Gruppen hinzufügen – optional
Mit Benutzergruppen können Sie Berechtigungen für mehrere Benutzer festlegen. Dies kann das Verwalten der Berechtigungen für diese Benutzer vereinfachen.
1. Wählen Sie Gruppe erstellen aus.
2. Es öffnet sich eine neue Browser-Registerkarte, die die Seite Gruppe erstellen anzeigt.
3. Geben Sie unter Gruppendetails im Feld Gruppenname den Text Administratoren ein.
4. Wählen Sie Gruppe erstellen aus.

Die Seite Gruppen wird angezeigt, auf der Ihre neue Gruppe Administratoren angezeigt wird.
5. Verlassen Sie die Registerkarte Gruppen oder navigieren Sie weg und kehren Sie zur Registerkarte Benutzer hinzufügen zurück.

6. Wählen Sie im Bereich Gruppen die Schaltfläche Aktualisieren aus.

Die neue Gruppe Administratoren wird in der Liste angezeigt.
7. Aktivieren Sie das Kontrollkästchen neben der Gruppe Administratoren, und wählen Sie dann Weiter aus.

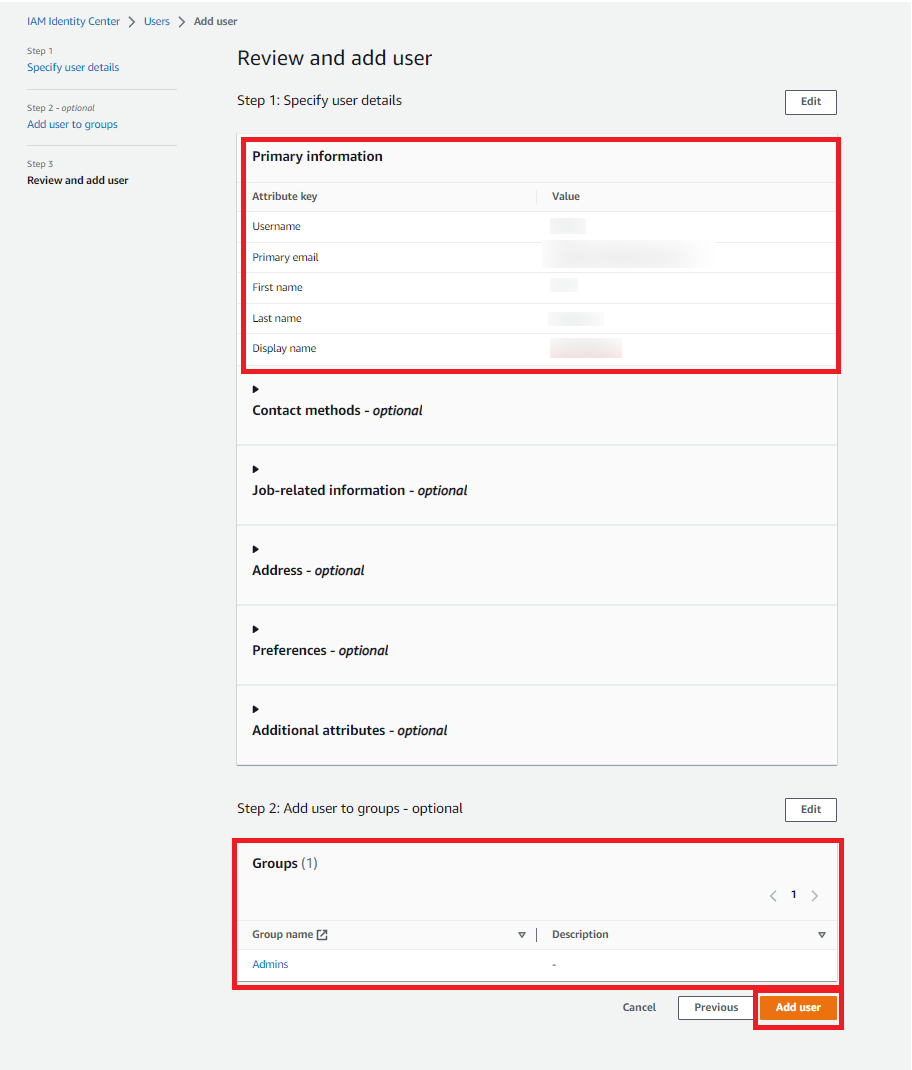
8. Bestätigen Sie auf der Seite Benutzer überprüfen und hinzufügen Folgendes:
- Primäre Informationen werden wie beabsichtigt angezeigt
- Gruppen zeigt den Benutzer an, der der von Ihnen erstellten Gruppe hinzugefügt wurde
Wenn Sie Änderungen vornehmen müssen, wählen Sie Bearbeiten, um die Aktualisierungen vorzunehmen.
9. Wenn alles korrekt ist, wählen Sie Benutzer hinzufügen.
Sie kehren zur Hauptseite von IAM Identity Center > Benutzer zurück.
Eine Benachrichtigung informiert Sie über das erfolgreiche Hinzufügen des Benutzers.
Herzlichen Glückwunsch, Sie haben jetzt einen Benutzer in Ihrer AWS-Organisation. Sie können diese Schritte wiederholen, um weitere Benutzer und Gruppen hinzuzufügen.

Zugriff auf Ihr AWS-Konto verwalten
Ihr neuer Benutzer ist vorhanden, hat jedoch keinen Zugriff auf Ressourcen, Services oder Anwendungen. Der Benutzer kann also Ihren Root-Benutzer für tägliche Verwaltungsaufgaben noch nicht ersetzen. Lassen Sie uns Ihrem neuen Benutzer Zugriff auf Ihr AWS-Konto gewähren. Da wir den Benutzer einer Gruppe zuordnen, weisen wir die Gruppe einem Konto zu und fügen dann einen Berechtigungssatz hinzu, der definiert, worauf die Mitglieder der Gruppe zugreifen können.
Wir werden weiterhin die Anmeldeinformationen des Root-Benutzers für dieses Verfahren verwenden.
Melden Sie sich mit den Anmeldeinformationen des Root-Benutzers bei Ihrem AWS-Konto an.
Navigieren Sie zur IAM-Identity-Center-Konsole und wählen Sie unter Empfohlene Einrichtungsschritte die Option Zugriff auf mehrere AWS-Konten verwalten aus.

Auf der Seite AWS-Konten unter Organisationsstruktur wird Ihr Root-Konto mit dem darunter liegenden Testkonto in der Hierarchie angezeigt. Aktivieren Sie das Kontrollkästchen für Ihr Testkonto und wählen Sie dann Benutzer oder Gruppen zuweisen aus.

Der Workflow Benutzer und Gruppen zuweisen wird angezeigt. Dieser besteht aus den folgenden Schritten:
Wählen Sie für Schritt 1: Benutzer und Gruppen auswählen die Gruppe Administratoren aus, die Sie zuvor in diesem Tutorial erstellt haben. Wählen Sie dann Weiter.

Wählen Sie für Schritt 2: Berechtigungssätze auswählen die Option Berechtigungssatz erstellen aus, um eine neue Registerkarte zu öffnen. Diese führt Sie durch die drei Unterschritte zum Erstellen des Berechtigungssatzes.

Eine neue Browser-Registerkarte wird geöffnet mit der Anzeige Schritt 1: Berechtigungssatztyp auswählen. Treffen Sie die folgenden Auswahlen:
- Wählen Sie als Typ des Berechtigungssatzes die Option Vordefinierter Berechtigungssatz
- Wählen Sie unter Richtlinie für vordefinierten Berechtigungssatz die Option AdministratorAccess aus
- Wählen Sie dann Weiter, um fortzufahren.

Behalten Sie für Schritt 2: Berechtigungssatzdetails angeben die Standardeinstellungen bei und wählen Sie Weiter aus. Die Standardeinstellungen erstellen einen Berechtigungssatz mit der Bezeichnung AdministratorAccess mit einer Sitzungsdauer von einer Stunde.

Stellen Sie für Schritt 3: Überprüfen und erstellen sicher, dass der Berechtigungssatztyp die von AWS verwaltete Richtlinie AdministratorAccess verwendet. Wählen Sie Erstellen.

Sie kehren zur Seite Berechtigungssätzen zurück. Oben auf der Seite wird eine Benachrichtigung angezeigt, die Sie darüber informiert, dass der Berechtigungssatz erfolgreich erstellt wurde. Wählen Sie X, um die Registerkarte zu schließen.

Wählen Sie auf der Browserregisterkarte Benutzer und Gruppen zuweisen für Schritt 2: Berechtigungssätze auswählen im Abschnitt Berechtigungssätze die Option Aktualisieren aus. Der von Ihnen erstellte Berechtigungssatz AdministratorAccess wird in der Liste angezeigt. Aktivieren Sie das Kontrollkästchen für diesen Berechtigungssatz und wählen Sie dann Weiter aus.

Überprüfen Sie für Schritt 3: Überprüfen und Absenden die ausgewählten Benutzer und Gruppen sowie den Berechtigungssatz und wählen Sie dann Absenden aus.

Die Seite wird mit einer Meldung aktualisiert, dass Ihr AWS-Konto konfiguriert wird. Warten Sie, bis der Vorgang abgeschlossen ist.
Sie werden zur Seite AWS-Konten im IAM Identity Center zurückgeleitet. Eine Benachrichtigung informiert Sie darüber, dass Ihr AWS-Konto erneut bereitgestellt und der aktualisierte Berechtigungssatz angewendet wurde.
Im Abschnitt Organisationsstruktur können Sie sehen, dass Ihr AWS-Konto jetzt das Verwaltungskonto im Stammverzeichnis der AWS-Organisation ist. In diesem Tutorial verwenden wir einen Platzhalter für den AWS-Kontonamen Test-acct. Stattdessen wird Ihnen der Name von Ihr AWS-Konto angezeigt.
Herzlichen Glückwunsch, Ihr Benutzer kann sich jetzt bei Ihrem AWS-Zugriffsportal anmelden und auf Ressourcen in Ihrem AWS-Konto zugreifen.


Anmeldung beim AWS-Zugriffsportal mit Ihren Administratoranmeldeinformationen
Jetzt können Sie sich mit Ihrem neuen Administratorbenutzer anmelden. Wenn Sie zuvor versucht hätten, sich anzumelden, hätten Sie nur Ihr Passwort festlegen und die Multi-Faktor-Authentifizierung (MFA) für Ihren Benutzer aktivieren können, da dem Benutzer keine anderen Berechtigungen gewährt wurden. Jetzt verfügt der Benutzer über vollständige Berechtigungen für Ihre AWS-Ressourcen, muss jedoch weiterhin ein Passwort konfigurieren und MFA einrichten. Lassen Sie uns diese Verfahren also Schritt für Schritt durchgehen.
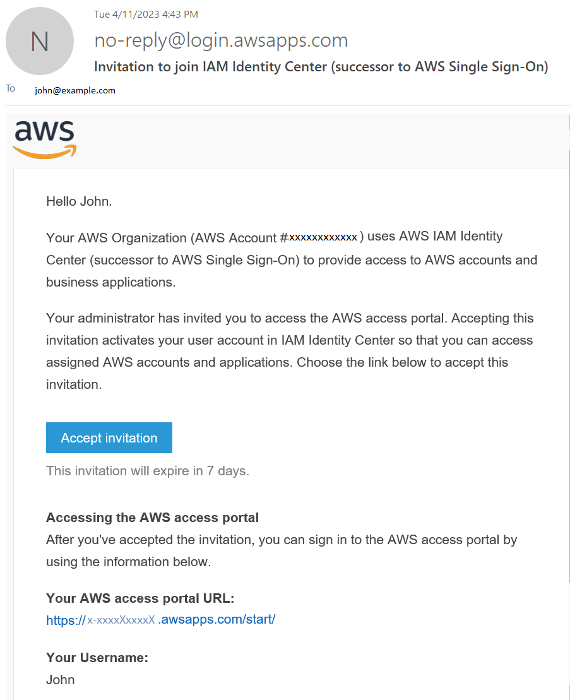
Eine neue Benutzer-E-Mail wurde an die E-Mail-Adresse gesendet, die Sie beim Erstellen des Benutzers angegeben haben. Die E-Mail enthält drei wichtige Elemente:
- Ein Link, um die Einladung zum Beitritt zu akzeptieren
- Die URL Ihres AWS-Zugriffsportals
- Ihr Benutzername, mit dem Sie sich anmelden
Öffnen Sie die E-Mail und notieren Sie die URL des AWS-Zugriffsportals und den Benutzernamen für die zukünftige Verwendung. Wählen Sie dann den Link Einladung annehmen aus.
Tipp: Wenn Sie die E-Mail-Einladung zum Beitritt zum IAM Identity Center nicht in Ihrem Posteingangsordner finden, überprüfen Sie Ihre Ordner für Spam, Junk und gelöschte Objekte (oder Papierkorb). Alle vom IAM-Identity-Center-Service gesendeten E-Mails werden entweder von der Adresse no-reply@signin.aws oder no-reply@login.awsapps.com gesendet. Wenn Sie die E-Mail nicht finden können, melden Sie sich als Root-Benutzer an und setzen Sie das Passwort des Identity-Center-Benutzers zurück. Anweisungen finden Sie unter Zurücksetzen eines Benutzerpassworts im IAM Identity Center. Wenn Sie die E-Mail immer noch nicht erhalten, setzen Sie das Passwort erneut zurück und wählen Sie die Option Ein Einmalpasswort generieren, das Sie stattdessen mit dem Benutzer teilen können.
Der Link öffnet ein Browserfenster und zeigt die Seite Anmeldung neuer Benutzer an.
Geben Sie auf der Anmeldeseite für neue Benutzer ein neues Passwort ein.
Passwörter müssen wie folgt lauten:
- 8 bis 64 Zeichen lang
- Bestehend aus Groß- und Kleinbuchstaben, Zahlen und nicht-alphanumerischen Zeichen.
Nachdem Sie das Passwort bestätigt haben, wählen Sie Neues Passwort festlegen.
Bei der Bereitstellung des Benutzers kommt es zu einer kurzen Verzögerung.

Die AWS-Konsole wird geöffnet.
Wählen Sie in der oberen Leiste neben dem Benutzernamen die Option MFA-Geräte aus, um MFA einzurichten.
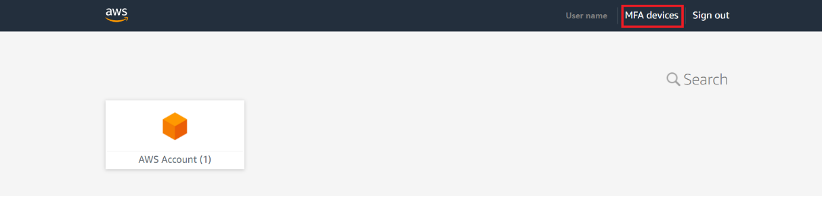
Die Seite Multi-Faktor-Authentifizierungsgeräte (MFA) wird geöffnet. Wählen Sie Gerät registrieren.

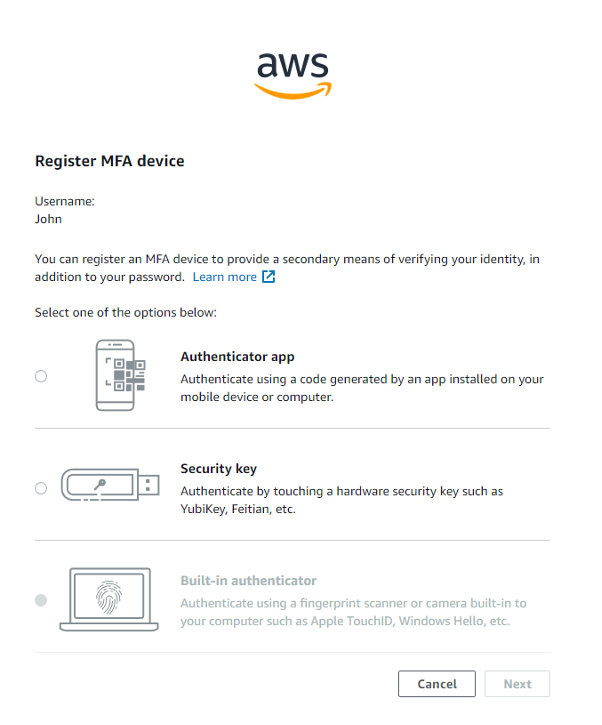
Wählen Sie auf der Seite MFA-Gerät registrieren das MFA-Gerät aus, das mit dem Konto verwendet werden soll. Optionen, die von Ihrem Browser oder Ihrer Plattform nicht unterstützt werden, sind ausgegraut und können nicht ausgewählt werden.
Wir gehen die Bildschirme für die Option Authentifizierungs-App durch. Dies ähnelt dem Vorgang, den Sie beim Festlegen des MFA-Geräts für Ihren Root-Benutzer im ersten Teil des Tutorials durchgeführt haben. Der Unterschied besteht darin, dass dieses MFA-Gerät beim IAM Identity Center und nicht bei IAM registriert wird. Wenn Sie ein anderes MFA-Gerät auswählen, befolgen Sie die Anweisungen für das von Ihnen ausgewählte Gerät.
Wählen Sie den Link QR-Code anzeigen, um einen eindeutigen QR-Code für Ihre AWS-Organisation anzuzeigen. Wenn Sie den QR-Code nicht scannen können, wählen Sie den Link Geheimen Schlüssel anzeigen, um einen Textschlüssel anzuzeigen. Diesen können Sie in der Authentifizierungs-Anwendung eingeben, um Ihre Organisation zu identifizieren. Scannen Sie entweder den QR-Code mit Ihrer Authentifizierungs-Anwendung oder geben Sie den Code in Ihre Authentifizierungs-Anwendung ein, um Ihr Authentifizierungsgerät mit Ihrer Organisation zu verknüpfen.
Sobald Ihr Authentifizierer die Verbindung zu Ihrer Organisation hergestellt hat, generiert er geheime Codes, die für eine begrenzte Anzahl von Sekunden gültig sind. Geben Sie unter Authentifizierungs-Code den Code ein, den Sie in der App sehen, und wählen Sie dann MFA zuweisen aus.
Hinweis: Bei der Registrierung eines MFA-Geräts beim IAM Identity Center ist nur ein Authentifizierungscode für die Registrierung erforderlich.
Ihr Gerät wurde erfolgreich registriert. Wählen Sie Fertig.


Sie können über die Seite MFA-Geräte ein anderes Gerät registrieren, Ihr vorhandenes MFA-Gerät umbenennen oder löschen.
Wählen Sie in der Navigationsleiste AWS-Zugriffsportal aus, um zum Hauptportal zurückzukehren und auf ein AWS-Konto zuzugreifen.

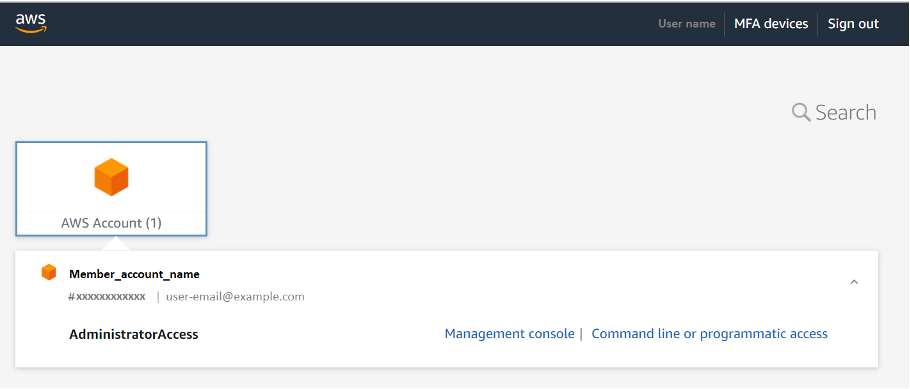
Wählen Sie im Zugriffsportal das zu verwaltende AWS-Konto aus. Ihnen werden die für Ihr Konto konfigurierten Berechtigungen mit zwei Verbindungsoptionen angezeigt.
- Wählen Sie Managementkonsole, um die AWS-Managementkonsole zu öffnen und Ihre AWS-Ressourcen mithilfe der Dashboards der Servicekonsole zu verwalten.
- Wählen Sie Befehlszeilen- oder programmgesteuerter Zugriff, um Anmeldeinformationen für den programmgesteuerten Zugriff auf AWS-Ressourcen oder über die AWS CLI zu erhalten. Weitere Informationen zum Abrufen dieser Anmeldeinformationen finden Sie unter Abrufen von Benutzeranmeldeinformationen in IAM Identity Center für die AWS CLI oder AWS-SDKs.
Wählen Sie für dieses Tutorial Managementkonsole aus.
Die AWS-Managementkonsole wird geöffnet. Als Benutzer mit Administratorzugriff können Sie Services hinzufügen, weitere Benutzer hinzufügen sowie Richtlinien und Berechtigungen konfigurieren. Sie müssen für diese Aufgaben nicht länger Ihren Root-Benutzer verwenden.
Zusammenfassung
Herzlichen Glückwunsch! Sie haben nun den Anmeldevorgang abgeschlossen, einen Administratorbenutzer im IAM Identity Center erstellt, die Sicherheit sowohl für Ihren Root-Benutzer als auch für Ihren Administratorbenutzer erhöht und sind bereit, mit der Arbeit mit AWS-Services und -Anwendungen zu beginnen. Denken Sie daran: Wenn Sie sich mit Ihrem Identity Center-Administratorbenutzer anmelden, verwenden Sie die URL des Zugriffsportals, die Sie in Ihrer Einladungs-E-Mail erhalten haben.
Wichtig: Jede AWS-Organisation verfügt über eine eindeutige Zugriffsportal-URL. Stellen Sie sicher, dass Sie dies zusammen mit Ihren Benutzer-Anmeldeinformationen dokumentieren.