Getting Started / Hands-on / ...
Deploy a P4d EC2 UltraCluster
Amazon EC2 P4d instances deliver the highest performance for machine learning (ML) training and high performance computing (HPC) applications in the cloud. Amazon EC2 P4d instances are deployed in hyperscale clusters called EC2 UltraClusters that are comprised of the high performance compute, networking, and storage in the cloud. Each EC2 UltraCluster of P4d instances comprises more than 4,000 of the latest NVIDIA A100 GPUs, Petabit-scale non-blocking networking infrastructure, and high throughput low latency storage with FSx for Lustre.
This step-by-step tutorial will help you launch a high performance HPC cluster in the cloud using EC2 UltraClusters of P4d Instances. You will setup the underlying networking for the cluster, deploy FSx for Lustre and P4d cluster, and delete your AWS resources.
Before launching an EC2 UltraCluster it is recommended first to launch a single P4d instance and get familiar with the instance type. Also note in which Availability Zone in your account and region you launched the P4d instance. You will need this information later in the tutorial.
You complete the following steps in this tutorial:
- Login to the AWS Console
- Create a private subnet with a NAT Gateway
- Create 3 security groups for access to the EC2 UltraCluster
- Launch a FSx for Lustre file system
- Launch a cluster of EC2 P4d instances with 4 EFA ENIs
- Launch a jumphost
- Deprovision resources in the EC2 UltraCluster
| About this Tutorial | |
|---|---|
| Time | 10 minutes |
| Cost | Costs Apply |
| Use Case | Compute |
| Products | Amazon EC2 P4d |
| Audience | Developer |
| Level | Intermediate |
| Last Updated | December 8, 2020 |
Already have an account? Sign-in
1. Login to the AWS Console
When you click here, the AWS Management Console will open in a new browser window, so you can keep this step-by-step guide open. When the screen loads, enter your user name and password to get started. Then type VPC in the search bar and select VPC to open the console.
2. Create a private subnet with a NAT Gateway
The EC2 UltraCluster will have multiple elastic network interfaces per instance. We will need to create the instances in a private subnet and route a NAT Gateway through a public subnet with the internet gateway (IGW) attached.
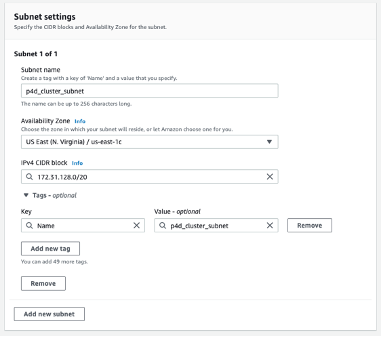
a. Create a subnet in your VPC with an available free CIDR range this CIDR range needs to be able to accommodate the number of instances you want to launch * 4.
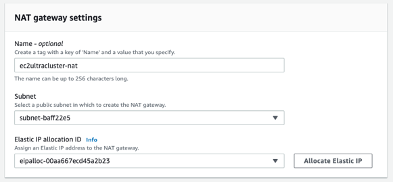
b. Create a NAT Gateway by going to NAT Gateways in the side menu launching a gateway in public subnet in the VPC. This will take a few minutes to provision.
c. After provisioning is complete go to route tables and create a new route table selecting the VPC that your Gateway was created in. In Routes for the route table add a route for the destination 0.0.0.0/0 where the target is the NAT Gateway ID you created earlier.

d. Associate this route table with the private subnet you created earlier, right click on the route table ID and choose “edit subnet associations”.
3. Create security groups for access to the EC2 UltraCluster
We will create 2 security groups with different policies for access for-
- external SSH access
- EFA networking.
a. In the EC2 Console navigate to the security groups and choose create security groups.
- Choose the VPC used earlier to associate this security group with
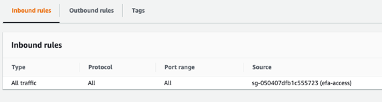
- For EFA: For inbound rules add All traffic on all ports in scope of the security group that is being created.
- For EFA: For outbound rules add All traffic on all ports in scope of the security group being created.

b. For the new SSH security group ensure that TCP port 22 is open inbound with outbound set to 0.0.0.0/0.
4. Launch a FSx for Lustre file system
As part of the EC2 UltraClusters you will need to launch a FSx for Lustre file system. You can use any of the existing FSx for Lustre file system tutorials or blogs but needs to be launched in the private subnet you created earlier.
a. In the FSx for Lustre console click on Create file system
b. Choose Amazon FSx for Lustre and click Next.
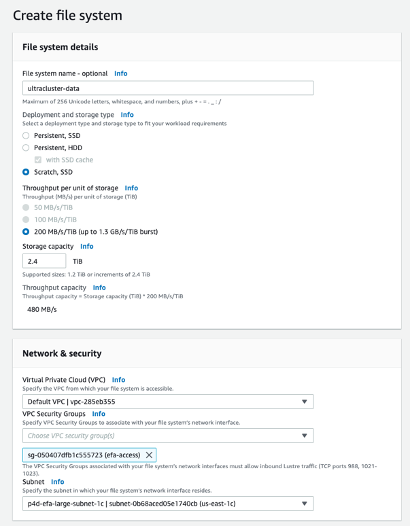
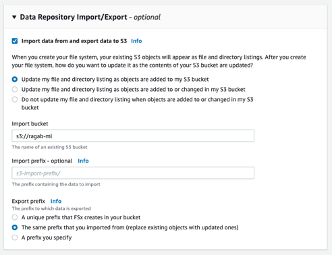
c. Fill in the form similar to screenshot with the following parameters:
- Deployment & storage type: Scratch,SSD
- Throughput per unit of storage: 200 MBs/TB
- Storage Capacity: 2.4TiB
- Virtual Private Cloud: VPC of the private subnet created earlier
- VPC Security Groups: Choose the EFA security group you created earlier
- Subnet: Private subnet created earlier
d. Choose an S3 bucket for data ingestion. The dataset for this tutorial is the BERT dataset. If you don’t have it, we can use synthetic benchmarks.
e. Wait until the FSx cluster is in the Available state. Note the dnsname and mountname of the cluster.
5. Launch a cluster of EC2 P4d instances with 4 EFA ENIs
We can launch the compute layer of the EC2 UltraCluster. You can use the Deep Learning AMI v36 for support for P4d or create your own. You will need to install the FSx client drivers.
In the EC2 management console, select in the EC2 Dashboard to launch an instance.
a. Select the AMI with A100 support as well as have the FSx client driver installed.
b. Instance Type choose: p4d.24xlarge
c. For the instance details choose the number of instances you want in the count.
d. Choose the VPC and private subnet created earlier.
e. Select a placement group created as a cluster.
f. For network interfaces add 3 more network interfaces with “Elastic Fabric Adapter” checked.
g. Set the NetworkCardIndex for each EFA adapter to 0,1,2,3 .

h. Add any relevant tags in the next screen for the Security Group section choose the security groups created earlier for SSH and EFA access.
i. Launch the instance and confirm they have 4 private IP addresses per node.
6. Launch a jumphost
Since the cluster is a private subnet. We need to launch a jumphost in the public subnet to be able to access the P4d instance in the EC2 UltraCluster. In the EC2 Console launch an EC2 instance, for example t3a.xlarge, in a public subnet of the VPC. Attach the security groups created earlier. Once the instance launched you can ssh into the instance and then ssh into one of the p4d.24xlarge nodes in the cluster.
7. Deprovision resources in the EC2 UltraCluster
You can easily delete the EC2 P4d cluster from the EC2 console and the FSx for Lustre file system from the FSx console. In fact, it is a best practice to delete resources you are no longer using so you don’t keep getting charged for them.
Congratulations!
You have just launched a P4d instance in the EC2 UltraCluster. With this cluster you can run large scale distributed deep learning workflows with the best practices for compute and storage.
EC2 UltraClusters is an optimized placement strategy for the EC2 P4d instances and FSx for Lustre file system. EC2 UltraClusters are supported in managed services such as Amazon Elastic Kubernetes Service (EKS). Follow examples on Github to launch an EC2 UltraCluster with containers using Amazon EKS.