Break a Monolithic Application into Microservices with AWS Copilot, Amazon ECS, Docker, and AWS Fargate
TUTORIAL


Module Three: Break the Monolith
Overview
The final application architecture uses Amazon ECS and the Application Load Balancer (ALB).
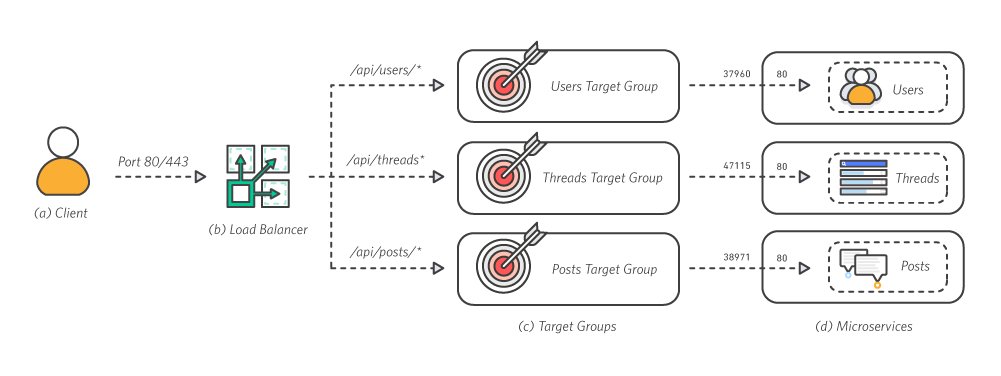
a. Client – The client makes traffic requests over port 80.
b. Load Balancer – The ALB routes external traffic to the correct service. The ALB inspects the client request and uses the routing rules to direct the request to an instance and port for the target group matching the rule.
c. Target Groups – Each service has a target group that keeps track of the instances and ports of each container running for that service.
d. Microservices – Amazon ECS deploys each service into a container across an EC2 cluster. Each container only handles a single feature.
Why microservices?
Isolation of crashes
Even the best engineering organizations can and do have fatal crashes in production. In addition to following all the standard best practices for handling crashes gracefully, one approach that can limit the impact of such crashes is building microservices. Good microservice architecture means that if one micro piece of your service is crashing, then only that part of your service will go down. The rest of your service can continue to work properly.
Isolation for security
In a monolithic application, if one feature of the application has a security breach, for example a vulnerability that allows remote code execution, then you must assume that an attacker could have gained access to every other feature of the system as well. This can be dangerous if, for example, your avatar upload feature has a security issue which ends up compromising your database with user passwords. Separating features into microservices using Amazon ECS allows you to secure access to AWS resources by giving each service its own AWS Identity and Access Management (IAM) role. When microservice best practices are followed, the result is that if an attacker compromises one service, they only gain access to the resources of that service, and cannot horizontally access other resources from other services without breaking into those services as well.
Independent scaling
When features are broken out into microservices, then the amount of infrastructure and number of instances used by each microservice class can be scaled up and down independently. This makes it easier to measure the cost of a particular feature and identify features that may need to be optimized first. If one particular feature is having issues with its resource needs, other features will not be impacted and reliable performance can be maintained.
Development velocity
Microservices lower the risks in development, which can enable a team to build faster. In a monolith, adding a new feature can potentially impact every other feature that the monolith contains. Developers must carefully consider the impact of any code they add, and ensure that they do not break anything. On the other hand, a proper microservices architecture has new code for a new feature going into a new service. Developers can be confident that any code they write will actually not be able to impact the existing code at all unless they explicitly write a connection between two microservices.
What you will accomplish
In this module, you will break the Node.js application into several interconnected services and create an AWS Copilot Service for each microservice.
Minimum time to complete
20 minutes
Services used
AWS Copilot
Implementation
Follow these step-by-step instructions to break the monolith.
Step 1: Create the services
In the previous module, you created and deployed the api Application and the api Environment. You can reuse these to deploy microservices. In this module, the code for the application has been divided into three microservices: posts, threads, and users. Each one will be deployed as a service. The monolith service was deployed using the CLI menu. In this module, you can deploy services by specifying the flags for the copilot svc init command. Create the post microservice first.
$ copilot svc init --app api --dockerfile ./3-microservices/services/posts/Dockerfile --name posts --svc-type "Load Balanced Web Service"

✔ Wrote the manifest for service posts at copilot/posts/manifest.yml
Your manifest contains configurations like your container size and port (:3000).

- Update regional resources with stack set "microservices-infrastructure"  [succeeded]  [0.0s]
Recommended follow-up actions:
  - Update your manifest copilot/posts/manifest.yml to change the defaults.
- Run `copilot svc deploy --name posts --env test` to deploy your service to a test environment.Repeat for threads and users microservices.
$ copilot svc init --app api --dockerfile ./3-microservices/services/threads/Dockerfile --name threads --svc-type "Load Balanced Web Service"

$ copilot svc init --app api --dockerfile ./3-microservices/services/users/Dockerfile --name users --svc-type "Load Balanced Web Service"
Step 2: Edit the path in the manifest.yml for each microservice.
AWS Copilot sets the path to a Service based on the Service name. However, the route to the microservice in server.js is api/<service name>. Edit the path in each microservice manifest, and add api/ to the path.
# Distribute traffic to your service.
http:
  # Requests to this path will be forwarded to your service.
  # To match all requests you can use the "/" path.
path: 'api/posts'Up Next: Deploy Microservices