Deploy a Container Web App on Amazon Lightsail
TUTORIAL


Module 3: Deploy a Container
In this module, we will deploy our container to the cloud
Overview
Now that your Amazon Lightsail container service is ready, the next step is to deploy your container.
Amazon Lightsail is able to deploy containers from public container image repositories such as Docker Hub, Amazon ECR Public Gallery, or your local machine.
In this tutorial, we will deploy directly from your local computer.
What you will accomplish
- Push a local container image to Amazon Lightsail
- Deploy a version of your container image on a container service
Minimum time to complete
10 minutes
Module prerequisites
- AWS account with administrator-level access*
- Recommended browser: The latest version of Chrome or Firefox
*Accounts created within the past 24 hours might not yet have access to the services required for this tutorial.
Implementation
Push a local container image
The first step to deploy a container is to push a container image to Amazon Lightsail.
Open a terminal in the directory in which you created your container and enter the following command. Make sure to use the same Region in which you created your Lightsail container service.
aws lightsail push-container-image --region eu-west-3 --service-name signup-application --label latest --image demo-flask-signup:latestThe command outputs a message, such as the following:
# aws lightsail push-container-image --region eu-west-3 --service-name signup-application --label latest --image demo-flask-signup:latest
f017a6ddb209: Pushed
b94dee417b5e: Pushed
37d77b23a488: Pushed
8e77a3b871e7: Pushed
4bc5d67b6427: Pushed
ce8ffb5c560e: Pushed
4226d5d0360f: Pushed
9d1af766c818: Pushed
d97733c0a3b6: Pushed
c553c6ba5f13: Pushed
48b4a40de359: Pushed
ace9ed9bcfaf: Pushed
764055ebc9a7: Pushed
Digest: sha256:128f84907d30a1fb47c1888720485fa8050cc99bc1034e0cfd1f46d3b6e57e19
Image "demo-flask-signup:latest" registered.
Refer to this image as ":signup-application.latest.1" in deployments.
The command invokes docker push to upload your image to Amazon Lightsail. It might take a couple of minutes to complete, depending on your network bandwidth.
The last line of the output is giving the internal name of your container; in our case, it's :signup-application.latest.1. Note the name, because we will need it to deploy the container onto the container service. In case you want to access the container name at a later stage, you can enter the following command:
aws lightsail get-container-images --region eu-west-3 --service-name signup-applicationThe command outputs a message, such as the following:
# aws lightsail get-container-images --region eu-west-3 --service-name signup-application
{
"containerImages": [
{
"image": ":signup-application.latest.1",
"digest": "sha256:128f84907d30a1fb47c1888720485fa8050cc99bc1034e0cfd1f46d3b6e57e19",
"createdAt": "2024-03-13T14:20:08-04:00"
}
]
}
Push a local container image to LightSail
Now that the container image is stored on Amazon Lightsail, we can deploy that image to the container service.
Lightsail requires the following information to create a deployment:
- The name of the container image to deploy (:signup-application.latest.1 as returned by the previous command)
- The network port exposed by the container (as described in the Dockerfile configuration)
- (optional) Details of a publicly accessible network endpoint: a TCP port number and protocol; the IP will be assigned automatically.
All this information is stored in a JSON file that you need to create before the deployment.
Create a JSON file named lc.json. If you are working from the downloaded code, you will modify the existing lc.json file which is in the same directory as your container. Copy the following json into the file:
{
    "serviceName": "signup-application",
    "containers": {
        "signup-app-container": {
            "image": ":signup-application.latest.1",
            "ports": {
                "80": "HTTP"
            }
        }
    },
    "publicEndpoint": {
        "containerName": "signup-app-container",
        "containerPort": 80
    }
}Then, deploy the container by entering the following command:
aws lightsail create-container-service-deployment --region eu-west-3 --cli-input-json file://lc.jsonThe command outputs a message, such as the following:
# aws lightsail create-container-service-deployment --region eu-west-3 --cli-input-json file://lc.json
{
"containerService": {
"containerServiceName": "signup-application",
"arn": "arn:aws:lightsail:eu-west-3:012345678901:ContainerService/528a0bcf-fd14-42d4-a09a-943a241adc51",
"createdAt": "2024-03-15T11:43:10-04:00",
"location": {
"availabilityZone": "all",
"regionName": "eu-west-3"
},
"resourceType": "ContainerService",
"tags": [],
"power": "nano",
"powerId": "nano-1",
"state": "DEPLOYING",
"scale": 2,
"nextDeployment": {
"version": 1,
"state": "ACTIVATING",
"containers": {
"signup-app-container": {
"image": ":signup-application.latest.1",
"command": [],
"environment": {},
"ports": {
"80": "HTTP"
}
}
},
"publicEndpoint": {
"containerName": "signup-app-container",
"containerPort": 80,
"healthCheck": {
"healthyThreshold": 2,
"unhealthyThreshold": 2,
"timeoutSeconds": 2,
"intervalSeconds": 5,
"path": "/",
"successCodes": "200-499"
}
},
"createdAt": "2024-03-15T11:43:10-04:00"
},
"isDisabled": false,
"principalArn": "arn:aws:iam::577312533299:role/amazon/lightsail/eu-west-3/containers/signup-application/1jetjd21p8qshe57seuh71tnrnn29ps77lnno20sbgl2ghbuc0r0",
"privateDomainName": "signup-application.service.local",
"url": "https://signup-application.me04fvc6dbk4e.eu-west-3.cs.amazonlightsail.com/"
}
}
Notice the "state": "ACTIVATING" status. After a while, the state becomes ACTIVE. The deployment takes a few minutes to complete. You can check the next and current state of your deployment using the following commands:
aws lightsail get-container-services --region eu-west-3 --query "containerServices[].nextDeployment.state"aws lightsail get-container-services --region eu-west-3 --query "containerServices[].currentDeployment.state" Test your deployment
To test your deployment, first retrieve the URL Lightsail created for you. Open a terminal and enter the following command:
aws lightsail get-container-services --region eu-west-3 --query "containerServices[].url"
The command outputs a message, such as the following:
# aws lightsail get-container-services --region eu-west-3 --query "containerServices[].url"
[
"https://signup-application.me04fvc6dbk4e.eu-west-3.cs.amazonlightsail.com/"
]
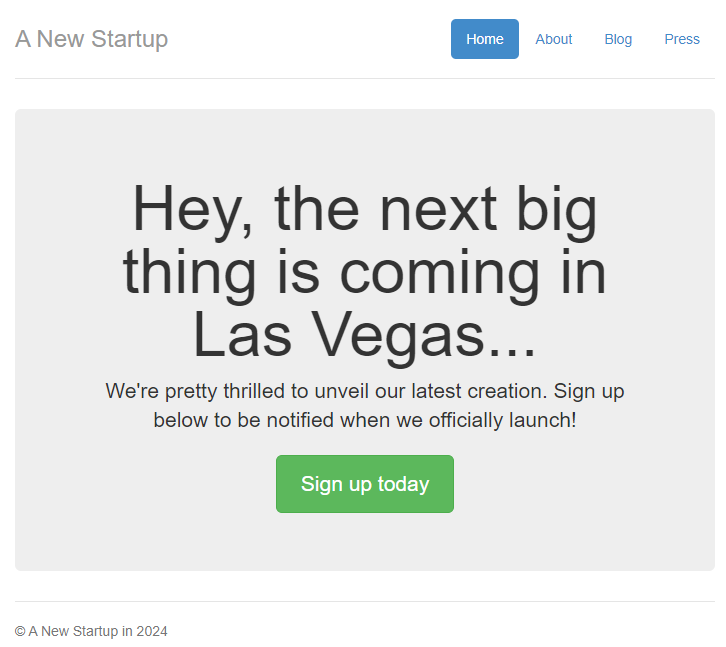
Open your favorite browser and point it to your deployment URL.
Alternatively, you can use cURL to test the endpoint from the command line:
# curl -I https://signup-application.me04fvc6dbk4e.eu-west-3.cs.amazonlightsail.com/
HTTP/2 200
date: Sat, 17 Jul 2021 13:38:04 GMT
content-type: text/html; charset=utf-8
content-length: 4579
server: nginx/1.21.1
Congratulations! Your container is now deployed onto Amazon Lightsail.
Conclusion
In this module, you learned how to deploy a container to Amazon Lightsail. In the next module, you are going to learn how to update your container.
Up Next: Update Container