Deploy a Container Web App on Amazon Lightsail
TUTORIAL


Module 1: Prepare Your Container
In this module, we will create a basic containerized web application
Overview
In this module, we will be reviewing the sample application provided with this tutorial. We will work through building a container to run the provided web application locally and test the web application on our local laptop before deploying it to the cloud.
What you will accomplish
In this module, you will:
- Build a container for an existing web application
- Run a container to test an application locally
Prerequisites
Before starting this tutorial, you will need:
- Docker Desktop installed
- Basic working knowledge of Docker commands
Minimum time to complete
10 minutes
Module prerequisites
- AWS account with administrator-level access*
- Recommended browser: The latest version of Chrome or Firefox
*Accounts created within the past 24 hours might not yet have access to the services required for this tutorial.
Implementation
Create the client app
The web application provided in the code folder later in this module and on the Introduction page of this tutorial is a web application developed with the Flask application framework for Python.
In a nutshell, the Flask framework includes a mini server to receive HTTP requests, a routing mechanism to associate specific requests (an HTTP verb and a /path) to your Python code, and a templating engine to render the final HTML.
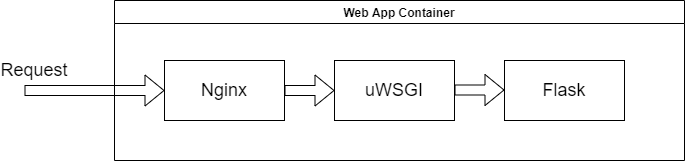
A best practice is to have a dedicated web server in front of your Flask application. The web server is configured to serve static content, such as images, style sheets (CSS), and JavaScript (JS) files. The web server forwards all other requests to your Flask application. For this tutorial, we chose to use the Nginx web server.
The communication between Nginx and the Flask app is made with uWSGI protocol. The uWSGI component is provided by Flask.
The setup of the application is illustrated by this image.
The application is made of the following files:
- application.py, the core of the application, defines attributes of the app, such as the logic and the communication with a backend, if any.
- Pipfile lists the Python dependencies of the web application.
- Dockerfile configures the container. It starts from an official Nginx container, adds Python, Flask, and its dependencies. Then, it copies the Nginx configuration file and a startup script.
- nginx-app.conf is the Nginx configuration file. It makes sure static content is served by Nginx while other requests are passed on to uWSGI/Flask.
- start.sh starts the Nginx and uWSGI daemons.
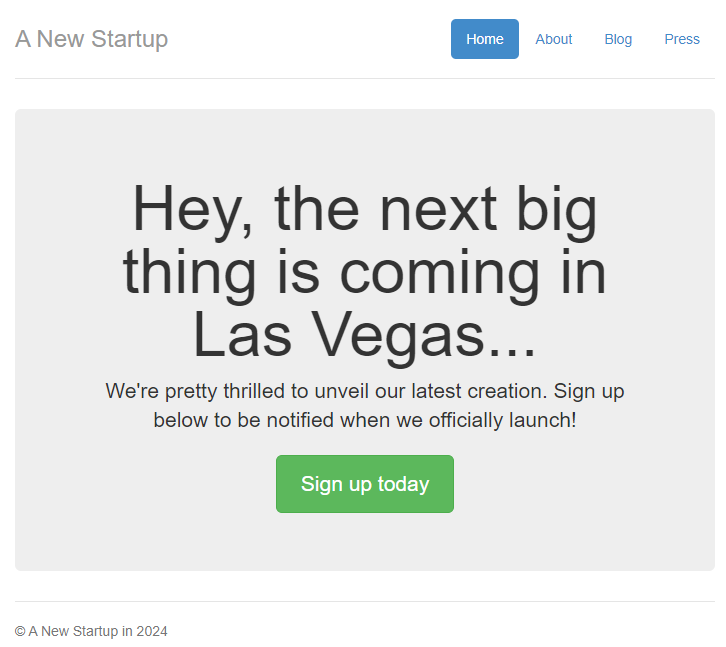
The application is a simple web application to announce the launch of a new service or product and has a form to capture pre-registrations.
Download the project
To build and test the container, download a local copy of the project. You can download a zip containing the files here.
After extracting the files from the zip, make sure to change your command or terminal window to the corresponding directory.
From now on, all commands are assuming you have navigated to this directory.
Build your container
Now that you have a good idea of the main application components and how they work together, let's build a container.
To build the application inside a container, use your terminal to navigate to the directory with your files and enter the following commands:
docker build -t demo-flask-signup .
If you run this tutorial on an Apple Silicon-based device, use Docker's multi-architecture build feature. To ensure your containers will run on Amazon Lightsail, use the following additional commands:
docker buildx create lightsaildemo
docker buildx build -t demo-flask-signup:amd-build-latest --platform linux/amd64 . —load After a few minutes (depending on your internet bandwidth), the container is built.
You can list all container images on your system using the following command:
docker imagesThe output of the command should appear similar to the output below:
REPOSITORY TAG IMAGE ID CREATED SIZE
demo-flask-signup latest ad80ca6ce65d 44 seconds ago 725MB
Test your container
To test the container on your local machine, first start the container, then point a browser at it.
docker run -p 8080:80 --rm -v ~/.aws:/root/.aws demo-flask-signup:latestThe options passed to the docker run command are
- -p 8080:80 to bridge your local machine TCP Port 8080 to the container port 80 (Nginx)
- --rm to instruct Docker to remove the container when it stops
- -v ~/.aws:/root/.aws to map your local machine AWS CLI configuration in directory ~/.aws to the container directory /root/.aws
- Finally, demo-flask-signup:latest - the name and tag of the container we just built.
Now that the container is running, open a browser and point it at http://localhost:8080. You should see the application home screen, as shown below.
Congratulations, you now have a container ready to be deployed into the cloud.
Conclusion
In this first module, we built a very basic container application and ran it locally to ensure it works. In the next module, we will learn how to create a Amazon Lightsail container service.
Up Next: Create Infrastructure