Deploy a Container Web App on Amazon Lightsail
TUTORIAL


Module 2: Create a Container Service
In this module, you will learn how to create a Lightsail container service
Overview
An Amazon Lightsail container service is a compute resource where you can deploy your Docker images. When you deploy your images to your Lightsail container service, the service automatically launches and runs your containers in the AWS infrastructure.
You can think of your Lightsail container service as a computing environment that lets you run containers on AWS infrastructure by using images that you create. In addition to the compute resources, container services allocate a DNS name, a TLS certificate, and an optional network load balancer to distribute network traffic among the multiple instances of your containers.
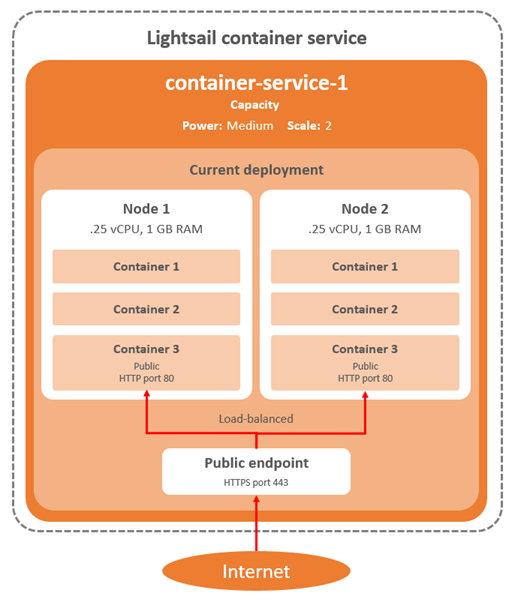
When creating a Lightsail container service, you choose the AWS Region where the service is created, and the compute power needed by your application. You can choose any capacity between 1 and 20 nodes, each node having between 0.25 vCPU and 4vCPUs, and 512Mb and 8Gb of RAM.
You can change the number of nodes and the size of the node at any time, depending on your application usage.
What you will accomplish
- Install Amazon Lightsail extensions to the AWS CLI
- Create a container service
Minimum time to complete
10 minutes
Module prerequisites
- AWS account with administrator-level access*
- Recommended browser: The latest version of Chrome or Firefox
*Accounts created within the past 24 hours might not yet have access to the services required for this tutorial.
Implementation
Install the AWS CLI Lightsail extension
To interact with Amazon Lightsail containers, you will need to install the AWS CLI and the container service plugin, a set of extensions allowing Lightsail to manipulate Docker containers. This is a one-time setup.
If you don't have the Lightsail CLI or container service plugin installed, you can follow the instructions located here for your operating system.
Create container service
To deploy our container, we first create a Lightsail container service. The container service is the compute infrastructure required to deploy and run your containers.
A container service is made of compute nodes, a TLS certificate, a DNS domain name, and an optional load balancer.
You need to select an option for three parameters before you create a container service:
- The AWS Region where you want to deploy your containers. Usually, you choose a Region geographically close to where your customers are. See Regions and Zones for a full list of AWS Regions and Availability Zones.
- The size of the compute nodes. Sizes are expressed as t-shirt sizes between Nano (0.25 vCPU and 512Mb RAM) and XLarge (4 vCPUS and 8Gb RAM).
- The number of nodes to be allocated, between 1 and 20.
To create the Lightsail container service, open a terminal and enter the following command:
aws lightsail create-container-service --region eu-west-3 --service-name signup-application --power nano --scale 1Here, we chose to deploy in the AWS Europe (Paris) Region (eu-west-3), using one Nano compute node.
The command outputs a JSON message, such as the following:
# aws lightsail create-container-service --region eu-west-3 --service-name signup-application --power nano --scale 1
{
"containerService": {
"containerServiceName": "signup-application", "arn": "arn:aws:lightsail:eu-west-3:012345678901:ContainerService/528a0bcf-fd14-42d4-a09a-943a241adc51",
"createdAt": "2024-03-18T10:25:22-04:00",
"location": {
"availabilityZone": "all",
"regionName": "eu-west-3"
},
"resourceType": "ContainerService",
"tags": [],
"power": "nano",
"powerId": "nano-1",
"state": "PENDING",
"scale": 1,
"isDisabled": false,
"principalArn": "",
"privateDomainName": "signup-application.service.local",
"url": "https://signup-application.me04fvc6dbk4e.eu-west-3.cs.amazonlightsail.com/"
}
}
Notice the "state": "PENDING" status. After a while, the state becomes READY. You can check the state of your container service using the following command:
aws lightsail get-container-services --region eu-west-3 --service-name signup-application --query "containerServices[].state"The command outputs a JSON message, such as the following:
# aws lightsail get-container-services --region eu-west-3 --service-name signup-application --query "containerServices[].state"
[
"READY"
]
You can change the number of nodes and the size of the node at any time, depending on your application usage. Here is an example to change scale from one to two:
aws lightsail update-container-service --region eu-west-3 --service-name signup-application --scale 2 Congratulations, your container service is now ready to host your containers.
Conclusion
In this module, you learned how to create an Amazon Lightsail container service. In the next module, you are going to learn how to deploy this to the cloud and how you can update your app when there are changes.
Up Next: Deploy Container