Deploy a Machine Learning Model to a Real-Time Inference Endpoint
TUTORIAL
Overview
In this tutorial, you learn how to deploy a trained machine learning (ML) model to a real-time inference endpoint using Amazon SageMaker Studio.
SageMaker Studio is an integrated development environment (IDE) for ML that provides a fully managed Jupyter notebook interface in which you can perform end-to-end ML lifecycle tasks, including model deployment.
SageMaker offers different inference options to support a broad range of use cases:
- SageMaker Real-Time Inference for workloads with low latency requirements in the order of milliseconds
- SageMaker Serverless Inference for workloads with intermittent or infrequent traffic patterns
- SageMaker Asynchronous Inference for inferences with large payload sizes or requiring long processing times
- SageMaker batch transform to run predictions on batches of data
In this tutorial, you will use the Real-Time Inference option to deploy a binary classification XGBoost model that has already been trained on a synthetic auto insurance claims dataset. The dataset consists of details and extracted features from claims and customer tables along with a fraud column indicating whether a claim was fraudulent or otherwise. The model predicts the probability of a claim being fraudulent. You will play the role of a machine learning engineer to deploy this model and run sample inferences.
What you will accomplish
In this guide, you will:
- Create a SageMaker model from a trained model artifact
- Configure and deploy a real-time inference endpoint to serve the model
- Invoke the endpoint to run sample predictions using test data
- Attach an autoscaling policy to the endpoint to handle traffic changes
Prerequisites
Before starting this guide, you will need:
- An AWS account: If you don’t already have an account, follow the Setting Up Your AWS Environment getting started guide for a quick overview.
- Public VPC configured: This stack assumes that you already have a public VPC set up in your account. If you do not have a public VPC, see VPC for a test environment to learn how to create a VPC.
AWS experience
Beginner
Time to complete
25 minutes
Cost to complete
See SageMaker pricing to estimate cost for this tutorial.
Requires
Active AWS account
Public VPC configured
Services used
Amazon SageMaker Real-time Inference, Amazon SageMaker Studio
Last updated
April 25, 2023
Implementation
Step 1: Set up your Amazon SageMaker Studio domain
Choose the AWS CloudFormation stack link. This link opens the AWS CloudFormation console and creates your SageMaker Studio domain and a user named studio-user. It also adds the required permissions to your SageMaker Studio account. In the CloudFormation console, confirm that US East (N. Virginia) is the Region displayed in the upper right corner. Stack name should be CFN-SM-IM-Lambda-Catalog, and should not be changed. This stack takes about 10 minutes to create all the resources.

Select I acknowledge that AWS CloudFormation might create IAM resources, and then choose Create stack.

On the CloudFormation pane, choose Stacks. It takes about 10 minutes for the stack to be created. When the stack is created, the status of the stack changes from CREATE_IN_PROGRESS to CREATE_COMPLETE.

Step 2: Set up a SageMaker Studio notebook
Enter SageMaker Studio into the console search bar, and then choose SageMaker Studio.


Open the SageMaker Studio interface. On the navigation bar, choose File, New, Notebook.

In the Set up notebook environment dialog box, under Image, select Data Science. The Python 3 kernel is selected automatically. Choose Select.

The kernel on the top right corner of the notebook should now display Python 3 (Data Science).

Copy and paste the following code snippet into a cell in the notebook, and press Shift+Enter to run the current cell to update the aiobotocore library, which is an API to interact with many of the AWS services. Ignore any warnings to restart the kernel or any dependency conflict errors.
Note: If you face any issues related to botocore, please downgrade the boto3 version in your lambda.
%pip install --upgrade -q aiobotocoreimport pandas as pd
import numpy as np
import boto3
import sagemaker
import time
import json
import io
from io import StringIO
import base64
import pprint
import re
from sagemaker.image_uris import retrieve
sess = sagemaker.Session()
write_bucket = sess.default_bucket()
write_prefix = "fraud-detect-demo"
region = sess.boto_region_name
s3_client = boto3.client("s3", region_name=region)
sm_client = boto3.client("sagemaker", region_name=region)
sm_runtime_client = boto3.client("sagemaker-runtime")
sm_autoscaling_client = boto3.client("application-autoscaling")
sagemaker_role = sagemaker.get_execution_role()
# S3 locations used for parameterizing the notebook run
read_bucket = "sagemaker-sample-files"
read_prefix = "datasets/tabular/synthetic_automobile_claims"
model_prefix = "models/xgb-fraud"
data_capture_key = f"{write_prefix}/data-capture"
# S3 location of trained model artifact
model_uri = f"s3://{read_bucket}/{model_prefix}/fraud-det-xgb-model.tar.gz"
# S3 path where data captured at endpoint will be stored
data_capture_uri = f"s3://{write_bucket}/{data_capture_key}"
# S3 location of test data
test_data_uri = f"s3://{read_bucket}/{read_prefix}/test.csv" Step 3: Create a Real-Time Inference endpoint
In SageMaker, there are multiple methods to deploy a trained model to a Real-Time Inference endpoint: SageMaker SDK, AWS SDK - Boto3, and SageMaker console. For more information, see Deploy Models for Inference in the Amazon SageMaker Developer Guide. SageMaker SDK has more abstractions compared to the AWS SDK - Boto3, with the latter exposing lower-level APIs for greater control over model deployment. In this tutorial, you deploy the model using the AWS SDK -Boto3. There are three steps you need to follow in sequence to deploy a model:
- Create a SageMaker model from the model artifact
- Create an endpoint configuration to specify properties, including instance type and count
- Create the endpoint using the endpoint configuration
# Retrieve the SageMaker managed XGBoost image
training_image = retrieve(framework="xgboost", region=region, version="1.3-1")

# Specify a unique model name that does not exist
model_name = "fraud-detect-xgb"
primary_container = {
                     "Image": training_image,
                     "ModelDataUrl": model_uri
                    }

model_matches = sm_client.list_models(NameContains=model_name)["Models"]
if not model_matches:
    model = sm_client.create_model(ModelName=model_name,
                                   PrimaryContainer=primary_container,
                                   ExecutionRoleArn=sagemaker_role)
else:
print(f"Model with name {model_name} already exists! Change model name to create new")You can check the created model in the SageMaker console under the Models section.

After the SageMaker model is created, copy and paste the following code to use the Boto3 create_endpoint_config method to configure the endpoint. The main inputs to the create_endpoint_config method are the endpoint configuration name and variant information, such as inference instance type and count, the name of the model to be deployed, and the traffic share the endpoint should handle. Alongside these settings, you can also set up data capture by specifying a DataCaptureConfig. This feature allows you to configure the real-time endpoint to capture and store the requests and/or responses in Amazon S3. The data capture is one of the steps in setting up model monitoring, and when combined with baseline metrics and monitoring jobs, it helps you to monitor the model performance by comparing test data metrics with baselines. Such monitoring is useful to schedule model retraining based on model or data drift and auditing purposes. In the current setup, both the input (incoming test data) and output (model predictions) are captured and stored in your default S3 bucket.
# Endpoint Config name
endpoint_config_name = f"{model_name}-endpoint-config"

# Endpoint config parameters
production_variant_dict = {
                           "VariantName": "Alltraffic",
                           "ModelName": model_name,
                           "InitialInstanceCount": 1,
                           "InstanceType": "ml.m5.xlarge",
                           "InitialVariantWeight": 1
                          }

# Data capture config parameters
data_capture_config_dict = {
                            "EnableCapture": True,
                            "InitialSamplingPercentage": 100,
                            "DestinationS3Uri": data_capture_uri,
                            "CaptureOptions": [{"CaptureMode" : "Input"}, {"CaptureMode" : "Output"}]
                           }


# Create endpoint config if one with the same name does not exist
endpoint_config_matches = sm_client.list_endpoint_configs(NameContains=endpoint_config_name)["EndpointConfigs"]
if not endpoint_config_matches:
    endpoint_config_response = sm_client.create_endpoint_config(
                                                                EndpointConfigName=endpoint_config_name,
                                                                ProductionVariants=[production_variant_dict],
                                                                DataCaptureConfig=data_capture_config_dict
                                                               )
else:
print(f"Endpoint config with name {endpoint_config_name} already exists! Change endpoint config name to create new")You can check the created endpoint configuration in the SageMaker console under the Endpoint configurations section.


Copy and paste the following code to create the endpoint. The create_endpoint method takes the endpoint configuration as a parameter, and deploys the model specified in the endpoint configuration to a compute instance. It takes about 6 minutes to deploy the model.
endpoint_name = f"{model_name}-endpoint"

endpoint_matches = sm_client.list_endpoints(NameContains=endpoint_name)["Endpoints"]
if not endpoint_matches:
    endpoint_response = sm_client.create_endpoint(
                                                  EndpointName=endpoint_name,
                                                  EndpointConfigName=endpoint_config_name
                                                 )
else:
    print(f"Endpoint with name {endpoint_name} already exists! Change endpoint name to create new")

resp = sm_client.describe_endpoint(EndpointName=endpoint_name)
status = resp["EndpointStatus"]
while status == "Creating":
    print(f"Endpoint Status: {status}...")
    time.sleep(60)
    resp = sm_client.describe_endpoint(EndpointName=endpoint_name)
    status = resp["EndpointStatus"]
print(f"Endpoint Status: {status}")
Step 4: Invoke the inference endpoint
After the endpoint status changes to InService, you can invoke the endpoint using the REST API, AWS SDK - Boto3, SageMaker Studio, AWS CLI, or SageMaker Python SDK. In this tutorial, you use the AWS SDK - Boto3. Before calling an endpoint, it is important that the test data is formatted suitably for the endpoint using serialization and deserialization. Serialization is the process of converting raw data in a format such as .csv to byte streams that the endpoint can use. Deserialization is the reverse process of converting byte stream to human readable format. In this tutorial, you invoke the endpoint by sending the first five samples from a test dataset. To invoke the endpoint and get prediction results, copy and paste the following code. Since the request to the endpoint (test dataset) is in the .csv format, a csv serialization process is used to create the payload. The response is then deserialized to an array of predictions. After the execution completes, the cell returns the model predictions and the true labels for the test samples. Notice that the XGBoost model returns probabilities instead of actual class labels. The model has predicted a very low likelihood for the test samples to be fraudulent claims and the predictions are in line with the true labels.
# Fetch test data to run predictions with the endpoint
test_df = pd.read_csv(test_data_uri)

# For content type text/csv, payload should be a string with commas separating the values for each feature
# This is the inference request serialization step
# CSV serialization
csv_file = io.StringIO()
test_sample = test_df.drop(["fraud"], axis=1).iloc[:5]
test_sample.to_csv(csv_file, sep=",", header=False, index=False)
payload = csv_file.getvalue()
response = sm_runtime_client.invoke_endpoint(
                                             EndpointName=endpoint_name,
                                             Body=payload,
                                             ContentType="text/csv",
                                             Accept="text/csv"
                                            )

# This is the inference response deserialization step
# This is a bytes object
result = response["Body"].read()
# Decoding bytes to a string
result = result.decode("utf-8")
# Converting to list of predictions
result = re.split(",|\n",result)

prediction_df = pd.DataFrame()
prediction_df["Prediction"] = result[:5]
prediction_df["Label"] = test_df["fraud"].iloc[:5].values
prediction_df 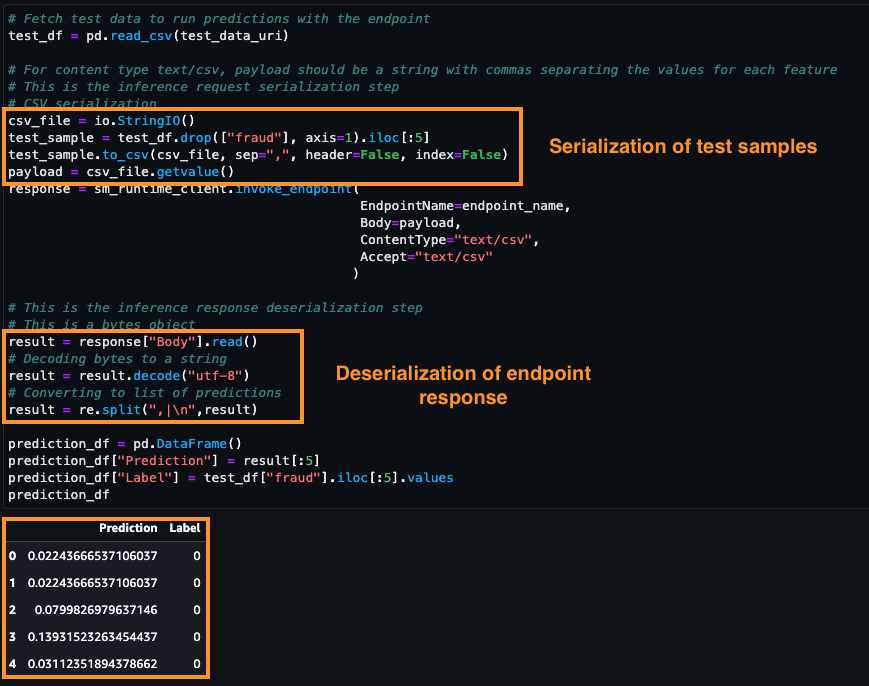
To monitor the endpoint invocation metrics using Amazon CloudWatch, open the SageMaker console. Under Inference, select Endpoints, fraud-detect-xgb-endpoint.

In the Endpoint details page, under Monitor, choose View invocation metrics. Initially, you might see only a single dot in the metrics chart. But after multiple invocations, you will see a line similar to the one in the sample screenshot.

The Metrics page shows multiple endpoint performance metrics. You can choose different time periods, such as over 1 hour or 3 hours, to visualize the endpoint performance. Select any metric to see its trend over the chosen time period. In the next step, you choose one of these metrics to define auto scaling policies.

Because data capture was set up in the endpoint configuration, you have a way to inspect what payload was sent to the endpoint alongside its response. The captured data takes some time to get fully uploaded to S3. Copy and paste the following code to check if data capture is complete.
from sagemaker.s3 import S3Downloader
print("Waiting for captures to show up", end="")
for _ in range(90):
    capture_files = sorted(S3Downloader.list(f"{data_capture_uri}/{endpoint_name}"))
    if capture_files:
        capture_file = S3Downloader.read_file(capture_files[-1]).split("\n")
        capture_record = json.loads(capture_file[0])
        if "inferenceId" in capture_record["eventMetadata"]:
            break
    print(".", end="", flush=True)
    time.sleep(1)
print()
print(f"Found {len(capture_files)} Data Capture Files:")The captured data is stored as a separate file for each endpoint invocation in S3 in JSON Lines, a newline-delimited format to store structured data where each line is a JSON value. Copy and paste the following code to retrieve the data capture files.
capture_files = sorted(S3Downloader.list(f"{data_capture_uri}/{endpoint_name}"))
capture_file = S3Downloader.read_file(capture_files[0]).split("\n")
capture_record = json.loads(capture_file[0])
capture_recordCopy and paste the following code to decode the data in the captured files using base64. The code retrieves the five test samples that were sent in as payload, and their predictions. This feature is useful in inspecting endpoint loads with model responses and monitor the model performance.
input_data = capture_record["captureData"]["endpointInput"]["data"]
output_data = capture_record["captureData"]["endpointOutput"]["data"]
input_data_list = base64.b64decode(input_data).decode("utf-8").split("\n")
print(input_data_list)
output_data_list = base64.b64decode(output_data).decode("utf-8").split("\n")
print(output_data_list)
Step 5: Configure auto scaling for endpoint
Workloads that use Real-Time Inference endpoints usually have low latency requirements. Furthermore, when traffic spikes, Real-Time Inference endpoints can experience CPU overload, high latency, or timeouts. Therefore, it's important to scale capacity to handle traffic changes efficiently with low latency. SageMaker inference auto scaling monitors your workloads and dynamically adjusts the instance count to maintain steady and predictable endpoint performance at a low cost. When the workload increases, auto scaling brings more instances online, and when the workload decreases, it removes unnecessary instances, helping you reduce your compute cost. In this tutorial, you use the AWS SDK - Boto3 to set up auto scaling to your endpoint. SageMaker provides multiple types of autoscaling: target tracking scaling, step scaling, on-demand scaling, and scheduled scaling. In this tutorial, you use a target tracking scaling policy, which is triggered when a chosen scaling metric increases over a chosen target threshold.
Auto scaling can be set up in two steps. First, you configure a scaling policy with details of minimum, desired, and maximum number of instances per endpoint. Copy and paste the following code to configure a target tracking scaling policy. The specified maximum number of instances are launched when traffic goes over chosen thresholds, which you choose in the next step.
resp = sm_client.describe_endpoint(EndpointName=endpoint_name)

# SageMaker expects resource id to be provided with the following structure
resource_id = f"endpoint/{endpoint_name}/variant/{resp['ProductionVariants'][0]['VariantName']}"

# Scaling configuration
scaling_config_response = sm_autoscaling_client.register_scalable_target(
                                                          ServiceNamespace="sagemaker",
                                                          ResourceId=resource_id,
                                                          ScalableDimension="sagemaker:variant:DesiredInstanceCount",
                                                          MinCapacity=1,
                                                          MaxCapacity=2
)Copy and paste the following code to create the scaling policy. The chosen scaling metric is SageMakerVariantInvocationsPerInstance, which is the average number of times per minute that each inference instance for a model variant is invoked. When this number crosses the chosen threshold of 5, the auto scaling is triggered.
# Create Scaling Policy
policy_name = f"scaling-policy-{endpoint_name}"
scaling_policy_response = sm_autoscaling_client.put_scaling_policy(
                                                PolicyName=policy_name,
                                                ServiceNamespace="sagemaker",
                                                ResourceId=resource_id,
                                                ScalableDimension="sagemaker:variant:DesiredInstanceCount",
                                                PolicyType="TargetTrackingScaling",
                                                TargetTrackingScalingPolicyConfiguration={
                                                    "TargetValue": 5.0, # Target for avg invocations per minutes
                                                    "PredefinedMetricSpecification": {
                                                        "PredefinedMetricType": "SageMakerVariantInvocationsPerInstance",
                                                    },
                                                    "ScaleInCooldown": 600, # Duration in seconds until scale in
                                                    "ScaleOutCooldown": 60 # Duration in seconds between scale out
                                                }
)Copy and paste the following code to retrieve the scaling policy details.
response = sm_autoscaling_client.describe_scaling_policies(ServiceNamespace="sagemaker")

pp = pprint.PrettyPrinter(indent=4, depth=4)
for i in response["ScalingPolicies"]:
    pp.pprint(i["PolicyName"])
    print("")
    if("TargetTrackingScalingPolicyConfiguration" in i):
pp.pprint(i["TargetTrackingScalingPolicyConfiguration"])Copy and paste the following code to stress-test the endpoint. The code runs for 250 seconds and invokes the endpoint repeatedly by sending randomly selected samples from the test dataset.
request_duration = 250
end_time = time.time() + request_duration
print(f"Endpoint will be tested for {request_duration} seconds")
while time.time() < end_time:
    csv_file = io.StringIO()
    test_sample = test_df.drop(["fraud"], axis=1).iloc[[np.random.randint(0, test_df.shape[0])]]
    test_sample.to_csv(csv_file, sep=",", header=False, index=False)
    payload = csv_file.getvalue()
    response = sm_runtime_client.invoke_endpoint(
                                                 EndpointName=endpoint_name,
                                                 Body=payload,
                                                 ContentType="text/csv"
)You can monitor the endpoint metrics using Amazon CloudWatch. For a list of available endpoint metrics, including invocation, see SageMaker Endpoint Invocation Metrics. On the SageMaker console, under Inference, choose Endpoints, fraud-detect-xgb-endpoint. On the Endpoint details page, navigate to the Monitor section, and choose View invocation metrics. On the Metrics page, select InvocationsPerInstance (this is a monitoring metric you chose when setting up the scaling policy) and Invocations from the list of metrics, and then choose the Graphed metrics tab.

On the Graphed metrics page, you can visually inspect the traffic pattern received by the endpoint, and change the time granularity, for example from the default 5 minutes to 1 minute. It may take a few minutes for auto scaling to add the second instance. Once the new instance is added, you will notice that invocations per instance are half of the total invocations.

When the endpoint receives the increased payload, you can check the status of the endpoint by running the code below. This code checks when the status of the endpoint changes from InService to Updating and keeps track of the instance counts. After a few minutes, you can see the status changing from InService to Updating and back to InService but with a higher instance count.
# Check the instance counts after the endpoint gets more load
response = sm_client.describe_endpoint(EndpointName=endpoint_name)
endpoint_status = response["EndpointStatus"]
request_duration = 250
end_time = time.time() + request_duration
print(f"Waiting for Instance count increase for a max of {request_duration} seconds. Please re run this cell in case the count does not change")
while time.time() < end_time:
    response = sm_client.describe_endpoint(EndpointName=endpoint_name)
    endpoint_status = response["EndpointStatus"]
    instance_count = response["ProductionVariants"][0]["CurrentInstanceCount"]
    print(f"Status: {endpoint_status}")
    print(f"Current Instance count: {instance_count}")
    if (endpoint_status=="InService") and (instance_count>1):
        break
    else:
        time.sleep(15)
Step 6: Clean up the resources
It is a best practice to delete resources that you are no longer using so that you don't incur unintended charges.
Delete the model, endpoint configuration, and endpoint you created in this tutorial by running the following code block in your notebook. If you do not delete the endpoint, your account will keep accumulating charges for the compute instance running at the endpoint.
# Delete model
sm_client.delete_model(ModelName=model_name)

# Delete endpoint configuration
sm_client.delete_endpoint_config(EndpointConfigName=endpoint_config_name)

# Delete endpoint
sm_client.delete_endpoint(EndpointName=endpoint_name)
To delete the S3 bucket, do the following:
- Open the Amazon S3 console. On the navigation bar, choose Buckets, sagemaker-<your-Region>-<your-account-id>, and then select the checkbox next to fraud-detect-demo. Then, choose Delete.
- On the Delete objects dialog box, verify that you have selected the proper object to delete and enter permanently delete into the Permanently delete objects confirmation box.
- Once this is complete and the bucket is empty, you can delete the sagemaker-<your-Region>-<your-account-id> bucket by following the same procedure again.

The Data Science kernel used for running the notebook image in this tutorial will accumulate charges until you either stop the kernel or perform the following steps to delete the apps. For more information, see Shut Down Resources in the Amazon SageMaker Developer Guide.
To delete the SageMaker Studio apps, do the following: On the SageMaker Studio console, choose studio-user, and then delete all the apps listed under Apps by choosing Delete app. Wait until the Status changes to Deleted.

If you used an existing SageMaker Studio domain in Step 1, skip the rest of Step 6 and proceed directly to the conclusion section.
If you ran the CloudFormation template in Step 1 to create a new SageMaker Studio domain, continue with the following steps to delete the domain, user, and the resources created by the CloudFormation template.

