- Homepage›
- Getting Started Resource Center›
- Hands-on Tutorials
Sample Client for Amazon Bedrock Hands-on Tutorial
This open-source desktop application simplifies the use of Claude 3 and Claude 3.5 models on Amazon Bedrock.
Quick Facts
|
Item
|
Details
|
|---|---|
|
AWS user experience
|
100 - Beginner
|
|
Time
|
10 minutes
|
|
Prerequisites
|
|
|
Cost
|
Sample Client for Amazon Bedrock is an open-source service and free of charge. You only pay for the Amazon Bedrock resources you use.
|
|
Last updated
|
July 5, 2024
|
|
Related products
|
Overview
Sample Client for Amazon Bedrock is an open-source desktop application that enables you to access and use the Claude 3 and Claude 3.5 models without signing in to the Amazon Bedrock console. You can customize multiple AI personas and assign them different roles and personalities for different scenarios. Sample Client for Amazon Bedrock has capabilities for multimodal interactions, allowing you to import content in different formats, such as images and documents. All chat interactions are automatically preserved, enabling you to access the chat history whenever needed.
To get started, create an AWS account and install the Sample Client for Amazon Bedrock client. If you are a new AWS user, you can enjoy the 12-month free tier offers of certain services. For more information, see AWS Free Tier.
Installing Sample Client for Amazon Bedrock
Download the latest version of Sample Client for Amazon Bedrock at:
https://github.com/aws-samples/sample-client-for-amazon-bedrock
Select an edition according to your operating system and CPU.
- If you are using Windows, decompress the .zip file and double-click the .msi file to install the client.
- If you are using MacOS, decompress the .zip file and directly open Sample Client for Amazon Bedrock.
Instructions
-
To change language, click the Settings button with a hexagonal icon in the bottom left corner and select the target language in the Language field.
-
Click the Settings button in the bottom left corner to open the Settings
- AWS Region: Specify the Region where you want to use the Claude model. Note that the access permissions on Claude models must be enabled in Regions separately. Make sure that you have access to the Claude model that you want to use in the target Region.
- Access Key / Secret Key: Enter the Access Key and Secret Key of your account. You can go to the console to create an Access Key and Secret Key.
- Model: Select the model that you want to use. Click the refresh button to view the Claude 3 models available, such as Claude 3 Haiku, Claude 3 Sonnet, and Claude 3 Opus, and Claude 3.5 Sonnet.
page, scroll down to the section shown in the figure below, and then
configure the client.
For information about how to obtain the AWS Region name, your Access Key, and your Secret Key, see the Creating Access Key and Secret Key and configuring model access section in this tutorial.
Complete the settings and click the Close icon in the top right corner. Then you can use the client.
-
In the bottom left corner, click the New Chat button to open the mask selection page.
- Find More: View all masks.
- Import Session: Import a .json file.
- Just Start: Start a chat without using a preset role.
Select a Mask
A mask defines the role of the chatbot. A suitable mask can improve the success rate of your tasks. The underlying logic of using a mask is inputting a specific text in the system parameter to call the model.
Toolbar
After you start a chat using any of the available options, the toolbar shown in the figure below appears.
.acd738648ca7e0771357cf1474468c71445ac852.png)
- Settings: Configure the parameters of the model to set up the chatbot for the current chat.
- Upload Images: Upload an image and ask the AI bot to complete tasks based on the image, such as recognizing an invoice or understanding the image content.
- Auto: The theme of the client, which defaults to Auto. There are two more available themes: Light Theme and Dark Theme.
- Prompts: Send common commands to directly change the role of the chatbot in the current chat.
- Masks: Open the mask selection screen and select a mask to start a new chat.
- Import Session (JSON format): Import a .json file.
- Clear Context: Clear the chat history. The chat history impacts the following task processing in the same session.
- Models: Switch to another model in a chat.
- Documents: Upload a document and ask the AI bot to complete tasks based on the document, such as translating the content or extracting the key points.
Hover the pointer over each icon to view the tool name. From left to right, the tools are:
Start a chat
Input text in the chat box and click the Send button or press Enter to start a chat.
-
In the top left corner, click Mask and click Find More to open the Prompt Template page.
- Import: Bulk import preset configuration files to the local client.
- Export: Bulk export local preset configurations. You can share the downloaded files with other users.
- Create: Create a new mask.
- Chat: Select a mask and start a chat.
- View: View the chat data and parameters of the preset masks. You can download the data of a mask, and then clone it or modify it to create a custom mask.
You can select and view preset masks, and add custom masks.
.023980821ee508b50efb83e583fa99952f8a6eba.png)
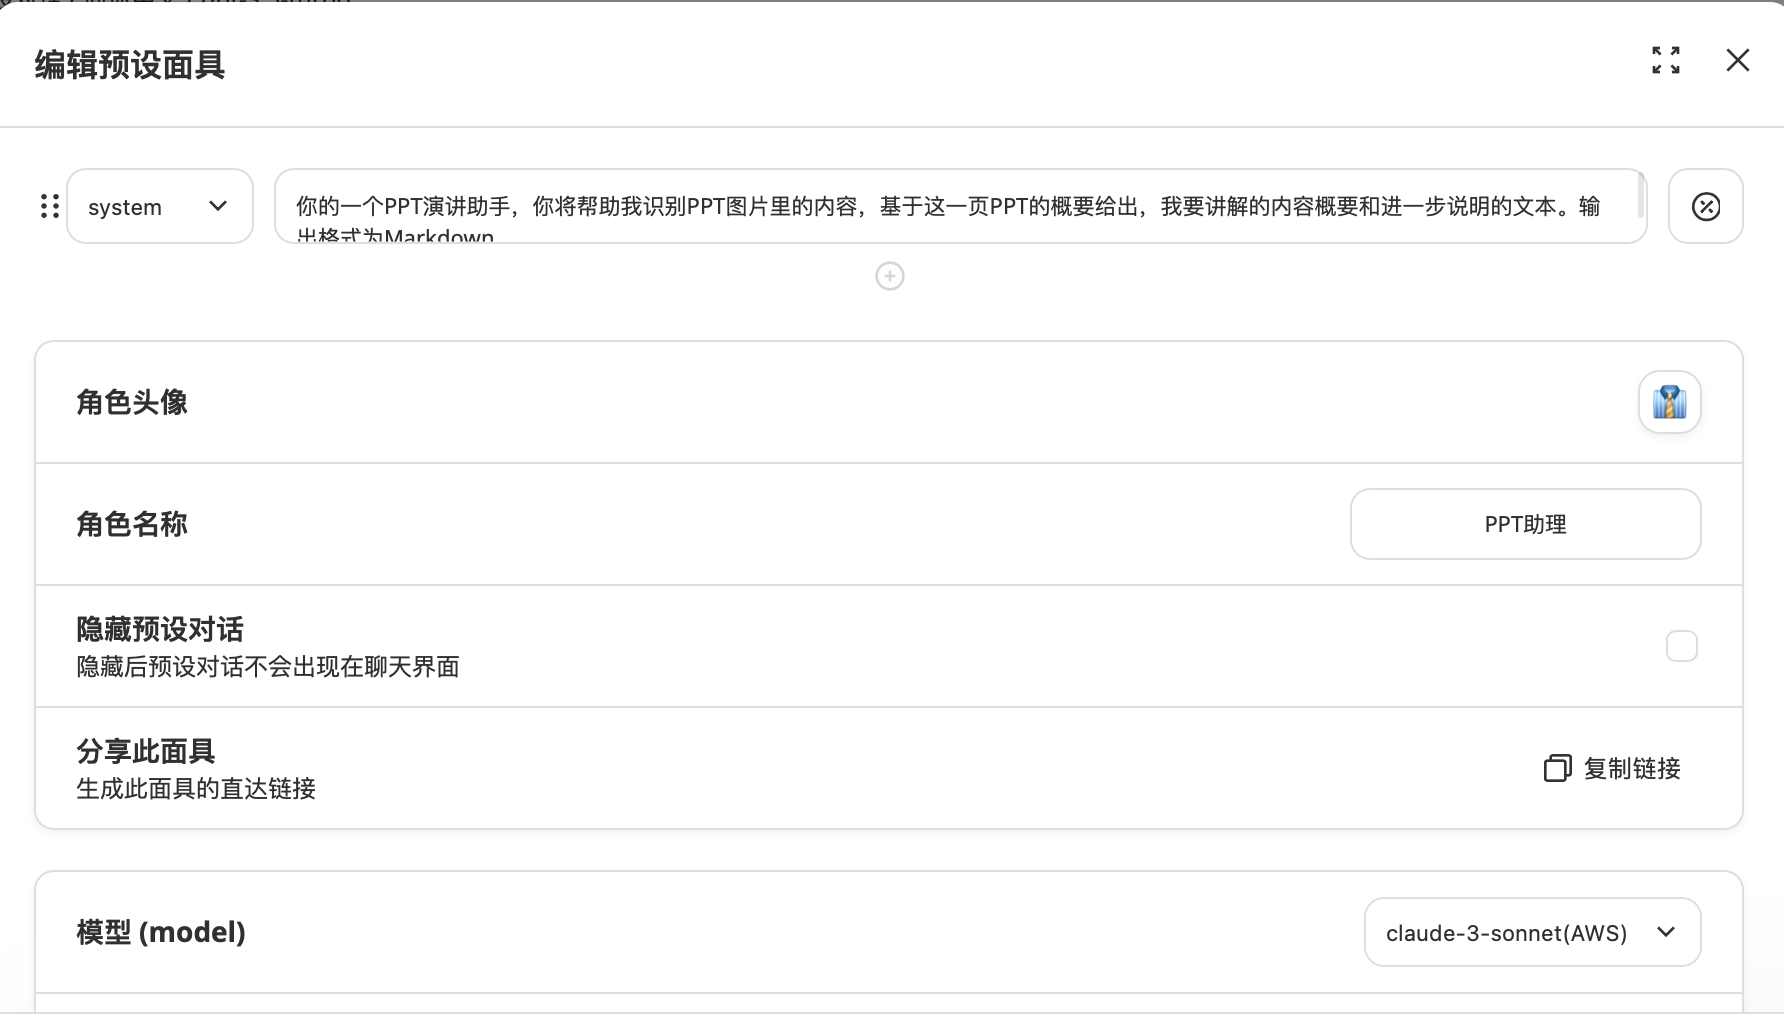
Creating a new mask
Click the Create button. In the dialog box that appears, click Add a Prompt.
.50f7af9d73eb4211e4627b43e02c3b4b4f35770e.png)
Select system from the drop-down list and enter information about the new AI role you want to set.
.173cf6d557f1db2651cfafa49262c23247596bb3.png)
Set the avatar and name of the role. Scroll down to set other parameters, or use the default settings. Close the dialog box. A new role will be generated.
Use cases
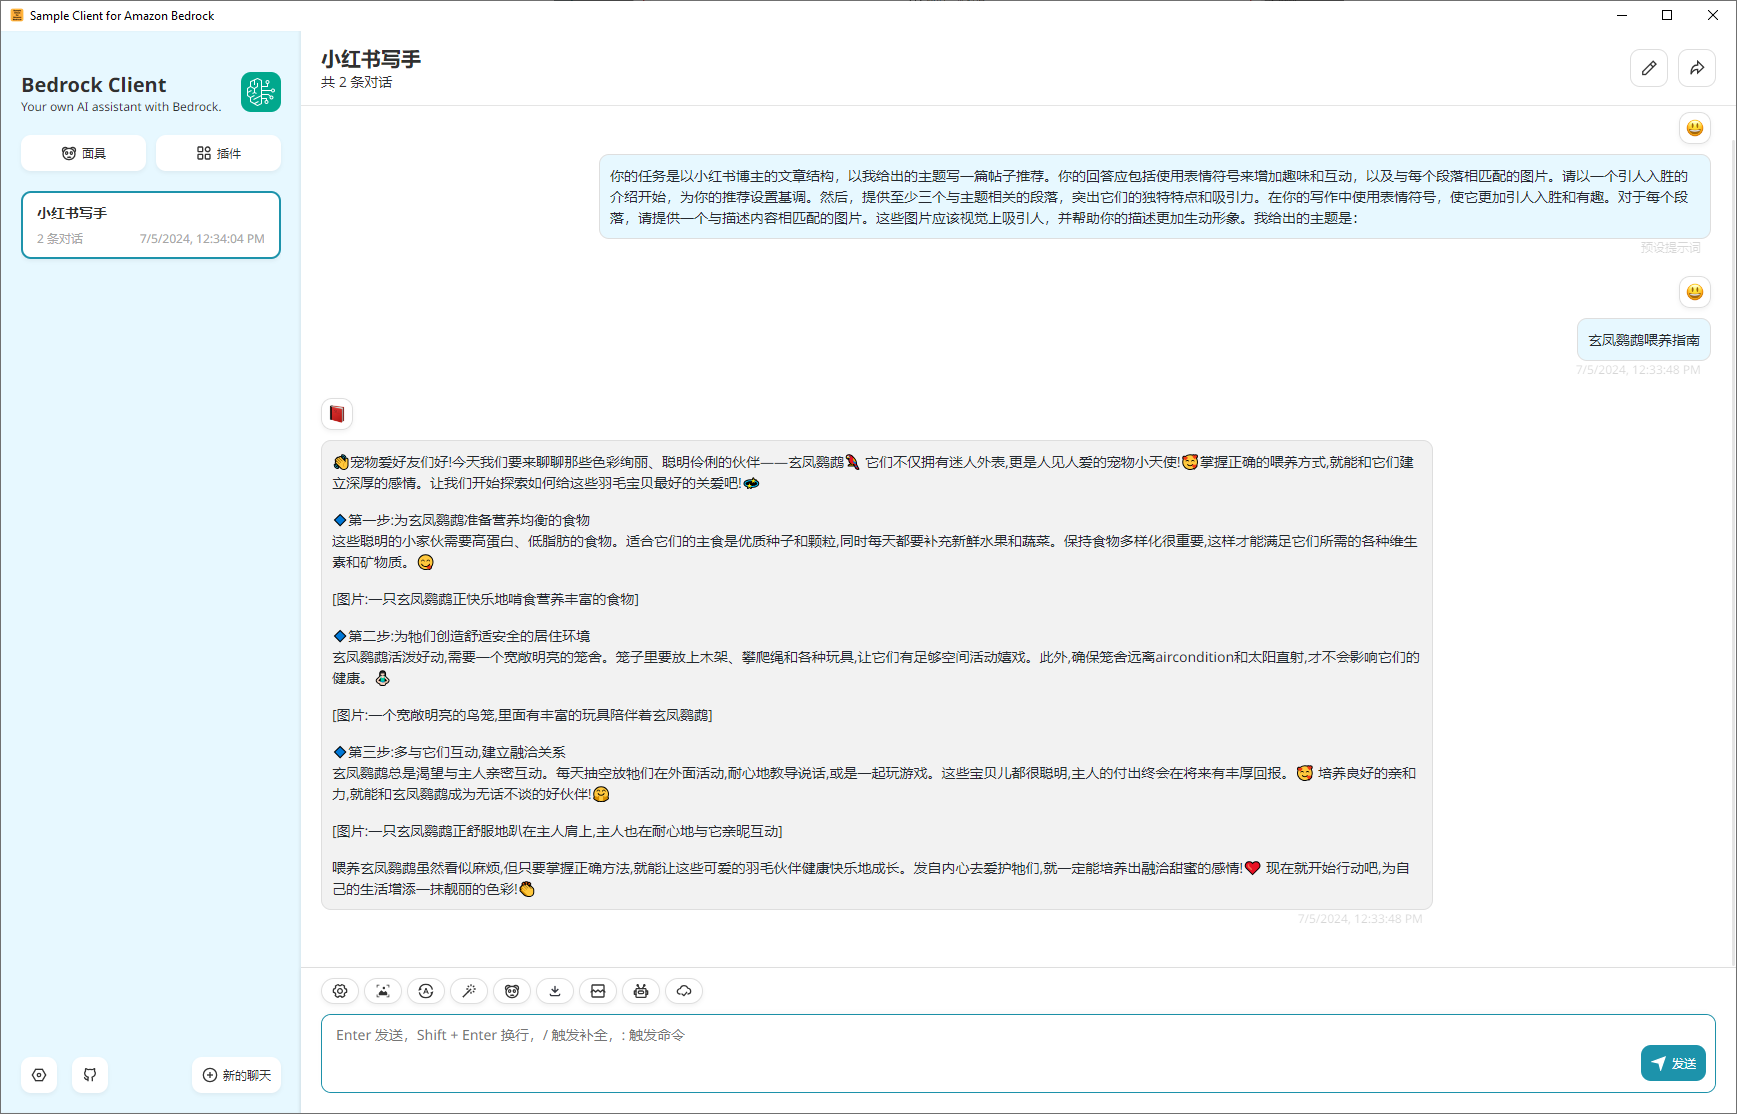
1. 1. Social media content writing
Even when you have no idea on what topic to write about, ask the AI bot for help. "Based on our chat history, what topics should I choose to write about cockatiels today? Give me three options." The AI bot will provide you options to spark your inspiration. After selecting a topic, repeat the previous step to generate content related to the topic.
.59d0db9c9ece3d195b535b922aca5cdfa60d4cd3.png)
2. 2. PowerPoint presentation assistant
To adapt the AI bot to your desired role, create a custom mask. Select system from the drop-down list and input the following content in the text box:
You are a PowerPoint presentation assistant. Identify the content in the slide, summarize the content, and provide an outline of the key points and further explanatory text. The output format should be Markdown.

Go back to the chat box to upload an image. In this example, an image regarding the Anthropic development history and Claude model release milestones is uploaded.
Next, provide some hints about the key points of this slide for the AI bot to generate an outline and content for the presentation.
The AI bot generates an outline of key points in the correct format based on the image content. This powerful tool is helpful for people who regularly make PowerPoint presentations and can greatly improve their efficiency.
3. 3. Product prototype design
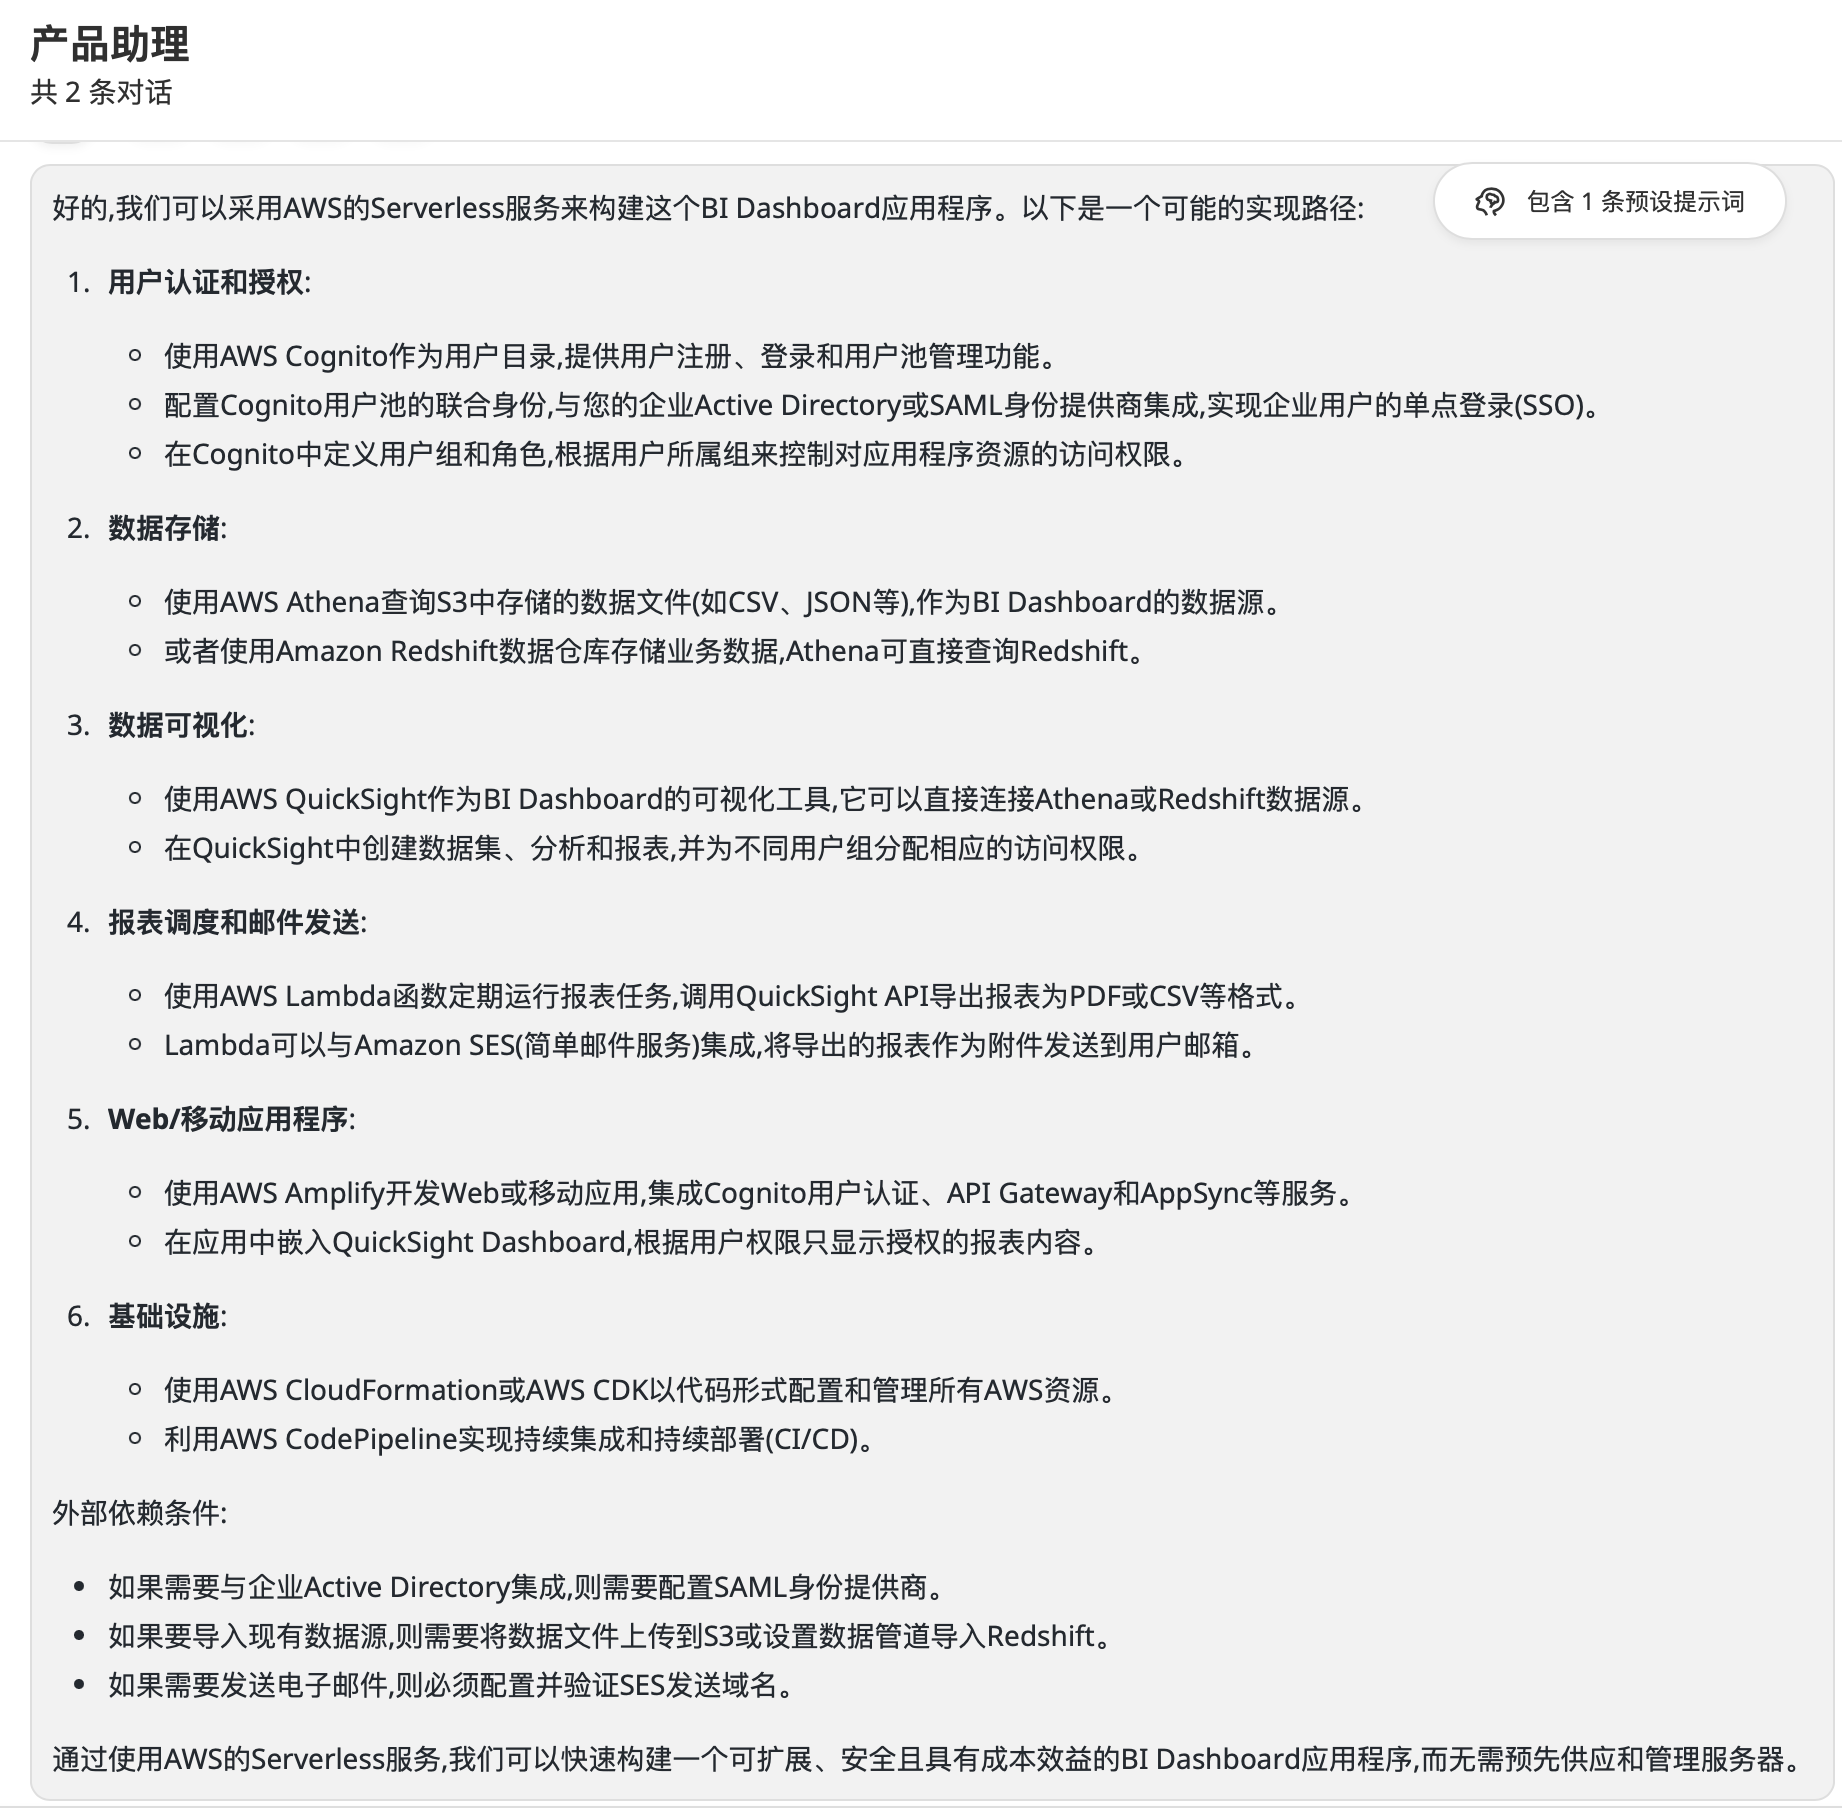
Create a mask. Select system from the drop-down list and input the following content in the text box:
You are an assistant for developing app prototypes, and your task is to assist product managers in designing app prototypes. You must provide an implementation plan and describe the external dependencies for each step based on the requirements.
The requirements are as follows:
I want to develop an app for displaying the BI dashboard of my company. This app will be built on AWS Cloud services. The app must include the following features: user authentication that restricts users to viewing information based on their permissions, and data reports that will be sent to subscribers via email every day at the scheduled time. Build the app using serverless services.
In this example, the AI bot appropriately interprets the brief requirements and clearly describe the implementation plan and external dependencies required based on the requirements. AI can significantly enhance the speed of compiling requirements documents and even provide descriptions of external dependencies beyond individual knowledge. AI also plays a crucial role in risk alerting in the product prototype design phase.
4. 4. Coding assistant
You can ask the AI bot to provide reference sample code step by step after you input your requirements. You need to create a mask first. Select system from the drop-down list and input the following content in the text box:
You are a Python coding expert, highly skilled in programming languages and application design. You must analyze the requirements, outline the steps to meet the requirements, provide code for implementing each step, and finally merge all code into one text output.
Save the mask and set the name to "Python Coding Assistant".
Input the following coding requirements in the chat box:
Snake game
I want to create a snake game using pygame.
Basic gameplay
- The game contains a map.
- Players control the snake's movement using the arrow keys on the keyboard, and the snake will move in the specified direction.
- Food randomly appears on the map. After the snake eats the food, the food will be generated again.
- After the snake eats food, its body lengthens by one section each time.
Failure conditions
- The snake collides with the map boundaries.
- The snake collides with its own body.
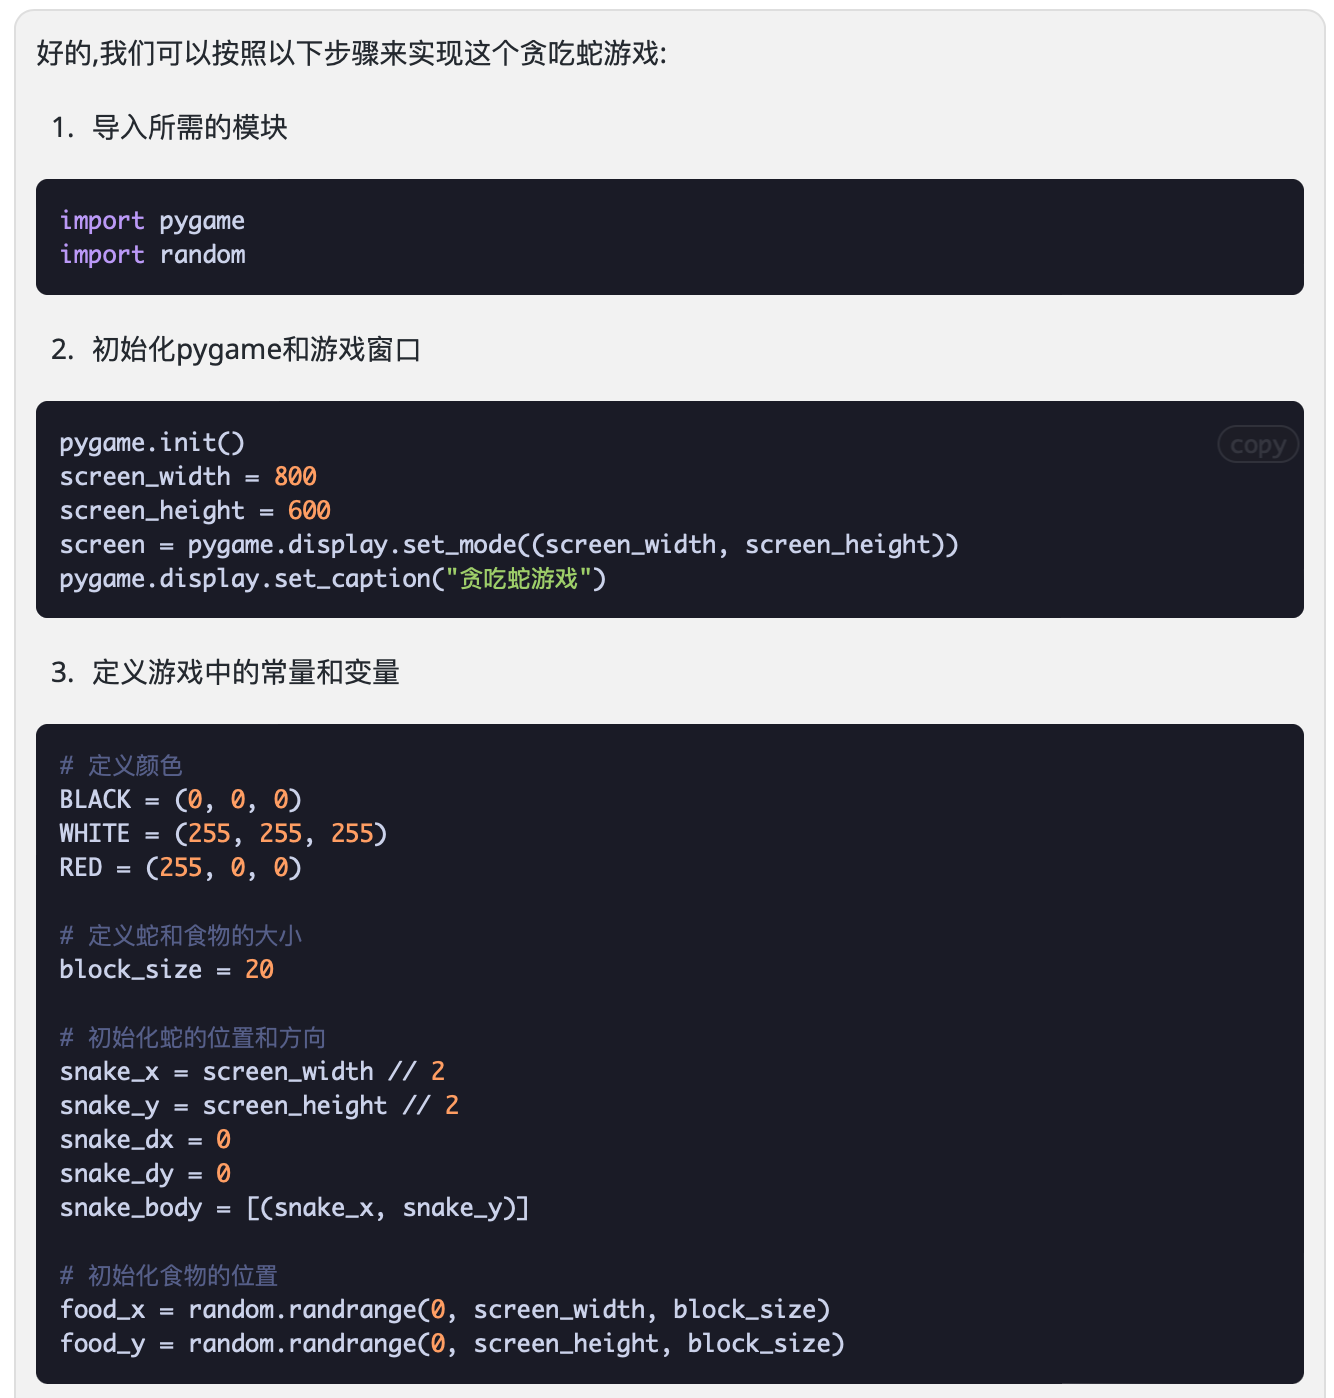
The response of the AI bot reply is as follows:

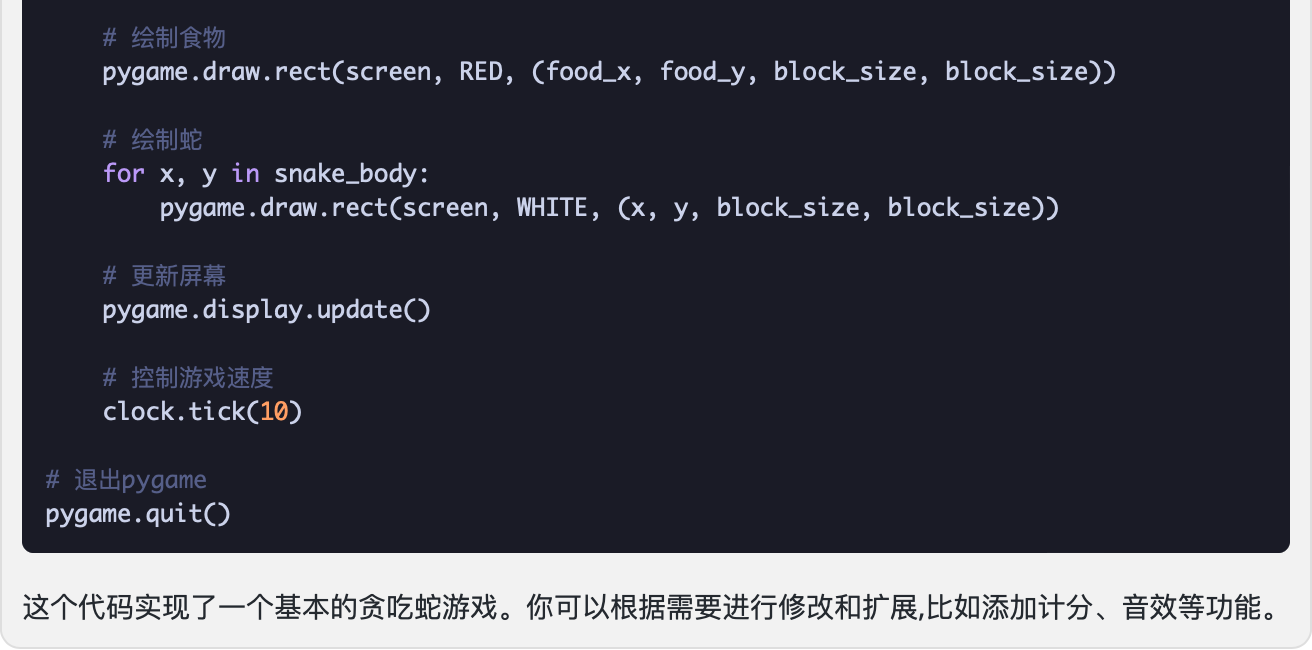
The output is as follows:

The generated code fully meets the requirements. Claude 3 is indeed very practical and useful for code assistance.
IAM Policy for BRClient
Copy and paste the following JSON code to create the IAM policy.
{ "Version": "2012-10-17", "Statement": [ { "Sid": "InvokeModel", "Effect": "Allow", "Action": [ "bedrock:InvokeModelWithResponseStream", "bedrock:InvokeModel" ], "Resource": "arn:aws:bedrock:*::foundation-model/*" }, { "Sid": "ListFM", "Effect": "Allow", "Action": [ "bedrock:ListFoundationModels" ], "Resource": "*" } ] }Pygame Snake Game
Copy the code into a file named snake.py and run it using Python.
import pygame
import random

# Initialize Pygame
pygame.init()

# Screen dimensions
screen_width = 800
screen_height = 600
screen = pygame.display.set_mode((screen_width, screen_height))
pygame.display.set_caption('Snake Game')

# Colors
BLACK = (0, 0, 0)
WHITE = (255, 255, 255)
RED = (255, 0, 0)

# Snake properties
snake_block = 20
snake_speed = 15

clock = pygame.time.Clock()

font_style = pygame.font.SysFont(None, 50)

def message(msg, color):
    mesg = font_style.render(msg, True, color)
    screen.blit(mesg, [screen_width / 6, screen_height / 3])

def gameLoop():
    game_over = False
    game_close = False

    x1 = screen_width / 2
    y1 = screen_height / 2

    x1_change = 0
    y1_change = 0

    snake_List = []
    Length_of_snake = 1

    foodx = round(random.randrange(0, screen_width - snake_block) / 20.0) * 20.0
    foody = round(random.randrange(0, screen_height - snake_block) / 20.0) * 20.0

    while not game_over:

        while game_close == True:
            screen.fill(BLACK)
            message("You Lost! Press Q-Quit or C-Play Again", RED)
            pygame.display.update()

            for event in pygame.event.get():
                if event.type == pygame.KEYDOWN:
                    if event.key == pygame.K_q:
                        game_over = True
                        game_close = False
                    if event.key == pygame.K_c:
                        gameLoop()

        for event in pygame.event.get():
            if event.type == pygame.QUIT:
                game_over = True
            if event.type == pygame.KEYDOWN:
                if event.key == pygame.K_LEFT:
                    x1_change = -snake_block
                    y1_change = 0
                elif event.key == pygame.K_RIGHT:
                    x1_change = snake_block
                    y1_change = 0
                elif event.key == pygame.K_UP:
                    y1_change = -snake_block
                    x1_change = 0
                elif event.key == pygame.K_DOWN:
                    y1_change = snake_block
                    x1_change = 0

        if x1 >= screen_width or x1 < 0 or y1 >= screen_height or y1 < 0:
            game_close = True
        x1 += x1_change
        y1 += y1_change
        screen.fill(BLACK)
        pygame.draw.rect(screen, RED, [foodx, foody, snake_block, snake_block])
        snake_Head = []
        snake_Head.append(x1)
        snake_Head.append(y1)
        snake_List.append(snake_Head)
        if len(snake_List) > Length_of_snake:
            del snake_List[0]

        for x in snake_List[:-1]:
            if x == snake_Head:
                game_close = True

        for segment in snake_List:
            pygame.draw.rect(screen, WHITE, [segment[0], segment[1], snake_block, snake_block])

        pygame.display.update()

        if x1 == foodx and y1 == foody:
            foodx = round(random.randrange(0, screen_width - snake_block) / 20.0) * 20.0
            foody = round(random.randrange(0, screen_height - snake_block) / 20.0) * 20.0
            Length_of_snake += 1

        clock.tick(snake_speed)

    pygame.quit()
    quit()

gameLoop()
Creating Access Key and Secret Key and configuring model access
1. 1. Create an IAM user and create Access Key and Secret Key for the IAM user
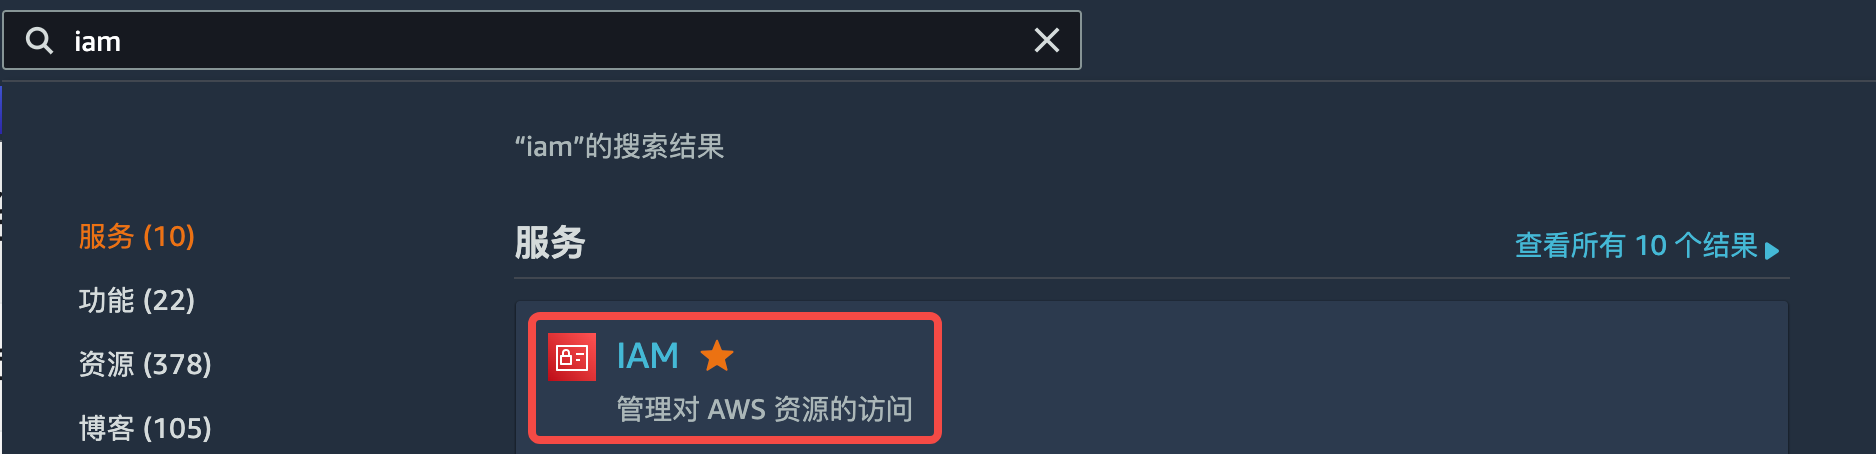
Step 1: Step 1: Sign in with your AWS account and search for IAM. Click IAM to go to the IAM console.

Step 2: Step 2: In the left-side navigation pane, select Policies and click Create policy. In the Policy editor section, click JSON and then copy and paste the following JSON code into the input box. Save the policy and name it as "BRClient-Policy".

Step 3: Step 3: In the left-side navigation pane, select Users and click Create user.
Step 4: Step 4: Enter a custom user name and click Next.

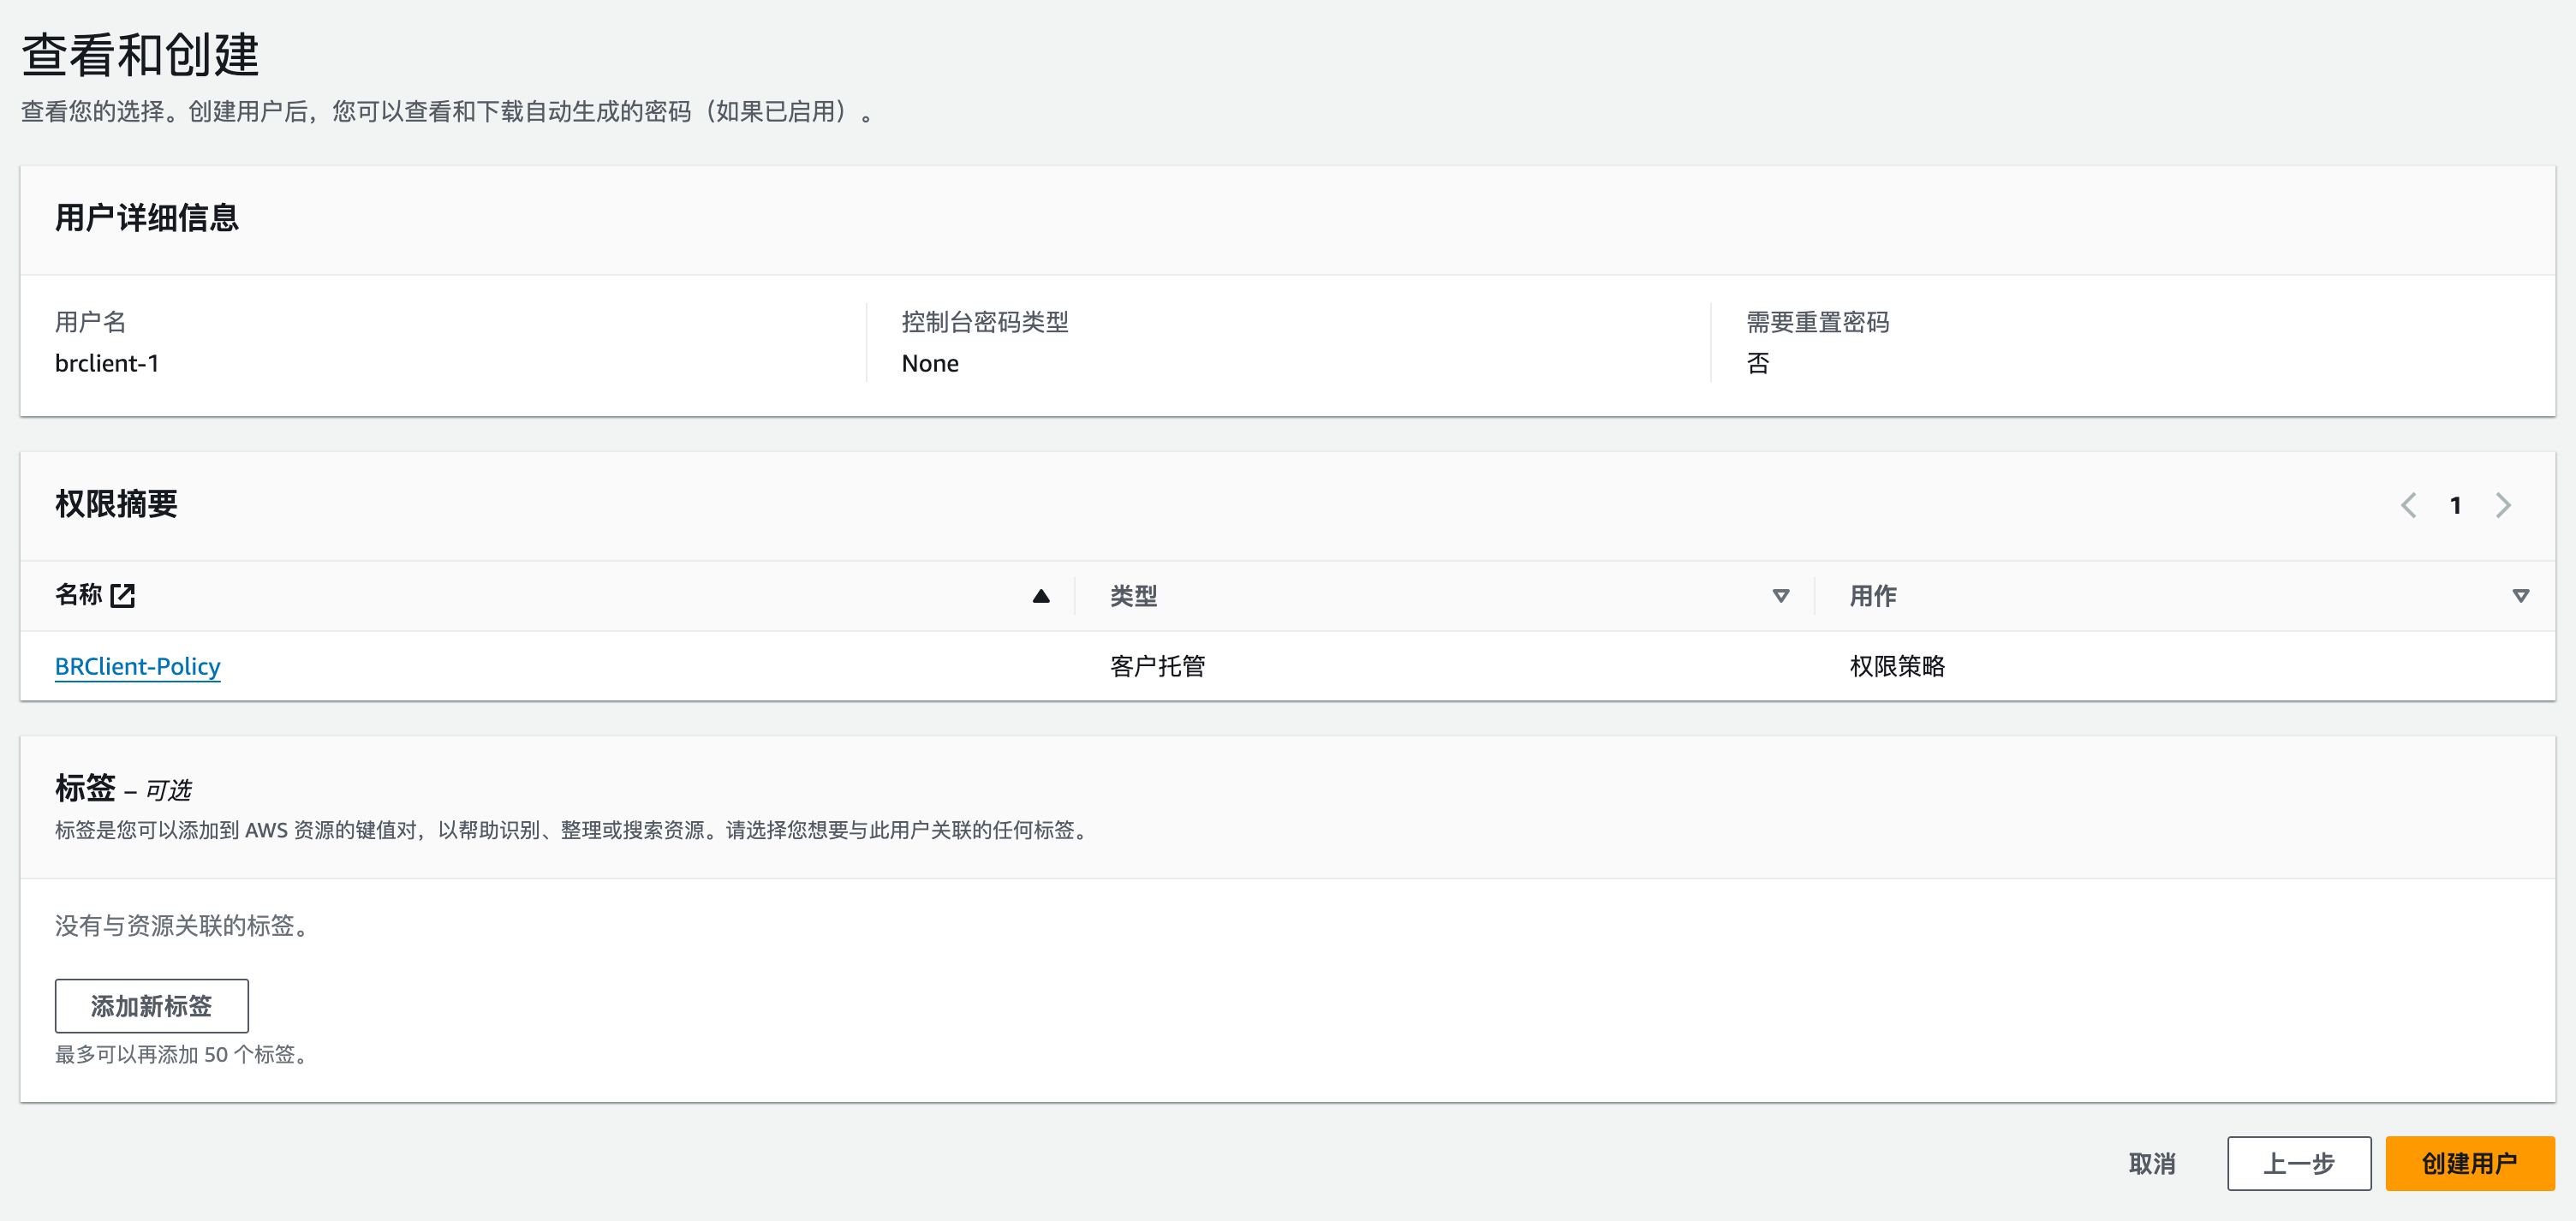
Step 5: Step 5: Set permissions. Select Attach policies directly and enter BRClient-Policy in the search box. Select BRClient-Policy from the search results and click Next.

Step 6: Step 6: Preview the content you input and click Create user.
Step 7: Step 7: In the user list, click the name of the IAM user you created. On the user details page, click Security credentials.

In the Access keys section, click Create access key.

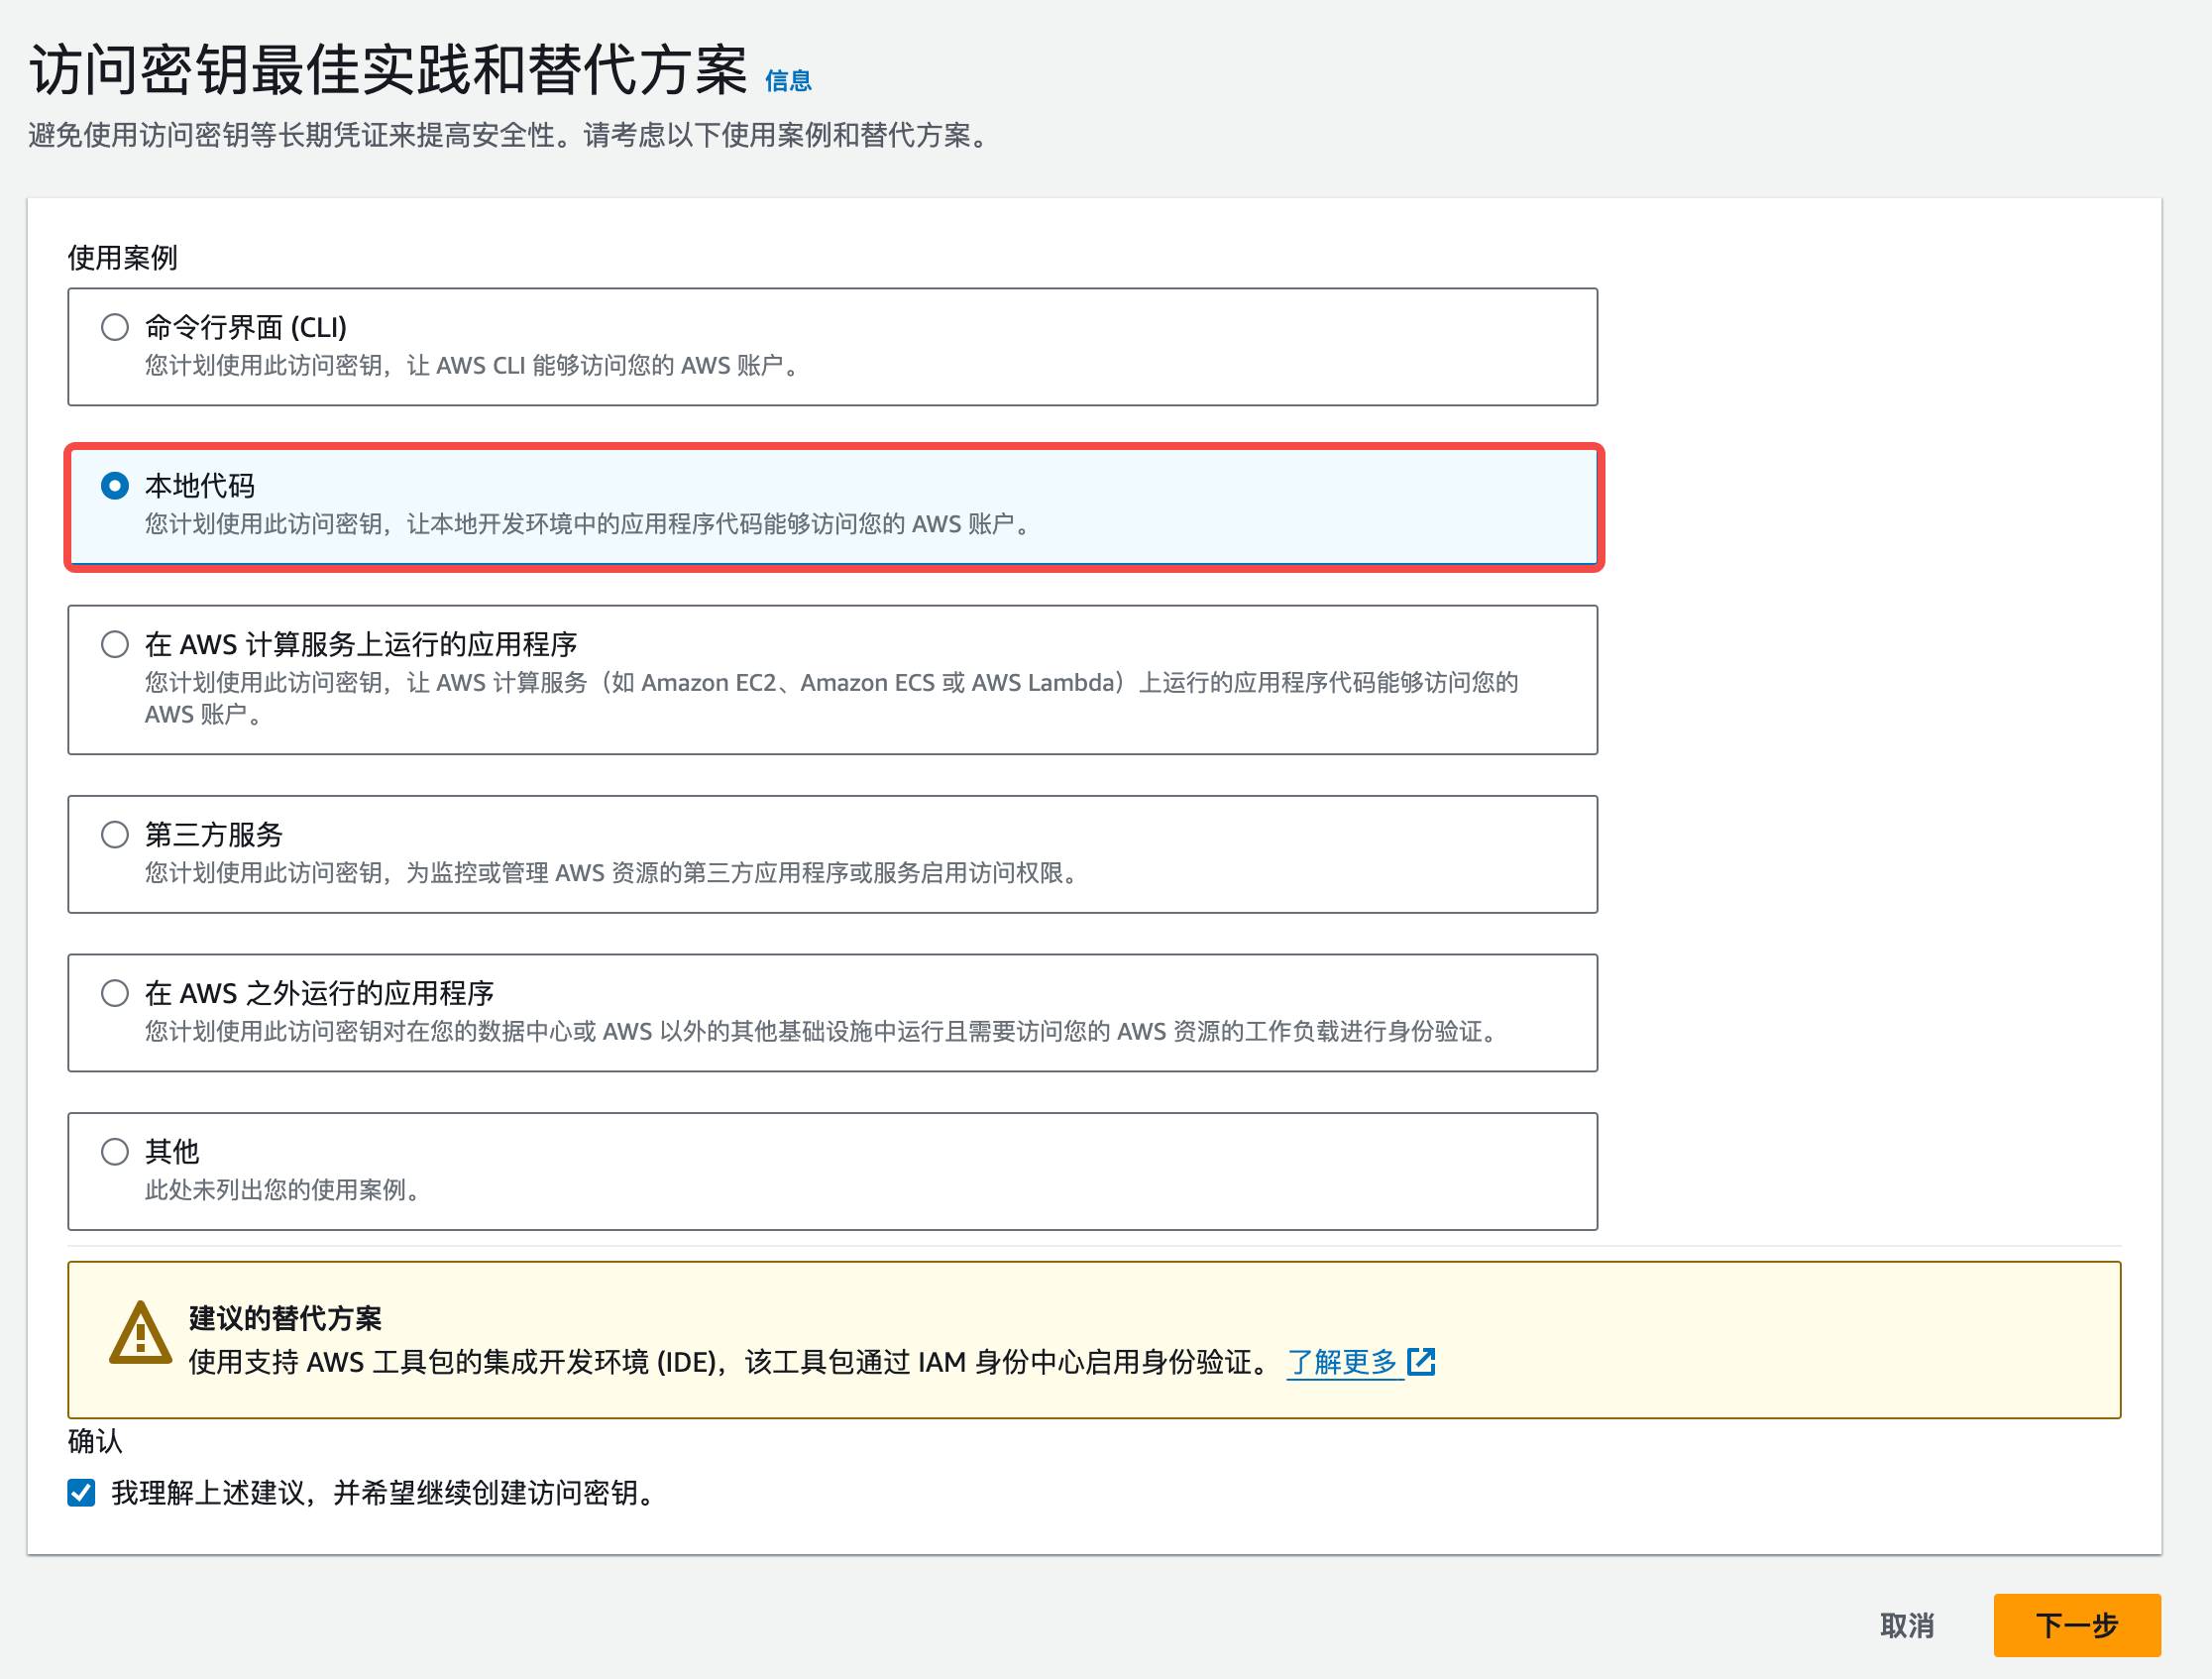
Step 8: Step 8: On the Access key best practices & alternatives page, select Local code.
Step 9: Step 9: Set a description tag value for the access key to facilitate cost tracking and then click Create access key.

Step 10: Step 10: View the AK/SK or download the .csv file.

Note that this is your only opportunity to save the AK and SK. After closing this page, you cannot view the AK and SK. If you do not save them, you must delete this access key pair and create a new pair. Anyone who obtains the AK and SK can access all available AWS resources under this user. You must keep the AK and SK confidential.
2. 2. View and manage Regions and model access permissions
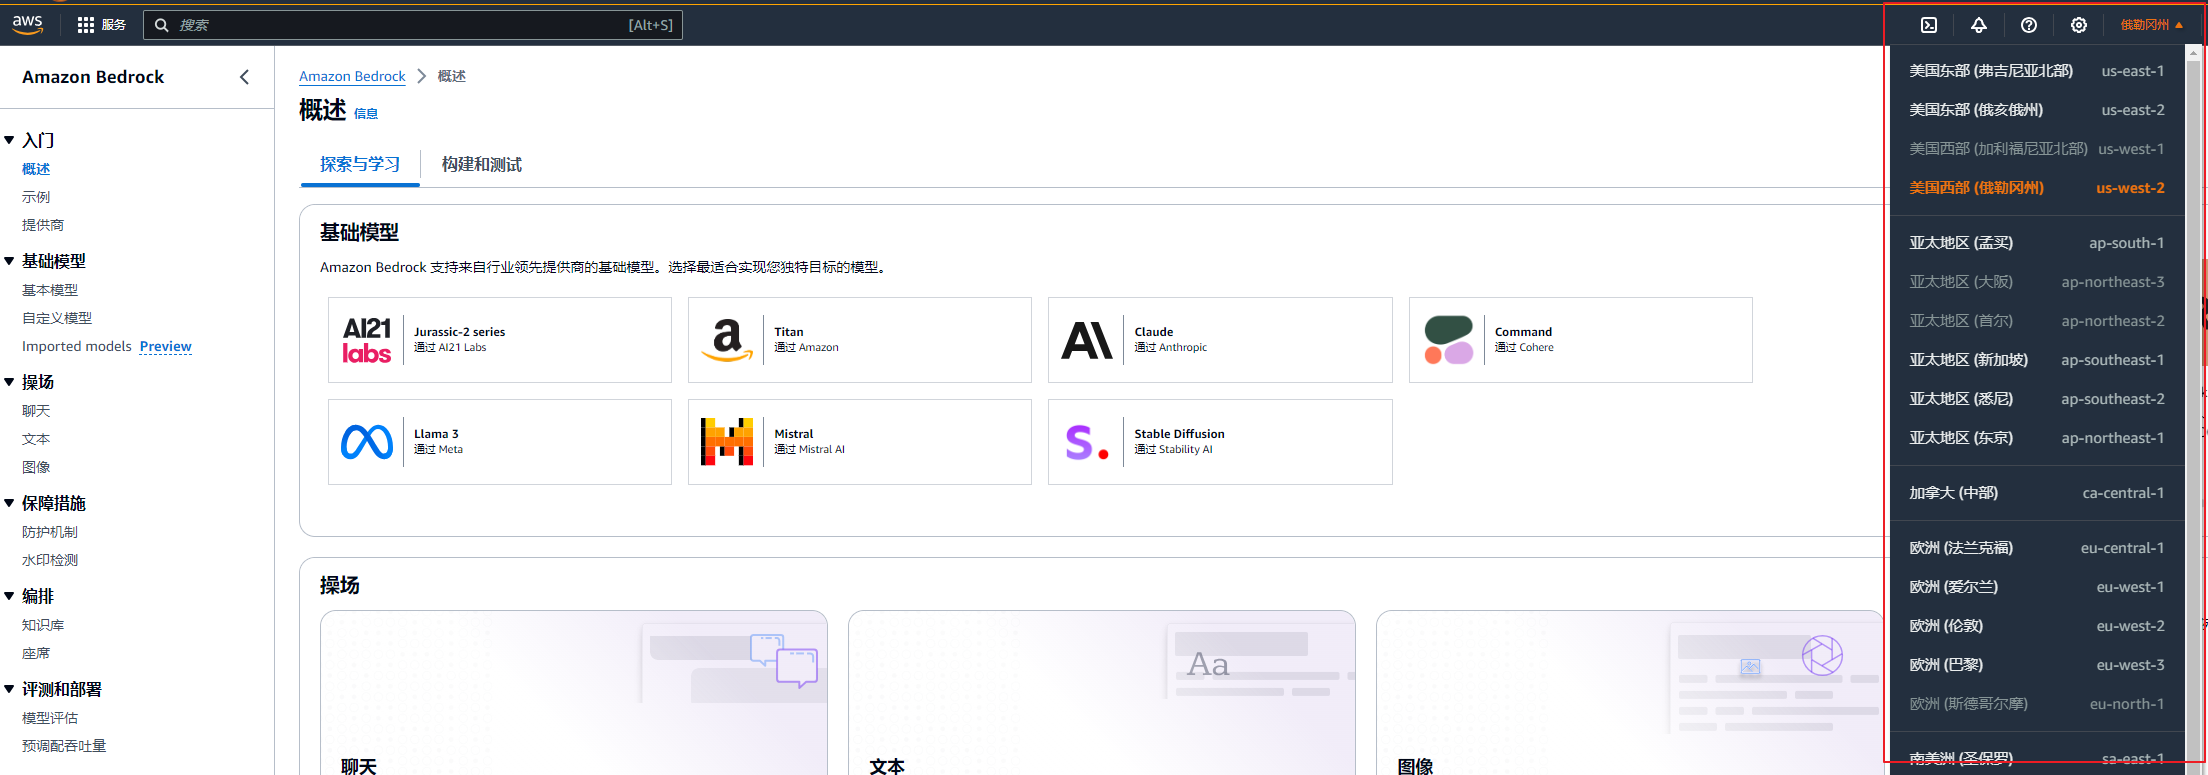
Step 2: Step 2: Select your desired Region in the top right corner.
Note: As of the date this tutorial is updated,
- Anthropic Claude 3 Opus is available only in the US West (Oregon) us-west-2 Region.
- Anthropic Claude 3.5 Sonnet is available only in the US East (N. Virginia) us-east-1 Region.
Step 3: Step 3: In the left-side navigation pane, select Model access and click the Modify model access button at the top right.
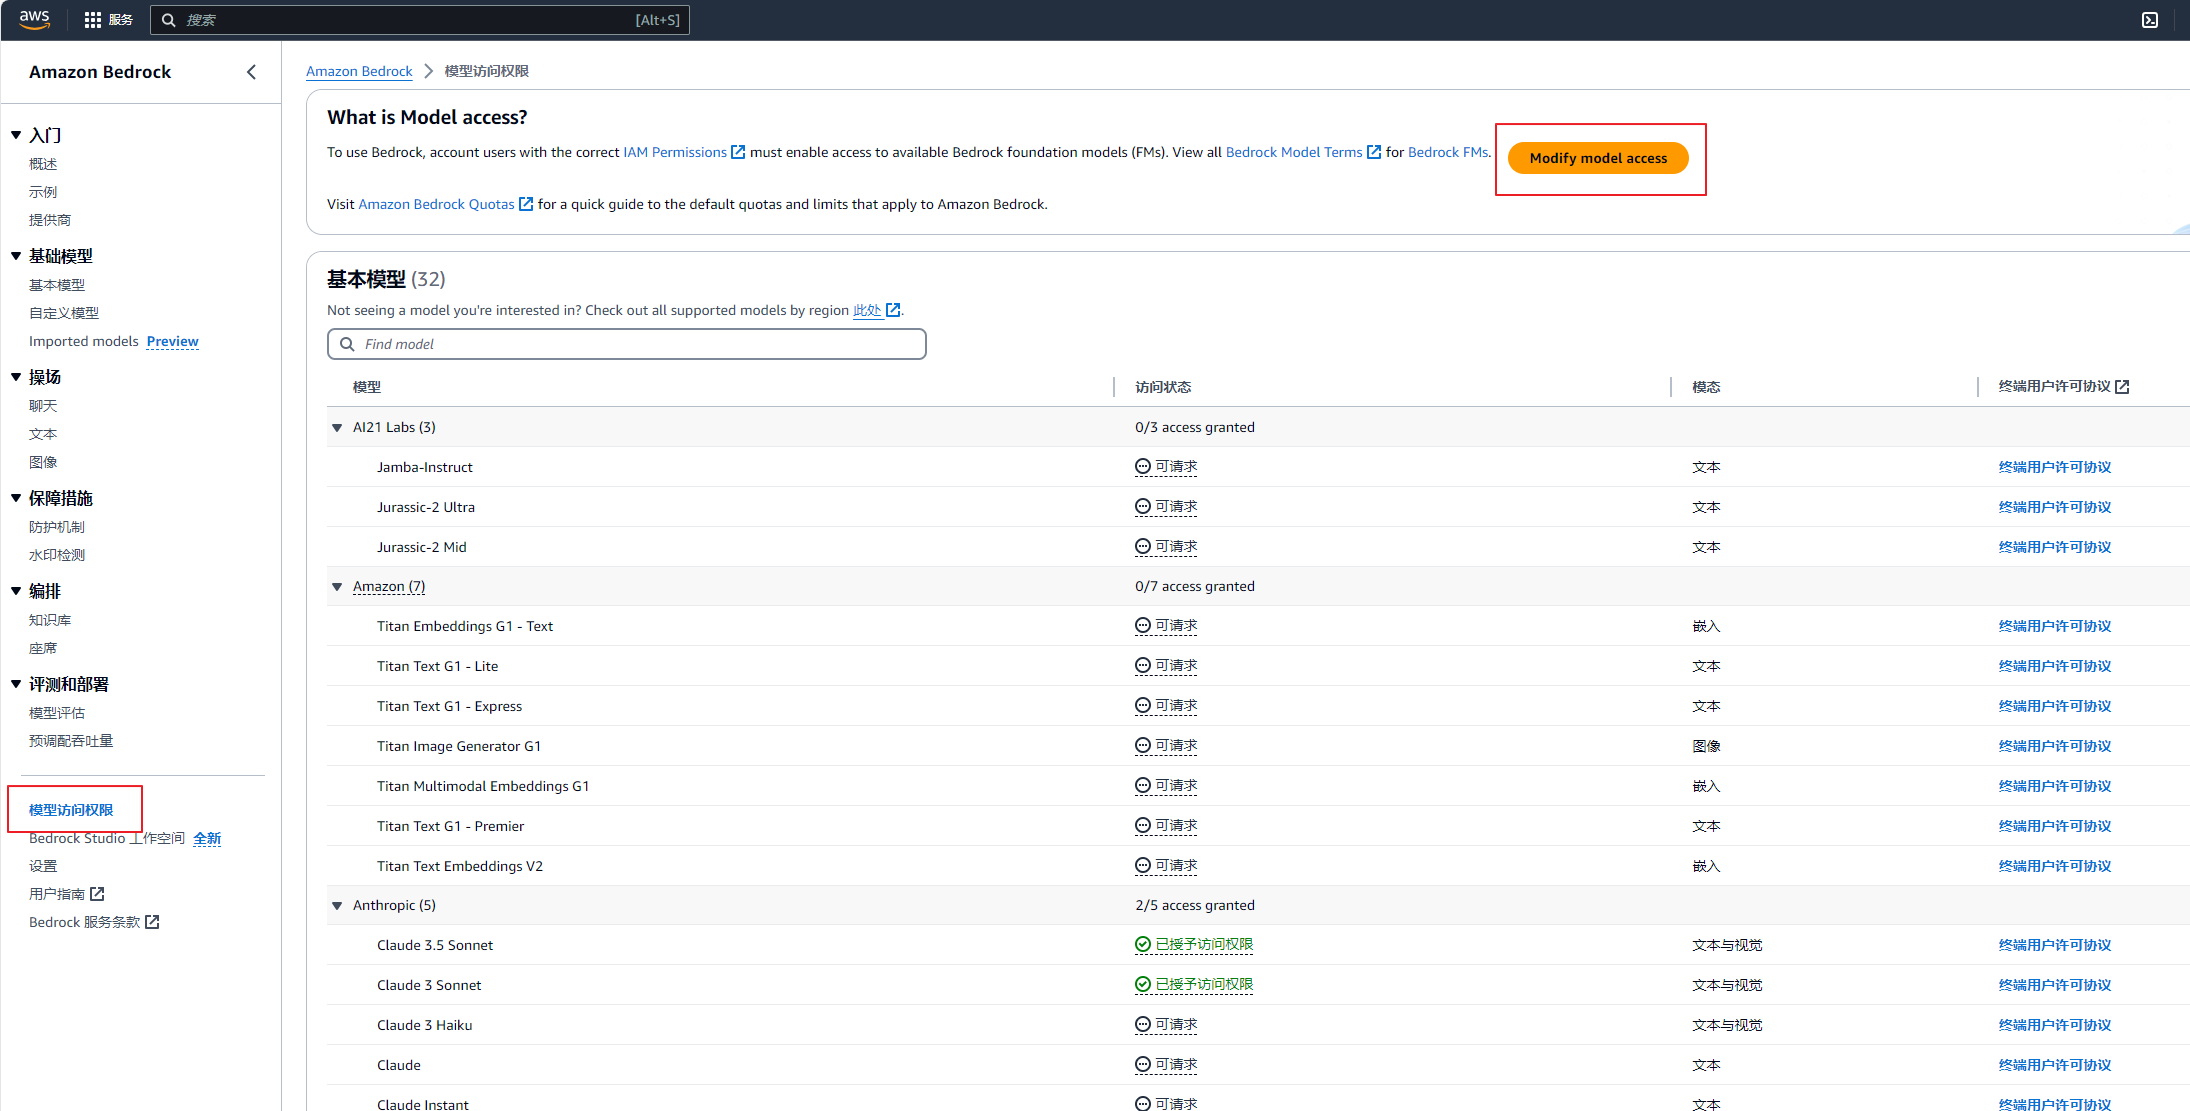
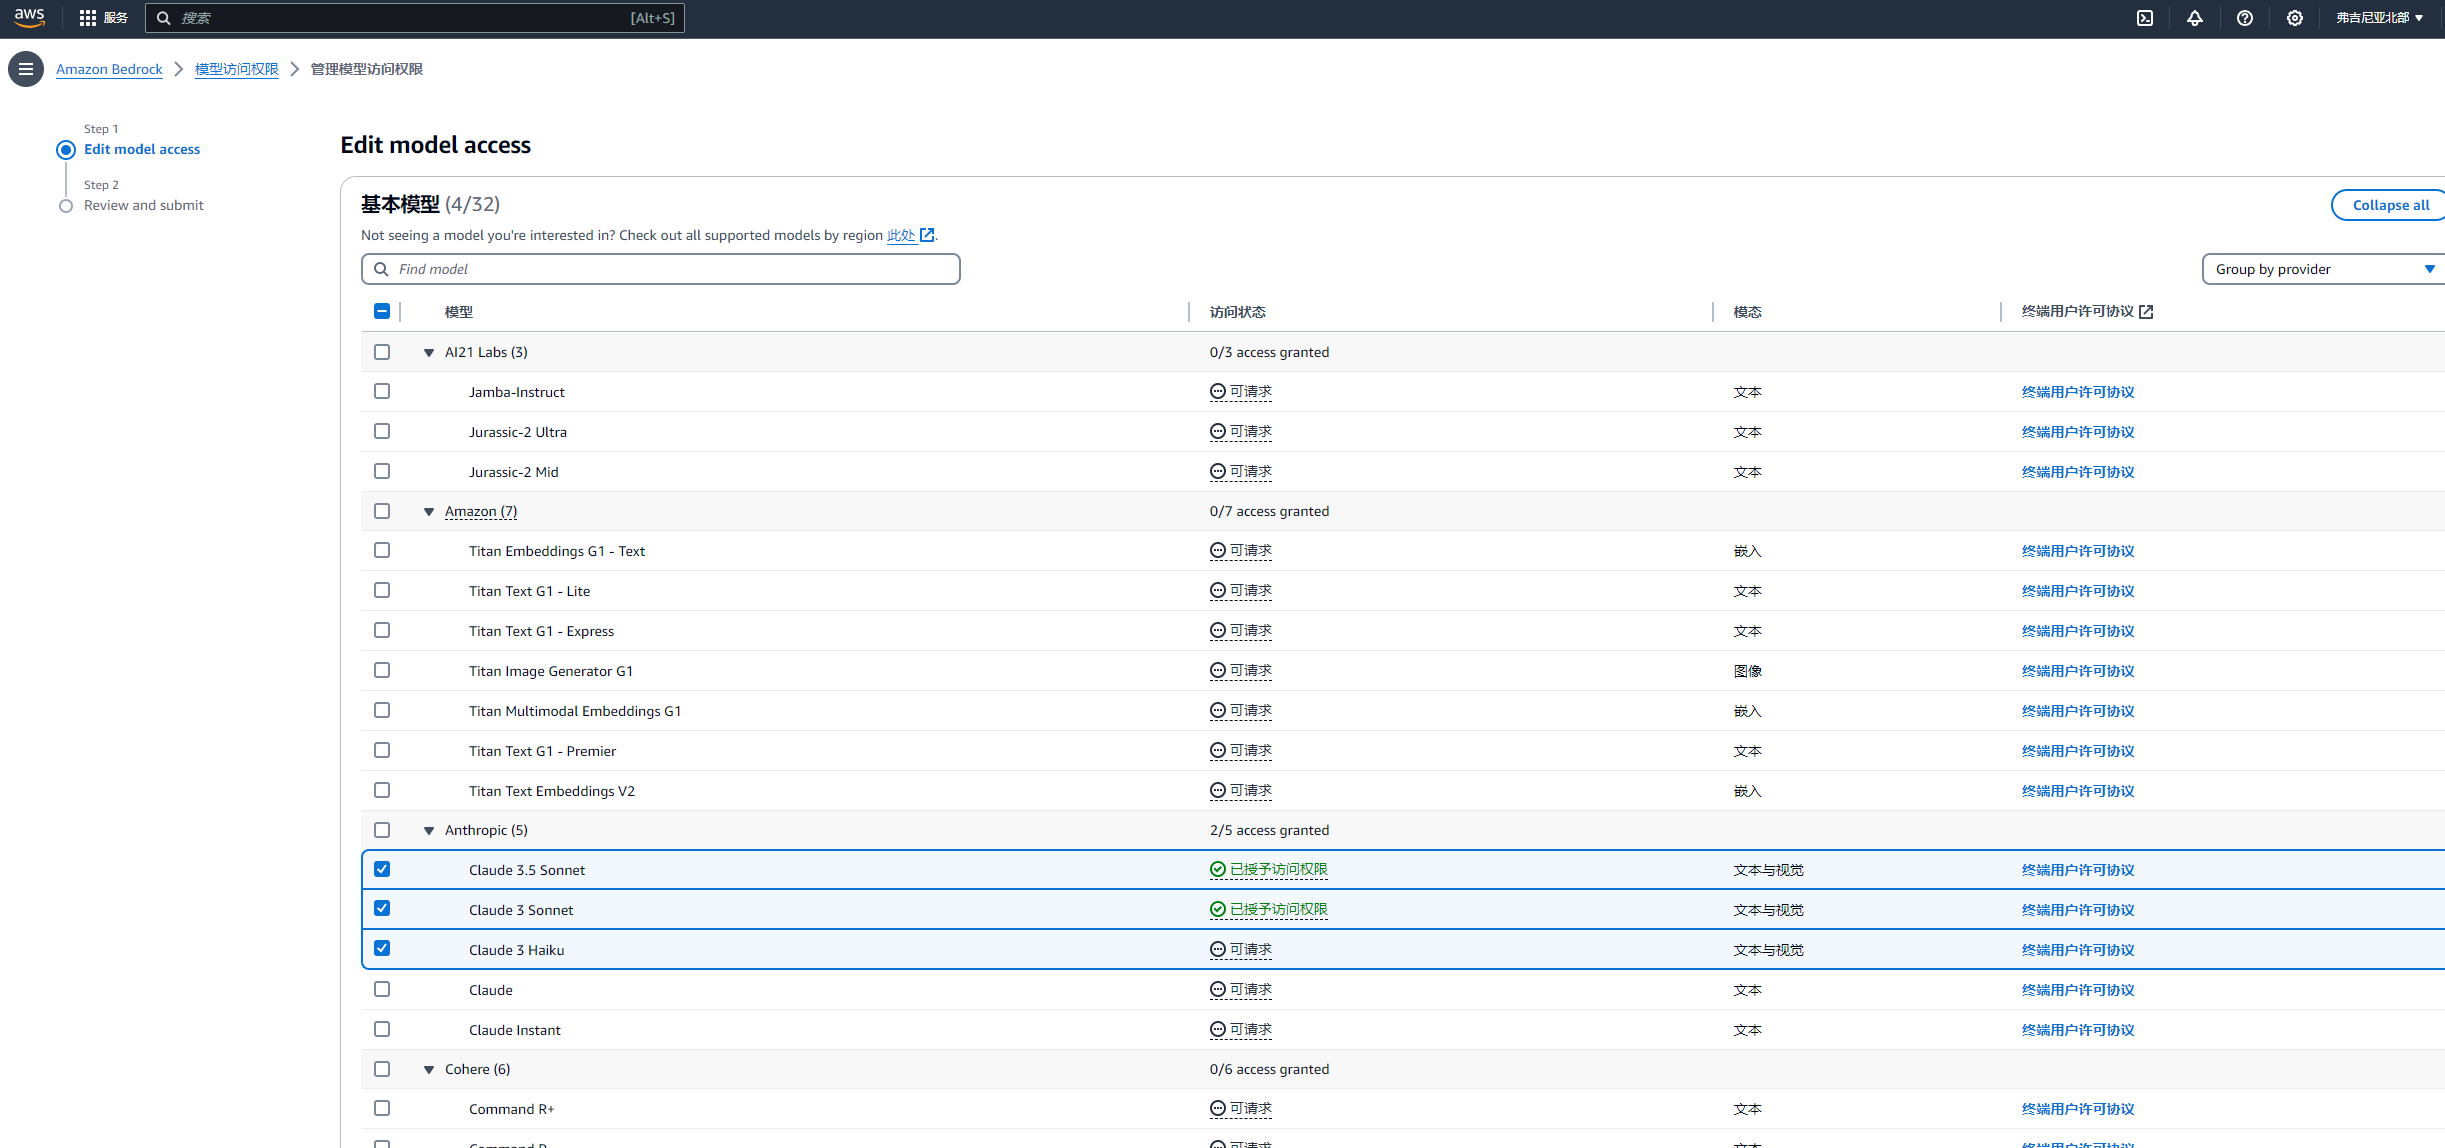
Step 4: Step 4: Select the models on which you want to request access permissions. Authorized models are selected by default, as shown in the figure below. Click Next in the bottom right corner.
Note: The first time you request the access permission on a model, you need to provide your use case information.
Step 5: Step 5: On the confirmation page, confirm the access request information and click Submit.
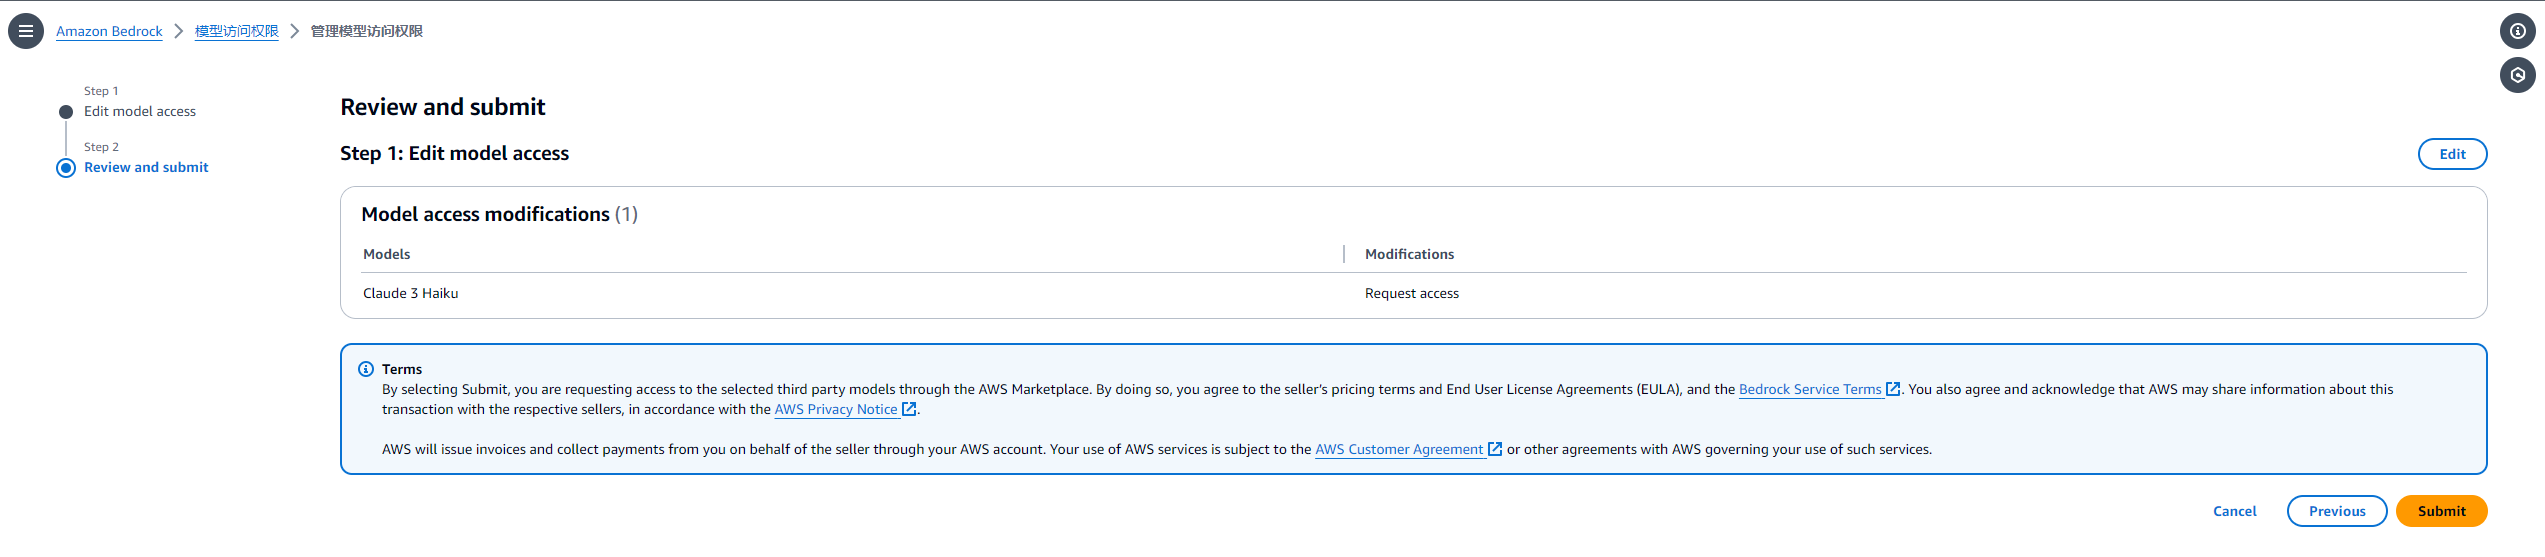
You will be redirected to the model list page. Wait a few moments. The model access will be granted.

Summary
Sample Client for Amazon Bedrock is in the testing phase. We recommend that developers use the developer mode to build your own versions.
In conclusion, Sample Client for Amazon Bedrock converts Anthropic Claude models to powerful AI assistants on desktops, contributing significantly to the popularization of AI and improving work efficiency. This is just the beginning. The future development of AI will bring more revolutionary changes to our lives and work.
Tutorials
Quickly explore generative AI with Amazon Bedrock
Use generative AI to automatically generate images for social media
Did you find what you were looking for today?
Let us know so we can improve the quality of the content on our pages