Redis & AWS ElastiCache for Redis 简介
REmote DIctionary Server(Redis)是一个由 Salvatore Sanfilippo 写的 Key-Value 存储系统,是跨平台的非关系型数据库。Redis是现在最受欢迎的NoSQL数据库之一,它是一个开源的使用 ANSI C 语言编写、遵守 BSD 协议、支持网络、可基于内存、分布式、可选持久性的键值对(Key-Value)存储数据库,并提供多种语言的 API。Redis 通常被称为数据结构服务器,因为值(Value)可以是字符串(String)、哈希(Hash)、列表(List)、集合(Sets)和有序集合(Sorted Sets)等类型。
Amazon ElastiCache for Redis 是速度超快的内存数据存储,能够提供亚毫秒级延迟来支持 Internet 范围内的实时应用程序。适用于 Redis 的 ElastiCache 基于开源 Redis 构建,可与 Redis API 兼容,能够与 Redis 客户端配合工作,并使用开放的 Redis 数据格式来存储数据。Amazon ElastiCache 是一项完全托管的服务。您无需执行硬件预置、软件修补、设置、配置、监控、故障恢复和备份等管理任务。ElastiCache 会持续监控您的集群,以保障您的 Redis 正常运行,使您可以集中精力开发更高价值的应用程序。支持 Redis 集群和非集群模式,能够通过自动故障转移支持提供高可用性。
为什么构建 Redis Cluster 代理服务集群
Redis Cluster 相比 Redis 单机版本有很多优点(比如可以构建大容量集群、性能好、扩缩容灵活),但是当一些项目工程期望从 Redis 迁移到 Redis Cluster 时,客户端却面临着大量的改造工作,与此同时带来的是需要大量的测试工作以及引入的新风险,这对于一些稳定运行的线上工程代价无疑是巨大的。
Redis-Cluster-Proxy 是 Redis 官方(RedisLabs)在 Redis 6.0 发布时推出的方便 Redis 集群迁移的工具。该工具可以实现从源端单节点/主从模式的 Redis 到 Redis Cluster 模式的无缝迁移。基本原理是从源节点写入数据到该工具,而该工具转换该 Redis 写入命令至目标节点,实现 Redis 命令在协议层进行无缝转发。并且该工具可以兼容RESP2/3协议,也即是说可以兼容从 Redis 3.0 至 Redis 6.0 各版本集群迁移的需求。
搭建代理服务集群
部署架构图

创建 EC2 服务器
基于 Ubuntu 18.04 LTS 系统构建Redis Cluster Proxy 服务预置镜像。

- 选择合适的存储大小,需要注意预留足够空间保存日志文件

安装 Redis Cluster Proxy
# 切换到root用户
~ sudo su

# 修改open file和max user process
~ vim /etc/security/limits.conf
root soft nproc 65000
root hard nproc 65000
root soft nofile 65000
root hard nofile 65000

# 创建统一部署目录 /opt/systemd-sh
~ cd /opt && mkdir -p /opt/systemd-sh && cd /opt/systemd-sh

# clone redis cluster proxy 项目到本地
~ git clone https://github.com/artix75/redis-cluster-proxy

# 检查 gcc 版本,需要 >=4.9 版本
~ gcc -v
Thread model: posix
gcc version 7.5.0 (Ubuntu 7.5.0-3ubuntu1~18.04)

# 编译服务,安装执行文件 redis-cluster-proxy 到/usr/local/bin/目录
~ cd redis-cluster-proxy && make && make install

#如果编译出错之后再编译可以先执行命令删除之前的编译文件
~ make distclean
创建 proxy.conf 配置文件
~ vim /opt/systemd-sh/proxy.conf
# Redis Cluster Configuration Endpoint
entry-point test-redis-cluster.w3cdfd.clustercfg.usw2.cache.amazonaws.com:6379
# Redis Cluster Proxy 对外服务端口
port 6379
# 线程数,建议 CPU Cores - 1
threads 3
# 和接入Client的timeout时长
tcpkeepalive 300
# 日志输出目录
logfile "/opt/systemd-sh/rcp.log"
# 连接池数量,默认即可
connections-pool-size 10
connections-pool-min-size 10
# 我们使用systemctl管理,配置为 no
daemonize no
# 支持跨 slot 查询
enable-cross-slot yes
# 最大接入Client数量
maxclients 10000
# 日志输出级别 - debug、info、error
log-level error

# 测试 redis proxy 正常工作
~ /usr/local/bin/redis-cluster-proxy -c /opt/systemd-sh/proxy.conf

~ redis-cli -h localhost
localhost:6379> proxy info
# Proxy
proxy_version:999.999.999
proxy_git_sha1:ac83840d
proxy_git_dirty:0
proxy_git_branch:unstable
os:Linux 5.4.0-1058-aws x86_64
arch_bits:64
multiplexing_api:epoll
gcc_version:7.5.0
process_id:855
threads:2
tcp_port:6379
uptime_in_seconds:23279
uptime_in_days:0
config_file:/opt/systemd-sh/proxy.conf
acl_user:default

# Memory
used_memory:2032008
used_memory_human:1.94M
total_system_memory:3905331200
total_system_memory_human:3.64G

# Clients
connected_clients:1
max_clients:10000
thread_0_clinets:1
thread_1_clinets:0

# Cluster
address:test-redis-cluster.w3cdfd.clustercfg.usw2.cache.amazonaws.com:6379
entry_node:test-redis-cluster.w3cdfd.clustercfg.usw2.cache.amazonaws.com:6379
配置 systemctl 管理 redis cluster proxy服务
~ vim /lib/systemd/system/redis-cluster-proxy.service
[Unit]
Description=redis-cluster-proxy service
After=network.target

[Service]
Type=simple
ExecStart=/usr/local/bin/redis-cluster-proxy -c /opt/systemd-sh/proxy.conf
Restart=always
RestartSec=5
StartLimitInterval=30
PrivateTmp=true

[Install]
WantedBy=multi-user.target
Alias=redis-cluster-proxy.service

# 打开服务自启动
~ systemctl enable redis-cluster-proxy
~ systemctl start redis-cluster-proxy
安装 CloudWatch Agent 增强对内存的监控
# 下载 cloudwatch agent 安装包,本地安装
~ wget https://s3.amazonaws.com/amazoncloudwatch-agent/ubuntu/amd64/latest/amazon-cloudwatch-agent.deb
~ dpkg -i -E ./amazon-cloudwatch-agent.deb
~ cd /opt/aws/amazon-cloudwatch-agent/etc/

# 启动 cloudwatch agent 服务
~ /opt/aws/amazon-cloudwatch-agent/bin/amazon-cloudwatch-agent-ctl -a fetch-config -m ec2 -s
~ systemctl status amazon-cloudwatch-agent

注意安装后系统目录的文件结构

├── etc
│  ├── amazon-cloudwatch-agent.d
│  │  └── amazon-cloudwatch-agent.json
│  ├── amazon-cloudwatch-agent.toml
│  ├── common-config.toml
│  └── env-config.json

# 更新上报参数的json配置文件
~ vim amazon-cloudwatch-agent.d/amazon-cloudwatch-agent.json
{
    "agent": {
        "metrics_collection_interval": 30,
        "run_as_user": "cwagent"
    },
    "metrics": {
        "append_dimensions": {
            "AutoScalingGroupName": "${aws:AutoScalingGroupName}",
            "ImageId": "${aws:ImageId}",
            "InstanceId": "${aws:InstanceId}",
            "InstanceType": "${aws:InstanceType}"
        },
        "aggregation_dimensions" : [
                    ["AutoScalingGroupName"],
                    ["AutoScalingGroupName", "InstanceType"],
                    ["InstanceId"],
                    ["InstanceType"],
                    ["InstanceId","InstanceType"]
            ],
        "metrics_collected": {
            "cpu": {
                "measurement": [
                    "cpu_usage_idle",
                    "cpu_usage_iowait",
                    "cpu_usage_user",
                    "cpu_usage_system"
                ],
                "metrics_collection_interval": 30,
                "resources": [
                    "*"
                ],
                "totalcpu": true
            },
            "mem": {
                "measurement": [
                    "mem_used_percent",
                    "mem_used",
                    "mem_cached",
                    "mem_total"
                ],
                "metrics_collection_interval": 5,
                "resources": [
                    "*"
                ]
            },
            "netstat": {
                "measurement": [
                    "tcp_established",
                    "tcp_time_wait"
                ],
                "metrics_collection_interval": 30
            }
        }
    }
}

# 修改配置文件权限
~ chown cwagent:cwagent amazon-cloudwatch-agent.d/amazon-cloudwatch-agent.json
~ rm amazon-cloudwatch-agent.d/default

# 重启服务,确认新配置生效
sudo systemctl restart amazon-cloudwatch-agent
sudo systemctl status amazon-cloudwatch-agent
创建 redis cluster proxy 基础镜像
# 修改 redis cluster proxy 和 cloudwatch agent 服务的 systemctl 配置
~ systemctl stop redis-cluster-proxy
~ systemctl disable redis-cluster-proxy

~ systemctl stop amazon-cloudwatch-agent
~ systemctl disable amazon-cloudwatch-agent
# 修改 proxy.conf 文件,添加占位符,后续用 CloudFormation 模板进行自动替换
~ vim /opt/systemd-sh/proxy.conf
entry-point REDIS-ENDPOINT
port 6379
threads 3
tcpkeepalive 300
logfile "/opt/systemd-sh/rcp.log"
connections-pool-size THREAD-COUNT
connections-pool-min-size 10
daemonize no
enable-cross-slot yes
maxclients 10000
log-level error
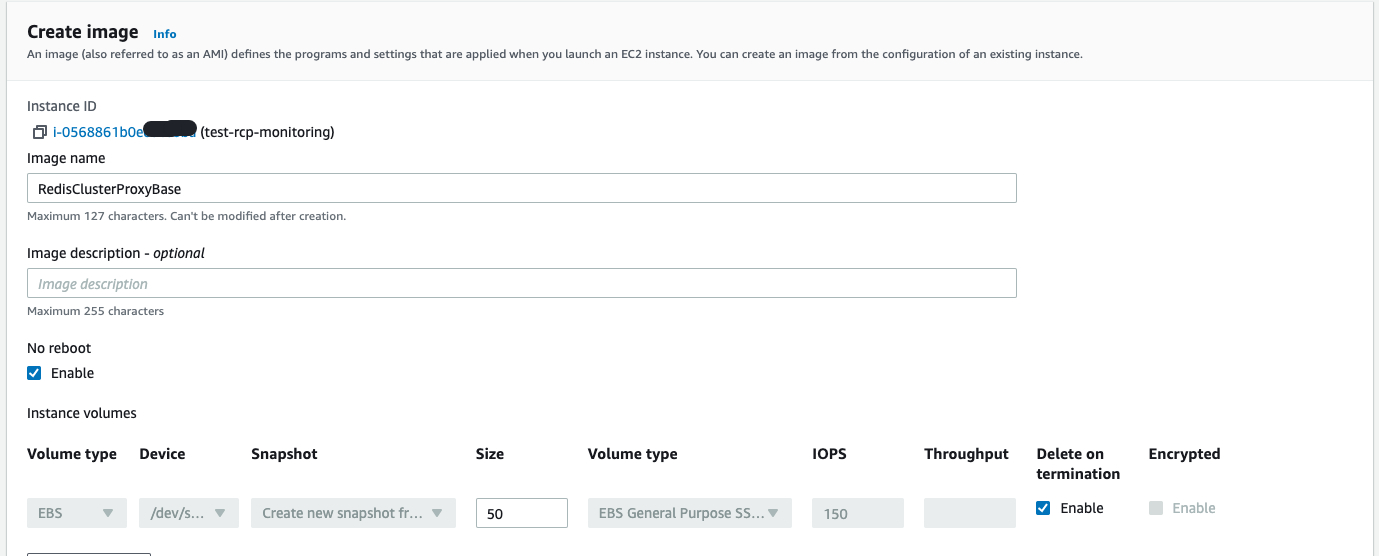
在控制台EC2界面,指定 redis cluster proxy 的服务器,创建基础镜像AMI

自动化部署 redis cluster 代理集群
利用 CloudFormation 自动化部署 NLB + Redis Cluster Proxy AutoScaling Group 架构。
- 准备 cloudwatch agent EC2 Role 权限
创建名为 CloudWatchAgentServerRole 的Role权限,具体策略 参考文档, EC2 可以有权限上报 metric。
~ vim rcp-cluster-cloudformation.yaml
AWSTemplateFormatVersion: 2010-09-09
Resources:
  RedisProxyAutoScalingGroupConfiguration:
    Type: 'AWS::AutoScaling::LaunchConfiguration'
    Properties:
      KeyName: !Ref RedisProxyKey
      ImageId: ami-003dba29adee0f4335 # 创建的Redis Cluster Proxy 基础镜像AMI ID
      IamInstanceProfile: !Ref RcpInstanceProfile
      SecurityGroups:
        - !Ref RedisProxySecurityGroup
      InstanceType: !Ref RedisClusterProxyInstanceType
      UserData:
        Fn::Base64:
          !Sub  |
            #!/bin/bash -xe
            sed -i 's/REDIS-ENDPOINT/${RedisClusterConfigurationEndPoint}/g' /opt/systemd-sh/proxy.conf
            sed -i 's/THREAD-COUNT/${RedisClusterProxyThreadCount}/g' /opt/systemd-sh/proxy.conf
            systemctl enable redis-cluster-proxy
            systemctl start redis-cluster-proxy
            systemctl enable amazon-cloudwatch-agent
            systemctl start amazon-cloudwatch-agent

  RcpInstanceProfile:
    Type: AWS::IAM::InstanceProfile
    Properties:
      Path: "/"
      Roles:
        - CloudWatchAgentServerRole # EC2 Role 权限名称

  RedisProxyAutoScalingPolicyCPUUtilization:
    Type: AWS::AutoScaling::ScalingPolicy
    Properties:
      AutoScalingGroupName: !Ref RedisProxyAutoScalingGroup
      PolicyType: TargetTrackingScaling
      TargetTrackingConfiguration:
        PredefinedMetricSpecification:
          PredefinedMetricType: ASGAverageCPUUtilization
        TargetValue: !Ref RedisClusterProxyAutoScallingCPUThreshold

  RedisProxyTargetGroup:
    Type: 'AWS::ElasticLoadBalancingV2::TargetGroup'
    Properties:
      HealthCheckEnabled: true
      HealthCheckIntervalSeconds: 10
      VpcId: !Ref RedisProxyVPC
      Protocol: TCP
      Port: 6379

  RedisProxyNLB:
    Type: 'AWS::ElasticLoadBalancingV2::LoadBalancer'
    Properties:
      Name: !Ref RedisProxyClusterName
      Type: network
      Scheme: internal
      Subnets: !Split [',', !Join [',', !Ref RedisProxySubnets]]

  RedisProxyELBListener:
    Type: 'AWS::ElasticLoadBalancingV2::Listener'
    DependsOn:
      - RedisProxyNLB
      - RedisProxyTargetGroup
    Properties:
      DefaultActions:
        - Type: forward
          TargetGroupArn: !Ref RedisProxyTargetGroup
      Port: 6379
      Protocol: TCP
      LoadBalancerArn: !Ref RedisProxyNLB

  RedisProxyAutoScalingGroup:
    Type: 'AWS::AutoScaling::AutoScalingGroup'
    DependsOn:
      - RedisProxyAutoScalingGroupConfiguration
      - RedisProxyTargetGroup
    Properties:
      TargetGroupARNs:
        - !Ref RedisProxyTargetGroup
      VPCZoneIdentifier: !Split [',', !Join [',', !Ref RedisProxySubnets]]
      DesiredCapacity: !Ref RedisClusterProxyDefaultInstanceCount
      HealthCheckGracePeriod: 100
      LaunchConfigurationName: !Ref RedisProxyAutoScalingGroupConfiguration
      MinSize: !Ref RedisClusterProxyMinimalInstanceCount
      MaxSize: !Ref RedisClusterProxyMaximumInstanceCount
      Tags:
        - Key: Name
          Value: !Ref RedisProxyClusterName
          PropagateAtLaunch: true

Parameters:

  RedisClusterProxyThreadCount:
    Type: Number
    Description: Set Redis Cluster Proxy thread count
    Default: 10
  RedisClusterProxyAutoScallingCPUThreshold:
    Type: Number
    Description: Set CPU threshold for redis proxy cluster scale up
    Default: 60
  RedisClusterProxyDefaultInstanceCount:
    Type: Number
    Description: Set initial size of EC2 instances for redis proxy cluster
    Default: 8
  RedisClusterProxyMinimalInstanceCount:
    Type: Number
    Description: Set minimize size of EC2 instances for redis proxy cluster
    Default: 4
  RedisClusterProxyMaximumInstanceCount:
    Type: Number
    Description: Set maximum size of EC2 instances for redis proxy cluster
    Default: 16
  RedisClusterProxyInstanceType:
    Type: String
    Default: c5.large
    AllowedValues:
      - c5.2xlarge
      - c5.xlarge
      - c5.large
    Description: Enter EC2 type for redis cluster proxy.
  RedisProxyClusterName:
    Type: String
    Description: Specific Redis Proxy Name
  RedisClusterConfigurationEndPoint:
    Type: String
    Description: Specific corresponding Redis Cluster Configuration Endpoint
  RedisProxyVPC:
    Type: 'AWS::EC2::VPC::Id'
    Description: Choose one valid VPC for Redis Proxy
  RedisProxySubnets:
    Type: 'List<AWS::EC2::Subnet::Id>'
    Description: Choose one or more valid subnet for Redis Proxy
  RedisProxyKey:
    Type: 'AWS::EC2::KeyPair::KeyName'
    Description: Select the key pair for those EC2 instance
  RedisProxySecurityGroup:
    Type: 'AWS::EC2::SecurityGroup::Id'
    Description: Choose Security Group for this cloudformation

Outputs:
  RedisProxyNLBDNSName:
    Description: The DNSName of the Redis Proxy NLB load balancer
    Value: !GetAtt RedisProxyNLB.DNSName
- 打开 AWS 控制台的 CloudFormation dashboard,使用以上模板创建集群。

- 配置 RedisCluster Endpoint 和 Thread Count

- 完成 CloudFormation 堆栈的创建,在 output 获取 NLB 地址

- 利用 Redis-cli 测试 NLB 连通性,最终完成 Redis Cluster 代理集群的创建。

压力测试
利用 redis-benchmark 命令做压力测试,分别测试 pipline 和 非pipeline 两种场景,proxy机型为 c5.large, 以下为压测结果(代理集群不支持CONFIG命令):
压测命令:redis-benchmark -h test-rcp-metrict-two.elb.us-west-2.amazonaws.com -t get,set,mset -n 500000 -q

压测命令:redis-benchmark -h test-rcp-metrict-two.elb.us-west-2.amazonaws.com -t get,set,mset -n 500000 -P 16 -q

- 利用 memtier_benchmark 工具,可以有效的测试 RCP 集群的负载均衡表现,通过观测集群 3 个节点的 CPU 负载变化,可以看到在压测过程中,流量是被均衡分发。

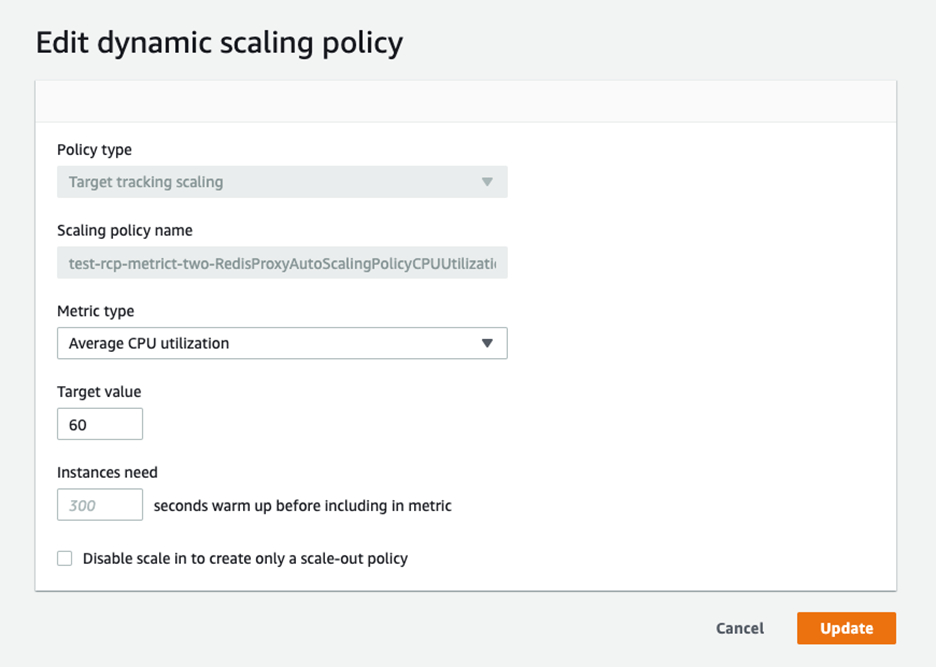
代理集群高可用
本方案是基于 NLB + Redis Cluster Proxy AutoScaling Group 架构,默认设置按照CPU负载的百分比做集群的扩缩容,利用 NLB + AutoScaling Group 来保证代理集群的高可用。可以在代理集群完成构建后,手动去调整。


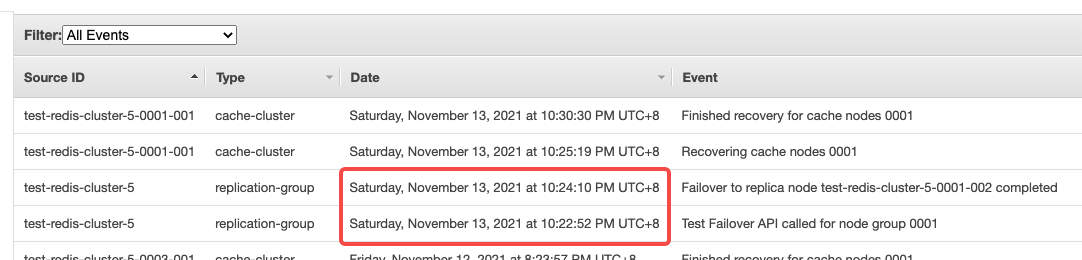
- 为了测试高可用架构,手动触发任意 Shard 的Failover,观察 RCP 集群的稳定性
触发 Shard 的 Failover,我们可以在控制台上直接手动触发

观察 ElastiCache Event,可以看到 Failover 的时间在 80 秒左右完成,由于我们在 RCP 集群配置的是 ElastiCache Redis 的 Configuration Endpoint URL,Failover 过程本身是基于 DNS 的切换,不需要 RCP 再进行配置更新。在集群恢复可用后,宕机节点在几分钟内也完成了故障恢复。

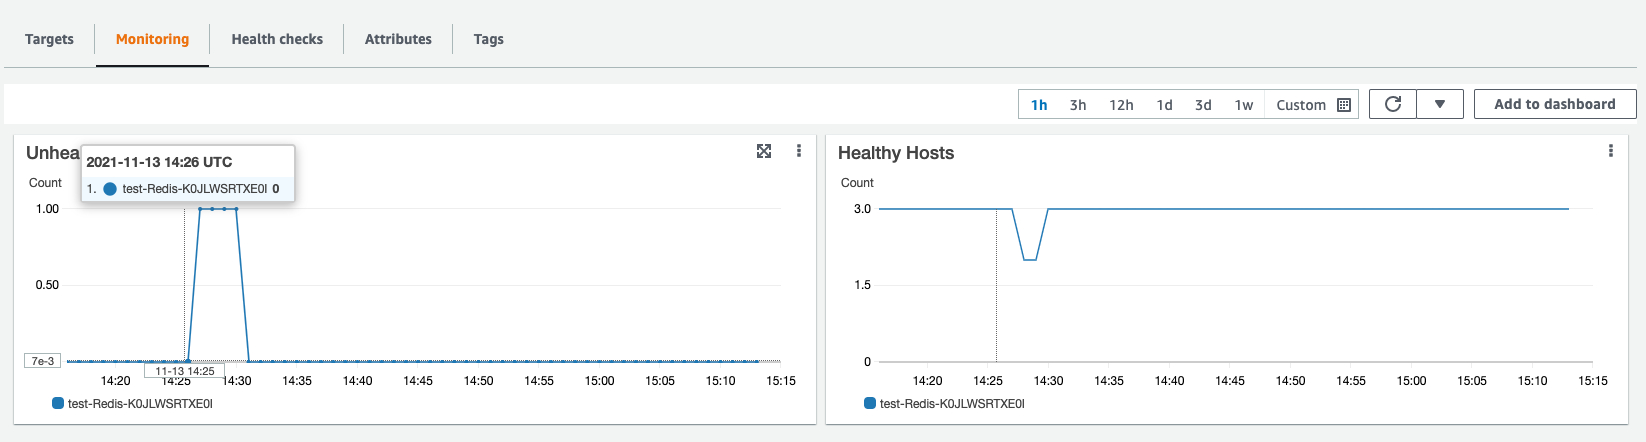
在Failover测试过程中,通过观察 RCP 的 Target Group 监控,发现 3 台服务器中有一台服务离线,服务器离线是在服务退出之后的一分钟左右,也就是 NLB 健康检查周期完成后被移除集群。

经过排查服务日志,发现是由于 ERROR: Failed to fetch cluster configuration! 异常,导致proxy服务异常推出,这个问题是 Redis Cluster Proxy 的已知 Issue,目前还没有修复,我们 Proxy 服务是使用 sytemctl 进行管理,可以通过设置持续重启,保障 Proxy 服务自动被拉起。在测试过程中也验证了可用性。并且参考上图,我们可以看到 AutoScaling Group 会自动把故障节点移除。
Proxy 集群的错误日志,在 Failover 时刻服务异常退出

经过 systemctl 持续对 Proxy 服务的重启,在3分钟后,服务启动成功,AutoScaling Group 会自动把这个节点加入到集群当中,实测在 NLB 健康检查周期内(一分钟左右)就会自动恢复。

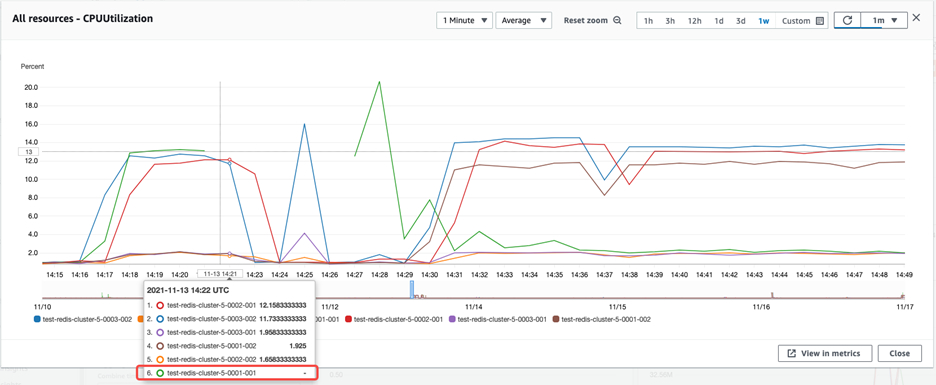
观察 Failover 时刻,ElastiCache Redis Cluster 的 CPU 负载变化,可以发现在切换阶段,0001-001号节点 CPU 为 0,几分钟完成切换后,负载恢复。

观察 Failover 时刻,ElastiCache Redis Cluster 各 Shard 的连接数变化,可以发现在切换开始,故障节点 0001-001 连接数为 0。

完成切换后,0001-001 节点开始恢复连接数,其他节点连接数因为宕机那台 Proxy 节点恢复,连接数都会均衡上涨,也说明 Redis Cluster Proxy 集群和 Redis Cluster 的连接数在 Failover 发生时于非故障节点的连接是稳定的。

总结
通过以上的步骤,可以在完成基础镜像步骤之后,使用 CloudFormation 模板按需快速做 Redis Cluster Proxy 集群的部署,建议使用本文推荐的默认配置,相关参数是经过多轮测试验证可行性。需要注意的是 Redis Cluster Proxy 作为 RedisLabs 官方推出的项目跟 Redis 6.0 一起发布,但是截止到目前这个项目已经有两年没有更新,文档里标识这个项目仍然在 Alpha 版本,如果考虑在生产环境中使用,请提前做好技术评估,尤其在文中提到的压测过程中已知 Issue 对稳定性影响。这里也推荐国内B站开源的一个Golang项目 Overlord,经过B站生产环境验证的版本。后续我也会整理使用 Overlord 搭建 Redis Cluster 代理服务集群的构建方案。
参考链接
本篇作者