1. 背景
特征工程本质是一项工程活动,目的是最大限度地从原始数据中提取特征以供下游算法和模型使用。通过特征工程实现的对数据特征的加工和提取决定了下游机器学习算法实现效果的上限。由此可见特征工程的重要性。实战中,特征工程往往需要跨团队协作完成:需要数据团队和算法团队紧密配合。在离线场景,数据团队通过离线的批处理任务(通过数据 ETL 完成对脏数据、数据标准化、根据业务需要的数据聚合等的处理)完成数据的清洗和分层存储,算法团队通过一系列特征处理方法(比如降维、特征选择等)完成特征加工和选择。在在线场景,两个团队的耦合程度更高。因为整体任务实时性的要求,特征的加工和选择需要在线实时完成,也就没有了离线完成特征加工和选择的时间窗。这就需要算法团队通过离线任务预先完成对特征定义的逻辑的梳理,然后将这些逻辑同数据团队沟通,并最终通过在实时数据处理任务完成。这些实时的特征将会被下游的模型任务实时消费,实时给出支持业务运营的预测结果。整个过程都是实时进行。前端的作为数据源的流数据往往具有负载大且有波动的特点(例如数据是移动端或 web 端的用户行为数据),因此需要流式处理任务具备处理弹性、实时高吞吐的能力。实时特征需要存储在可以实现高速读写的介质中,以实现上游流式任务和下游模型任务对其高速读写操作。在很多场景,对实时特征的操作还需要被全量记录下来,以支持离线的特征修正,和可能的特征数据复盘。
Amazon Glue 是一项无服务器的数据集成服务。可让数据准备更简单、更快、更便宜。目前 Glue 支持对接超过 70 种不同的数据来源,可以通过集中式数据目录管理数据资产,并以可视化方式创建、运行和监控 ETL 管道以将数据加载到数据湖中。
参考链接:Glue
Glue3.0 同时支持离线批处理(Glue ETL)和在线流式处理(Glue Streaming)任务的开发和部署,数据处理引擎是 spark(离线批处理)和 sparkstreaming(在线流式处理)。无服务器架构使得 Glue 在处理弹性、实时高吞吐的负载时得心应手:
(1)根据不同的负载可以拉起相应的算力来部署任务。
Glue 部署算力的粒度是 DPU(Data Processing Unit)。DPU 是对处理能力的相对度量,Standard 的 DPU 由 4 个 vCPU 的计算容量和 16GB 内存组成。Glue 3.0 除了支持 Standard 的 DPU 之外,还支持 G.1X、G.2X 以及 G.025X。
参考链接:Glue DPU
(2)当任务完成时可以即刻释放 DPU 资源,最大限度地实现资源集约化使用。
Amazon SageMaker Feature Store 是一个完全托管式的专用存储库,用于存储、共享和管理机器学习(ML)模型特征。当用于批量离线训练模型的特征可用于实时推理时,很难保持两个特征存储同步。SageMaker Feature Store 为整个 ML 生命周期中的特征使用提供安全且统一的存储。SageMaker Feature Store 的 Online Store 采用 DynamoDB 作为存储介质;Offline Store 采用 S3 作为存储介质,通过 Athena 进行查询。Online Store 和 Offline Store 的 schema 管理通过 Feature Store 本身来实现,可以通过命令行来定义,通过 console 来查看。
参考链接:SageMaker Feature Store
这篇 blog 将描述如何通过 Glue Streaming job 和 SageMaker Feature Store 完成对在线特征的加工和存储,并演示 SageMaker Feature Store 的特征快照/特征 time travel 功能。
2.架构设计
实时数据源采用 Amazon Managed Steaming for Apache Kafka (简称 MSK)集群承载。通过 python 脚本向 MSK 集群中生产随机生成的符合一定 schema 要求的模拟数据。Glue Streaming job 作为 MSK 集群上数据的消费者,在消费数据的过程中完成对数据的变换(transformation),进而形成实时特征,并写入到 Feature Store 的 Online Store 中。Feature Store 将自动地批量地将 Online Store 中的数据操作完整地同步到 Offline Store 中,方便下游操作对 Feature 可能进行的离线处理以及特征修正或者复盘。架构图如下所示:

3.工程实现
3.1 Python Data Generator
本实验中用到的 MSk Cluster 是 private 部署的,因此需要在与 MSK Cluster 同 VPC 的 ec2/cloud9 上运行下面的 python 脚本。运行脚本之前,需要确认环境已经安装了 kafka-python package。安装命令如下:
数据生成脚本代码如下:
import json
import random
import string
import sys
import time
import datetime as dt
from kafka import KafkaProducer

alphabet_upper_list = string.ascii_uppercase
alphabet_lower_list = string.ascii_lowercase

# Randomly generate a string of specified digits
def get_random(instr, length):
    # Obtain segments of a specified length from a specified sequence randomly and form an array, for example: ['a', 't', 'f', 'v', 'y']
    res = random.sample(instr, length)
    # Combine elements in the array into a character string.
    result = ''.join(res)
    return result

# Store the generated rowkey that does not exist.
rowkey_tmp_list = []
# Make a rowkey.
def get_random_rowkey():
    import time
    pre_rowkey = ""
    while True:
        # Obtain a two-digit number from 00 to 99, including 00 and 99.
        num = random.randint(00, 99)
        # Obtain the current 10-digit timestamp.
        timestamp = int(time.time())
        # str(num).zfill(2) If the string does not contain two digits, 0 is automatically added to the string.
        pre_rowkey = str(num).zfill(2) + str(timestamp)
        if pre_rowkey not in rowkey_tmp_list:
            rowkey_tmp_list.append(pre_rowkey)
            break
    return pre_rowkey

# Create a username.
def get_random_name(length):
    name = string.capwords(get_random(alphabet_lower_list, length))
    return name

# Obtain the age.
def get_random_age():
    return str(random.randint(18, 60))

# Obtain the gender.
def get_random_sex():
    return random.choice(["woman", "man"])

# Obtain the goods ID.
def get_random_goods_no():
    goods_no_list = ["220902", "430031", "550012", "650012", "532120","230121","250983", "480071", "580016", "950013", "152121","230121"]
    return random.choice(goods_no_list)

# Obtain the goods price (floating point number).
def get_random_goods_price():
    # Randomly generate the integer digits of the goods price. The value is a three-digit number ranging from 1 to 999, including 1 and 999.
    price_int = random.randint(1, 999)
    # Generate the number of decimal places in the price randomly. The value is a two-digit number ranging from 1 to 99, including 1 and 99.
    price_decimal = random.randint(1, 99)
    goods_price = str(price_int) +"." + str(price_decimal)
    return goods_price


# Obtain the shop ID.
def get_random_store_id():
    store_id_list = ["313012", "313013", "313014", "313015", "313016","313017","313018", "313019", "313020", "313021", "313022","313023"]
    return random.choice(store_id_list)

# Obtain the shopping behavior type.
def get_random_behavior_type():
    goods_type_list = ["click", "buy", "cart", "fav", "scan"]  #click, purchase, add, add to favorites, and browse
    return random.choice(goods_type_list)

# Obtain the goods purchase date (data of the last seven days).
def get_current_time():
    _ts = time.time()
    eventtime = dt.datetime.utcfromtimestamp(_ts).strftime("%Y-%m-%dT%H:%M:%SZ")
    return eventtime

# Generate a piece of data.
def get_random_record():
    return {'rowkey': get_random_rowkey(),
     'name': get_random_name(5),
     'age': get_random_age(),
     'sex': get_random_sex(),
     'goods_no': get_random_goods_no(),
     'goods_price': get_random_goods_price(),
     'store_id': get_random_store_id(),
     'behavior_type': get_random_behavior_type(),
     'buy_time': get_current_time()}

# Obtain a random integer for sleep.
def get_random_sleep_time():
    return random.randint(5, 10)

def send_data(_kafka_topic, _producer):
    while True:
        data = get_random_record()
        partition_key = str(data["rowkey"])
        print(data)
        _producer.send(_kafka_topic, json.dumps(data).encode('utf-8'))


if __name__ == '__main__':
    producer = KafkaProducer(bootstrap_servers="<your msk brokers list> ")
    KAFKA_TOPIC = "<your kafka topic>"
    send_data(KAFKA_TOPIC, producer)
生成的模拟数据的 sample 如下:
{'rowkey': '071682399346', 'name': 'Famzj', 'age': '55', 'sex': 'woman', 'goods_no': '230121', 'goods_price': '902.41', 'store_id': '313015', 'behavior_type': 'fav', 'buy_time': '2023-04-25T05:09:06Z'}
{'rowkey': '881682399346', 'name': 'Bmfus', 'age': '44', 'sex': 'man', 'goods_no': '230121', 'goods_price': '274.24', 'store_id': '313022', 'behavior_type': 'scan', 'buy_time': '2023-04-25T05:09:06Z'}
{'rowkey': '631682399346', 'name': 'Zimpg', 'age': '31', 'sex': 'man', 'goods_no': '230121', 'goods_price': '586.31', 'store_id': '313014', 'behavior_type': 'buy', 'buy_time': '2023-04-25T05:09:06Z'}
{'rowkey': '901682399346', 'name': 'Dsrec', 'age': '45', 'sex': 'woman', 'goods_no': '950013', 'goods_price': '712.78', 'store_id': '313019', 'behavior_type': 'fav', 'buy_time': '2023-04-25T05:09:06Z'}
{'rowkey': '171682399346', 'name': 'Tncap', 'age': '58', 'sex': 'man', 'goods_no': '230121', 'goods_price': '671.16', 'store_id': '313013', 'behavior_type': 'fav', 'buy_time': '2023-04-25T05:09:06Z'}
{'rowkey': '751682399346', 'name': 'Wcums', 'age': '23', 'sex': 'woman', 'goods_no': '480071', 'goods_price': '370.28', 'store_id': '313017', 'behavior_type': 'cart', 'buy_time': '2023-04-25T05:09:06Z'}
{'rowkey': '201682399346', 'name': 'Hjlfo', 'age': '28', 'sex': 'man', 'goods_no': '950013', 'goods_price': '513.38', 'store_id': '313021', 'behavior_type': 'scan', 'buy_time': '2023-04-25T05:09:06Z'}
{'rowkey': '981682399346', 'name': 'Akfgz', 'age': '60', 'sex': 'woman', 'goods_no': '580016', 'goods_price': '751.67', 'store_id': '313020', 'behavior_type': 'cart', 'buy_time': '2023-04-25T05:09:06Z'}
{'rowkey': '261682399346', 'name': 'Hxiyr', 'age': '54', 'sex': 'man', 'goods_no': '220902', 'goods_price': '512.47', 'store_id': '313022', 'behavior_type': 'click', 'buy_time': '2023-04-25T05:09:06Z'}
{'rowkey': '861682399346', 'name': 'Ozfis', 'age': '39', 'sex': 'woman', 'goods_no': '230121', 'goods_price': '985.46', 'store_id': '313023', 'behavior_type': 'scan', 'buy_time': '2023-04-25T05:09:06Z'}
{'rowkey': '501682399346', 'name': 'Kphlj', 'age': '60', 'sex': 'woman', 'goods_no': '230121', 'goods_price': '129.43', 'store_id': '313018', 'behavior_type': 'cart', 'buy_time': '2023-04-25T05:09:06Z'}
3.2 创建 MSK Cluster
通过 console 创建 MSK Cluster。Create method 选择 Custom Create,Cluster type 选择 Provisioned,Apache Kafka version 选择 2.8.1(recommend),Broker type 选择 kafka.m5.large,Number of zones 选择 3 个(2 个也可以,推荐 3 个),Brokers per zone 选择 1 个,Networking 部分注意在同一个 VPC 的不同 subnet 中创建 broker,最好可以为 MSK Cluster 的 broker 在 VPC 的每个 AZ 中创建一个 subnet。因为是内网访问,Security Group 可以放的开一些,允许所有。Security 中 Access control methods 选择 Unauthenticated access,Encryption 选择 plain text 就可以。可以在 console 的 Properties 页签的 Broker details 中查看到建完成的 MSK Cluster 的 broker 的 endpoint 的信息。三个 broker 的 endpoints 加上端口号 9092 组合成 list,就是 MSK Cluster 访问的地址。具体的格式说明如下:
<broker1 endpoint>:9092,<broker2 endpoint>:9092,<broker3 endpoint>:9092
本 blog 的重点是 Glue Streaming 和 Sagemaker Feature Store。对 MSK Cluster 的管理并没有展开讨论。关于 MSK Cluster 的 sizing、configuration 以及 ops 等的话题可以参考 MSK Cluster Deep Dive。
3.3 配置 Glue Streaming Job
Glue 是 AWS 托管的服务器架构的服务,其网络部分的设置对用户不可见。而实战中,处于安全和公网延迟大的考虑,客户基本上都会将 MSK Cluster 的网络设置成不公开的。所以,要实现 Glue 消费 MSK Cluster 的消息,必须在 MSK Cluster 的 broker 所在的 VPC 构建一个 MSK connector 来建立起 MSK Cluster 和 Glue 的连接。这个 Connector 的创建方式如下:
在 Glue Console 左侧的 navigation bar 中选择 Data connections,如下面截图所示

然后点击 create connection,开始创建连接器

Connection type 中选择 Kafka

然后在 Connection access 中训责 MSK,在下面的下拉列表中选中之前创建好的 MSK Cluster

Authentication method 选择 none,Encryption 中的 SSL 根据需要选择。Network options 中的 VPC 选择 MSK Cluster 所在的 VPC,subnet 选择这个 VPC 中的任一 subnet 都可以。Security group 选择和 MSK Cluster 一样的。
Connector 创建完成之后,通过 Glue Console 继续进行 Glue Streaming Job 的创建。步骤如下:
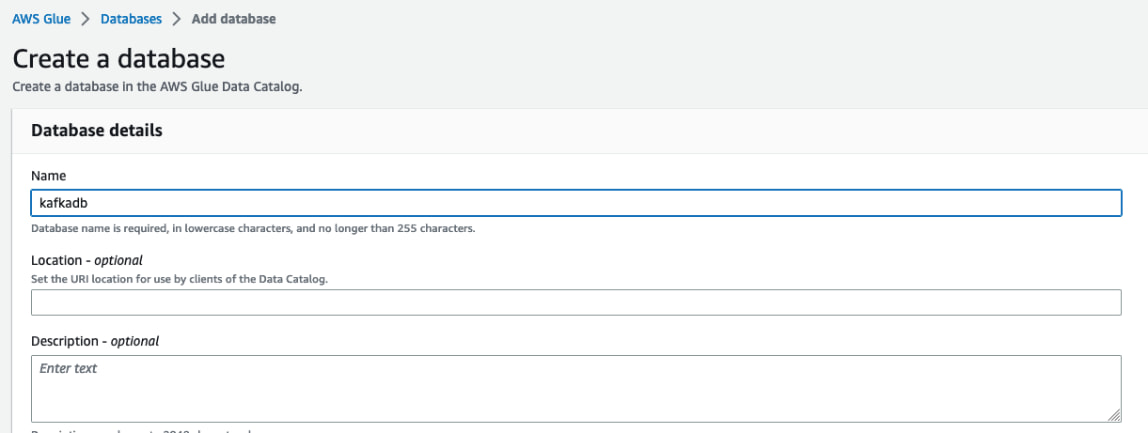
在 glue console 左侧的 navigation bar 中选择 Databases

添加 kafkadb,如下图所示

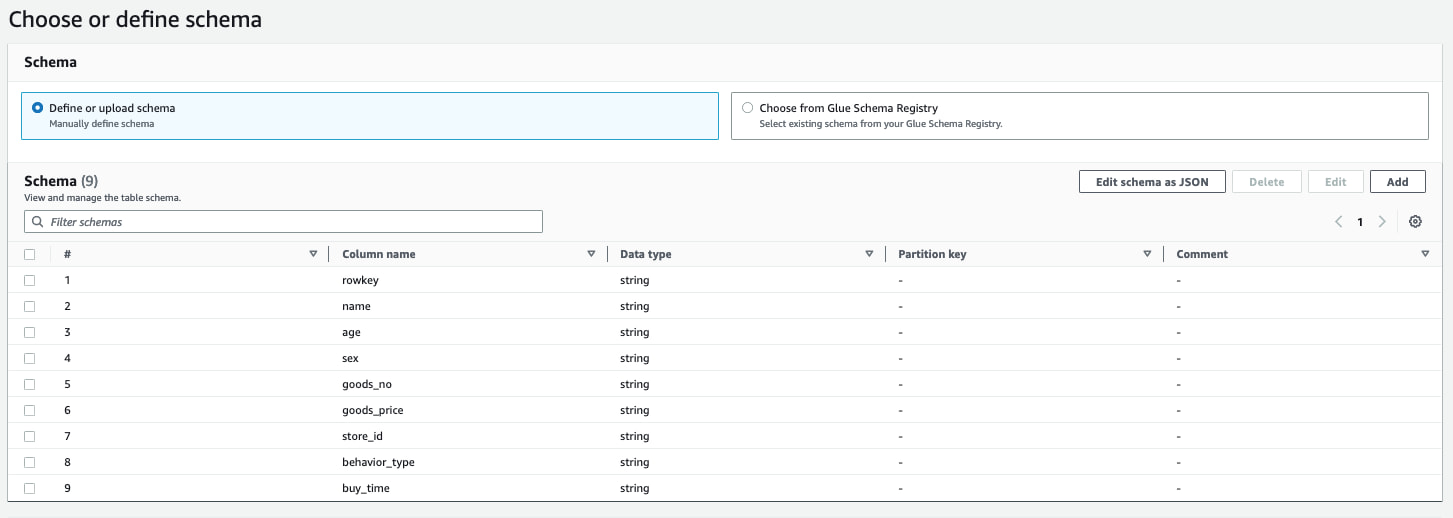
点击 kafkadb,进入 kafkadb 的页面,点击 Add Table,然后按照下面截图中的内容设定好 table

并按照之前 data generator 中的 schema 定义 table 的 schema,如下图所示

在 glue console 左侧的 navigation bar 中选择 Visual ETL

然后在右侧的 AWS Glue Studio 中选择 Visual with a source and target

将画布中原有的元素都删除掉,然后 data 选择 apache kafka,transform 选择 change schema,targets 里选择 s3。按如下图所示进行配置

注意:(1)不要勾选 Detect schema 选项;(2)由于目前 Glue 中还不原生支持 Sagemaker Feature Store,S3 作为 target 只是临时借用,后面的步骤中会详细描述如何通过代码把 target 从 S3 替换成 Feature Store。S3 的配置中需要设定一个 output 的目录。因为是临时用,所以随便指定一个路径就可以;(3)在 Job Details 里会有指定 IAM Role 的提示,可以创建一个 role 然后赋予 poweruser 的 policy;(4)Job Details 中的 Job Parameters 中需要添加两个参数设置。
--additional-python-modules, sagemaker
--user-jars-first, true
详细的文档说明见链接:Glue Arguments。
保存任务后,在 script 中视图点击右上角的 Edit Script,开始编辑代码。开始编辑代码之后,图形化的界面将失效。

由于 MSK Cluster 是在 private subnet 中部署的,并没有暴露在公网上,所以通过原生的 spark 是拿不到 MSK Cluster 中的数据的:下面的示例代码跑不通。
from pyspark.sql import SparkSession
spark = SparkSession \
        .builder \
        .appName("<app name>") \
        .config("spark.sql.debug.maxToStringFields", "100") \
        .getOrCreate()
kafka_df = spark.readStream \
    .format("kafka") \
    .option("kafka.bootstrap.servers", "<msk cluster broker list>") \
    .option("kafka.security.protocol", "SSL") \
    .option("failOnDataLoss", "false") \
    .option("subscribe", "topic1") \
    .option("includeHeaders", "true") \
    .option("startingOffsets", "latest") \
    .option("spark.streaming.kafka.maxRatePerPartition", "50") \
    .load()
在这种私有网络部署情况下,只能通过 Glue Streaming 原生的 DynamicFrame 来获取。DynamicFrame 的介绍如链接:Glue Dynamic Frame。
下面代码中的 ChangeSchemaApplyMapping_nodexxxxxxxxxxxxx 是 DynamcFrame 的实例。
ApacheKafka_nodexxxxxxxxxxxxx = DynamicFrame.fromDF(
data_frame, glueContext, "from_data_frame"
)
# Script generated for node Change Schema (Apply Mapping)
ChangeSchemaApplyMapping_nodexxxxxxxxxxxxx = ApplyMapping.apply(
frame=ApacheKafka_nodexxxxxxxxxxxxx,
mappings=[
       ("rowkey", "string", "rowkey", "string"),
       ("name", "string", "name", "string"),
       ("age", "string", "age", "string"),
       ("sex", "string", "sex", "string"),
       ("goods_no", "string", "goods_no", "string"),
       ("goods_price", "string", "goods_price", "string"),
       ("store_id", "string", "store_id", "string"),
       ("behavior_type", "string", "behavior_type", "string"),
       ("buy_time", "string", "buy_time", "string"),
],
transformation_ctx="ChangeSchemaApplyMapping_nodexxxxxxxxxxxxx",
)
对 DynamicFrame 实例进行进一步操作来获取数据,需要将 DynamicFrame 实例转化成 Dataframe 实例并构建一个 iterator,将 Dataframe 中的记录分隔开。示例代码如下:
etl_df = ChangeSchemaApplyMapping_nodexxxxxxxxxxxxx.toDF()
data_collect = etl_df.collect()
接下来可以对 data_collect 中的数据进行特征工程处理。由于不同的业务对代码逻辑的要求差异很大,这篇 blog 暂时不对业务逻辑的代码进行展开。后续会有相关的 workshop 选择一个特定的业务场景展开业务代码。
处理过的数据需要写入 SageMaker Feature Group,供下游的应用调用。在数据处理过程中,通常需要 record by record 地对保存在 feature group 中实时特征进行读写操作。通过命令行对 feature group 的操作主要有三种:(1)通过 feature_store_manager 实现;(2)通过 feature_group 实现;(3)通过 sagemaker_session’s boto_session 实现。实战中发现 feature_store_manager 和 customers_feature_group 这两种方式对 Glue Streaming 的支持不够好,建议使用 sagemaker_session’s boto_session 的方式实现。
示例代码如下:
region = "<region id>"
featurestore_runtime_client = sagemaker_session.boto_session.client('sagemaker-featurestore-runtime', region_name=region)
featurestore_runtime_client.delete_record(FeatureGroupName=customers_feature_group_name, RecordIdentifierValueAsString=str(_rowkey), EventTime=str(_eventtime))
response = featurestore_runtime_client.put_record(FeatureGroupName=customers_feature_group_name,Record=[
    {
        'FeatureName': 'rowkey',
        'ValueAsString': str(_rowkey)
    },

    {
        'FeatureName': 'name',
        'ValueAsString': str(_name)
    },

    {
        'FeatureName': 'age',
        'ValueAsString': str(_age)
    },

    {
        'FeatureName': 'sex',
        'ValueAsString': str(_sex)
    },

    {
        'FeatureName': 'goods_no',
        'ValueAsString': str(_goods_no)
    },

    {
        'FeatureName': 'goods_price',
        'ValueAsString': str(_goods_price)
    },

    {
        'FeatureName': 'store_id',
        'ValueAsString': str(_store_id)
    },

    {
        'FeatureName': 'behavior_type',
        'ValueAsString': str(_behavior_type)
    },

    {
        'FeatureName': 'event_time',
        'ValueAsString': str(_buy_time)
    }
]
)
详细 API 说明请见链接:SageMaker Feature Store API。
3.4 创建 Feature Group
可以通过 Console 的图形化界面和命令行两种方式创建 Feature Group。建议使用命令行方式在 SageMaker 的 notebook 中创建(选择 Data Science 作为 image,Python3 作为 kernel)。示例代码如下:
import sagemaker
from sagemaker.feature_store.feature_group import FeatureGroup
from time import gmtime, strftime, sleep
from random import randint
import pandas as pd
import numpy as np
import subprocess
import importlib
import logging
import time
import sys

data = {
  "rowkey": ["071682399346"],
  "name": ["Famzj"],
  "age": ["55"],
  "sex": ["woman"],
  "goods_no": ["230121"],
  "goods_price": ["902.41"],
  "store_id": ["313015"],
  "behavior_type": ["fav"],
  "event_time": ["2023-04-25T05:09:06Z"],
}

df = pd.DataFrame(data)
print(df)

df['UserId'] = df['UserId'].astype('string')
df['UserClickSeq'] = df['UserClickSeq'].astype('string')
df['BuyIDSeq'] = df['BuyIDSeq'].astype('string')
df['EventTime'] = df['EventTime'].astype('string')

df.info()

logger = logging.getLogger('__name__')
logger.setLevel(logging.DEBUG)
logger.addHandler(logging.StreamHandler())
logger.info(f'Using SageMaker version: {sagemaker.__version__}')
logger.info(f'Using Pandas version: {pd.__version__}')

sagemaker_session = sagemaker.Session()
role = sagemaker.get_execution_role()
default_bucket = sagemaker_session.default_bucket()
logger.info(f'Default S3 bucket = {default_bucket}')
prefix = 'sagemaker-feature-store'

customers_feature_group_name = "user-realtime-fg-dev-apr51"
customers_feature_group = FeatureGroup(name=customers_feature_group_name, sagemaker_session=sagemaker_session)

customers_feature_group.load_feature_definitions(data_frame=df)

customers_feature_group.create(s3_uri=f's3://<bucket name>/user-realtime-fg-dev-apr5',
                               record_identifier_name='rowkey',
                               event_time_feature_name='event_time',
                               role_arn=role,
                               enable_online_store=True)

%%time

logger.info(f'Ingesting data into feature group: {customers_feature_group.name} ...')
customers_feature_group.ingest(data_frame=df, max_processes=16, wait=True)
logger.info(f'{len(df)} customer records ingested into feature group: {customers_feature_group.name}')


region = "us-west-2"
featurestore_runtime_client = sagemaker_session.boto_session.client('sagemaker-featurestore-runtime', region_name=region)


rowkey = "071682399346"
feature_record_1 = featurestore_runtime_client.get_record(FeatureGroupName=customers_feature_group_name,
                                                        RecordIdentifierValueAsString=rowkey)
feature_record_1
3.5 Online Store 到 Offline Store 的数据快照功能
如果代码不指定操作的目标是 Online Store 还是 Offline Store,sagemaker_session’s boto_session 对 feature store 的操作是对 online store 直接操作,同时会开启 offline store 的快照功能,如果代码指定操作的目标是 online store,那么 offline store 的快照功能将不会开启。如果代码指定的操作目标是 offline store,那么 online store 中将不会记录。在本例中,如果在 put_record 中指定 TargetStores 是[‘OnlineStore’],那么 offline store 的快照功能将不会开启。代码如下所示:
response = featurestore_runtime_client.put_record(FeatureGroupName=customers_feature_group_name,Record=[
    {
        'FeatureName': 'rowkey',
        'ValueAsString': str(_rowkey)
    },

    {
        'FeatureName': 'name',
        'ValueAsString': str(_name)
    },

    {
        'FeatureName': 'age',
        'ValueAsString': str(_age)
    },

    {
        'FeatureName': 'sex',
        'ValueAsString': str(_sex)
    },

    {
        'FeatureName': 'goods_no',
        'ValueAsString': str(_goods_no)
    },

    {
        'FeatureName': 'goods_price',
        'ValueAsString': str(_goods_price)
    },

    {
        'FeatureName': 'store_id',
        'ValueAsString': str(_store_id)
    },

    {
        'FeatureName': 'behavior_type',
        'ValueAsString': str(_behavior_type)
    },

    {
        'FeatureName': 'event_time',
        'ValueAsString': str(_buy_time)
    },TargetStores=['OnlineStore']
]
)
开启了快照功能的 feature store,将在 offline store 中记录对实时特征进行的所有操作。如果实时特征被做过删除操作,会在 is_deleted 列中用 true 标记出来。
4. 总结
本文描述了利用 Glue Streaming Job 和 SageMaker Feature Store 实现实时特征工程处理的工程实现过程。几个要点总结如下:
(1)MSK 私网部署与 Glue Streaming 的联通需要通过构建 connector 来实现。数据获取需要通过 Glue 的 DynamicFrame 实现;
(2)在 Glue Streaming Job 中对 Feature Group 的读写操作建议通过 sagemaker_session’s boto_session 实现(不推荐其他两种方式:feature_store_manager、feature_group:);
(3)在 Glue Streaming Job 中实现 Sagemaker Feature Store 的 sagemaker_session’s boto_session 的加载,需要在 Glue Streaming Job 的 Job Parameter 中配置。
--additional-python-modules, sagemaker
--user-jars-first, true
(4)对 Feature Group 的创建建议通过命令行方式实现(不推荐通过 console 实现);
(5)开启 Offline Store 特征快照功能需要在命令行调用时不特指 online 或 offline store。
5. 参考文献
Glue
Glue DPU
SageMaker Feature Store
Glue Job Parameters
Glue Dynamic Frame
SageMaker Feature Store API
MSK Cluster Deep Dive
本篇作者