背景介绍
文本摘要,就是对给定的单个或者多个文档进行梗概,即在保证能够反映原文档的重要内容的情况下,尽可能地保持简明扼要。质量良好的文摘能够在信息检索过程中发挥重要的作用,比如利用文摘代替原文档参与索引,可以有效缩短检索的时间,同时也能减少检索结果中的冗余信息,提高用户体验。随着信息爆炸时代的到来,自动文摘逐渐成为自然语言处理领域的一项重要的研究课题。
文本摘要的需求来自多个我们真实的客户案例,对于大量的长文本对于新闻领域,金融领域,法律领域是司空见惯的。而在人力成本越来越高的今天,雇佣大量的专业人员进行信息精炼或者内容审核无疑要投入大量的资金。而自动文本摘要就显得意义非凡,具体来说,通过大量数据训练的深度学习模型可以在几百毫秒内产生长度可控的文本摘要,这大大地提升了摘要生成效率,节约了大量人力成本。
对于目前的技术,可以根据摘要产生的方式大体可以分为两类:1)抽取式文本摘要:找到一个文档中最重要的几个句子并对其进行拼接;2)生成式文本摘要:直接建模为序列到序列的生成问题,根据源文本直接递归生成摘要。对于抽取式摘要,其具备效率高,解释性强的优势,但是抽取得到的文本在语义连续性上相较生成式摘要有所不足,故这里我们主要展示生成式摘要。
Amazon SageMaker是亚马逊云计算(Amazon Web Service)的一项完全托管的机器学习平台服务,算法工程师和数据科学家可以基于此平台快速构建、训练和部署机器学习 (ML) 模型,而无需关注底层资源的管理和运维工作。它作为一个工具集,提供了用于机器学习的端到端的所有组件,包括数据标记、数据处理、算法设计、模型训练、训练调试、超参调优、模型部署、模型监控等,使得机器学习变得更为简单和轻松;同时,它依托于AWS强大的底层资源,提供了高性能CPU、GPU、弹性推理加速卡等丰富的计算资源和充足的算力,使得模型研发和部署更为轻松和高效。同时,本文还基于Huggingface,Huggingface是NLP著名的开源社区,并且与Amazon SagaMaker高度适配,可以在Amazon SagaMaker上以几行代码轻松实现NLP模型训练和部署。
解决方案概览
在此示例中, 我们将使用Amazon SageMaker执行以下操作:
- 环境准备
- 下载数据集并将其进行数据预处理
- 使用本地机器训练
- 使用 Amazon SageMaker BYOS进行模型训练
- 托管部署及推理测试
环境准备
我们首先要创建一个Amazon SageMaker Notebook,笔记本实例类型最好选择ml.p3.2xlarge,因为本例中用到了本地机器训练的部分用来测试我们的代码,卷大小建议改成10GB或以上,因为运行该项目需要下载一些额外的数据。

笔记本启动后,打开页面上的终端,执行以下命令下载代码。
cd ~/SageMaker
git clone https://github.com/HaoranLv/nlp_transformer.git
下载数据集并将其进行数据预处理
这里给出若干开源的中英文数据集:
1.公开数据集 (英文)
- XSUM,227k BBC articles
- CNN/Dailymail,93k articles from the CNN, 220k articles from the Daily Mail
- NEWSROOM,3M article-summary pairs written by authors and editors in the newsrooms of 38 major publications
- Multi-News,56k pairs of news articles and their human-written summaries from the http://com
- Gigaword,4M examples extracted from news articles,the task is to generate theheadline from the first sentence
- arXiv, PubMed,two long documentdatasets of scientific publications from http://org(113k) andPubMed (215k). The task is to generate the abstract fromthe paper body.
- BIGPATENT,3 millionU.S. patents along with human summaries under nine patent classification categories
2.公开数据集 (中文)
本文以Multi-News为例,数据分为两列,headlines代表摘要,text代表全文。由于文本数据集较小,故直接官网下载原始csv文件上传到SageMaker Notebook即可。如下是部分数据集样例。

找到hp_data.ipynb运行代码。
首先加载数据集
df=pd.read_csv(./data/hp/summary/news_summary.csv')
而后进行数据清洗
class Settings:

    TRAIN_DATA = "./data/hp/summary/news_summary_total.csv"
    Columns = ['headlines', 'text']
    encoding = 'latin-1'
    columns_dict = {"headlines": "headlines", "text": "text"}
    df_column_list = ['text', 'headlines']
    SUMMARIZE_KEY = ""
    SOURCE_TEXT_KEY = 'text'
    TEST_SIZE = 0.2
    BATCH_SIZE = 16
    source_max_token_len = 128
    target_max_token_len = 50
    train_df_len = 82332
    test_df_len = 20583

class Preprocess:
    def __init__(self):
        self.settings = Settings

    def clean_text(self, text):
        text = text.lower()
        text = re.sub('\[.*?\]', '', text)
        text = re.sub('https?://\S+|www\.\S+', '', text)
        text = re.sub('<.*?>+', '', text)
        text = re.sub('[%s]' % re.escape(string.punctuation), '', text)
        text = re.sub('\n', '', text)
        text = re.sub('\w*\d\w*', '', text)
        return text

    def preprocess_data(self, data_path):
        df = pd.read_csv(data_path, encoding=self.settings.encoding, usecols=self.settings.Columns)
        # simpleT5 expects dataframe to have 2 columns: "source_text" and "target_text"
        df = df.rename(columns=self.settings.columns_dict)
        df = df[self.settings.df_column_list]
        # T5 model expects a task related prefix: since it is a summarization task, we will add a prefix "summarize: "
        df[self.settings.SOURCE_TEXT_KEY] = df[self.settings.SOURCE_TEXT_KEY]

        return df
settings=Settings
preprocess=Preprocess()
df = preprocess.preprocess_data(settings.TRAIN_DATA)
随后完成训练集和测试集的划分并分别保存:
df.to_csv('./data/hp/summary/news_summary_cleaned.csv',index=False)
df2=pd.read_csv('./data/hp/summary/news_summary_cleaned.csv')
order=['text','headlines']
df3=df2[order]
train_df, test_df = train_test_split(df3, test_size=0.2,random_state=100)
train_df.to_csv('./data/hp/summary/news_summary_cleaned_train.csv',index=False)
test_df.to_csv('./data/hp/summary/news_summary_cleaned_test.csv',index=False)
使用本地机器训练
在完成了上述的数据处理过程后,就可以进行模型训练了,下面的命令运行后即开始模型训练,代码会自动Huggingface hub中加载google/pegasus-large作为预训练模型,而后使用我们处理后的数据集进行模型训练。
!python -u examples/pytorch/summarization/run_summarization.py \
--model_name_or_path google/pegasus-large \
--do_train \
--do_eval \
--per_device_train_batch_size=2 \
--per_device_eval_batch_size=1 \
--save_strategy epoch \
--evaluation_strategy epoch \
--overwrite_output_dir \
--predict_with_generate \
--train_file './data/hp/summary/news_summary_cleaned_train.csv' \
--validation_file './data/hp/summary/news_summary_cleaned_test.csv' \
--text_column 'text' \
--summary_column 'headlines' \
--output_dir='./models/local_train/pegasus-hp' \
--num_train_epochs=1.0 \
--eval_steps=500 \
--save_total_limit=3 \
--source_prefix "summarize: " > train_pegasus.log
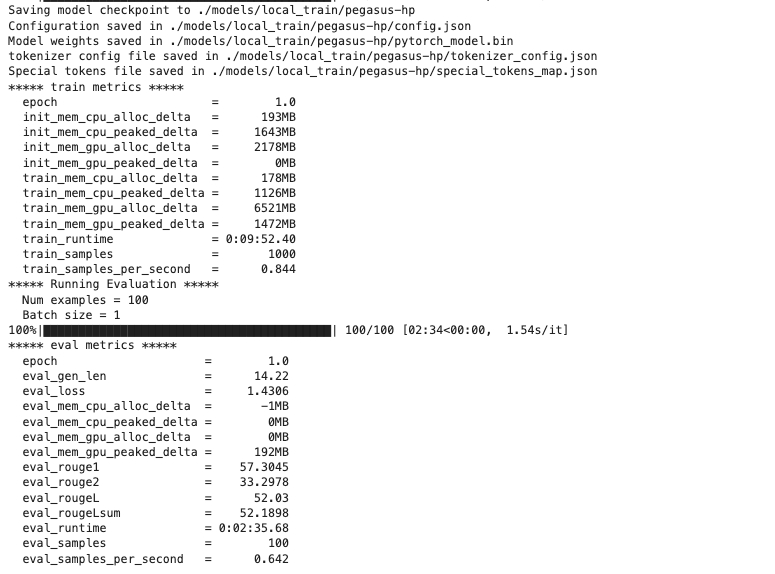
训练完成后,会提示日志信息如下。

并且会对验证集的数据进行客观指标评估,这里使用Rouge进行评估。

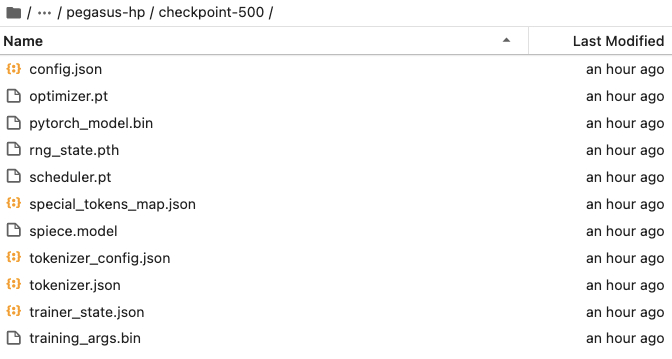
模型结果文件及相应的日志等信息会自动保存在./models/local_train/pegasus-hp/checkpoint-500

我们可以直接用这个产生的模型文件进行本地推理。注意这里的模型文件地址的指定为你刚刚训练产生的。
import pandas as pd
df=pd.read_csv('./data/hp/summary/news_summary_cleaned_small_test.csv')
print('原文:',df.loc[0,'text'])
print('真实标签:',df.loc[0,'headlines'])
from transformers import pipeline
summarizer=pipeline("summarization",model="./models/local_train/Pegasus-hp/checkpoint-500")
print('模型预测:',summarizer(df.loc[0,'text'], max_length=50)[0]['summary_text'])
输出如下:
原文: Germany on Wednesday accused Vietnam of kidnapping a former Vietnamese oil executive Trinh Xuan Thanh, who allegedly sought asylum in Berlin, and taking him home to face accusations of corruption. Germany expelled a Vietnamese intelligence officer over the suspected kidnapping and demanded that Vietnam allow Thanh to return to Germany. However, Vietnam said Thanh had returned home by himself.
真实标签: Germany accuses Vietnam of kidnapping asylum seeker
模型预测: Germany accuses Vietnam of kidnapping ex-oil exec, taking him home
到这里,就完成了一个模型的本地训练和推理过程。
使用 Amazon SageMaker BYOS进行模型训练
在上文的范例中,我们使用本地环境一步步的训练了一个较小的模型,验证了我们的代码。现在,我们需要把代码进行整理,在Amazon SageMaker上,进行可扩展至分布式的托管训练任务。
首先,我们要将上文的训练代码整理至一个python脚本,然后使用SageMaker上预配置的Huggingface容器,我们提供了很多灵活的使用方式来使用该容器,具体可以参考Hugging Face Estimator。
由于SageMaker预置的Huggingface容器已经具备推理逻辑, 故这里只需要将上一步中的训练脚本引入容器即可, 具体流程如下:
启动一个Jupyter Notebook,选择python3作为解释器完成如下工作:
权限配置
import sagemaker
import os
sess = sagemaker.Session()
role = sagemaker.get_execution_role()

print(f"sagemaker role arn: {role}")
print(f"sagemaker bucket: {sess.default_bucket()}")
print(f"sagemaker session region: {sess.boto_region_name}")
数据上传到S3
# dataset used
dataset_name = ' news_summary'
# s3 key prefix for the data
s3_prefix = 'datasets/news_summary'
WORK_DIRECTORY = './data/'
data_location = sess.upload_data(WORK_DIRECTORY, key_prefix=s3_prefix)
data_location
定义超参数并初始化estimator。
from sagemaker.huggingface import HuggingFace

# hyperparameters which are passed to the training job
hyperparameters={'text_column':'text',
                 'summary_column':'headlines',
                 'train_file':'/opt/ml/input/data/train/news_summary_cleaned_train.csv',
                 'validation_file':'/opt/ml/input/data/test/ news_summary_cleaned_test.csv',
                 'output_dir':'/opt/ml/model',
                 'do_train':True,
                 'do_eval':True,
                 'max_source_length': 128,
                 'max_target_length': 128,
                 'model_name_or_path': 't5-large',
                 'learning_rate': 3e-4,
                 'num_train_epochs': 1,
                 'per_device_train_batch_size': 2,#16
                 'gradient_accumulation_steps':2,
                 'save_strategy':'epoch',
                 'evaluation_strategy':'epoch',
                 'save_total_limit':1,
                 }
distribution = {'smdistributed':{'dataparallel':{ 'enabled': True }}}
# create the Estimator
huggingface_estimator = HuggingFace(
        entry_point='run_paraphrase.py',
        source_dir='./scripts',
        instance_type='ml.p3.2xlarge',#'ml.p3dn.24xlarge'
        instance_count=1,
        role=role,
        max_run=24*60*60,
        transformers_version='4.6',
        pytorch_version='1.7',
        py_version='py36',
        volume_size=128,
        hyperparameters = hyperparameters,
#         distribution=distribution
)
启动模型训练。
huggingface_estimator.fit(
  {'train': data_location+'/news_summary_cleaned_train.csv',
   'test': data_location+'/news_summary_cleaned_test.csv',}
)
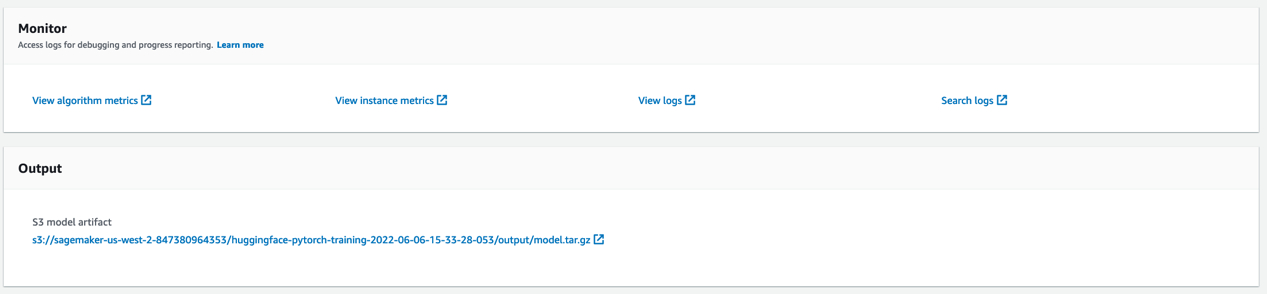
训练启动后,我们可以在Amazon SageMaker控制台看到这个训练任务,点进详情可以看到训练的日志输出,以及监控机器的GPU、CPU、内存等的使用率等情况,以确认程序可以正常工作。训练完成后也可以在CloudWatch中查看训练日志。


托管部署及推理测试
完成训练后,我们可以轻松的将上面的模型部署成一个实时可在生产环境中调用的端口。
from sagemaker.huggingface.model import HuggingFaceModel

# create Hugging Face Model Class
huggingface_model = HuggingFaceModel(
#    env= {'HF_TASK':'text-generation'},
   model_data="s3://sagemaker-us-west-2-847380964353/huggingface-pytorch-training-2022-04-19-05-56-07-474/output/model.tar.gz",  # path to your trained SageMaker model
   role=role,                                            # IAM role with permissions to create an endpoint
   transformers_version="4.6",                           # Transformers version used
   pytorch_version="1.7",                                # PyTorch version used
   py_version='py36',                                    # Python version used

)
predictor = huggingface_model.deploy(
   initial_instance_count=1,
   instance_type="ml.g4dn.xlarge"
)
模型调用
from sagemaker.huggingface.model import HuggingFacePredictor
predictor=HuggingFacePredictor(endpoint_name='huggingface-pytorch-inference-2022-04-19-06-41-55-309')

import time
s=time.time()
df=pd.read_csv('./data/hp/summary/news_summary_cleaned_small_test.csv')
print('原文:',df.loc[0,'text'])
print('真实标签:',df.loc[0,'headlines'])
out=predictor.predict({
        'inputs': df.loc[0,'text'],
        "parameters": {"max_length": 256},
    })
e=time.time()
print('模型预测:' out)
输出如下:
原文: Germany on Wednesday accused Vietnam of kidnapping a former Vietnamese oil executive Trinh Xuan Thanh, who allegedly sought asylum in Berlin, and taking him home to face accusations of corruption. Germany expelled a Vietnamese intelligence officer over the suspected kidnapping and demanded that Vietnam allow Thanh to return to Germany. However, Vietnam said Thanh had returned home by himself.
真实标签: Germany accuses Vietnam of kidnapping asylum seeker
模型预测: Germany accuses Vietnam of kidnapping ex-oil exec, taking him home
Amazon SageMaker
以上就是使用Amazon SageMaker构建文本摘要应用的全部过程,可以看到通过Amazon SageMaker可以非常便利地结合Huggingface进行NLP模型的搭建,训练,部署的全流程。整个过程仅需要准备训练脚本以及数据即可通过若干命令启动训练和部署,同时,我们后续还会推出,使用Amaozn SageMaker进行更多NLP相关任务的实现方式,敬请关注。
参考资料
本篇作者