什么是 LoRA
很多小伙伴接触 LoRA 是 Stable Diffusion 的 LoRA 模型,用于人物和风格训练,但本质上 LoRA 并不专为 Stable Diffusion 服务。LoRA 英文全称 Low-Rank Adaptation of Large Language Models,是微软开源的解决大模型微调而开发的一项技术。
大模型参数规模巨大,比如 GPT-3 有 1750 亿参数,对这类大模型进行微调成本太高,LoRA 的做法是,冻结预训练好的模型权重参数,然后在每个 Transformer 块里进行低秩矩阵运算,注入新的训练的层参数。
这种方式与普通 fine tuning 需要对模型的权重参数重新计算梯度不同,相当于在原有 layer 上新增加的 network 层参数,所以大大减少了需要训练的计算量,并且保存的训练后的模型文件只是 network 超参值,相比于原模型文件大小小很多,方便进行分享和转换。
LoRA 本来是给大语言模型准备的,但把它用在 cross-attention layers 也能影响用文字生成图片的效果,在 Stable Diffusion 模型支持 LoRA 后,效果出乎意料,一时火遍全网。
在 Stable Diffusion 中使用 LoRA,是一种使用少量图像来训练模型的方法,由于冻结原有基础模型的权重层并重新计算,LoRA 训练速度很快,通常 8-10 张图片在 T4 单显卡机器上只需要 20 分钟即可训练完毕,且产生模型文件只有几 MB 到一两百 MB,相对于原几个 GB 的模型文件显著降低存储成本,提升效率。
LoRA 和 Dreambooth 的区别
LoRA 与 Dreambooth 都是目前业界主流的 Stable Diffusion 模型 fine tuning 的方法,二者面向的业务场景和实现方式各不相同,这里简单对比如下:
| LoRA |
Dreamboth |
| 类似 hypernetwork 的单独网络层参数训练模型大小适中,8~200MB 推理加载时需要 LoRA 模型和基础模型融合推理时可以多个不同的 LoRA 模型+权重叠加使用本地训练时需要显存适中,>=7GB 推荐训练人物。 |
根据 instance token/class token 重新训练 unet/Clip 等子模型模型文件很大,2-5GB 独立的完整模型加载可以进行多次 fine tuning,训练不同的 concept,从而融合多个造型或者物件款式本地训练时需要高显存,>=12GB 推荐训练人脸及物件。 |
在 SageMaker 上进行 LoRA fine tuning
Stable Diffusion 的 LoRA 如此火爆,自然吸引众多业界商机和关注,很多行业(e.g: 游戏,社交)将 LoRA 模型训练做为 VIP/付费用户的高级体验功能,允许其训练模型生成自己的专属人物,性格画像,二次元虚拟人物,数字模特等。因此将 LoRA 的训练和推理在业务系统/AIOps/ML 中台上的工程化,是实施落地的关键。
本文将详细讲解 LoRA 在 Amazon SageMaker training job 的 fine tuning,以及 Amazon SageMaker inference 推理的开发和部署,以及在 Stable Diffusion Quick Kit 上简单快捷的集成和使用的具体内容,以帮助客户快速上手并将该功能集成到整个后台端到端业务流程中。
SageMaker LoRA 整体流程
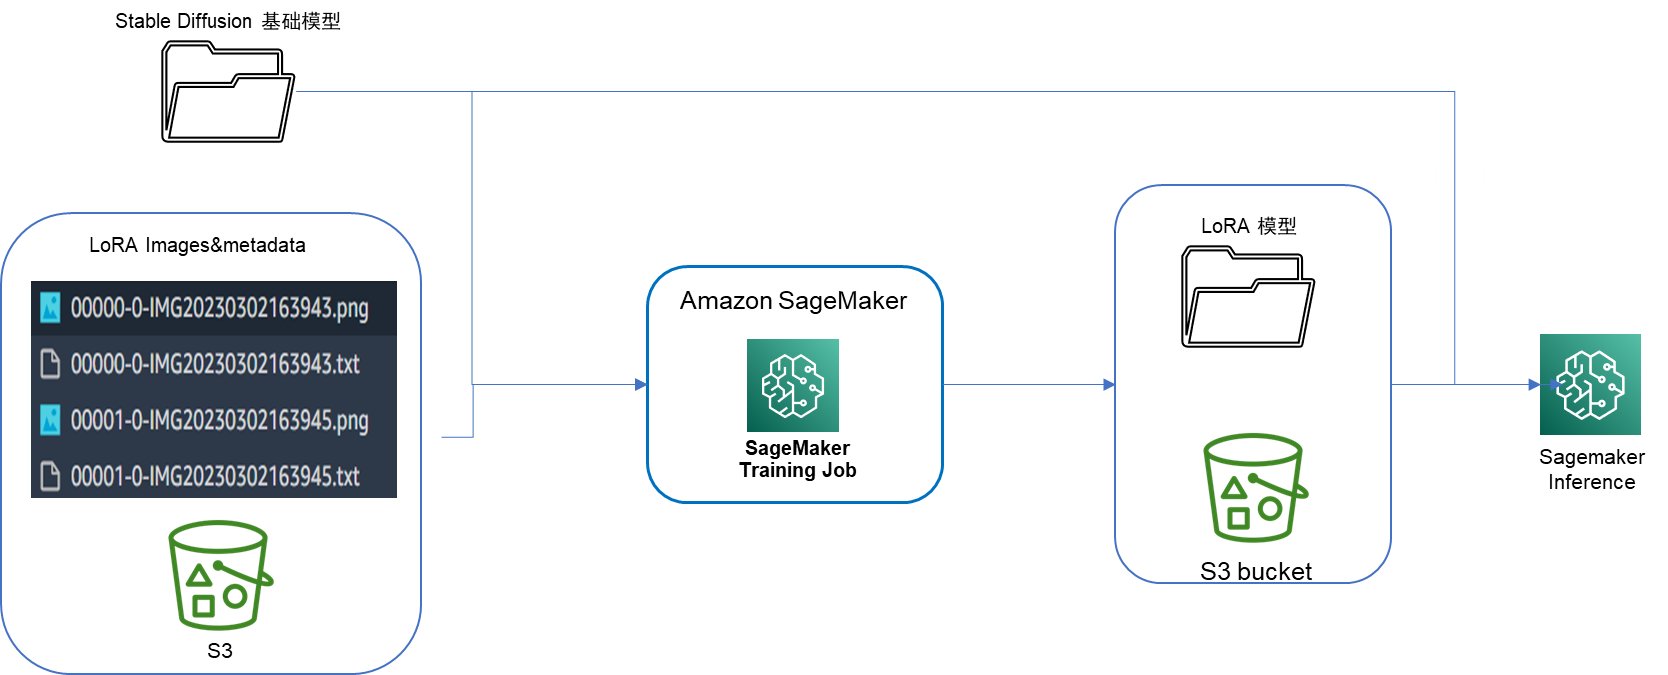
我们使用 SageMaker BYOC Training Job 进行 LoRA 模型的 fine tuning,传入待训练的基础模型和图像数据集,做为训练 input,训练完成后输出模型保存在 S3 路径推理部署时,同样通过 BYOC inference 打包推理镜像,传入基础模型 uri 及训练后的 LoRA 模型 S3 位置,合并二者并加载,进行模型的推理生图。
SageMaker BYOC(Bring your own Container)方式训练及推理具体方法这里不再赘述,感兴趣的小伙伴可以在附录中查阅 Amazon 官方文档。
整个流程 pipeline 如下图所示:

LoRA on SageMaker Training Job
LoRA 发展迅速,开源的 fine tuning 框架众多,百花齐放,使用的时候要注意根据业务场景需求进行选择,这里列举部分 LoRA 模型训练业界主要的 github repository,供大家参考:
我们这里选择 Kohya_ss 的 sd-scripts 开源代码,该 repository 是 Stable Diffusion WebUI 的 LoRA 插件的开发者,使用该开源 repository 可以保持与前端 UI 的参数兼容性,并且该插件支持 safetensor、checkpoint 格式的模型文件,自带了这些格式到 Stable Diffusion 模型格式的转换,方便 diffuser pipeline 的加载,最新的 kohya_ss 上还实现了单独的 GUI,方便进行 LoRA 训练的开发调试。
以下详细讲解 LoRA 在 Amazon SageMaker training job 的 fine tuning 开发,以及 Amazon SageMaker inference 推理部署的实现,以及在 Stable Diffusion Quick Kit 上简单快捷的使用的具体内容。
1. 准备阶段
1. 1 准备训练数据集
与早期的 Hypernetwork 网络训练类似,LoRA 也是通过图像训练权重参数层。
传入 LoRA 图像训练数据集有两种方式——
可以使用 HuggingFace 的 dataset 数据集格式,通过传递 HuggineFace 的 dataset 路径 url(e.g: lambdalabs/pokemon-blip-captions),此方式下可以方便地寻找开放的训练数据集,或者按照 HuggingFace 规定的数据格式上传图像及 metadata 元数据文件,即可使用 HuggingFace 的 Load_dataset 标准 API 进行数据 download 和加载。
HuggingFace image Dataset 图像训练数据集格式此处不再赘述,感兴趣的小伙伴可以参考其官方文档说明详细了解:https://huggingface.co/docs/datasets/image_dataset#imagefolder。
另一种方式是客户已经通过图像工具自行准备好了待训练的 images 及 prompt 文本(e.g: 卡通风格的一组二次元 IP 图片),这时可以使用 Kohya_ss 自定义的训练数据集格式,构造 toml 元数据配置文件,指明训练图片放置的位置及层次结构,训练脚本会自动识别该配置文件并获取对应目录下的图像文件。
toml 格式元数据配置文件如下示例所示:
[general]
shuffle_caption = true
caption_extension = '.txt'
keep_tokens = 1

[[datasets]]
resolution = [768, 768]
batch_size = 2

  [[datasets.subsets]]
  image_dir = '/opt/ml/input/data/images/'
  # metadata_file = '/opt/ml/input/data/images/metadata.jsonl'
如上示例文件中,[general]为训练数据集整体配置,指定了整体配置的设置,比如每张图像对应的 prompt 文本文件(caption_extension)格式后缀。[[datasets]] 是 general 下的二级配置,指定训练数据集的 revision 像素及训练 batch size 等。[[datasets.subsets]]是具体的每一类训练数据集的详细配置,比如图像所在目录 image_dir,该类图像的元数据 metadaga 文件(如果已经有每张图片名.txt 的 prompt 文本配置文件,则该配置项注释掉)。
详细 toml 格式配置项可以参见 kohya_ss 插件的说明文档:https://github.com/bmaltais/kohya_ss/blob/master/train_network_README.md。
在本次示例中,我们将使用 https://d374aanje223q0.cloudfront.net/pokemon-blip-captions-dataset.tar.gz 作为训练数据集(数据来源于开源链接:https://huggingface.co/datasets/lambdalabs/pokemon-blip-captions),我们将数据集解压后与 dataset.toml 文件一起上传到 S3 中。
# 下载数据集
$ wget https://d374aanje223q0.cloudfront.net/pokemon-blip-captions-dataset.tar.gz
$ tar -xzvf pokemon-blip-captions-dataset.tar.gz
$ cd pokemon-blip-captions-dataset
# 创建配置文件
$ cat > dataset.toml << EOF
[general]
shuffle_caption = true
caption_extension = '.txt'
keep_tokens = 1
[[datasets]]
resolution = [768, 768]
batch_size = 2
[[datasets.subsets]]
image_dir = '/opt/ml/input/data/images/'
# metadata_file = '/opt/ml/input/data/images/metadata.jsonl'
EOF
# 将数据集上传到 S3 中
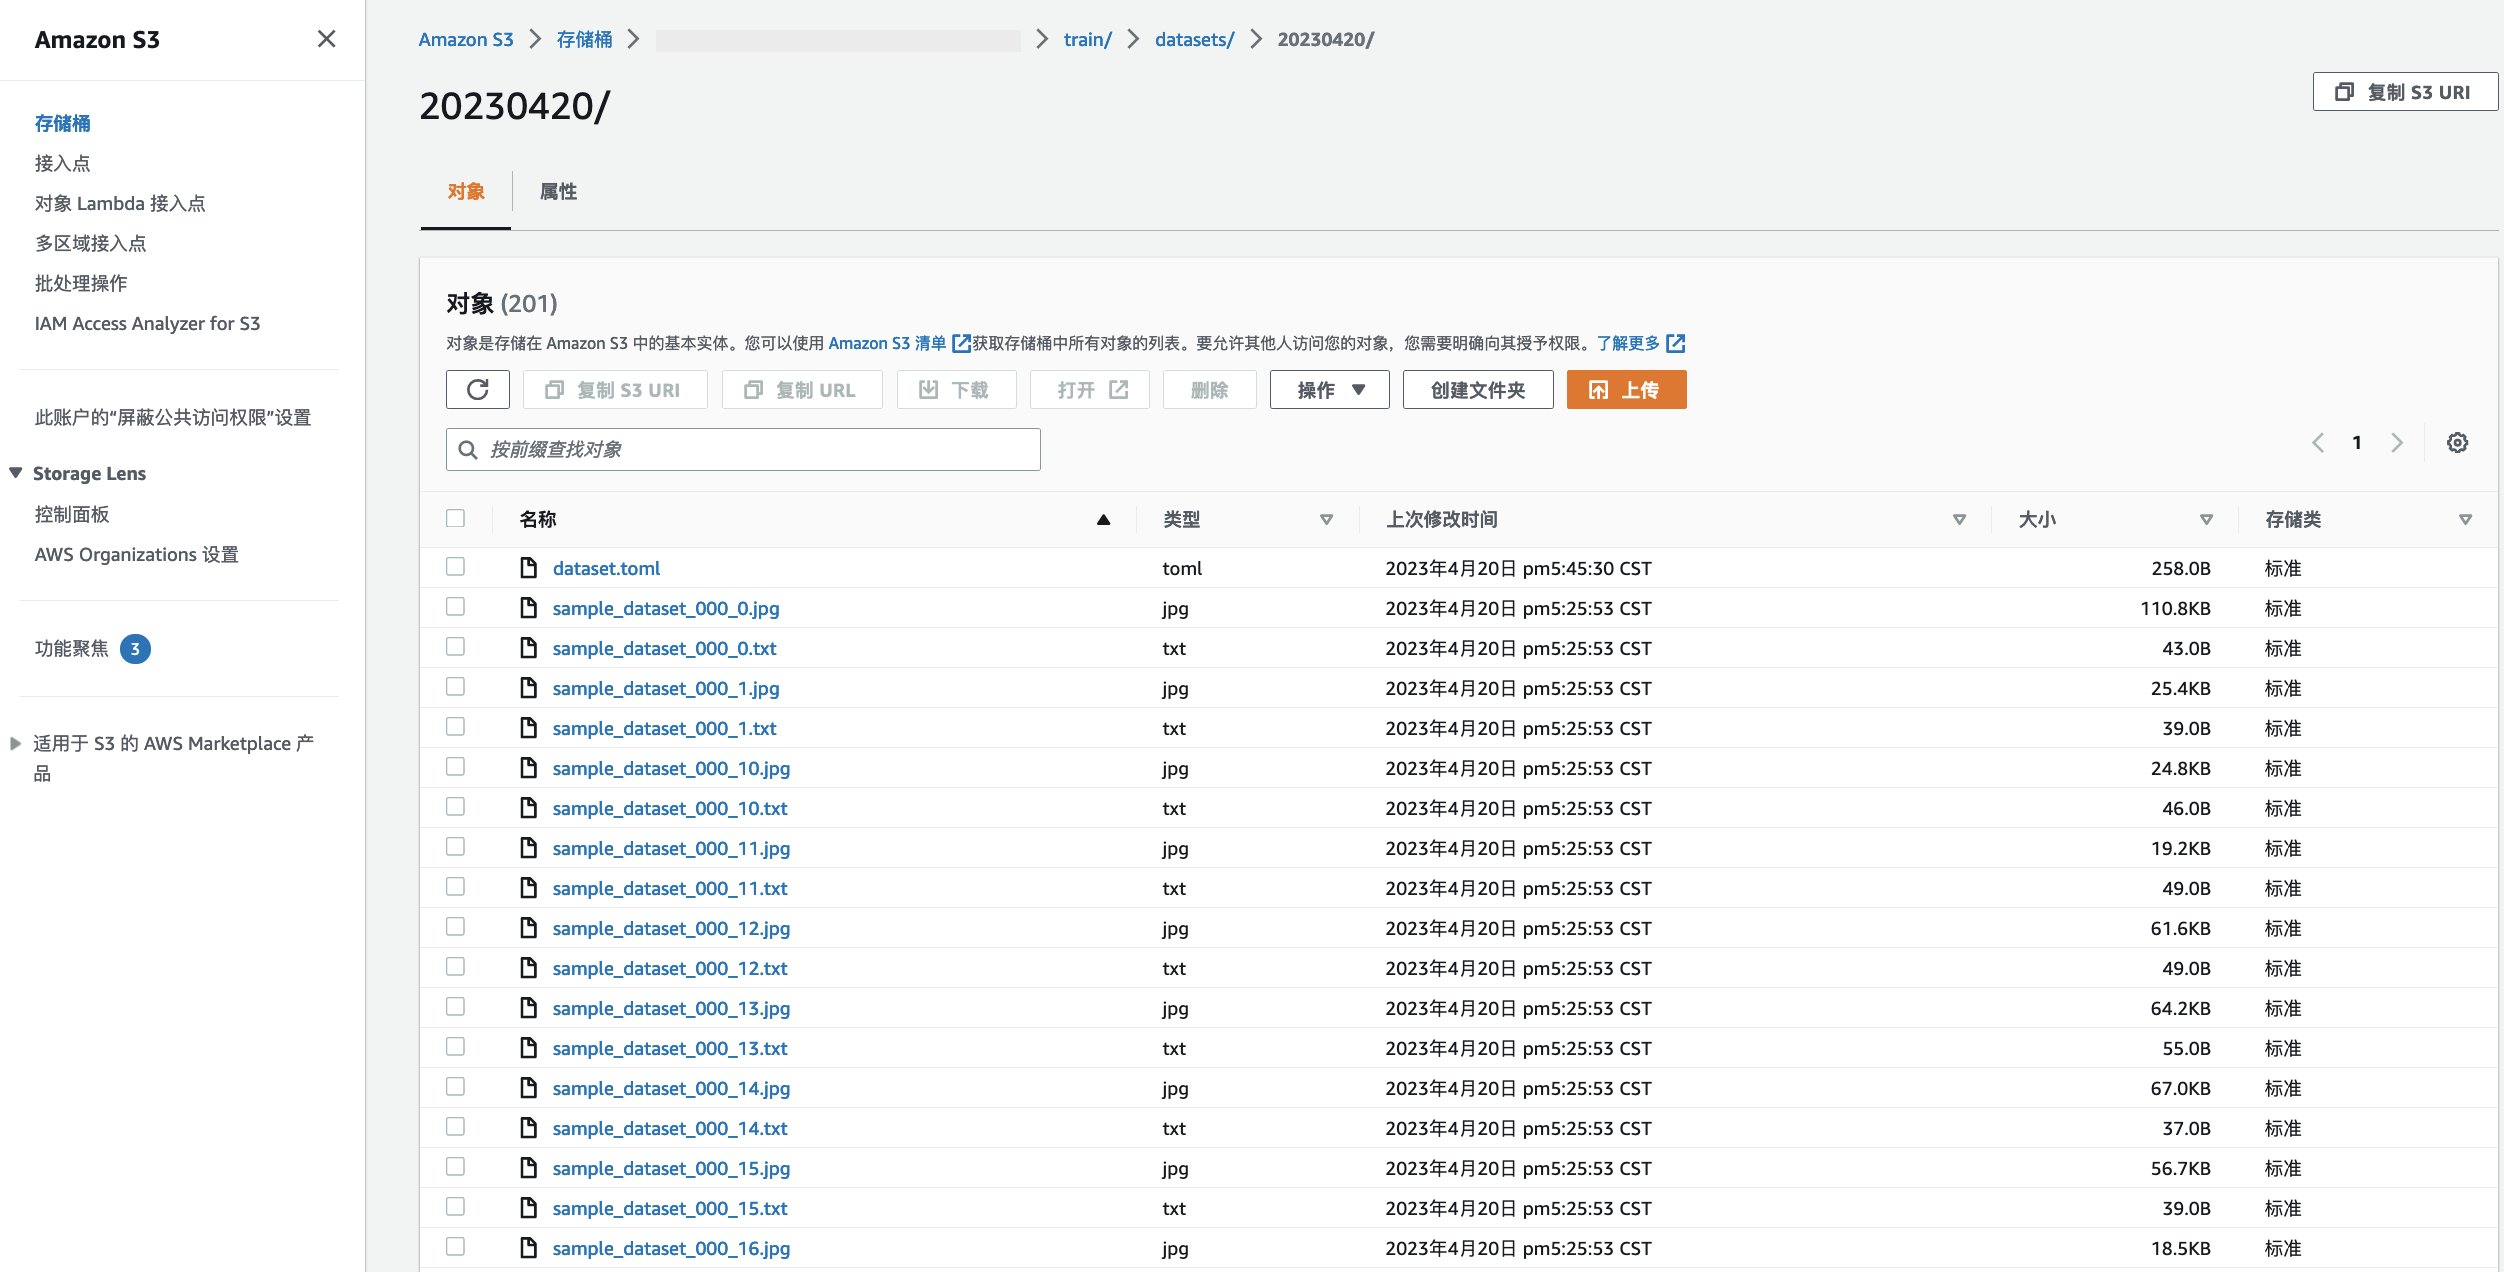
$ aws s3 cp ./ s3://${yourbucket}/train/datasets/20230420/ --recursive
整理好的训练数据集如下图示例:

1.2 准备 Sagemaker NoteBook,下载工程化代码
我们将利用 AWS Sagemaker 的 NoteBook 来逐步执行工程化代码。
我们需要以下前提条件:
- 在 https://aws.amazon.com/cn/ 中登录 Amazon Web Service 账号;
- 进入 SageMaker 服务,在左侧菜单栏选择 笔记本→ 笔记本实例,创建一个拥有 SageMaker, S3, ECR 权限的笔记本实例,笔记本实例请使用 g5.2xlarge,磁盘使用 300GB,创建完成之后点击打开 JupyterLab。
我们启动一个 Terminal,将 工程化代码下载到 notebook 中。

$ cd SageMaker/
$ git clone https://github.com/qingyuan18/sm_sample.git
$ cd ./sm_sample/lora/
1.3 打包容器镜像
我们通过 BYOC 方式 build 一个训练 LoRA 的 docker 镜像,在该镜像中安装部署所需要的 lib 和训练脚本,做为 Amazon SageMaker training job 的容器。
$ sh build_push_lora_v2.sh
打包部署镜像的 shell 脚本“build_push_lora_v2.sh”内容如下:
algorithm_name=lora-finetuning-v2

account=$(aws sts get-caller-identity --query Account --output text)

# Get the region defined in the current configuration (default to us-west-2 if none defined)
region=$(aws configure get region)

fullname="${account}.dkr.ecr.${region}.amazonaws.com/${algorithm_name}:latest"

# If the repository doesn't exist in ECR, create it.

aws ecr describe-repositories --repository-names "${algorithm_name}" > /dev/null 2>&1
if [ $? -ne 0 ]
then
aws ecr create-repository --repository-name "${algorithm_name}" > /dev/null
fi

# Log into Docker
pwd=$(aws ecr get-login-password --region ${region})
docker login --username AWS -p ${pwd} ${account}.dkr.ecr.${region}.amazonaws.com

mkdir -p ./sd_code
cp ./training/requirements_v2.txt ./sd_code/
cd ./sd_code/ && git clone https://github.com/qingyuan18/sd-scripts.git
cd ../

# Build the docker image locally with the image name and then push it to ECR
# with the full name.
docker build -t ${algorithm_name}  ./ -f ./dockerfile_lora_v2 > ./docker_build.log
docker tag ${algorithm_name} ${fullname}
docker push ${fullname}
rm -rf ./sd_code
DockerFile 文件“dockerfile_lora_v2”内容示例如下:
#FROM pytorch/pytorch:1.13.0-cuda11.6-cudnn8-runtime
#FROM 763104351884.dkr.ecr.ap-southeast-1.amazonaws.com/pytorch-trcomp-training:1.12.0-gpu-py38-cu113-ubuntu20.04-sagemaker
FROM ghcr.io/allenai/pytorch:1.12.1-cuda11.3-python3.9-v1.2.0
ENV PATH="/opt/ml/code:${PATH}"

ENV DEBIAN_FRONTEND noninteractive
RUN apt-get update
RUN apt-get install --assume-yes apt-utils -y

RUN apt update
RUN echo "Y"|apt install vim
RUN apt install wget git -y
RUN apt install libgl1-mesa-glx -y
RUN pip install opencv-python-headless

RUN mkdir -p /opt/ml/code

# install the SageMaker Training Toolkit
RUN pip3 install sagemaker-training

COPY ./sd_code/  /opt/ml/code/

# this environment variable is used by the SageMaker training toolkit to         determine our program entry point
ENV SAGEMAKER_PROGRAM sd-scripts/train_network.py
RUN ls -lt /opt/ml/code/sd-scripts/
RUN pip install -r /opt/ml/code/requirements_v2.txt

RUN export TORCH_CUDA_ARCH_LIST="7.5 8.0 8.6" && export FORCE_CUDA="1" && pip install ninja triton==2.0.0.dev20221120 && git clone https://github.com/xieyongliang/xformers.git /opt/ml/code/repositories/xformers && cd /opt/ml/code/repositories/xformers && git submodule update --init --recursive && pip install -r requirements.txt && pip install -e .

ENTRYPOINT []
2. 训练阶段
我们从左侧菜单栏导航到 sm_sample/lora 目录下,双击打开 stablediffusion_lora_webui.ipynb 文件,我们将顺序执行其中的代码块。
首先我们初始化 SageMaker 的客户端,获取默认的 bucket,role,account_id,region_name 等变量:
import sagemaker
import boto3
from sagemaker.pytorch import PyTorch
sagemaker_session = sagemaker.Session()
bucket = sagemaker_session.default_bucket()
role = sagemaker.get_execution_role()
account_id = boto3.client('sts').get_caller_identity().get('Account')
region_name = boto3.session.Session().region_name

print("bucket: {0}".format(bucket))
print("role: {0}".format(role))
print("account_id: {0}".format(account_id))
print("region_name: {0}".format(region_name))
下面我们将设置用于训练的基础模型,训练数据集,2.2 步中打包好的容器镜像地址,用于训练的机型等参数:
import json
from sagemaker.estimator import Estimator

def json_encode_hyperparameters(hyperparameters):
    for (k, v) in hyperparameters.items():
        print(k, v)

    return {k: json.dumps(v) for (k, v) in hyperparameters.items()}

# 1.设置基础模型
# model_name_or_path="runwayml/stable-diffusion-v1-5"
model_name_or_path="s3://{0}/lora-pretrain-model/chilloutmix_NiPrunedFp32Fix.safetensors".format(bucket)

# 2.设置训练数据集
images_s3uri = 's3://{0}/train/datasets/20230425/'.format(bucket)

# 3.设置容器镜像地址
image_uri = '{0}.dkr.ecr.{1}.amazonaws.com/lora-finetuning-v2:latest'.format(account_id,region_name)

# 4.设置用于训练的机型
instance_type = 'ml.g4dn.xlarge'

# 5.设置输出目录,环境变量,超参
output_dir="/opt/ml/model/"
我们定义用于 LoRA 训练的基础模型 model_name_or_path,支持两种方式指定基础模型
- 方式1:e.g: runwayml/stable-diffusion-v1-5,部署后会自动从 HuggingFace 中拉取开源模型
- 方式2:e.g: s3://{bucket}/lora-pretrain-model/chilloutmix_NiPrunedFp32Fix.safetensors,需要提前将模型文件上传到 S3 中
训练数据集 images_s3uri, 如上文第一步介绍,训练数据集必须包含 dataset.toml 文件,并且必须上传到 S3 中,此处只需要指定数据集所在的 S3 位置即可。
inputs = {
    'images': images_s3uri
}
# 如果基础模型是 S3 的地址,直接映射到容器中 /opt/ml/input/models 目录下
pretrained_model_name_or_path=model_name_or_path
if model_name_or_path.startswith("s3://"):
    inputs['models'] = model_name_or_path
    pretrained_model_name_or_path = "/opt/ml/input/data/models/" + model_name_or_path.split('/')[-1]

print(pretrained_model_name_or_path)
在 ‘inputs’ 中设置的变量可以通过 SageMaker Input Channel 方式方便地传入算力机的对应目录,比如:
inputs[“images”] 指定的 S3 地址 “s3://{bucket}/train/datasets/20230425/” 中的文件会被直接映射到算力机的 ‘/opt/ml/input/data/images/’ 目录
inputs[“models”] 指定的 S3 地址 “s3://{bucket}/lora-pretrain-model/chilloutmix_NiPrunedFp32Fix.safetensors” 会被直接映射到算力机的 ‘/opt/ml/input/data/models/chilloutmix_NiPrunedFp32Fix.safetensors’ 目录
具体请参考:https://docs.aws.amazon.com/zh_cn/sagemaker/latest/dg/model-train-storage.html。
与 Dreambooth,embedding 等 Stable Diffusion 模型 fine tuning 类似,kohya_ss 的 LoRA 训练也使用 accelerate 框架,支持多机多卡分布式训练,有各种训练参数可以优化训练时的成本和性能,比如:
- mixed_precision:混合精度,如果设置为 fp16,浮点数计算&存储可以由 4 个字节降低为 2 个字节,显著降低显存占用
- ‘learning_rate’:学习率,决定 LoRA 模型收敛和最终效果输出的关键参数指标,通常建议从一个较小值出发,比如 2e-4
- ‘optimizer_type’:优化器,目前业界通常设置为”AdamW”,保障一阶和二阶动量都被计算在梯度下降过程中
- ‘xformers’:显存优化神器,设置为 True 显著降低 attention 层的显存占用
- save_every_n_epochs:多少次迭代保存模型 checkpoint,建议和 max train steps 和 batch_size 综合考虑
这里我们选取了其中主要的影响性能和功能的关键参数整理出来,构造为 SageMaker Training Job 的 HyperParameters ,以便在拉起训练任务时进行控制:
hyperparameters = {
                    'mixed_precision':'fp16',
                    'pretrained_model_name_or_path': pretrained_model_name_or_path,
                    'dataset_config':'/opt/ml/input/data/images/dataset.toml',
                    'output_dir':output_dir,
                    'output_name':'aws-trained-lora-model',
                    'save_model_as':'safetensors',
                    'prior_loss_weight':1.0,
                    'max_train_steps':400,
                    'learning_rate':1e-4,
                    'optimizer_type':"AdamW8bit",
                    'xformers':True,
                    'cache_latents':True,
                    'gradient_checkpointing':True,
                    'save_every_n_epochs':400,
                    'network_module':'networks.lora'
}
准备好训练镜像后,即可使用 Amazon SageMaker 的 Estimator SDK,传入 image_uri 指定为上述镜像 repository uri,即可开始训练,这里我们将指定使用 Spot Instance 以节省训练成本:
estimator = Estimator(
    role = role,
    instance_count=1,
    use_spot_instances=True,
    max_wait=7200,
    max_run=3600,
    instance_type = instance_type,
    image_uri = image_uri,
    hyperparameters = hyperparameters,
    environment = environment
)
estimator.fit(inputs)
训练时间视 train steps、图像数量及资源情况不定,实测在 G4dn.xlarge 机型上 10 张左右整个训练时长(包括镜像下载及资源拉起)只需要 20 分钟左右。
训练后的 LoRA 模型文件会放到算力机的/opt/ml/model/目录下,SageMaker 会自动将该目录中的文件上传到 training job 特定的 S3 目录(例如:s3://sagemaker-us-east-1-091063646508/lora-finetuning-v2-2023-04-26-03-29-49-073/output/model.tar.gz)。
我们通过执行以下代码将模型文件获取到当前目录下:
lora_model_data = estimator.model_data
print("Model artifact saved at:\n", lora_model_data)
!aws s3 cp $lora_model_data ./
!tar -xvf ./model.tar.gz
3. LoRA on SageMaker Inference 推理
在 notebook 中安装用于推理的依赖环境
!pip install --upgrade diffusers accelerate transformers safetensors omegaconf
我们通过执行以下代码将训练后的模型文件下载到本地,并解压缩
lora_model_data = estimator.model_data
print("Model artifact saved at:\n", lora_model_data)

!aws s3 cp $lora_model_data ./
!tar -xvf model.tar.gz
!rm -fr model.tar.gz
如果基础模型是上传到 S3 的 safetensors 文件,则将基础模型下载到本地,并将格式转换成 diffusers 目录格式
import boto3
import torch
from diffusers.pipelines.stable_diffusion.convert_from_ckpt import download_from_original_stable_diffusion_ckpt

# 将 safetensors 文件转成 diffuser 格式
def convert_from_safetensors_to_diffuser(checkpoint_path,dump_path):
    pipe = download_from_original_stable_diffusion_ckpt(
            checkpoint_path=checkpoint_path,
            original_config_file=None,
            image_size=None,
            prediction_type=None,
            model_type=None,
            extract_ema=True,
            scheduler_type='pndm',
            num_in_channels=None,
            upcast_attention=True,
            from_safetensors=True,
            device='cuda:0',
            stable_unclip=None,
            stable_unclip_prior=None,
            clip_stats_path=None,
            controlnet=None,
        )
    pipe.to(torch_dtype=torch.float16)
    pipe.save_pretrained(dump_path, safe_serialization=True)


if model_name_or_path.startswith("s3://"):
    s3_client = boto3.client("s3")
    s3_path = model_name_or_path[len("s3://"):]
    bucket = s3_path.split('/')[0]
    key = s3_path[len(bucket)+1:]
    file_name = s3_path.split("/")[-1]
    #print("s3_path:{0}".format(s3_path))
    #print("bucket:{0}".format(bucket))
    #print("key:{0}".format(key))
    #print("file_name:{0}".format(file_name))
    s3_client.download_file(bucket,key,file_name)

    # 将基础模型转换成 Diffuser 格式
    base_model_diffuser_dir=file_name.split(".safetensors")[0]
    convert_from_safetensors_to_diffuser(file_name,base_model_diffuser_dir)
    model_name_or_path = model_name_or_path
LoRA 模型推理时,需要把基础模型和 LoRA 模型合并加载,相当于将基础模型的权重层替换为 LoRA train 后的参数,具体实现如下——
加载 Base Model,把 base_model 的 weight 参数全部替换为 LoRA 的 model:
from huggingface_hub import model_info
# LoRA weights
model_path = "sayakpaul/sd-model-finetuned-LoRA-t4"
info = model_info(model_path)
model_base = info.cardData["base_model"]
print(model_base)   # CompVis/stable-diffusion-v1-4
pipe.unet.load_attn_procs(model_path)
pipe.to("cuda")
pipe 已经为合并 LoRA 权重后的模型,此时用 diffuser 的普通文生图 API 即可进行生图:
image = pipe("Green pokemon with menacing face", num_inference_steps=25).images[0]
image.show()
需要注意的是:不同的 training 方式产生的 LoRA 结果模型文件中,torch 权重的 key 值不尽相同,目前使用 Stable Diffusion WebUI 训练出来的 safetensors 格式的 LoRA 模型需要转换才能在 Diffusers 加载。如果使用 Diffusers 自带的 load_attn_procs 方法加载,会提示 KeyError: ‘to_k_lora.down.weight’,具体操作代码示例如下:
def load_lora_weights(pipeline, checkpoint_path, multiplier, device, dtype):
    LORA_PREFIX_UNET = "lora_unet"
    LORA_PREFIX_TEXT_ENCODER = "lora_te"
    # load LoRA weight from .safetensors
    state_dict = load_file(checkpoint_path, device=device)

    updates = defaultdict(dict)
    for key, value in state_dict.items():
        # it is suggested to print out the key, it usually will be something like below
        # "lora_te_text_model_encoder_layers_0_self_attn_k_proj.lora_down.weight"

        layer, elem = key.split('.', 1)
        updates[layer][elem] = value

    # directly update weight in diffusers model
    for layer, elems in updates.items():

        if "text" in layer:
            layer_infos = layer.split(LORA_PREFIX_TEXT_ENCODER + "_")[-1].split("_")
            curr_layer = pipeline.text_encoder
        else:
            layer_infos = layer.split(LORA_PREFIX_UNET + "_")[-1].split("_")
            curr_layer = pipeline.unet

        # find the target layer
        temp_name = layer_infos.pop(0)
        while len(layer_infos) > -1:
            try:
                curr_layer = curr_layer.__getattr__(temp_name)
                if len(layer_infos) > 0:
                    temp_name = layer_infos.pop(0)
                elif len(layer_infos) == 0:
                    break
            except Exception:
                if len(temp_name) > 0:
                    temp_name += "_" + layer_infos.pop(0)
                else:
                    temp_name = layer_infos.pop(0)

        # get elements for this layer
        weight_up = elems['lora_up.weight'].to(dtype)
        weight_down = elems['lora_down.weight'].to(dtype)
        alpha = elems['alpha']
        if alpha:
            alpha = alpha.item() / weight_up.shape[1]
        else:
            alpha = 1.0

        # update weight
        if len(weight_up.shape) == 4:
            curr_layer.weight.data += multiplier * alpha * torch.mm(weight_up.squeeze(3).squeeze(2), weight_down.squeeze(3).squeeze(2)).unsqueeze(2).unsqueeze(3)
        else:
            curr_layer.weight.data += multiplier * alpha * torch.mm(weight_up, weight_down)

    return pipeline

#使用方法
# base_model="runwayml/stable-diffusion-v1-5"
# lora_model="./mylora.safetensors"

# pipe = StableDiffusionPipeline.from_pretrained(base_model, torch_dtype=torch.float16)
# pipe = load_lora_weights(pipe, lora_model, 0.5, 'cuda', torch.float16)
调用 StableDiffusionPipeline 加载基础模型,并加载 Lora 模型权重
from diffusers import StableDiffusionPipeline

pipe = StableDiffusionPipeline.from_pretrained(model_name_or_path, torch_dtype=torch.float16)
pipe.to("cuda")
pipe = load_lora_weights(pipe, lora_model_name+".safetensors", 0.8, 'cuda', torch.float16)
执行推理方法,获取推理结果
# 执行推理方法
image = pipe("Green pokemon with menacing face", num_inference_steps=25).images[0]
image.show()
小结
以上介绍了 LoRA 在亚马逊 SageMaker 上 fine tuning 训练和推理的实现,以及在 Stable Diffusion Quick Kit 工具上的使用指南,感兴趣的小伙伴可以在此基础上快速上手并定制开发,以实现自身需求相关的业务场景。
附录
LoRA 技术原理:
Stable Diffusion LoRA training 脚本:https://github.com/huggingface/diffusers/blob/main/examples/text_to_image/train_text_to_image_lora.py
kohya LoRA training 插件:https://github.com/kohya-ss/sd-scripts
Hugging Face Dataset 数据集:https://huggingface.co/docs/datasets/image_dataset#imagefolder
Amazon SageMaker BYOC 模型训练:https://docs.aws.amazon.com/zh_cn/sagemaker/latest/dg/your-algorithms-training-algo.html
Amazon SageMaker BYOC 模型推理:https://docs.aws.amazon.com/zh_cn/sagemaker/latest/dg/adapt-inference-container.html#byoc-inference-handler-service
本篇作者