Original URL: https://aws.amazon.com/cn/blogs/machine-learning/setting-up-human-review-of-your-nlp-based-entity-recognition-models-with-amazon-sagemaker-ground-truth-amazon-comprehend-and-amazon-a2i/
目前,各个行业的组织都拥有大量非结构化数据,供决策团队通过评估获得基于实体的洞察见解。此外,大家可能还希望添加自己的专有业务实体类型,例如专有零件编号或行业特定术语等。要创建基于自然语言处理(NLP)的模型,我们首先需要根据这些特定实体进行数据标记。
Amazon SageMaker Ground Truth 能够帮助大家轻松构建起用于机器学习(ML)的高精度训练数据集,Amazon Comprehend则为您的模型训练作业快速选择正确的算法与参数。最后,Amazon Augmented AI (Amazon A2I)使您能够审计、核对并扩充得出的预测结果。
在本文中,我们将介绍如何使用Ground Truth命名实体识别(named entity recognition,简称NER)进行特征标记,借此为自定义实体构建起标记数据集;如何使用Amazon Comprehend训练一套自定义实体识别器,以及如何使用Amazon A2I提供的人工审核机制对置信度低于特定阈值的Amazon Comprehend预测进行复核。
我们将使用一套示例 Amazon SageMaker Jupyter notebook,在演练中完成以下步骤:
- 预处理输入文件。
- 创建一项Ground Truth NER标记作业。
- 训练Amazon Comprehend自定义实体识别器模型。
- 使用Amazno A2I设置人工审核循环,借此检测低置信度预测结果。
先决条件
在开始之前,请通过以下步骤设置Jupyter notebook:
确保您的Amazon SageMaker notebook,拥有notebook中先决条件部分所提及的必要AWS身份与访问管理(AWS Identity and Access Management,简称IAM)角色及权限。
- 在notebook处于活动状态时,选择 Open Jupyter。
- 在Jupyter仪表上选择 New, 而后选择 Terminal。
- 在终端内,输入以下代码:
cd SageMaker
git clone “https://github.com/aws-samples/augmentedai-comprehendner-groundtruth”
- 5. 在augmentedai-comprehendner-groundtruth文件夹中选择 SageMakerGT-ComprehendNER-A2I-Notebook.ipynb 以打开该notebook。
现在,您可以在notebook单元中执行以下操作步骤。
预处理输入文件
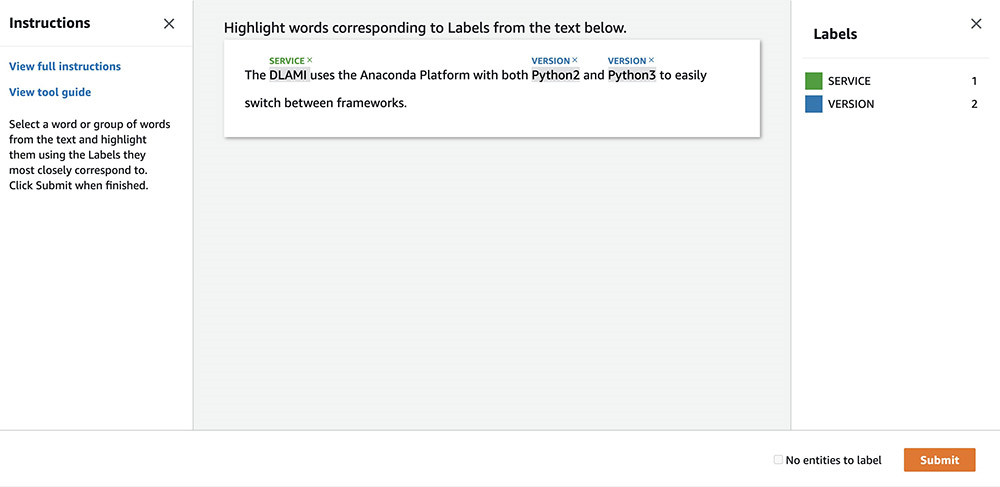
在本用例中,大家正在查看聊天消息或几份提交的工单,希望弄清它们是否与AWS产品有关。我们使用Ground Truth中的NER标记功能,将输入消息中的 SERVICE 或 VERSION实体标记出来。之后,我们训练Amazon Comprehend自定义实体识别器,借此从推特或工单注释等文本当中识别出对应实体。
样本数据集可通过GitHub repo中的 data/rawinput/aws-service-offerings.txt处获取。以下截屏所示,为本次演练中使用的数据集示例。

通过对文件进行预处理,我们将生成以下文件:
- inputs.csv – 使用此文件为Ground Truth NER标记生成输入manifest文件。
- Train.csv 与 test.csv – 使用这些文件作为自定义实体训练的输入。大家可以在Amazon Simple Storage Service (Amazon S3)存储桶中找到这些文件。
关于数据集生成方法,请参阅notebook中的步骤1a与1b部分。
创建一项Ground Truth NER标记作业
我们的目标是对输入文件中的句子进行注释与标记,将其归类于我们的各自定义实体。在本节中,大家需要完成以下步骤:
- 创建Ground Truth所需要的manifest文件。
- 设置标记工作人员。
- 创建标记作业。
- 启动标记作业并验证其输出结果。
创建一个manifest文件
我们使用在预处理过程中生成的 inputs.csv文件创建NER标记特征所需要的manifest文件。我们将生成的manifest文件命名为prefix+-text-input.manifest,用于在创建Ground Truth作业时进行数据标记。详见以下代码:
# Create and upload the input manifest by appending a source tag to each of the lines in the input text file.
# Ground Truth uses the manifest file to determine labeling tasks

manifest_name = prefix + '-text-input.manifest'
# remove existing file with the same name to avoid duplicate entries
!rm *.manifest
s3bucket = s3res.Bucket(BUCKET)

with open(manifest_name, 'w') as f:
    for fn in s3bucket.objects.filter(Prefix=prefix +'/input/'):
        fn_obj = s3res.Object(BUCKET, fn.key)
        for line in fn_obj.get()['Body'].read().splitlines():
            f.write('{"source":"' + line.decode('utf-8') +'"}\n')
f.close()
s3.upload_file(manifest_name, BUCKET, prefix + "/manifest/" + manifest_name)
The NER labeling job requires its input manifest in the {"source": "embedded text"}. The following screenshot shows the generated input.manifest file from inputs.csv.

创建专有标记工作人员
在Ground Truth中,我们使用专有工作人员创建一套经过标记的数据集。
您可以在Amazon SageMaker控制台上创建专有工作人员。关于具体操作说明,请参阅使用Amazon SageMaker Ground Truth与Amazon Comprehend开发NER模型中的创建专有工作团队部分。
或者,您也可以按照 notebook中的指导分步操作。
在本演练中,我们使用同一专有工作人员在自定义实体训练完成之后,使用Amazon A2I标记并扩充低置信度数据。
创建一项标记作业
下一步是创建NER标记作业。本文将重新介绍其中的关键步骤。关于更多详细信息,请参阅使用Amazon SageMaker Ground Truth添加数据标记工作流以实现命名实体识别。
- 在Amazon SageMaker控制台的Ground Truth之下, 选择 Labeling jobs。
- 选择 Create labeling job。
- 在Job name部分,输入一个作业名称。
- 在Input dataset location部分,输入您之前创建的输入manifest文件所对应的Amazon S3存储位置 (
s3://bucket//path-to-your-manifest.json)。
- 在Output Dataset Location部分,输入带有输出前缀的S3存储桶(例如
s3://bucket-name/output)。
- 在 IAM role部分, 选择 Create a new Role。
- 选择Any S3 Bucket。
- 选择 Create。
- 在Task category部分, 选择 Text。
- 选择 Named entity recognition。
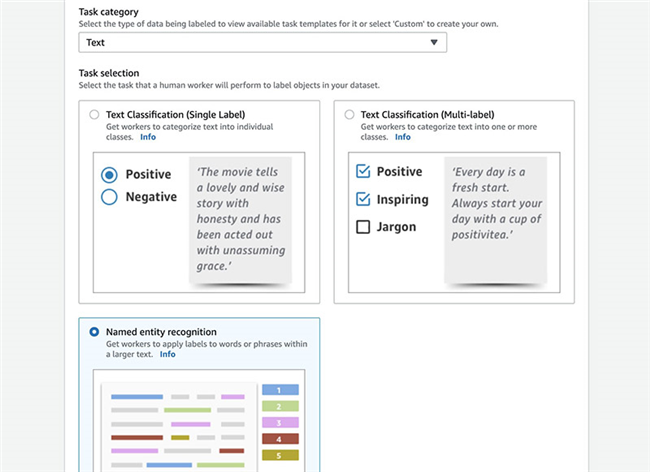
- 选择 Next。
- 在Worker type部分, 选择 Private。
- 在Private Teams当中, 选择您所创建的团队。
- 在Named Entity Recognition Labeling Tool部分的 Enter a brief description of the task位置,输入
Highlight the word or group of words and select the corresponding most appropriate label from the right。
- 在 Instructions 对话框中,输入
Your labeling will be used to train an ML model for predictions. Please think carefully on the most appropriate label for the word selection. Remember to label at least 200 annotations per label type。
- 选择 Bold Italics。
- 在Labels 部分,输入您希望向工作人员展示的标签名称。
- 选择 Create。
启动标记作业
您的工作人员(或者是由您亲自担任工作人员)将收到一封包含登录说明的电子邮件。
- 选择 the URL provided and enter your user name and password.
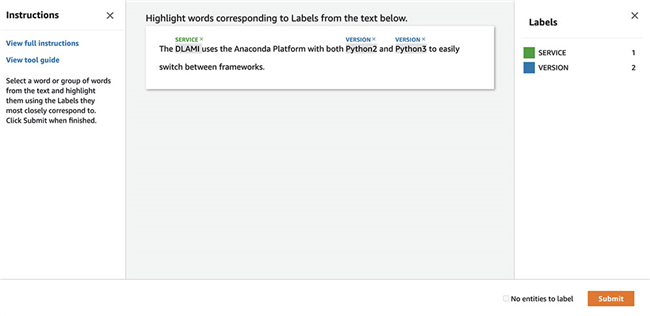
您将被定向至标记任务UI。
- 通过为词组选择标签以完成标记任务。
- 选择 Submit。
- 在对所有条目进行过标记之后,UI将自动退出。
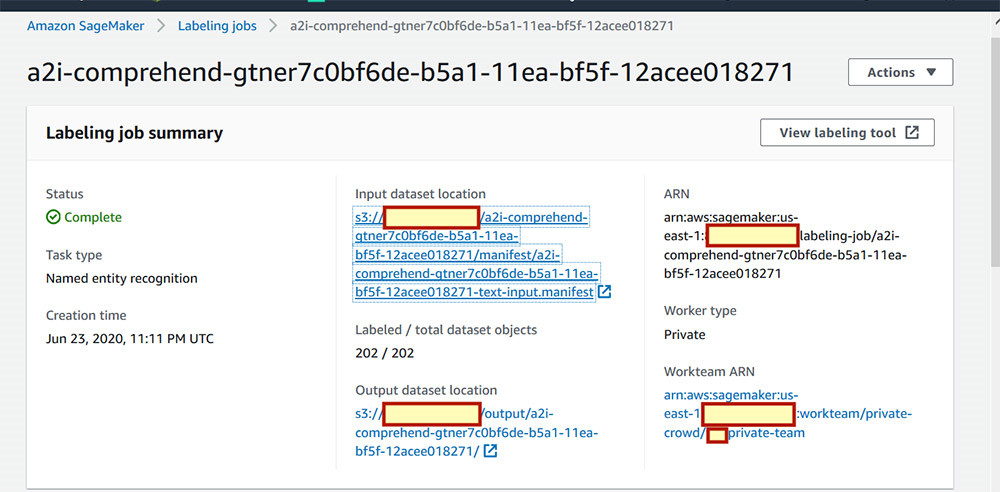
- 要检查您的作业状态,请在Amazon SageMaker控制台的 Ground Truth之下, 选择 Labeling jobs。
- 等待,直至作业状态显示为
Complete。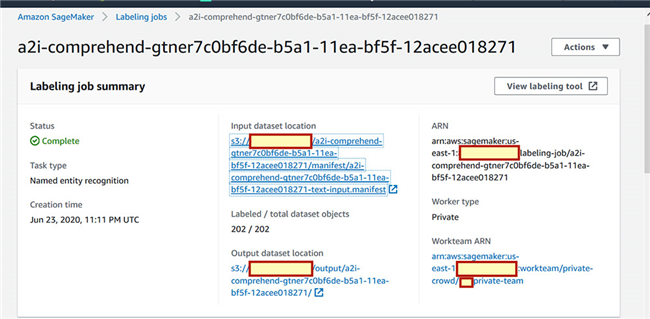
验证注释输出
要 验证您的注释输出, 请打开S3存储桶并前往 <S3 Bucket Name>/output/<labeling-job-name>/manifests/output/output.manifest。您可以在这里查看Ground Truth创建的manifest文件。以下截屏所示,为本次演练中的示例条目。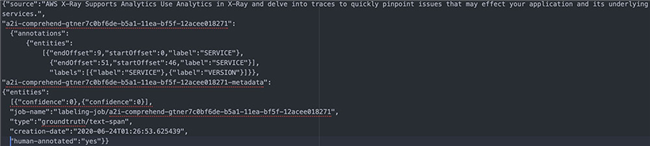
训练一套自定义实体模型
现在,我们可以使用经过注释的数据集或者之前创建的output.manifest Ground Truth训练一套自定义实体识别器了。本节将引导大家完成notebook中提及的具体步骤。
处理经过注释的数据集
大家可以通过实体列表或者注释,为Amazon Comprehend自定义实体提供标签。在本文中,我们将使用Ground Truth标记作业生成注释内容。大家需要将经过注释的output.manifest文件转换为以下CSV格式:
File, Line, Begin Offset, End Offset, Typedocuments.txt, 0, 0, 11, VERSION
运行notebook中的以下代码以生成此annotations.csv 文件:
# Read the output manifest json and convert into a csv format as expected by Amazon Comprehend Custom Entity Recognizer
import json
import csv

# this will be the file that will be written by the format conversion code block below
csvout = 'annotations.csv'

with open(csvout, 'w', encoding="utf-8") as nf:
    csv_writer = csv.writer(nf)
    csv_writer.writerow(["File", "Line", "Begin Offset", "End Offset", "Type"])
    with open("data/groundtruth/output.manifest", "r") as fr:
        for num, line in enumerate(fr.readlines()):
            lj = json.loads(line)
            #print(str(lj))
            if lj and labeling_job_name in lj:
                for ent in lj[labeling_job_name]['annotations']['entities']:
                    csv_writer.writerow([fntrain,num,ent['startOffset'],ent['endOffset'],ent['label'].upper()])
    fr.close()
nf.close()

s3_annot_key = "output/" + labeling_job_name + "/comprehend/" + csvout

upload_to_s3(s3_annot_key, csvout)
下图所示,为该文件的具体内容。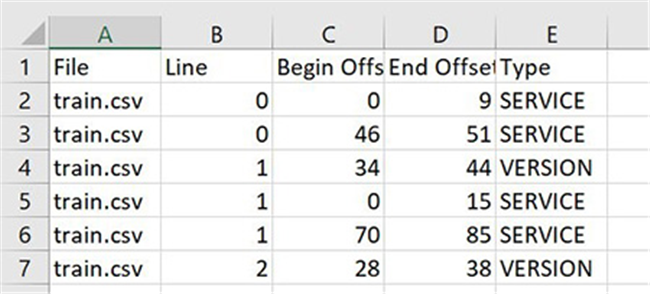
设置一套自定义实体识别器
本文在示例中使用API,但大家可以选择在Amazon Comprehend控制台上创建识别与批量分析作业。关于具体操作说明,请参阅使用Amazon Comprehend构建自定义实体识别器。
- 输入以下代码。在
s3_train_channel当中使用我们在预处理阶段生成的 train.csv 文件,借此进行识别器训练。在 s3_annot_channel当中,使用 annotations.csv 作为标签以训练您的自定义实体识别器。
custom_entity_request = {

      "Documents": {
         "S3Uri": s3_train_channel
      },
      "Annotations": {
         "S3Uri": s3_annot_channel
      },
      "EntityTypes": [
                {
                    "Type": "SERVICE"
                },
                {
                    "Type": "VERSION"
                }
      ]
}
- 使用 CreateEntityRecognizer 创建实体识别器。该实体识别器使用最低数量训练样本进行训练,借此生成Amazon A2I工作流中需要的部分低置信度预测结果。详见以下代码:
import datetime

id = str(datetime.datetime.now().strftime("%s"))
create_custom_entity_response = comprehend.create_entity_recognizer(
        RecognizerName = prefix + "-CER",
        DataAccessRoleArn = role,
        InputDataConfig = custom_entity_request,
        LanguageCode = "en"
)
在实体识别器作业完成之后,我们将获得一款附带性能分数的识别器。如前所述,我们使用最低数量的训练样本进行识别器训练,借此生成Amazon A2I工作流中需要的部分低置信度预测结果。您可以在Amazon Comprehend控制台上找到这些指标,具体参见以下截屏。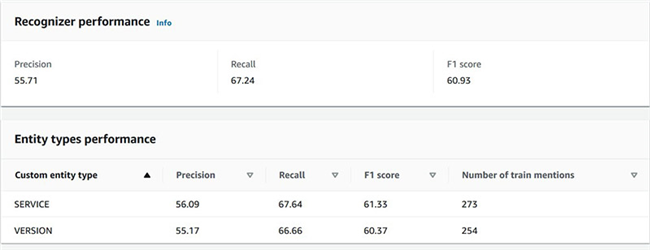
- 创建一项批量实体检测分析作业,用以检测大量文件中的相应实体。
使用Amazon Comprehend StartEntitiesDetectionJob 操作以检测文件中的自定义实体。关于使用自定义实体识别器创建实时分析端点的具体操作说明,请参阅启动Amazon Comprehend自定义实体识别实时端点以执行注释任务。
要使用EntityRecognizerArn 进行自定义实体识别,我们需要为识别器提供访问权限以进行自定义实体检测。执行CreateEntityRecognizer操作即可通过响应结果获得此ARN。
- 运行自定义实体检测作业,通过 notebook运行以下单元,对预处理步骤当中创建的测试数据集做出预测:
s3_test_channel = 's3://{}/{}'.format(BUCKET, s3_test_key) s3_output_test_data = 's3://{}/{}'.format(BUCKET, "output/testresults/")
test_response = comprehend.start_entities_detection_job(   InputDataConfig={
'S3Uri': s3_test_channel,
'InputFormat': 'ONE_DOC_PER_LINE'
},
OutputDataConfig={'S3Uri': s3_output_test_data
},
DataAccessRoleArn=role,
JobName='a2i-comprehend-gt-blog',
EntityRecognizerArn=jobArn,
LanguageCode='en')
以下截屏所示,为本次演练中得出的测试结果。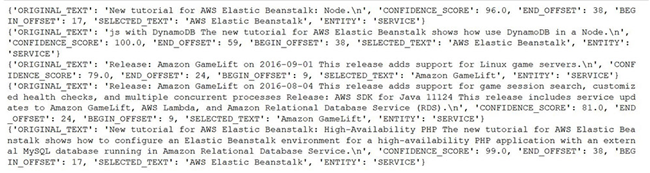
建立人工审核循环
在本节中,我们将为Amazon A2I中的低置信度检测建立起人工审核循环,具体包括以下步骤:
- 选择您的工作人员。
- 创建人工任务UI。
- 创建一项工作人员任务模板创建器函数。
- 创建流定义。
- 检查人员循环状态,并等待审核人员完成任务。
选择您的工作人员
在本文中,我们使用由为Ground Truth标记作业创建的专有工作人员。使用工作人员ARN为Amazon A2I设置工作人员。
创建人工任务UI
使用liquid HTML中的UI模板创建人工任务UI资源。每当需要人工循环时,皆需要使用这套模板。
以下示例代码已通过测试,能够与Amazon Comprehend实体检测相兼容:
template = """
<script src="https://assets.crowd.aws/crowd-html-elements.js"></script>

<style>
    .highlight {
        background-color: yellow;
    }
</style>

<crowd-entity-annotation
        name="crowd-entity-annotation"
        header="Highlight parts of the text below"
        labels="[{'label': 'service', 'fullDisplayName': 'Service'}, {'label': 'version', 'fullDisplayName': 'Version'}]"
        text="{{ task.input.originalText }}"
>
    <full-instructions header="Named entity recognition instructions">
        <ol>
            <li><strong>Read</strong> the text carefully.</li>
            <li><strong>Highlight</strong> words, phrases, or sections of the text.</li>
            <li><strong>Choose</strong> the label that best matches what you have highlighted.</li>
            <li>To <strong>change</strong> a label, choose highlighted text and select a new label.</li>
            <li>To <strong>remove</strong> a label from highlighted text, choose the X next to the abbreviated label name on the highlighted text.</li>
            <li>You can select all of a previously highlighted text, but not a portion of it.</li>
        </ol>
    </full-instructions>

    <short-instructions>
        Select the word or words in the displayed text corresponding to the entity, label it and click submit
    </short-instructions>

    <div id="recognizedEntities" style="margin-top: 20px">
                <h3>Label the Entity below in the text above</h3>
                <p>{{ task.input.entities }}</p>
    </div>
</crowd-entity-annotation>

<script>

    function highlight(text) {
        var inputText = document.getElementById("inputText");
        var innerHTML = inputText.innerHTML;
        var index = innerHTML.indexOf(text);
        if (index >= 0) {
            innerHTML = innerHTML.substring(0,index) + "<span class='highlight'>" + innerHTML.substring(index,index+text.length) + "</span>" + innerHTML.substring(index + text.length);
            inputText.innerHTML = innerHTML;
        }
    }

    document.addEventListener('all-crowd-elements-ready', () => {
        document
            .querySelector('crowd-entity-annotation')
            .shadowRoot
            .querySelector('crowd-form')
            .form
            .appendChild(recognizedEntities);
    });
</script>
"""
Creating a worker task template creator fun
创建一项工作人员任务模板创建器函数
此函数属于对Amazon SageMaker软件包方法的高级抽象,用于创建人工审核工作流。详见以下代码:
def create_task_ui():
    '''
    Creates a Human Task UI resource.

    Returns:
    struct: HumanTaskUiArn
    '''
    response = sagemaker.create_human_task_ui(
        HumanTaskUiName=taskUIName,
        UiTemplate={'Content': template})
    return response
# Task UI name - this value is unique per account and region. You can also provide your own value here.
taskUIName = prefix + '-ui'

# Create task UI
humanTaskUiResponse = create_task_ui()
humanTaskUiArn = humanTaskUiResponse['HumanTaskUiArn']
print(humanTaskUiArn)
创建流定义
我们可以在流定义中指定以下内容:
本文使用API,但您也可以选择在Amazon A2I控制台上创建这项工作流定义。
关于更多详细信息,请参阅如何创建流定义。
要设置触发人工循环审核的条件,请输入以下代码(您可以设置CONFIDENCE_SCORE_THRESHOLD阈值,借此调整触发人工审核的具体置信度):
human_loops_started = []

import json

CONFIDENCE_SCORE_THRESHOLD = 90
for line in data:
    print("Line is: " + str(line))
    begin_offset=line['BEGIN_OFFSET']
    end_offset=line['END_OFFSET']
    if(line['CONFIDENCE_SCORE'] < CONFIDENCE_SCORE_THRESHOLD):
        humanLoopName = str(uuid.uuid4())
        human_loop_input = {}
        human_loop_input['labels'] = line['ENTITY']
        human_loop_input['entities']= line['ENTITY']
        human_loop_input['originalText'] = line['ORIGINAL_TEXT']
        start_loop_response = a2i_runtime_client.start_human_loop(
        HumanLoopName=humanLoopName,
        FlowDefinitionArn=flowDefinitionArn,
        HumanLoopInput={
                "InputContent": json.dumps(human_loop_input)
            }
        )
        print(human_loop_input)
        human_loops_started.append(humanLoopName)
        print(f'Score is less than the threshold of {CONFIDENCE_SCORE_THRESHOLD}')
        print(f'Starting human loop with name: {humanLoopName}  \n')
    else:
         print('No human loop created. \n')
检查人工循环状态并等待审核人员完成任务
要定义一项检查人工循环状态的函数,请输入以下代码:
completed_human_loops = []
for human_loop_name in human_loops_started:
    resp = a2i_runtime_client.describe_human_loop(HumanLoopName=human_loop_name)
    print(f'HumanLoop Name: {human_loop_name}')
    print(f'HumanLoop Status: {resp["HumanLoopStatus"]}')
    print(f'HumanLoop Output Destination: {resp["HumanLoopOutput"]}')
    print('\n')

    if resp["HumanLoopStatus"] == "Completed":
        completed_human_loops.append(resp)
导航至专有工作人员门户(为notebook在上一步骤中的单元2输出结果),详见以下代码:
workteamName = WORKTEAM_ARN[WORKTEAM_ARN.rfind('/') + 1:]
print("Navigate to the private worker portal and do the tasks. Make sure you've invited yourself to your workteam!")
print('https://' + sagemaker.describe_workteam(WorkteamName=workteamName)['Workteam']['SubDomain'])
这套UI模板类似于Ground Truth NER标记功能。Amazon A2I显示从输入文本中识别出的实体(即低置信度预测结果)。而后,工作人员可以根据需要更新或验证实体标签,并选择 Submit。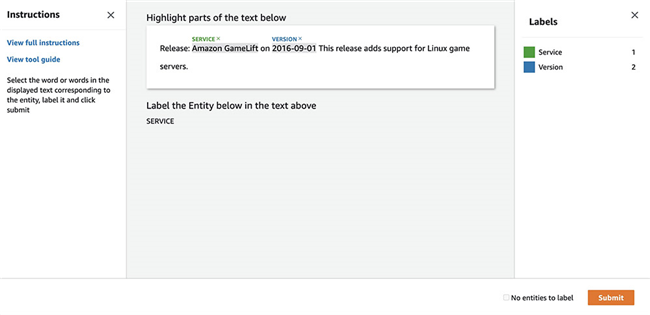
此项操作将生成更新的注释,其中包含由人工审核员高亮标注的偏移量与实体。
资源清理
为了避免产生不必要的费用,请在完成本演练后删除相应资源,包括Amazon SageMaker notebook实例、Amazon Comprehend自定义实体识别器,以及Amazon S3当中不再使用的模型工件。
总结
本文演示了如何使用Ground Truth NER为Amazon Comprehend自定义实体识别结果创建注释。我们还使用Amazon A2I以更新并改进Amazon Comprehend的低置信度预测结果。
您可以使用Amazon A2I生成的注释更新您创建的注释文件,并逐步训练自定义识别器以不断提升模型精度。
关于视频演示、Jupyter示例notebook以及更多与用例相关的详细信息,包括文档处理、内容审核、情感分析与文本翻译等,请参阅Amazon Augmeneted AI资源。期待大家在实际应用中扩展出更多解决方案,也欢迎您提供反馈与建议。
本篇作者