背景
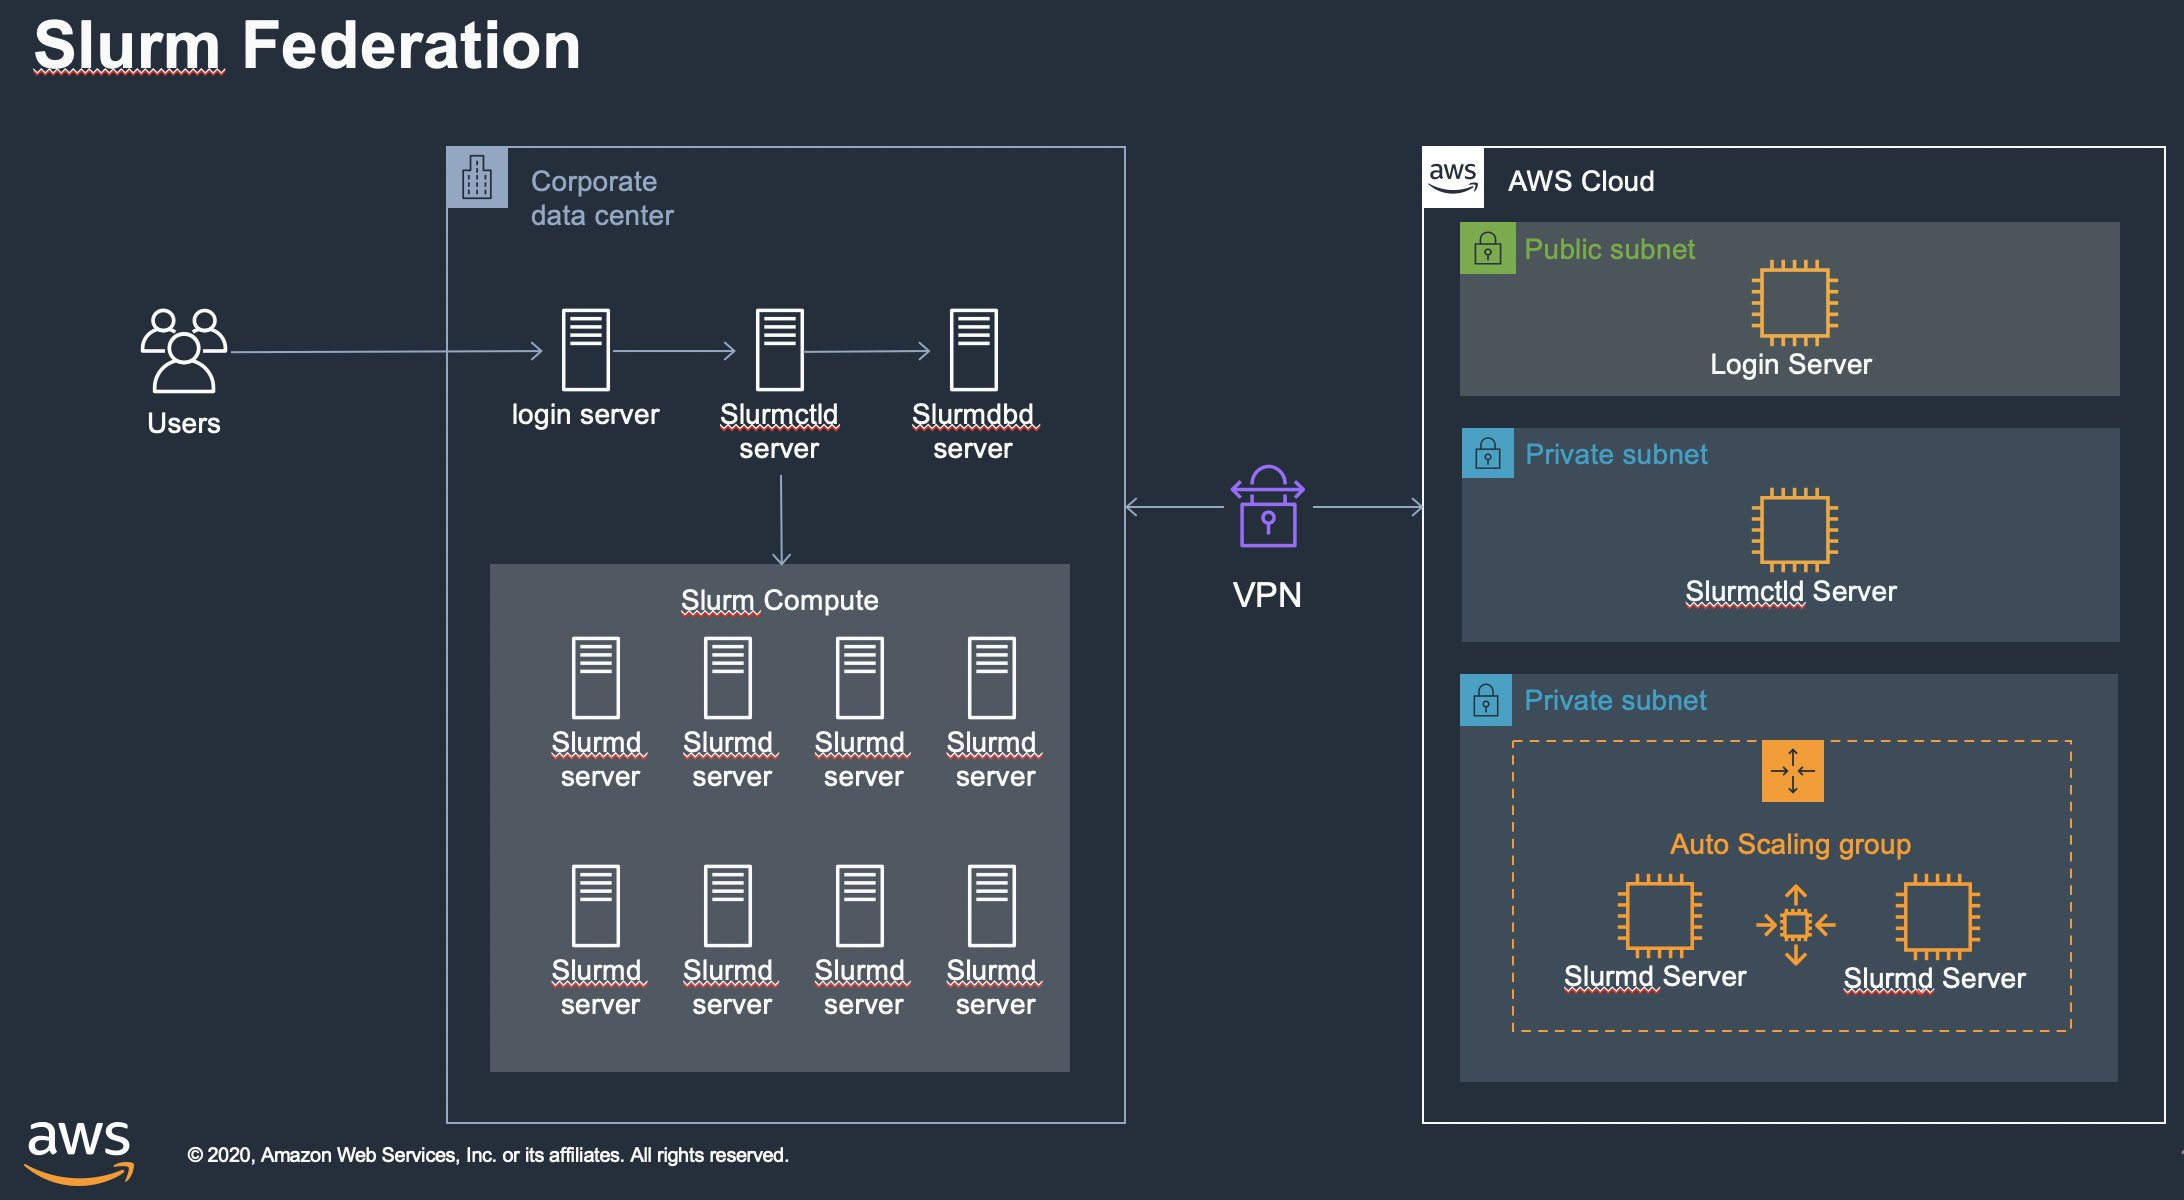
Slurm集群调度系统支持创建集群联合(Federation),并在集群之间以对等方式调度作业。提交到联合集群的作业将收到唯一的作业ID,该ID在联合集群中的所有群集中都是唯一的。作业提交到本地集群(集群在slurm.conf中定义),然后跨联盟中的群集进行复制。然后,每个集群根据自己的调度策略独立地尝试调度作业。集群与“原始”集群(作业提交到的集群)协调以调度作业。
利用 Federation 作业调度,可以实现本地-云端混合 HPC 调度,提升本地已有 Slurm 集群的资源弹性和扩展,Slurm 本地与云端集群组成 Federation 集群联合,用户可以像往常一样在本地 Slurm 中提交作业,作业会同时复制到云端Slurm 集群中,每个集群都会试图调度作业运行,为作业分配资源。如果成功,它将通知原始集群(作业提交集群)它启动了作业,原始集群会通知其它集群终止和删除这个作业并置于吊销状态。

基本流程:
- 客户登录本地集群(on-prem)
- 客户提交作业到本地集群
- Slurm集群会将作业拷贝到 AWS 云上 Slurm 集群(aws)
- 如果本地集群可以执行作业,则通知云上集群(aws)取消作业
- 如果本地集群无调度执行作业,而云上集群可以调度执行,则云上集群(aws)开始调度执行作业,并通知本地集群(on-prem)取消(revoke)作业
- 可以使用 sinfo –federation, squeue –federation, sacct –federation命令查看所有的作业执行情况。
验证配置:
- 使用 Parallecluster在一个AWS 区域建立一个 Slurm 集群,最大节点和最小节点相同以模拟本地集群(on-prem);
- 启用本地集群 slurmdbd 进程和 accounting 服务,Slurm 多集群依赖 accounting 服务;
- 使用 Parallecluster 在另外一个区域建立一个 Slurm 集群,作为云上 cloudburst 集群(aws);
- 使用 VPC-peering,连接两个集群模拟混合云,必须配置 DNS 机器名解析;
- 配置多集群;
- 配置 Federation;
- 提交测试作业验证 Federation 集群调度;
具体配置流程:
- 安装Parallecluster ,使用虚拟环境,以便安装两套 Parallecluster
$ python3 -m pip install --upgrade pip
$ python3 -m pip install --user --upgrade virtualenv
$ python3 -m virtualenv ~/.pcluster
$ source ~/.pcluster/bin/activate
(.pcluster) a483e778a9b5:~ xinxx$ python3 -m pip install --upgrade aws-parallelcluster
(.pcluster) a483e778a9b5:~ xinxx$ pcluster version
2.10.0
- 使用 Parallecluster 建立模拟本地 Slurm 集群(on-prem),可以配置initial_queue_size=max_queue_size,以模拟本地固定集群情况。在安装的时候,指定 pcluster 的配置文件,以区别本地(on-perm)和云端(aws)集群。
(.pcluster) a483e778a9b5:~ xinxx$ pcluster configure -c ~/.parallelcluster/pcluster-config-on-perm
INFO: Configuration file /Users/xinxx/.parallelcluster/pcluster-config-on-perm will be written.
Press CTRL-C to interrupt the procedure.
Allowed values for AWS Region ID:
1. cn-north-1
2. cn-northwest-1
AWS Region ID [cn-northwest-1]:
Allowed values for EC2 Key Pair Name:
1. xinxx-key-nx
EC2 Key Pair Name [xinxx-key-nx]:
Allowed values for Scheduler:
1. sge
2. torque
3. slurm
4. awsbatch
Scheduler [slurm]:
Allowed values for Operating System:
1. alinux
2. alinux2
3. centos7
4. centos8
5. ubuntu1604
6. ubuntu1804
Operating System [alinux2]:
Minimum cluster size (instances) [0]: 2
Maximum cluster size (instances) [10]: 2
Master instance type [t2.micro]:
Compute instance type [t2.micro]:
Automate VPC creation? (y/n) [n]: y
Allowed values for Network Configuration:
1. Master in a public subnet and compute fleet in a private subnet
2. Master and compute fleet in the same public subnet
Network Configuration [Master in a public subnet and compute fleet in a private subnet]: 2
Beginning VPC creation. Please do not leave the terminal until the creation is finalized
Creating CloudFormation stack...
Do not leave the terminal until the process has finished
Stack Name: parallelclusternetworking-pub-20201211120145
Status: parallelclusternetworking-pub-20201211120145 - CREATE_COMPLETE
The stack has been created
Configuration file written to /Users/xinxx/.parallelcluster/pcluster-config-on-perm
You can edit your configuration file or simply run 'pcluster create -c /Users/xinxx/.parallelcluster/pcluster-config-on-perm cluster-name' to create your cluster
(.pcluster) a483e778a9b5:~ xinxx$ pcluster create on-perm -c /Users/xinxx/.parallelcluster/pcluster-config-on-perm
Beginning cluster creation for cluster: on-perm
Creating stack named: parallelcluster-on-perm
Status: parallelcluster-on-perm - CREATE_COMPLETE
MasterPublicIP: 52.82.115.178
ClusterUser: ec2-user
MasterPrivateIP: 10.0.3.94
- 修改本地集群
- 更新集群名称为:on-perm
- 编辑 vi /opt/slurm/etc/slurm.conf,修改 ClusterName 参数为 on-perm
ClusterName=on-perm
[root@ip-10-0-3-94 ]# systemctl stop slurmctld
-
-
- 删除/var/spool/slurm.state/下的所有文件
[root@ip-10-0-3-94 ]# rm -rf /var/spool/slurm.state/*
[root@ip-10-0-3-94 ]# systemctl start slurmctld
-
-
[root@ip-10-0-3-94 ]# lsid
Slurm 20.02.4, Feb 1 2020
Copyright SchedMD LLC, 2010-2017.

My cluster name is on-perm
My master name is ip-10-0-3-94

[root@ip-10-0-3-94 ]# sinfo
PARTITION AVAIL TIMELIMIT NODES STATE NODELIST
compute* up infinite 2 idle~ compute-st-t2micro-[1-2]
-
- 在 on-perm 集群的管理节点安装 SlurmDBD,用于 Accounting 信息记录,多集群下这个服务必须安装
- 安装 MariaDB,本例为 Amazon Linux2作为管理节点,使用 root 身份执行下列命令
[root@ip-10-0-3-94 ~]# yum install -y mariadb mariadb-server
-
-
[root@ip-10-0-3-94 ]# systemctl start mariadb
[root@ip-10-0-3-94 ]# systemctl enable mariadb
[root@ip-10-0-3-94 ]# mysqladmin -u root password <yourpassword>
[root@ip-10-0-3-94 ]# mysql -u root -p
Enter password:
Welcome to the MariaDB monitor. Commands end with ; or \g.
-
-
- 创建Slurm Accounting 需要的 database
MariaDB [(none)]> create user 'slurm'@'localhost' identified by '<password>';
Query OK, 0 rows affected (0.00 sec)

MariaDB [(none)]> grant all on slurm_acct_db.* TO 'slurm'@'localhost';
Query OK, 0 rows affected (0.00 sec)

MariaDB [(none)]> grant all on slurm_acct_db.* TO 'slurm'@'system0';
Query OK, 0 rows affected (0.00 sec)

MariaDB [(none)]> create database slurm_acct_db;
Query OK, 1 row affected (0.00 sec)

MariaDB [(none)]> quit
Bye
-
- 在配置文件/opt/slurm/etc/slurm.conf中增加Accounting参数,JobCompHost用于保存作业完成信息,目前只支持直接访问 MySQL,所以,JobCompHost=<MySQL Server hostname>,JobCompPass=MySQL用户「slurm」的密码。AccountingStorageHost=slurmdbd进程运行的机器名。注意:缺省的配置中在 LOGGING 段中已有 JobCompType=jobcomp/none,需要注释掉
# LOGGING
SlurmctldDebug=info
SlurmctldLogFile=/var/log/slurmctld.log
SlurmdDebug=info
SlurmdLogFile=/var/log/slurmd.log
#JobCompType=jobcomp/none

...

# JobComp
JobCompType=jobcomp/mysql
JobCompHost=localhost
JobCompPort=3306
JobCompPass=<your_mariadb_slurm_password>
JobCompUser=slurm
JobCompLoc=slurm_acct_db
#JobCompLoc=
#
# ACCOUNTING
JobAcctGatherType=jobacct_gather/linux
JobAcctGatherFrequency=30
#
AccountingStorageType=accounting_storage/slurmdbd
AccountingStorageHost=ip-10-0-3-94
AccountingStoragePort=6819
#AccountingStorageLoc=
#AccountingStoragePass=
#AccountingStorageUser=
#
DebugFlags=NO_CONF_HASH
-
- 建立配置文件/opt/slurm/etc/slurmdbd.conf
# slurmDBD info
DbdHost=localhost
DbdPort=6819
SlurmUser=slurm
#MessageTimeout=60
DebugLevel=6
#DefaultQOS=normal
LogFile=/var/log/slurmdbd.log
PidFile=/var/run/slurmdbd.pid
PluginDir=/opt/slurm/lib/slurm
#PrivateData=accounts,users,usage,jobs
#TrackWCKey=yes
# Database info
StorageType=accounting_storage/mysql
StorageHost=localhost
StoragePort=3306
StoragePass=Letmein123
StorageUser=slurm
StorageLoc=slurm_acct_db
-
- 重启 slurmctld,和启动 slurmdbd
[root@ip-10-0-3-94 etc]# systemctl stop slurmctld
[root@ip-10-0-3-94 etc]# systemctl start slurmctld
[root@ip-10-0-3-94 etc]# /opt/slurm/sbin/slurmdbd
[root@ip-10-0-3-94 log]# sacctmgr list Stats
*******************************************************************
sacctmgr show stats output at Sun Dec 13 03:31:08 2020 (1607830268)
Data since Sun Dec 13 03:25:33 2020 (1607829933)
All statistics are in microseconds
*******************************************************************

Internal DBD rollup last ran Sun Dec 13 03:25:33 2020 (1607829933)
 Last cycle: 44
 Max cycle: 44
 Total time: 44
 Total cycles: 1
 Mean cycle: 44

Remote Procedure Call statistics by message type
 SLURM_PERSIST_INIT ( 6500) count:9 ave_time:380 total_time:3423
 DBD_FINI ( 1401) count:9 ave_time:172 total_time:1552
 DBD_CLUSTER_TRES ( 1407) count:1 ave_time:640 total_time:640
 DBD_GET_JOBS_COND ( 1444) count:1 ave_time:526 total_time:526
 DBD_GET_ACCOUNTS ( 1409) count:1 ave_time:488 total_time:488
 DBD_GET_CLUSTERS ( 1412) count:1 ave_time:479 total_time:479

Remote Procedure Call statistics by user
 root ( 0) count:20 ave_time:302 total_time:6058
 slurm ( 990) count:2 ave_time:525 total_time:1050
- 建立云端集群
- 使用新的配置文件配置 pcluster
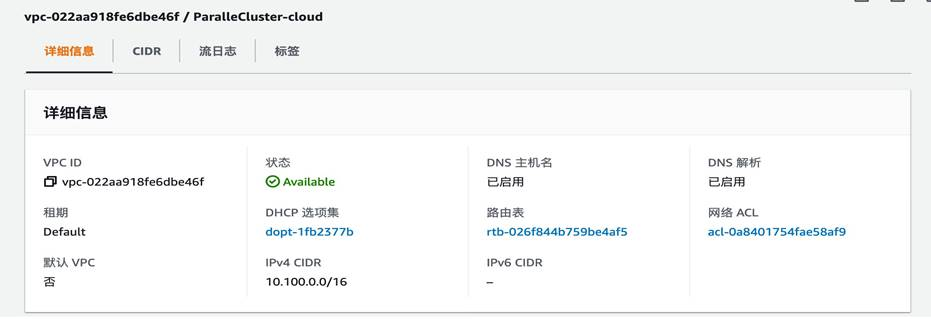
- 手动建立一个 VPC,因为组成多集群,CIDR不能重叠,使用10.100.0.0/16,注意要启用 DNS 主机名和解析
-
-
- 运行 pcluster configure -c ~/.parallecluster/pcluster-config-aws,使用上一部创建的 VPC
(.pcluster) a483e778a9b5:~ xinxx$ pcluster configure -c .parallelcluster/pcluster-config-aws
INFO: Configuration file .parallelcluster/pcluster-config-aws will be written.
Press CTRL-C to interrupt the procedure.


Allowed values for AWS Region ID:
1. cn-north-1
2. cn-northwest-1
AWS Region ID [cn-northwest-1]: 1
Allowed values for EC2 Key Pair Name:
1. xin-key-bj
EC2 Key Pair Name [xin-key-bj]:
Allowed values for Scheduler:
1. sge
2. torque
3. slurm
4. awsbatch
Scheduler [slurm]:
Allowed values for Operating System:
1. alinux
2. alinux2
3. centos7
4. centos8
5. ubuntu1604
6. ubuntu1804
Operating System [alinux2]:
Minimum cluster size (instances) [0]:
Maximum cluster size (instances) [10]:
Master instance type [t2.micro]:
Compute instance type [t2.micro]:
Automate VPC creation? (y/n) [n]: n
Allowed values for VPC ID:
 # id name number_of_subnets
--- --------------------- ----------------------------------- -------------------
 1 vpc-022aa918fe6dbe46f ParalleCluster-cloud 0
 2 vpc-6e....a 2

VPC ID [vpc-022aa918fe6dbe46f]: 1
There are no qualified subnets. Starting automatic creation of subnets...
Allowed values for Network Configuration:
1. Master in a public subnet and compute fleet in a private subnet
2. Master and compute fleet in the same public subnet
Network Configuration [Master in a public subnet and compute fleet in a private subnet]:
Creating CloudFormation stack...
Do not leave the terminal until the process has finished
Stack Name: parallelclusternetworking-pubpriv-20201213061955
Status: parallelclusternetworking-pubpriv-20201213061955 - CREATE_COMPLETE
The stack has been created
Configuration file written to .parallelcluster/pcluster-config-aws
You can edit your configuration file or simply run 'pcluster create -c .parallelcluster/pcluster-config-aws cluster-name' to create your cluster
(.pcluster) a483e778a9b5:~ xinxx$ pcluster create -c .parallelcluster/pcluster-config-aws aws
Beginning cluster creation for cluster: aws
Creating stack named: parallelcluster-aws
Status: parallelcluster-aws - CREATE_COMPLETE
ClusterUser: ec2-user
MasterPrivateIP: 10.100.0.216
-
-
[ec2-user@ip-10-100-0-216 ~]$ lsid
Slurm 20.02.4, Feb 1 2020
Copyright SchedMD LLC, 2010-2017.

My cluster name is parallelcluster
My master name is ip-10-100-0-216
[ec2-user@ip-10-100-0-216 ~]$ sinfo
PARTITION AVAIL TIMELIMIT NODES STATE NODELIST
compute* up infinite 10 idle~ compute-dy-t2micro-[1-10]
-
- 登录管理节点,修改 ClusterName=aws
- 登录管理节点,编辑/opt/slurm/etc/slurm.conf
[root@ip-10-100-0-216 etc]# cat slurm.conf
#
# Example slurm.conf file. Please run configurator.html
# (in doc/html) to build a configuration file customized
# for your environment.
#
#
# slurm.conf file generated by configurator.html.
#
# See the slurm.conf man page for more information.
#
# CLUSTER SETTINGS
ClusterName=aws
...
-
-
- 删除/var/spool/slurm.state/*,重启集群
[root@ip-10-100-0-216 etc]# systemctl stop slurmctld
[root@ip-10-100-0-216 etc]# rm -rf /var/spool/slurm.state/*
[root@ip-10-100-0-216 etc]# ls /var/spool/slurm.state/
[root@ip-10-100-0-216 etc]# systemctl start slurmctld
[root@ip-10-100-0-216 etc]# lsid
Slurm 20.02.4, Feb 1 2020
Copyright SchedMD LLC, 2010-2017.

My cluster name is aws
My master name is ip-10-100-0-216
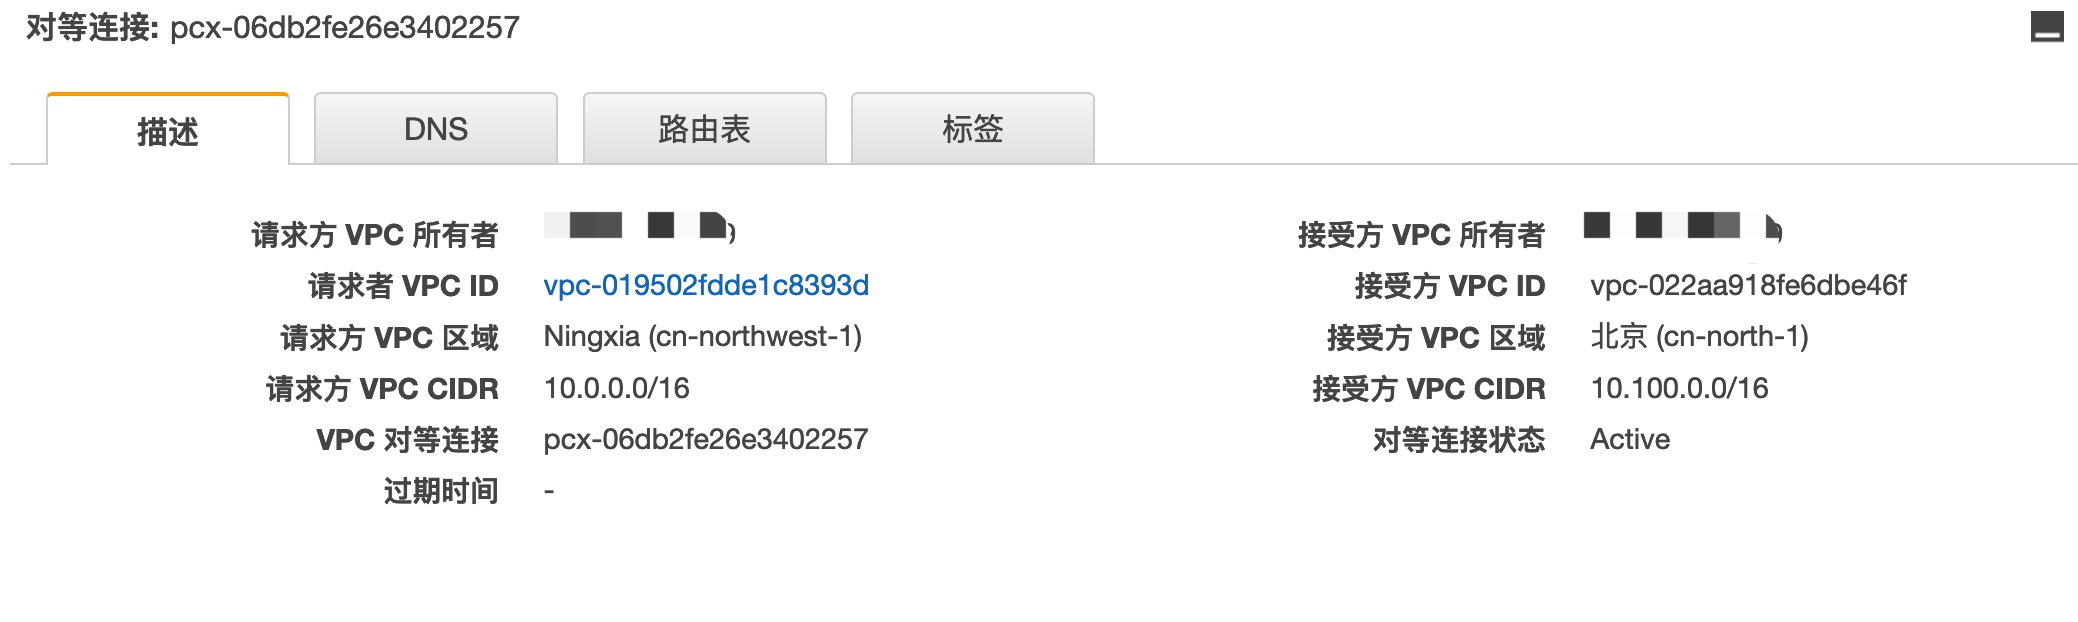
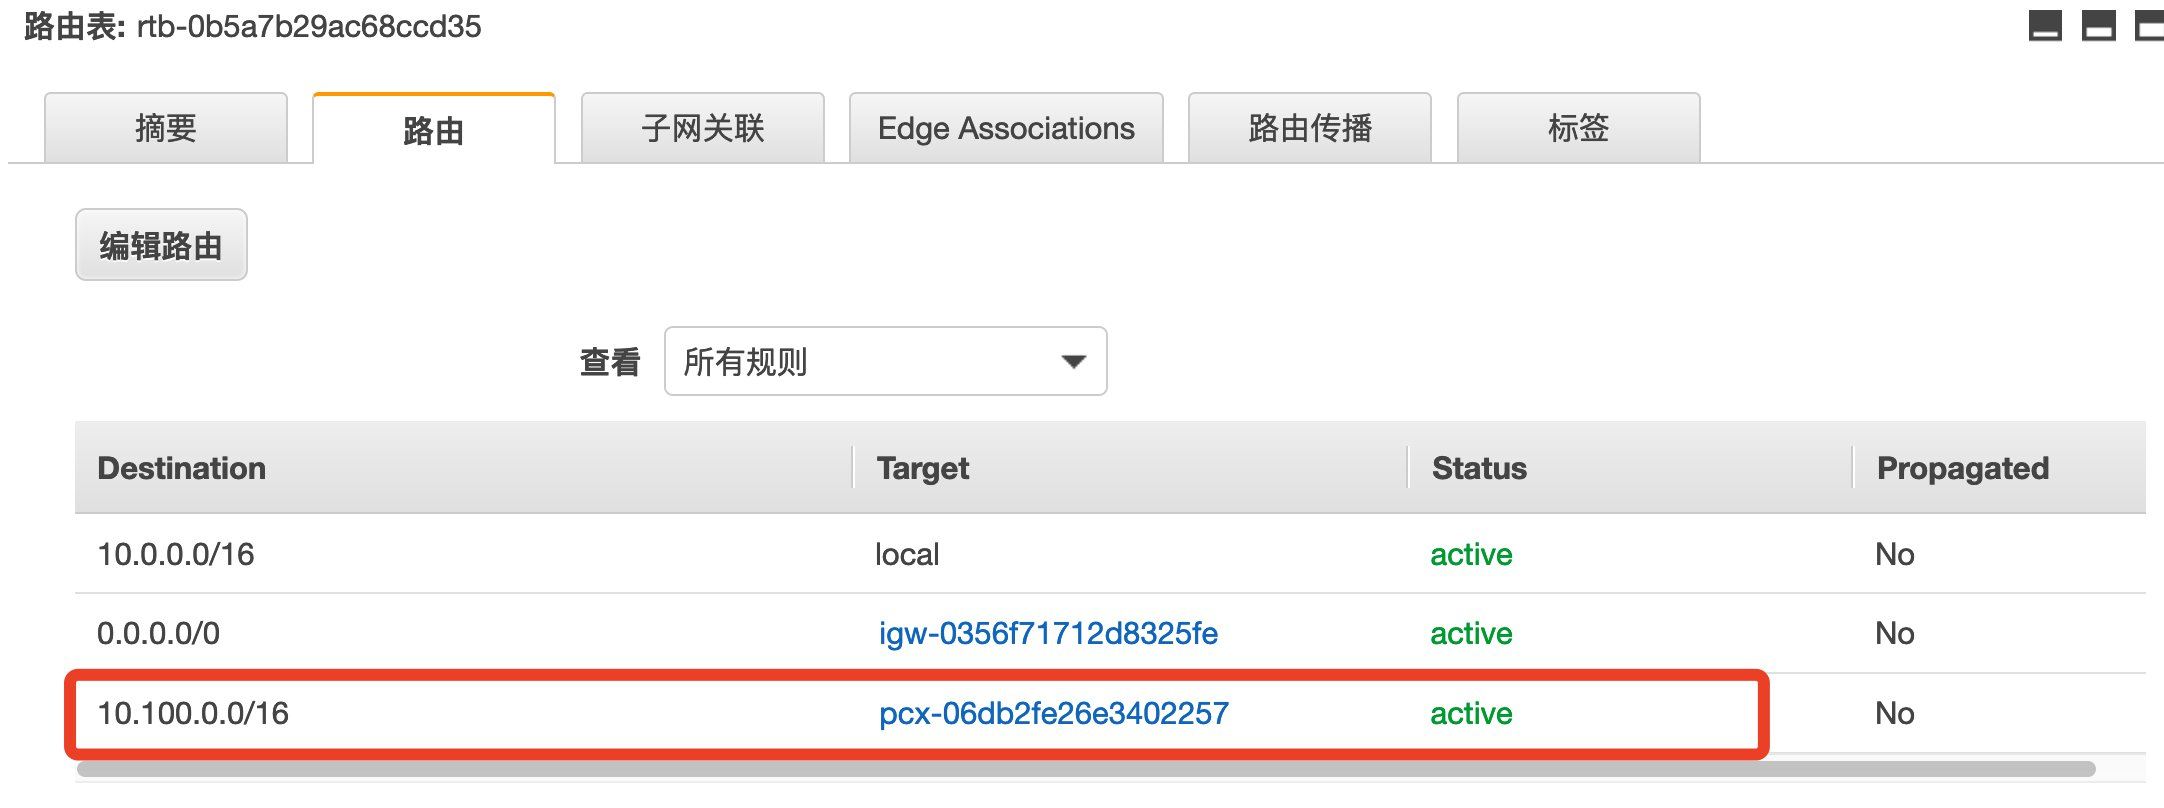
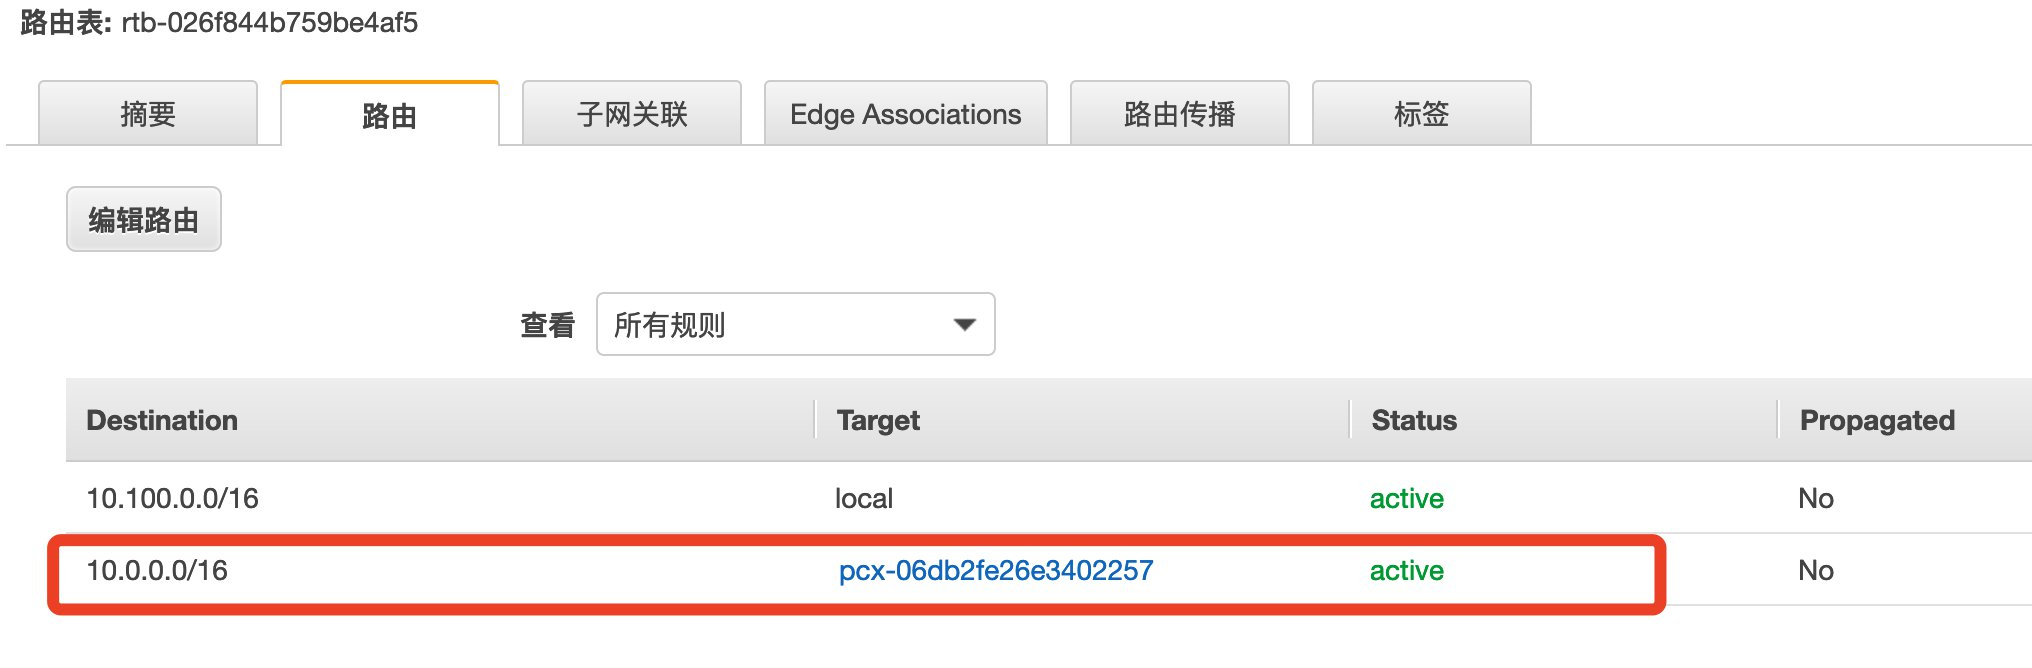
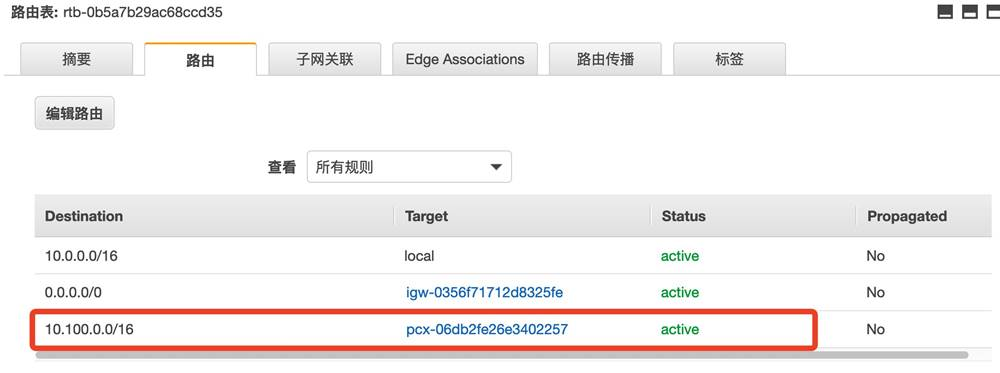
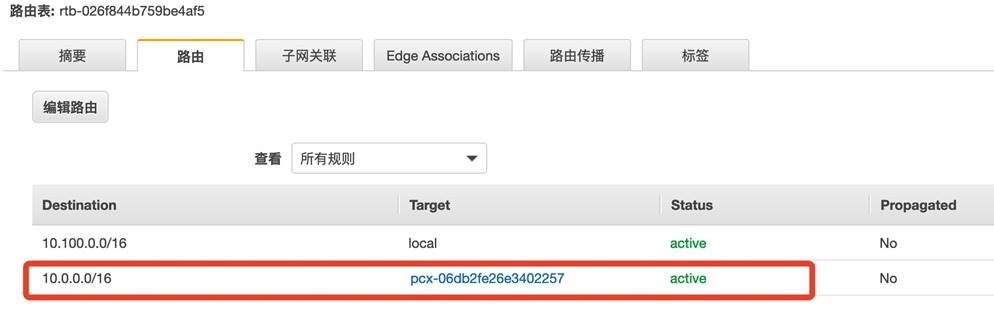
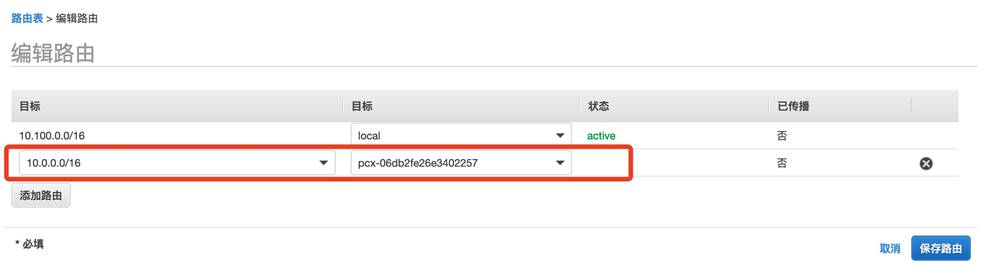
- 配置 VPC peer,打开 双方 VPC 的DNS 解析,修改路由,安全组,建立双方连接


-
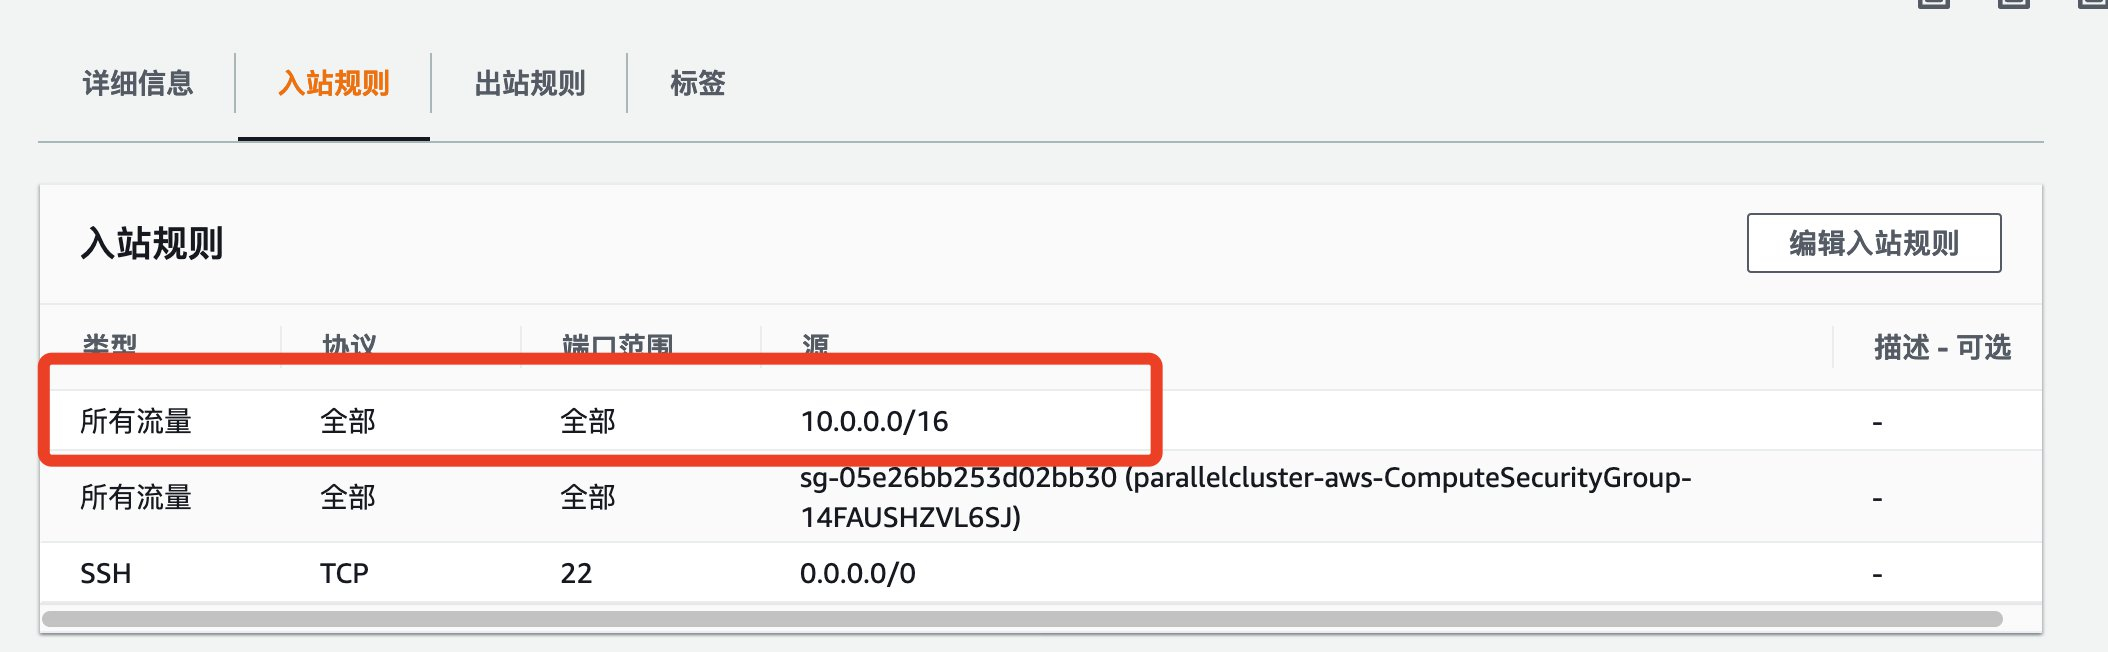
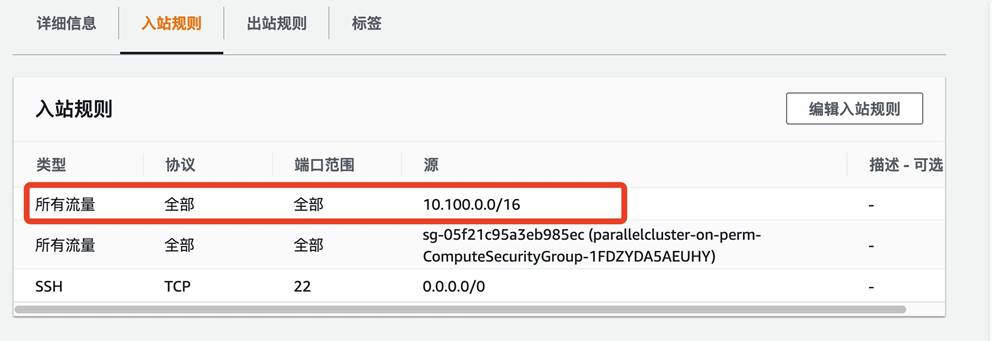
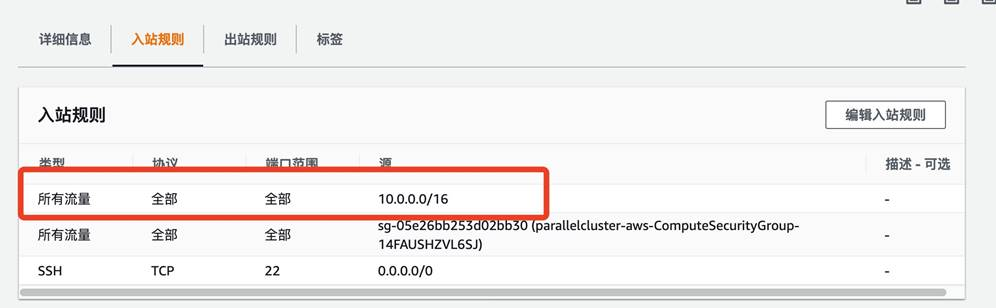
- 修改本地集群(on-perm)和云端集群(aws)的安全组的入站规则,允许互相访问

- 配置云端集群 (aws)的 Accounting 配置
- 编辑/opt/slurm/etc/slurm.conf,增加下列内容
#
# ACCOUNTING
JobAcctGatherType=jobacct_gather/linux
JobAcctGatherFrequency=30
#
AccountingStorageType=accounting_storage/slurmdbd
AccountingStorageHost=ip-10-0-3-94
AccountingStoragePort=6819
#AccountingStorageLoc=
#AccountingStoragePass=
#AccountingStorageUser=
[root@ip-10-100-0-216 etc]# systemctl restart slurmctld
- 登录本地集群(on-perm)管理节点,注册集群
- 注册集群,如果报告云端集群(aws)已经注册,请忽略
[root@ip-10-0-3-94 log]# sacctmgr --immediate add cluster Name=on-perm
 Adding Cluster(s)
 Name = on-perm
[root@ip-10-0-3-94 log]# sacctmgr --immediate add cluster Name=aws
[root@ip-10-0-3-94 etc]# sacctmgr show cluster format=cluster,controlhost,controlport
 Cluster ControlHost ControlPort
---------- --------------- ------------
 aws 10.100.0.216 6820
 on-perm 10.0.3.94 6820
-
- 测试多集群作业提交,切换到普通用户 ec2-user
[ec2-user@ip-10-0-3-94 ~]$ vi host_batch
[ec2-user@ip-10-0-3-94 ~]$ chmod a+x host_batch
[ec2-user@ip-10-0-3-94 ~]$ cat host_batch
#!/bin/bash
#
#SBATCH --job-name=hostname_sleep_sample
#SBATCH --output=out_%j.txt
#
#SBATCH --nodes=1

srun hostname
sleep 60
[ec2-user@ip-10-0-3-94 ~]$ sbatch host_batch
Submitted batch job 2
[ec2-user@ip-10-0-3-94 ~]$ squeue
 JOBID PARTITION NAME USER ST TIME NODES NODELIST(REASON)
 2 compute hostname ec2-user R 0:05 1 compute-st-t2micro-1
[ec2-user@ip-10-0-3-94 ~]$ sacct
 JobID JobName Partition Account AllocCPUS State ExitCode
------------ ---------- ---------- ---------- ---------- ---------- --------
2 hostname_+ compute 1 RUNNING 0:0
2.batch batch 1 RUNNING 0:0
2.0 hostname 1 COMPLETED 0:0
-
-
- 提交到云端集群(aws),使用-M指定集群。注意 squeue 和 sacct 也需要指定-M 参数才可以看到作业在云端集群(aws)的执行情况
[ec2-user@ip-10-0-3-94 ~]$ sbatch -M aws host_batch
Submitted batch job 2 on cluster aws
[ec2-user@ip-10-0-3-94 ~]$ squeue
 JOBID PARTITION NAME USER ST TIME NODES NODELIST(REASON)
[ec2-user@ip-10-0-3-94 ~]$ squeue -M aws
CLUSTER: aws
 JOBID PARTITION NAME USER ST TIME NODES NODELIST(REASON)
 2 compute hostname ec2-user CF 0:10 1 compute-dy-t2micro-1
[ec2-user@ip-10-0-3-94 ~]$ sacct -M aws
 JobID JobName Partition Account AllocCPUS State ExitCode
------------ ---------- ---------- ---------- ---------- ---------- --------
2 hostname_+ compute 1 RUNNING 0:0
- 建立集群 Federation 联合
[root@ip-10-0-3-94 ~]# sacctmgr add federation cloudburst clusters=on-perm,aws
 Adding Federation(s)
 cloudburst
 Settings
 Cluster = on-perm
 Cluster = aws
Would you like to commit changes? (You have 30 seconds to decide)
(N/y): y
[root@ip-10-0-3-94 ~]# sacctmgr show federation
Federation Cluster ID Features FedState
---------- ---------- -- -------------------- ------------
cloudburst aws 2 ACTIVE
cloudburst on-perm 1 ACTIVE
- 提交测试作业,检查在 Federation 的执行情况
[ec2-user@ip-10-0-3-94 ~]$ sbatch host_batch
Submitted batch job 67108870

...
Submitted batch job 67108871
Submitted batch job 67108872
-
- 检查作业情况,可以看到已经有作业在本地集群开始执行
[ec2-user@ip-10-0-3-94 ~]$ squeue --federation
 JOBID PARTITION NAME USER ST TIME NODES NODELIST(REASON)
 67108872 compute hostname ec2-user CF 0:31 1 compute-dy-t2micro-1
 67108873 compute hostname ec2-user CF 0:23 1 compute-dy-t2micro-3
 67108874 compute hostname ec2-user CF 0:23 1 compute-dy-t2micro-4
 67108875 compute hostname ec2-user CF 0:23 1 compute-dy-t2micro-5
 67108876 compute hostname ec2-user CF 0:17 1 compute-dy-t2micro-6
 67108877 compute hostname ec2-user CF 0:17 1 compute-dy-t2micro-7
 67108878 compute hostname ec2-user CF 0:16 1 compute-dy-t2micro-8
 67108869 compute hostname ec2-user R 0:05 1 compute-dy-t2micro-2
 67108870 compute hostname ec2-user R 0:32 1 compute-st-t2micro-1
 67108871 compute hostname ec2-user R 0:32 1 compute-st-t2micro-2
[ec2-user@ip-10-0-3-94 ~]$ sinfo --federation
PARTITION CLUSTER AVAIL TIMELIMIT NODES STATE NODELIST
compute* aws up infinite 7 alloc# compute-dy-t2micro-[1,3-8]
compute* aws up infinite 2 idle~ compute-dy-t2micro-[9-10]
compute* on-perm up infinite 2 alloc compute-st-t2micro-[1-2]
compute* aws up infinite 1 alloc compute-dy-t2micro-2
-
- 检查云端 集群的 EC2,发现已经有 EC2开始启动,并作为计算节点加入集群
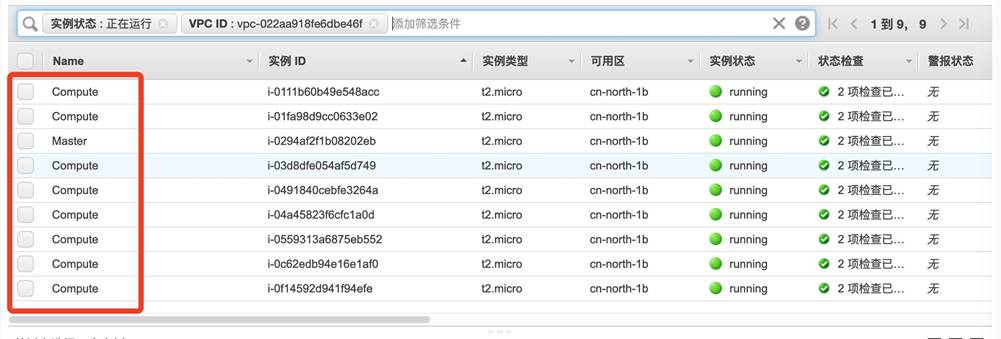
-
- 检查最终运行情况,当本地资源不足的情况,作业会在云端集群分配计算节点并执行
[ec2-user@ip-10-0-3-94 ~]$ sacct --federation -o JobID,JobName,State,Cluster,NodeList
 JobID JobName State Cluster NodeList
------------ ---------- ---------- ---------- ---------------
2 hostname_+ COMPLETED on-perm compute-st-t2m+
2.batch batch COMPLETED on-perm compute-st-t2m+
2.0 hostname COMPLETED on-perm compute-st-t2m+
67108867 hostname_+ COMPLETED on-perm compute-st-t2m+
67108867.ba+ batch COMPLETED on-perm compute-st-t2m+
67108867.0 hostname COMPLETED on-perm compute-st-t2m+
67108868 hostname_+ COMPLETED on-perm compute-st-t2m+
67108868.ba+ batch COMPLETED on-perm compute-st-t2m+
67108868.0 hostname COMPLETED on-perm compute-st-t2m+
67108869 hostname_+ COMPLETED aws compute-dy-t2m+
67108869.ba+ batch COMPLETED aws compute-dy-t2m+
67108869.0 hostname COMPLETED aws compute-dy-t2m+
67108870 hostname_+ COMPLETED on-perm compute-st-t2m+
67108870.ba+ batch COMPLETED on-perm compute-st-t2m+
67108870.0 hostname COMPLETED on-perm compute-st-t2m+
67108871 hostname_+ COMPLETED on-perm compute-st-t2m+
67108871.ba+ batch COMPLETED on-perm compute-st-t2m+
67108871.0 hostname COMPLETED on-perm compute-st-t2m+
67108872 hostname_+ COMPLETED aws compute-dy-t2m+
67108872.ba+ batch COMPLETED aws compute-dy-t2m+
67108872.0 hostname COMPLETED aws compute-dy-t2m+
67108873 hostname_+ COMPLETED aws compute-dy-t2m+
67108873.ba+ batch COMPLETED aws compute-dy-t2m+
67108873.0 hostname COMPLETED aws compute-dy-t2m+
67108874 hostname_+ COMPLETED aws compute-dy-t2m+
67108874.ba+ batch COMPLETED aws compute-dy-t2m+
67108874.0 hostname COMPLETED aws compute-dy-t2m+
67108875 hostname_+ COMPLETED aws compute-dy-t2m+
67108875.ba+ batch COMPLETED aws compute-dy-t2m+
67108875.0 hostname COMPLETED aws compute-dy-t2m+
67108876 hostname_+ COMPLETED aws compute-dy-t2m+
67108876.ba+ batch COMPLETED aws compute-dy-t2m+
67108876.0 hostname COMPLETED aws compute-dy-t2m+
67108877 hostname_+ COMPLETED aws compute-dy-t2m+
67108877.ba+ batch COMPLETED aws compute-dy-t2m+
67108877.0 hostname COMPLETED aws compute-dy-t2m+
67108878 hostname_+ COMPLETED aws compute-dy-t2m+
67108878.ba+ batch COMPLETED aws compute-dy-t2m+
67108878.0 hostname COMPLETED aws compute-dy-t2m+
参考资料:
本篇作者