- AWS Builder Center›
- builders.flash
AWS Infrastructure Composer で実現するサーバーレス開発の現場革命
2024-08-15 | Author : 三浦 信二
はじめに
みなさんこんにちは。シニアテクニカルインストラクターの三浦です。普段はお客様向けに AWS をより広く、深く学んでいただけるように主に開発者向けの有償トレーニングを提供しています。前職まではソフトウェアエンジニアでしたので、アプリケーション設計や実装、マネジメントなどをしていました。開発、楽しいですよね !
余談ですが、私はゲームが大好きなので仕事が終わるとだいたいゲームしています。最近ハマっているゲームはゼンレスゾーンゼロ (ZZZ) です。
本記事の目的
-
実践を通じて VS Code と AWS Infrastructure Composer の使い方を知る
-
AWS Infrastructure Composer のローコードおよびローカル IDE 統合の強みが理解できる
-
サーバーレスのローカル開発環境の構築と開発方法が分かる
※ AWS Application Composer は AWS Infrastructure Composer に名称変更が行われました。そのため、記事中のアニメーション、スクリーンショットでのサービス名称は旧名称のままとなります。ご了承ください。
builders.flash メールメンバー登録
builders.flash メールメンバー登録で、毎月の最新アップデート情報とともに、AWS を無料でお試しいただけるクレジットコードを受け取ることができます。
サーバーレス開発の現状と課題
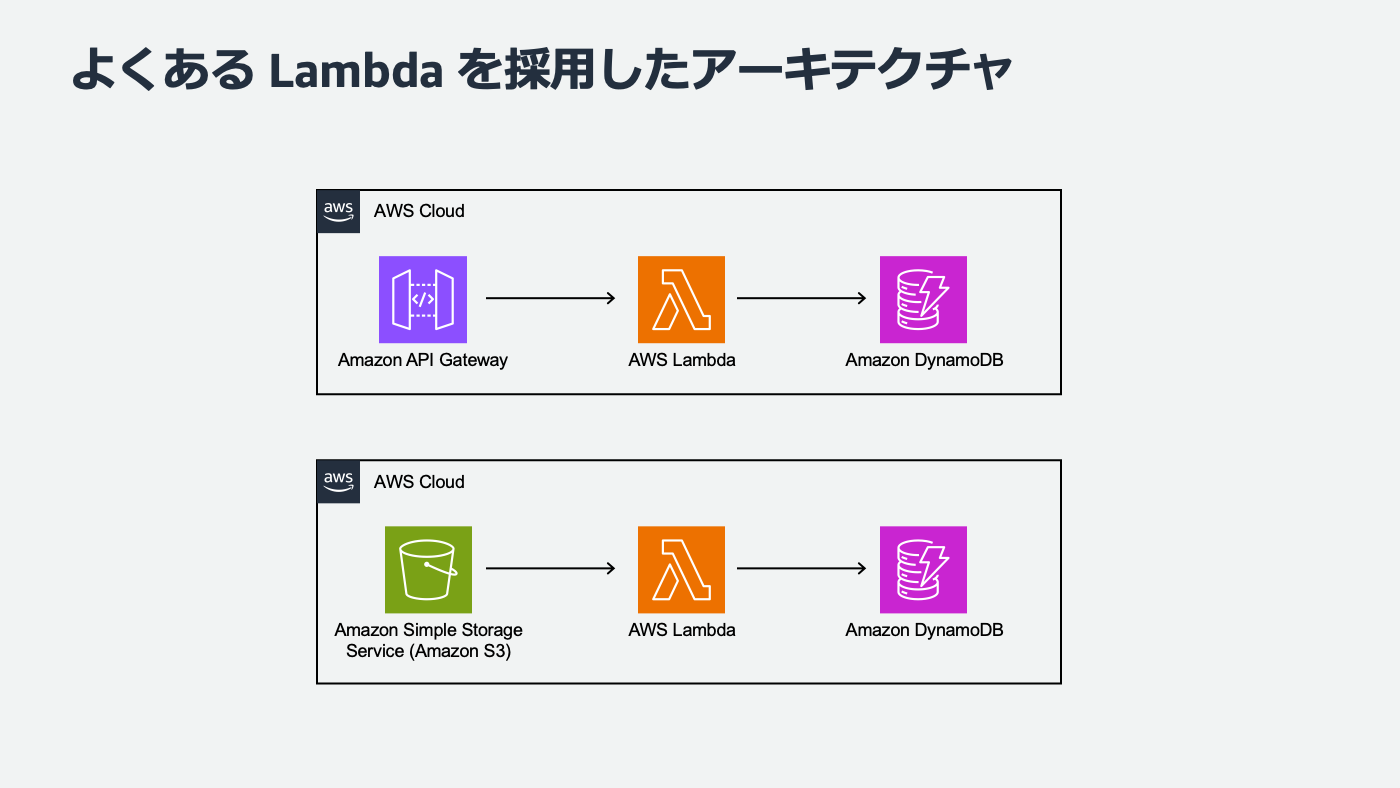
さて、AWS で開発、コンピューティングというと Amazon EC2 やコンテナ、サーバーレスなど様々な選択肢があります。私はインフラ管理をお任せできるという点でサーバーレス、特に AWS Lambda をよく使います。みなさんはサーバーレスサービスを使われていますか ? 例えば API として使ったり、ファイルがアップロードされたら発火するようなイベント駆動アーキテクチャで採用することも多いのではないでしょうか。
よくある Lambda を採用したアーキテクチャ
Lambda に関するよくあるお悩み
私はサーバーレスのトレーニングも担当しているのですが、よくお客様からこんなお悩み相談をいただきます。
-
Lambda は便利そうだけど、よくわからなくて結局 EC2 インスタンスを立ててプログラムを実行しています
-
Lambda 関数で実行するソースコードを、関数ごとに管理するのが大変
-
デプロイが 毎回 CLI で S3 にアップロードしていて面倒
-
開発環境や本番環境ごとに環境を分離管理するのも大変
-
AWS 環境上でテストやデバッグするのが怖い(コストや本番環境への影響など)
-
などなど・・・
たしかに、私も最初 Lambda を初めて触ったときはマネジメントコンソールでコードをデプロイしていました。ちょっと修正するたびに CLI でビルドして、zip 圧縮して、デプロイして、マネジメントコンソール上で動作確認して・・・たしかに大変ですよね。
もしまだみなさんが上述した開発プロセスをしている、もしくはイメージしているのでしたら今回の記事はお役に立てるかもしれません。これはまさにサーバーレス開発の現場革命です。今は、これらの課題を解決してくれる便利なサービスがたくさんあるんです。
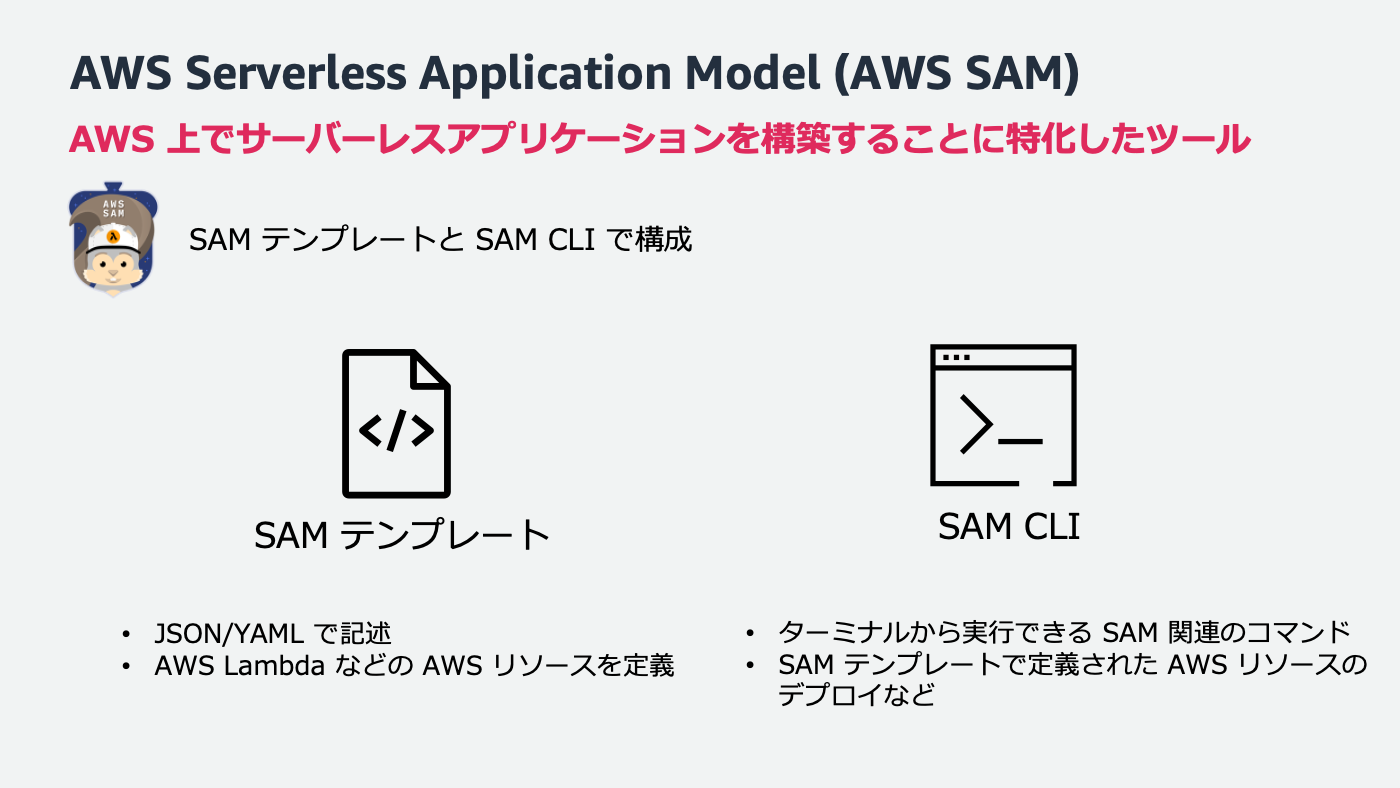
AWS Serverless Application Model (AWS SAM) の紹介
まずは AWS SAM (サーバーレスアプリケーションモデル) です。SAM は コンテナ Lambda を AWS SAM でデプロイしよう ! ~コンテナ利用者に捧げる AWS Lambda の新しい開発方式 ! ~ 第 4 回 で使い方も含めて詳しく解説していますので、そちらもご参照ください。公式ドキュメントには チュートリアル もありますので、使い方がわからなくなったらご参照ください。ここでは簡単に概要をお話しますね。
SAM は大きく「SAM テンプレート」と「SAM CLI」の 2 つの機能があります。
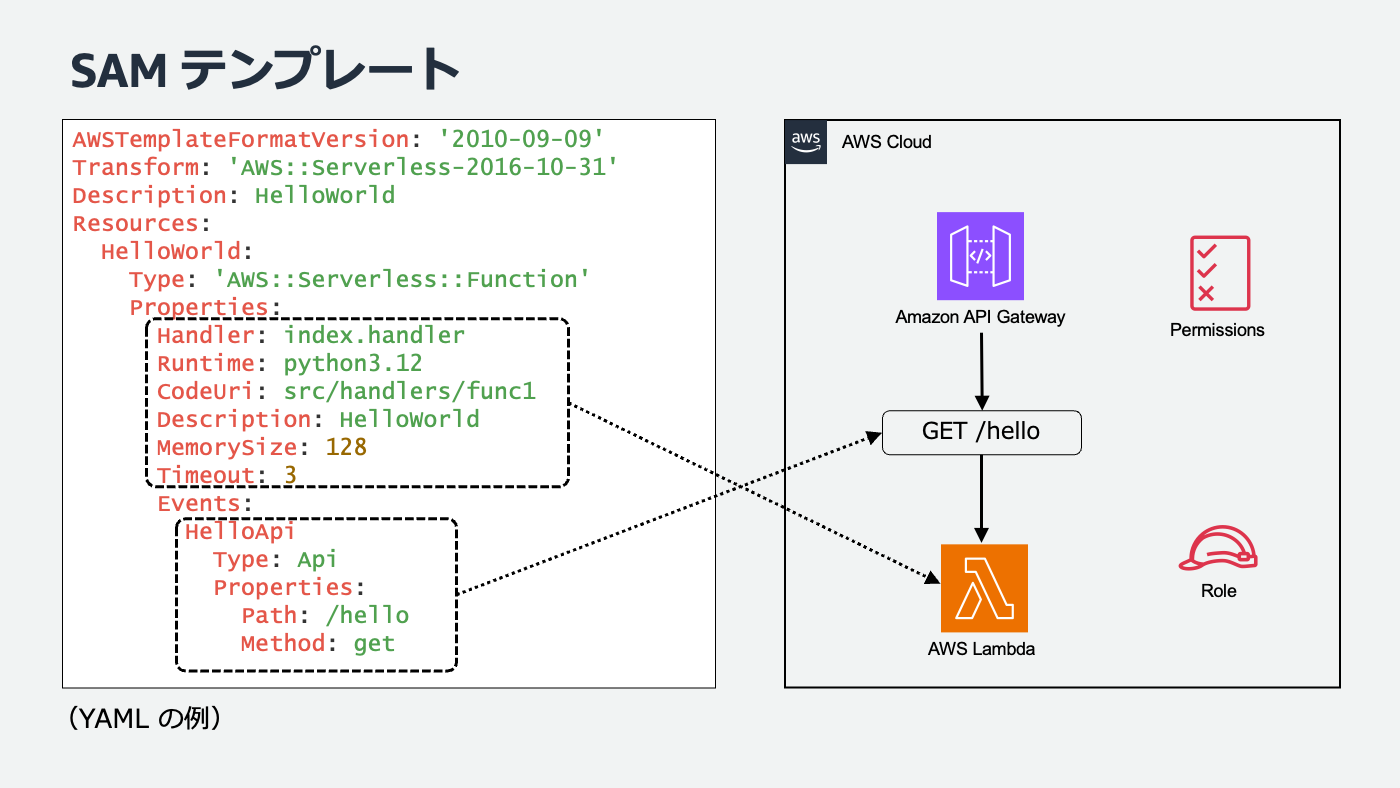
SAM テンプレート
SAM テンプレートは AWS CloudFormation の拡張機能で、サーバーレスリソースをよりシンプルに記述・実装できます。
これは API を作成している例です。Amazon API Gateway と Lambda を統合しています。加えて、必要な権限や IAM ロールもよしなに作成してくれるんです。これだけの内容を数行で実現できるのは嬉しいですよね!
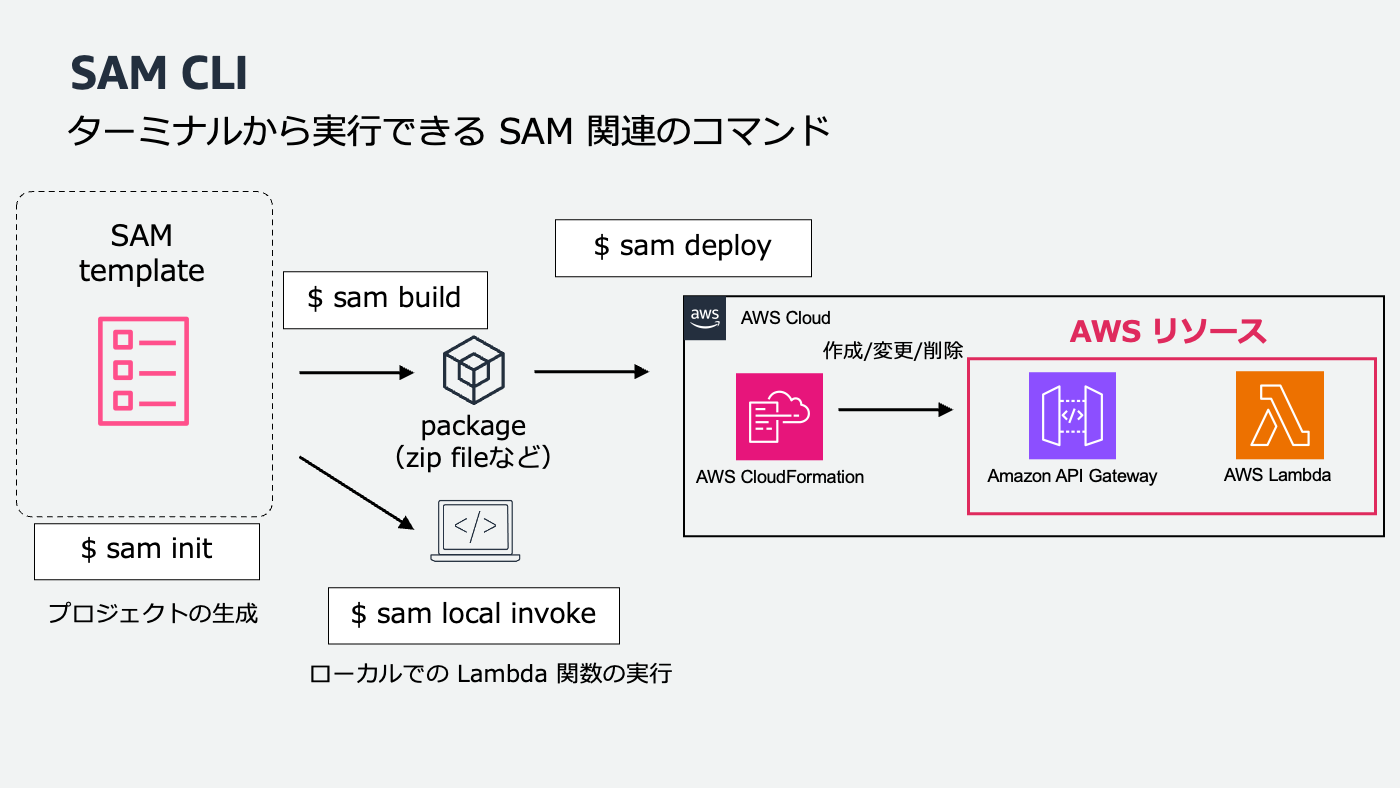
SAM CLI
そして、SAM テンプレートでインフラ周りをコード化したら、Lambda 関数のコードを実装します。ビルド、動作確認、テストをしてデプロイ。これらの作業は SAM CLI の出番です。
SAM の利点
SAM CLI を使って動作確認したり、デプロイしたり、モニタリングしたりなど、様々な便利コマンドがあります。AWS SAM CLI コマンドリファレンス - AWS Serverless Application Model も参照してみてくださいね。
後ほど出てくるサービスと組み合わせて、この後デモでもお見せします !
個人的に SAM の嬉しいところはインフラ定義とコード実装を同じプロジェクトとしてまとめられることです ! Lambda を作る CloudFormation と、各 Lambda 関数のコードを全てバラバラの Git リポジトリで運用するのは大変です。それこそデプロイも一つ一つ実施する必要があります。ですが、SAM なら SAM テンプレートで複数の Lambda を作って、フォルダに各 Lambda 関数を実装し、テストしてデプロイまで同一プロジェクトで完結します。後はこのプロジェクトごと Git リポジトリで管理して、CI/CD に組み込むのもおすすめです。
さて、こんな便利な SAM なのですが、シンプルになったとはいえ、テンプレートの作成ハードルが高いかもしれません。
そんなみなさまにぜひお勧めしたい、とっておきのサービスがあります。この記事の本題ですね !
AWS Infrastructure Composer の紹介
AWS Infrastructure Composer はノーコードツールのようにドラッグアンドドロップでさくさく SAM テンプレートが作れてしまうサービスです。
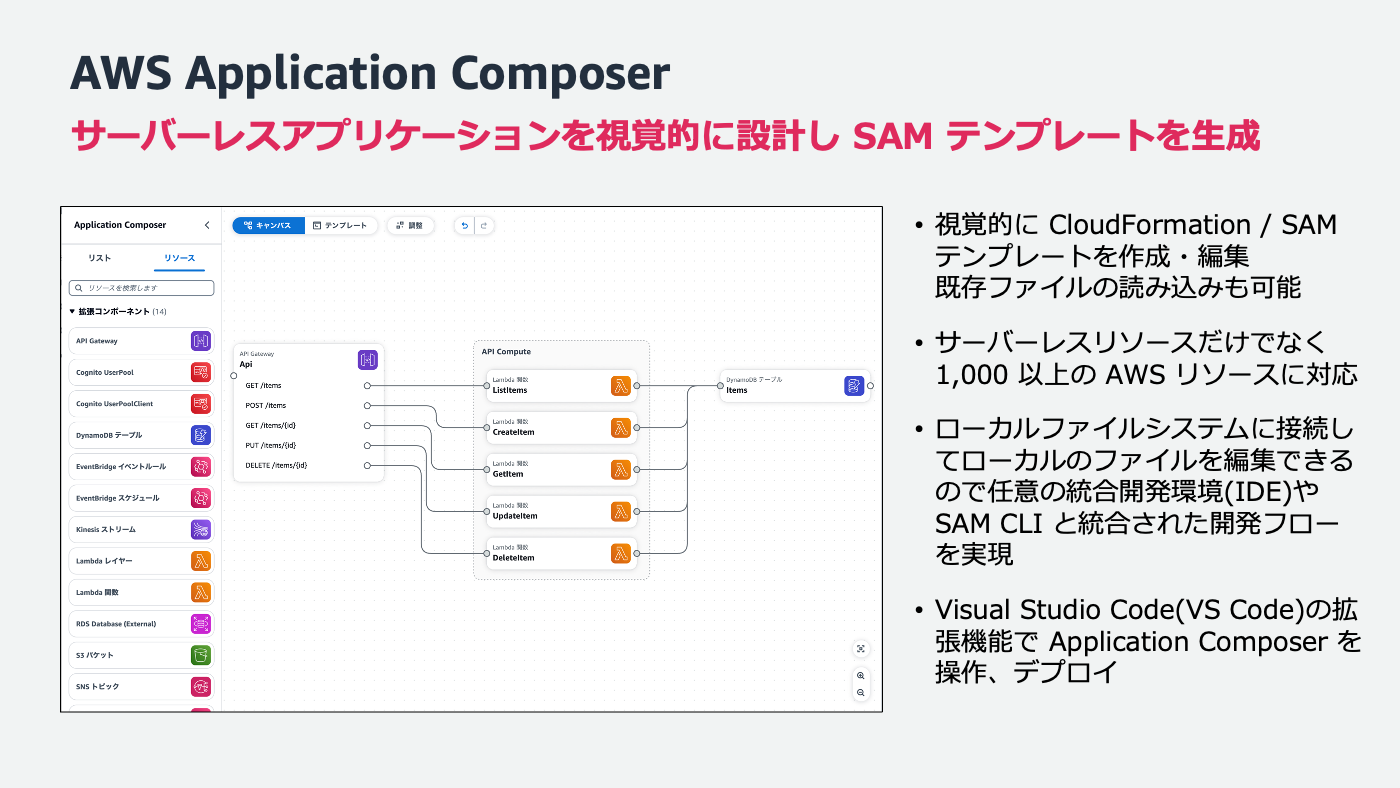
Infrastructure Composerの動作イメージ
イメージとして Infrastructure Composer のサービスにアクセスすると表示される GIF 動画がわかりやすいので持ってきました。

こんな感じで、キャンバスへドラッグアンドドロップするだけでサクサクとサーバーレスの構成が作れちゃうんです。そして、キャンバスで作成した構成を作って終わり、ではなく、実は裏では SAM テンプレートが作られており、編集するたびに内容が同期されています。また、Lambda 関数の名前やランタイム、その他サービスの各種設定も GUI で行えて、必要なポリシーなども自動で作成してくれます。
これなら複数の Lambda 関数を組み合わせた構成も素早く作れますし、何より各サービスの構成が視覚的に繋がりが把握できるのでサーバーレスの設計としても使えそうですよね!これからサーバーレスを開発してみたい方にはぜひ触ってほしいサービスです。
VS Code 上で Infrastructure Composer を使ってローカル開発してみよう
こんな便利な Infrastructure Composer、ブラウザを開いてマネジメントコンソールで使ってもいいのですが、できれば設計だけでなく、SAM テンプレートが作成されたら続けて開発に入りたいですよね。
AWS の開発をする際に IDE を使うことが多いと思いますが、今回は Visual Studio Code(以下 VS Code) を使ってローカル開発をお見せしたいと思います。
ぜひこの記事を読まれている方も、ハンズオンのようにご自身で体験してみてください!
⚠️注意: この記事で紹介するスクリーンショットや動画、自動生成された内容などは執筆時点となります。お手元で動かしたときに機能差異などがあれば読み替えて進めてください。
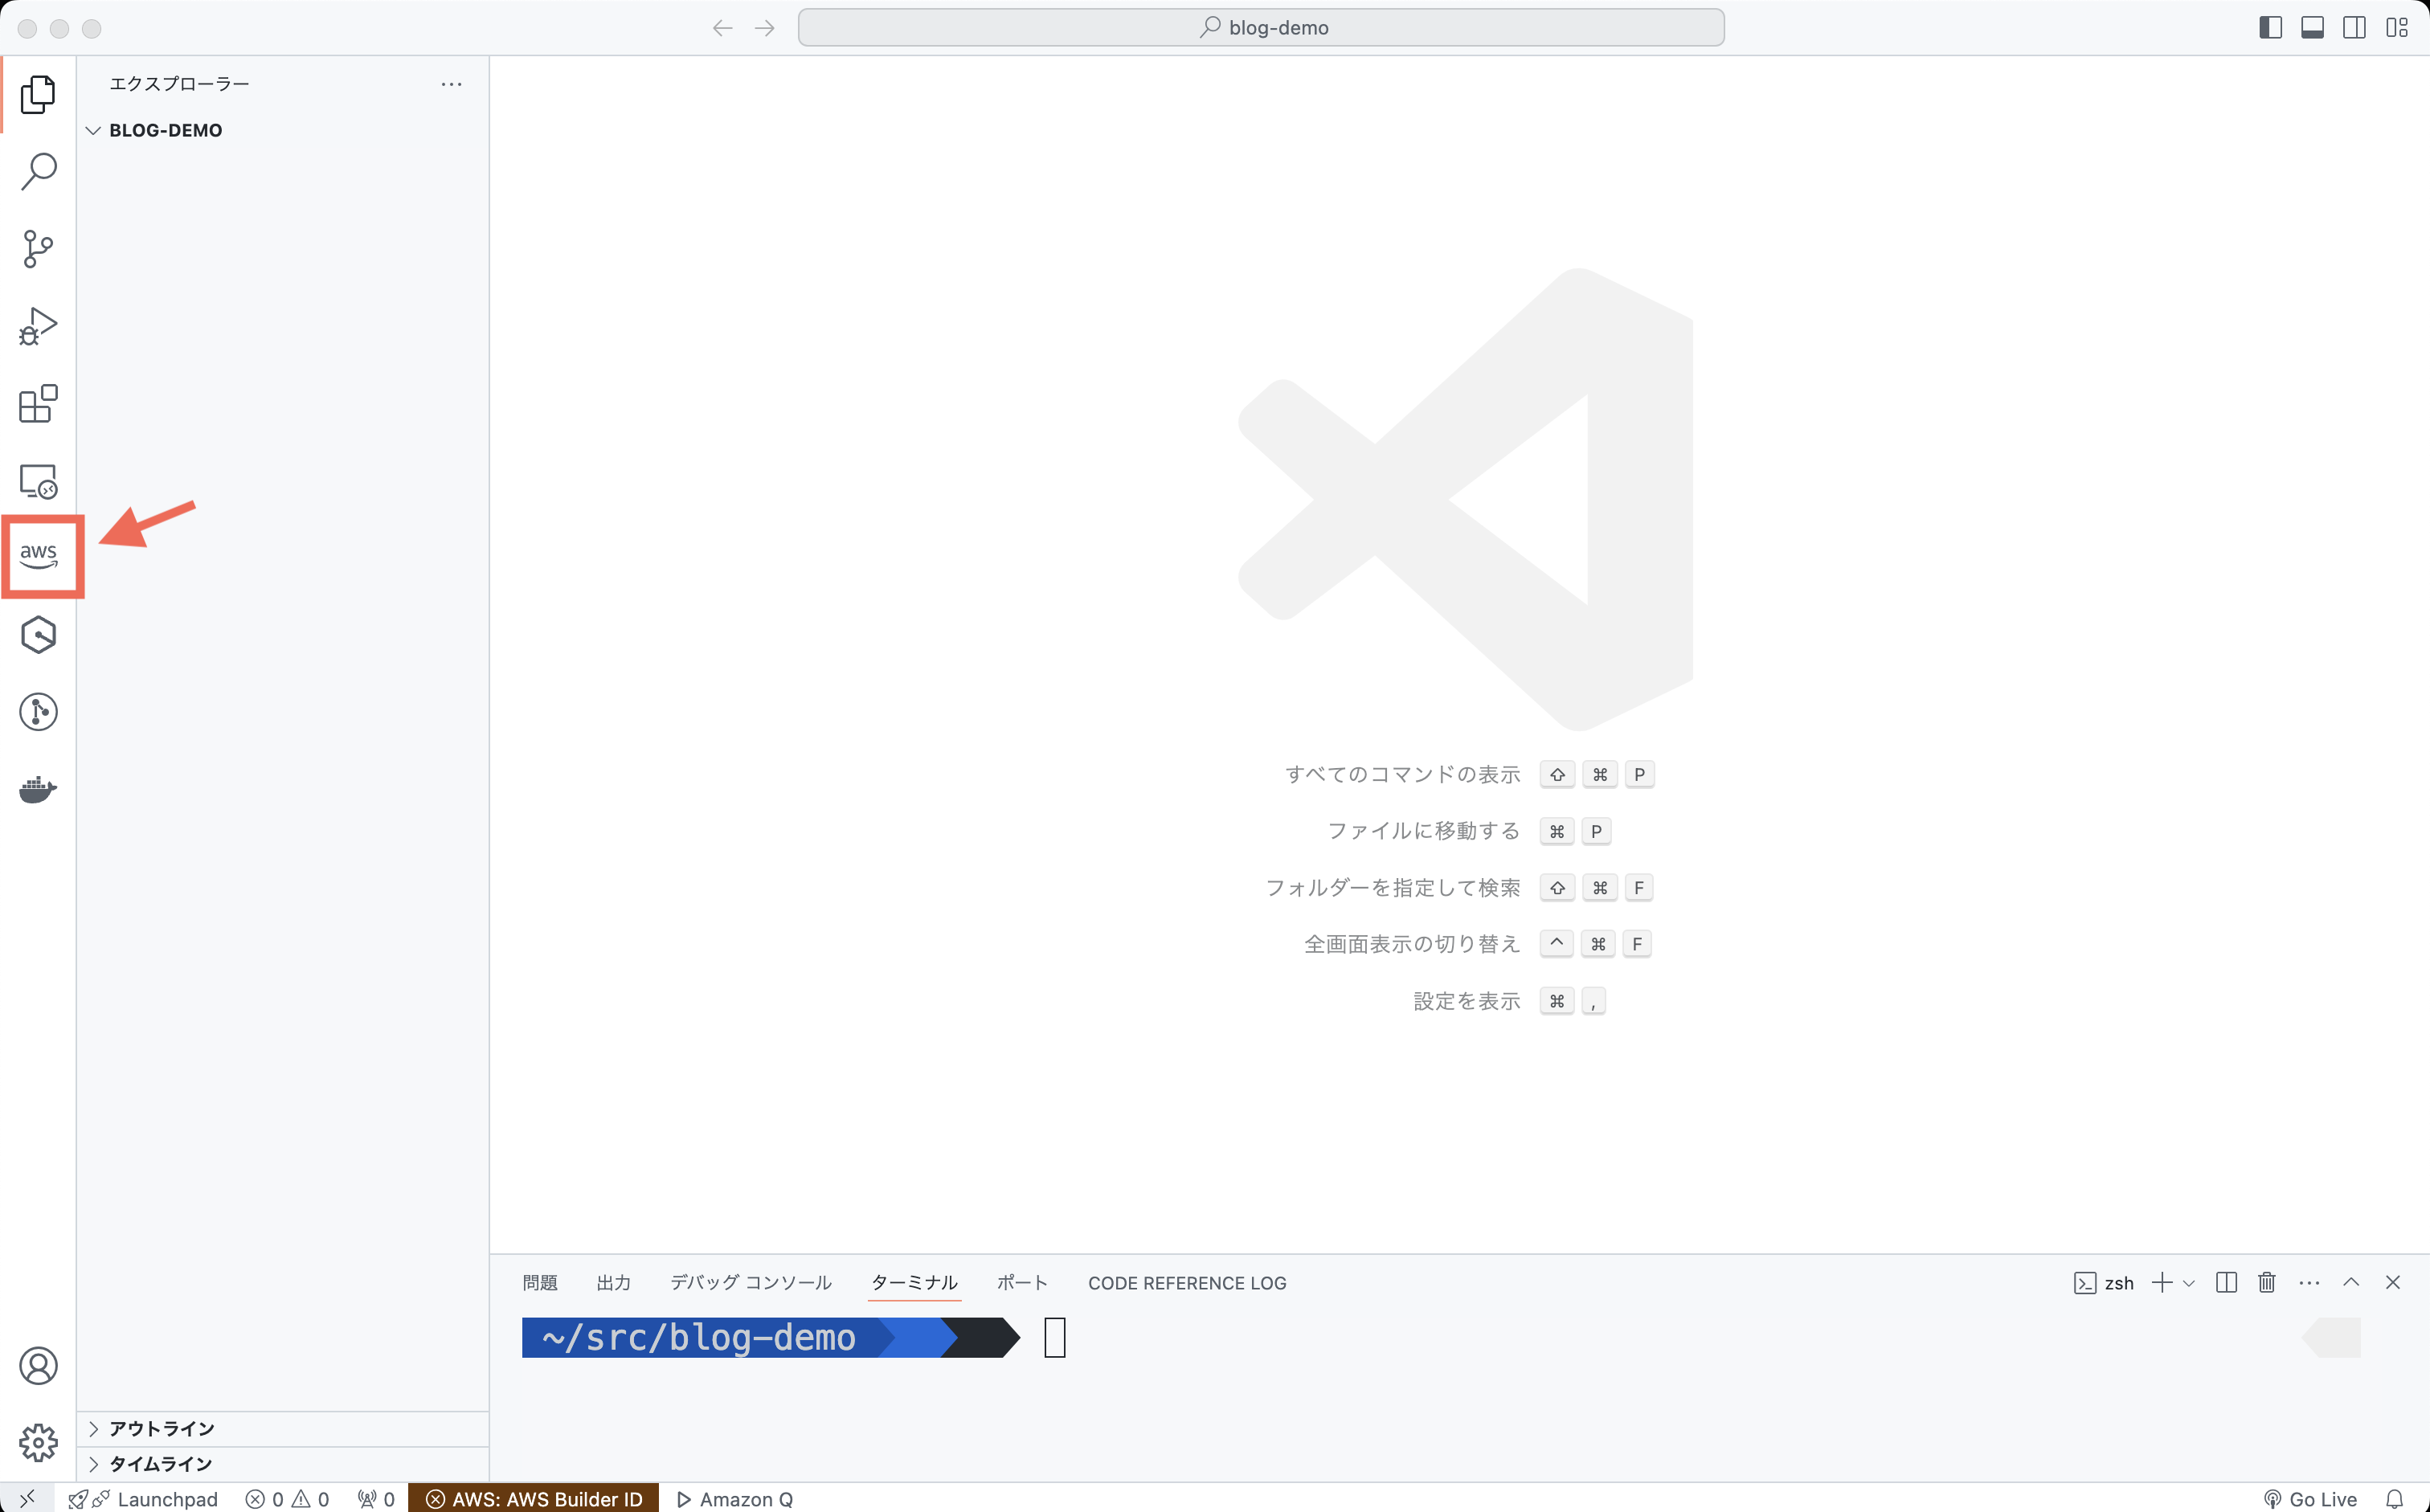
⚠️注意: VS Code の拡張機能「AWS Toolkit for Visual Studio Code」をセットアップしておきましょう。こちらのように「AWS」のアイコンがあれば準備 OK です。
template.yaml を新規作成
では、ローカルで動いている VS Code で Infrastructure Composer を動かしてみましょう!
-
好きなディレクトリを作成し、移動します(今回の例では ~/src/blog-demo です)
-
template.yaml というファイルを新規作成します
-
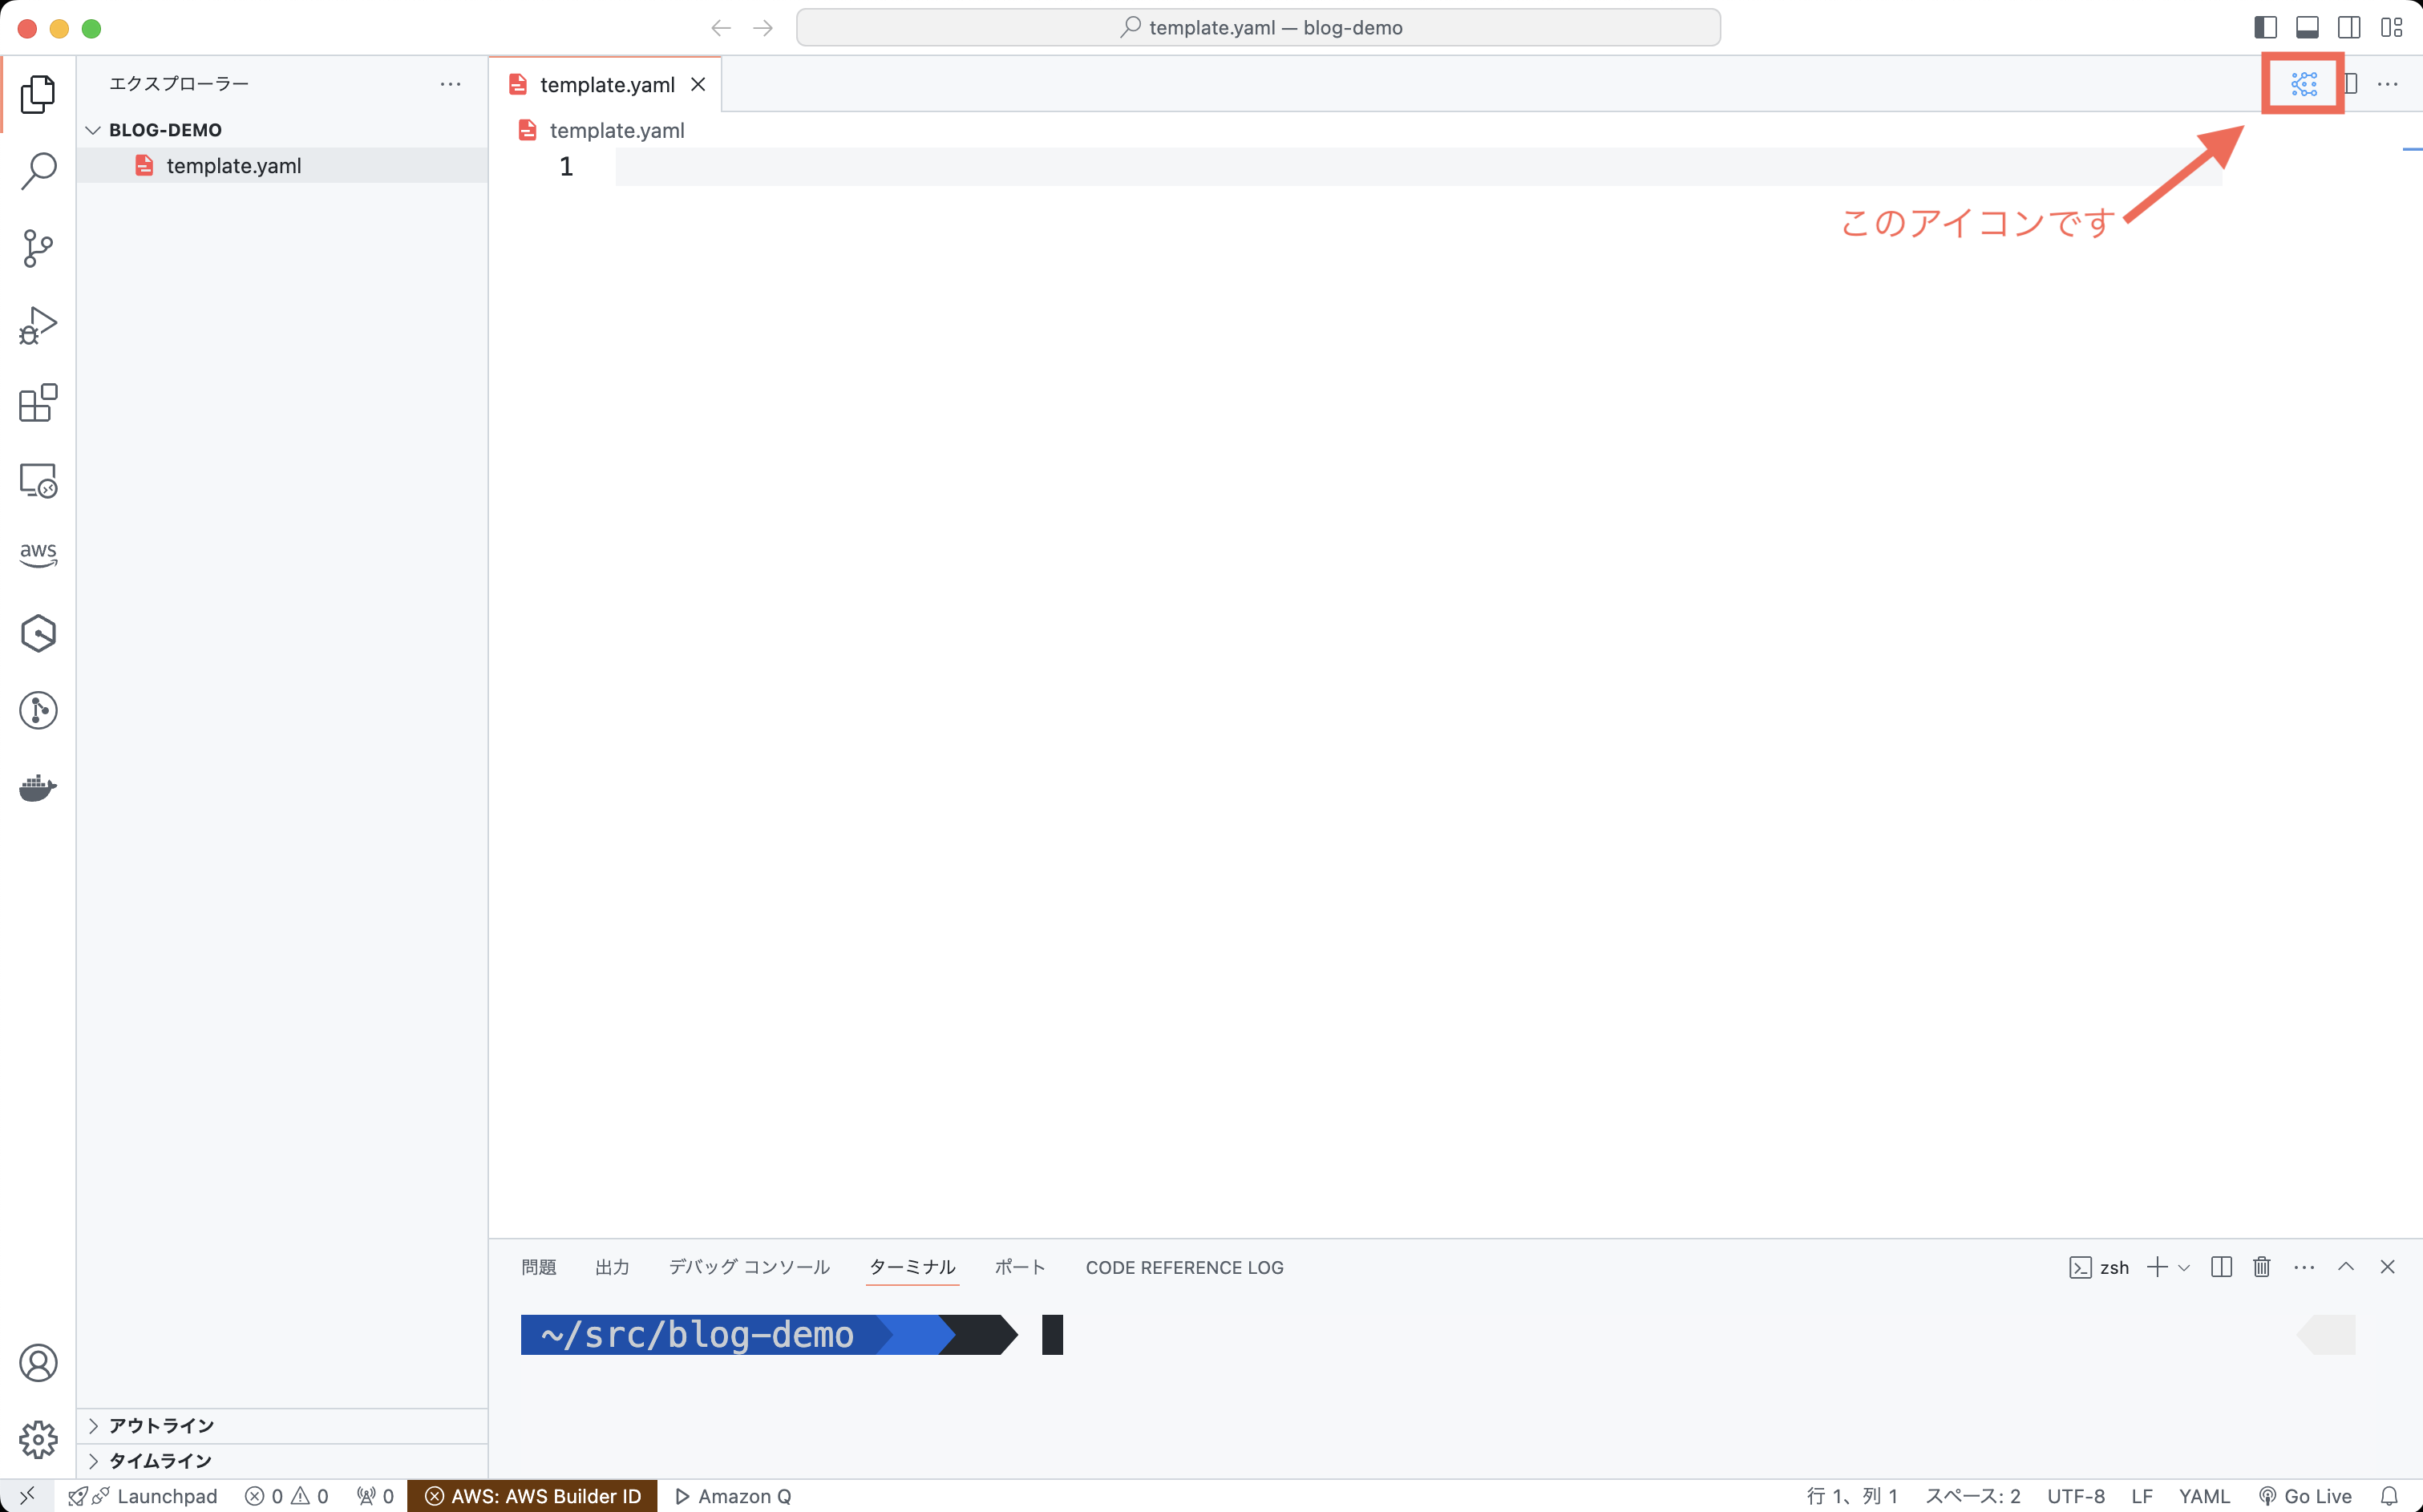
template.yaml をダブルクリックすると、空のファイルが開きます

template.yaml のキャンパスを開く
4.開いた template.yaml の右上に細かい丸と線のアイコンがあるのでクリックします
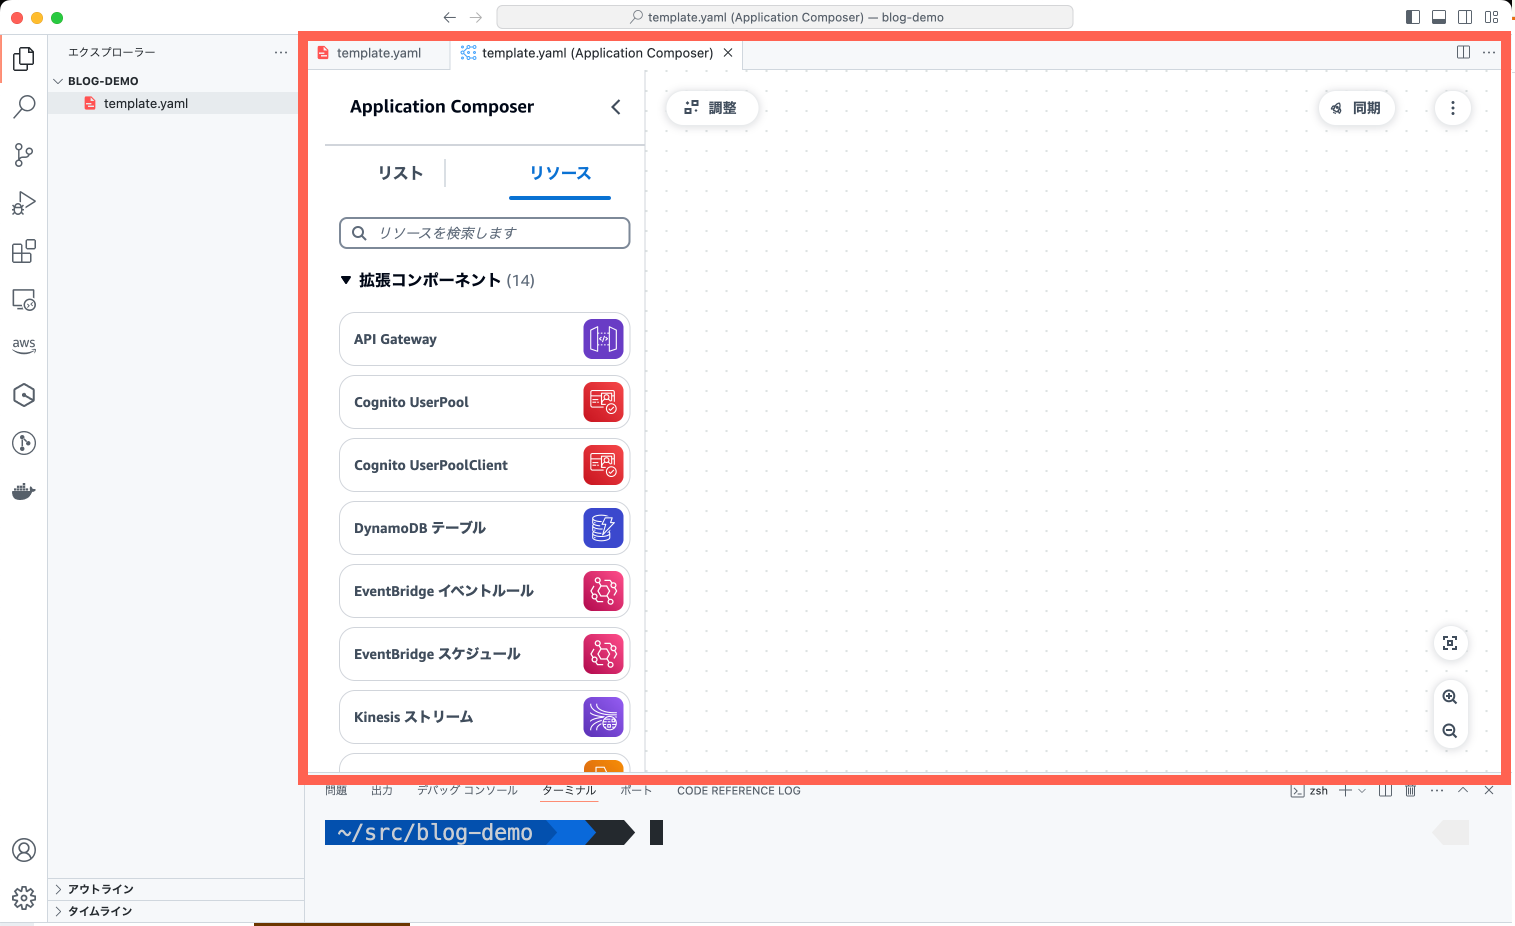
Infrastructure Composer のキャンバス画面
5. すると、先ほど紹介したキャンバスが開きます!これが Infrastructure Composer のキャンバス画面です。
6. 左の各種アイコンをキャンバスへドラッグアンドドロップすれば色々と作れます。リソースの検索もできます。Infrastructure Composer は CloudFormation と統合されているので、サーバーレスリソース以外にも色々なサービスを取り扱えます。
Lambda 関数の設定
7. ためしに Lambda 関数を検索して、ドラッグアンドドロップしてみましょう。クリックすると関数の名前やランタイムなど、各種設定もできます。7. ためしに Lambda 関数を検索して、ドラッグアンドドロップしてみましょう。クリックすると関数の名前やランタイムなど、各種設定もできます。

template.yaml を再度開く
8. そして、左側のメニューに注目してみると、src フォルダができあがっていますね。さらに、先ほど作成した空っぽの template.yaml を開いてみると…

SAM テンプレートが生成されています!Lambda 関数のコードもローカルの src/Function を示していることがわかります。後は handler.py へ実装すれば SAM によるサーバーレス環境構築の完成です !
詳しくは AWS のリソース構築の自動化に取り組んでみよう ! ~ AWS CloudFormation テンプレートの効率的な作成方法 の「5. AWS Infrastructure Composer の活用」を見てみてください。アニメーションもあるのでイメージがしやすいです。
まずはここで一区切りしましょう。VS Code の拡張機能、凄いですね ! マネジメントコンソールにアクセスしなくてもローカルで同様のことができて便利なことが伝わりますでしょうか。
サーバーレスアプリのローカル開発をお見せします
Infrastructure Composer で SAM テンプレートを作成できることがわかりました。ここまではいわゆる IaC ですよね。この記事はさらに発展して開発プロセスも紹介したいので、ちょっとしたサーバーレスアプリを開発してみましょう !
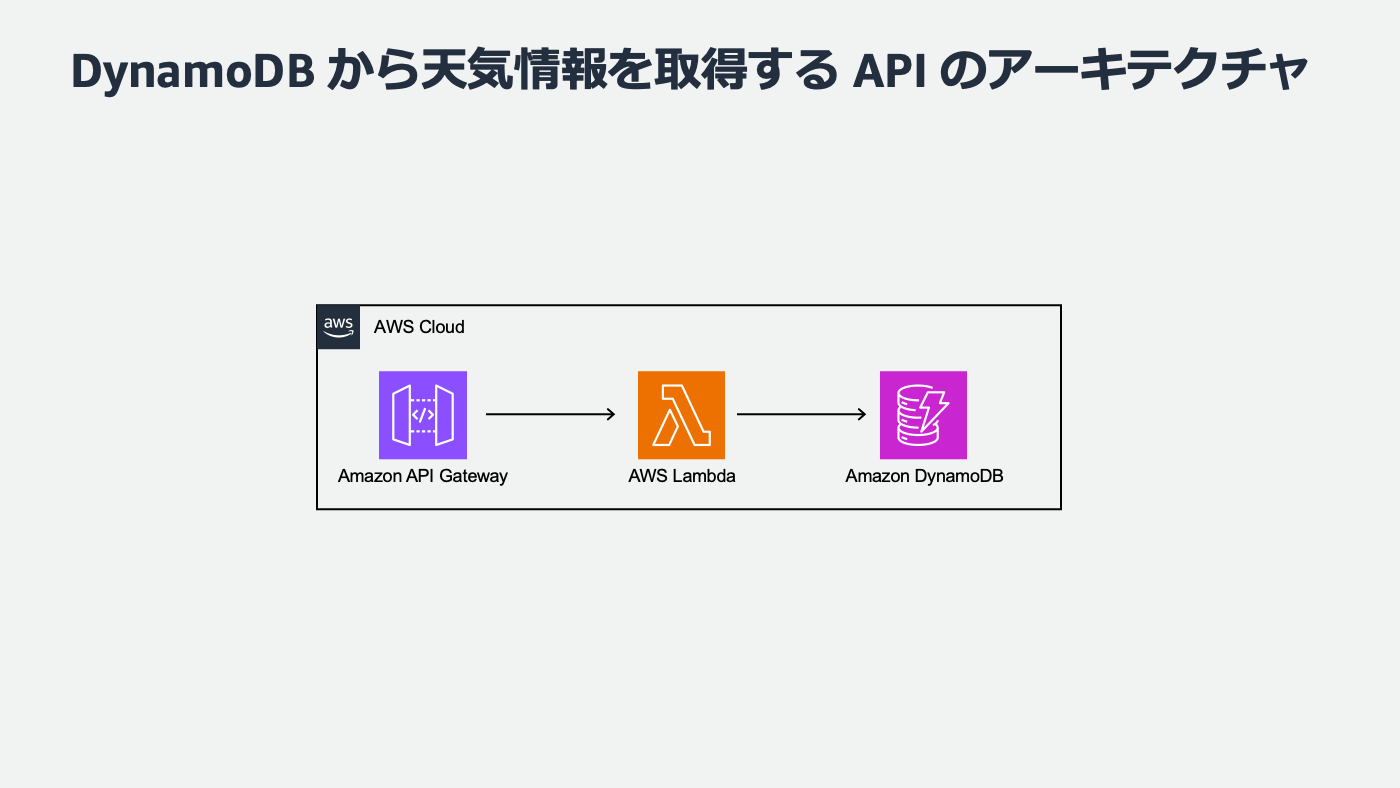
今回はシンプルに Lambda から Amazon DynamoDB を呼び出し、格納されている天気情報を返却する API を作ってみようと思います。下記の API Gateway → Lambda → DynamoDB の構成ですね。
では、まずは Lambda 関数、DynamoDB、API Gateway を Infrastructure Composer で作成してみましょう。名前なども好きに決めていただいて問題ありません。今回の例では
-
Lambda 関数
-
関数名 : WeatherFunction
-
ランタイム : Python 3.12
-
-
DynamoDB
-
テーブル名 : Weather
-
パーティションキー : CityCode
-
ソートキー : Date
-
-
API Gateway
-
API名 : WeatherApi
-
パス : /
-
という構成にしました。
Infrastructure Composer でインフラストラクチャを作成
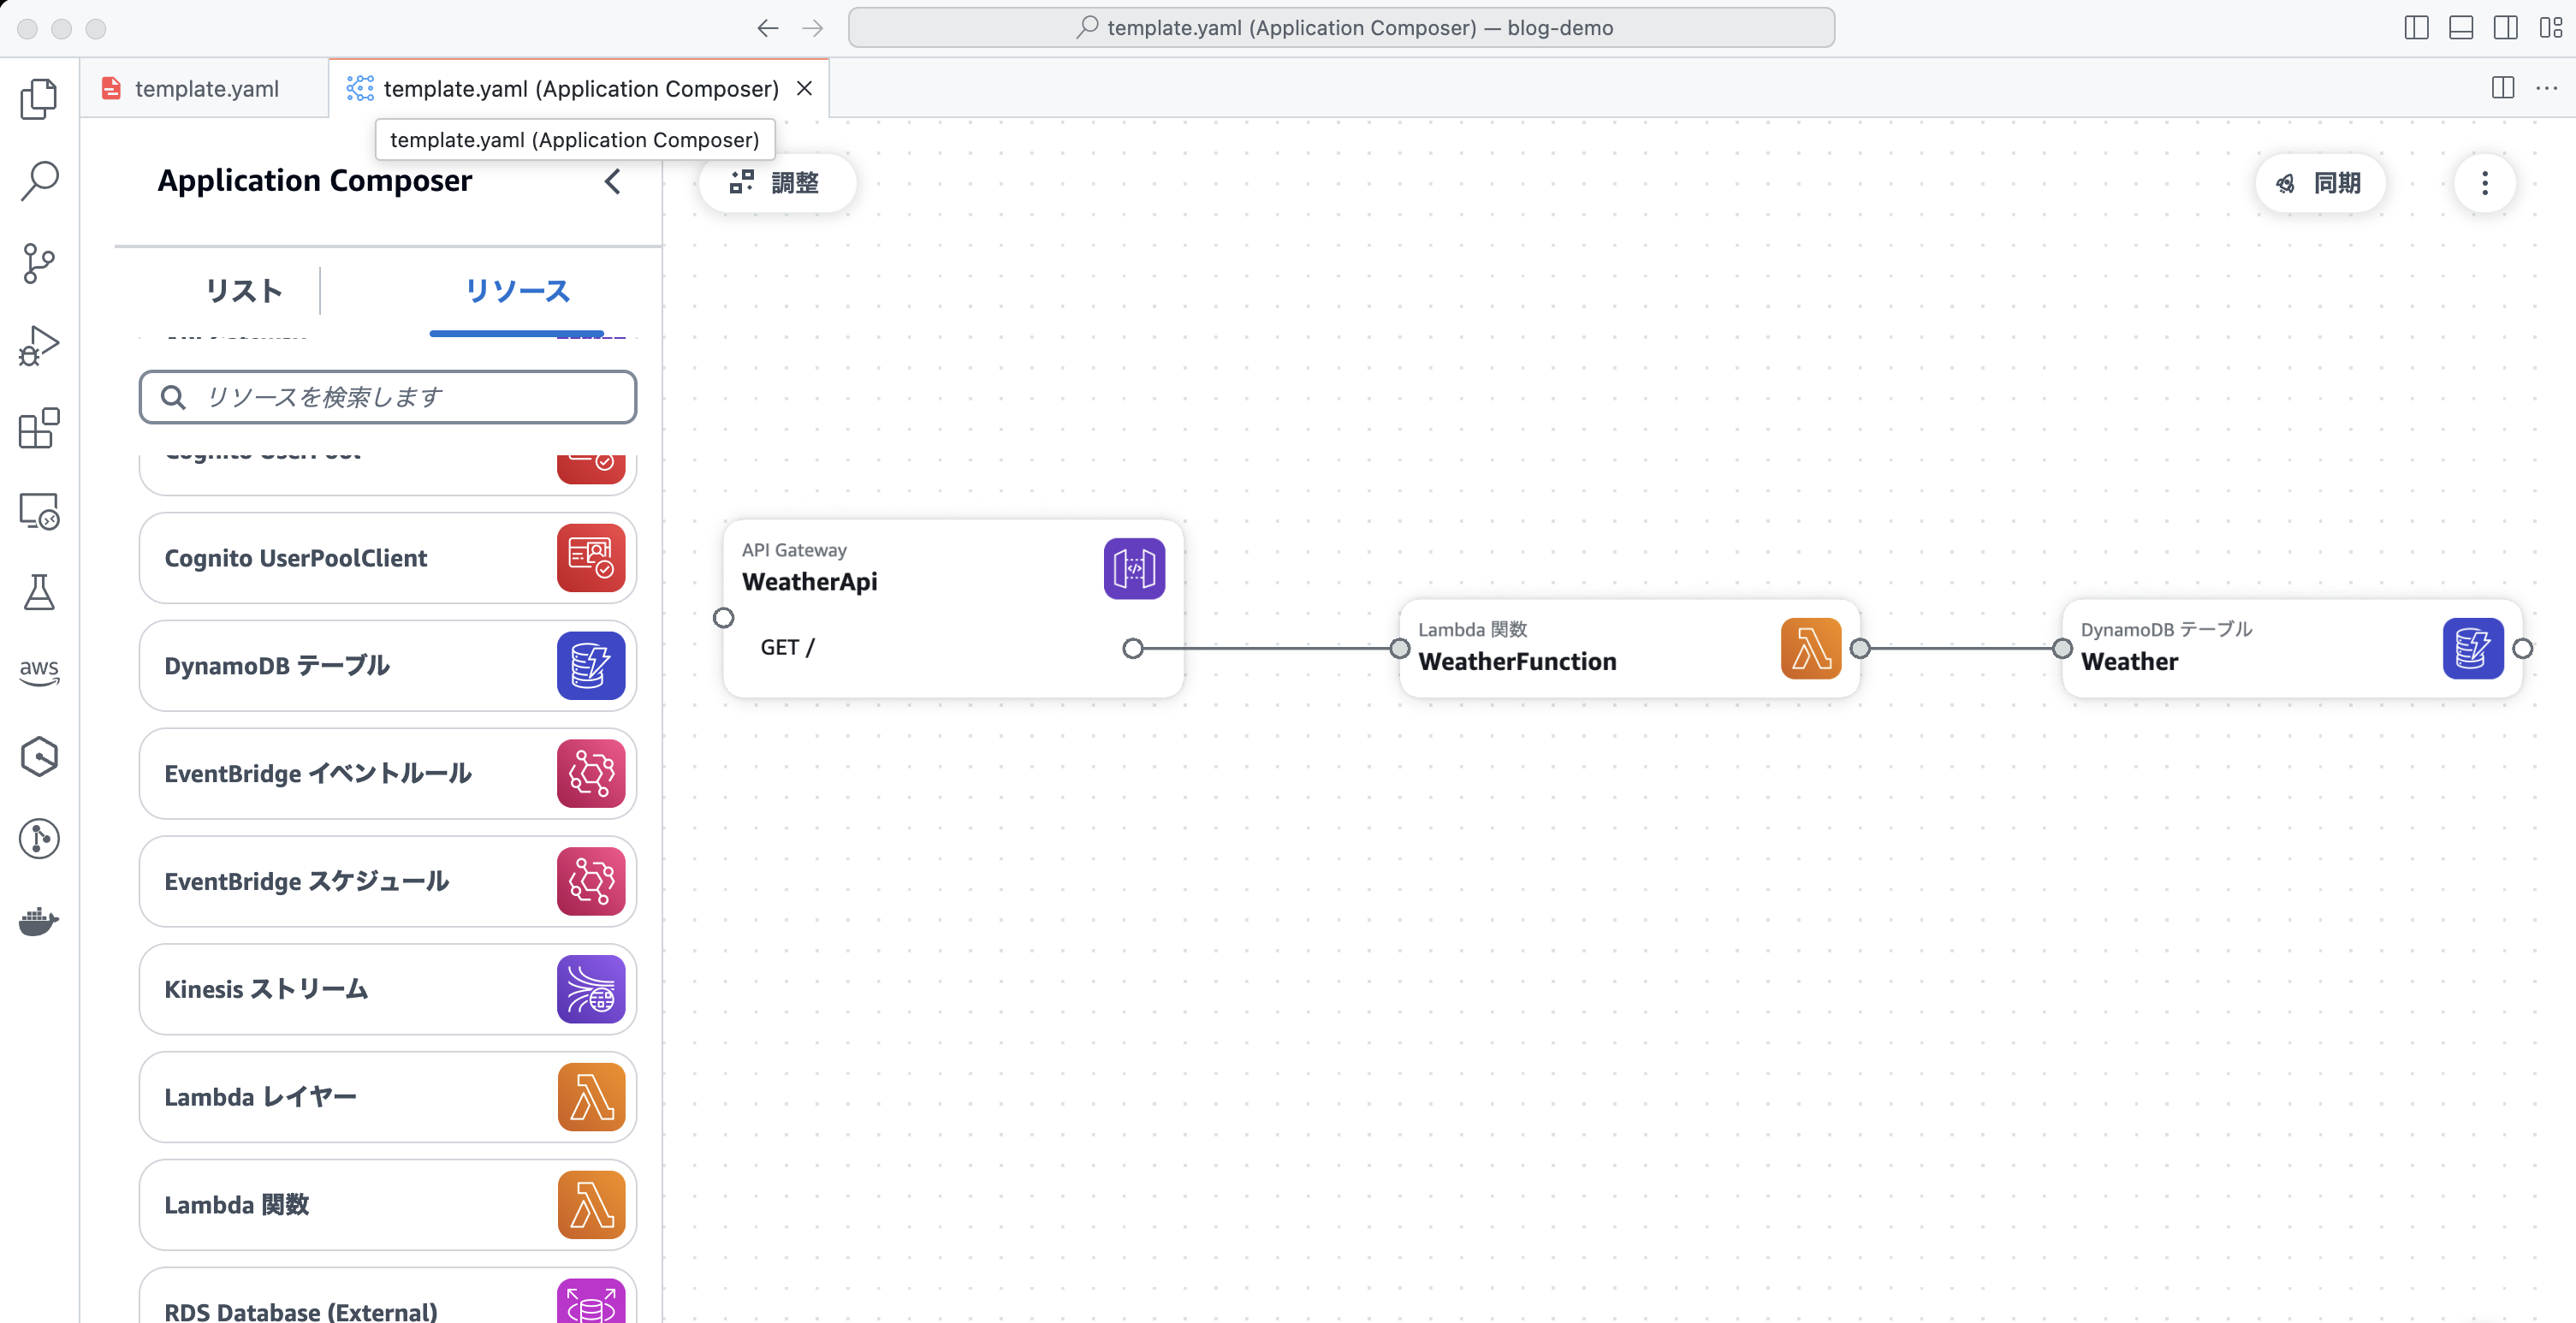
では Infrastructure Composer から始めましょう。各サービスそれぞれをドラッグアンドドロップしたら API Gateway → Lambda → DynamoDB と線で繋いでみましょう。
環境変数とポリシー
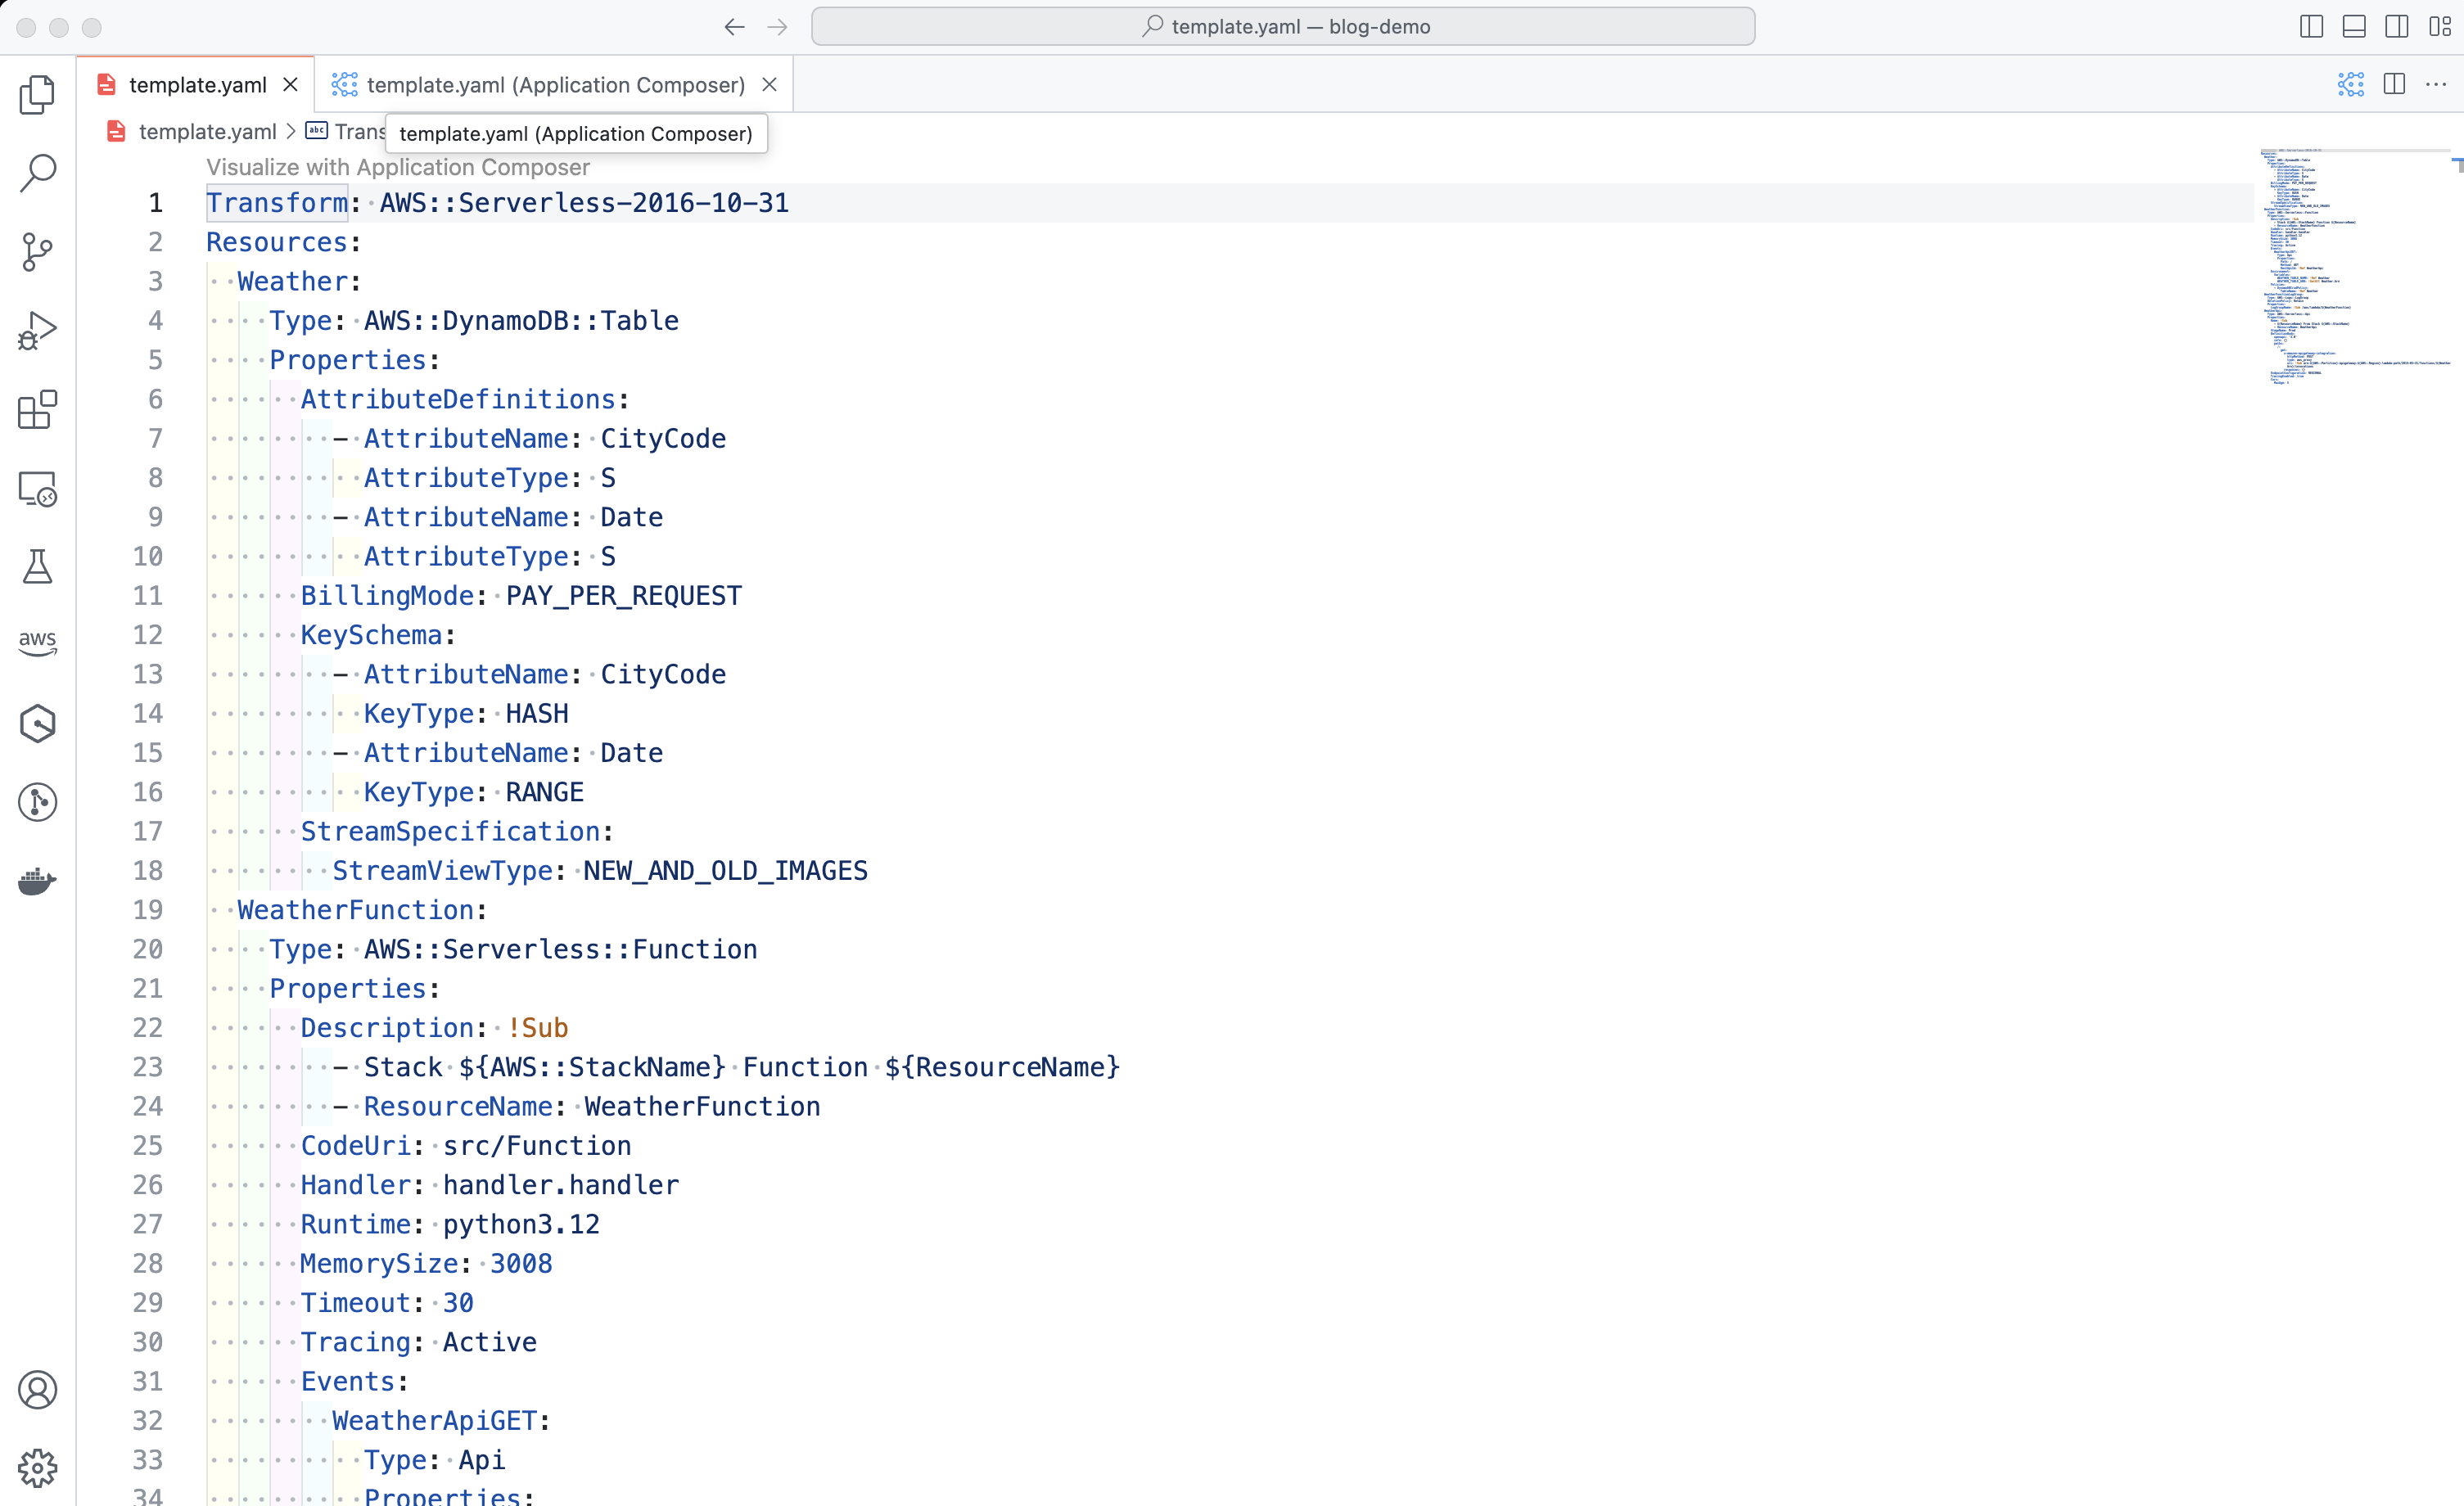
テンプレートファイルを開いてみると 71 行のファイルになっていました。
⚠️注意: 作り方などに影響してみなさんとは行数が異なるかもしれませんが気にせず進めてください。
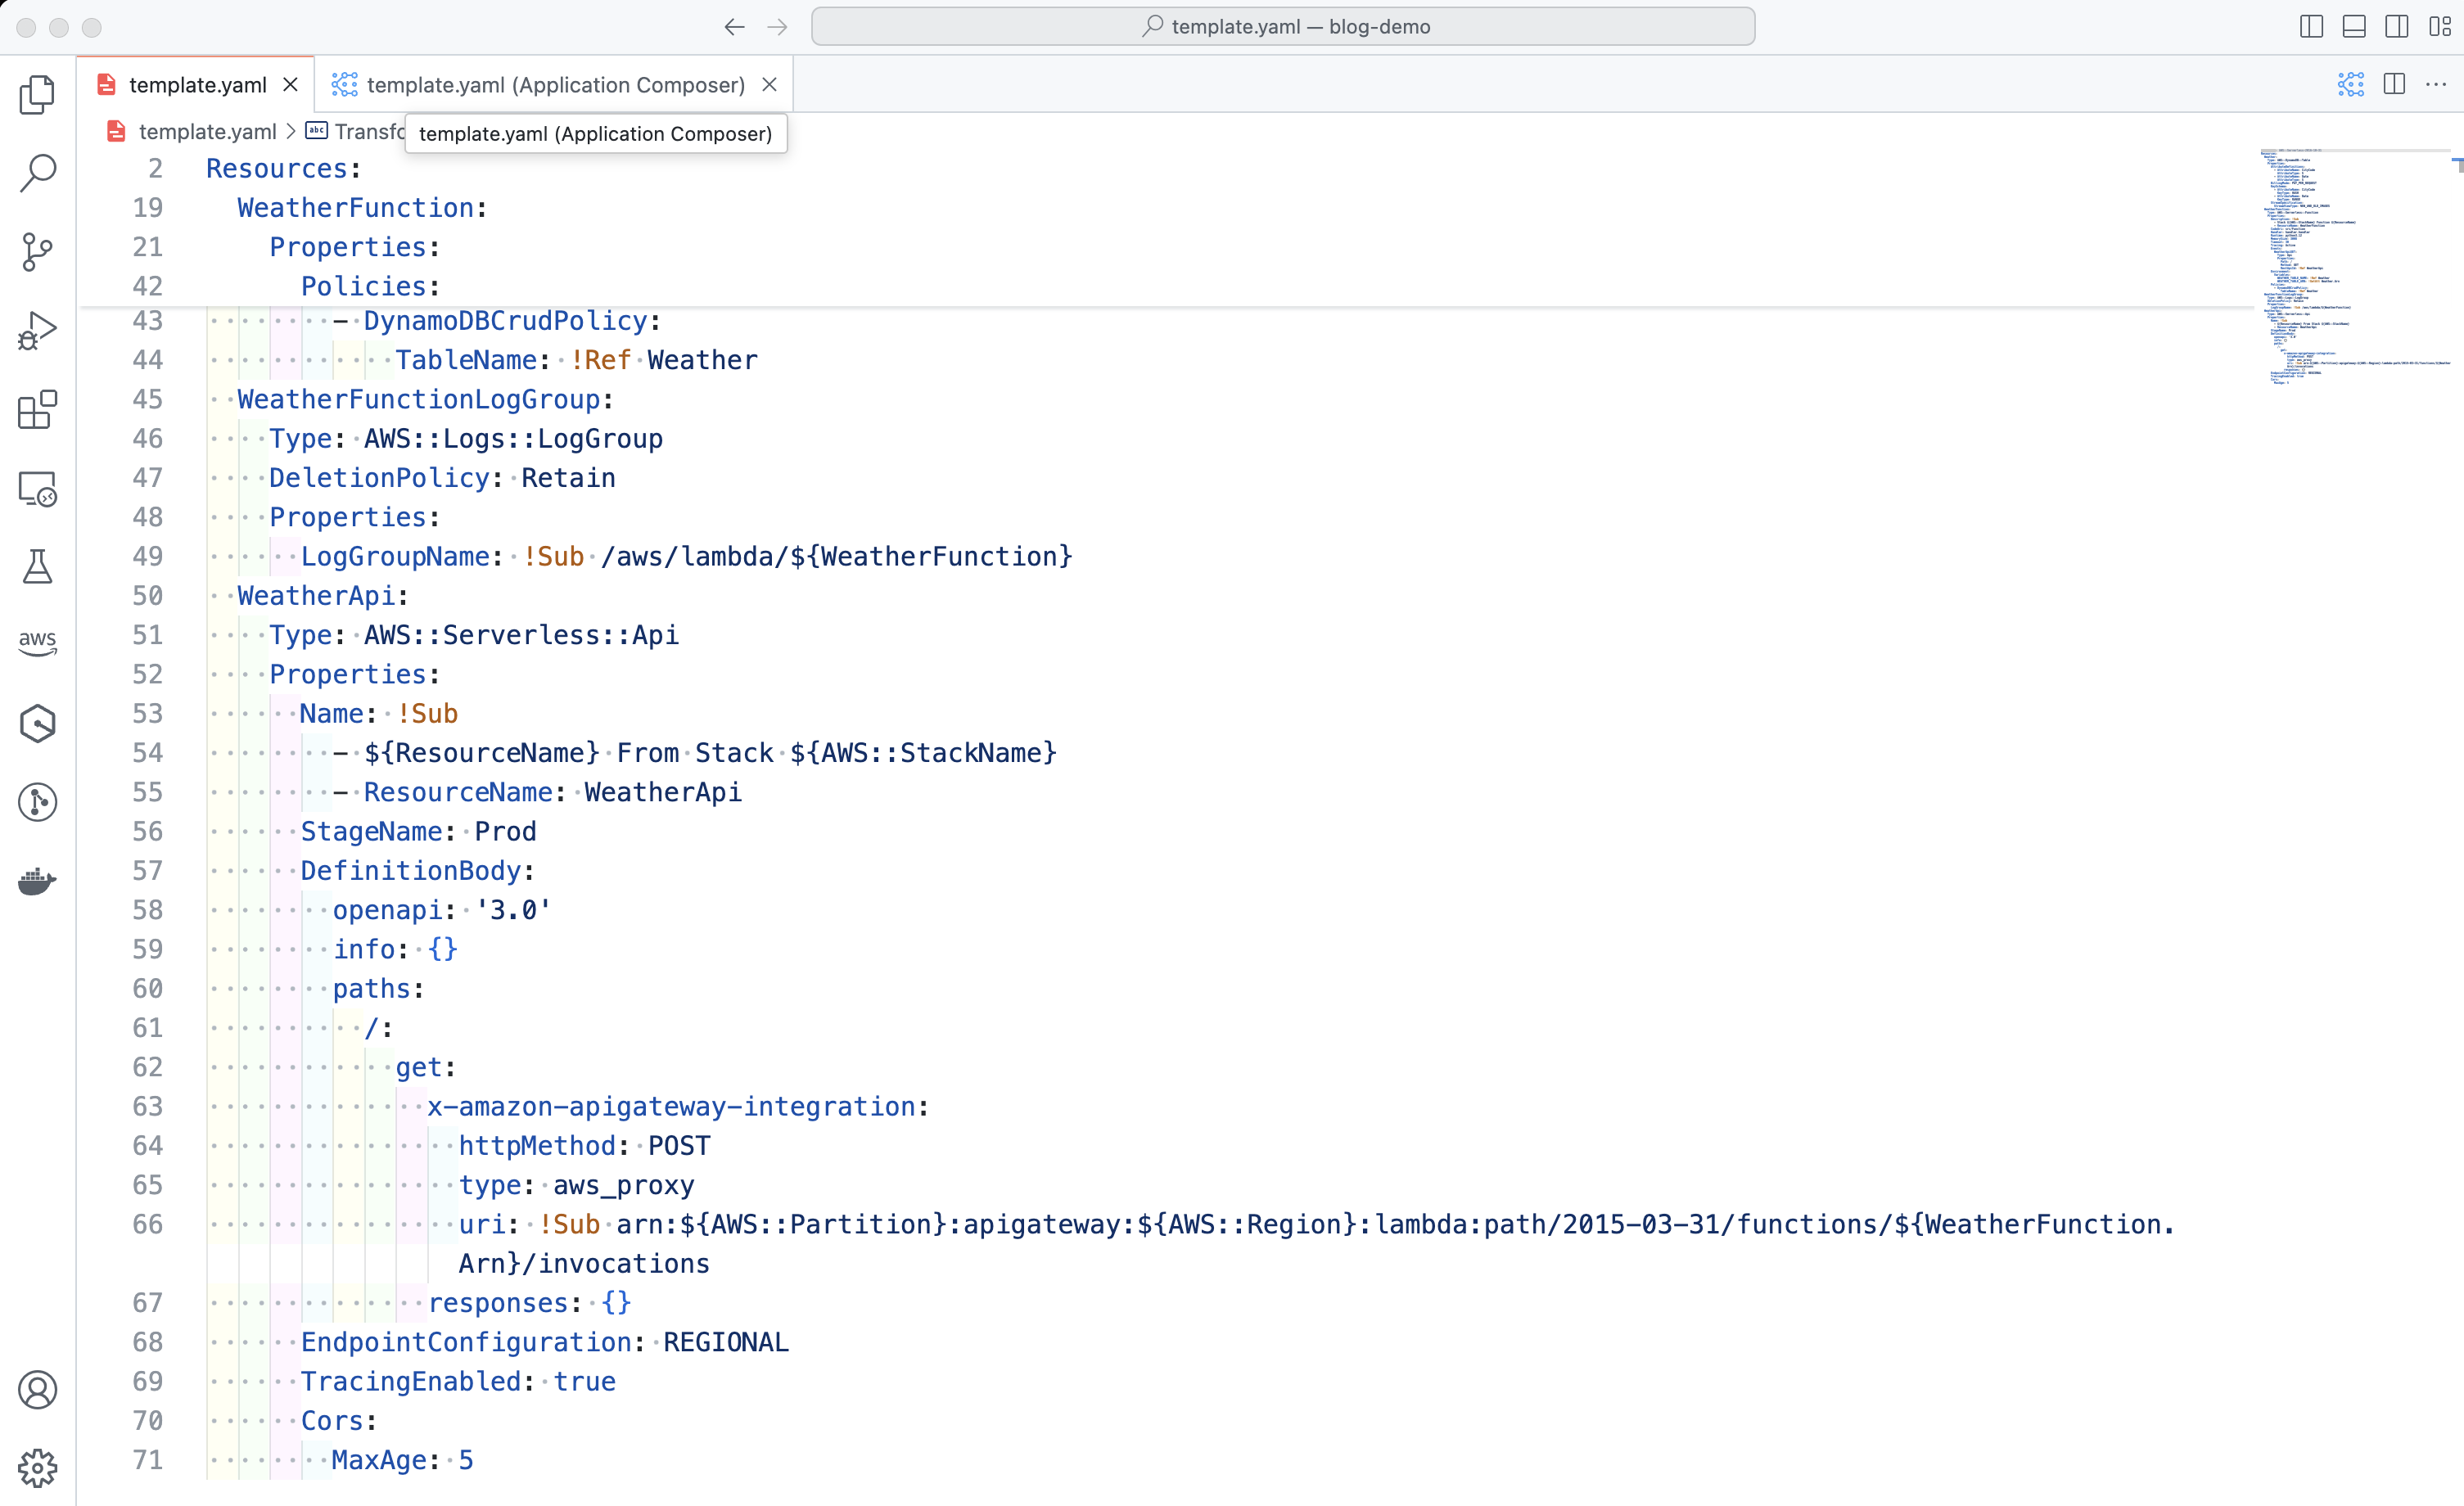
Lambda 関数、DynamoDB、API Gateway が作成されていることがわかりますね!さらに、Lambda 関数には DynamoDB と繋げたので 環境変数として DynamoDB テーブル名が渡されていたり、Policies セクションには Students テーブルに対して DynamoDBCrudPolicy の権限が付与されていることもわかります。地味に DynamoDB のキースキーマを生成してくれる点もありがたいですね !
テンプレートファイルの例
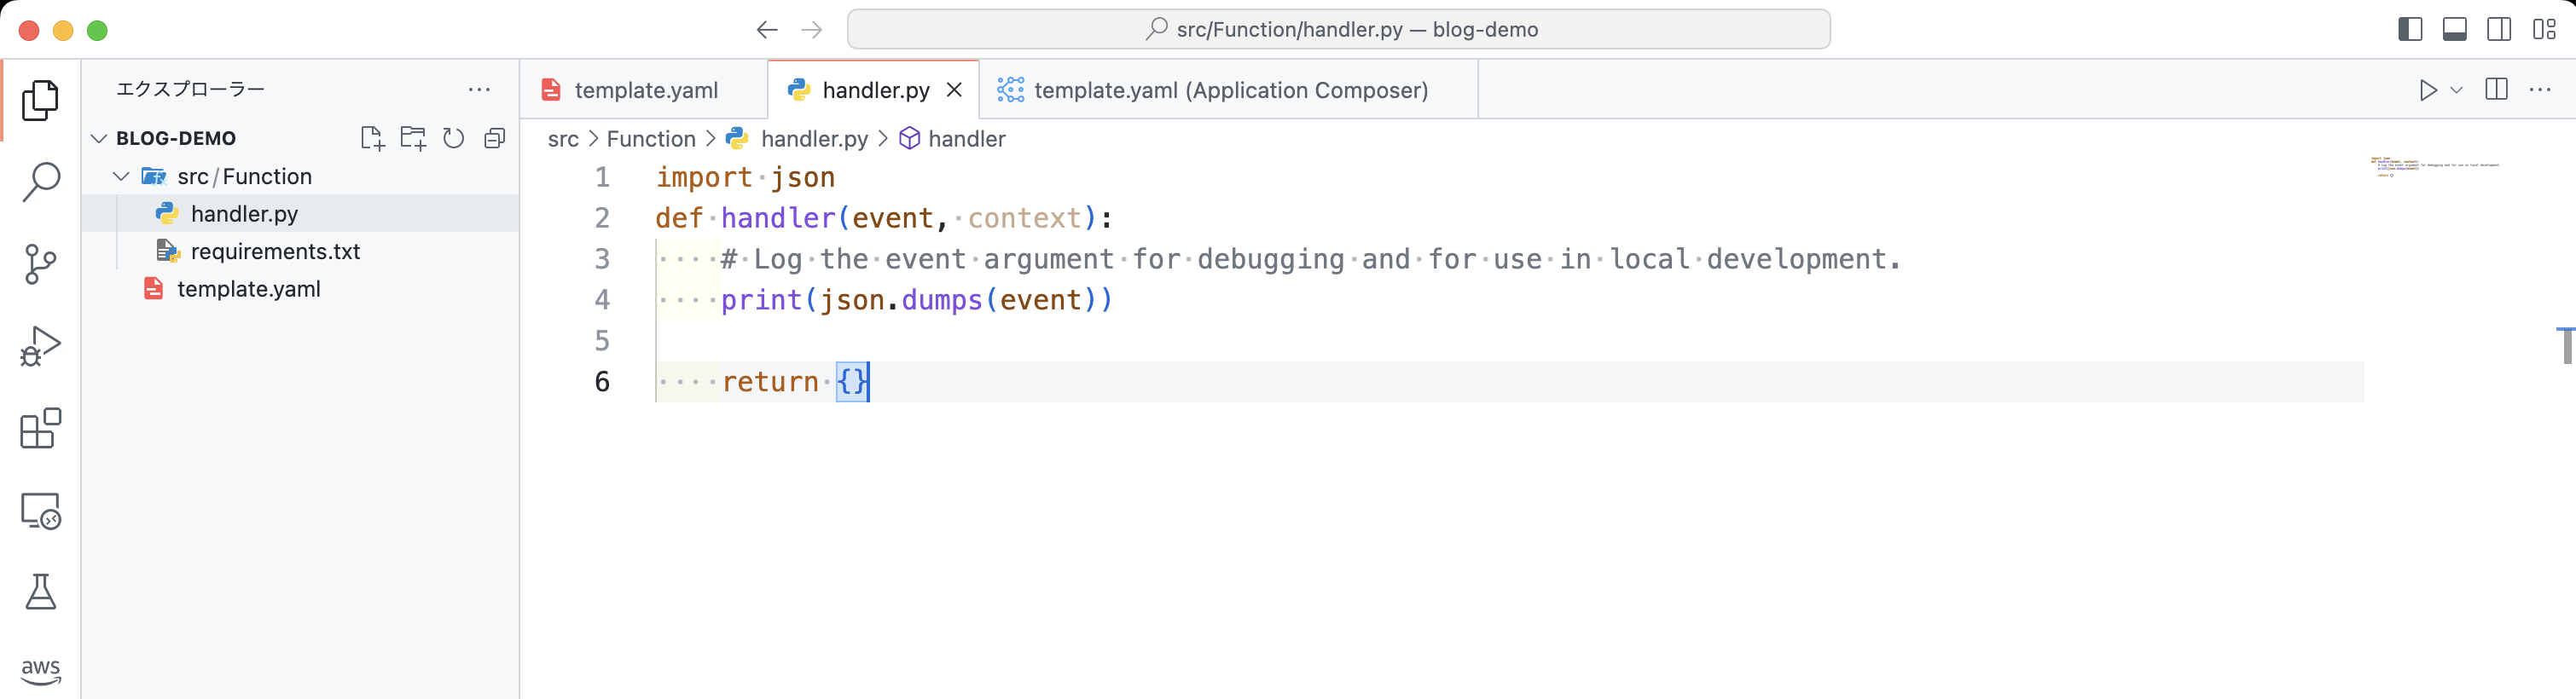
src/Function/handler.py
src/Function/handler.py を開いてみると、サンプルコードが記述されています。渡されたイベント情報を標準出力していますね。
イベント情報ファイルを作成
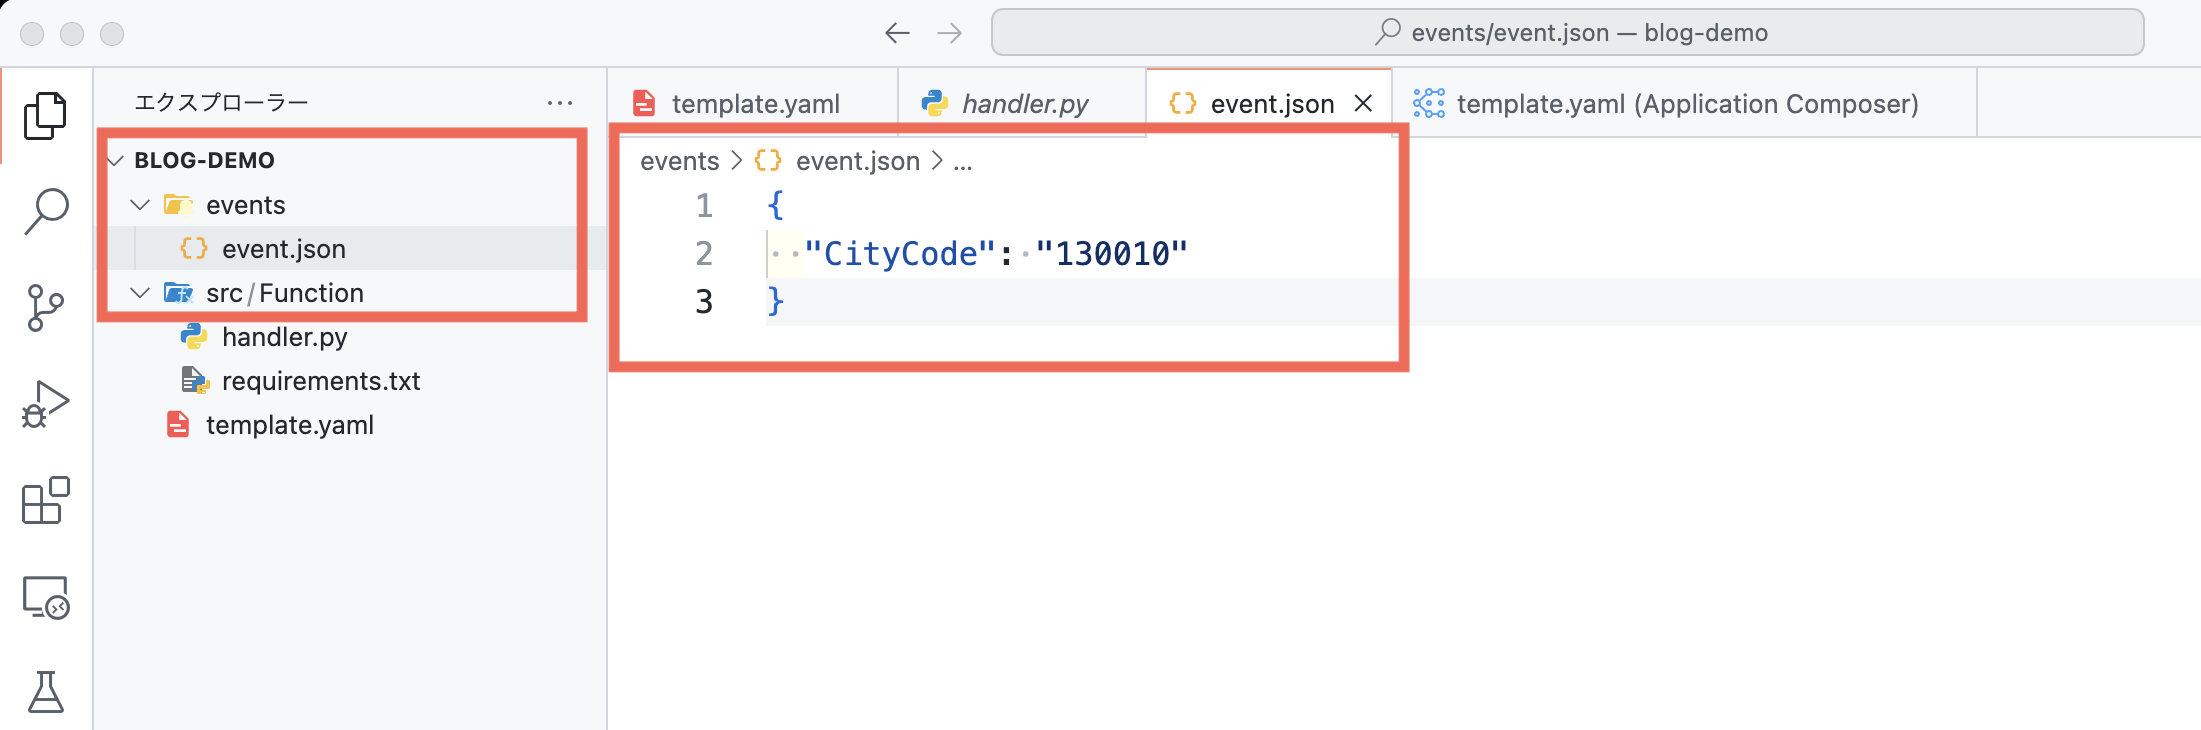
Lambda 関数に渡すイベント情報のファイルを作成しましょう。ローカルでの動作確認がしやすくなります。開いているフォルダ直下に events というフォルダを作成し、その中に event.json というファイルを作ります。
event.jason の編集
event.json には下記の JSON を入力し、ファイルを保存します。ここでは、CityCode が 130010 の天気情報を取得しようとしています。130010 は東京都を表す地域コードです (参照)。今回はただのサンプルデータですので、どんな値でも問題はありません。
event.json
サンプル
{
  "CityCode": "130010"
}
SAM の動作確認(ビルド・ローカル実行)
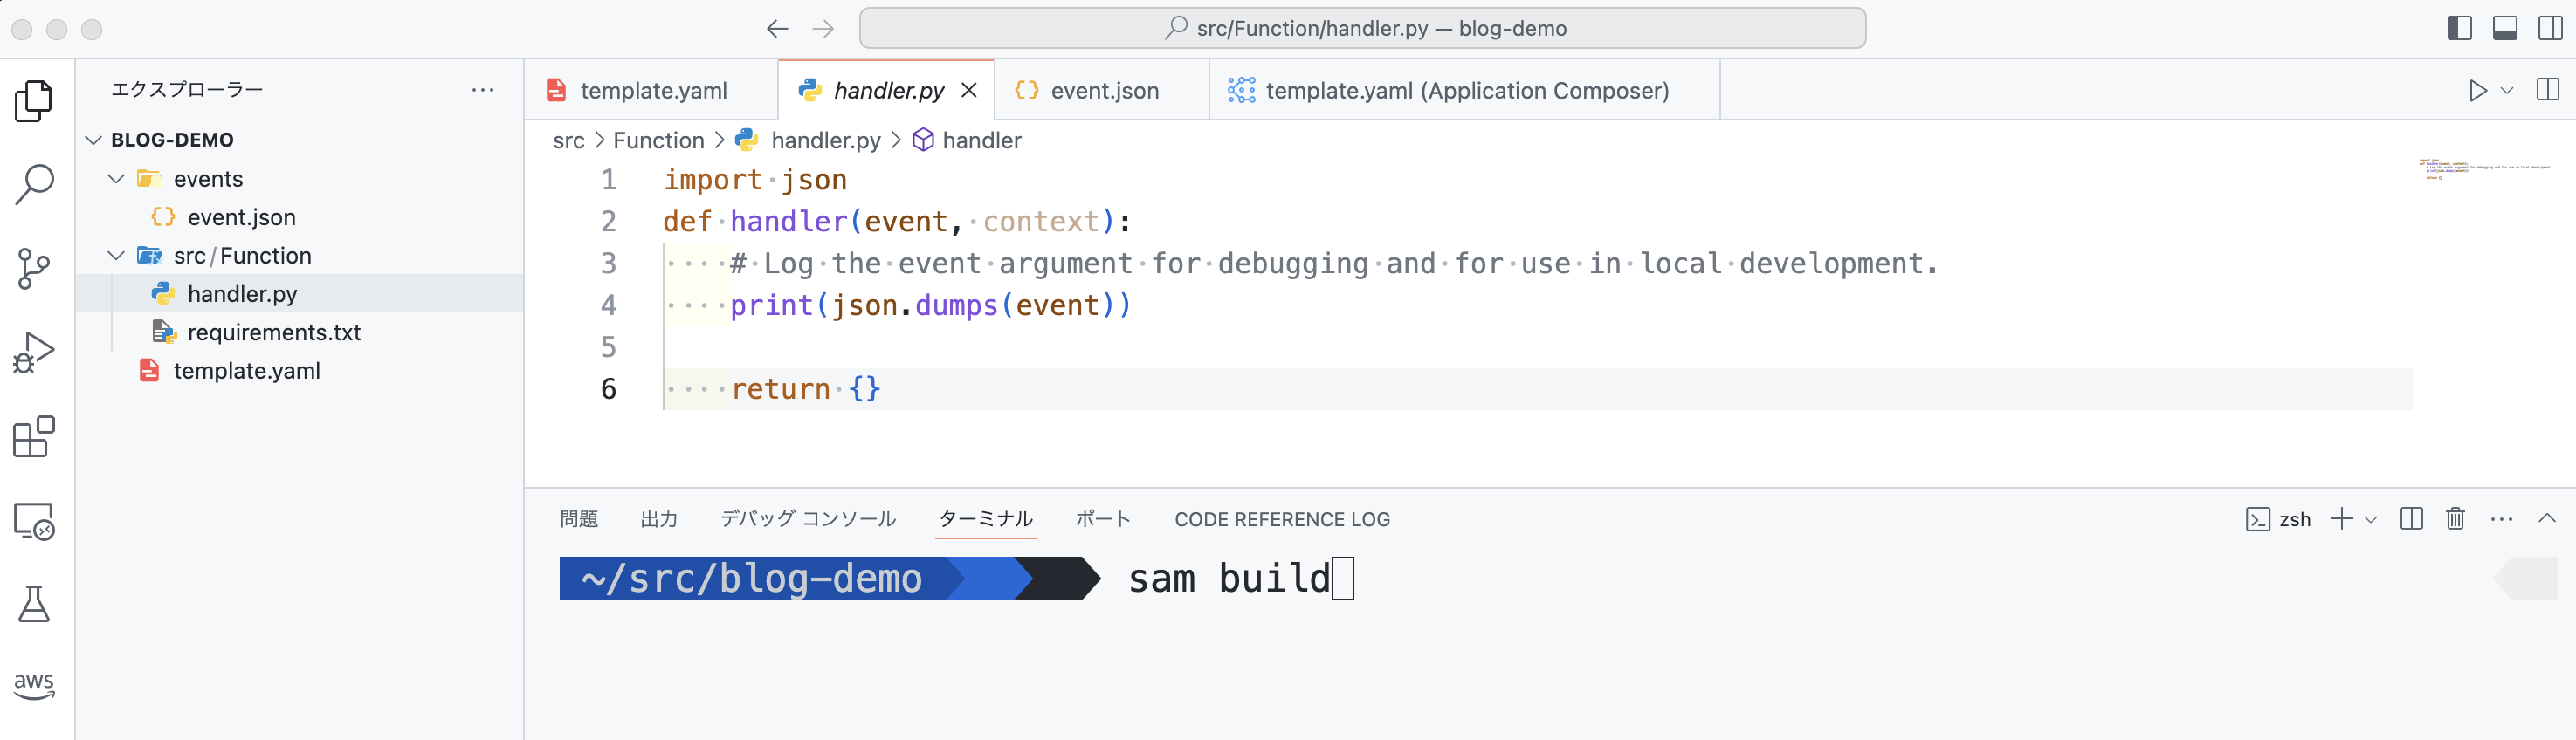
では、まずこの時点で SAM プロジェクトが正常に動作するか確認してみましょう。VS Code のターミナルを開いて、以下の SAM CLI コマンドを実行します。
SAM CLI コマンド
コマンド
am build --use-containerビルド
すると、ローカル環境でビルドが行われ、Build Succeeded と出力されればうまく動作しています。
sam local invoke を実行
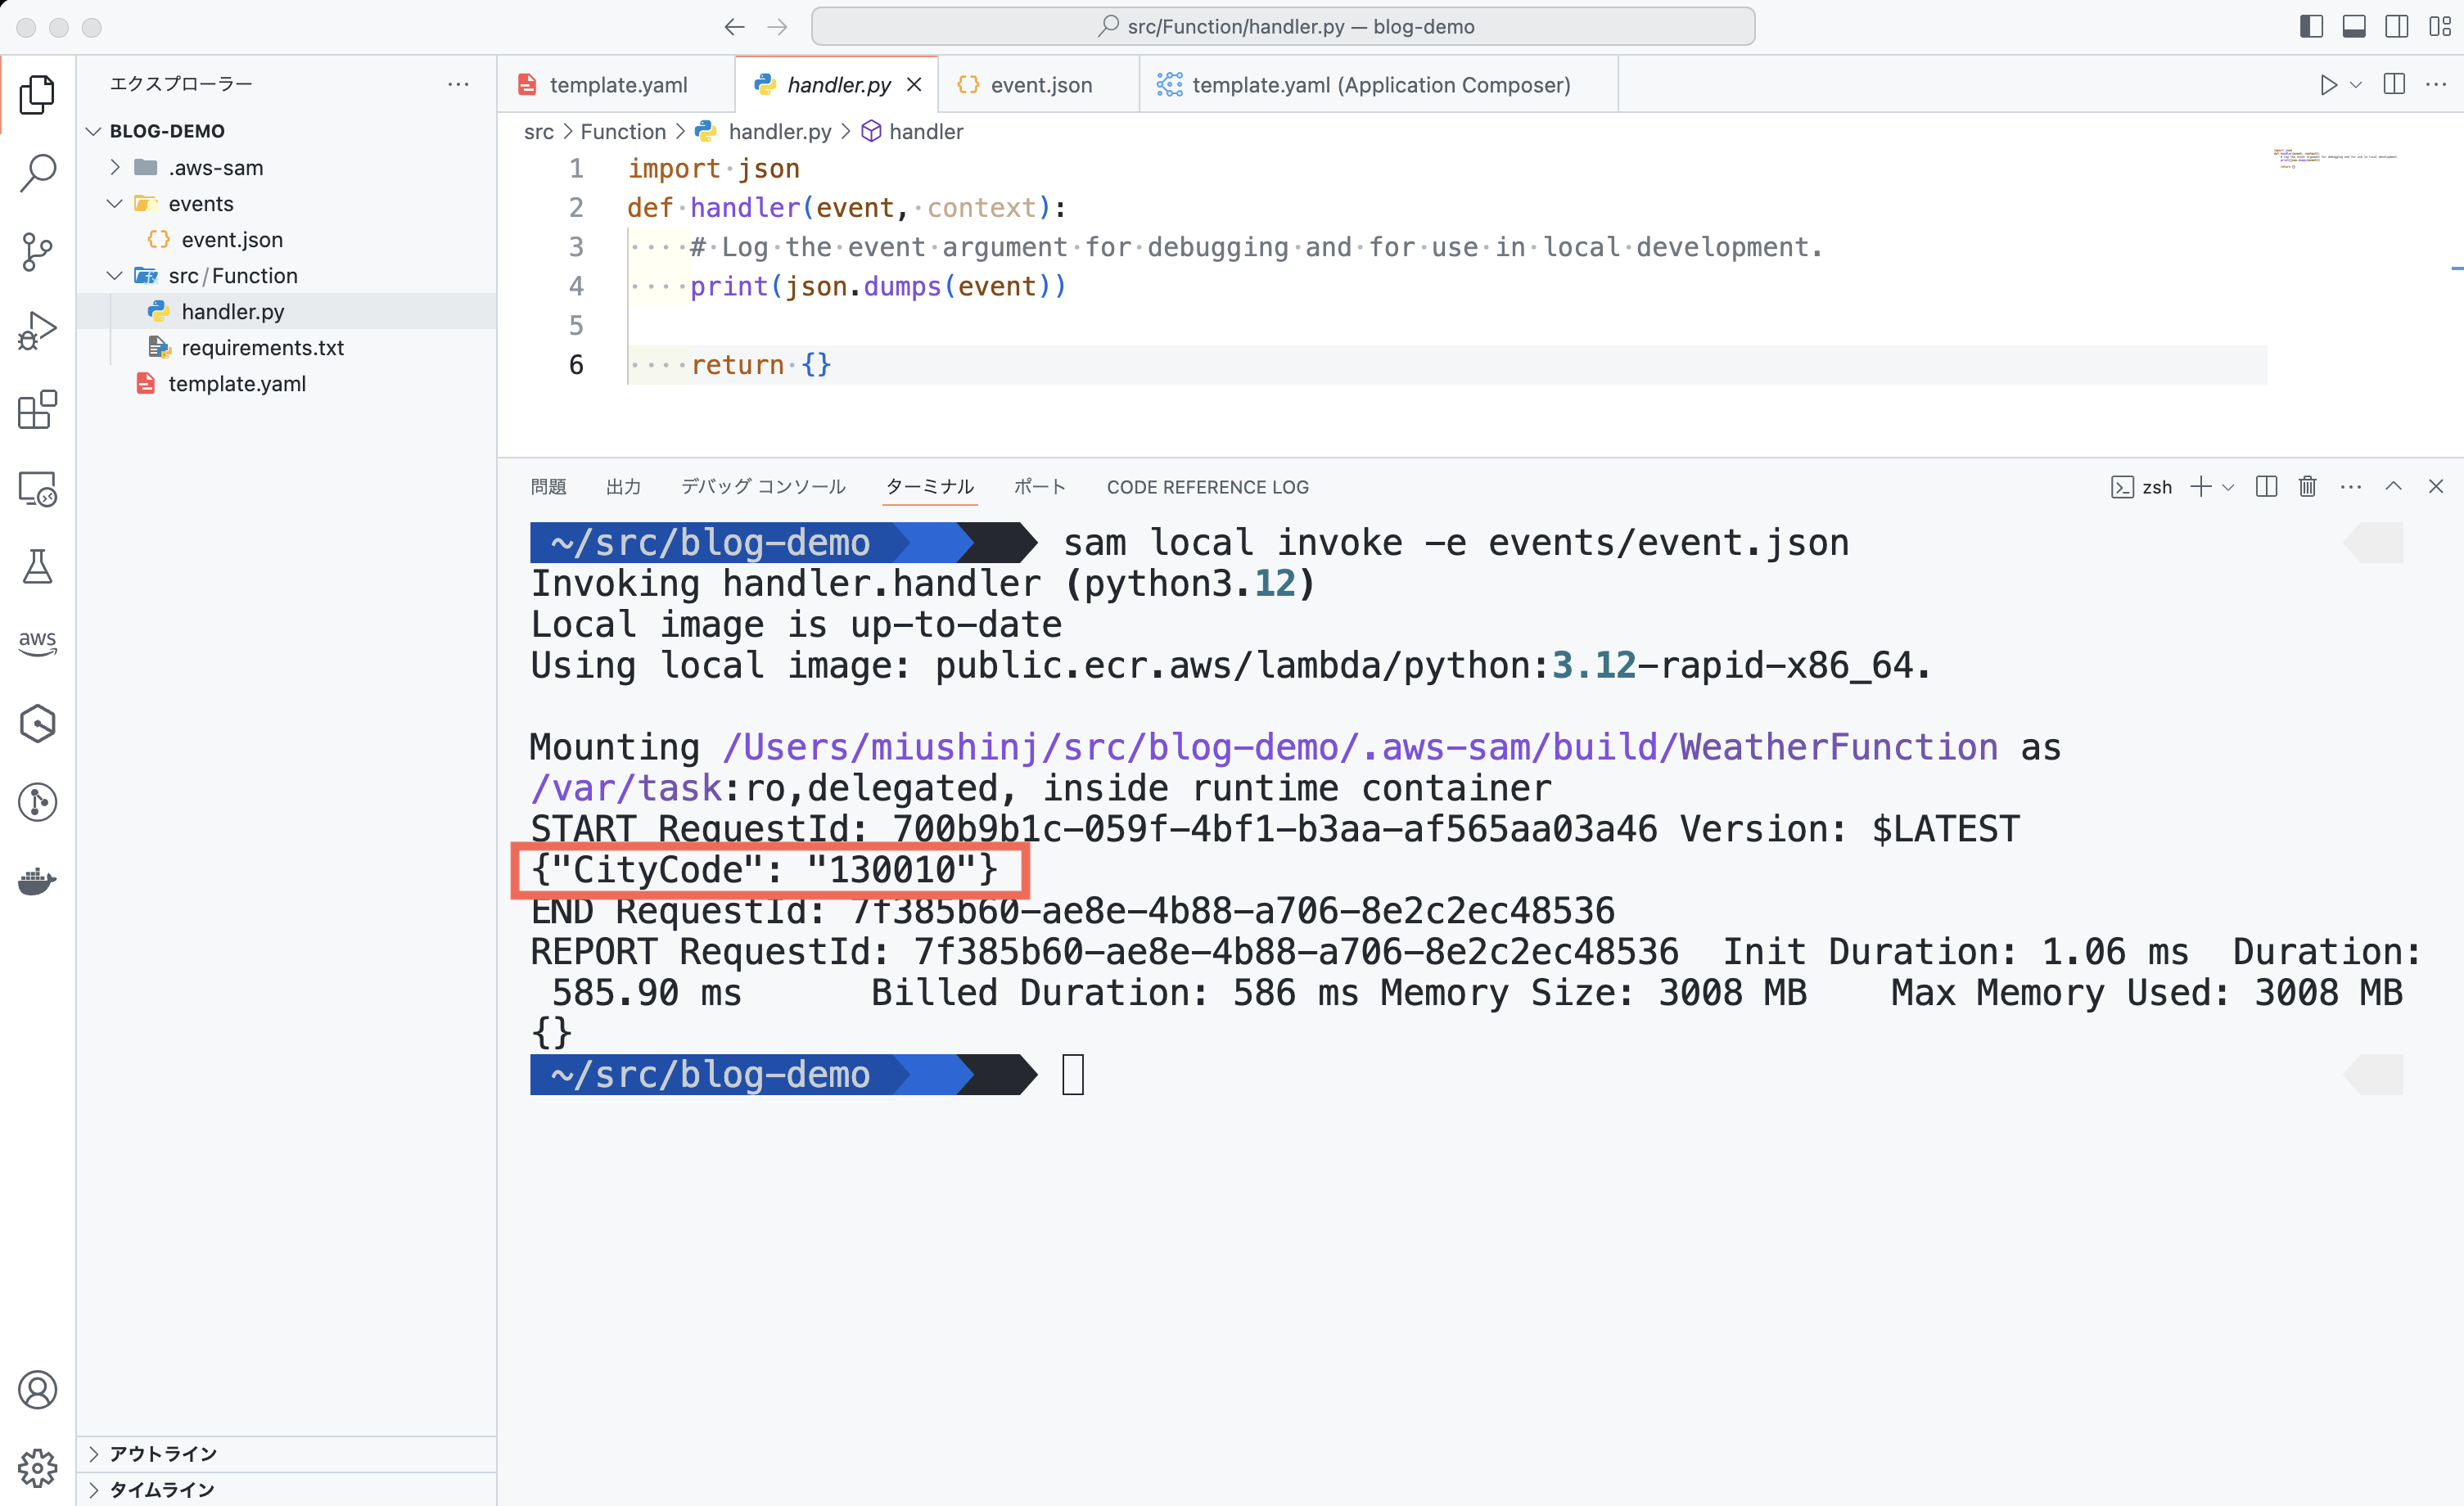
次に、現時点で Lambda 関数がローカルで動作するか確認してみましょう。sam local invoke を実行すると、ローカルで Lambda 関数が実行されます (API リファレンス)。今回は先ほど作成したイベント情報を渡したいので、以下のコマンドを実行すると、events.json が Lambda 関数の event 変数に渡されます。
⚠️注意: 動作環境としてコンテナを利用するため Docker が必要です。もしインストールされていない場合は こちらのドキュメント からインストールを行って下さい。
{"CityCode": "130010"} と出力されていることがわかります。もちろん、event.json の内容を変更して sam local invoke -e events/event.json を実行すると実行結果が変わります。
一見すると「ふーん」で終わってしまいそうですが、これはローカルで動作しているんです。なので Lambda 関数のコードを修正した後、また sam build → sam local invoke を実行すれば毎回 AWS 環境へデプロイしなくても動作確認ができます。これだけでも凄く便利ですよね。開発のサイクルを早く回せて、開発速度が上がります !
sam local invoke コマンド
コマンド
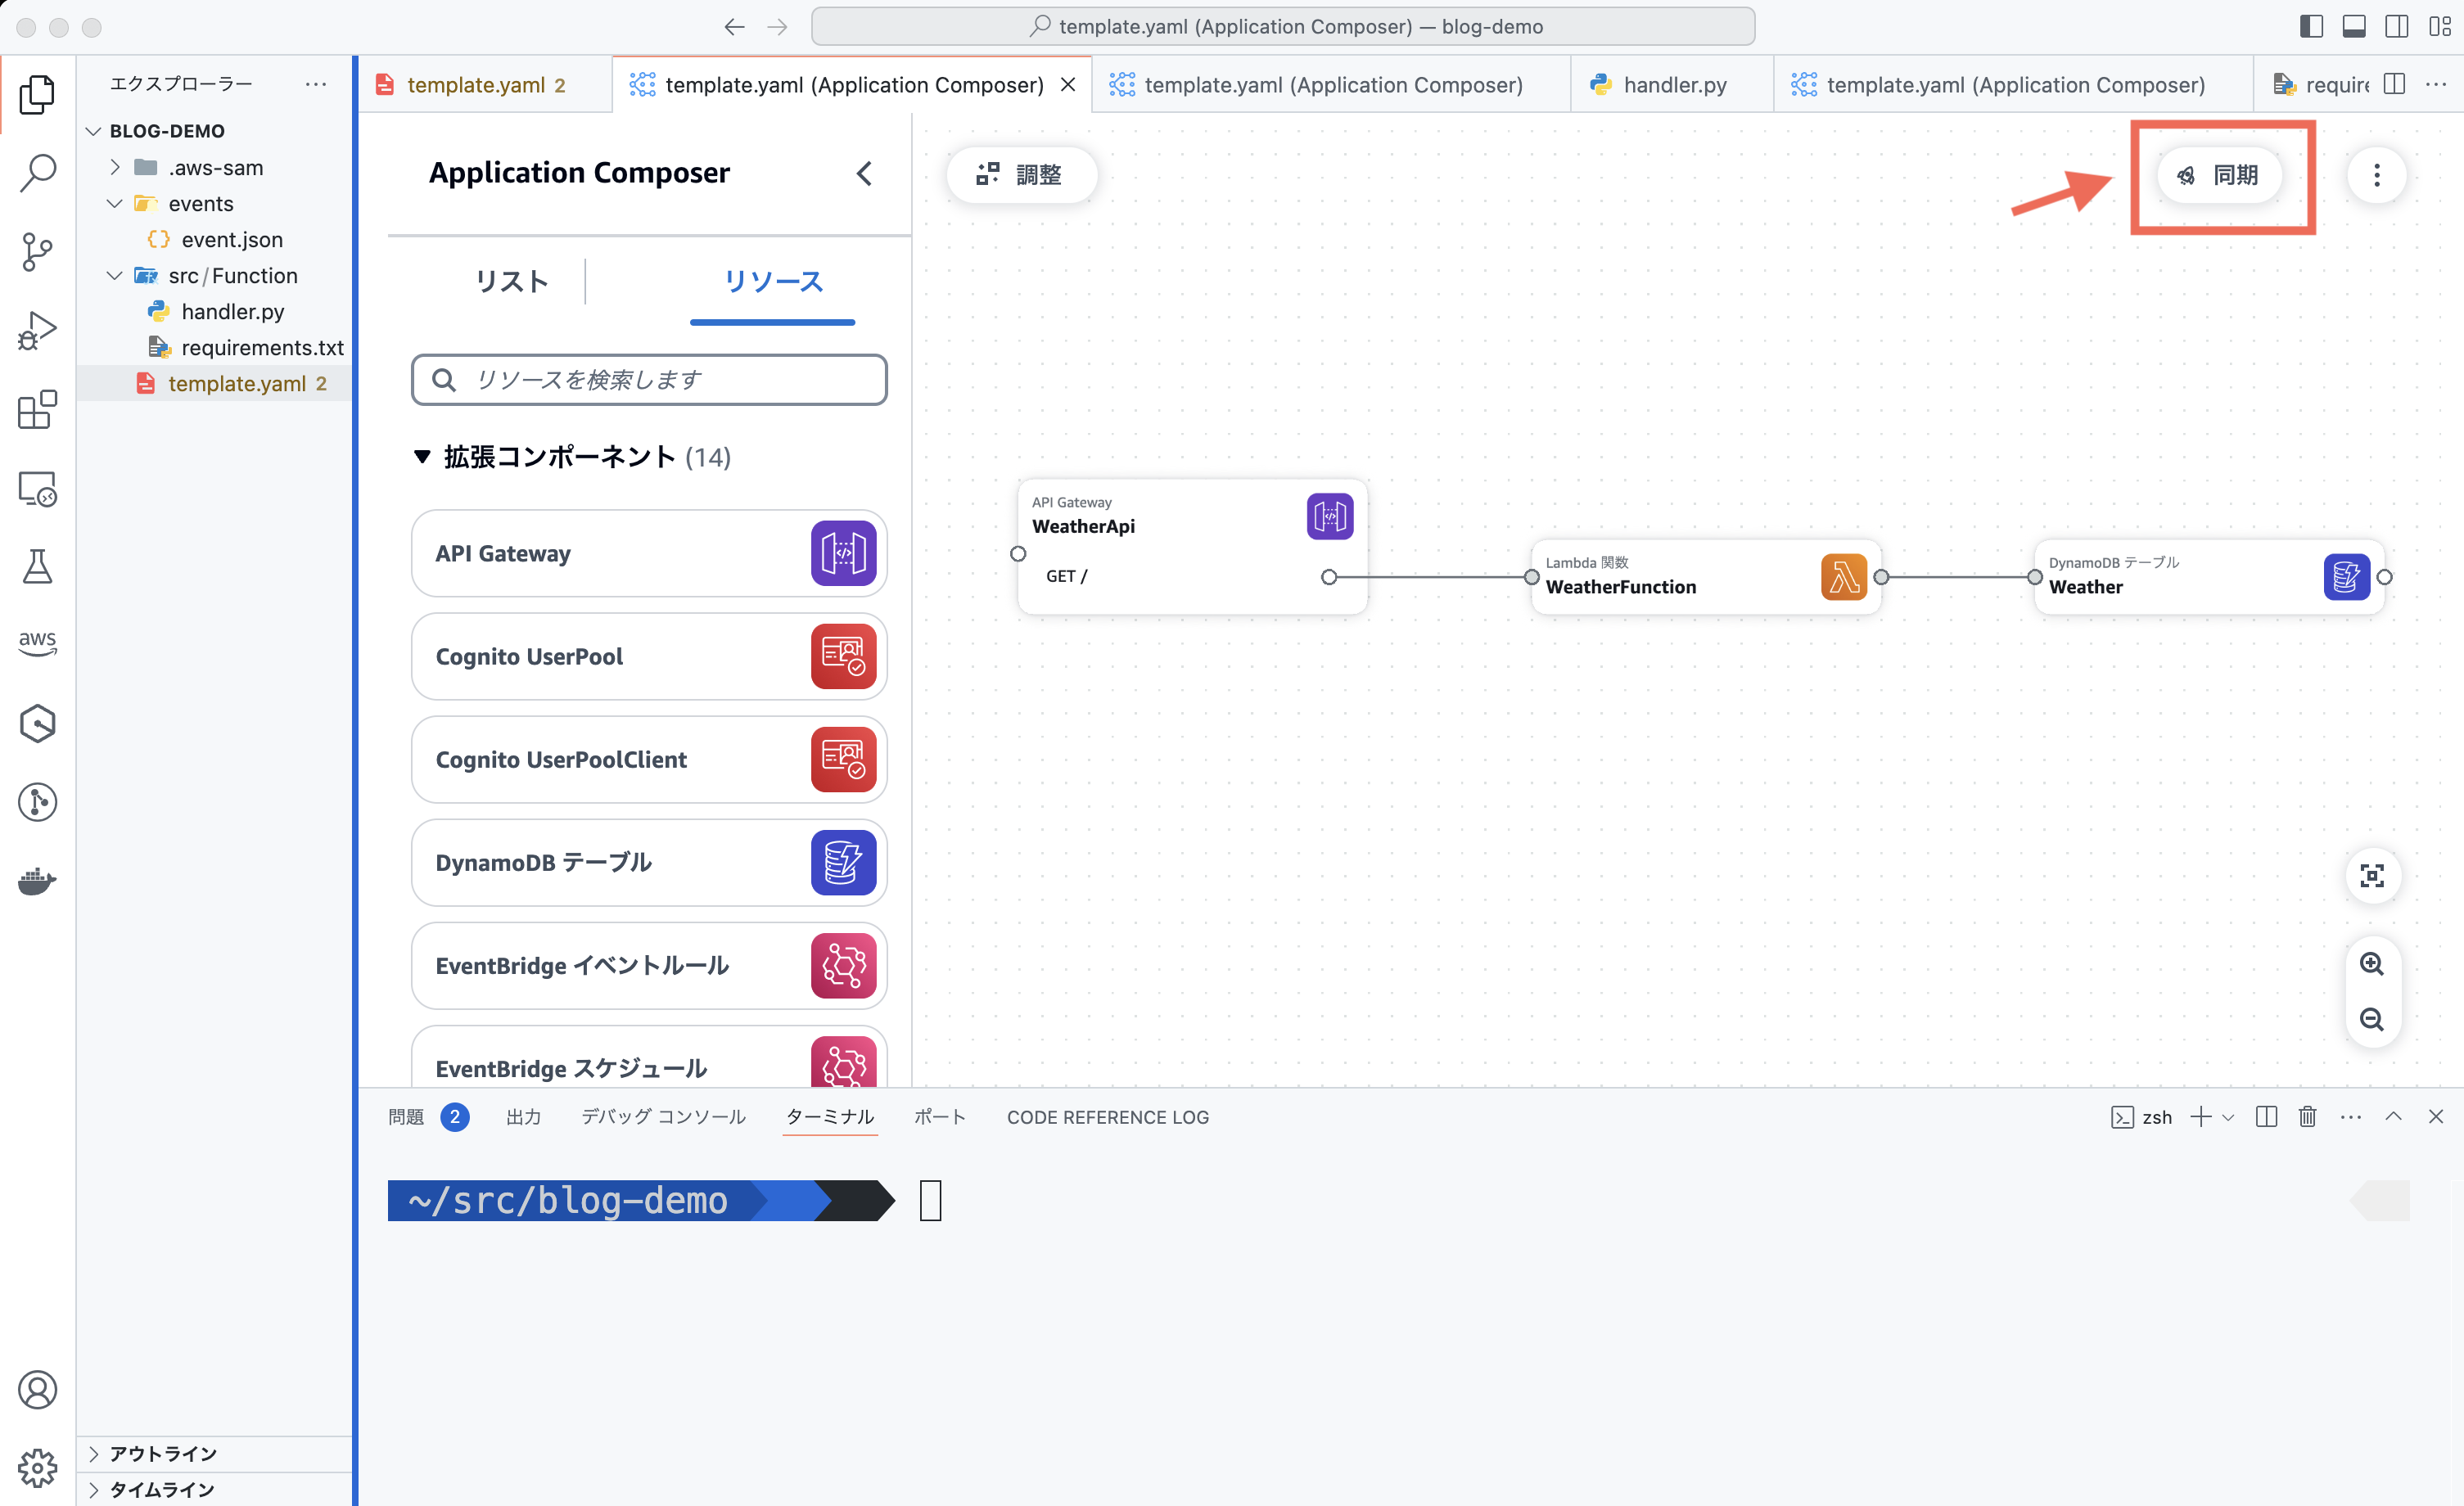
sam local invoke -e events/event.json AWS 環境へサーバーレスのインフラストラクチャをデプロイ
では Infrastructure Composer で作成した SAM テンプレートをデプロイしてみましょう。SAM CLI の sam deploy --guided でも良いですが、Infrastructure Composer 上の「同期」ボタンで GUI ベースでデプロイできます。
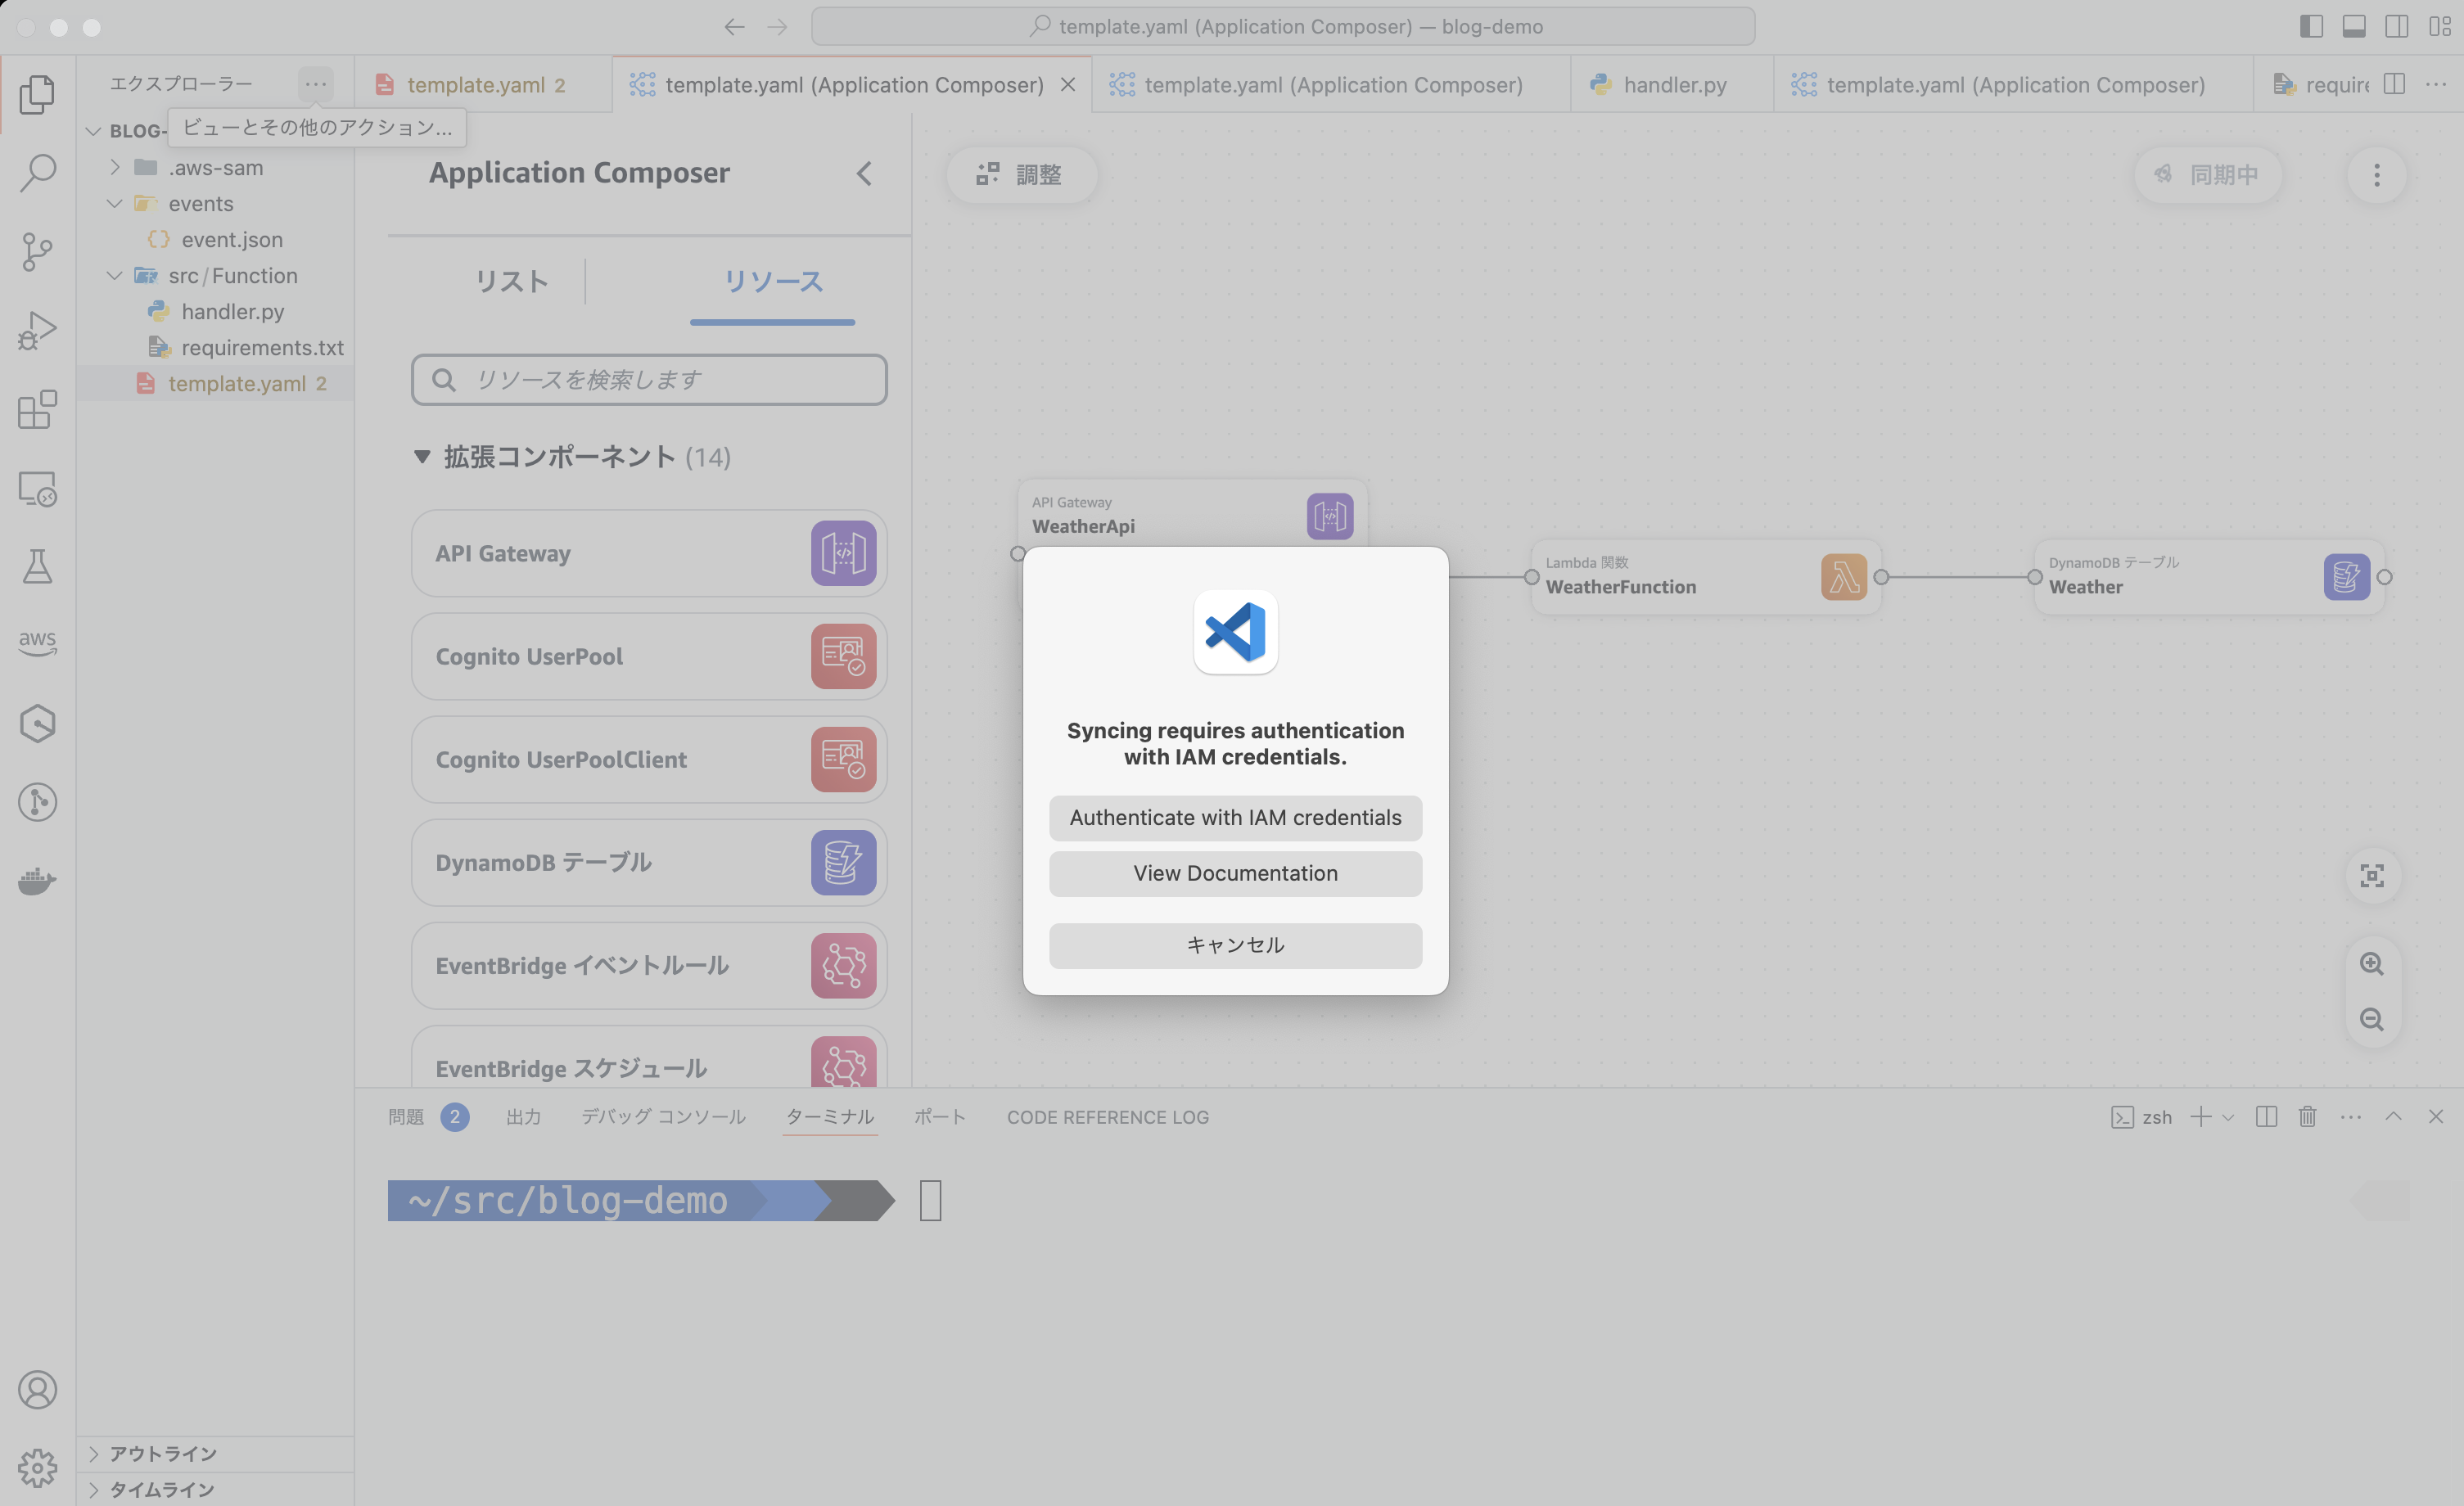
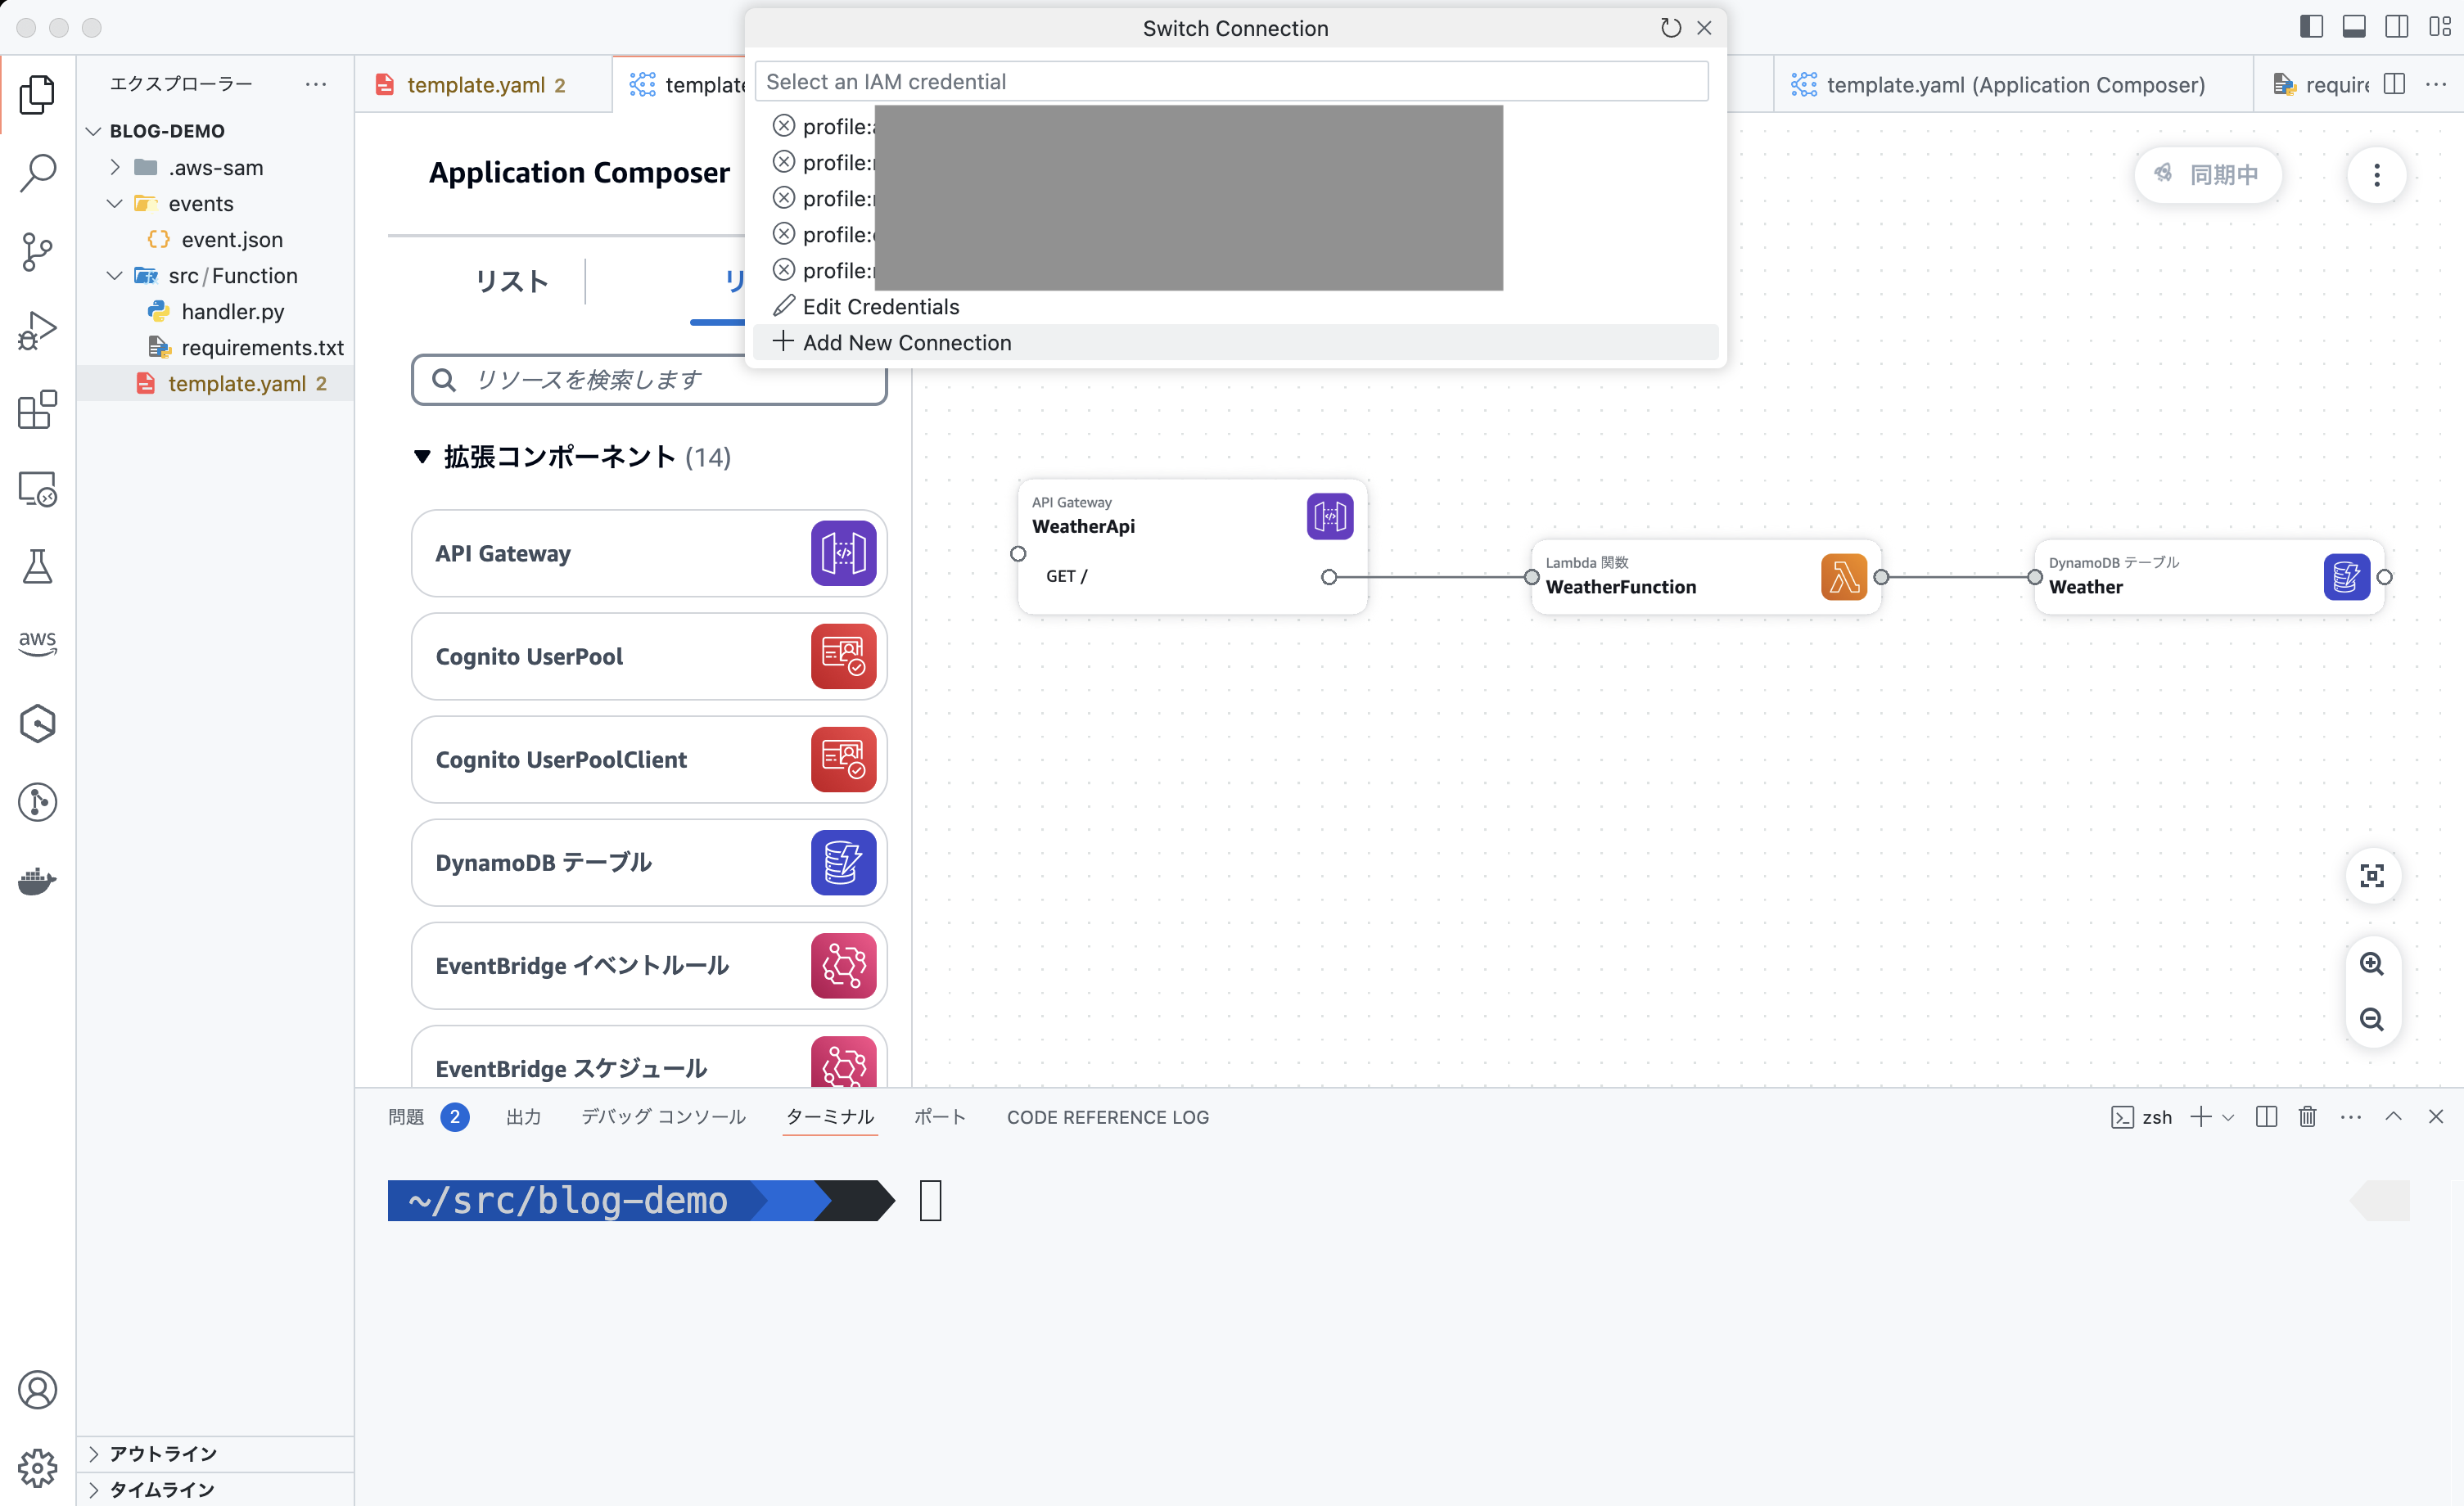
AWS の認証情報の入力
すると AWS の認証情報を求められます。こちらは AWS Builder ID でも IAM Identity Center でもどちらでも問題ありません。
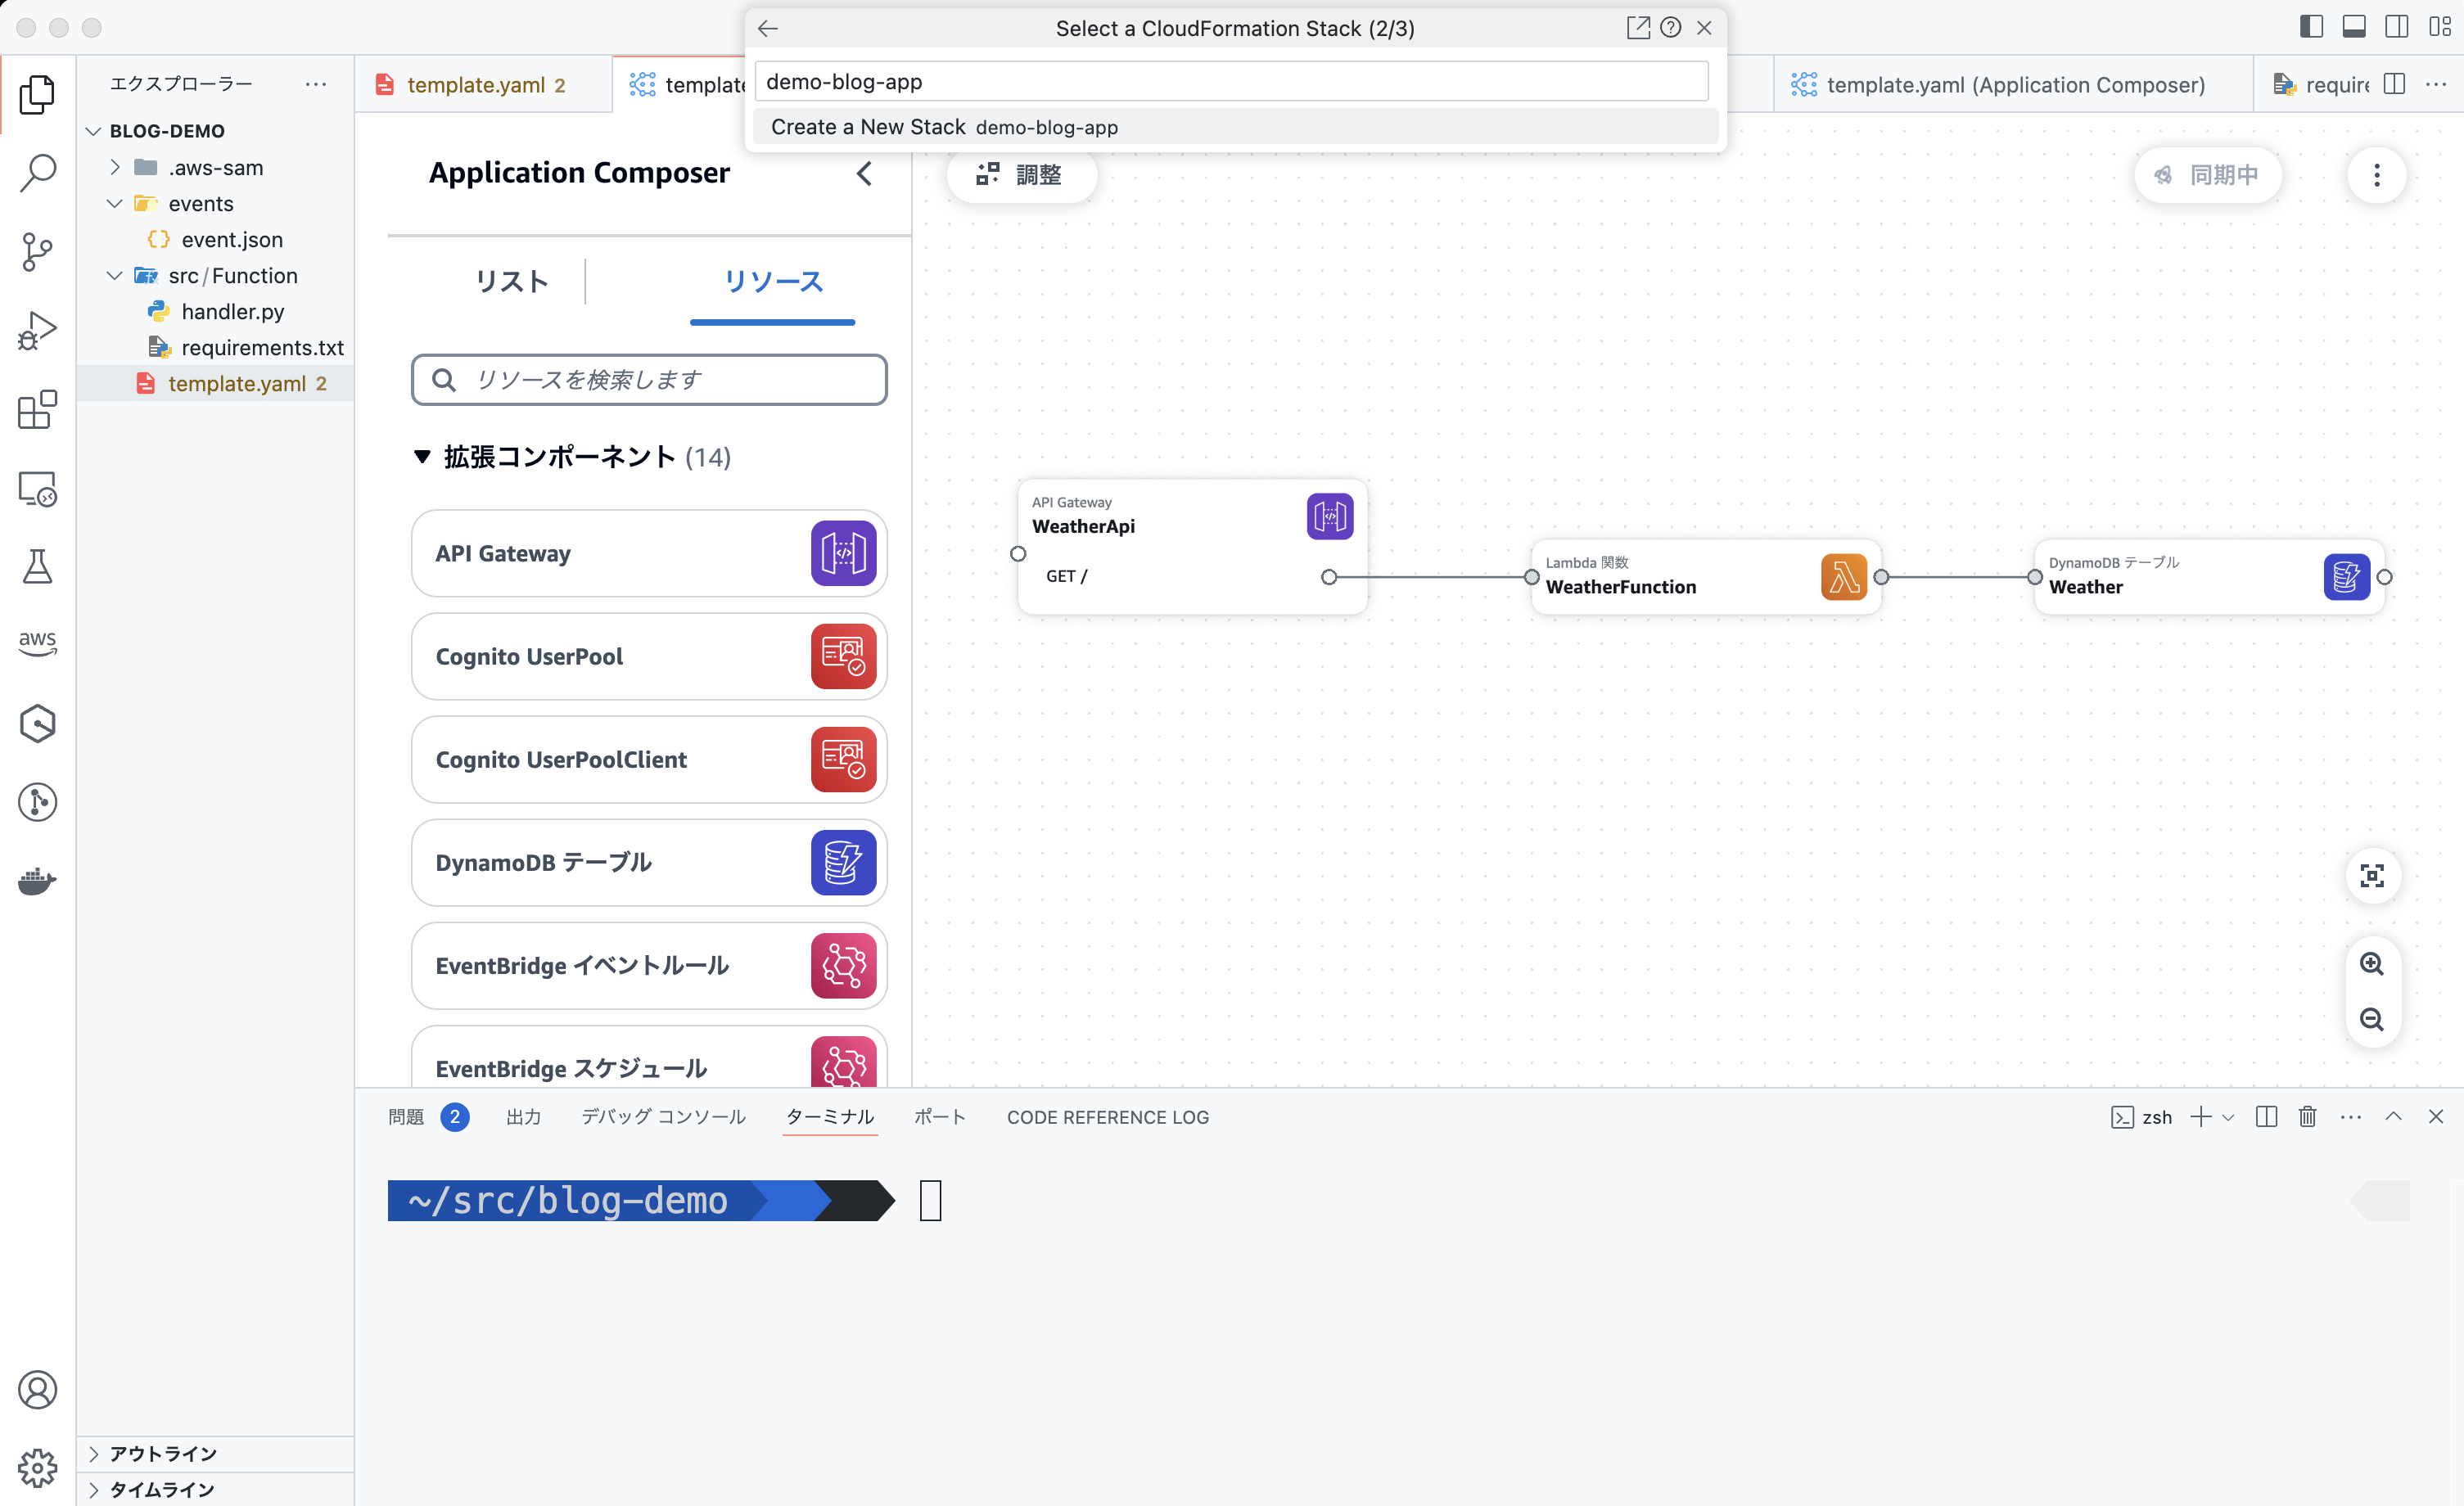
スタック名を入力
スタック名を入力して・・・
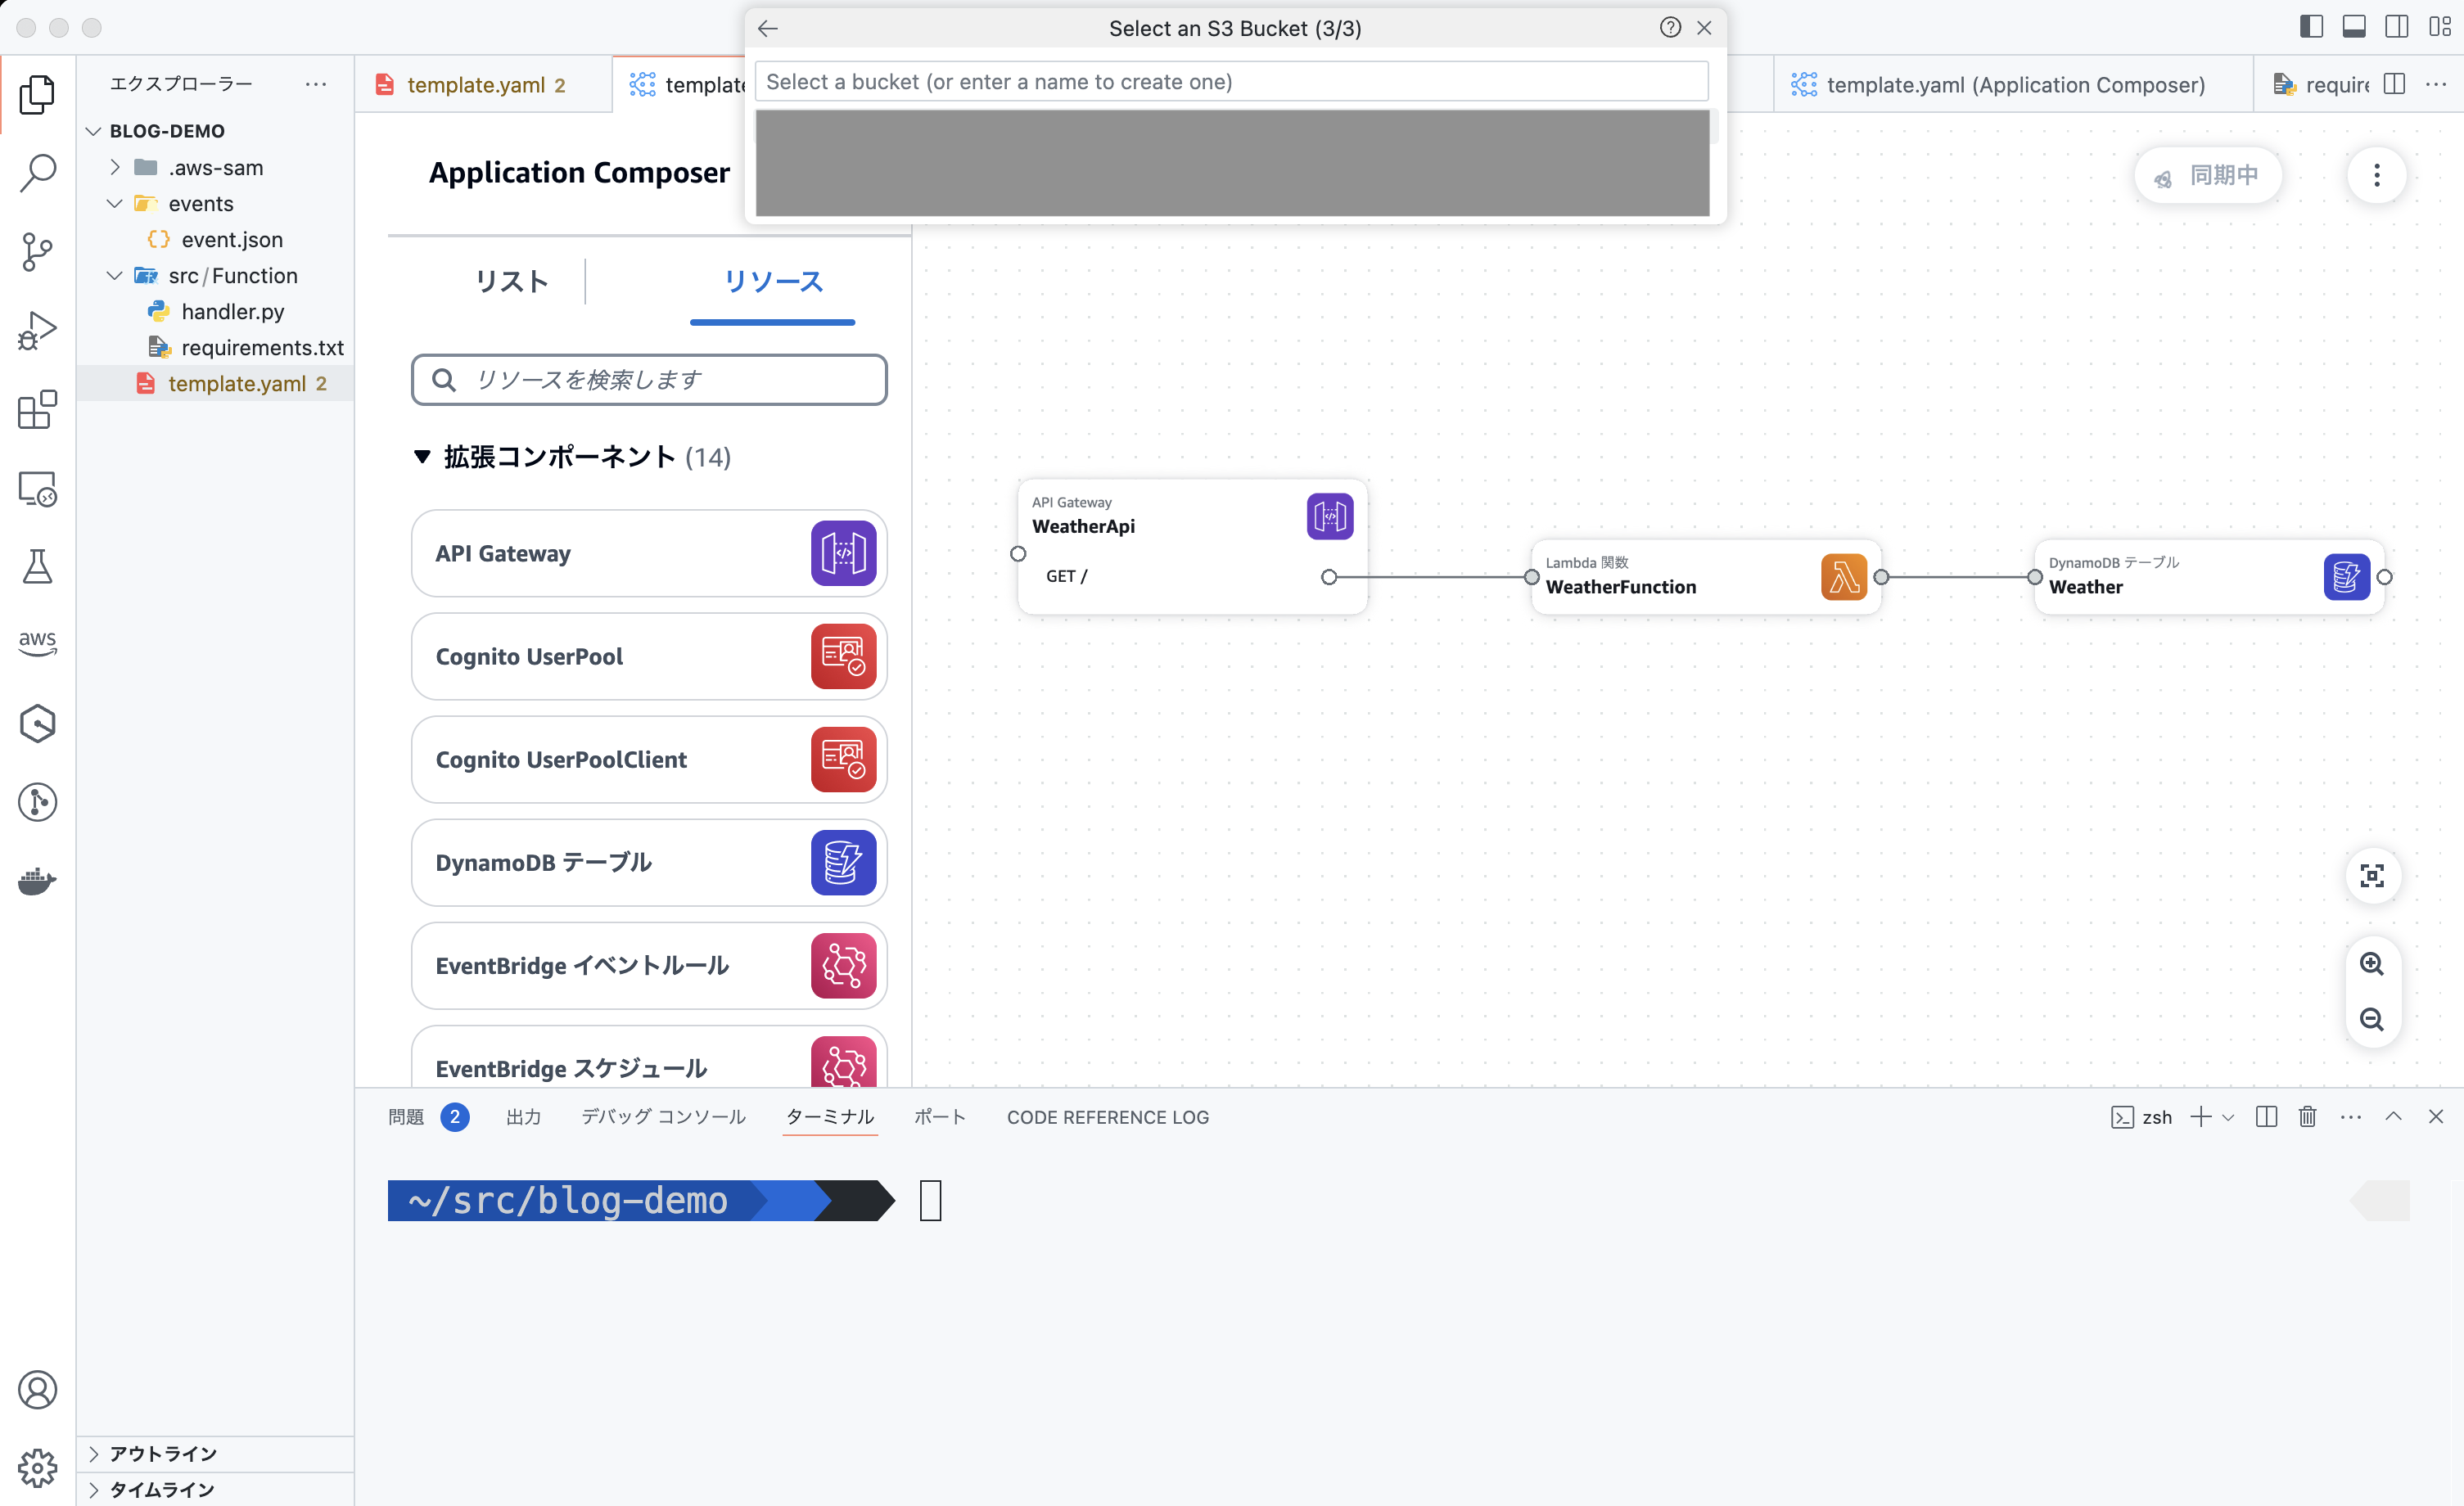
S3 バケットを選択
SAM テンプレートと Lambda 関数をデプロイする S3 バケットを選択すると・・・
ビルド
ビルドが実行されて・・・
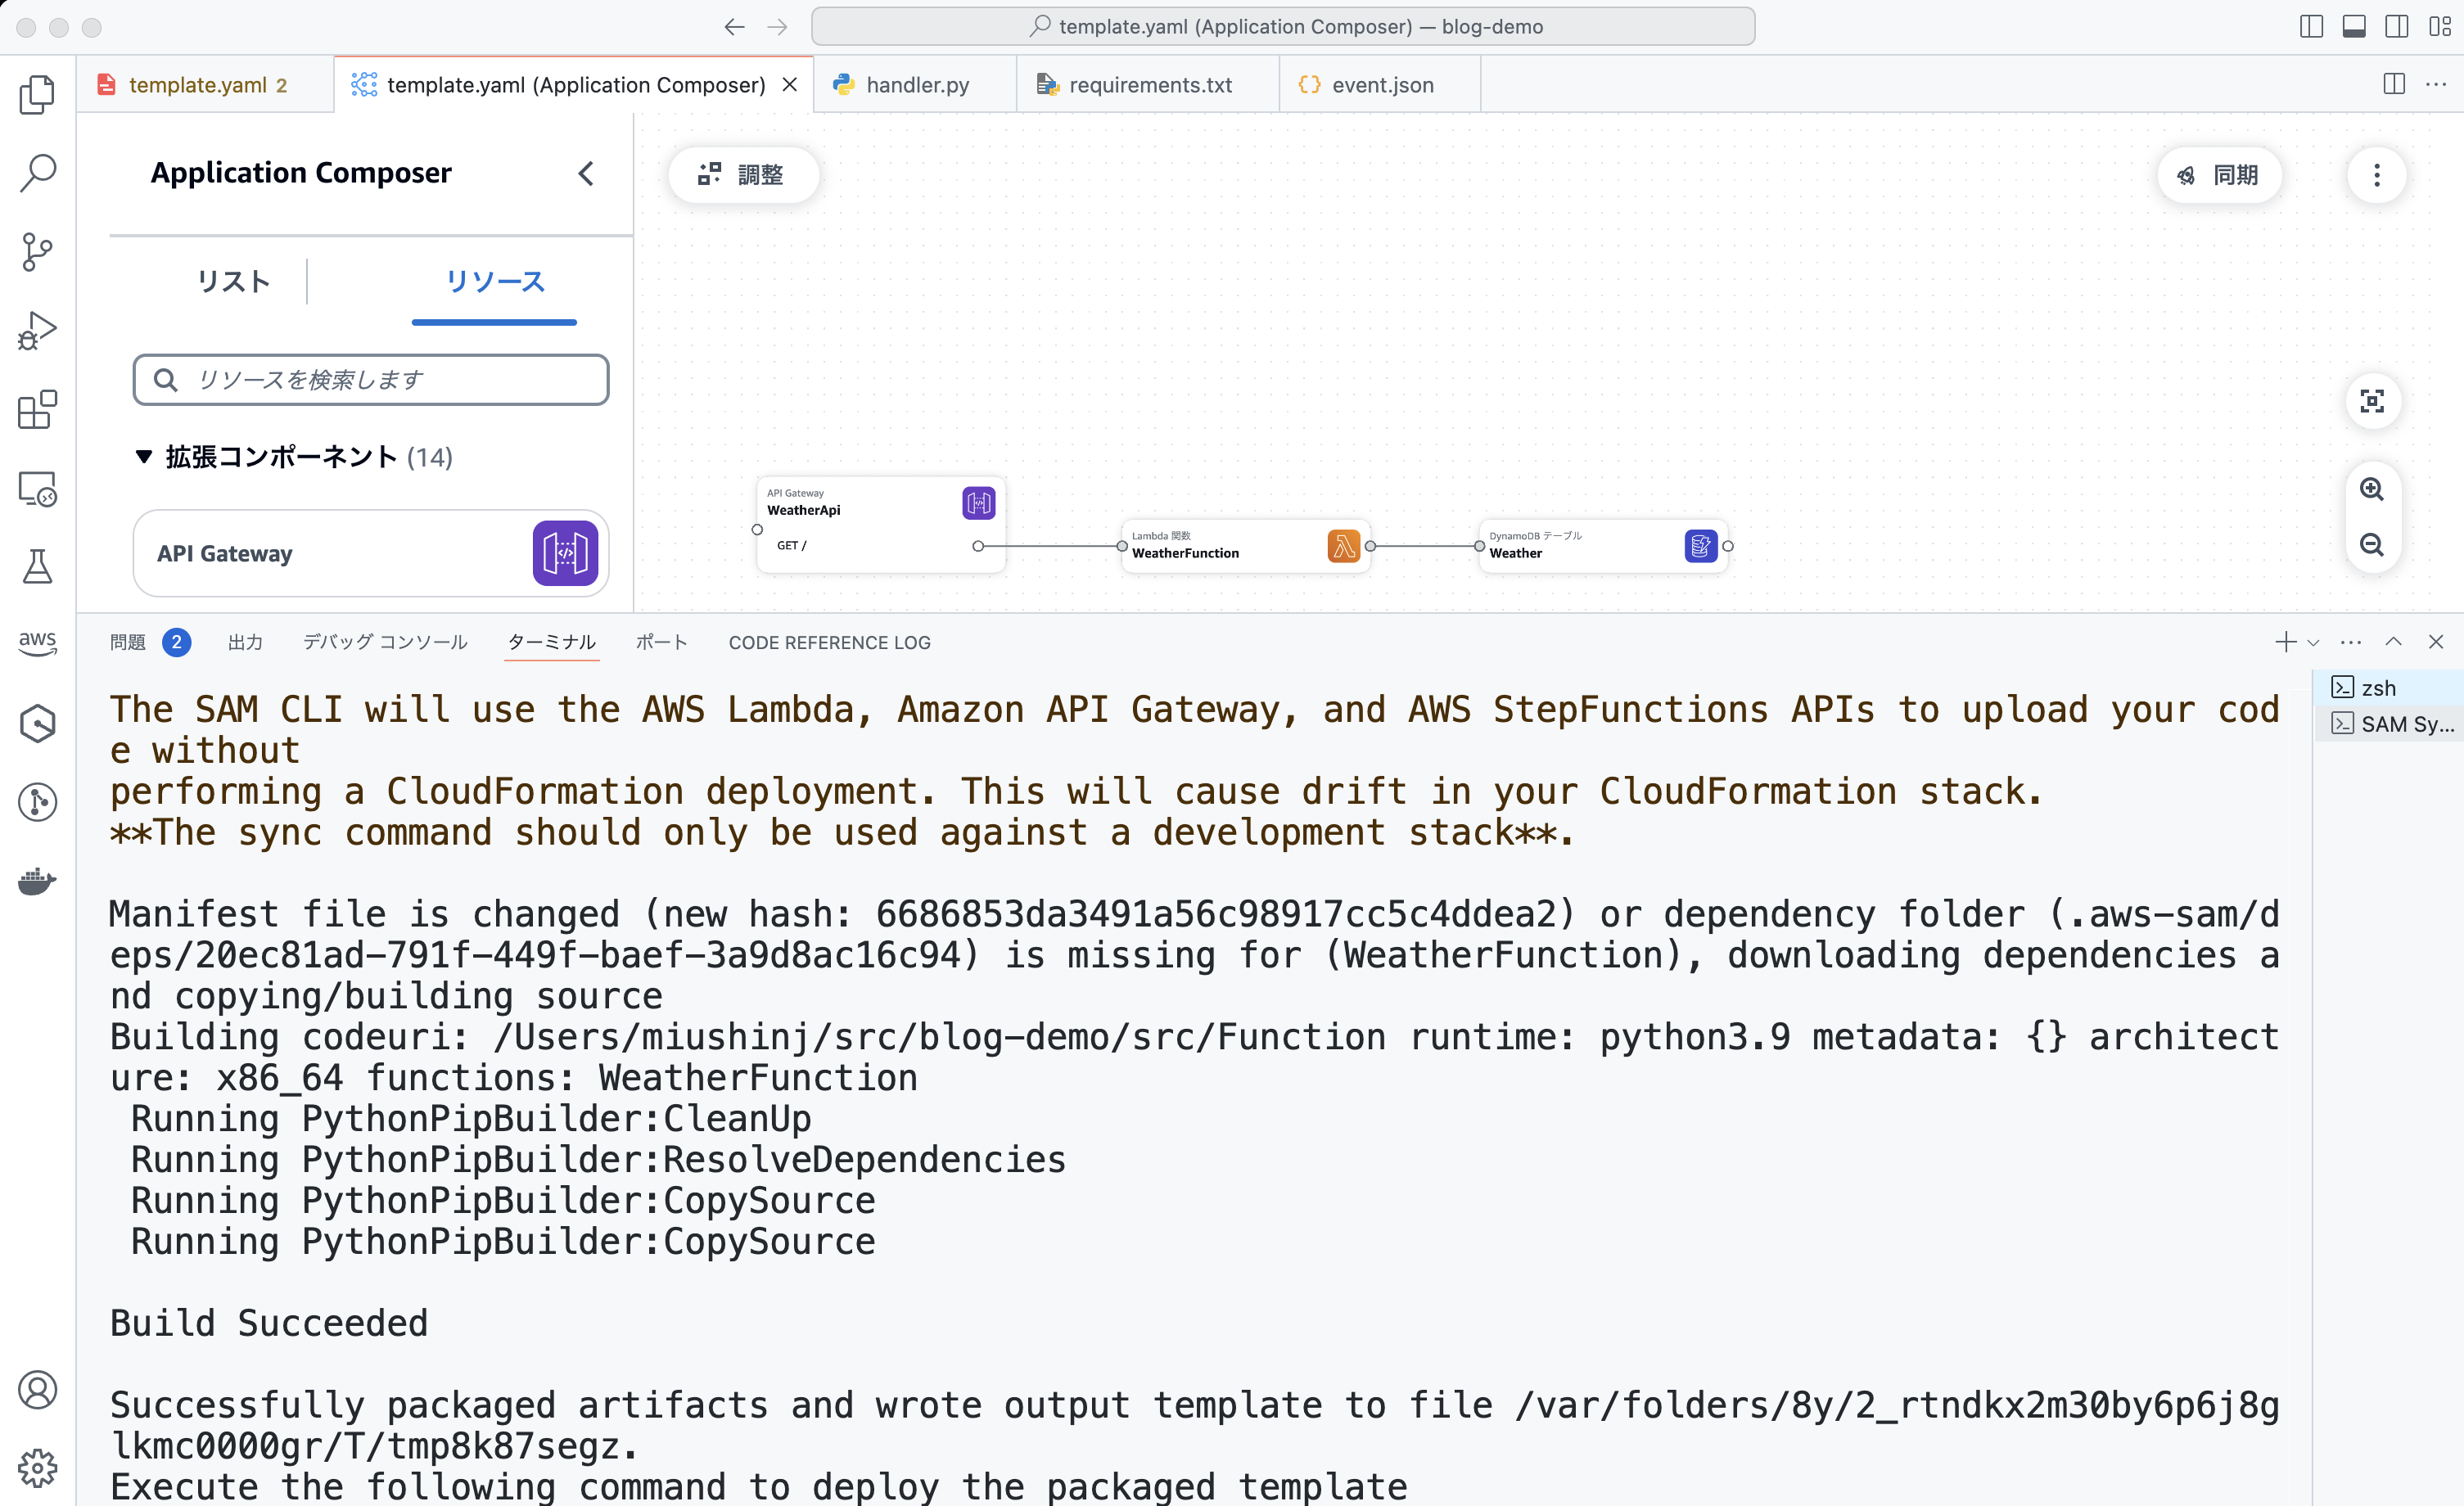
デプロイ
つらつらとデプロイされていきます !
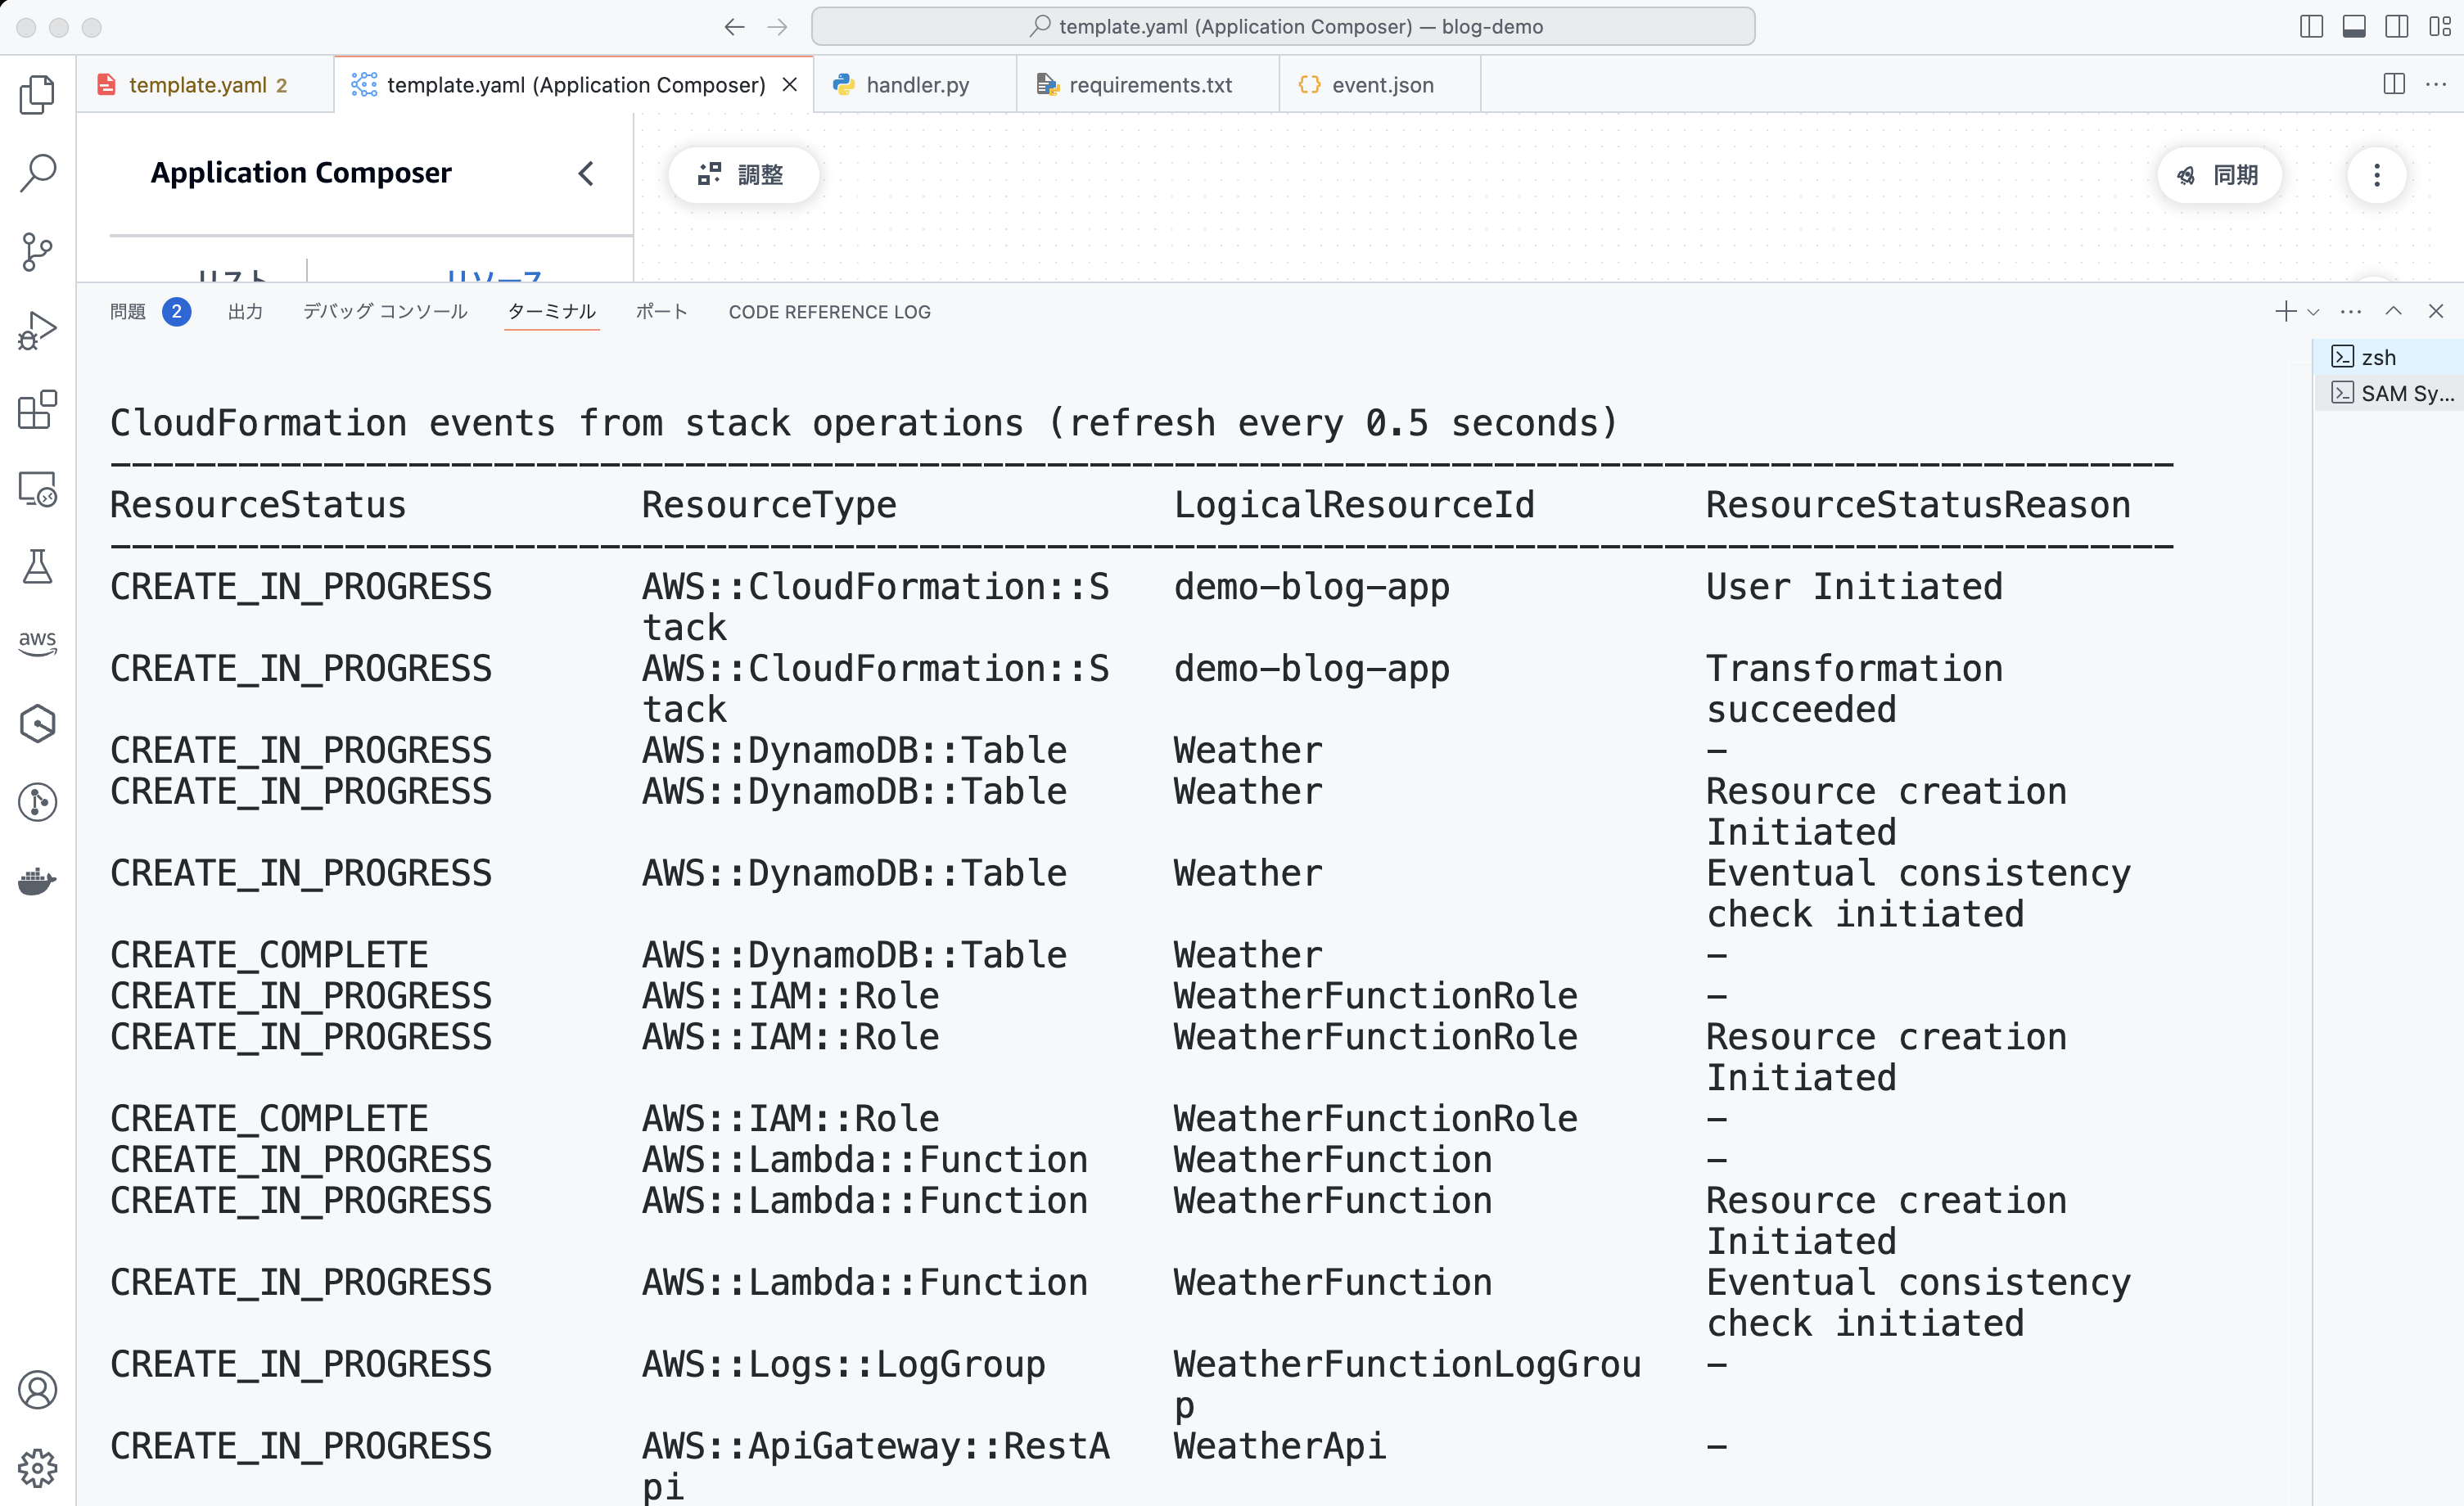
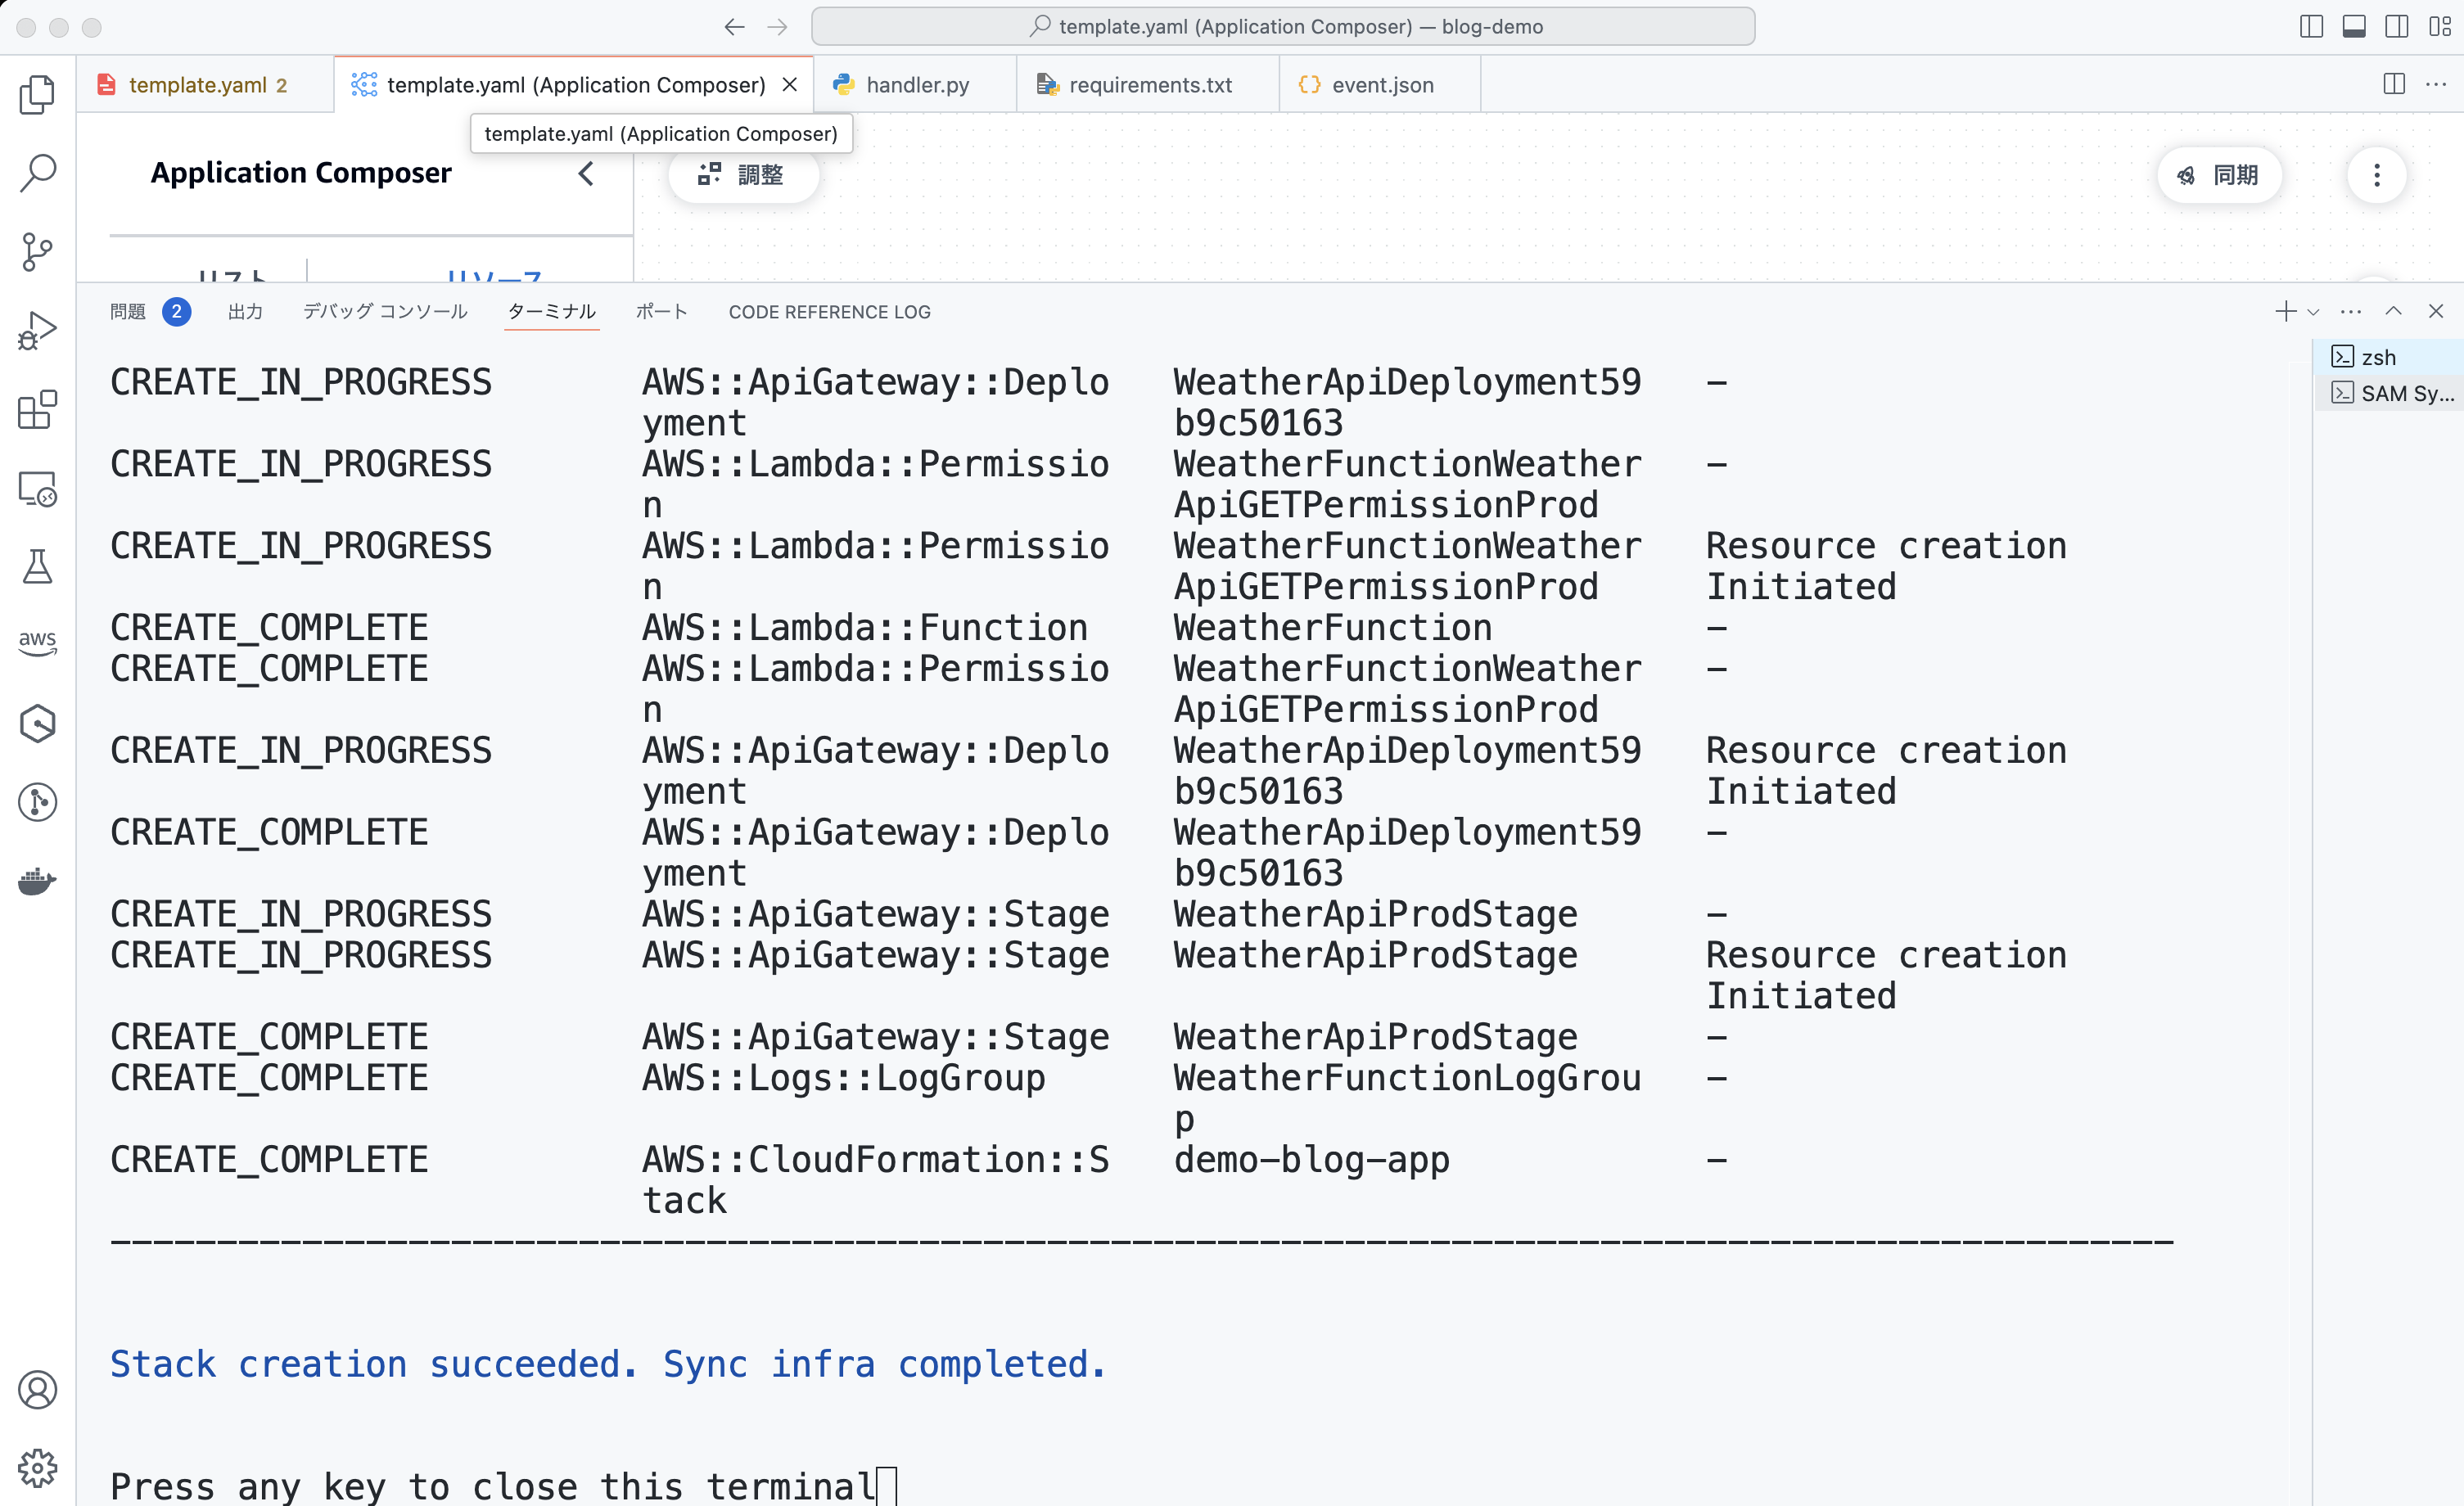
CloudFormation スタック作成完了
CloudFormation のスタックが作成されました ! マネジメントコンソールで CloudFormation のダッシュボードでもスタックが作成されたことを確認できます。
これで AWS 環境へ Lambda、DynamoDB、API Gateway をまとめてデプロイできました !
ここまでの振り返り
いいですね ! 一度ここで一息入れましょう。コーヒーや紅茶を用意するのもいいですね。休憩したら実施してきたことを振り返ってみましょう。
-
Infrastructure Composerで API Gateway、Lambda 関数、DynamoDBを作成
-
イベント情報のファイルを作成
-
sam build でローカルビルド
-
sam local invoke -e events/event.json でローカル環境で Lambda 関数を実行
-
AWS 環境へ Lambda をデプロイ
ここまで実施してきました。
後半はローカルで開発を進めていきましょう。
-
Lambda 関数の実装
-
Lambda 関数の単体テスト
-
Lambda 関数のデバッグ
-
AWS 環境へ Lambda をデプロイして更新
をお話していきます。
Amazon Q Developer でコードを生成
では、せっかくなので Amazon Q Developer にコードを書いてもらいましょう。私の拙い英語力で恐縮ですが、以下のようにコメントを入力してみます。
コードの自動化
すると ・・・おお、コードが補完されていきました !

返却する JSON コードも・・・

最後の例外処理も補完してくれました !

生成 AI もうまく活用して、開発速度を上げていきたいですね !
⚠️注意: 生成 AI が提案・補完するコードは必ずしも正解のコードとは限りません。今回はそのまま利用しましたが、本来であれば提案・補完されたコードを修正しながら仕上げていくのが本来の開発手法です。
天気情報の実装
同じように
-
DynamoDB の Weather テーブルから CityCode と Date を指定して天気情報を取得
-
天気情報を返却
を実装していきます。こちらも Amazon Q Developer を使いながら、修正を加えて・・・
こんな感じになりました!ファイル名も weather.py へ修正しています。あくまでサンプルコードですので、みなさんも自由に実装してみてくださいね。
Lambda 関数の単体テスト
先ほど sam local invoke で動作確認ができました。できれば単体テストを組み込んで継続的にテストが実行され、壊れていないか品質を担保したいところです。サーバーレスにおけるテストの考え方は Serverlessをテストしよう / Serverless Testing - Speaker Deck もご参照ください。
今回は Lambda の ベストプラクティス でも紹介されているとおり、Lambda ハンドラーをコアロジックから分離し、かつ外部に依存しないロジックを切り出してテストするのが推奨されています。
今回は Python を採用していますので、pytest を使ってテストコードを書いて実行してみましょう。
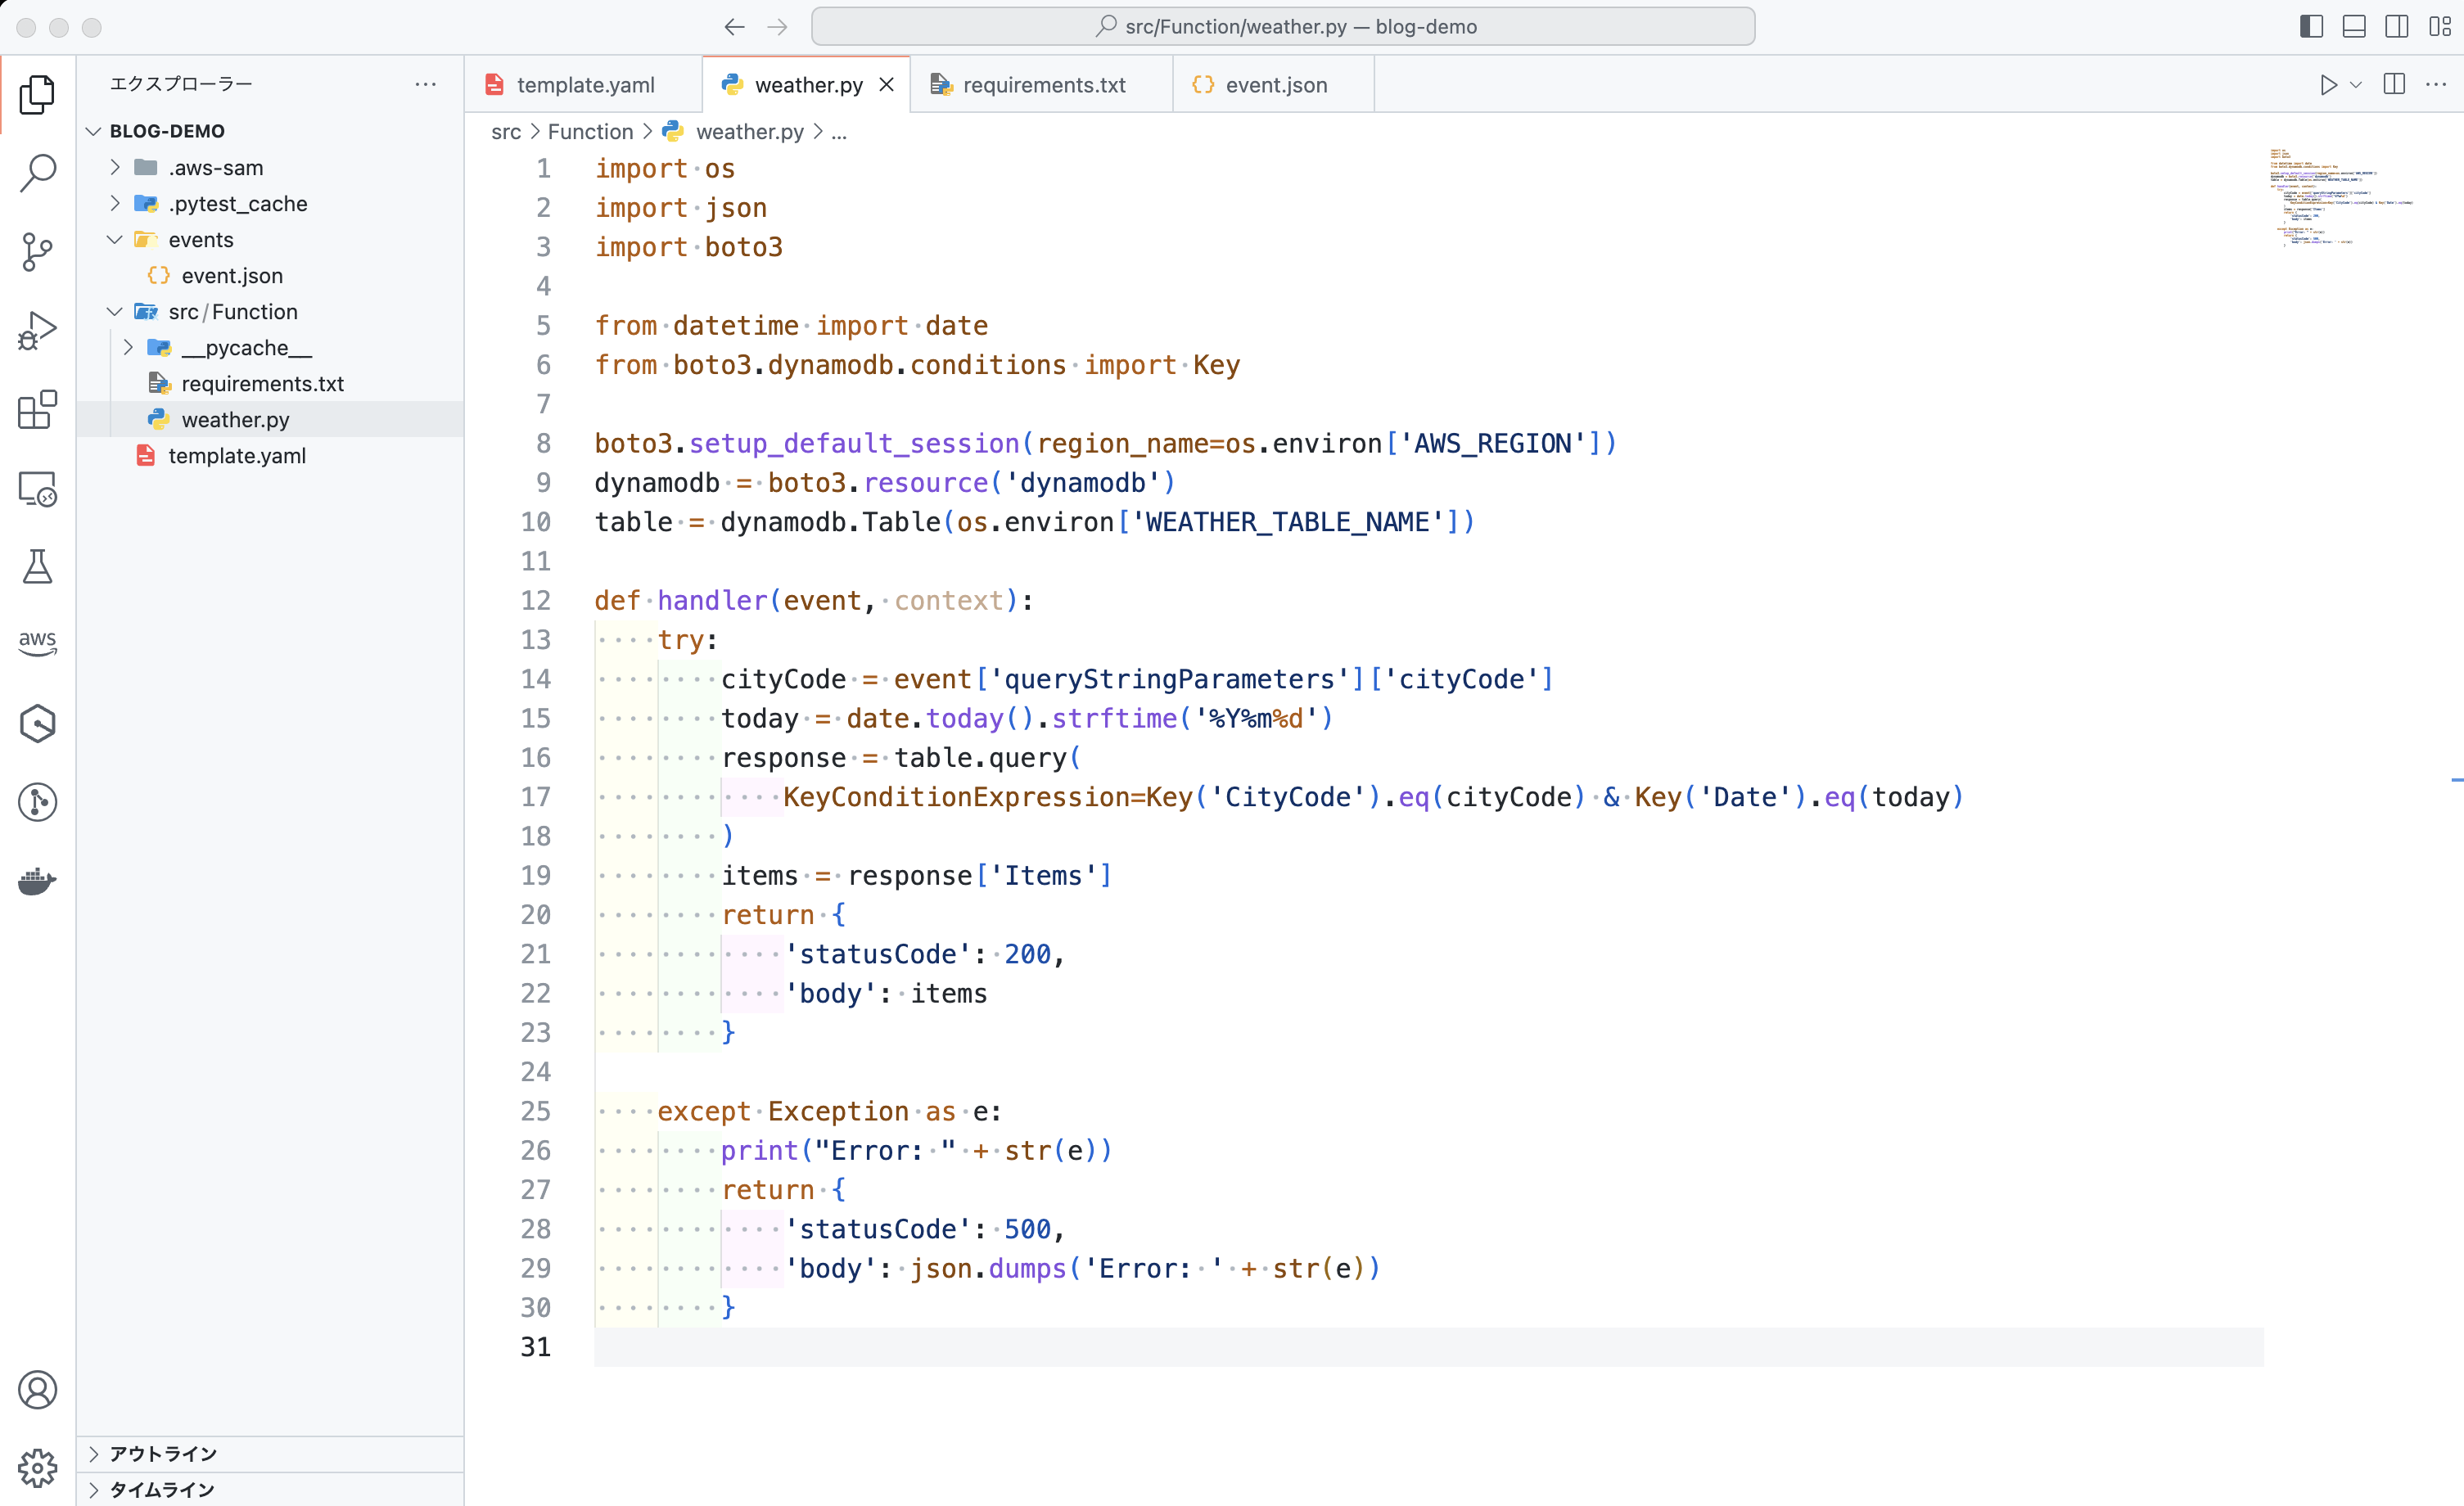
対象となるロジック
対象となるロジックは、例えばこちらのように DynamoDB から取得してきた Items があればその内容を、無ければ {'message': 'No items found'} という固定の JSON を返却するとします。
環境変数をセットアップ
Lambda 関数に渡す環境変数を CLI でセットアップしておきます。
export AWS_REGION=ap-northeast-1 export WEATHER_TABLE_NAME=Weather次に単体テスト用のディレクトリとして、 tests を作成し、その配下に test_weather.py と__init__.py を作成しておきます。
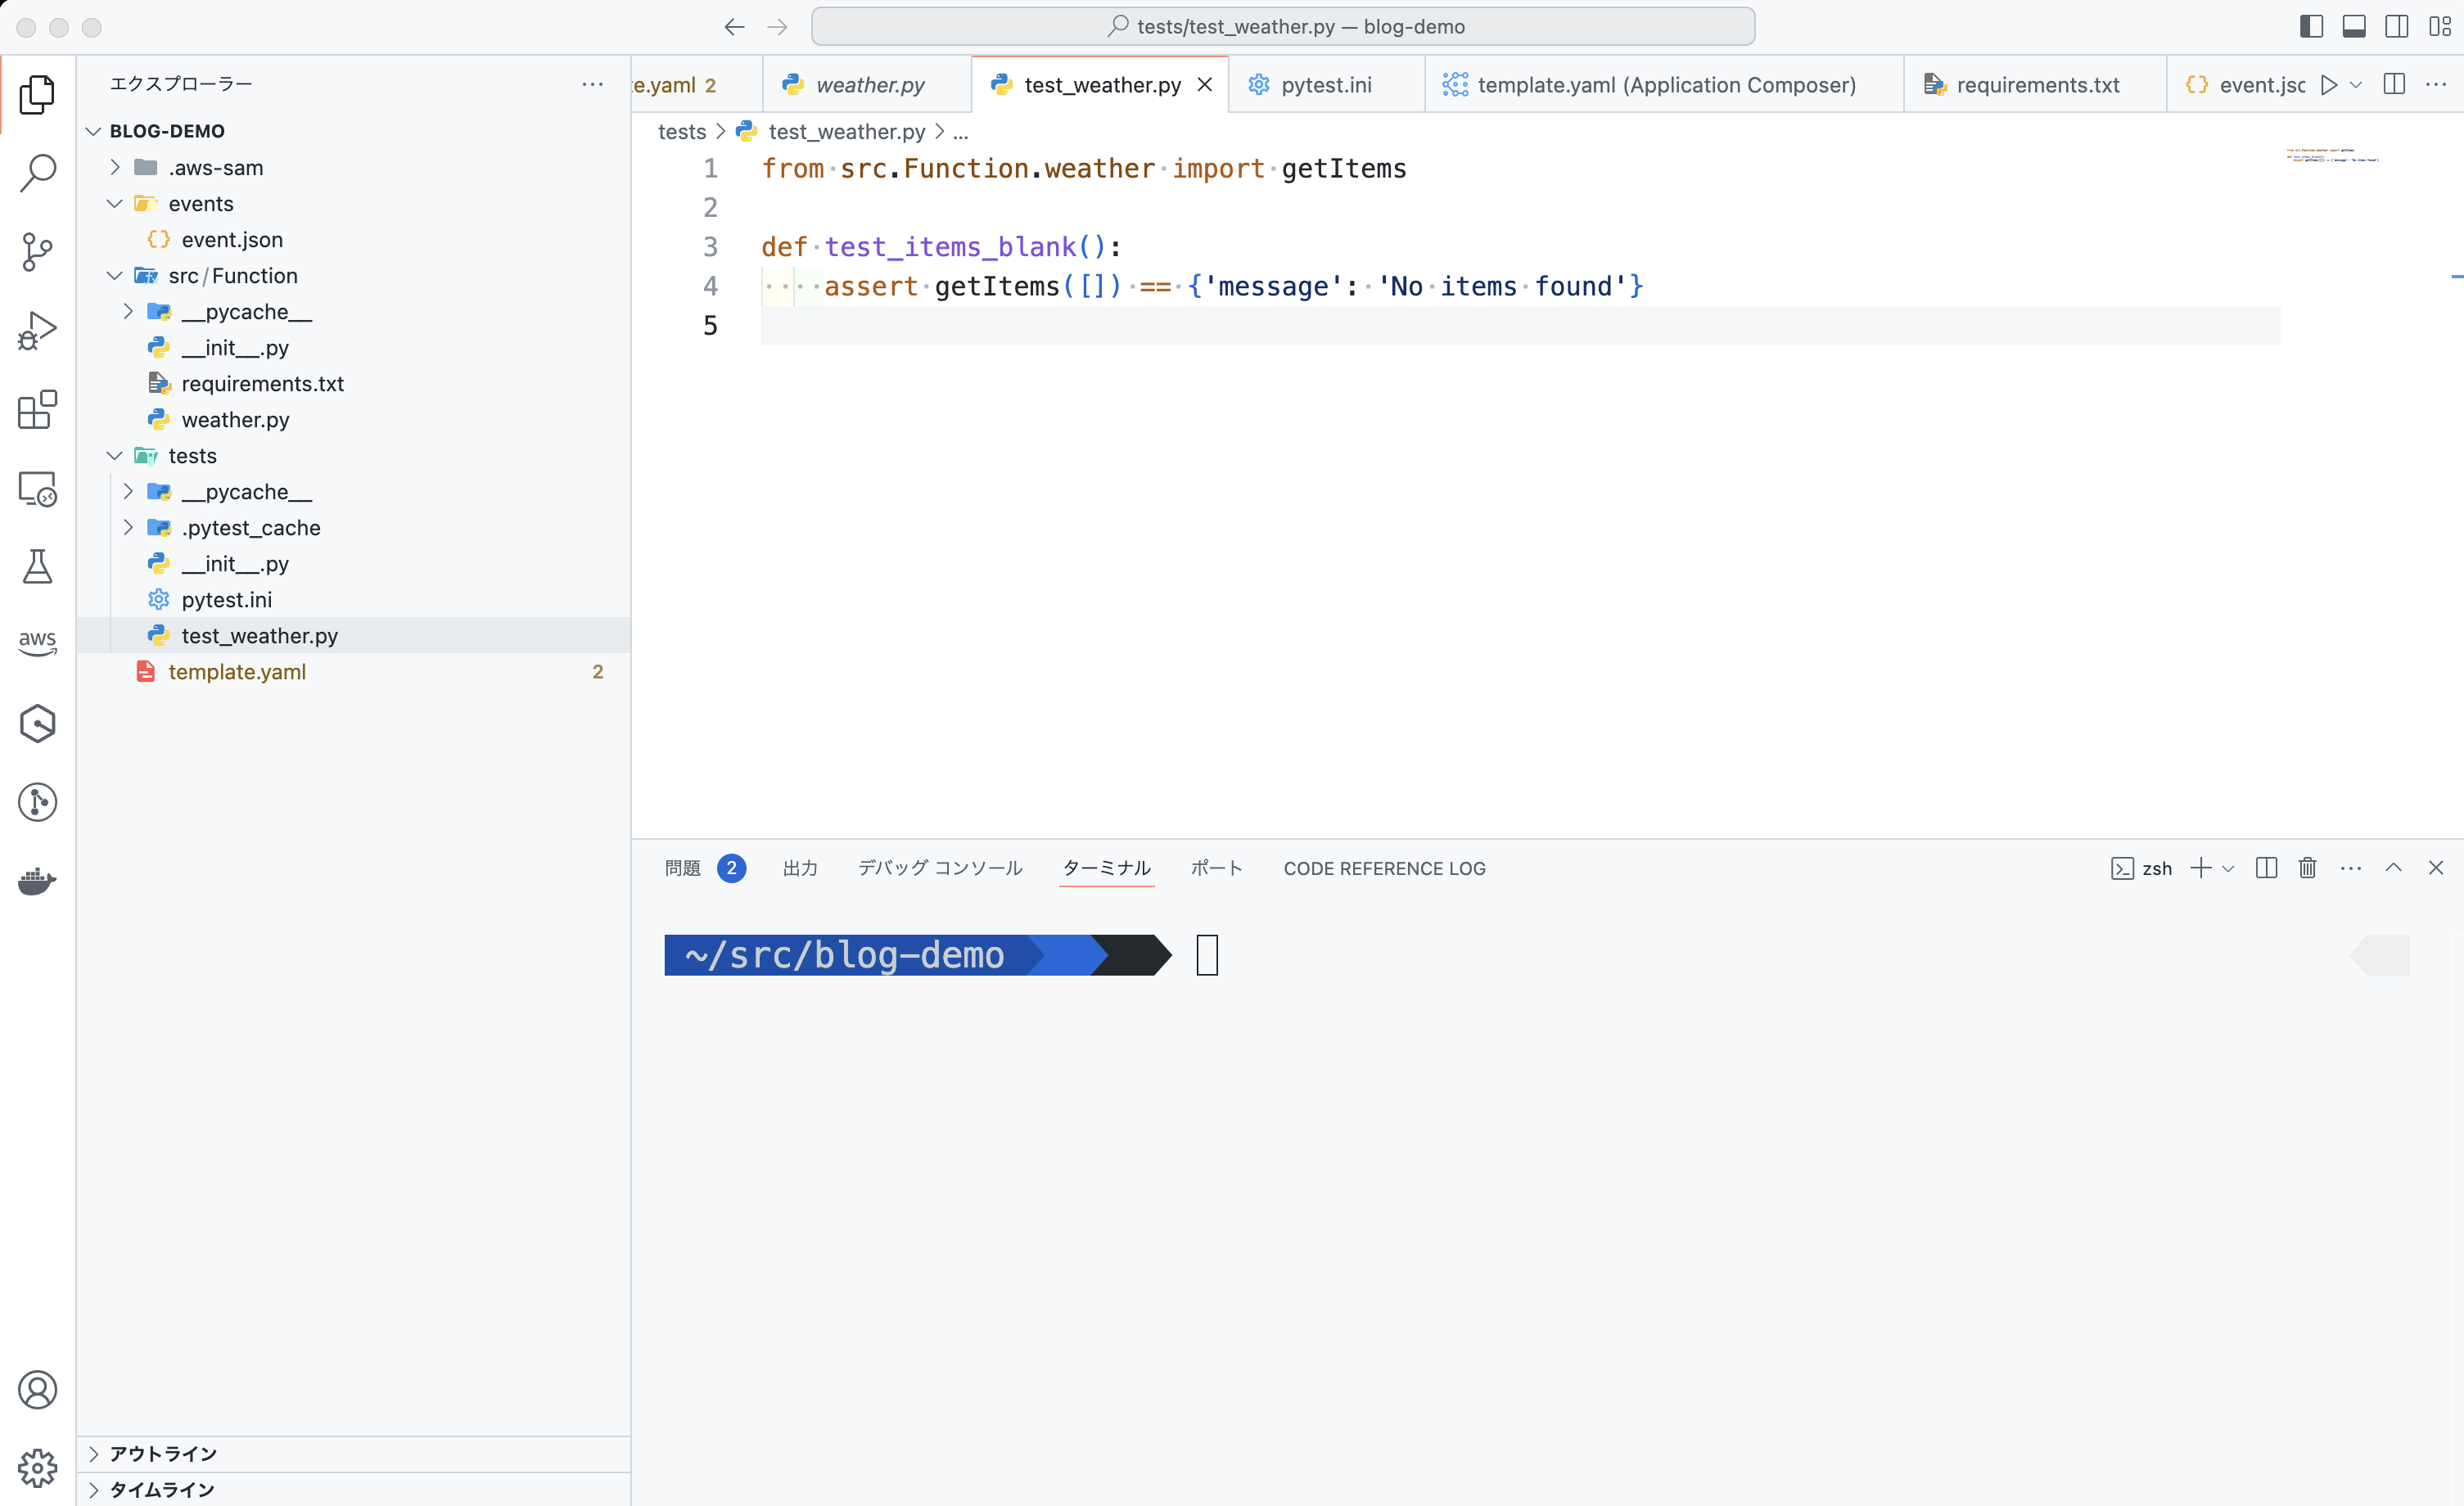
作成した test_weather.py にテストコードを書いていきます。まだ getItems という関数はありませんが、これから作るとしましょう。
pytest を実行
この時点で pytest を実行して、エラーが出るか確認します。単体テストは Red (失敗) から始めましょう。
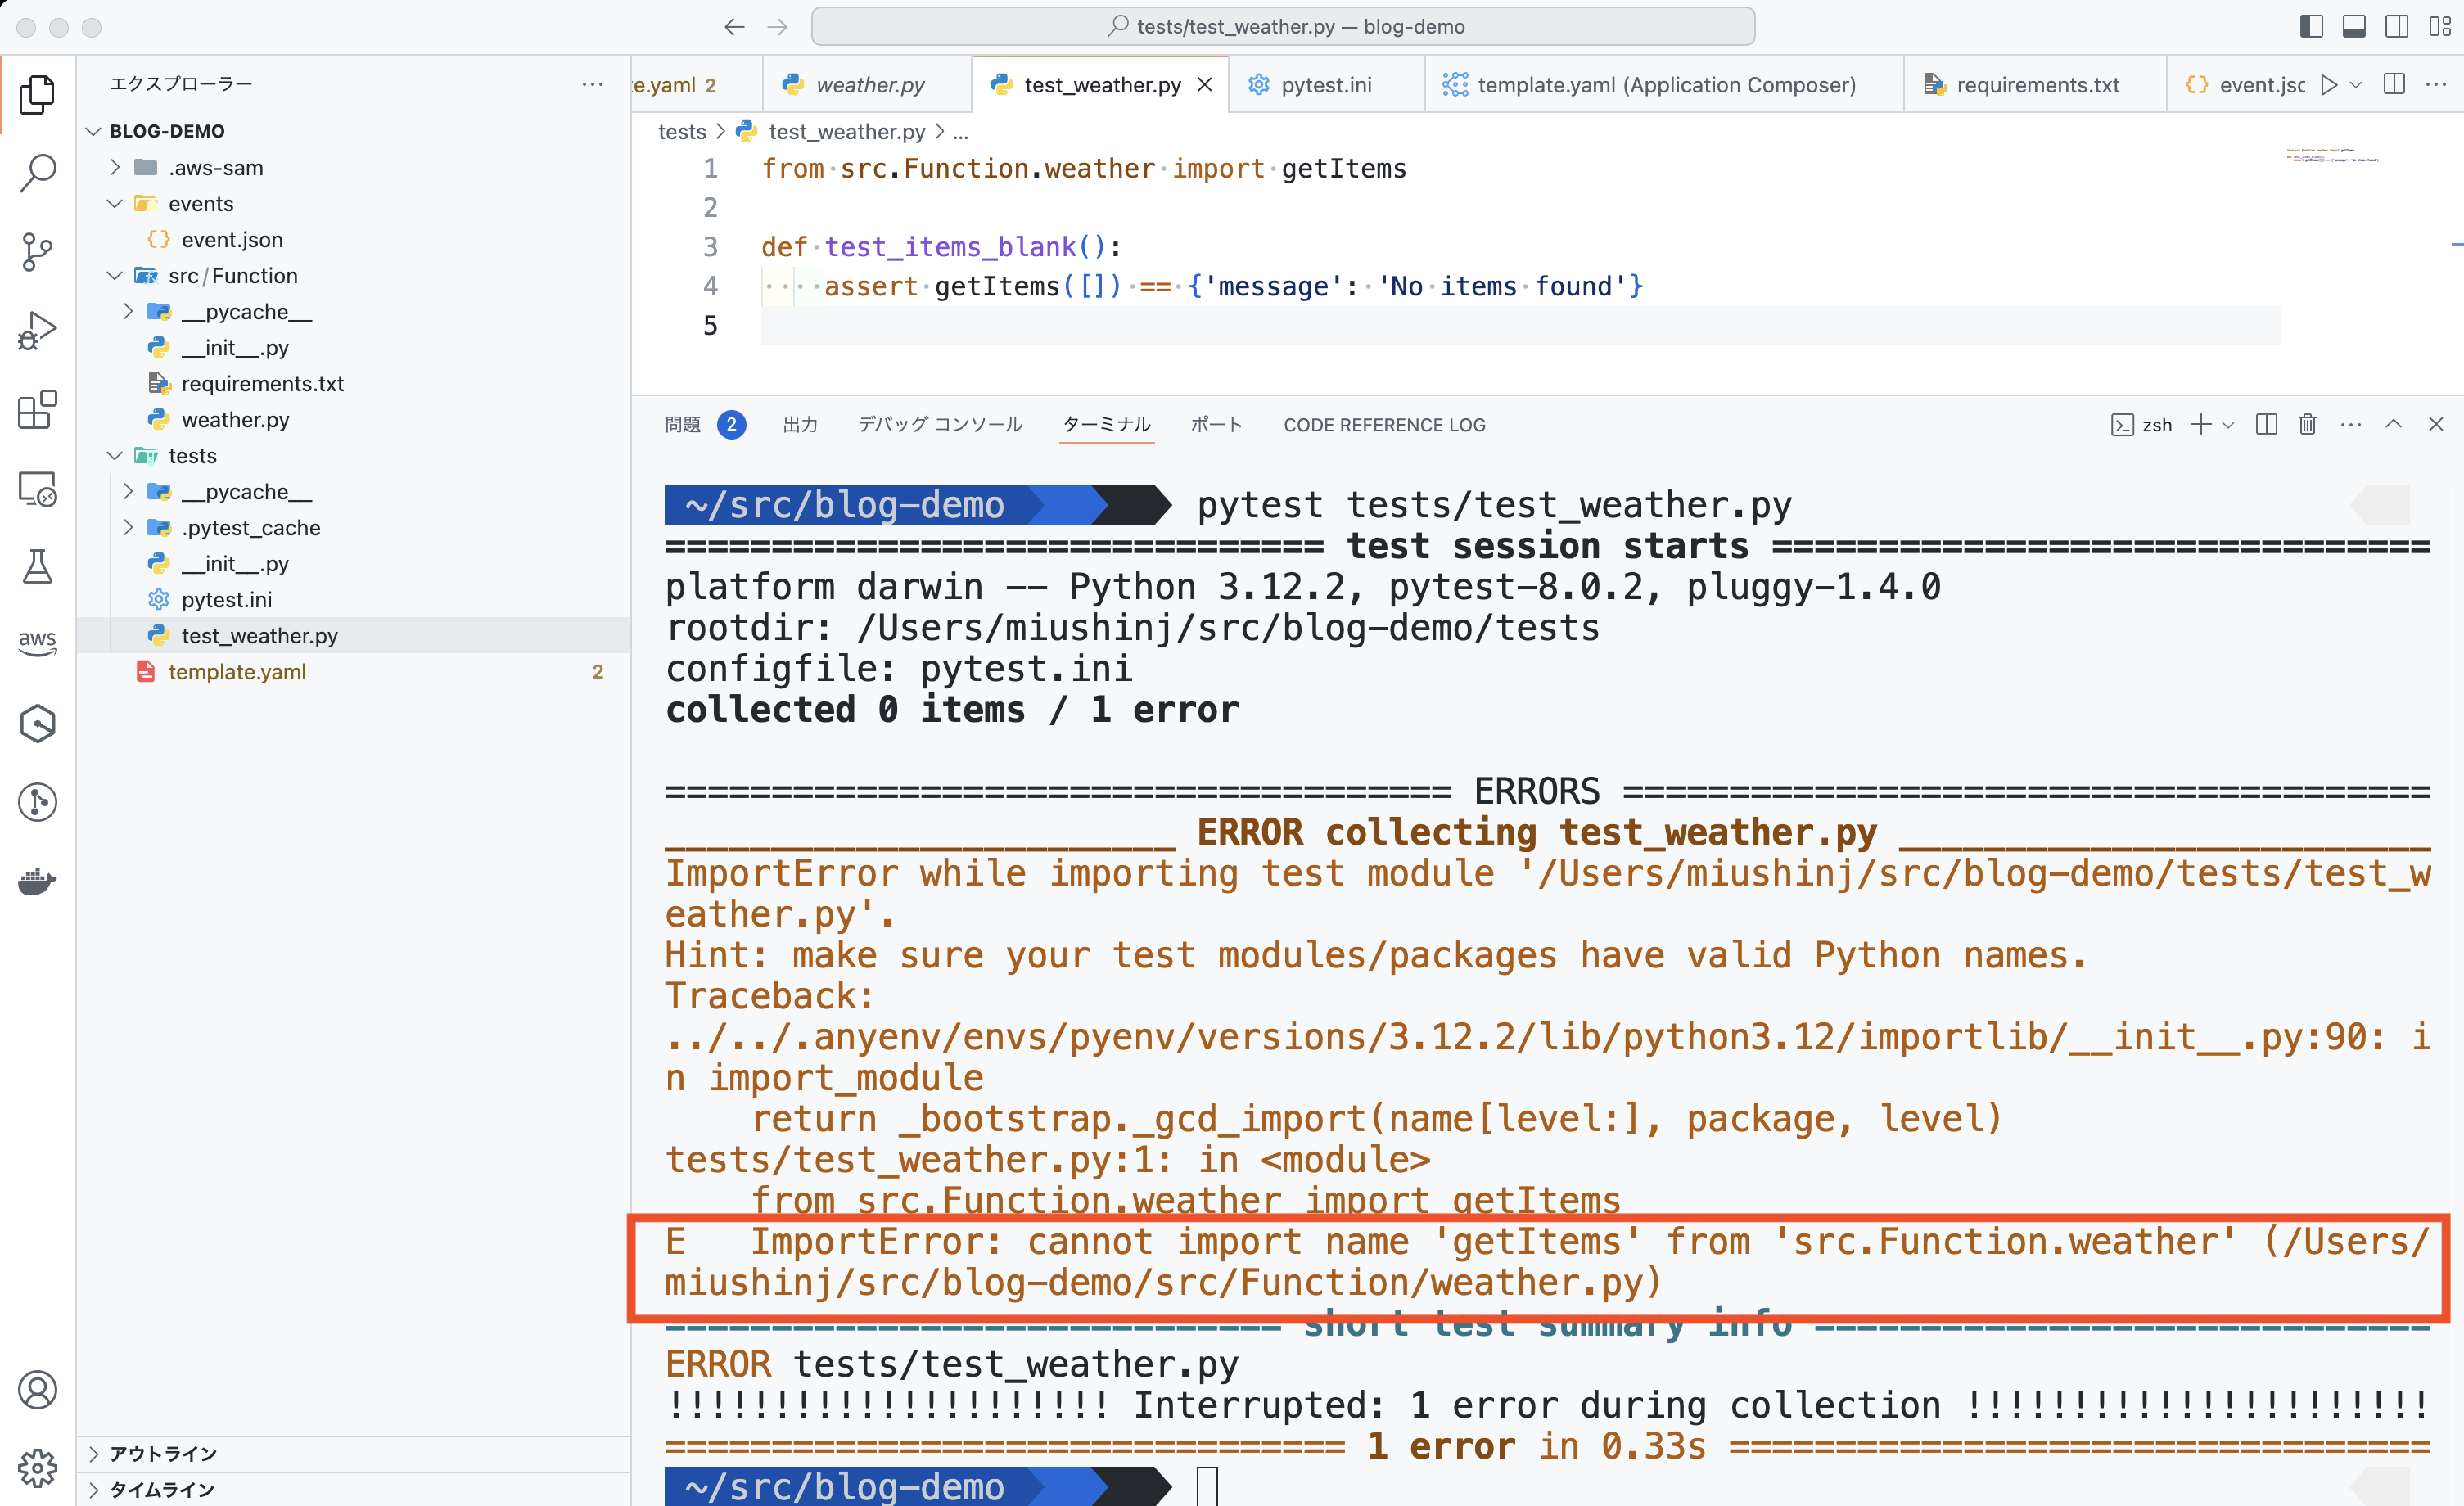
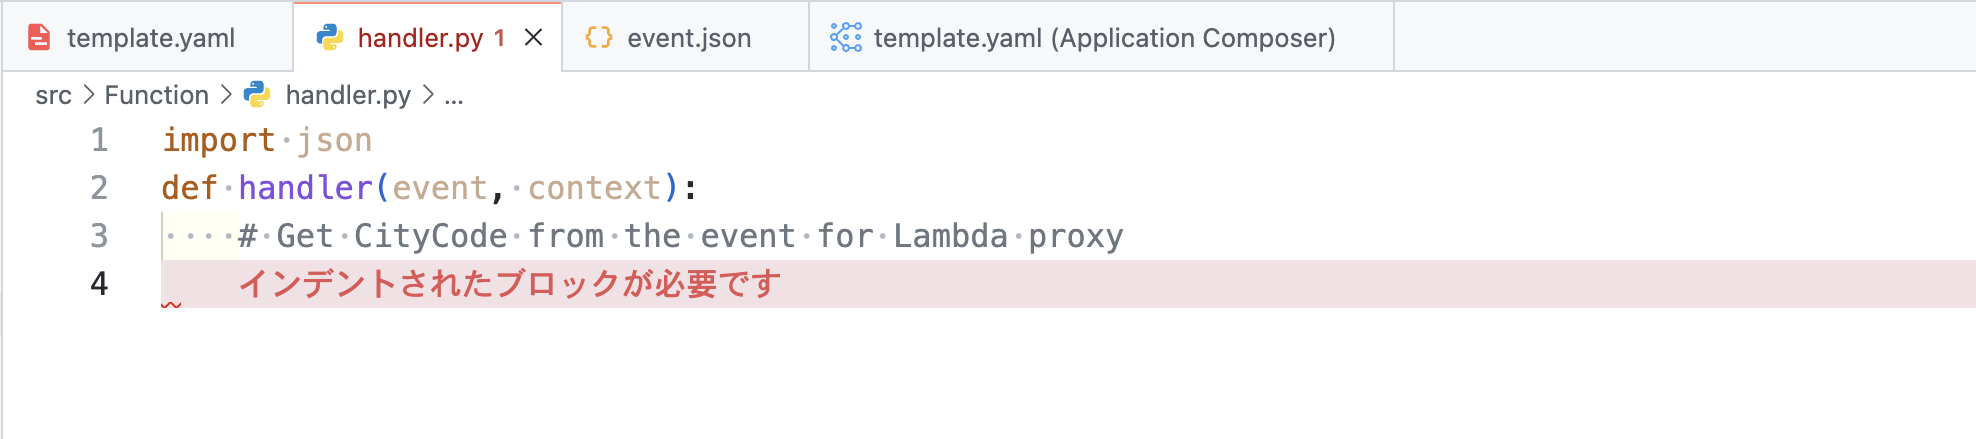
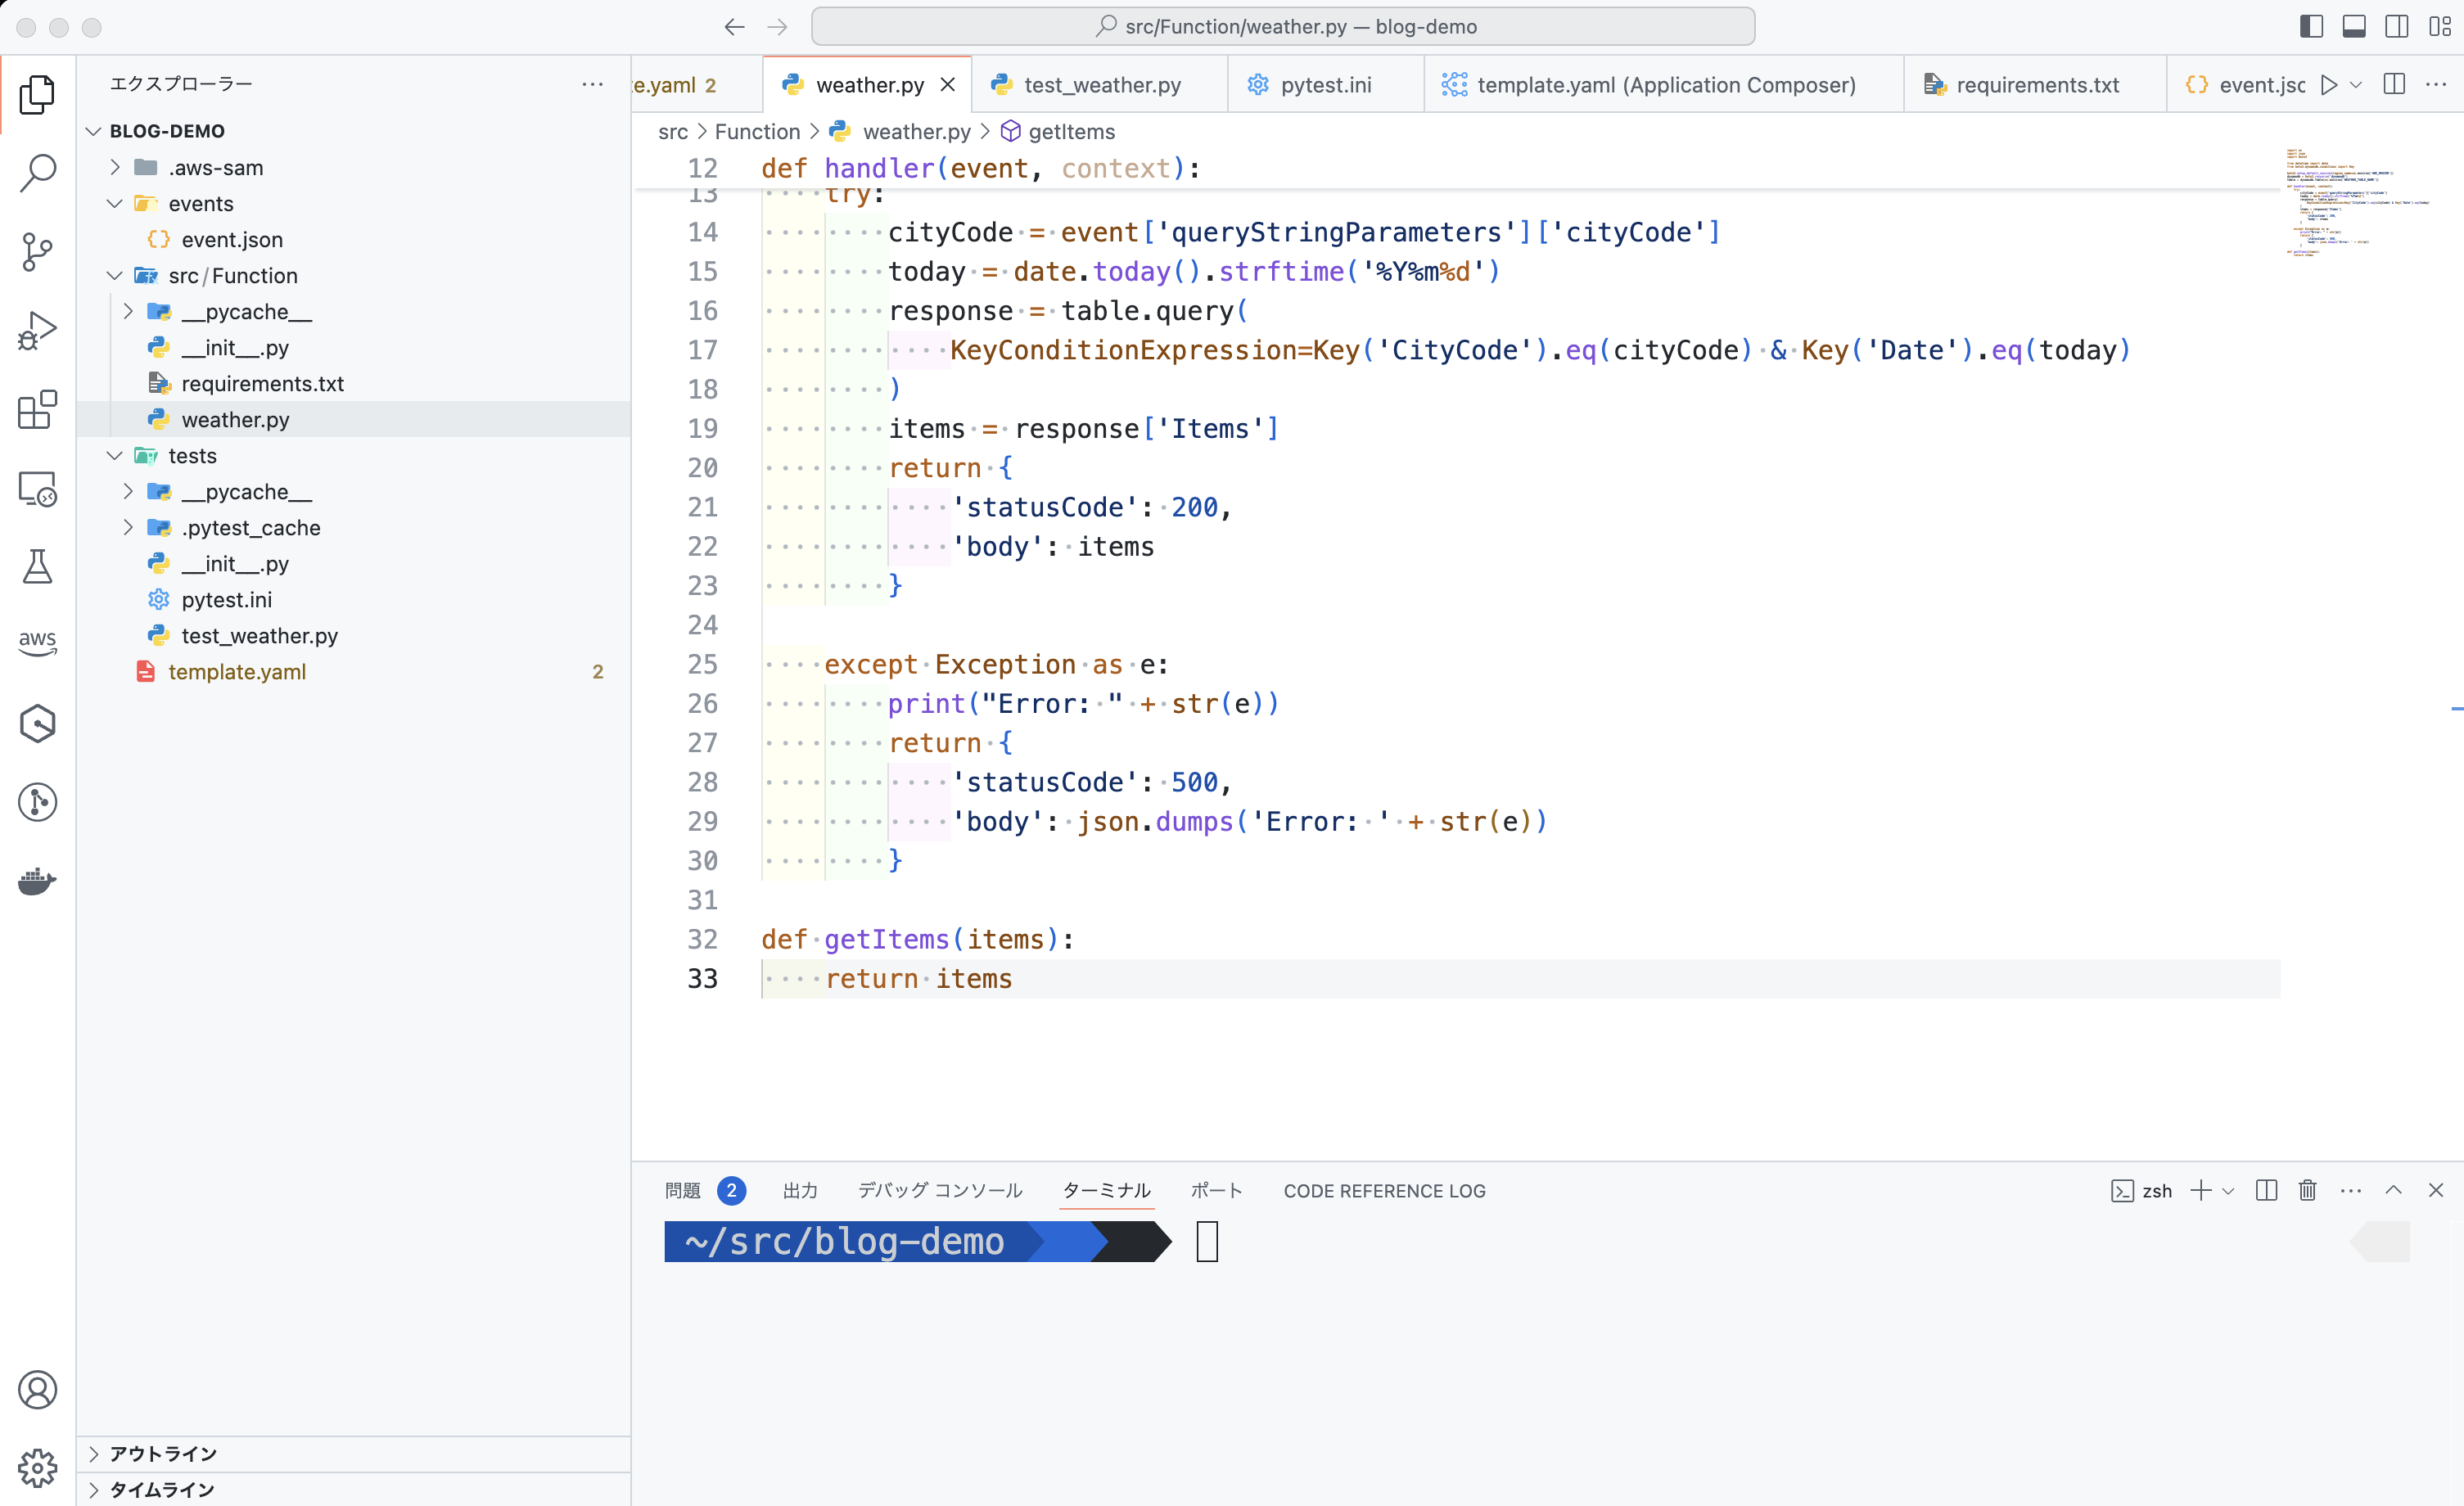
getItems 関数を実装
無事にエラーが出ました。では Lambda 関数に getItems 関数を実装していきます。ここでは渡された配列をそのまま返却する実装として、テストが失敗するようにしました。
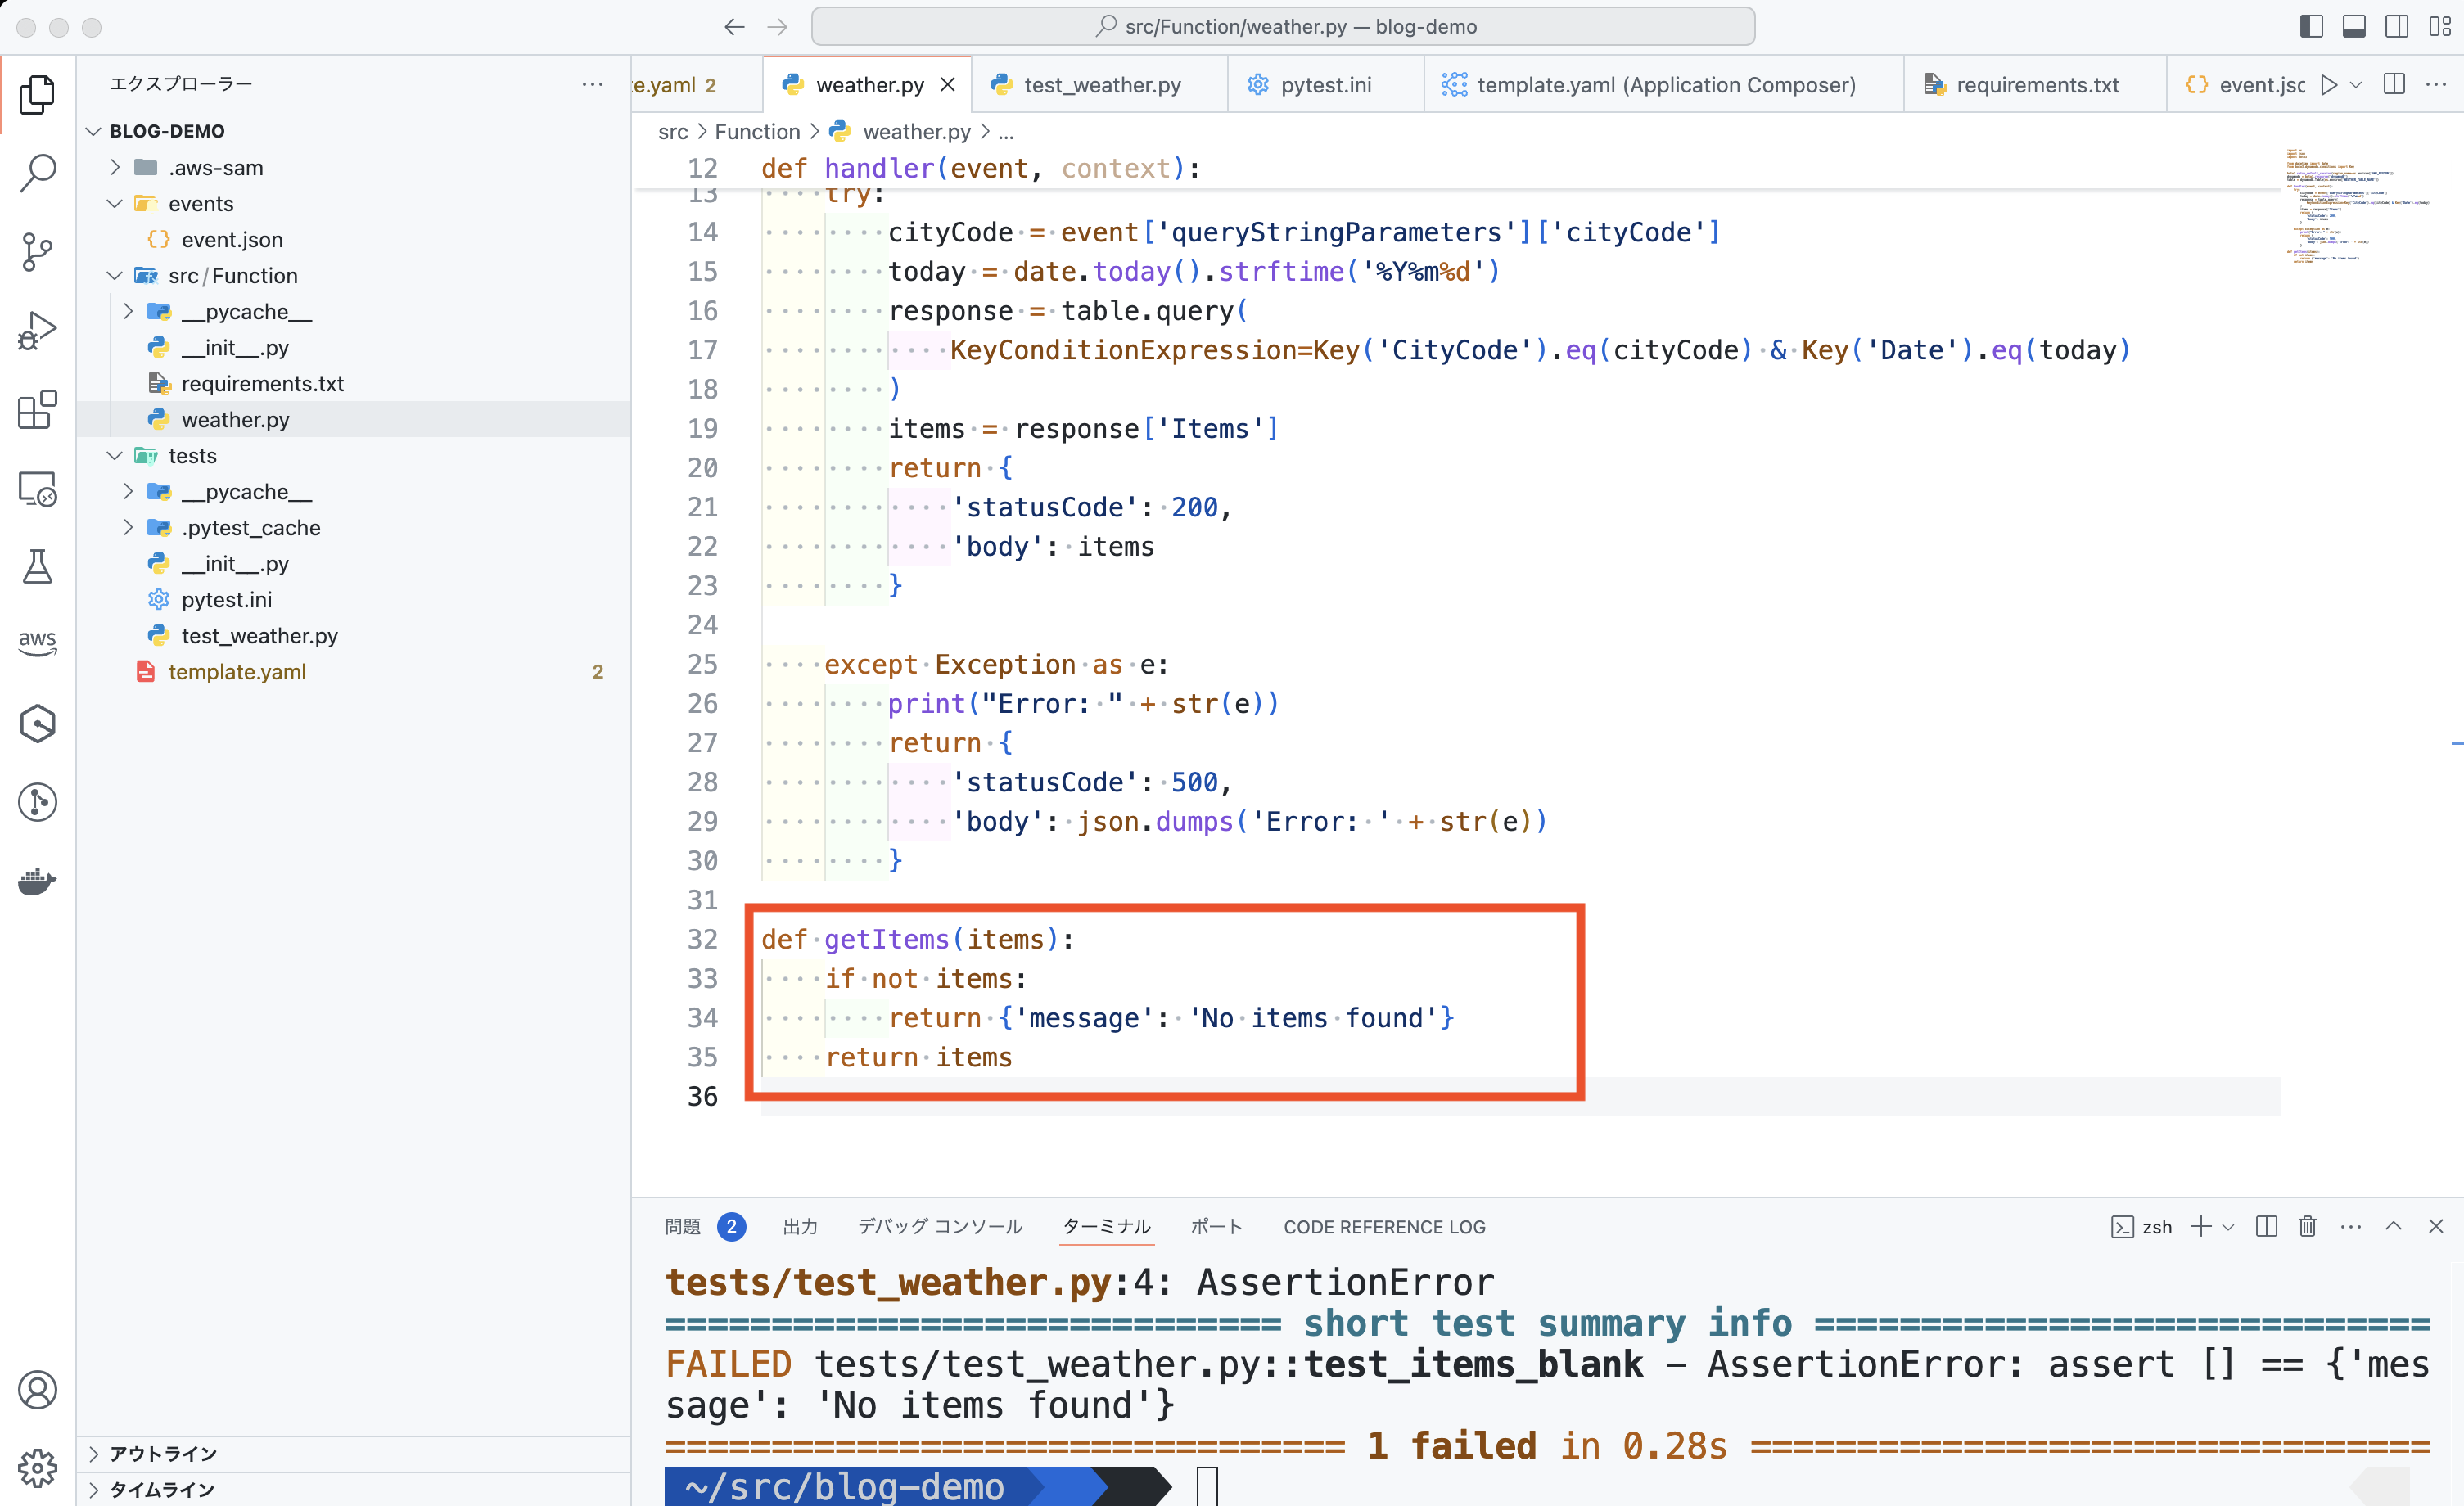
pytest を実行
再度 pytest を実行して、エラーが出るか確認します。

実装
いいですね!では Green (成功) になるような実装をしていきましょう。
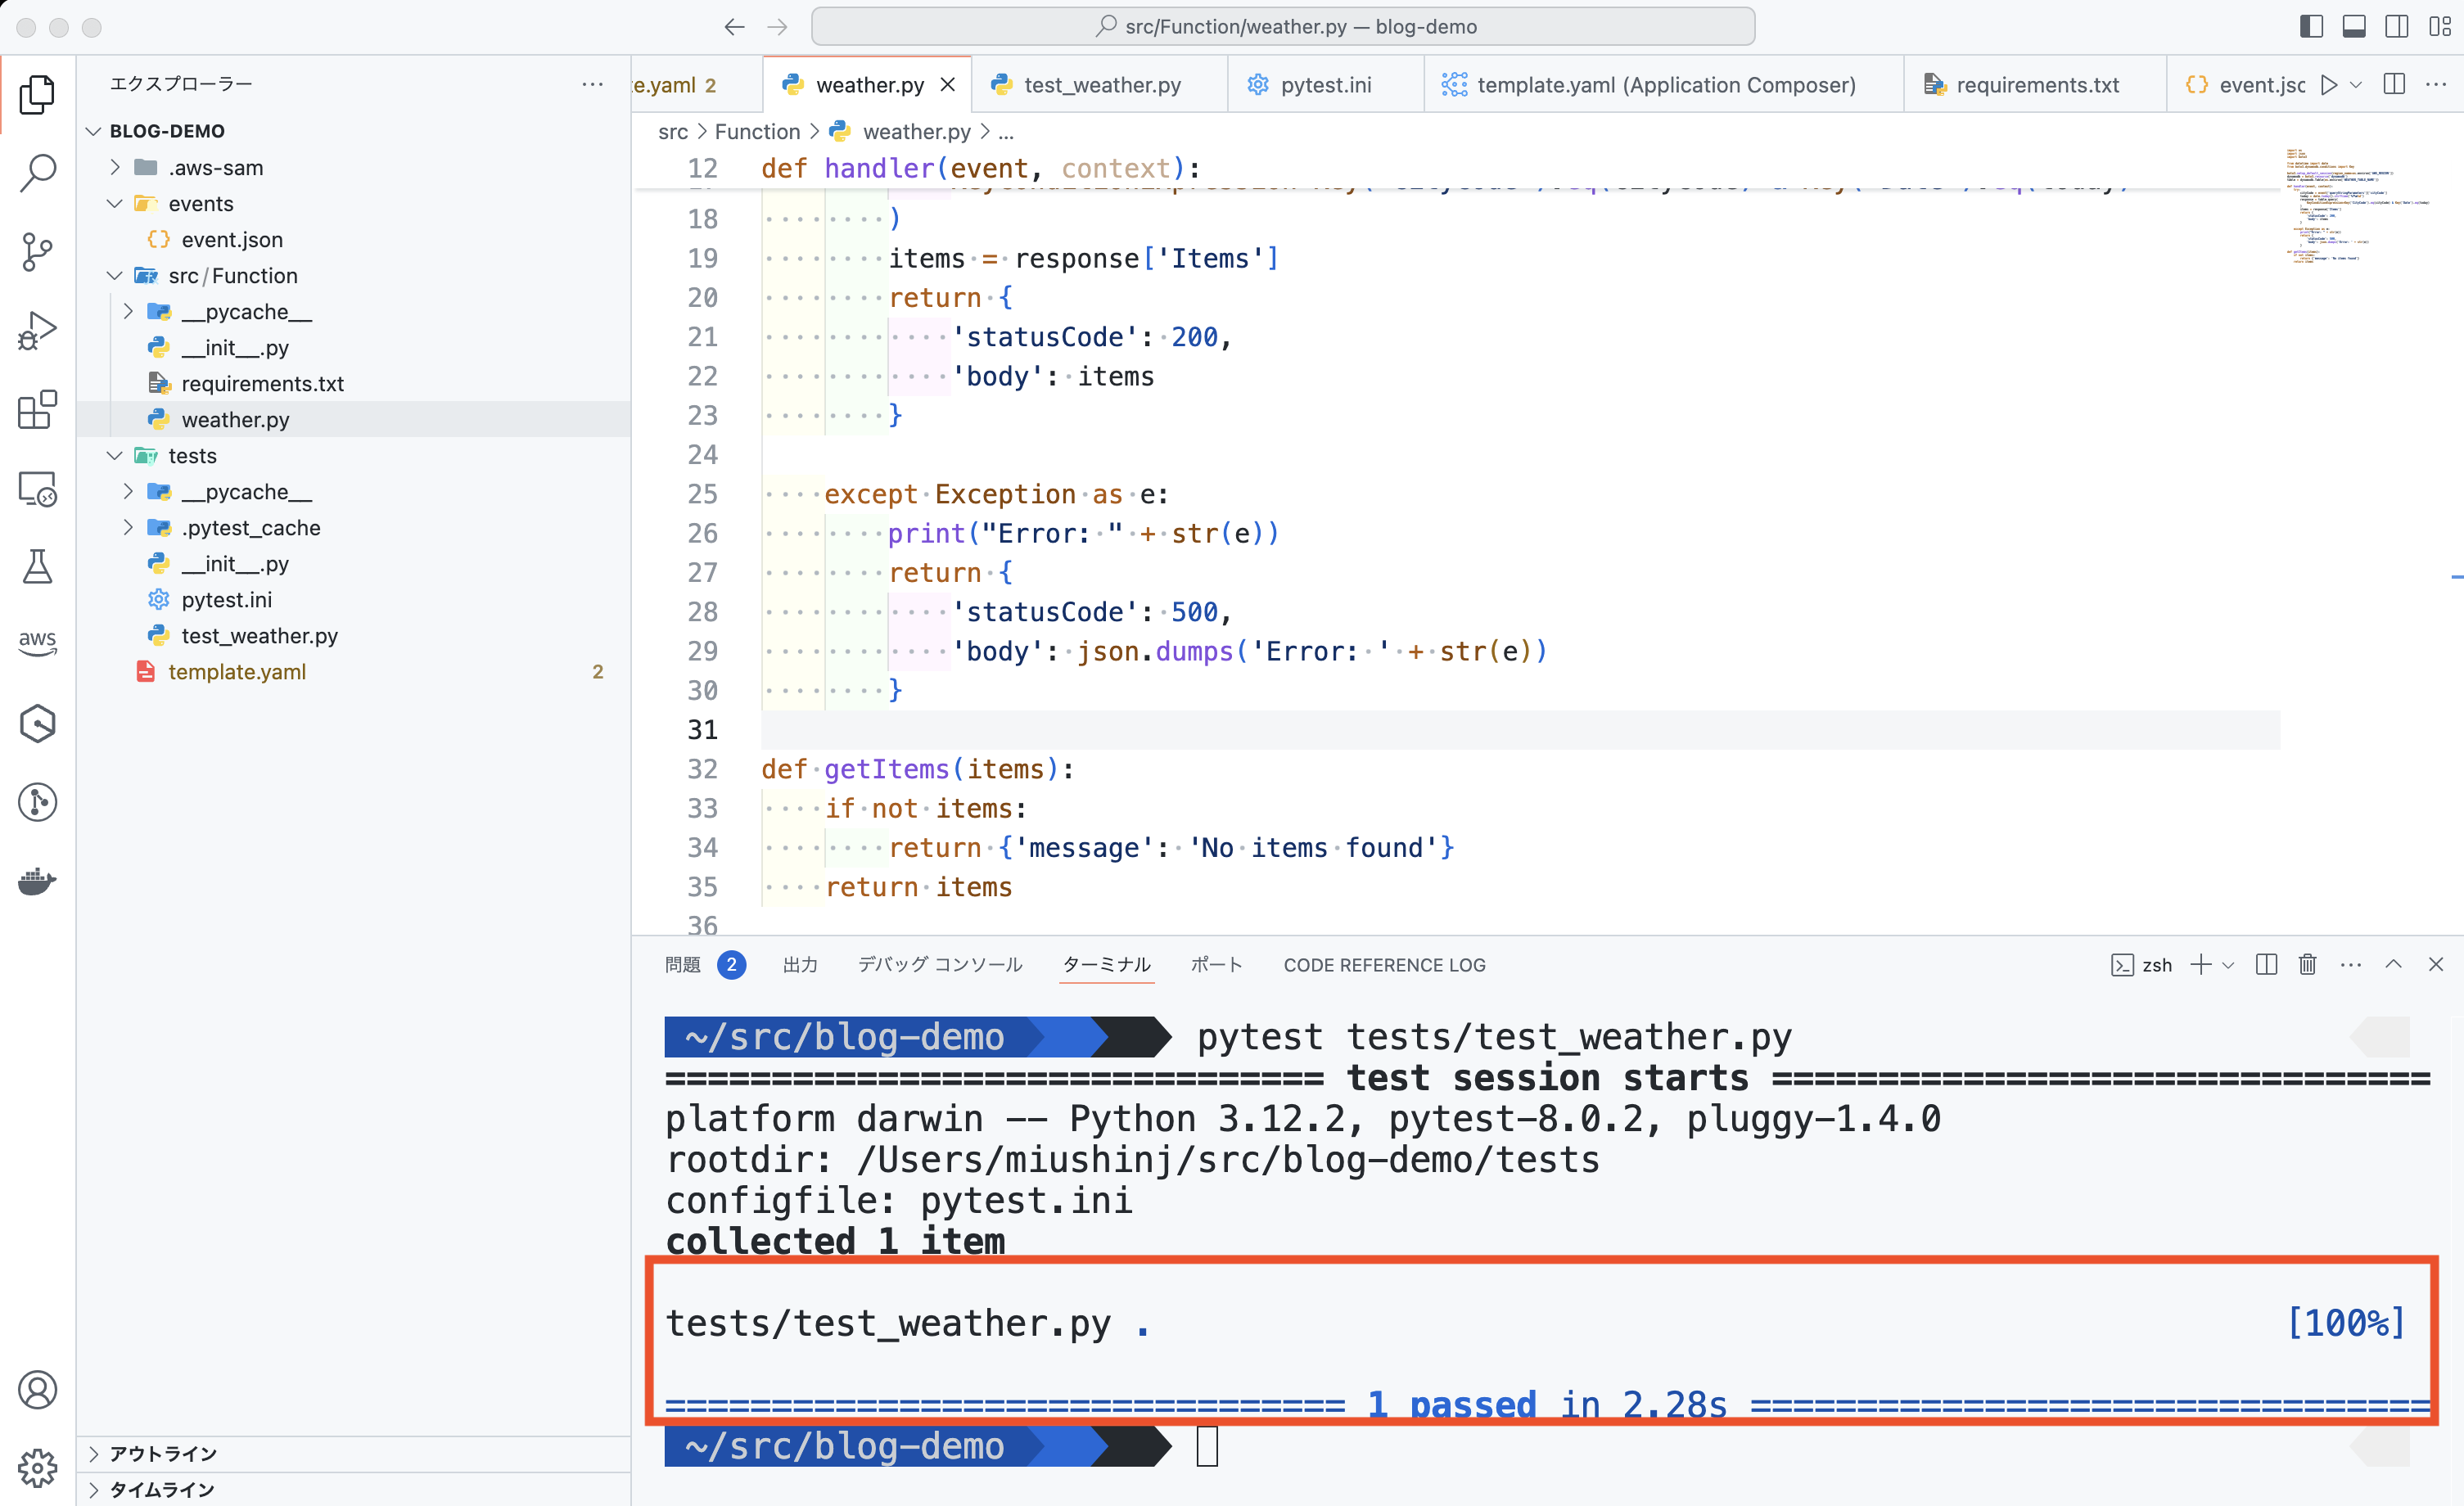
テスト成功
これで pytest でテストが通りました !
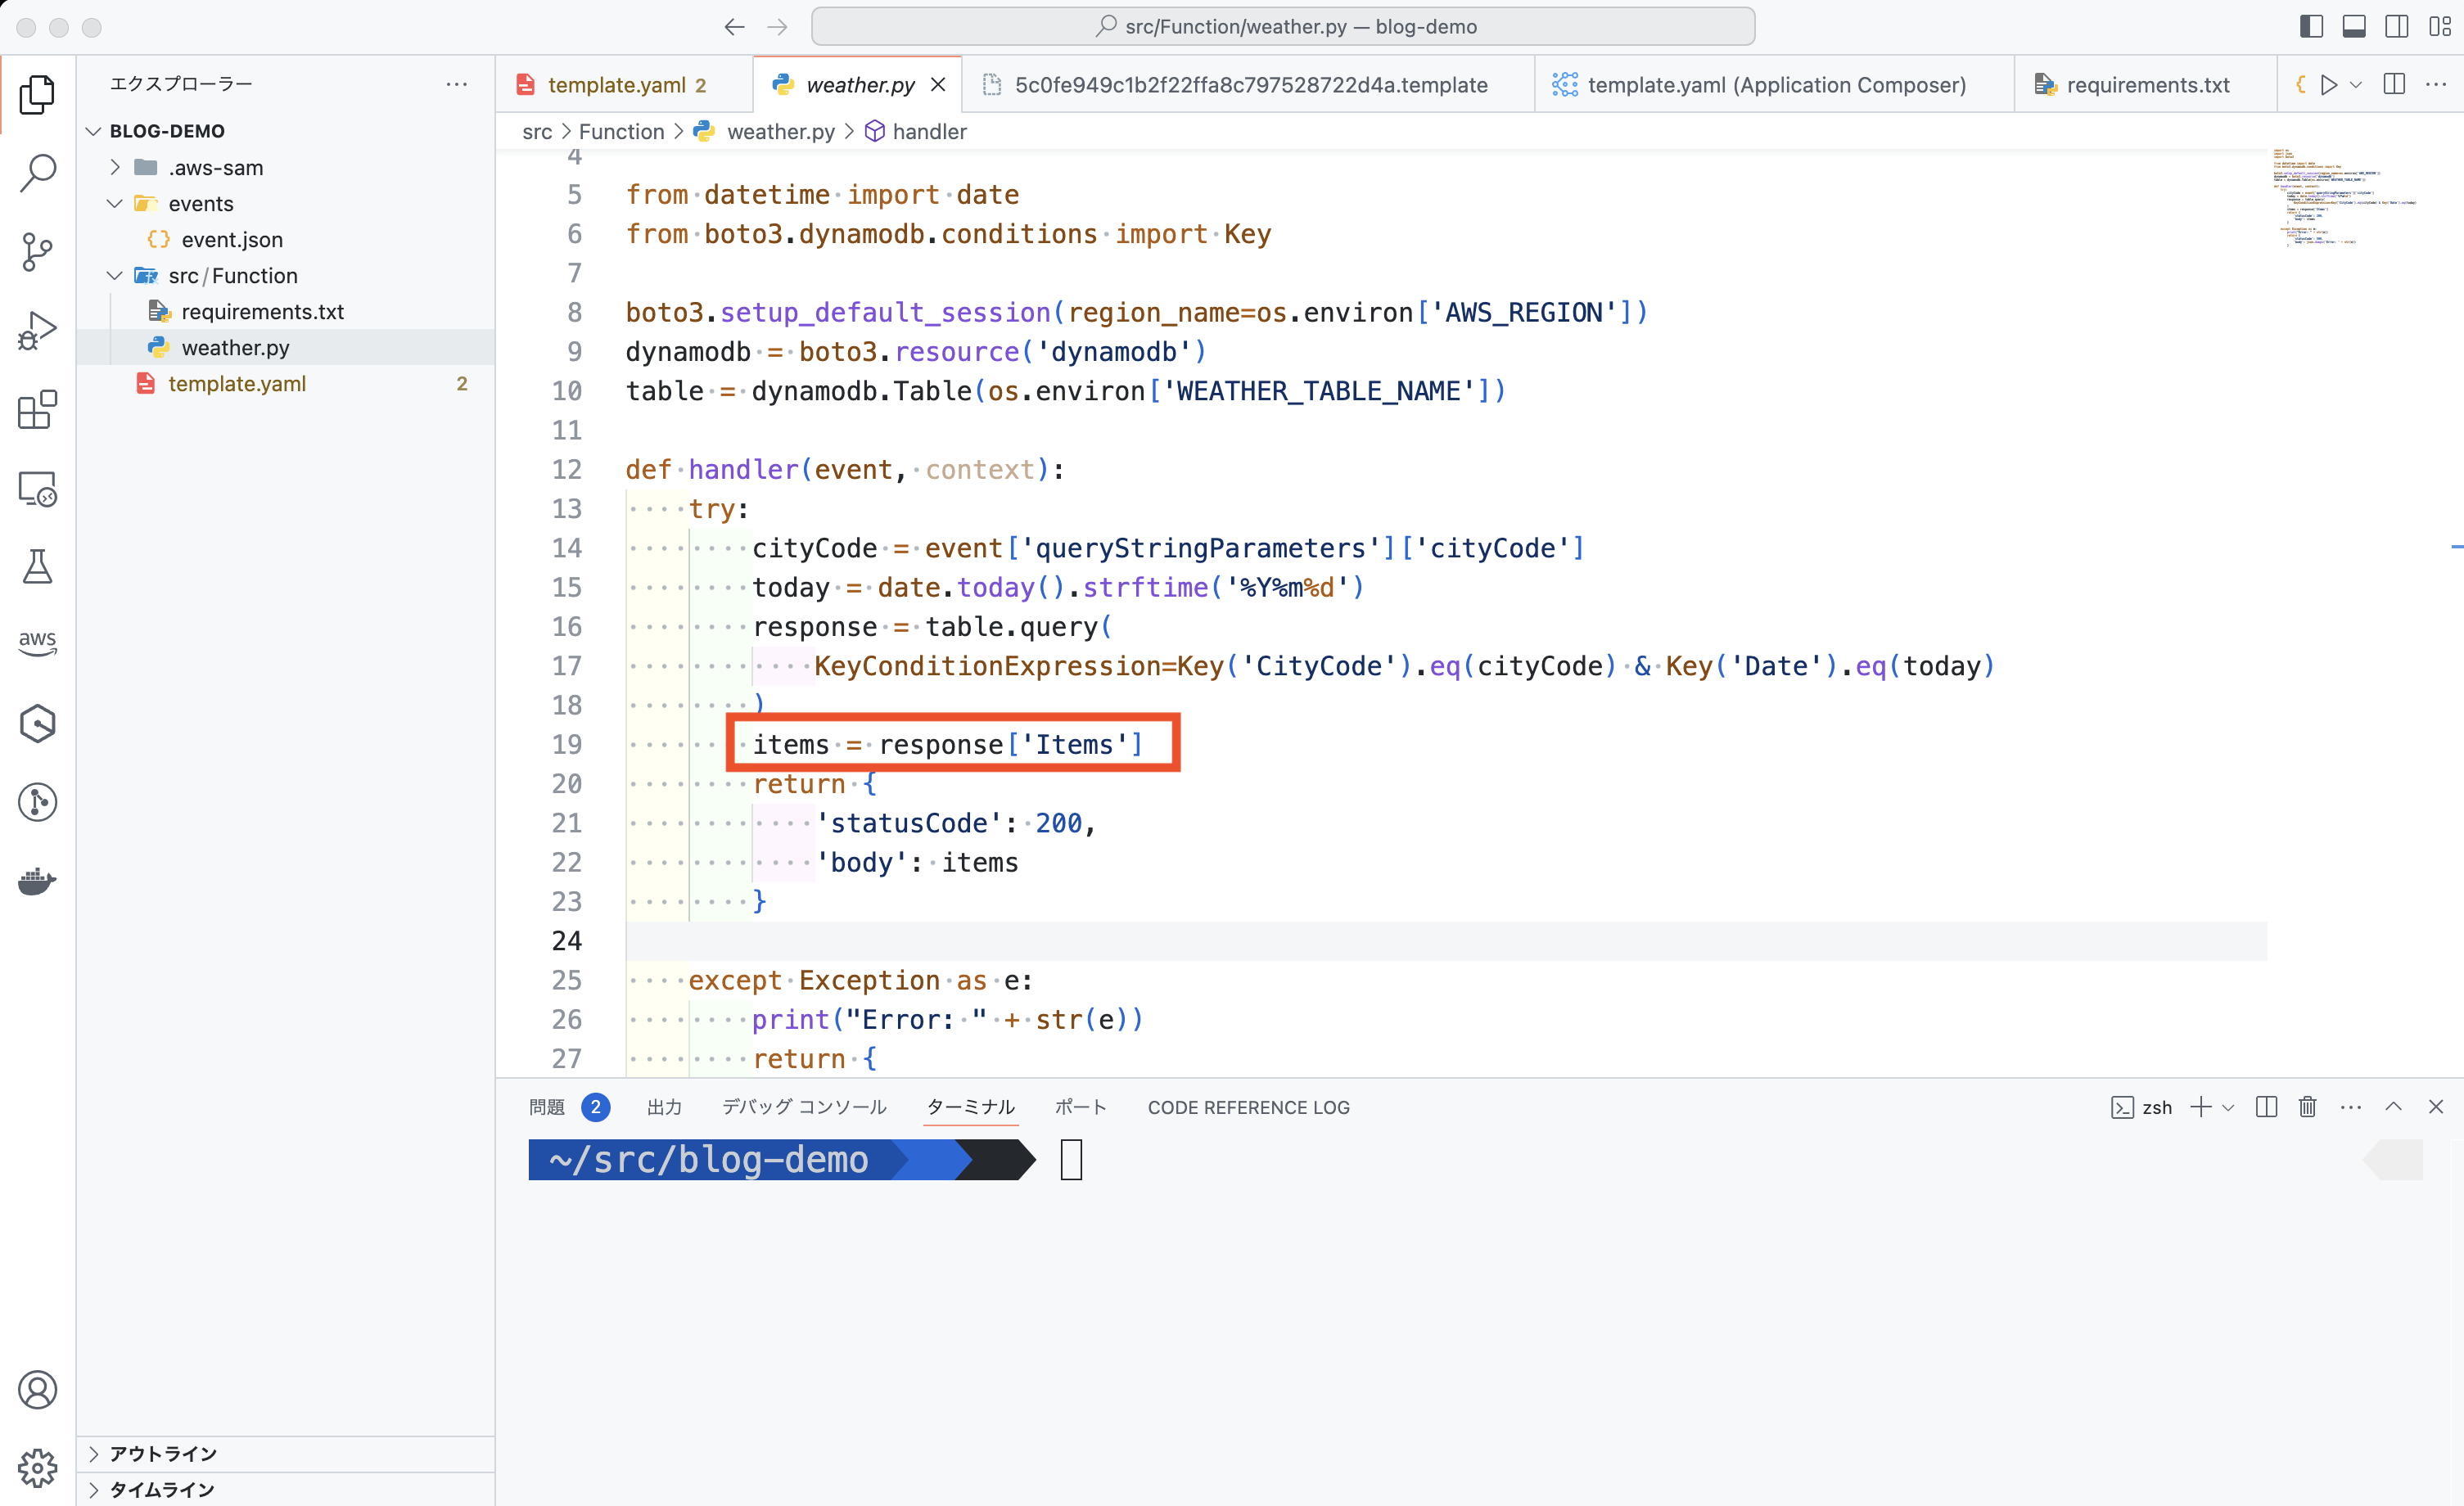
Lambda Handler の修正
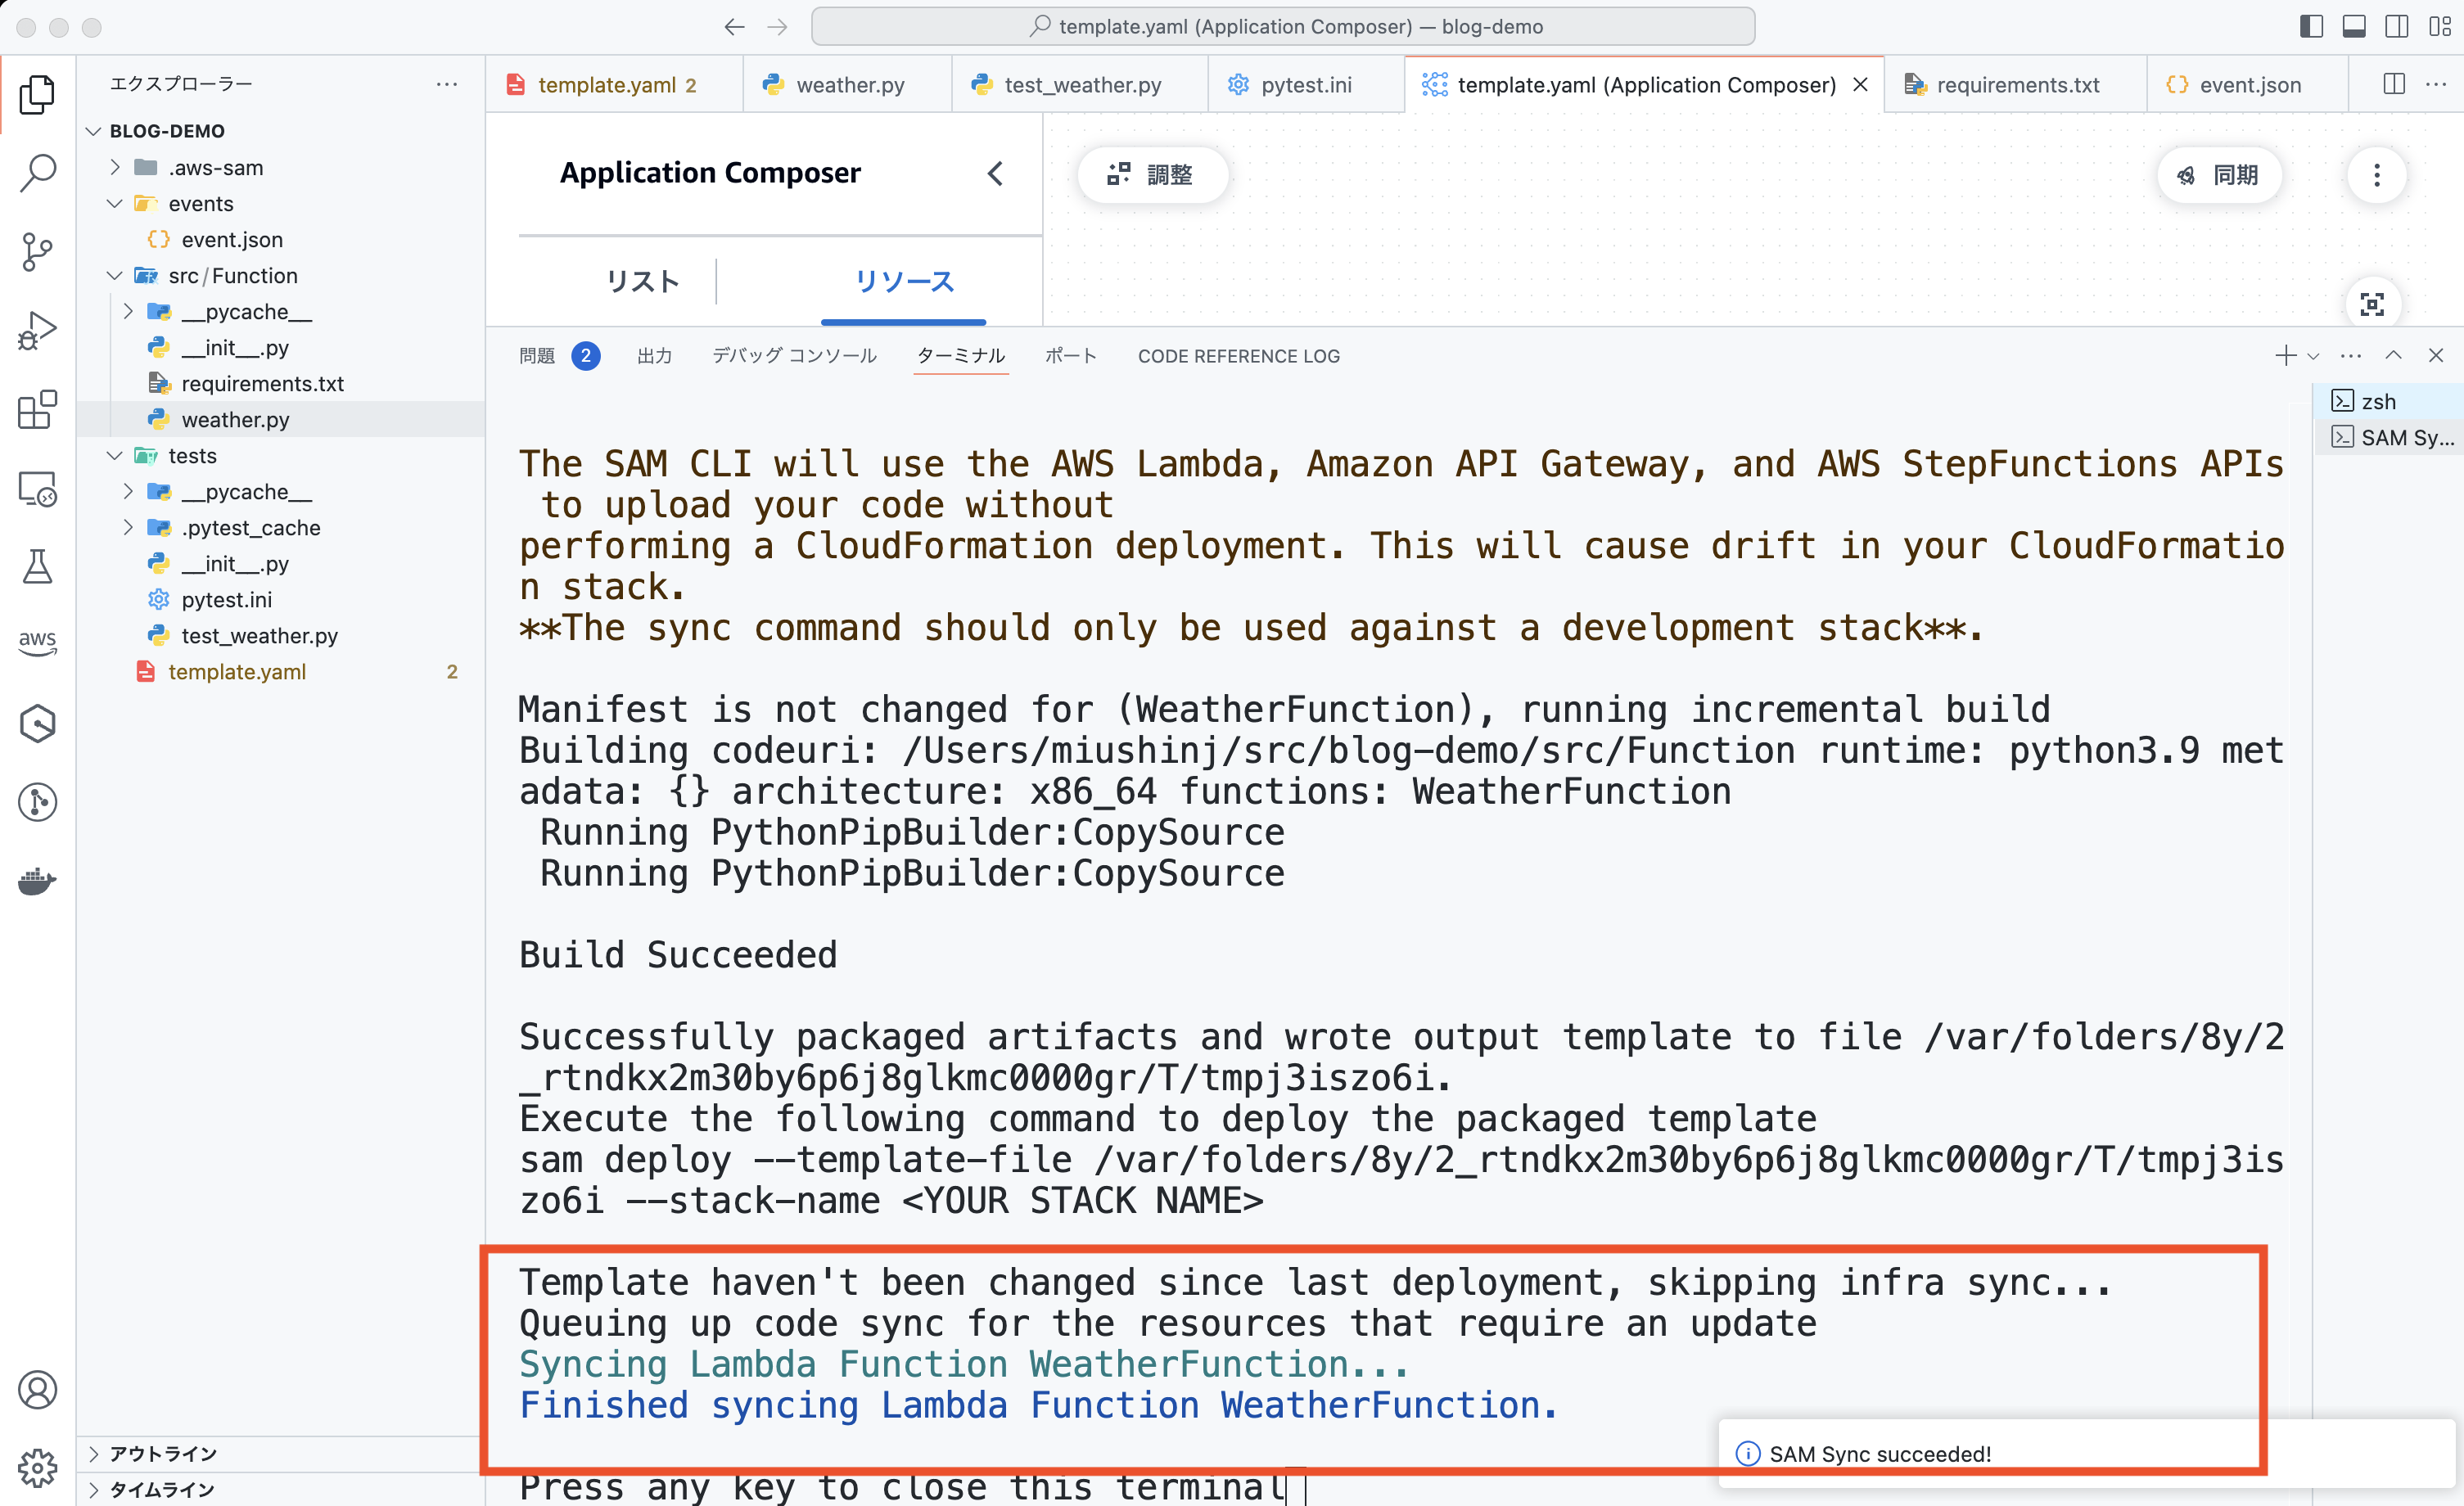
最後に、Lambda Handler から getItems を呼び出すように修正しました。
![Screenshot of Visual Studio Code showing a Python AWS SAM project for a weather app, highlighting a test for the weather.py file. The highlighted code demonstrates accessing a 'response[Items]' entry, and the terminal at the bottom displays a successful pytest result for a weather app unit test.](https://d1.awsstatic.com/onedam/marketing-channels/website/aws/ja_JP/blogs/approved/images/c6b59296997d401779d01d6e274a8f91-vscode-python-aws-sam-weather-py-test-highlight-3010x1840.98802c10e2eec1b599cd42122c7b375e74d0571e.png)
デプロイ
このような流れで Lambda 関数を単体テストし、開発を進めていけそうですね !
単体テストを書き終えてデプロイしたいな、と思ったら先ほどの手順と同様に Infrastructure Composer 上の「同期」ボタンで 変更した Lambda 関数のみをデプロイできます。これは sam sync というコマンドが VS Code の裏で動作しており、差分デプロイも素早く実現できます。
そして、この SAM プロジェクトを Git リポジトリにすれば、サーバーレスのインフラストラクチャと 複数の Lambda 関数もまとめて管理できるようになります。さらに発展して、CI/CD 環境にして Lambda を修正し git push したら自動でデプロイまでできるようになると DevOps にも繋がりますね !
Lambda 関数のデバッグ
今回は省略しますが、動作確認方法としてデバッグ機能を使って開発を進めるのも良いですね ! また、ローカルで DynamoDB などの AWS リソースをどのようにテストするか興味がある方はこちらの記事・動画も参考にしてみてください。
まとめ
サーバーレスを触ったことが無い方、これからサーバーレス開発をしてみたいけど、どのように始めたらいいかわからない方、Lambdaのコード管理に悩まれている方、ローカルでの開発方法のイメージが掴めない方に当記事が参考になれば幸いです。
まずはシンプルなサーバーレスアプリケーションを作ってみましょう !
次回は Infrastructure Composer上で AWS Step Functions を実装する内容をご紹介します。こちらもとても便利なのでお楽しみに !
筆者プロフィール
三浦 信二
アマゾン ウェブ サービス ジャパン合同会社
AWS トレーニングサービス本部 シニアテクニカルインストラクター
自分が好きなコト・モノを広めるのが大好きなエンジニアです。もっと AWS を知ってほしい、AWS のファンになってほしいという想いで AWS トレーニングのインストラクターをしています。
人と話すことが大好きで、エンジニアが集まるシェアハウスに住んだり、運営したりしていました。仕事が終わるとだいたいゲームしています。