1. 前言
Amazon ElastiCache 是一种 Web 服务,可让用户在云中轻松设置、管理和扩展分布式内存数据存储或缓存环境。它可以提供高性能、可扩展且具有成本效益的缓存解决方案。同时,它可以帮助消除与部署和管理分布式缓存环境相关的复杂性。
ElastiCache for Redis 集群是一个或多个缓存节点的集合,其中所有节点都运行 Redis 缓存引擎软件的实例。ElastiCache for Redis 启用集群模式比之禁用集群模式拥有更好的可扩展性尤其是写入可扩展性,更强的高可用性以及更高的资源上限,因而现在越来越多的客户选择 ElastiCache for Redis 启用集群模式。要使用 ElastiCache for Redis 集群(启用集群模式),您需要使用可以支持redis集群模式的客户端。
当您使用 Go 程序连接 ElastiCache 集群时,目前目前主流的SDK是 Go-Redis项目,本篇 Blog 将为您介绍如何使用 go-redis 连接和使用 ElastiCache for Redis 集群。
除此以外,我们还推出了一系列博客,展示了如何在不同语言中,使用不同的支持 ElastiCache 集群模式的客户端对 ElastiCache 集群进行连接和操作,欢迎大家阅读。
2. Go-Redis测试环境搭建
Go-Redis 是目前排名最高的 Go 语言版本的 Redis client,支持连接哨兵和集群模式的 Redis,并且提供了高级的Api封装,区别于另一个比较常用的 Go 语言 Redis client 库:Redigo,在服务集成过程中提供更多的功能支持,并且保障 Redis 数据类型安全支持。可以参考 go-redis 和 redigo 对比 去了解更多的差异。
2.1 ElastiCache for Redis 集群搭建
在亚马逊云科技上搭建 ElastiCache for Redis 集群,可以参考本篇的系列 Blog,条条大路通罗马 —— 使用 Redisson 连接 Amazon ElastiCache for Redis 集群 的2.1章节,这里就不再赘述。(Redis Cluster,打开Auth + TLS模式)
2.2 构建Golang SDK 测试代码工程的目录结构
[ec2-user src]$ tree test-redis-sdk/
test-redis-sdk/
|-- cmd
|   `-- test-redis
|       `-- redis_test.go
|-- go.mod
`-- go.sum
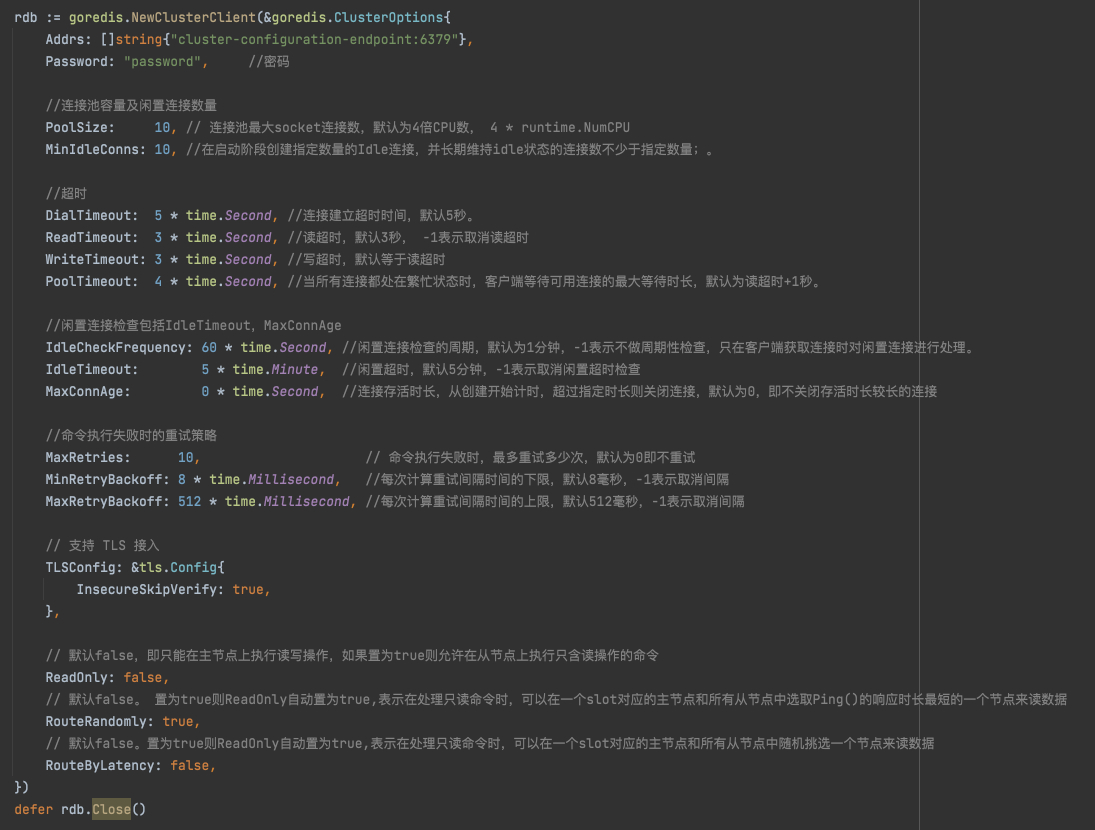
2.2 使用go-redis 最新的版本分支 v8版本 ,下图总结了初始化 cluster client 常用参数,PoolSize 和 MinIdleConns控制请求的连接池。go-redis 支持TLS 连接,本示例主要演示打开 TLS + Password 的 ElastiCache for Redis 集群如何接入,如下图所示,参数Password已设置,参数TLSConfig控制TLS开关已打开。如果您连接的 ElastiCache for Redis 集群没有开启 TLS 接入,只需要把 Password 参数置为空字符串,去除 TLSConfig 配置即可(TLSConfig 默认关闭)。

2.3 使用 go-redis SDK 初始化 cluster client,包括读请求的测试逻辑(源代码)
[ec2-user test-redis]$ cat redis_test.go
package main

import (
    "context"
    "crypto/tls"
    "fmt"
    goredis "github.com/go-redis/redis/v8"
    "strconv"
    "sync"
    "testing"
    "time"
)

func TestGoRedisCluster(t *testing.T) {
    var ctx = context.Background()

    rdb := goredis.NewClusterClient(&goredis.ClusterOptions{
	Addrs: []string{"cluster-configuration-endpoint:6379"},
	Password: "password",     //密码
        //连接池容量及闲置连接数量
        PoolSize:     10, // 连接池最大socket连接数,默认为4倍CPU数, 4 * runtime.NumCPU
        MinIdleConns: 10, //在启动阶段创建指定数量的Idle连接,并长期维持idle状态的连接数不少于指定数量;。

        //超时
        DialTimeout:  5 * time.Second, //连接建立超时时间,默认5秒。
        ReadTimeout:  3 * time.Second, //读超时,默认3秒, -1表示取消读超时
        WriteTimeout: 3 * time.Second, //写超时,默认等于读超时
        PoolTimeout:  4 * time.Second, //当所有连接都处在繁忙状态时,客户端等待可用连接的最大等待时长,默认为读超时+1秒。

        //闲置连接检查包括IdleTimeout,MaxConnAge
        IdleCheckFrequency: 60 * time.Second, //闲置连接检查的周期,默认为1分钟,-1表示不做周期性检查,只在客户端获取连接时对闲置连接进行处理。
        IdleTimeout:        5 * time.Minute,  //闲置超时,默认5分钟,-1表示取消闲置超时检查
        MaxConnAge:         0 * time.Second,  //连接存活时长,从创建开始计时,超过指定时长则关闭连接,默认为0,即不关闭存活时长较长的连接

        //命令执行失败时的重试策略
        MaxRetries:      10,                     // 命令执行失败时,最多重试多少次,默认为0即不重试
        MinRetryBackoff: 8 * time.Millisecond,   //每次计算重试间隔时间的下限,默认8毫秒,-1表示取消间隔
        MaxRetryBackoff: 512 * time.Millisecond, //每次计算重试间隔时间的上限,默认512毫秒,-1表示取消间隔

        TLSConfig: &tls.Config{
            InsecureSkipVerify: true,
        },

        // ReadOnly = true,只择 Slave Node
        // ReadOnly = true 且 RouteByLatency = true 将从 slot 对应的 Master Node 和 Slave Node, 择策略为: 选择PING延迟最低的点
        // ReadOnly = true 且 RouteRandomly = true 将从 slot 对应的 Master Node 和 Slave Node 选择,选择策略为: 随机选择

        ReadOnly: true,
        RouteRandomly: true,
        RouteByLatency: true,
    })
    defer rdb.Close()

    rdb.Set(ctx, "test-0", "value-0", 0)
    rdb.Set(ctx, "test-1", "value-1", 0)
    rdb.Set(ctx, "test-2", "value-2", 0)

    AllMaxRun := 6

    wg := sync.WaitGroup{}
    wg.Add(AllMaxRun)

    for i := 0; i < AllMaxRun; i ++ {
        go func(wg *sync.WaitGroup, idx int) {
            defer wg.Done()

            for i := 0; i < 50000; i++ {
                key := "test-" + strconv.Itoa(i % 3)
                val, err := rdb.Get(ctx, key).Result()
                if err == goredis.Nil {
                    fmt.Println("job-" + strconv.Itoa(idx) + " " + key + " does not exist")
                } else if err != nil {
                    fmt.Printf("err : %s", err.Error())
                } else {
                    fmt.Printf("%s Job-%d %s = %s-%d \n", time.Now().Format("2006-01-02 15:04:05"), idx, key, val, i)
                }
                time.Sleep(500 * time.Millisecond)
            }
        }(&wg, i)
    }

    wg.Wait()

    stats := rdb.PoolStats()
    fmt.Printf("Hits=%d Misses=%d Timeouts=%d TotalConns=%d IdleConns=%d StaleConns=%d\n",
        stats.Hits, stats.Misses, stats.Timeouts, stats.TotalConns, stats.IdleConns, stats.StaleConns)
}
3. go-redis 读写分离控制测试
Redis cluster是有Master和Slave节点,go-redis 支持对Slave 节点的访问,通过配置 ReadOnly参数,控制Master和Slave节点的读写管理。下面我们通过不同的配置去做测试验证。
3.1 ReadOnly 配置规则说明
// 默认false,即只能在主节点上执行读写操作,如果置为true则允许在从节点上执行只含读操作的命令
ReadOnly: false,

// 默认false。 置为true则ReadOnly自动置为true,表示在处理只读命令时,可以在一个slot对应的主节点和所有从节点中选取Ping()的响应时长最短的一个节点来读数据
RouteByLatency: false,

// 默认false。置为true则ReadOnly自动置为true,表示在处理只读命令时,可以在一个slot对应的主节点和所有从节点中随机挑选一个节点来读数据
RouteRandomly: false,
3.2 关闭ReadOnly配置测试
修改测试代码,关闭 ReadOnly配置(三个 ReadOnly 参数配置都置为 false),观察监控仍然是维持10个 conn,但是按照配置说明,服务不会从读节点读取数据
[ec2-user ~]$ netstat -a | grep 6379 | grep ESTABLISHED | awk '{print $5}' | sort | uniq -c | sort -rn
     10 ip-172-31-18-215.a:6379
     10 ip-172-31-46-118.a:6379
     10 ip-172-31-34-217.a:6379
     10 ip-172-31-31-193.a:6379
     10 ip-172-31-15-157.a:6379
     10 ip-172-31-10-163.a:6379
观察对应的连接数,连接数仍然保持在10个

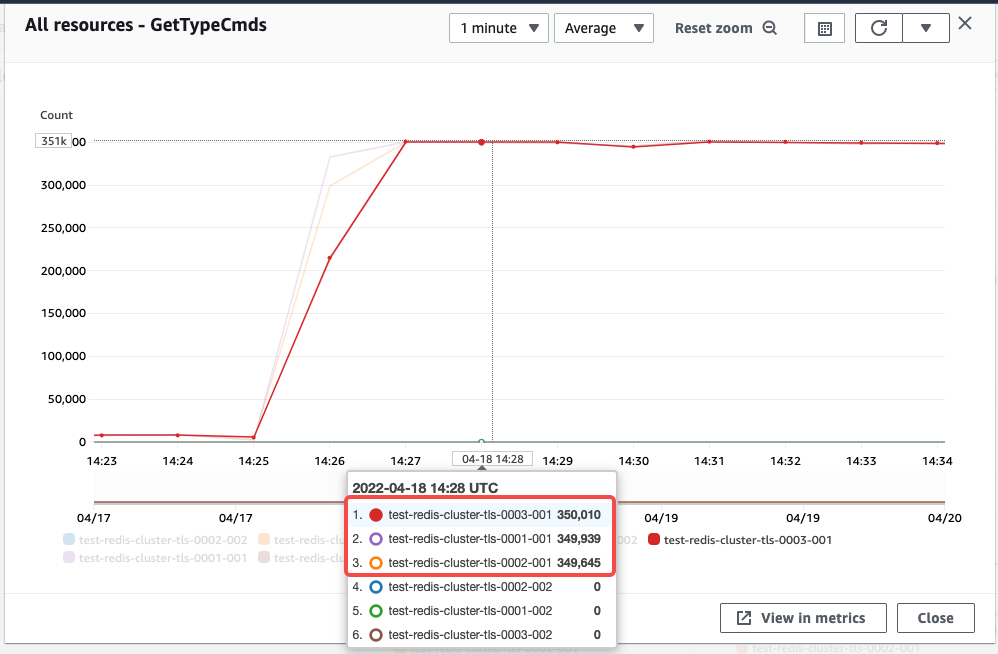
调整测试代码,增大查询压力,观察GetTypeCmds监控指标,可以看到只有master节点上是所有的读请求,判断所有的读压力都是分布在所有的 master 节点上。

3.3 打开ReadOnly配置测试
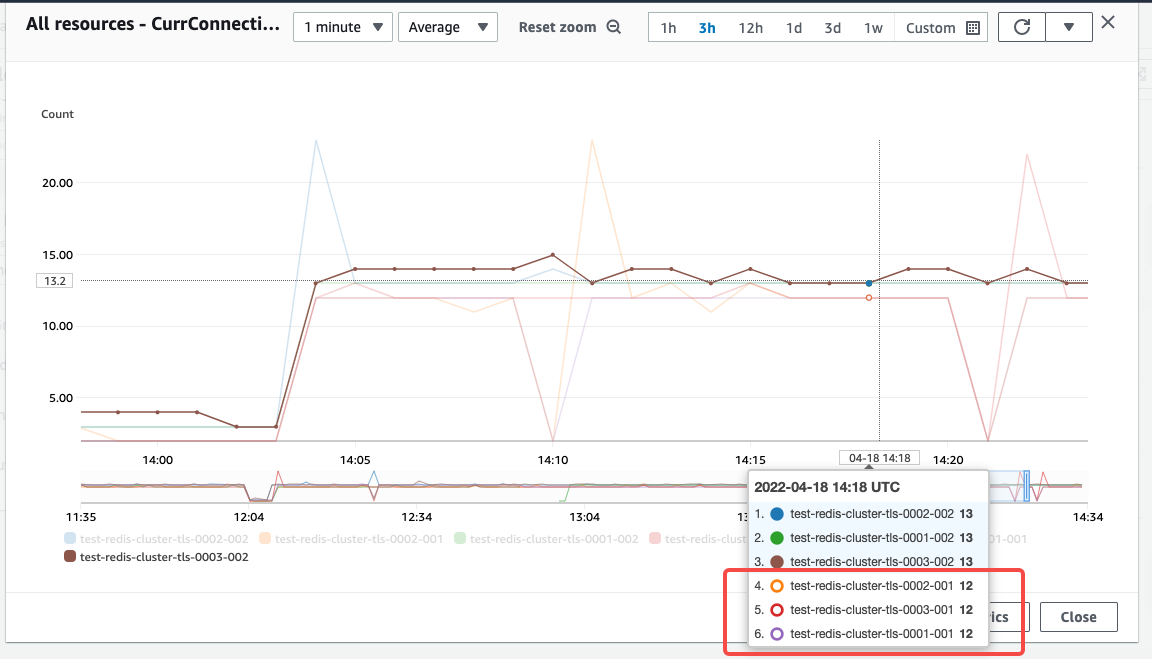
修改测试代码,打开 ReadOnly配置(或者 RouteByLatency 和 RouteRandomly 任意一个),观察监控仍然是维持10个 conn,但是按照配置说明,服务是会从读节点读取数据,可以判断 go-redis 默认和所有的 Master/Slave 节点都有长连接。
[ec2-user ~]$ netstat -a | grep 6379 | grep ESTABLISHED | awk '{print $5}' | sort | uniq -c | sort -rn
     10 ip-172-31-18-215.a:6379
     10 ip-172-31-46-118.a:6379
     10 ip-172-31-34-217.a:6379
     10 ip-172-31-31-193.a:6379
     10 ip-172-31-15-157.a:6379
     10 ip-172-31-10-163.a:6379
参考 CloudWatch Metrics观察对应的连接数,连接数仍然保持,没有变化,和客户端连接数统计一致。

如果ReadOnly打开,在适当压力情况下,观察GetTypeCmds监控,可以看到Master 和 Slave 节点都均匀分布读请求,可以判断读的压力是均匀分配到Master + Slave 节点上

4. 多值查询测试
4.1 go-redis 可以支持在 Redis 非集群和集群模式下 Pipeline 命令正确执行,以下给出 Pipeline 的代码示例。
func TestRedisClusterPipline(t *testing.T) {
    var ctx = context.Background()

    rdb := goredis.NewClusterClient(&goredis.ClusterOptions{
	Addrs: []string{"cluster-configuration-endpoint:6379"},
	Password: "password",     //密码

        //连接池容量及闲置连接数量
        PoolSize:     10, // 连接池最大socket连接数,默认为4倍CPU数, 4 * runtime.NumCPU
        MinIdleConns: 10, //在启动阶段创建指定数量的Idle连接,并长期维持idle状态的连接数不少于指定数量;。

        //超时
        DialTimeout:  5 * time.Second, //连接建立超时时间,默认5秒。
        ReadTimeout:  3 * time.Second, //读超时,默认3秒, -1表示取消读超时
        WriteTimeout: 3 * time.Second, //写超时,默认等于读超时
        PoolTimeout:  4 * time.Second, //当所有连接都处在繁忙状态时,客户端等待可用连接的最大等待时长,默认为读超时+1秒。

        //闲置连接检查包括IdleTimeout,MaxConnAge
        IdleCheckFrequency: 60 * time.Second, //闲置连接检查的周期,默认为1分钟,-1表示不做周期性检查,只在客户端获取连接时对闲置连接进行处理。
        IdleTimeout:        5 * time.Minute,  //闲置超时,默认5分钟,-1表示取消闲置超时检查
        MaxConnAge:         0 * time.Second,  //连接存活时长,从创建开始计时,超过指定时长则关闭连接,默认为0,即不关闭存活时长较长的连接

        //命令执行失败时的重试策略
        MaxRetries:      10,                     // 命令执行失败时,最多重试多少次,默认为0即不重试
        MinRetryBackoff: 8 * time.Millisecond,   //每次计算重试间隔时间的下限,默认8毫秒,-1表示取消间隔
        MaxRetryBackoff: 512 * time.Millisecond, //每次计算重试间隔时间的上限,默认512毫秒,-1表示取消间隔

TLSConfig: &tls.Config{
          InsecureSkipVerify: true,
        },

        ReadOnly: true,
    })

    rdb.Set(ctx, "test-0", "value-0", 0)
    rdb.Set(ctx, "test-1", "value-1", 0)
    rdb.Set(ctx, "test-2", "value-2", 0)

    pipe := rdb.Pipeline()
    pipe.Get(ctx, "test-0").Result()
    pipe.Get(ctx, "test-1").Result()
    pipe.Get(ctx, "test-2").Result()
    cmders, err := pipe.Exec(ctx)
    if err != nil {
        fmt.Println("err", err)
    }

    for idx, cmder := range cmders {
        cmd := cmder.(*goredis.StringCmd)
        strVal, err := cmd.Result()
        if err != nil {
            fmt.Println("err", err)
        }
        fmt.Println("strVal_" + strconv.Itoa(idx) + ":", strVal)
    }
}
4.2 go-redis 不支持 Redis 集群模式下,对不在一个 Shard 的多个Key执行MGet / MSet 操作,如果有类似的使用场景,建议使用 Redis-Go-Cluster开源项目,源码链接:Redis-Go-Cluster,以下为相应的代码示例。
func TestRedisClusterMGetMSet(t *testing.T) {
    cluster, err := rediscluster.NewCluster(
        &rediscluster.Options{
            StartNodes: []string{"cluster-configuration-endpoint:6379"},
            ConnTimeout: 100 * time.Millisecond,
            ReadTimeout: 100 * time.Millisecond,
            WriteTimeout: 100 * time.Millisecond,
            KeepAlive: 16,
            AliveTime: 60 * time.Second,
        })

    if err != nil {
        fmt.Println(err.Error())
        return
    }

    _, err = cluster.Do("MSET", "test-0", "value-0", "test-1", "value-1", "test-2", "value-2")
    if err != nil {
        fmt.Println("MSET" + err.Error())
        return
    }

    replys, err := rediscluster.Values(cluster.Do("MGET", "test-0", "test-1", "test-2"))
    if err != nil {
        fmt.Println("MGET" + err.Error())
        return
    }

    for i := 0; i < 3; i++ {
        fmt.Println(rediscluster.String(replys[i], nil))
    }
}
5. Failover测试
5.1 执行 go test 做测试,持续的做读请求
[ec2-user test-redis]$ go test -v redis_test.go -run TestGoRedisCluster -timeout 100m
=== RUN   TestGoRedisCluster
2022-04-18 12:27:37 Job-4 test-0 = value-0-0
2022-04-18 12:27:37 Job-1 test-0 = value-0-0
2022-04-18 12:27:37 Job-0 test-0 = value-0-0
2022-04-18 12:27:37 Job-5 test-0 = value-0-0
2022-04-18 12:27:37 Job-2 test-0 = value-0-0
2022-04-18 12:27:37 Job-3 test-0 = value-0-0
在 Idle 和 PoolSize 相等的配置下,可以观察到 Redis 客户端服务和 Master 和 Slave 都是建立 10 个连接
[ec2-user ~]$ netstat -a | grep 6379 | grep ESTABLISHED | awk '{print $5}' | sort | uniq -c | sort -rn
     10 ip-172-31-18-215.a:6379
     10 ip-172-31-46-118.a:6379
     10 ip-172-31-34-217.a:6379
     10 ip-172-31-31-193.a:6379
     10 ip-172-31-15-157.a:6379
     10 ip-172-31-10-163.a:6379
在go test 开始之前,cluster 的 avg 连接数

在 go test 执行开始,3个master 和 3 个 slave 都新增了 10 个 conn

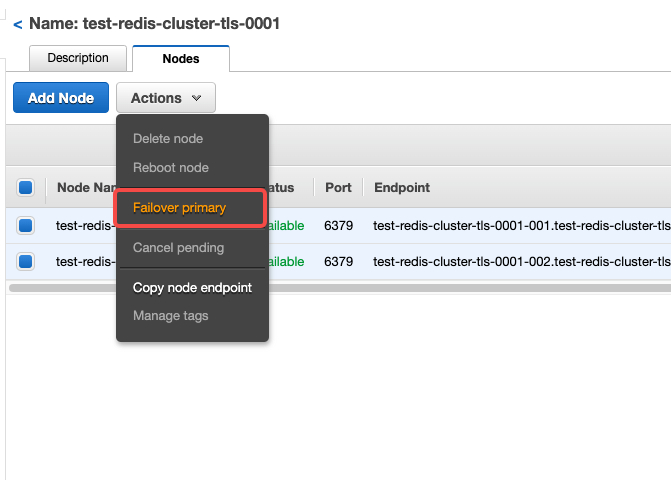
5.2 测试对 redis cluster的第一个 shard 做主动的 failover

5.3 在命令行输出观察到压测代码发生中断

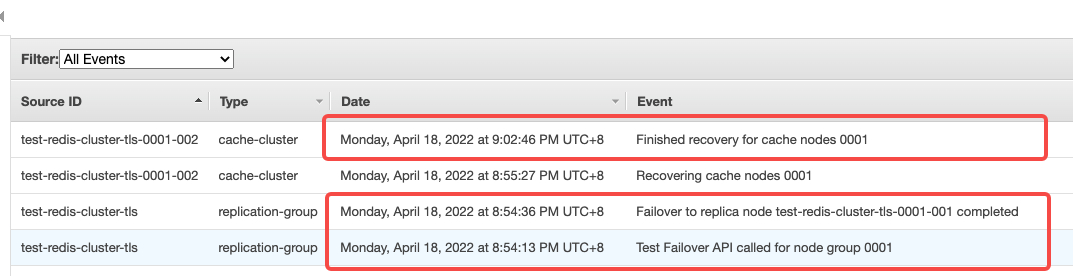
5.4 在 ElastiCache Dashboard Events 观察 Failover 过程

可以观察到 8:54:13 PM ~ 8:54:36 PM UTC+8 经过 23s完成 Failover,测试代码的时间戳是 12:54:16 ~ 12:54:26 UTC,实际服务中断只有 10s 时间
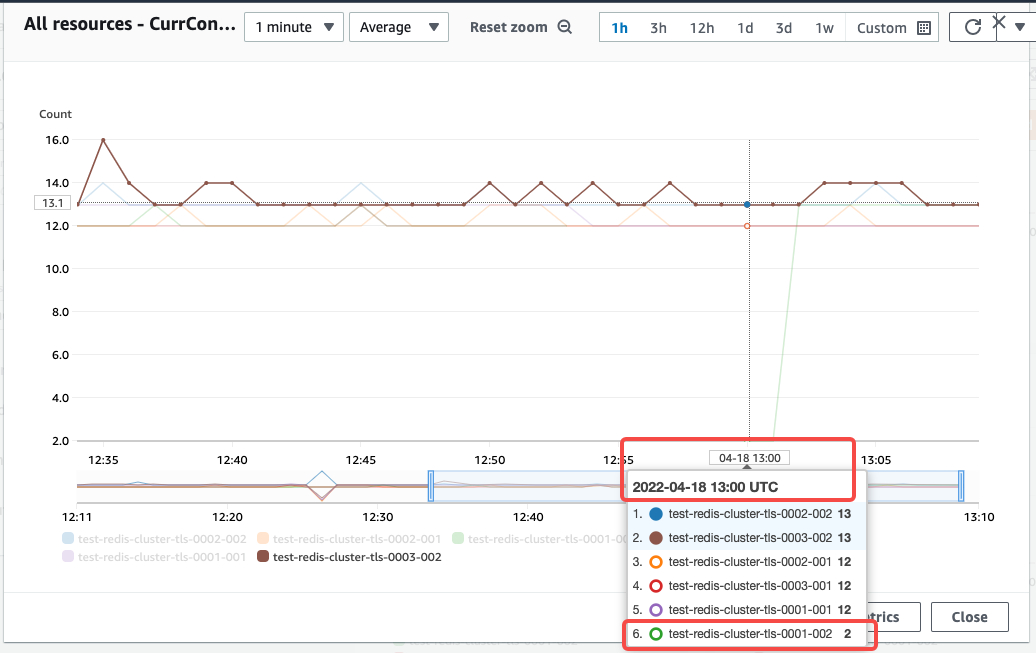
在 12:53 UTC 时刻,连接正常

在 12:54 UTC 时刻,故障节点断开连接

在 13:00 UTC 时刻,故障节点开始恢复连接,但是所有服务请求未受到影响

在 13:02 UTC 时刻,所有连接完全恢复

5.5 在 ReadOnly = False 时,做Failover 时
2022-04-18 15:04:27 Job-5 test-1 = value-1-601
2022-04-18 15:04:27 Job-0 test-1 = value-1-601
2022-04-18 15:04:27 Job-1 test-1 = value-1-601

err : dial tcp 172.31.31.193:6379: i/o timeouterr : dial tcp 172.31.31.193:6379: i/o timeouterr : dial tcp 172.31.31.193:6379: i/o timeouterr : dial tcp 172.31.31.193:6379: i/o timeouterr : dial tcp 172.31.31.193:6379: i/o timeout2022-04-18 15:04:38 Job-3 test-0 = value-0-603
2022-04-18 15:04:38 Job-5 test-0 = value-0-603
2022-04-18 15:04:39 Job-0 test-0 = value-0-603
err : dial tcp 172.31.31.193:6379: i/o timeout2022-04-18 15:04:39 Job-2 test-0 = value-0-603
2022-04-18 15:04:39 Job-4 test-0 = value-0-603
2022-04-18 15:04:39 Job-3 test-1 = value-1-604
2022-04-18 15:04:39 Job-5 test-1 = value-1-604
2022-04-18 15:04:40 Job-0 test-1 = value-1-604
2022-04-18 15:04:40 Job-1 test-0 = value-0-603
2022-04-18 15:04:40 Job-2 test-1 = value-1-604
2022-04-18 15:04:40 Job-4 test-1 = value-1-604
2022-04-18 15:04:41 Job-1 test-1 = value-1-604
err : dial tcp 172.31.31.193:6379: i/o timeouterr : dial tcp 172.31.31.193:6379: i/o timeout2022-04-18 15:04:50 Job-3 test-0 = value-0-606
err : dial tcp 172.31.31.193:6379: i/o timeout2022-04-18 15:04:50 Job-2 test-0 = value-0-606
err : dial tcp 172.31.31.193:6379: i/o timeouterr : dial tcp 172.31.31.193:6379: i/o timeouterr : dial tcp 172.31.31.193:6379: i/o timeout2022-04-18 15:04:51 Job-3 test-1 = value-1-607
2022-04-18 15:04:51 Job-5 test-0 = value-0-606
2022-04-18 15:04:51 Job-2 test-1 = value-1-607
2022-04-18 15:04:52 Job-1 test-0 = value-0-606
2022-04-18 15:04:52 Job-4 test-0 = value-0-606
2022-04-18 15:04:52 Job-0 test-0 = value-0-606
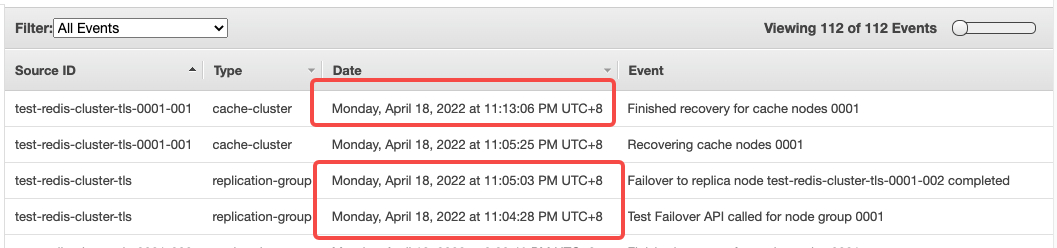
Failover 时,中断时间

可以观察到 11:04:28 PM ~ 11:05:03 PM UTC+8 经过 35s完成 Failover,测试代码的时间戳是 15:04:27 ~ 15:04:51 UTC,实际服务中断为 24s 时间

在 15:03 UTC 连接正常

在 15:04 UTC Failover 开始断开一个节点

在 15:11 UTC 开始恢复一个节点

在 15:13 UTC 完全恢复

6. 小结
本博客为大家展示了如何在 Golang 程序中通过 go-redis 连接和操作 ElastiCache 集群,从这个简单的Demo中我们可以看到 go-redis 能很好地支持 ElastiCache 集群开启 TLS 及 Auth 的功能,并自动完成读写分离,负载均衡,Failover 等工作。在第5小结的Failover的测试中观察到打开ReadOnly可以加速故障恢复,建议实际使用基于ReadOnly更好的提升服务读写 Redis Cluster的性能。通过 go-redis,我们可以便捷,高效地使用 ElastiCache 集群。
除了本博客以外,我们还推出了一系列博客,展示了如何在不同语言中使用不同的客户端对 ElastiCache 集群进行连接和操作,欢迎大家阅读。
相关博客
本篇作者