亚马逊AWS官方博客
条条大路通罗马系列—— 使用Hiredis-cluster连接Amazon ElastiCache for Redis集群
前言
Amazon ElastiCache for Redis 是速度超快的内存数据存储,能够提供亚毫秒级延迟来支持 实时应用程序。适用于 Redis 的 ElastiCache 基于开源 Redis 构建,可与 Redis API 兼容,能够与 Redis 客户端配合工作,并使用开放的 Redis 数据格式来存储数据。适用于 Redis 的 ElastiCache 兼具开源 Redis 的速度、简单性和多功能性与 Amazon 的可管理性、安全性和可扩展性,能够在游戏、广告技术、电子商务、医疗保健、金融服务和物联网领域支持要求最严苛的实时应用程序。
利用 ElastiCache for Redis,客户可以使用多个分区创建和运行托管的 Redis 集群。当遇到以下三种主要场景时,必须扩展Redis 环境。第一,如果 Redis 数据的总内存大小超出或预计超出单个虚拟机的内存容量。第二,如果应用程序将数据写入 Redis 的写入吞吐量超出单个虚拟机的容量。第三,如果要将数据分布到多个分区中,以便在单个节点遇到任何问题时,对总体 Redis 环境产生的影响都较小。
我们推出了一系列博客,展示了如何在不同语言中使用不同的支持ElastiCache集群模式的客户端对ElastiCache集群进行连接和操作,前面已经有一篇博客介绍了 “使用redission连接Amazon ElastiCache for redis集群”, 今天的主题是讨论如何使用C语言连接Elasticache for redis 集群。通过 redis 官网上查询到现有的客户端,C 语言中支持 redis cluster的主要有Hiredis-cluster, hiredis-vip等,C++ 语言中支持redis cluster的主要有redis-plus-plus,xredis等。本篇博客主要会介绍Hiredis-cluster 的使用。
2. 搭建测试环境
在此说明下,此次测试在宁夏区域进行,测试的主要内容包括:
- 在开启TLS及Auth的ElastiCache集群中验证读写和Failover
- 在未开启TLS及Auth的ElastiCache集群中验证读写和Failover,因为对于未开启TLS及Auth的集群,Client端的代码实现会有所不同。
2.1. 创建测试环境
创建ElastiCache集群
- 首先创建一个开启TLS及其Auth的3 shards,6节点的ElastiCache集群,实例类型为cache.t3.small,版本为5.0.6, 按下文的方式获取configuration endpoint,此处假设其值为<Enable TLS and auth ElastiCache configuration endpoint>:<port>
具体获取endpoint的方式如下:

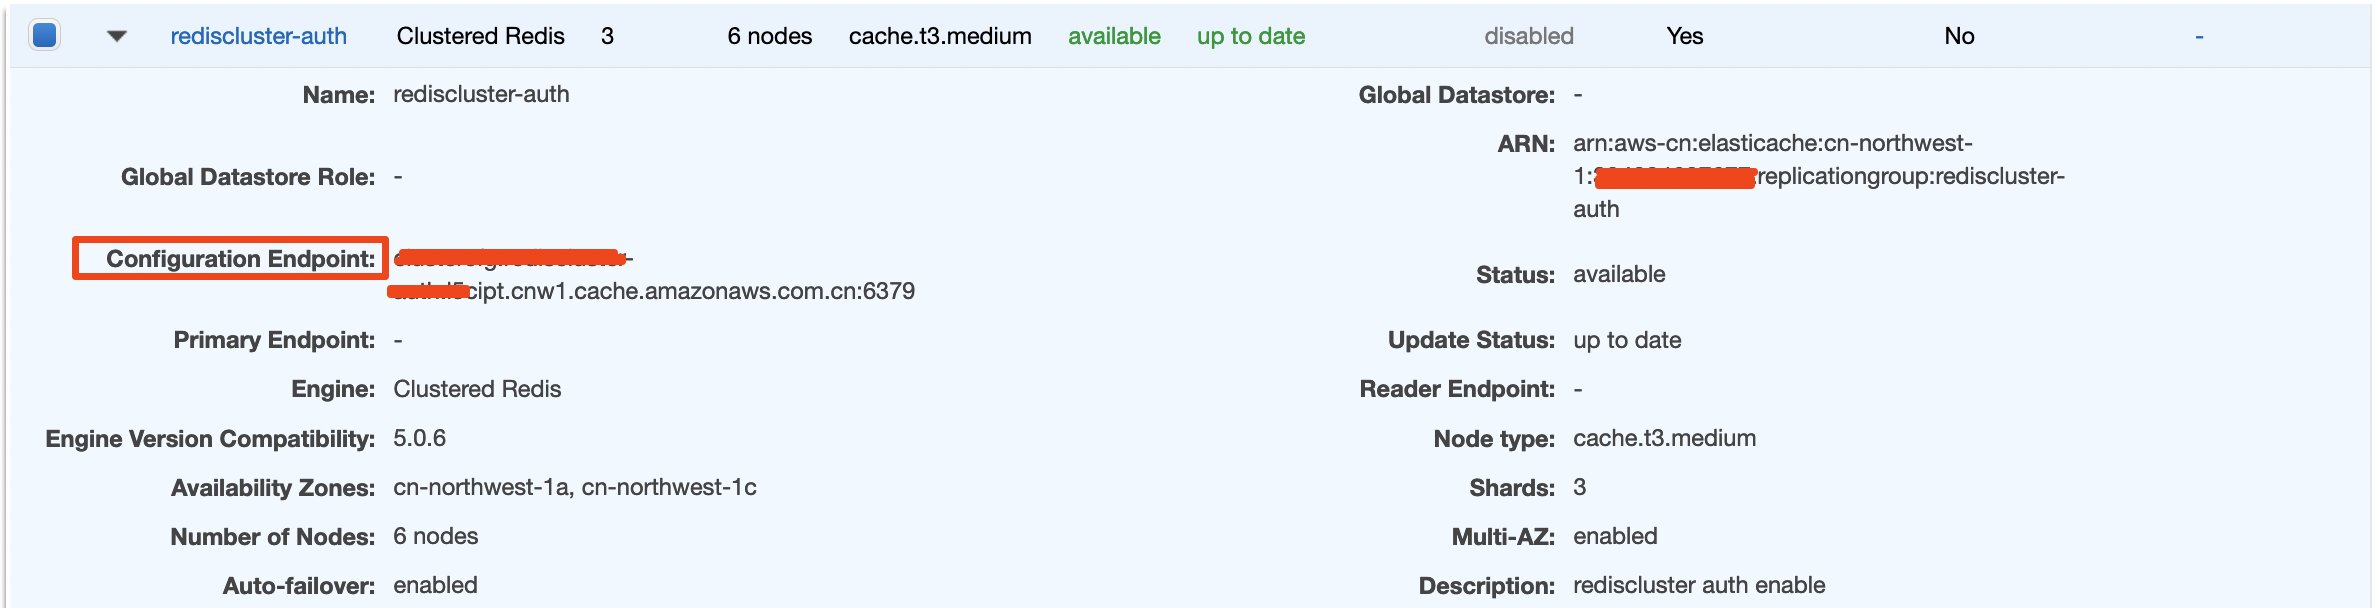
查找 Redis(已启用集群模式)集群的configuration endpoint
- 登录 AWS Management Console 并打开 ElastiCache 控制台 (https://console.aws.amazon.com/elasticache/)。
- 从导航窗格中,选择Redis。
此时会显示一个列表,其中包含运行任意版本 Redis 的集群。
- 从集群列表中,选择运行“集群 Redis”的集群左侧的复选框。
此时屏幕会展开,以显示有关选定集群的详细信息。
- 找到Configuration endpoint。
2.创建一个关闭TLS且无auth的3 shards,6节点的ElastiCache集群,实例类型为cache.t3.medium,版本为5.0.6,按上文的方式获取configuration endpoint,此处假设其值为<No TLS and auth ElastiCache configuration endpoint>:<port>

创建EC2测试客户端
1.在同一个VPC内创建一个EC2并配置好响应security group,我使用的EC2是 Ubuntu 18.04,安装的环境是一些Ubuntu的参考命令。
2.在EC2上准备环境, Hiredis-cluster 是基于hiredis 扩展编写的, 我们环境准备准备的时候也会涉及到hiredis部分,
- C Compiler 安装,这里我使用GCC,可参考这个How to install GCC Compiler on Ubuntu 18.04
- libssl-dev 安装,
sudo apt-get install libssl-dev注意在CMake之前安装,否则会报错 “Could NOT find OpenSSL, try to set the path to OpenSSL root folder in the system variable OPENSSL_ROOT_DIR (missing: OPENSSL_CRYPTO_LIBRARY OPENSSL_INCLUDE_DIR)” - CMake安装,我使用的是CMake 编译,CMake 官网提供了安装方式https://cmake.org/install/
- libevent-dev 安装,
sudo apt install libevent-dev, 直接安装可能会报如下错误,解决办法是
- hiredis 下载并编译,因为hiredis-cluster是基于hiredis扩展编写的,所以需要安装并编译hiredis。 如下命令,因为会用到SSL,所以我使用 make USE_SSL=1, 可以直接使用 make 替代。
- hiredis-cluster 环境准备,因为会测试ssl,所以通过选项指定,Redis
3.在上面的步骤完成后,你的环境会是这样的:
hiredis相关,<path to hiredis>中会生成hiredis_ssl lib文件,在</usr/local/lib/>中hiredis.a文件


<path to hiredis-cluster> 中,hiredis_cluster lib文件生成

2.2 不开启传输中加密(TLS)及auth的ElastiCache集群测试
加载测试数据
- 使用redis-cli登录未开启了TLS和auth的ElastiCache集群并通过cluster nodes命令获取slots在shards中的分布,通过redis-cli工具连接集群并进行操作的具体方法请见使用redis-cli连接到 Redis 集群。
redis-cli -c -h <No TLS and auth ElastiCache configuration endpoint> -p <port>

- 分别生成testka,testb,testc三个key,可以通过其slot值结合上文各个shard上slot分布信息,判断出3个key恰好分布在shard1,shard2和shard3上

C代码
1.以下是写入ElastiCache 集群的代码, 针对于Elasticache三个shard上的test1,test2,test3三个key进行写入,请注意配置的地址为ElastiCache集群的configuration endpoint,另外修改不同的keyname。
2.以下是读取ElastiCache 集群的代码, 针对于Elasticache三个shard上的test1,test2,test3三个key进行读取,请注意配置的地址为ElastiCache集群的configuration endpoint,另外修改不同的keyname。
基本功能测试
1.使用如下命令编译代码:
2.运行程序并监控ElastiCache未开启TLS及Auth集群的CurrConnections指标,可以看到负载被均衡地发送到了6个节点上,即 hiredis-cluster可以完成读写分离和负载均衡的工作:
我的代码在~/hiredis-cluster路径下面,所以

2.3. 开启传输中加密(TLS)及auth的ElastiCache集群测试
Amazon ElastiCache 传输中加密是一项可选功能,它允许您在数据最脆弱时候(从一个位置传输到另一个位置时)提高数据的安全性。由于在终端节点加密和解密数据时需要进行一些处理,因此启用传输中加密会对性能产生一些影响。应对使用和不使用传输中加密的数据进行基准测试,以确定对使用案例的性能影响。 关于TLS加密这一块,具体可以参考条条大路通罗马- 使用redission连接Amazon ElastiCache for redis集群。
加载测试数据
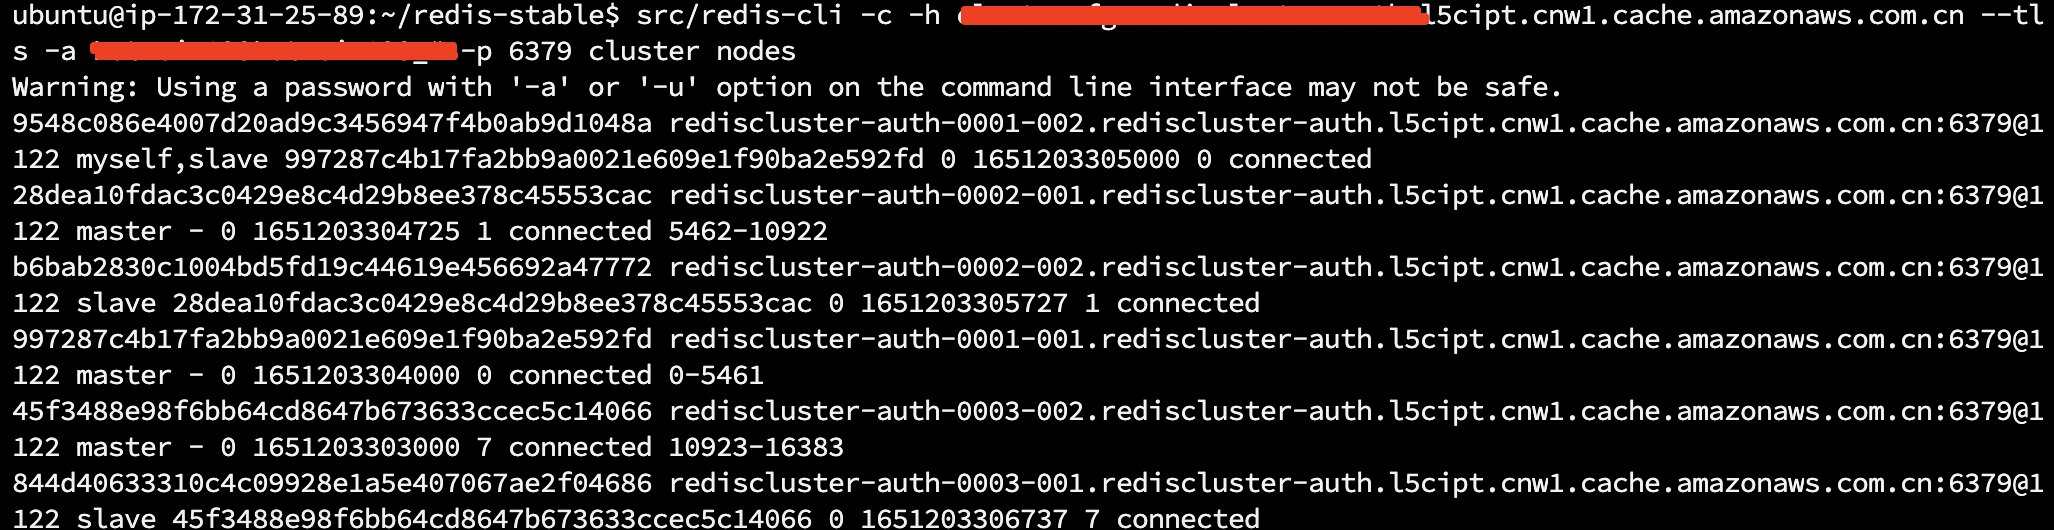
- 使用redis-cli登录开启了TLS和auth的ElastiCache集群并通过cluster nodes命令获取slots在shards中的分布,通过redis-cli工具连接集群并进行操作的具体方法请见使用redis-cli连接到 Redis 集群。
redis-cli -c -h <No TLS and auth ElastiCache configuration endpoint> -p <port>
- 分别生成testka,testb,testc三个key,可以通过其slot值结合上文各个shard上slot分布信息,判断出3个key恰好分布在shard1,shard2和shard3上

C代码
1.以下是写入ElastiCache 集群的代码, 针对于Elasticache三个shard上的test1,test2,test3三个key进行写入,请注意配置的地址为ElastiCache集群的configuration endpoint,设置密码,另外修改不同的keyname。这里需要注意的是hiredis-cluster 对SSL的支持,可以分为两种方式,一种是指定SSL 证书路径,另一种是指定证书,对于EC2访问ElastiCache的情况,指定证书路径即可, 具体可参考hiredis的文档。
2.以下是读取ElastiCache 集群的代码, 针对于Elasticache三个shard上的test1,test2,test3三个key进行读取,请注意配置的地址为ElastiCache集群的configuration endpoint,另外修改不同的keyname。
基本功能测试
1.使用如下命令编译代码:
2.运行程序并监控ElastiCache开启TLS及Auth集群的CurrConnections指标,可以看到负载被均衡地发送到了6个节点上,即 hiredis-cluster可以完成读写分离和负载均衡的工作:
我的代码在~/hiredis-cluster路径下面,所以

3. failover测试
3.1. 未开启TLS及auth的ElastiCache failover测试
登录console,对Shard1进行failover,然后观测我们的C程序的输出, 此过程大约持续12s ((观测所得)),

从ElastiCache集群的每个节点的CurrConnections指标截图同样可以看出,hiredis-cluster将读写请求都发送到了shard1新的主节点上:

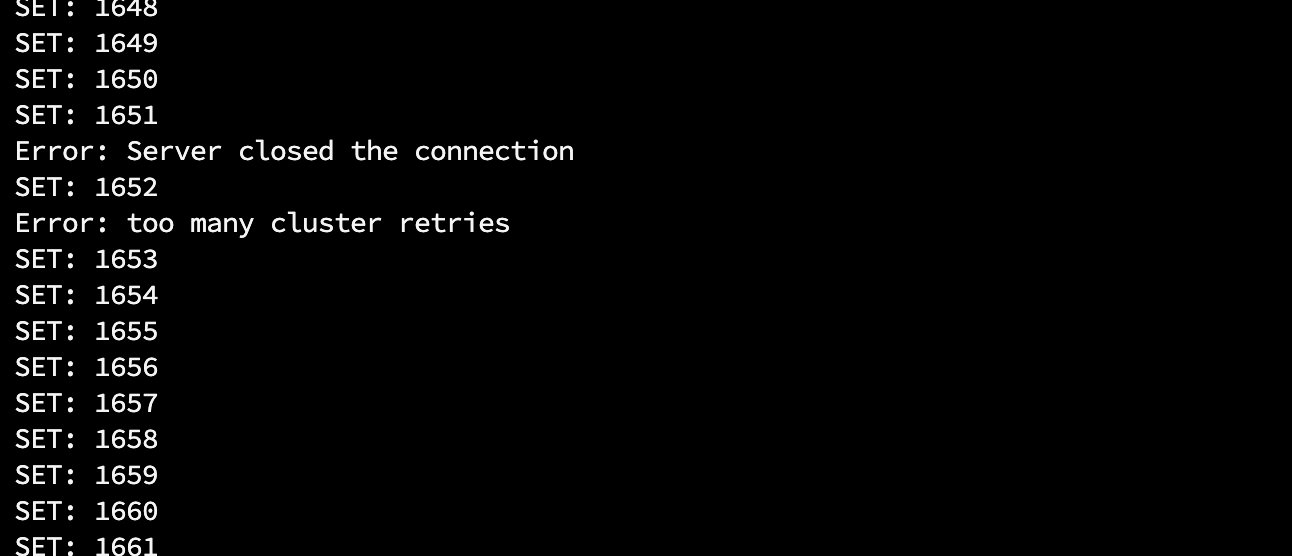
3.2. 开启TLS及auth的ElastiCache failover测试
登录console,对Shard1进行failover,然后观测我们的C程序的输出,这个时间大概 10s 左右(观测所得),
从ElastiCache集群的每个节点的CurrConnections指标截图同样可以看出,hiredis-cluster将读写请求都发送到了shard1新的主节点上:

failover测试中发生问题以及解决方案
在做failover 的时候发现一个问题,在failover过程中,有的时候client端直接断开链接,有的时候成功,后来经过分析hiredis的代码得知需要把timeout时间调整下,所以从1.5s 调整为5.5s, 注意这个值并不是最佳实践,是根据测试得来的。
4. 结束语
在本博客中,主要使用C语言通过hiredis-cluster连接和操作ElastiCache集群,从简单的Demo中我们可以看到hiredis-cluster可以很好地支持ElastiCache集群开启TLS及auth等功能,并自动完成读写分离,负载均衡,failover等工作,有助于我们便捷,高效地使用ElastiCache。
5.参考
Hiredis-cluster 文档:https://github.com/Nordix/hiredis-cluster
Hiredis 文档: https://github.com/redis/hiredis
AWS Elasticache : https://aws.amazon.com/elasticache/redis/
条条大路通罗马 —— 使用redisson连接Amazon ElastiCache for redis 集群:https://aws.amazon.com/cn/blogs/china/connecting-amazon-elasticache-for-redis-cluster-using-redisson/
相关博客
- 条条大路通罗马 — 使用 redisson 连接 Amazon ElastiCache for redis 集群:https://aws.amazon.com/cn/blogs/china/connecting-amazon-elasticache-for-redis-cluster-using-redisson/
- 条条大路通罗马 — 使用 redis-py 访问 Amazon ElastiCache for redis 集群:https://aws.amazon.com/cn/blogs/china/use-redis-py-to-access-amazon-elasticache-for-redis-cluster/
- 条条大路通罗马 — 使用 go-redis 连接 Amazon ElastiCache for Redis 集群:https://aws.amazon.com/cn/blogs/china/all-roads-lead-to-rome-use-go-redis-to-connect-amazon-elasticache-for-redis-cluster/
- 条条大路通罗马 — 如何在.NET 程序中使用 StackExchange.Redis 操作 Amazon ElastiCache for Redis:https://aws.amazon.com/cn/blogs/china/all-roads-lead-to-rome-how-to-use-stackexchange-redis-to-operate-amazon-elasticache-for-redis-in-net-program/
- 条条大路通罗马 — 使用 Jedis 访问 Amazon ElastiCache for Redis 集群:https://aws.amazon.com/cn/blogs/china/accessing-an-amazon-elasticache-for-redis-cluster-using-jedis/