Amazon GameLift 可以为基于会话的多人游戏管理云上部署和扩展,如服务器的扩展,游戏会话的放置,玩家匹配等。在游戏运行过程中,我们通常需要根据游戏会话中的日志来定位线上问题。GameLift 提供了远程访问游戏主机方式(https://docs.aws.amazon.com/zh_cn/gamelift/latest/developerguide/fleets-remote-access.html),可以通过SSH登陆服务器查看日志,但当实例较多时,登陆服务器查看日志并不是一种便捷的方法,并且当服务器上的游戏会话结束后,实例可能被自动回收,实例上的日志也随之丢失。本文将以 Amazon Linux2 系统和 Unity 引擎为基础,讨论几种 Gamelift 游戏服务端会话日志可视化方案。
在收集日志之前,我们需要将游戏运行的日志持久化到日志文件中,我们将通过在服务端以 端口+时间戳 的命名方式存储日志文件,然后分别实现通过CloudWatch Agent, FluentBit, 上传S3 等三种方式收集服务端日志并进行可视化分析。在Unity中我们可以通过以下方式生成日志文件:
using System;
using System.Collections.Generic;
using UnityEngine;
using Aws.GameLift.Server;
using Aws.GameLift.Server.Model;
using Aws.GameLift;
using Amazon;
using Amazon.GameLift;
using Amazon.S3;
using Amazon.S3.Model;
using System.IO;
using Amazon.SecurityToken;
using Amazon.SecurityToken.Model;

// Based on https://docs.aws.amazon.com/gamelift/latest/developerguide/integration-engines-unity-using.html
public class GameLiftServer : MonoBehaviour
{
    // server used to communicate with client
    private BADNetworkServer _server;

    // Identify port number the game server is listening on for player connections
    private static int _tcpServerPort = 7000;
    public static string _logFileName = "";

    private void OnEnable()
    {
        Application.logMessageReceived += Log;
    }

    private void OnDisable()
    {
        Application.logMessageReceived -= Log;
    }

    // This is an example of a simple integration with GameLift server SDK that will make game server processes go active on GameLift!
    public void Start()
    {
        //InitSDK will establish a local connection with GameLift's agent to enable further communication.
        var initSDKOutcome = GameLiftServerAPI.InitSDK();

        _tcpServerPort = UnityEngine.Random.Range(7000, 8000);
// 通过端口和时间戳的命名方式为每一个Game Session创建不同的日志文件
        _logFileName = Application.dataPath + "/gameserver-" + _tcpServerPort + "-"+ DateTime.Now.ToString("yyyyMMdd-HHmmss") + ".log";
        Debug.Log("TCP Port: " + _tcpServerPort);
        // integration with gamelift
        ...
    }

    public void Log(string logString, string stackTrace, LogType type)
    {
        TextWriter tw = new StreamWriter(_logFileName, true);
        tw.WriteLine("{\"type\":\"" + type + "\",\"time\":\"" + DateTime.Now.ToString("yyyy-MM-dd HH:mm:ss:fff") + "\",\"session\":\"" + _gameSessionId + "\",\"message\":\"" + logString + "\",\"stackTrace\":\"" + stackTrace + "\"}");
        tw.Close();
    }
}
关于 Unity 与 GameLift 的集成,可以参考 https://docs.aws.amazon.com/gamelift/latest/developerguide/integration-engines-unity-using.html
上述代码中,我们通过 Application.logMessageReceived 扩展 Debug.Log ,添加自定义的 Log 方法,将 json 格式的日志输出到日志文件中,接下来我们将从日志文件中采集日志数据。
方案一:基于 CloudWatchLogs 的日志可视化方案
为了将游戏日志采集到CloudWatch Logs,我们需要在游戏服务器启动的时候,为主机安装Cloud Watch Agent,GameLift 支持运行自定义脚本 (https://docs.aws.amazon.com/zh_cn/gamelift/latest/developerguide/gamelift-build-cli-uploading.html) 在游戏服务器启动时进行环境初始化,因此我们可以利用此方式部署CloudWatchAgent.
1.1 首先我们需要让 GameLift 具备访问 CloudWatch Logs 的权限,GameLift 通过AssumeRole 来访问外部资源(https://docs.amazonaws.cn/gamelift/latest/developerguide/gamelift-sdk-server-resources.html), 我们需要创建该角色,并与GameLift 队组关联,角色需要以下托管权限【CloudWatchAgentServerPolicy】【GameLiftGameServerGroupPolicy】【CloudWatchFullAccess】, 角色信任关系如下:
{
    "Version": "2012-10-17",
    "Statement": [
        {
            "Sid": "",
            "Effect": "Allow",
            "Principal": {
                "Service": "gamelift.amazonaws.com"
            },
            "Action": "sts:AssumeRole"
        }
    ]
}
创建角色可以参考(https://docs.aws.amazon.com/zh_cn/IAM/latest/UserGuide/id_roles_create.html),我们将角色命名为 gamelift-role,创建完成后,在控制台获取角色ARN “arn:aws:iam:::role/gamelift-role”
1.2 创建用于运行 CloudWatch Agent 的配置文件 amazon-cloudwatch-agent.json ,关于 CloudWatch Agent 配置文件的详细配置可以参考(https://docs.aws.amazon.com/zh_cn/AmazonCloudWatch/latest/monitoring/CloudWatch-Agent-Configuration-File-Details.html),注意修改配置文件中的 role_arn 和 file_path :
{
    "agent": {
        "metrics_collection_interval": 10,
        "logfile": "/opt/aws/amazon-cloudwatch-agent/logs/amazon-cloudwatch-agent.log",
        "credentials": {
            "role_arn": "arn:aws:iam::<AccountId>:role/gamelift-role"
        }
    },
    "logs": {
        "logs_collected": {
            "files": {
                "collect_list": [{
                    "file_path": "/local/game/TestApplicationServer_Data/gameserver-**.log",
                    "log_group_name": "FGLogs",
                    "log_stream_name": "FGLogs-{hostname}",
                    "retention_in_days": 7
                }]
            }
        }
    }
}
注意,file_path 的统配符路径,每次只能取到最新修改的文件,如果一台服务器多个游戏进程,需要将多个日志文件区分开,并添加到 collect_list 中
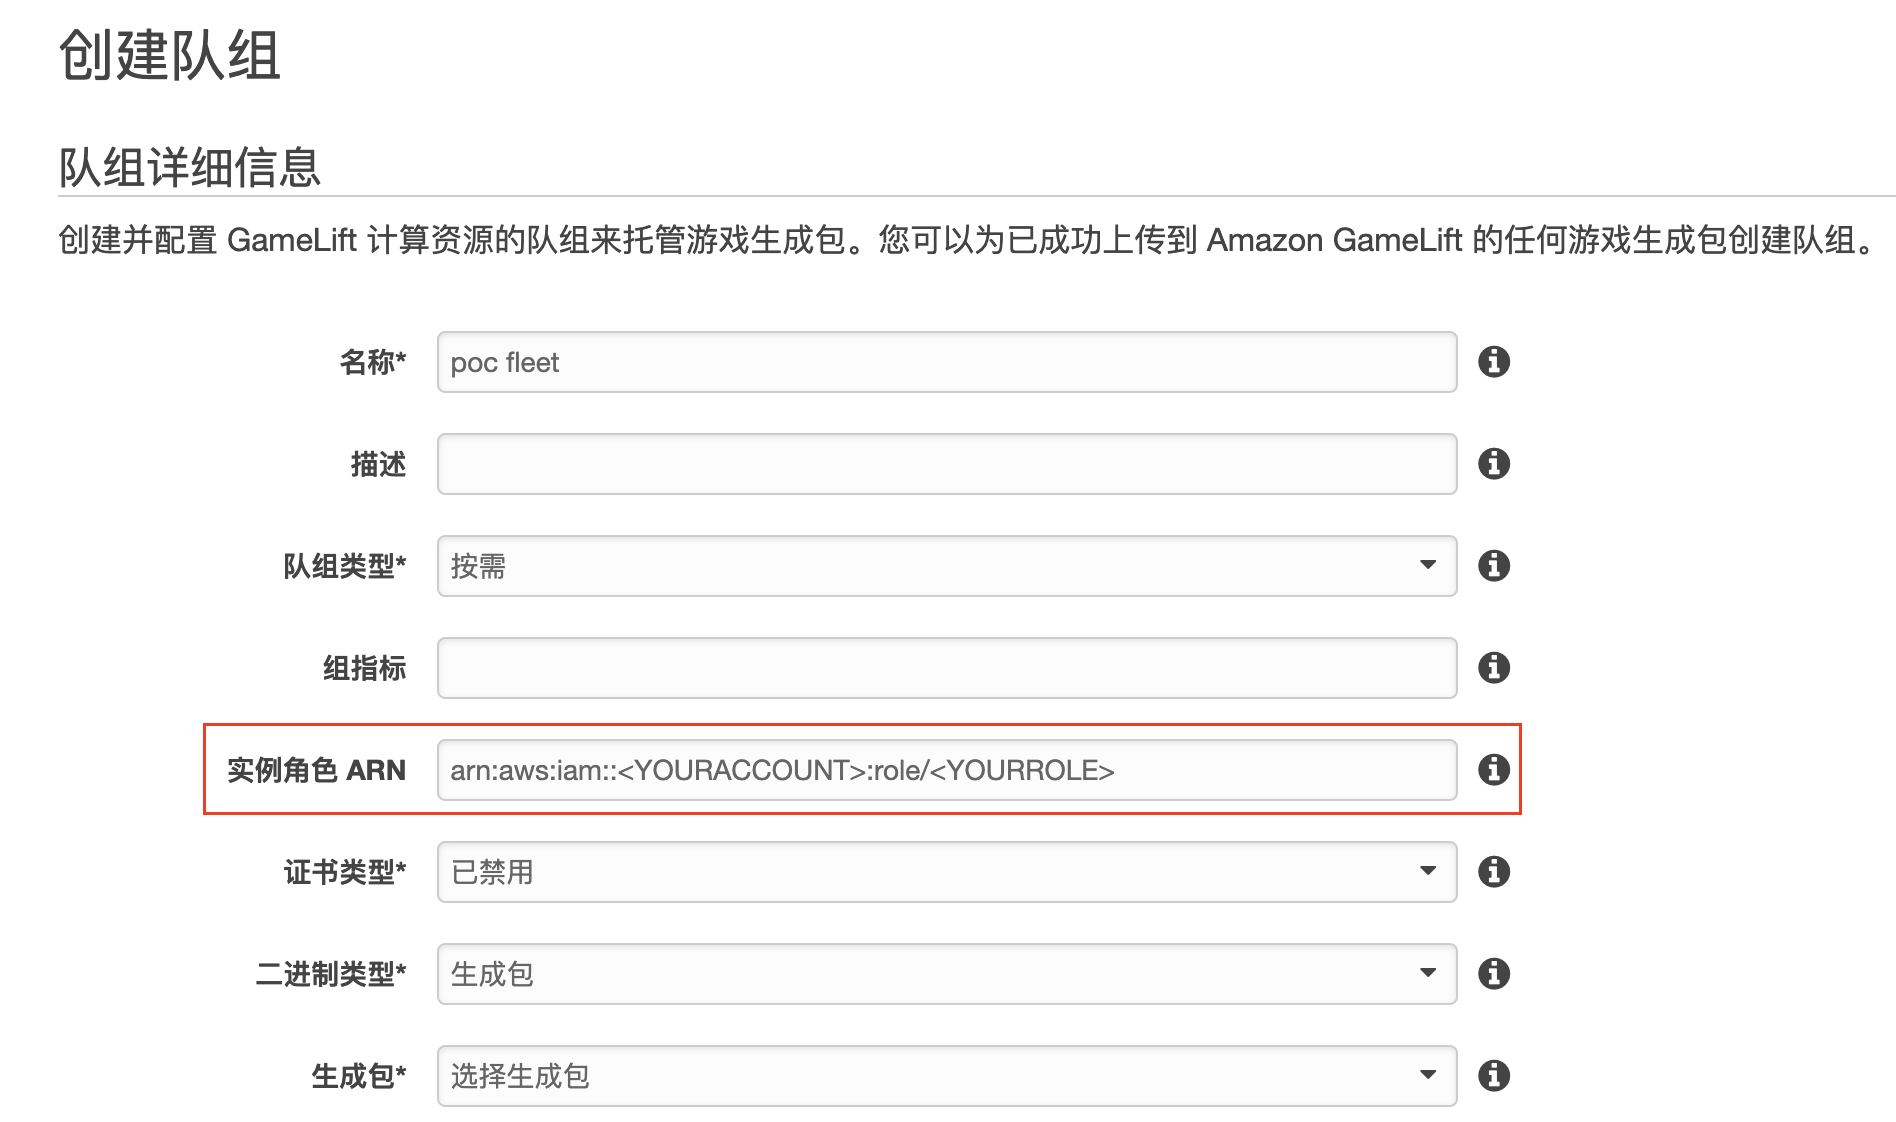
1.3 在创建队组时也需要将ARN加入到实例角色ARN中,与队组关联,如下图:
1.4 在 install.sh 中通过脚本安装 CloudWatch Agent 并指定我们创建的配置文件
#!/bin/bash

# 给游戏二进制文件添加可执行权限(请将TestApplicationServer 替换为你自己的游戏二进制文件名)
/usr/bin/chmod +x /local/game/TestApplicationServer

# 下载cloudwatch agent 安装包,并执行本地安装
wget https://s3.amazonaws.com/amazoncloudwatch-agent/amazon_linux/amd64/latest/amazon-cloudwatch-agent.rpm
sudo rpm -U ./amazon-cloudwatch-agent.rpm

# 将配置文件复制到对应目录,并根据配置文件启动Agent
sudo cp amazon-cloudwatch-agent.json /opt/aws/amazon-cloudwatch-agent/etc/amazon-cloudwatch-agent.json
sudo /opt/aws/amazon-cloudwatch-agent/bin/amazon-cloudwatch-agent-ctl -a fetch-config -m ec2 -c file:/opt/aws/amazon-cloudwatch-agent/etc/amazon-cloudwatch-agent.json -s
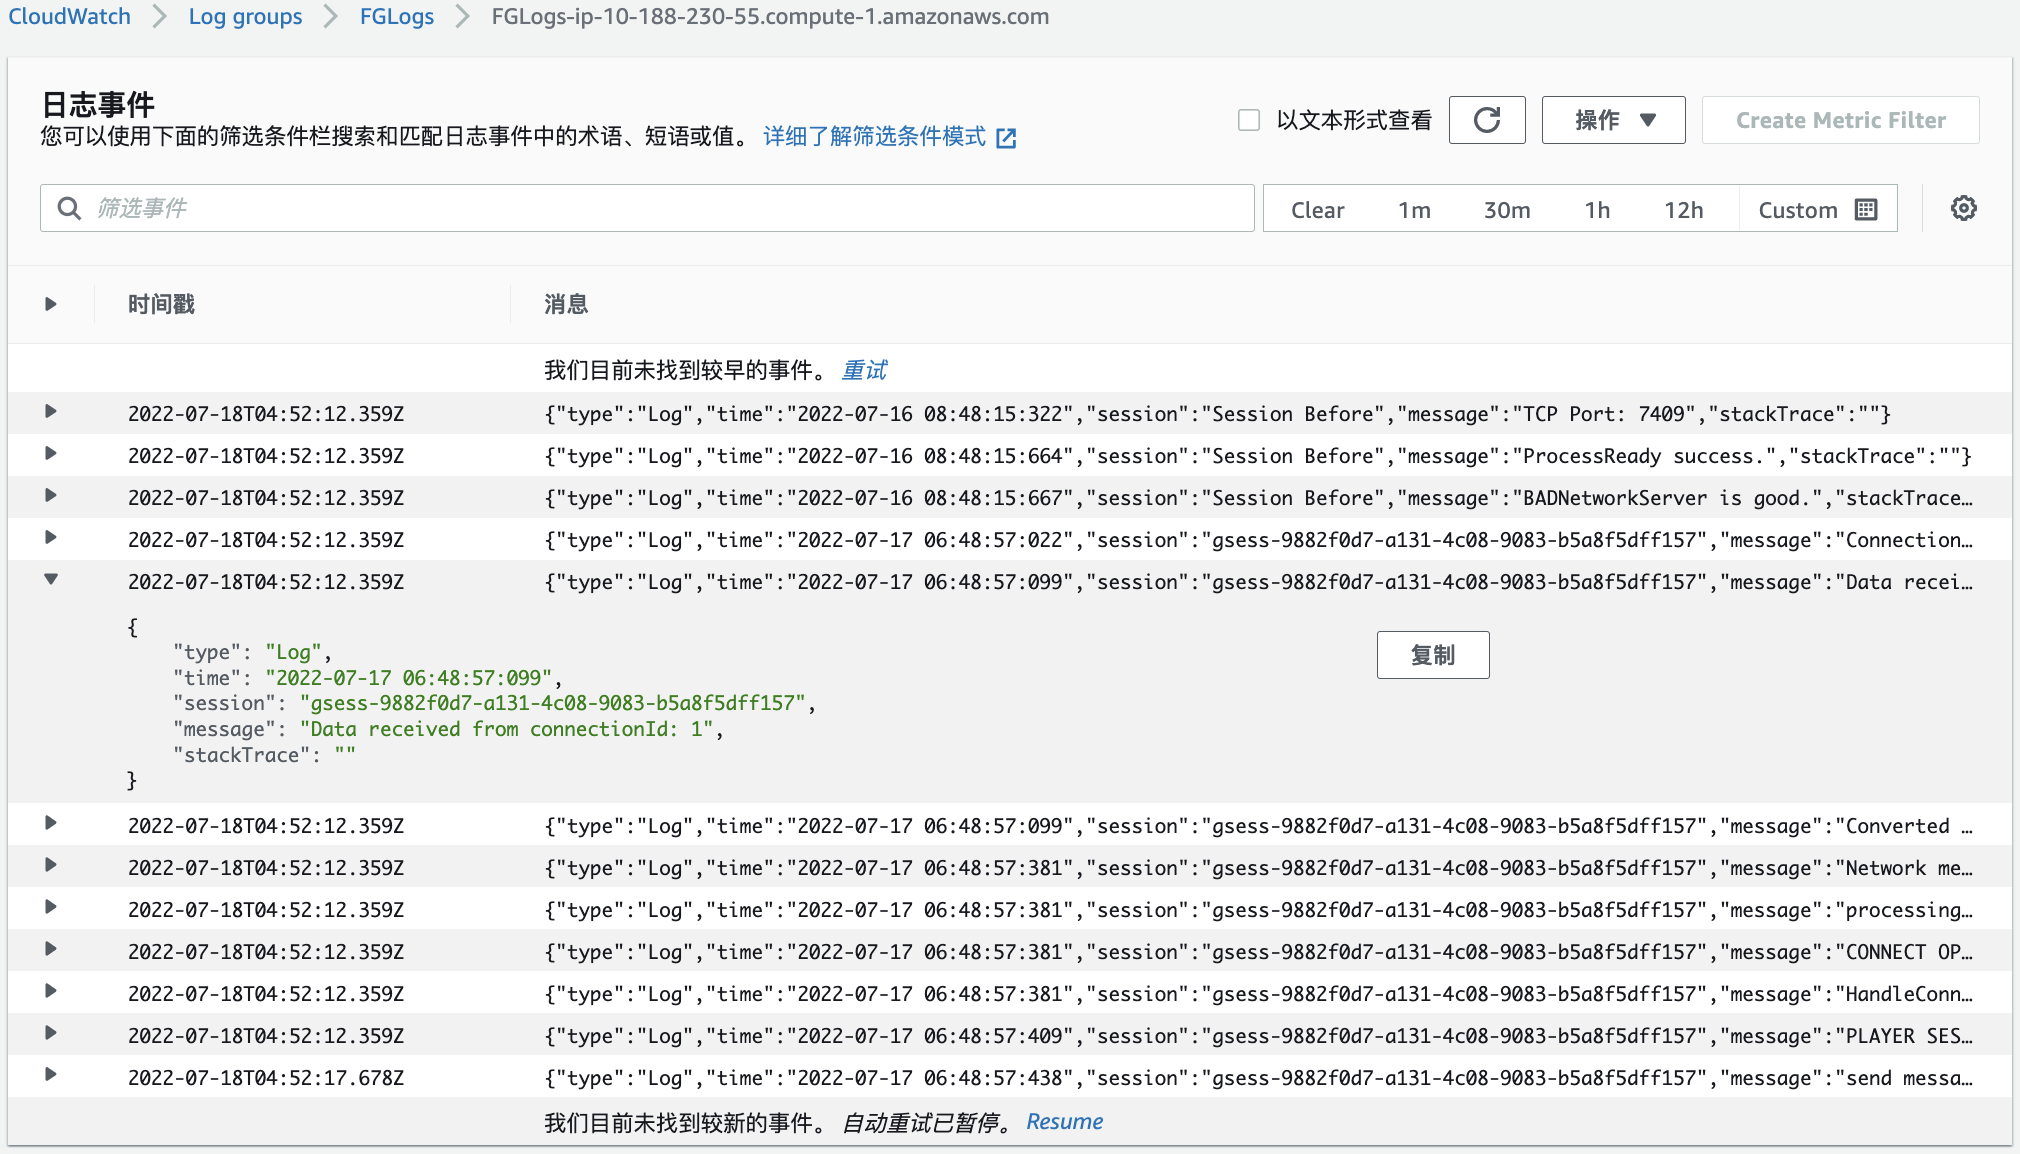
1.5 将 amazon-cloudwatch-agent.json,install.sh 与游戏打包文件放在同一目录中,通过 upload build, 创建队组,创建session,即可启动游戏应用,启动后我们在Cloud Watch Logs 中可以看到以下效果:
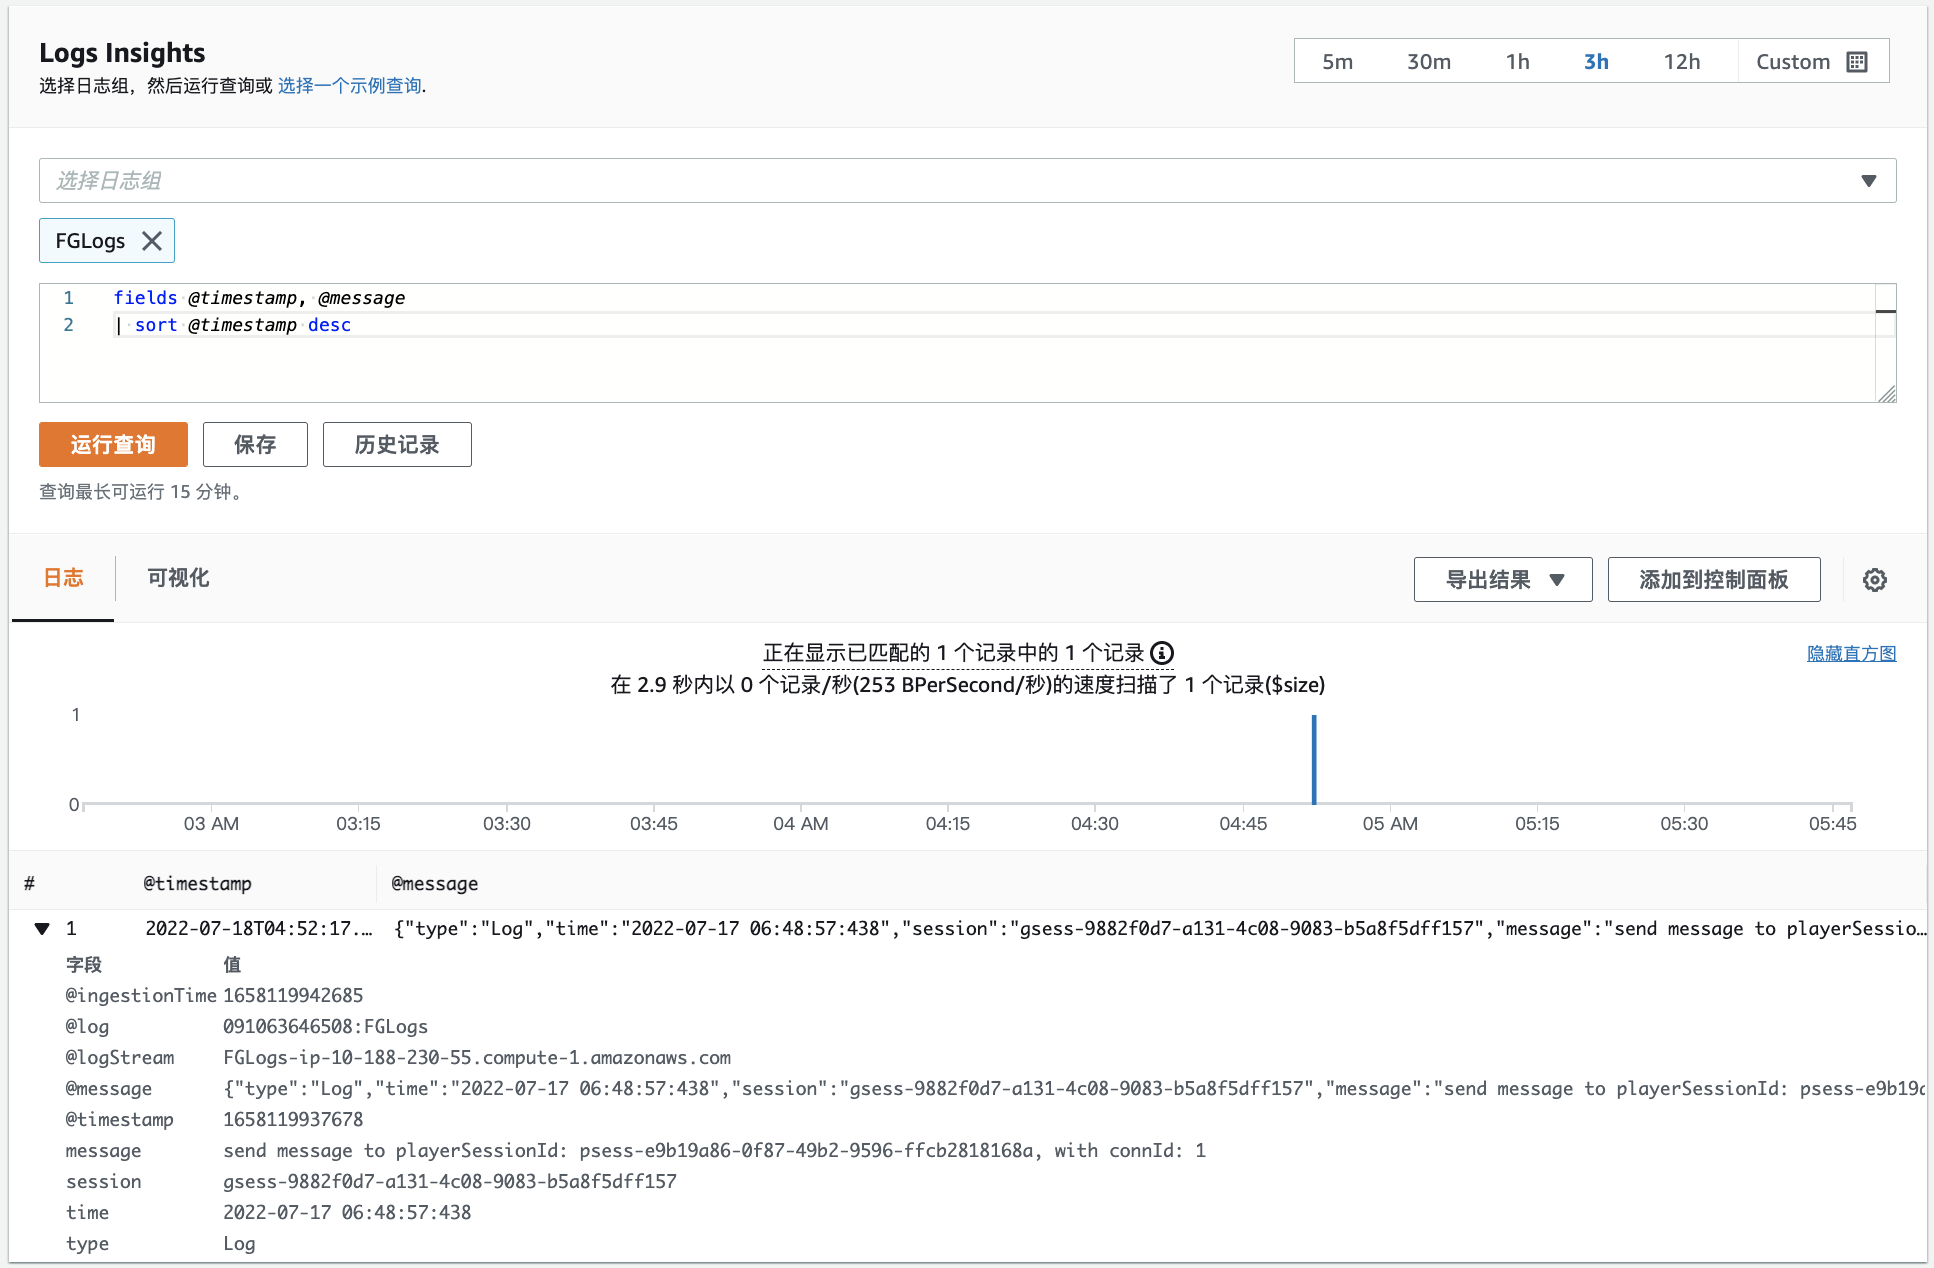
通过 CloudWatch Logs Insight 我们可以实时查询日志:
方案二:基于 Fluentbit + S3 + Athena 的日志可视化方案
通过Fluentbit可以将日志文件中的内容近实时的采集到 S3 中,当我们的游戏日志量较多的时候,S3可以提供更加低廉的存储成本,利用Athena,可以通过 SQL 的形式从海量的 S3 日志文件中查询结果,并以按需的方式计算成本。
2.1 首先需要创建用于存储日志的 S3 存储桶,我们命名为 gamelift-logs,并为 gamelift-role 添加此存储桶的读写权限,IAM Policy 如下:
{
  "Version": "2012-10-17",
  "Statement": [
    {
      "Effect": "Allow",
      "Action": ["s3:ListBucket"],
      "Resource": ["arn:aws:s3:::gamelift-logs"]
    },
    {
      "Effect": "Allow",
      "Action": [
        "s3:PutObject",
        "s3:GetObject",
        "s3:DeleteObject"
      ],
      "Resource": ["arn:aws:s3:::gamelift-logs/*"]
    }
  ]
}
2.2 准备 Fluent-bit 的配置文件 fluent-bit.conf, 注意修改配置文件中的日志文件路径 Path ,存储日志文件的存储桶 bukcet , 以及 role_arn。为了方便查询,我们通过 Filter 添加 EC2 的元数据信息,包括 az, ec2_instance_id 等信息。
[SERVICE]
    Flush         2
    Log_Level     info
    Daemon        off
    Parsers_File parsers.conf
[INPUT]
    Name              tail
    Tag               game.access.stage
    Path              /local/game/TestApplicationServer_Data/gameserver-*.log
    Mem_Buf_Limit     1MB
    Refresh_Interval  1
[FILTER]
    Name aws
    Match *
    imds_version v1
    az true
    ec2_instance_id true
    ec2_instance_type true
    private_ip true
    ami_id true
    account_id true
    hostname true
    vpc_id true
[FILTER]
    Name parser
    Parser docker
    Match *
    Key_Name     log
    Reserve_Data On
    Preserve_Key On
[OUTPUT]
    Name            s3
    Match           *
    bucket          gamelift-logs
    region          us-east-1
    role_arn        arn:aws:iam::<AccountId>:role/gamelift-role
    upload_timeout  1m
    total_file_size 1M
    s3_key_format   /$TAG[2]_$TAG[0]_$TAG[1]/date=%Y%m%d/$UUID.log
    s3_key_format_tag_delimiters .-
2.3 同样,我们在 install.sh 中安装 fluent-bit 代理
#!/bin/bash
# 为游戏二进制文件添加可执行权限
sudo /usr/bin/chmod +x /local/game/TestApplicationServer.x86_64

# 命令行方式安装 fluentbit
curl https://raw.githubusercontent.com/fluent/fluent-bit/master/install.sh | sh

# 替换配置文件
sudo mv /etc/fluent-bit/fluent-bit.conf /etc/fluent-bit/fluent-bit.conf.bak
sudo mv fluent-bit.conf /etc/fluent-bit/fluent-bit.conf

# 后台方式启动进程
nohup sudo /opt/fluent-bit/bin/fluent-bit -c /etc/fluent-bit/fluent-bit.conf >/dev/null 2>&1 &
# 添加开机自启动
sudo bash -c 'echo "nohup sudo /opt/fluent-bit/bin/fluent-bit -c /etc/fluent-bit/fluent-bit.conf >/dev/null 2>&1 &" >> /etc/rc.d/rc.local'
sudo bash -c 'echo "exit 0" >> /etc/rc.d/rc.local'
sudo bash -c 'sudo chmod +x /etc/rc.d/rc.local'

exit 0
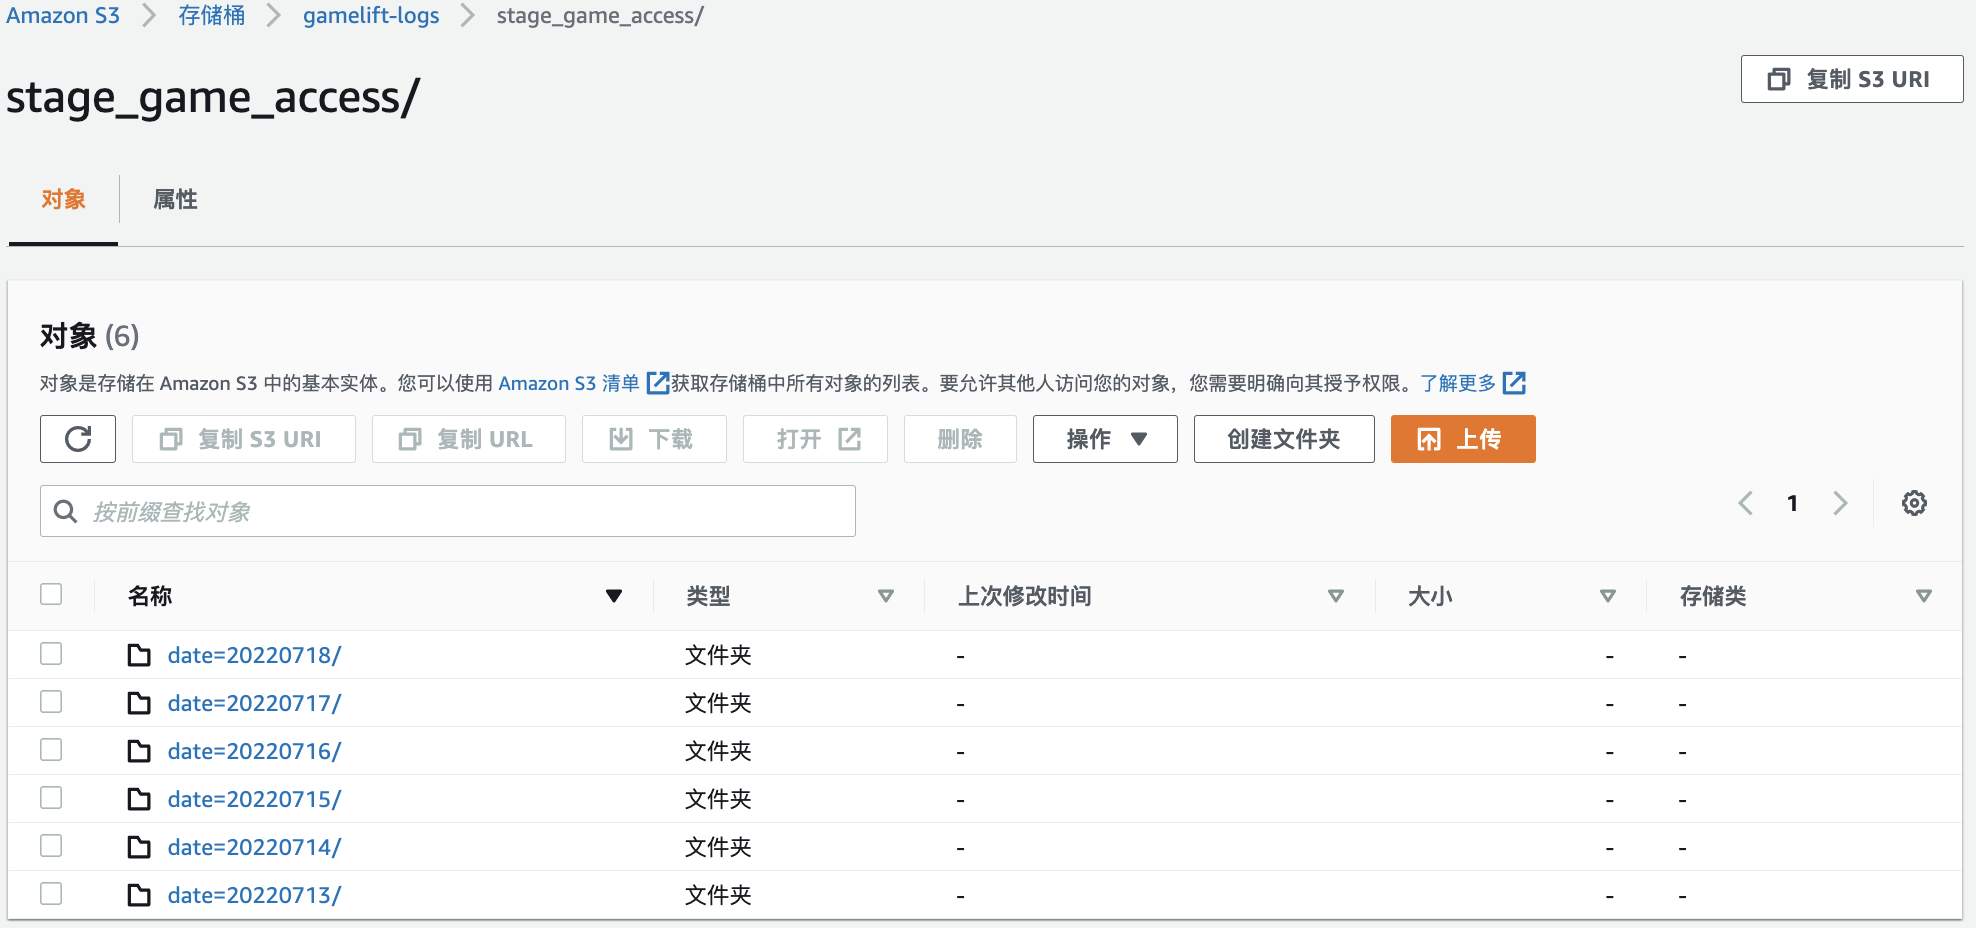
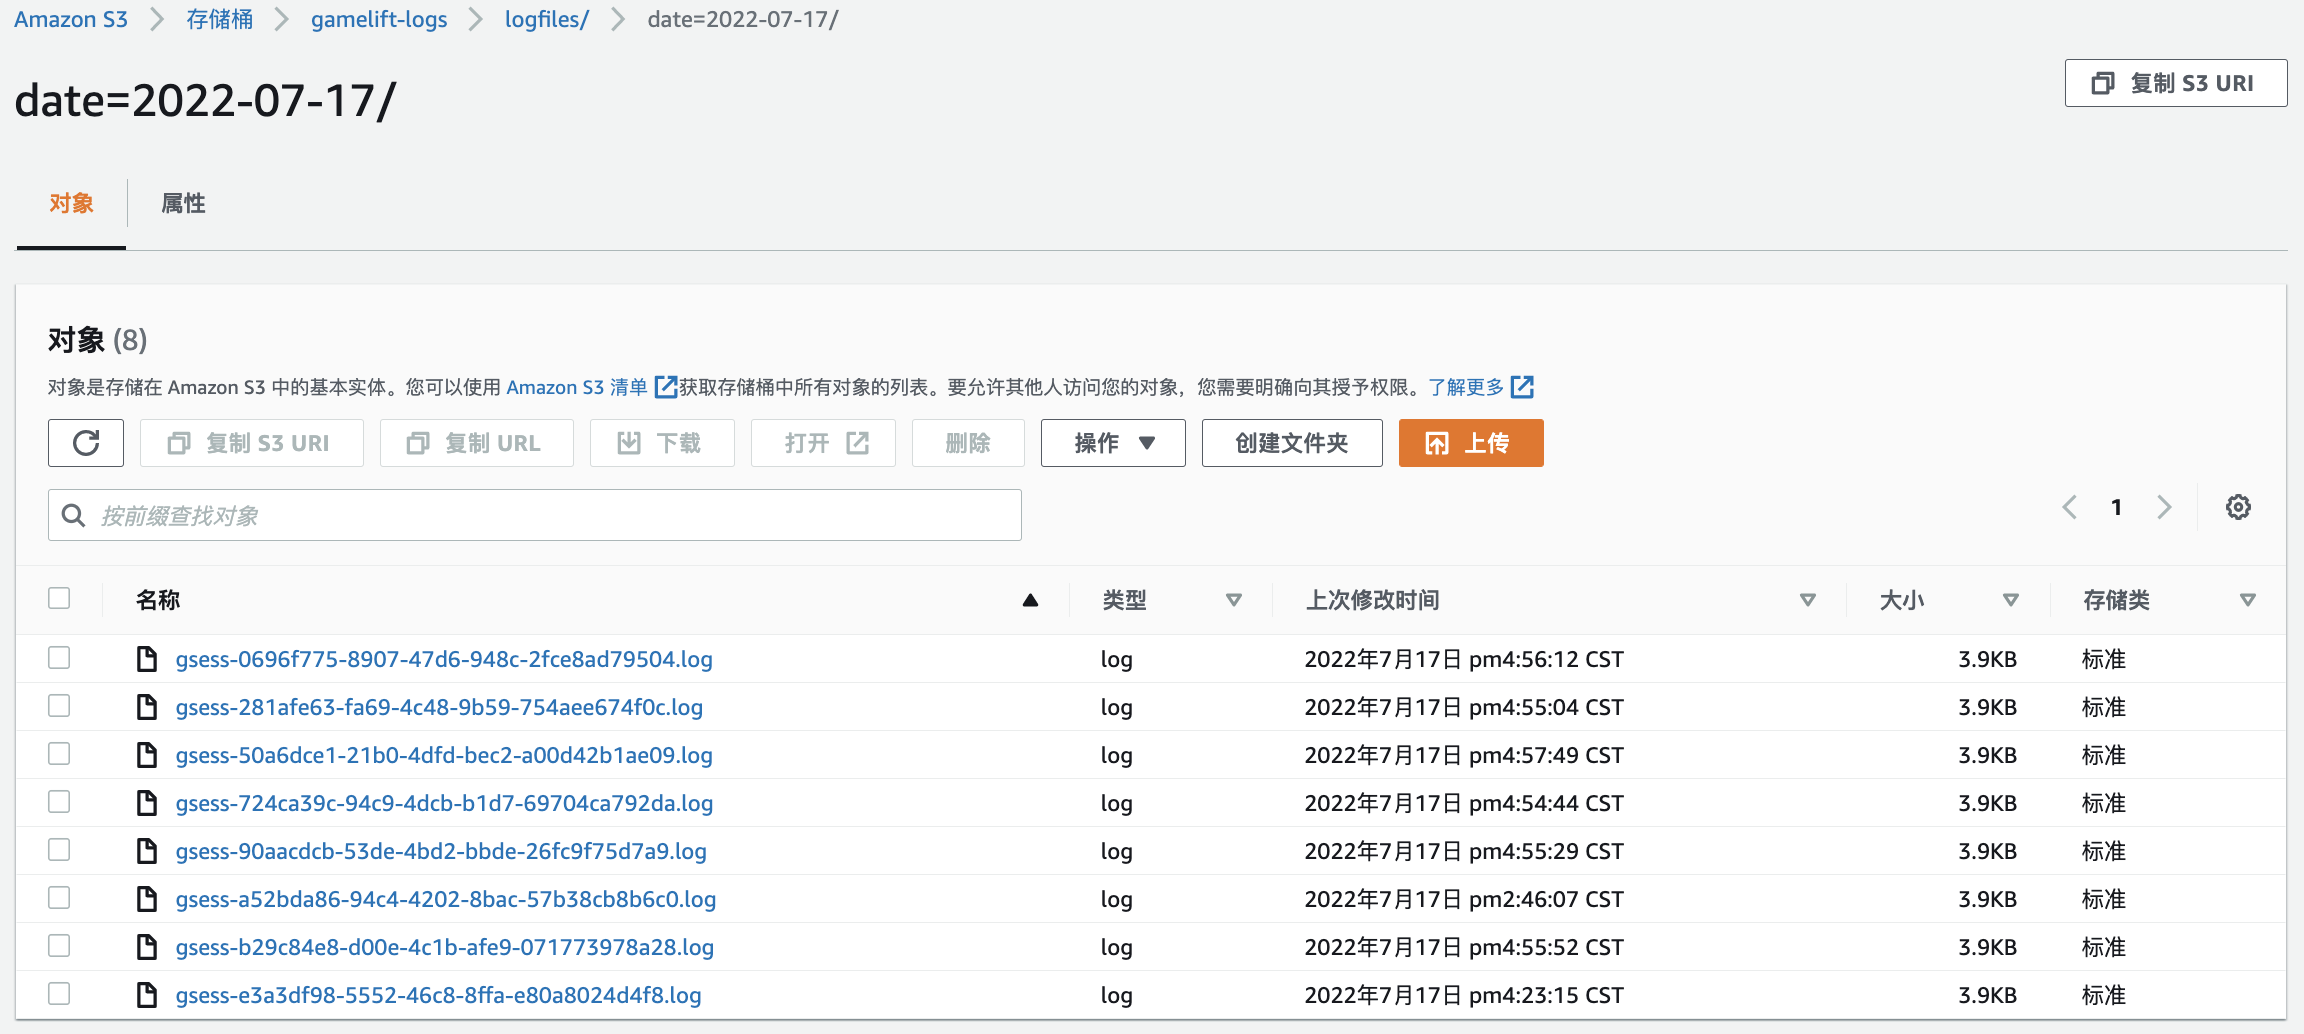
2.4 为了优化查询效率,我们对 S3 中的日志按照天为单位进行了分区( fluent-bit.conf 文件中 s3_key_format ), 在S3中我们可以看到S3中的目录如下:
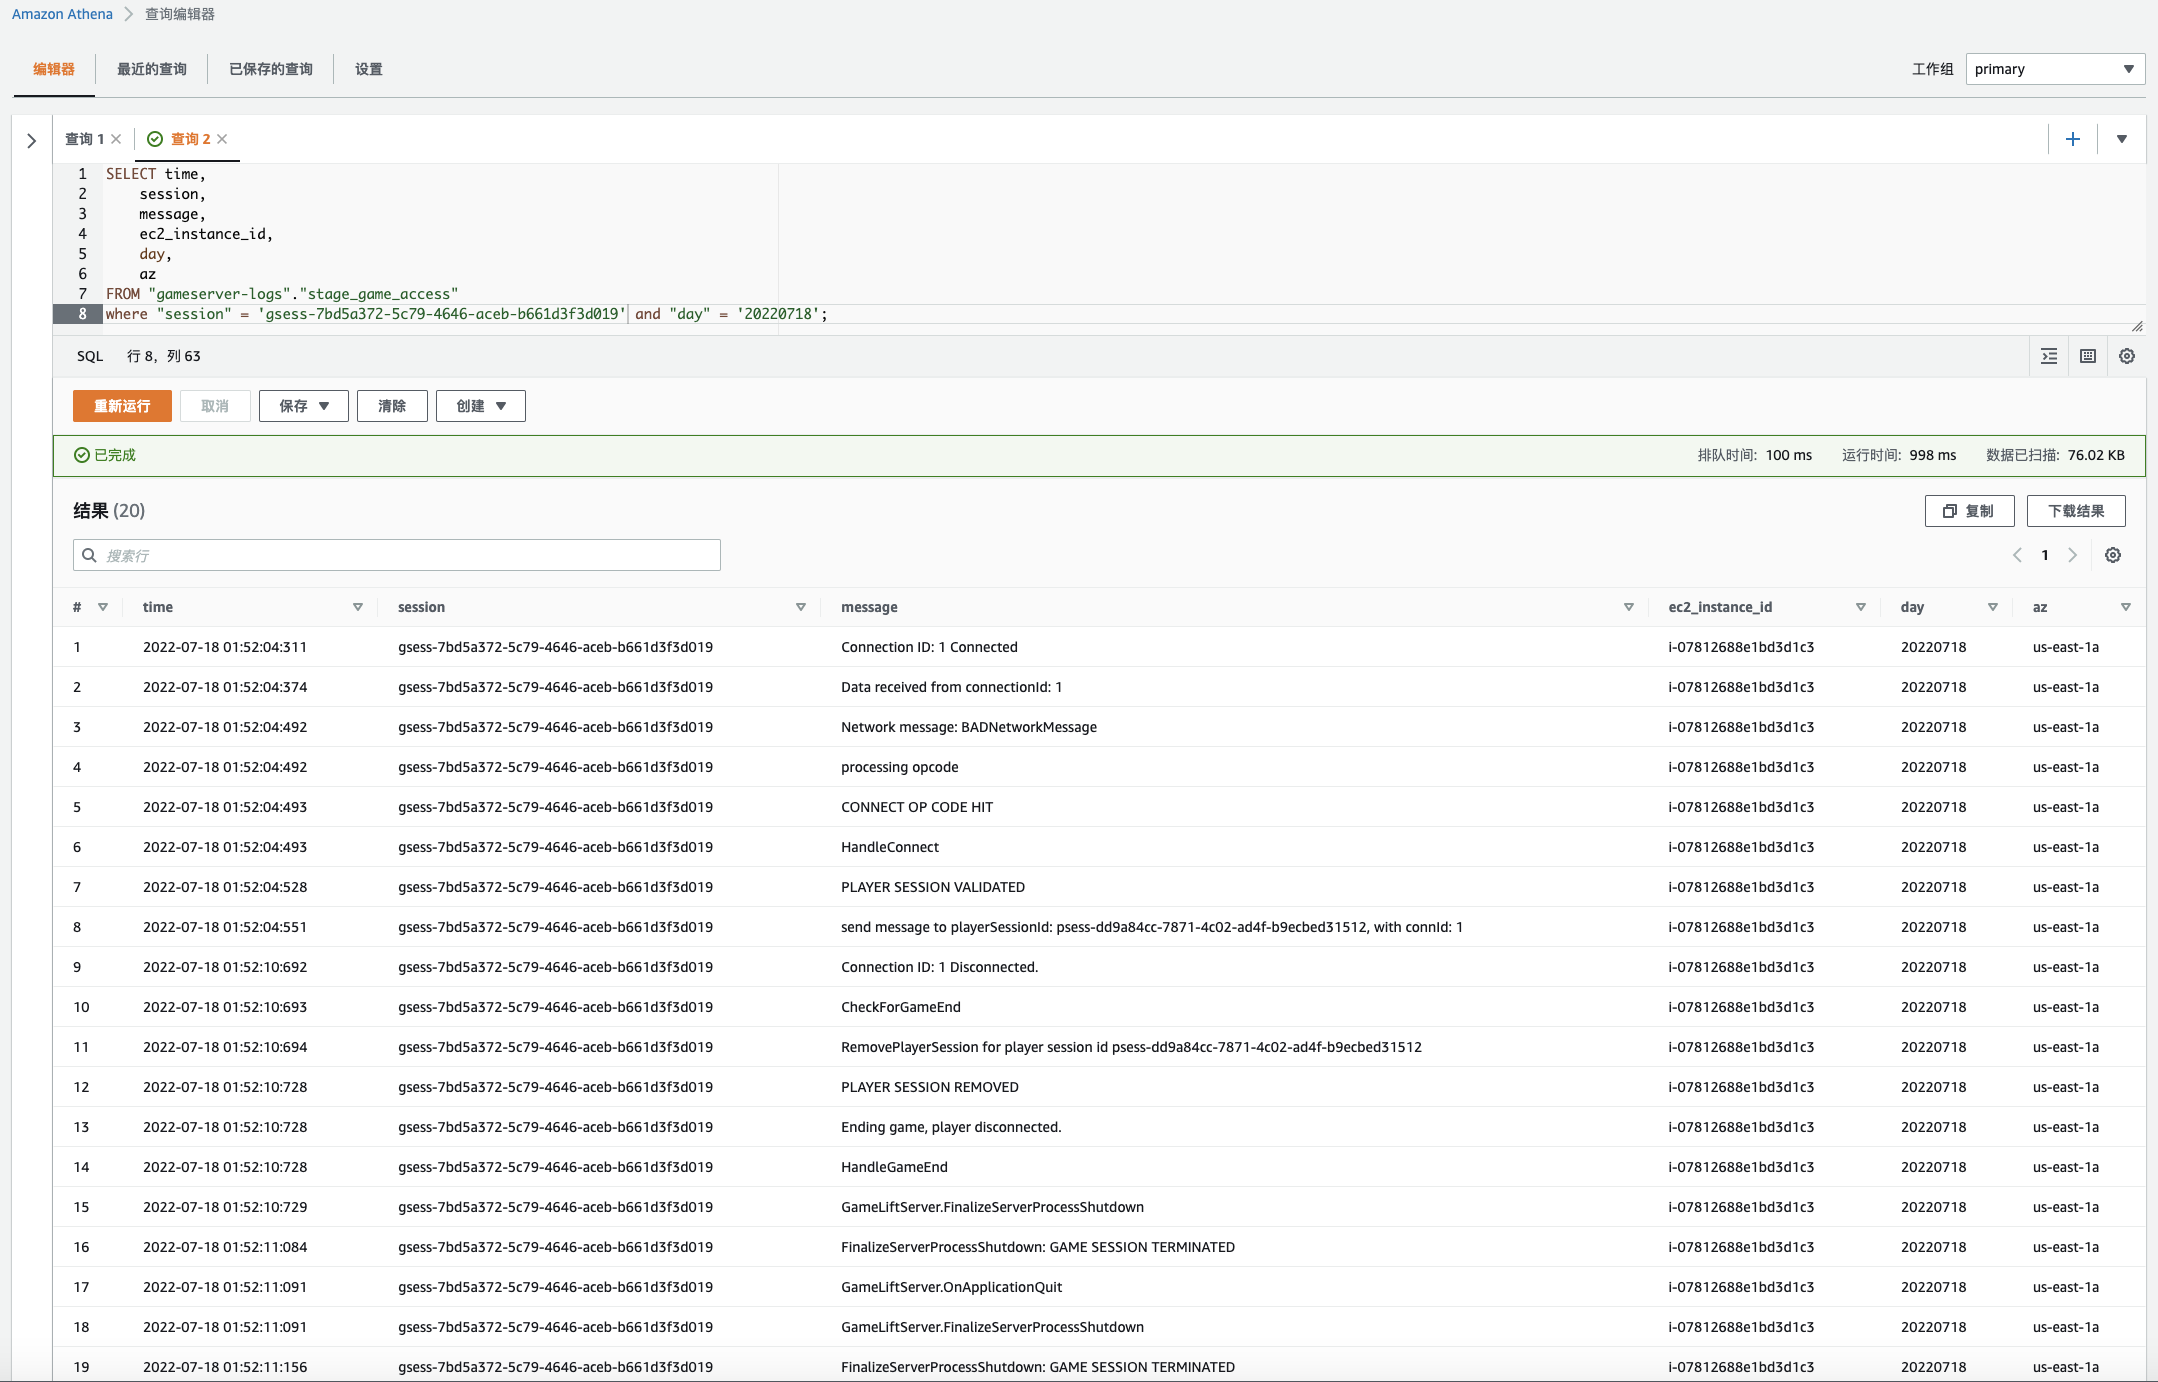
通过 Amazon Glue 爬取 S3 目录,并可以利用 Athena 快速查询日志数据,Athena 与 Glue 的配置可以参考 https://docs.aws.amazon.com/zh_cn/athena/latest/ug/data-sources-glue.html, 最终日志查询效果如下,我们可以通过SQL的方式实时查询游戏会话的日志:
方案三:Game Session 会话日志上传
以上基于Agent的日志方案将所有会话日志集中收集和管理,在实际的游戏运维过程中,我们可能希望集中分析某个session的日志,我们可以在 game session 结束之前,调用 SDK,将 game session 的日志文件上传到S3中, 在 Unity 中的实现如下:
//请修改以下代码
public static string _bucket = <s3 bucket name>; // 用于存放日志文件的S3存储痛名称
public static string _roleArn = "arn:aws:iam::<AWS Account ID >:role/gamelift-role"; // 创建队组时指定的实例角色ARN

 // a Unity callback when the program is quitting
    void OnApplicationQuit()
    {
        Debug.Log("GameLiftServer.OnApplicationQuit");
        FinalizeServerProcessShutdown();
        Debug.Log("Upload Log files to S3 bucket");
        try
        {
            AmazonSecurityTokenServiceClient stsClient = new AmazonSecurityTokenServiceClient(RegionEndpoint.USEast1);
            AssumeRoleResponse assumeRoleResponse = stsClient.AssumeRole(new AssumeRoleRequest()
            {
                RoleArn = _roleArn,
                RoleSessionName = System.Guid.NewGuid().ToString()
            });
            AmazonS3Client amazonS3Client = new AmazonS3Client(assumeRoleResponse.Credentials.AccessKeyId,assumeRoleResponse.Credentials.SecretAccessKey,assumeRoleResponse.Credentials.SessionToken,RegionEndpoint.USEast1);
            PutObjectRequest putObjectRequest = new PutObjectRequest
            {
                BucketName = _bucket,
                Key = "logfiles/date=" + DateTime.Now.ToString("yyyy-MM-dd") + "/" + _gameSessionId + ".log",
                FilePath = _logFileName,
                ContentType = "text/plain"
            };
            PutObjectResponse response = amazonS3Client.PutObject(putObjectRequest);
            Application.logMessageReceived -= Log;

            // delete the local log files after upload to s3
            Debug.Log("Delete Local Log File " + _logFileName);
            File.Delete(_logFileName);
        }
        catch (Exception e)
        {
            Debug.LogError("Log files upload exception : " + e.Message);
        }
    }
在游戏会话结束时通过 sessionId 命名日志文件,最终我们可以直接在 S3 中下载每一个 Game Session 的日志
因为我们在日志上传的时候做了目录分区,因此我们也可以通过 Athena 来快速查询分区数据。
此方案在游戏会话结束之后统一收集日志,对游戏本身的性能没有影响,利用S3存储日志文件,节省存储成本。但是无法查询实时日志,只能在游戏结束之后进行分析。
与其他平台的集成
对于 Fluent-bit 也可以支持直接将日志文件收集到 Amazon Opensearch 中,通过在 fluen-bit.conf 文件中增加如下输出即可
[OUTPUT]
    Name            es
    Match           *
    Host            ${ES_ENDPOINT}
    Port            443
    TLS             On
    AWS_Auth        On
    AWS_Region      ${AWS_REGION}
    Retry_Limit     6
对于已经使用 Log Hub (https://www.amazonaws.cn/solutions/log-hub/?nc1=h_ls) 的用户,我们也可以通过将日志上传S3之后,与 LogHub 对接,实现统一的日志管理。https://awslabs.github.io/log-hub/zh/implementation-guide/applications/
本篇作者


