Introduction
AWS Backup enables you to centralize and automate data protection across AWS services. AWS Backup offers a cost-effective, fully managed, policy-based service that simplifies data protection at scale. AWS Backup helps you support your regulatory compliance obligations and meet your business continuity goals.
With just a few clicks in the AWS Backup console, you can create backup policies that automate backup schedules and retention management. With AWS Backup, you can create backup policies called backup plans. You can use these plans to define your backup requirements, such as how frequently to back up your data and how long to retain those backups. AWS Backup lets you apply backup plans to your AWS resources by simply tagging them. AWS Backup then automatically backs up your AWS resources according to the backup plan that you defined.
All new Amazon Elastic File System (Amazon EFS) file systems created using the Amazon EFS console are automatically backed with AWS Backup, using the default settings for daily backups with a retention of 35 days. You can also use AWS Backup to create on-demand backup jobs, or customize a backup plan to backup the supported resources. When using AWS Backup with Amazon EFS file systems, you can centralize your compliance and policy control for backups, increase security choices for your organization, and access instant enterprise level features and functionality. In addition, AWS Backup supports recovering file and folder level restores from the backups created by the service. You pay only for the EFS backup capacity you use, with no other added costs.
What you will learn
- How to create an on-demand backup job of an Amazon EFS file system
- How to use a backup plan to backup Amazon EFS resources - using a backup plan within AWS Backup lets you automate your backups on a schedule
- How to add resources to an existing backup plan using tags
AWS Experience
Intermediate
Time to Complete
10 minutes
Cost to Complete
Less than $1 (Amazon EFS pricing page)
Services Used
Implementation
- An AWS account will be needed for this tutorial. For more information on using AWS Backup for the first time, view the AWS Backup documentation.
- One or more Amazon EFS file systems. A 10 GB file system will cost $3 per month. You can refer to the Amazon EFS pricing page for more details. For AWS Backup pricing, refer to the AWS Backup pricing page.
- IAM roles used by AWS Backup to create a backup of the Amazon EFS file system.
- If a subsequent role is not created, then the default IAM role can be used - AWSBackupDefaultRole.
-
Step 1: Go to the AWS Backup console
- 1.1 — Sign in
- Log in to the AWS Management Console, and open the AWS Backup console.
%20.aaa7e7c67eacfc25788fb60d360311b499ccb07b.PNG)
- 1.1 — Sign in
-
Step 2: Configure an on-demand AWS Backup job of an Amazon EFS file system
- 2.1 — Configure the services used with AWS Backup
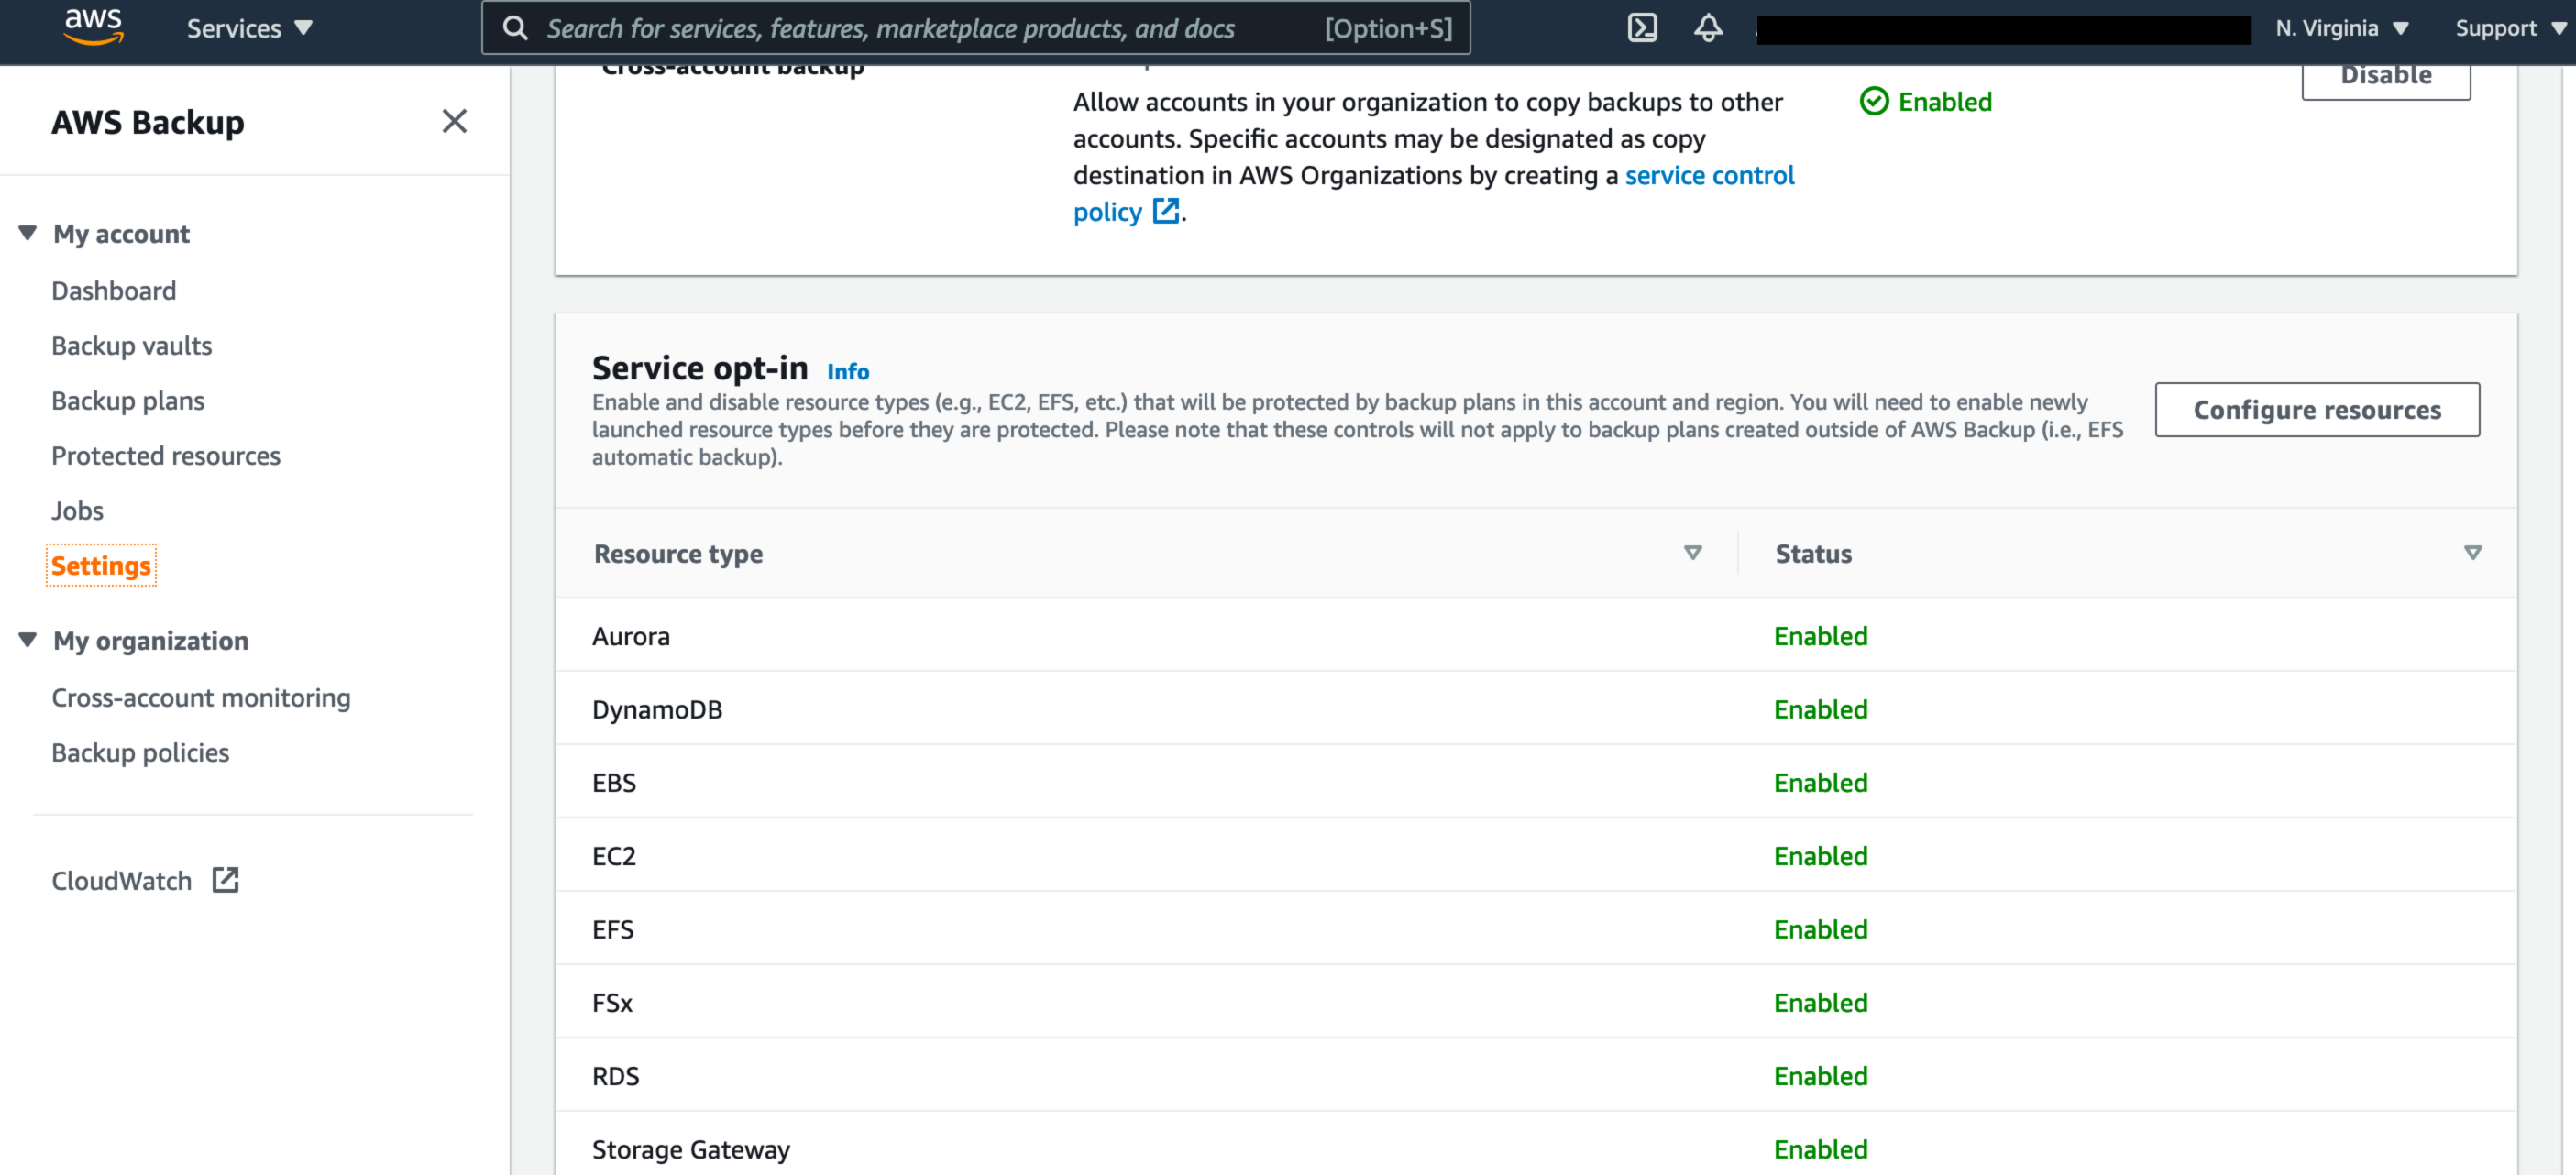
- On the navigation pane on the left side of the AWS Backup console, under My account, choose Settings.
- On the Service opt-in page, select the Configure resources button.
- 2.1 — Configure the services used with AWS Backup (continued)
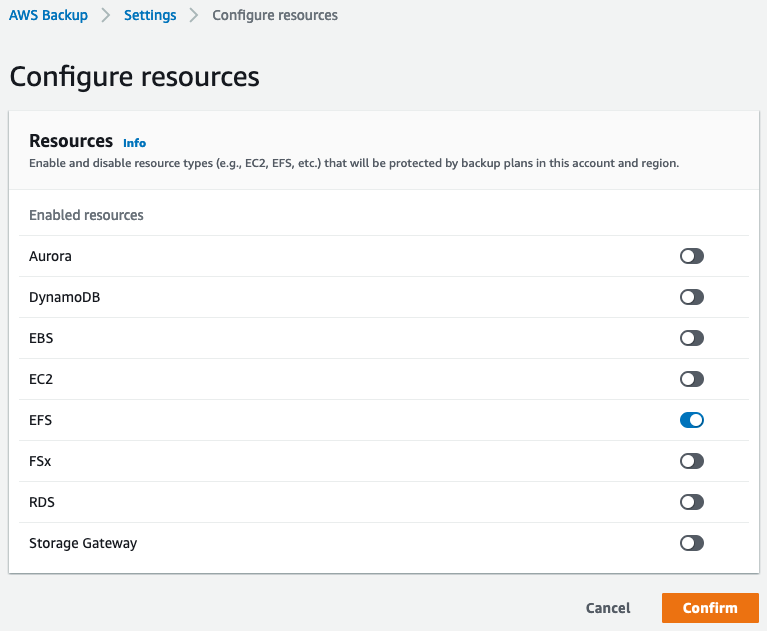
- On the Configure resources page, use the toggle switches to enable or disable the services used with AWS Backup. In this case, select EFS. Choose Confirm when your services are configured.
- AWS resources that you're backing up should be in the Region you are using for this tutorial, and resources must all be in the same AWS Region (however, see step 3.2 for information on cross-Region copy). This tutorial uses the US East (N. Virginia) Region (us-east-1).
- AWS resources that you're backing up should be in the Region you are using for this tutorial, and resources must all be in the same AWS Region (however, see step 3.2 for information on cross-Region copy). This tutorial uses the US East (N. Virginia) Region (us-east-1).
- On the Configure resources page, use the toggle switches to enable or disable the services used with AWS Backup. In this case, select EFS. Choose Confirm when your services are configured.
- 2.2 — Create an on-demand backup Job of an Amazon EFS file system
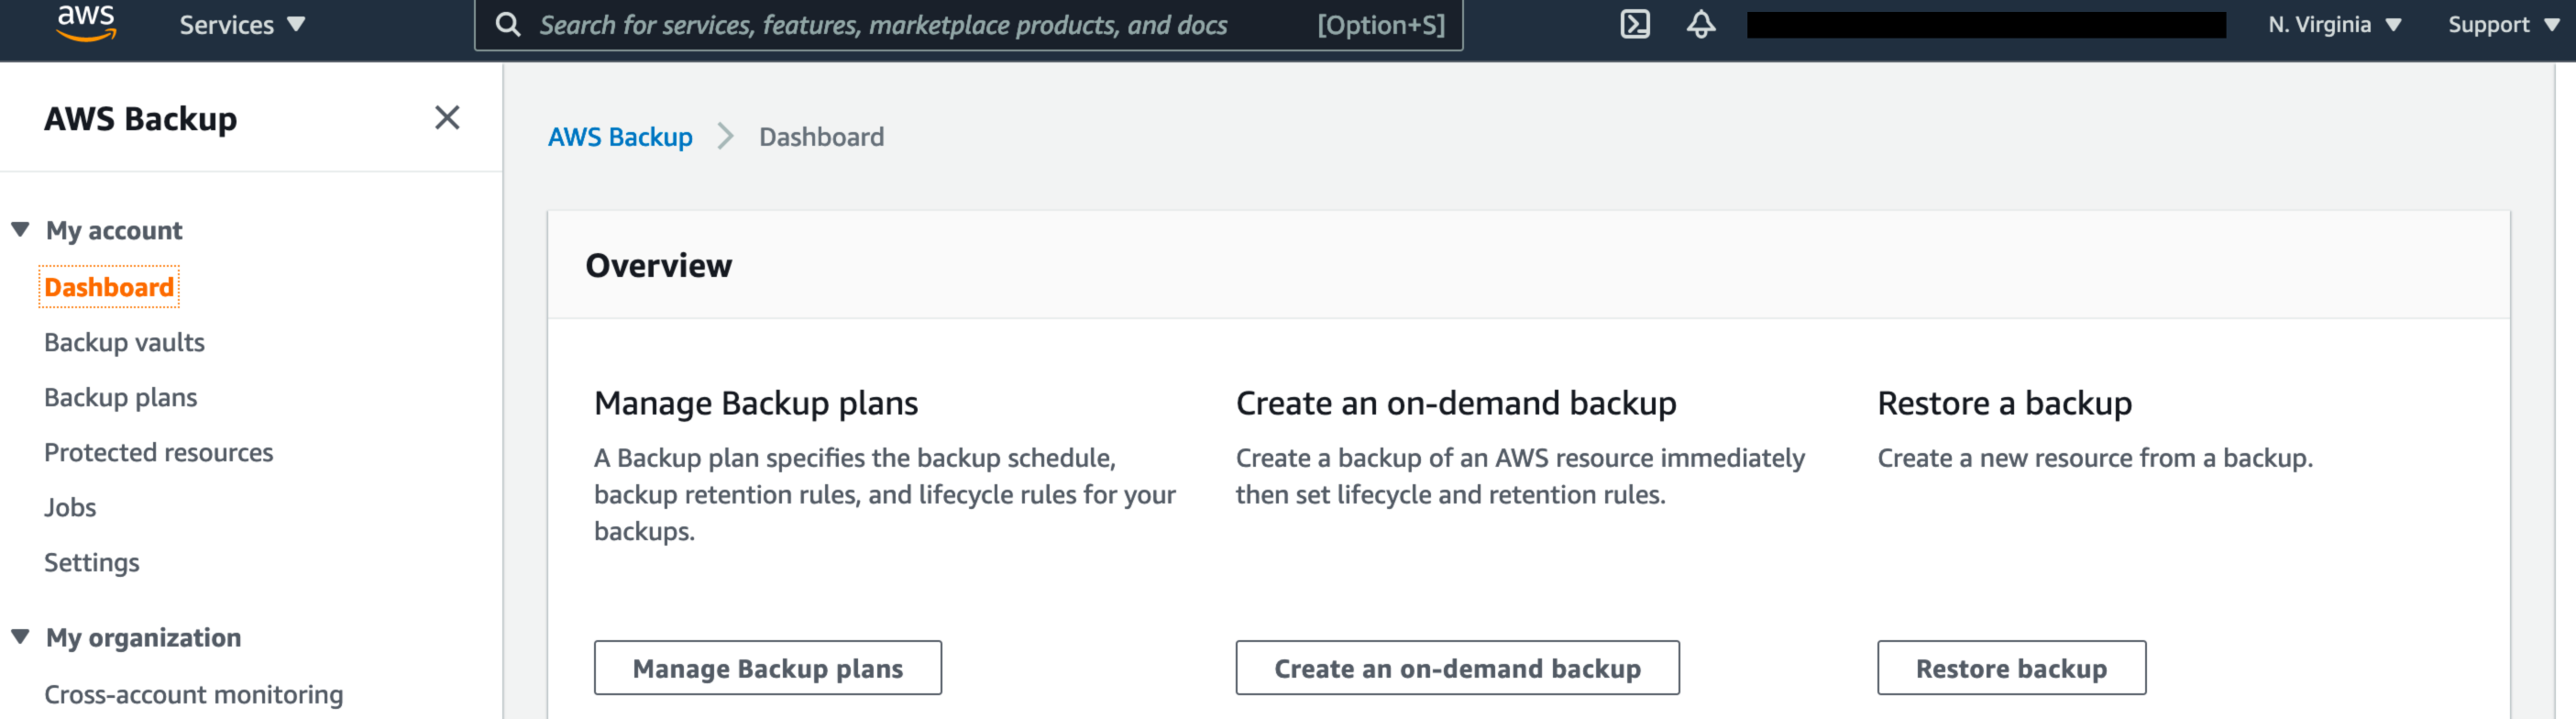
- Back in the AWS Backup console, under My account, select Dashboard on the left navigation pane. Then, select the Create on-demand backup button.
- Back in the AWS Backup console, under My account, select Dashboard on the left navigation pane. Then, select the Create on-demand backup button.
- 2.2 — Create an on-demand backup Job of an Amazon EFS file system (continued)
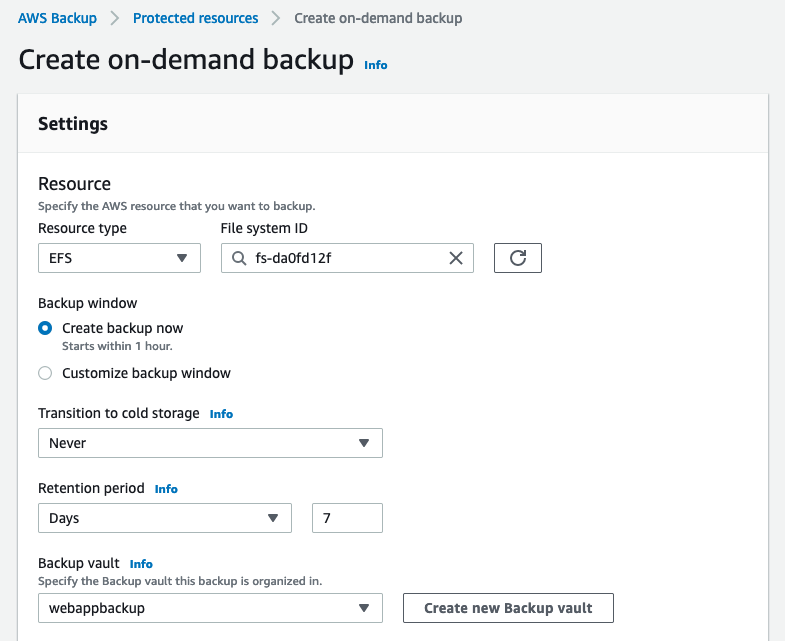
- On the Create on-demand backup page, choose the Resource type that you want to back up; for example, choose EFS for Amazon EFS.
- Choose the File system ID of the EFS resource that you want to protect.
- In the Backup window section, select Create backup now. This initiates a backup immediately and enables you to see your saved resource sooner on the Protected resources page.
- In the Retention period section, select Days and type the number of days you want to retain the backups for. In this example, we selected 7 days.
- In the Backup vault section, select one of the pre-existing vaults and continue with step 2.2, or follow step 2.2.1 to create a new backup vault (which begins with selecting Create new Backup vault) before continuing with step 2.2.
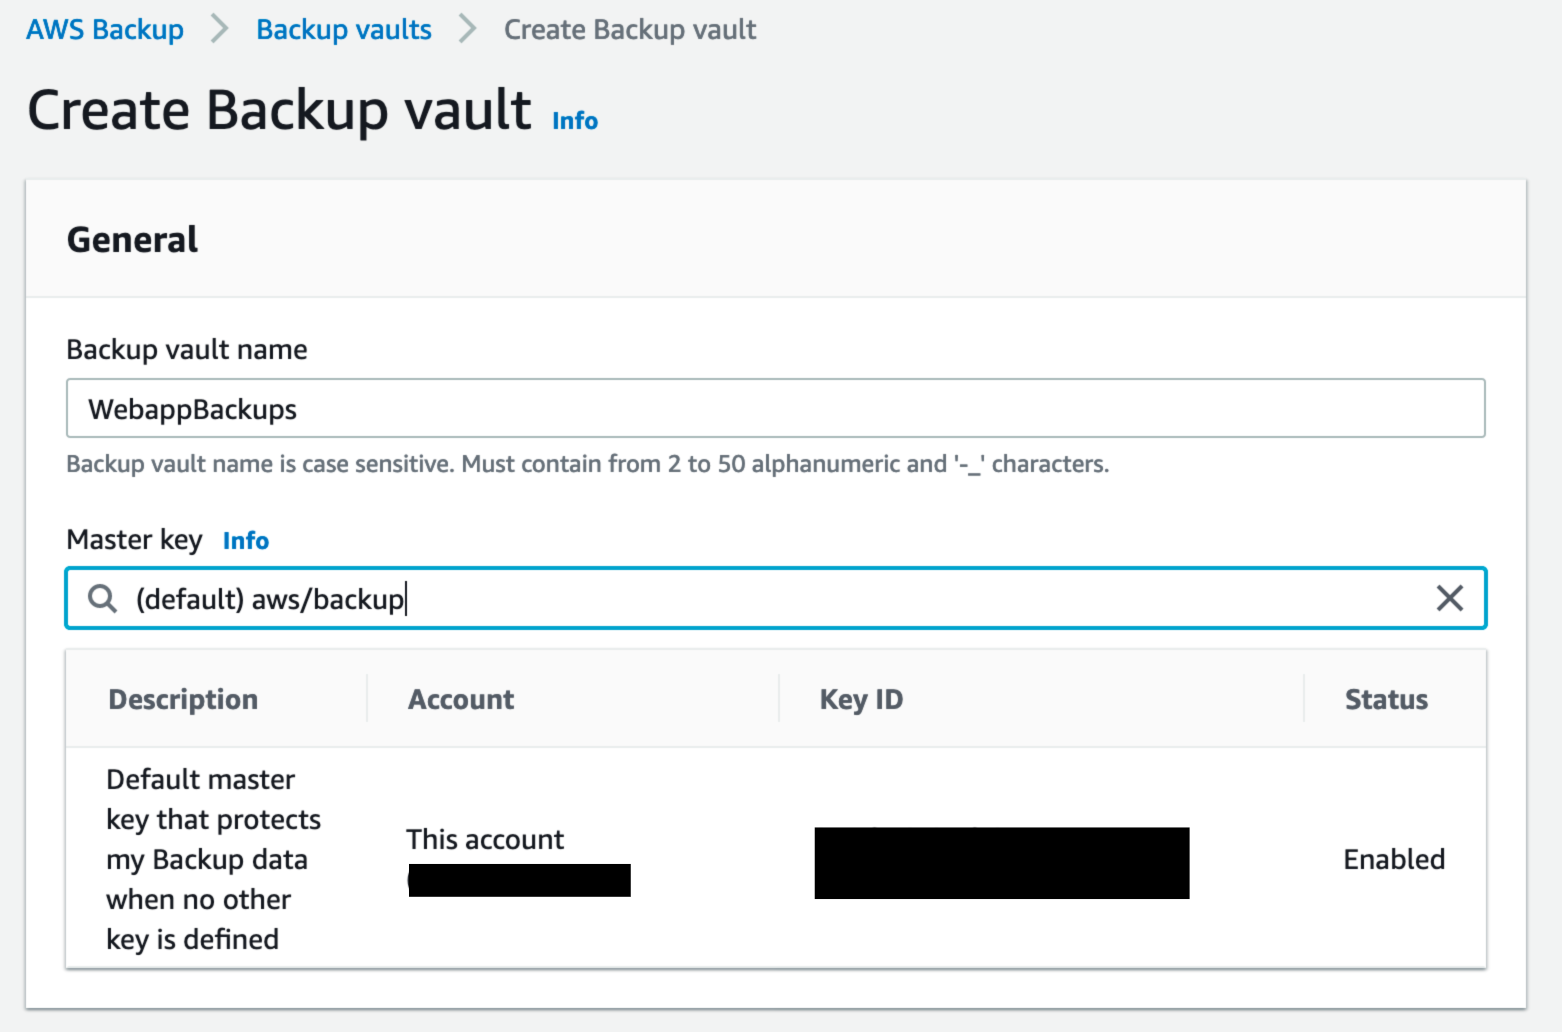
- 2.2.1 — Create a backup vault: Instead of using the default backup vault that is automatically created for you on the AWS Backup console, you can create specific backup vaults to save and organize groups of backups in the same vault.
- On the Create on-demand backup page, choosing Create new Backup vault opens a new page to create a vault, and you are returned to the Create on-demand backup page after you are finished.
- You can also go to the AWS Backup console in the navigation pane on the left and select Backup vaults and then Create backup vault to create a backup vault.
- Enter a name for your backup vault. You can name your vault to reflect what you will store in it, or to make it easier to search for the backups you need. For example, you could name it "webappBackups."
- Select an AWS Key Management Service (KMS) key. You can use either a key that you already created, or select the default AWS Backup master key.
- On the Create on-demand backup page, choosing Create new Backup vault opens a new page to create a vault, and you are returned to the Create on-demand backup page after you are finished.
- 2.2.1 — Create a backup vault (continued)
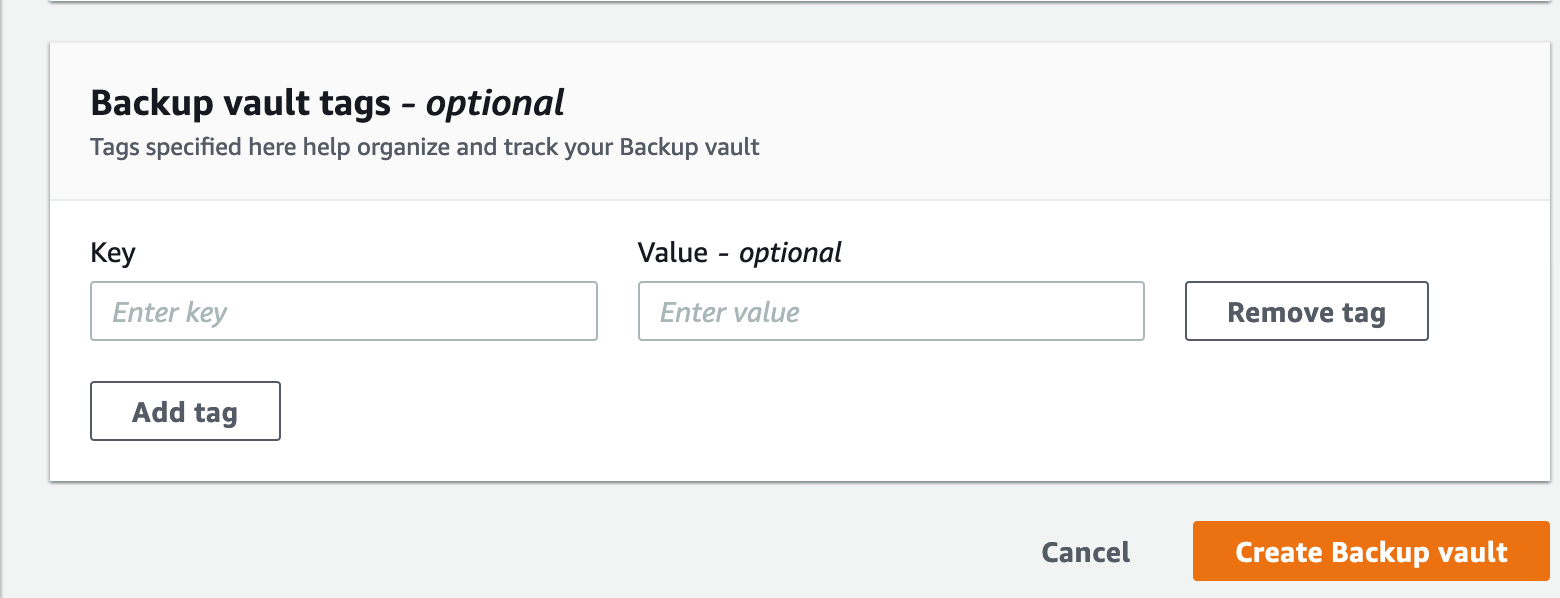
- Optionally, add tags that will help you search for and identify your backup vault.
- Optionally, add tags that will help you search for and identify your backup vault.
- 2.2 — Create a backup vault (continued)
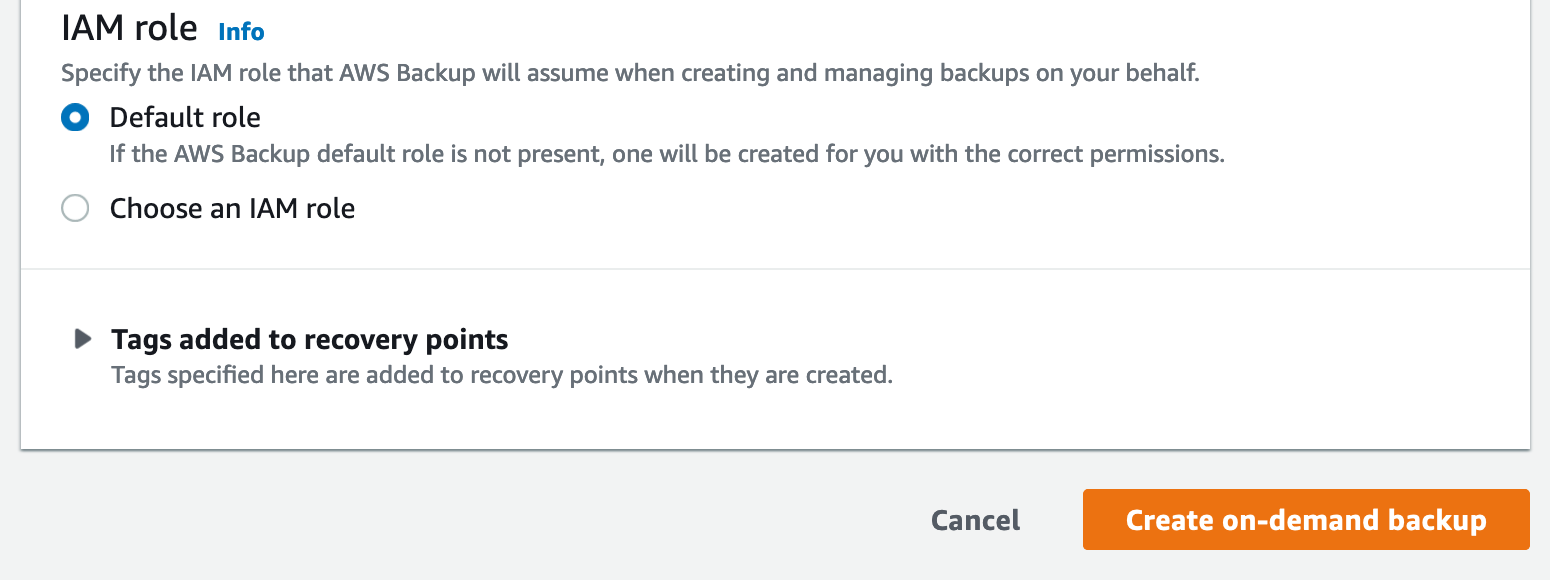
- Back on the Create on-demand backup page, after you have selected an existing backup vault or created a new one, choose the Default role for the IAM role, as shown in the following screenshot, or Choose an IAM role.
- Note: If the AWS Backup Default role is not present in your account, then one is created with the correct permissions.
- Note: If the AWS Backup Default role is not present in your account, then one is created with the correct permissions.
- Select the Create on-demand backup button. This takes you to the Jobs page, where you will see a list of jobs.
- Back on the Create on-demand backup page, after you have selected an existing backup vault or created a new one, choose the Default role for the IAM role, as shown in the following screenshot, or Choose an IAM role.
- 2.3 — Checking job details
- In the Jobs panel under My account, ensure the Backup jobs tab is selected.
- Choose the Backup job ID for the resource that you chose to back up to see the details of that job.
- After some time, the Status of the backup job will go from Created to Completed.

- 2.1 — Configure the services used with AWS Backup
-
Step 3: Configure an automatic AWS Backup job of an Amazon EFS file system
- 3.1 — Configure the services used with AWS Backup
- On the navigation pane on the left side of the AWS Backup console, under My account, choose Settings.
- On the Service opt-in page, select the Configure resources button.
- 3.1 — Configure the services used with AWS Backup (continued)
- On the Configure resources page, use the toggle switches to enable or disable the services used with AWS Backup. Choose Confirm when your services are configured.
- AWS resources that you're backing up should be in the Region you are using for this tutorial, and resources must all be in the same AWS Region (however, see step 3.2 for information on cross-Region copy). This tutorial uses the US East (N. Virginia) Region (us-east-1).
- AWS resources that you're backing up should be in the Region you are using for this tutorial, and resources must all be in the same AWS Region (however, see step 3.2 for information on cross-Region copy). This tutorial uses the US East (N. Virginia) Region (us-east-1).
- On the Configure resources page, use the toggle switches to enable or disable the services used with AWS Backup. Choose Confirm when your services are configured.
- 3.2 — Configure a backup plan for an Amazon EFS file system
- In the AWS Backup console, under My account, select Backup plans on the left rail, and then select the Create Backup plan button.
- In the AWS Backup console, under My account, select Backup plans on the left rail, and then select the Create Backup plan button.

- 3.2 — Configure a backup plan for an Amazon EFS file system (continued)
- AWS Backup provides three ways to get started using the AWS Backup console:
- Start from an existing plan: You can create a new backup plan based on the configurations in an existing plan. Be aware that backup plans created by AWS Backup are based on backup best practices and common backup policy configurations. When you select an existing backup plan to start from, the configurations from that backup plan are automatically populated for your new backup plan. You can then change any of these configurations according to your backup requirements.
- Build a new plan from scratch: You can create a new backup plan by specifying each of the backup configuration details, as described in the next section. You can choose from the recommended default configurations.
- Define a plan using JSON: You can modify the JSON expression of an existing backup plan or create a new expression.
- Backup plan name - You must provide a unique backup plan name. If you try to create a backup plan that is identical to an existing plan, you get an AlreadyExistsException error.
- AWS Backup provides three ways to get started using the AWS Backup console:

- 3.2 — Configure a backup plan for an Amazon EFS file system (continued)
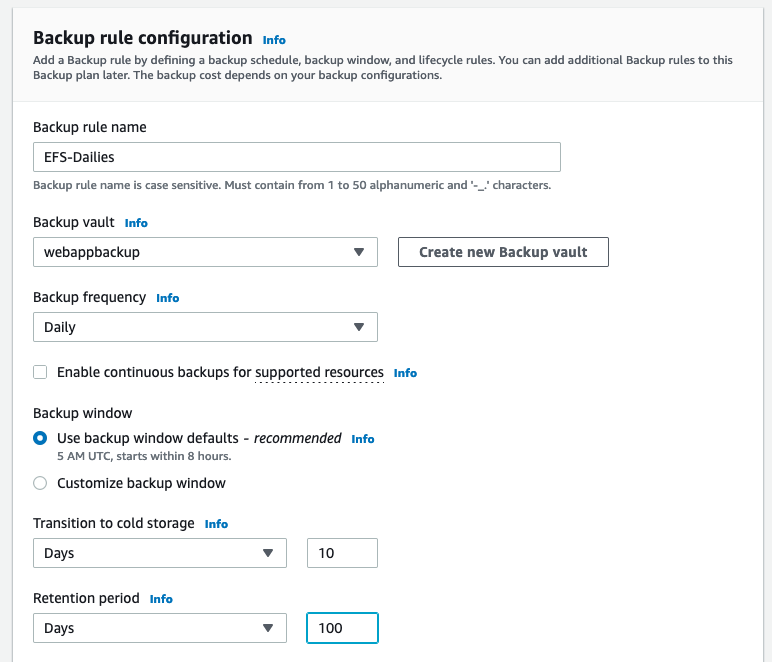
- Backup rule name - Backup plans are composed of one or more backup rules. Backup rule names are case sensitive. They must contain from 1 to 63 alphanumeric characters or hyphens.
- In the Backup vault section, you can select the default vault or one of the pre-existing vaults. Backups created by a backup rule are organized in the backup vault that you specify in the backup rule. You can use backup vaults to set the AWS KMS encryption key that is used to encrypt backups in the backup vault and to control access to the backups in the backup vault. You can also add tags to backup vaults to help you organize them. If you don't want to use the default vault, you can create your own.
- Create new Backup vault - Instead of using the default backup vault that is automatically created for you on the AWS Backup console, you can create specific backup vaults to save and organize groups of backups in the same vault. To create a new backup vault, refer to step 3.2.1.
- In the Backup Frequency section, Choose Daily. The backup frequency determines how often a backup is created. You can choose a frequency of every 12 hours, daily, weekly, or monthly. When selecting weekly, you can specify which days of the week you want backups to be taken. When selecting monthly, you can choose a specific day of the month.
- In the Backup window section, select backup window defaults, which initiates the backup job at 5 AM UTC (Coordinated Universal Time) and lasts 8 hours. If you would like to customize the backup frequency, refer to the documentation for more information.
- In the Transition to cold storage section, type "10" as the number of days you want to retain the backups in warm storage.
- In the Retention period section, select Days and type "100" as the number of days that you want to retain the backups in the cold storage. Backups that are transitioned to cold storage must be stored in cold storage for a minimum of 90 days.
- 3.2 — Configure a backup plan for an Amazon EFS file system (continued)
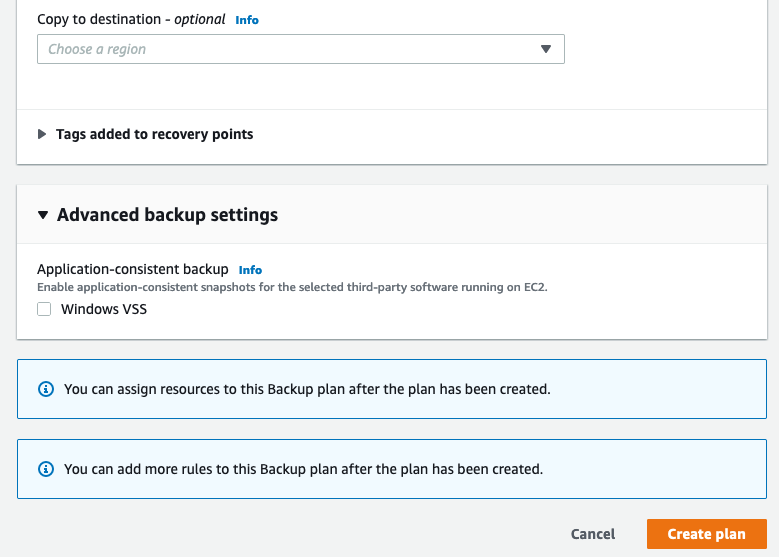
- In the Copy to destination section, leave it as the default, since this tutorial covers backups within the same AWS Region. As part of your backup plan, you can optionally create a backup copy in another AWS Region. Using AWS Backup, you can copy backups to multiple AWS Regions on-demand, or automatically as part of a scheduled backup plan. Cross-region replication is particularly valuable if you have business continuity or compliance requirements to store backups a minimum distance away from your production data. When you define a backup copy, you configure the following options:
- Destination Region: The destination Region for the backup copy
- (Advanced Settings) Backup Vault: The destination backup vault for the copy.
- (Advanced Settings) IAM Role: The IAM role that AWS Backup uses when creating the copy. The role must also have AWS Backup listed as a trusted entity, which enables AWS Backup to assume the role. If you choose Default and the AWS Backup default role is not present in your account, a role is created for you with the correct permissions.
- (Advanced Settings) Lifecycle: Specifies when to expire (delete) the copy.
- Note: Cross-region copy incurs additional data transfer costs. You can refer to the AWS Backup pricing page.
- Tags added to recovery points: The tags that you list here are automatically added to backups when they are created.
- Advanced Backup Settings: Enables application consistent backups for third-party applications that are running on Amazon EC2 instances. Currently, AWS Backup supports Windows VSS backups. This is only applicable for Windows EC2 Instances running SQL Server or Exchange Databases. You can refer to the documentation for more details.
- Then, select the Create Plan button. Once the plan is created, tags and resources can be added to the backup plan.
- In the Copy to destination section, leave it as the default, since this tutorial covers backups within the same AWS Region. As part of your backup plan, you can optionally create a backup copy in another AWS Region. Using AWS Backup, you can copy backups to multiple AWS Regions on-demand, or automatically as part of a scheduled backup plan. Cross-region replication is particularly valuable if you have business continuity or compliance requirements to store backups a minimum distance away from your production data. When you define a backup copy, you configure the following options:
- 3.2.1 — Create a backup vault
- In the AWS Backup console, in the left navigation pane under My account, select Backup vaults.
- Select Create backup vault.
- Enter a name for your backup vault. You can name your vault to reflect what you will store in it, or to make it easier to search for the backups you need. For example, you could name it "WebappBackups."
- Select an AWS KMS key. You can use either a key that you already created, or select the default AWS Backup master key.

- 3.2.1 — Create a backup vault (continued)
- Optionally, add tags that will help you search for and identify your backup vault.
- Optionally, add tags that will help you search for and identify your backup vault.
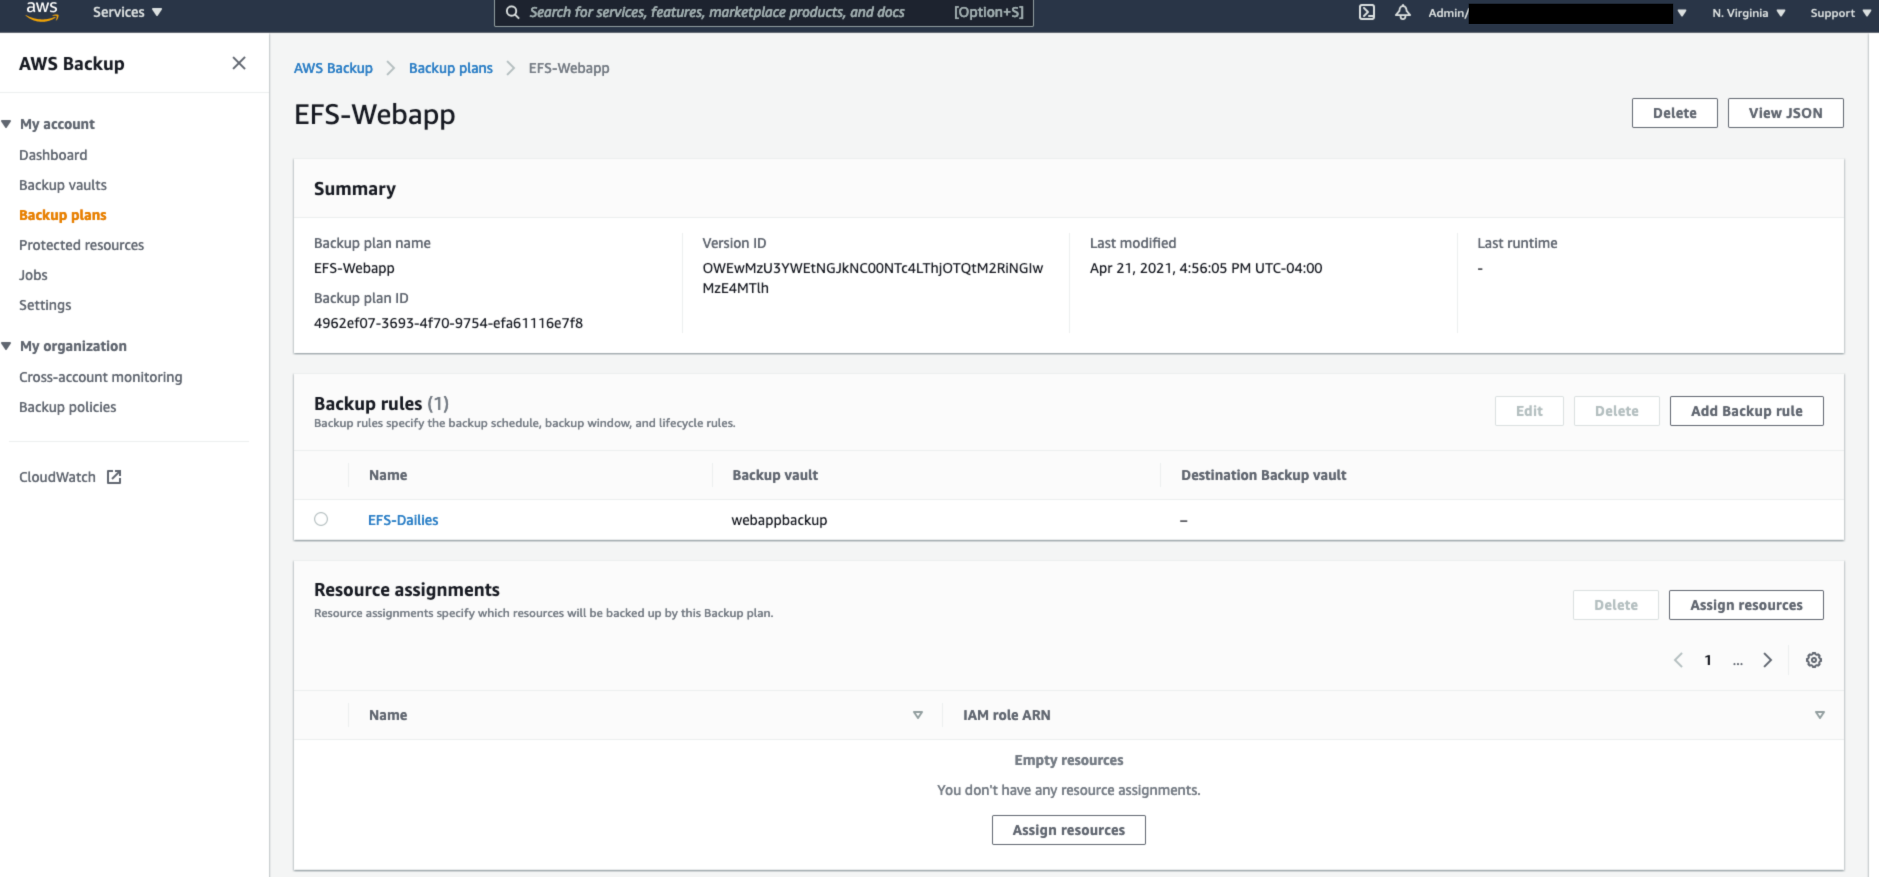
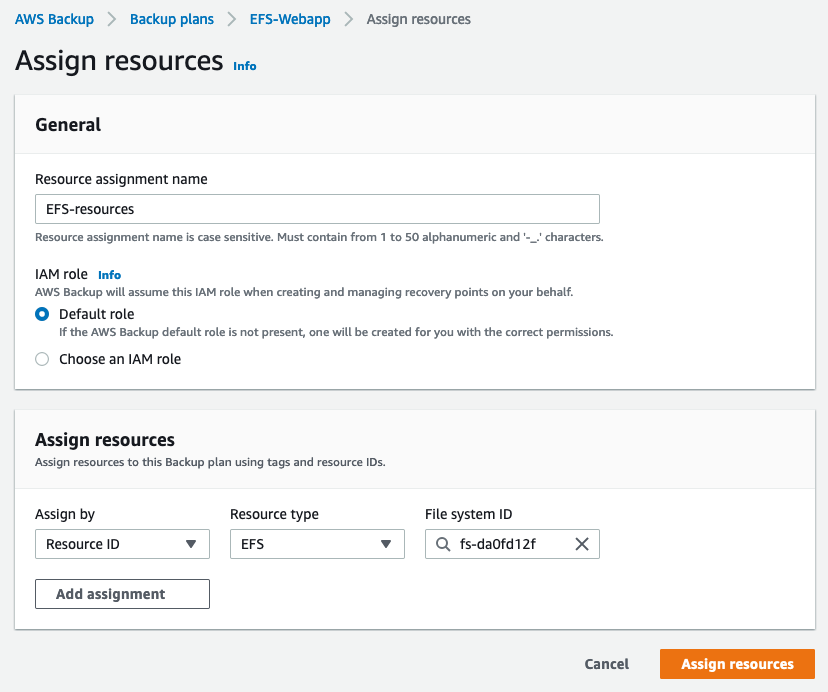
- 3.3 — Assign resources to the backup plan
- When you assign a resource to a backup plan, that resource is backed up automatically according to the backup plan. The backups for that resource are managed according to the backup plan. You can assign resources using tags or resource IDs. Using tags to assign resources is a simple and scalable way to back up multiple resources.
- Select the created backup plan and select the Assign resources button.
- 3.3 — Assign resources to the backup plan (continued)
- Resource assignment name: Provide a resource assignment name.
- IAM Role: When creating a tag-based backup plan, if you choose a role other than Default role, make sure that it has the necessary permissions to back up all tagged resources. AWS Backup tries to process all resources with the selected tags. If it encounters a resource that it doesn't have permission to access, the backup plan fails.
- Assign by: You can select Tags or Resource ID. For a tags-based resource assignment, provide the key-value pair of the Amazon EFS file system.
- Select Assign resources. The backup plan will then have the resources assigned to it.
- 3.3 — Assign resources to the backup plan (continued)
- Navigate to the AWS Backup console and select Jobs in the left navigation pane. Once there, you will be able to see your Backup jobs.
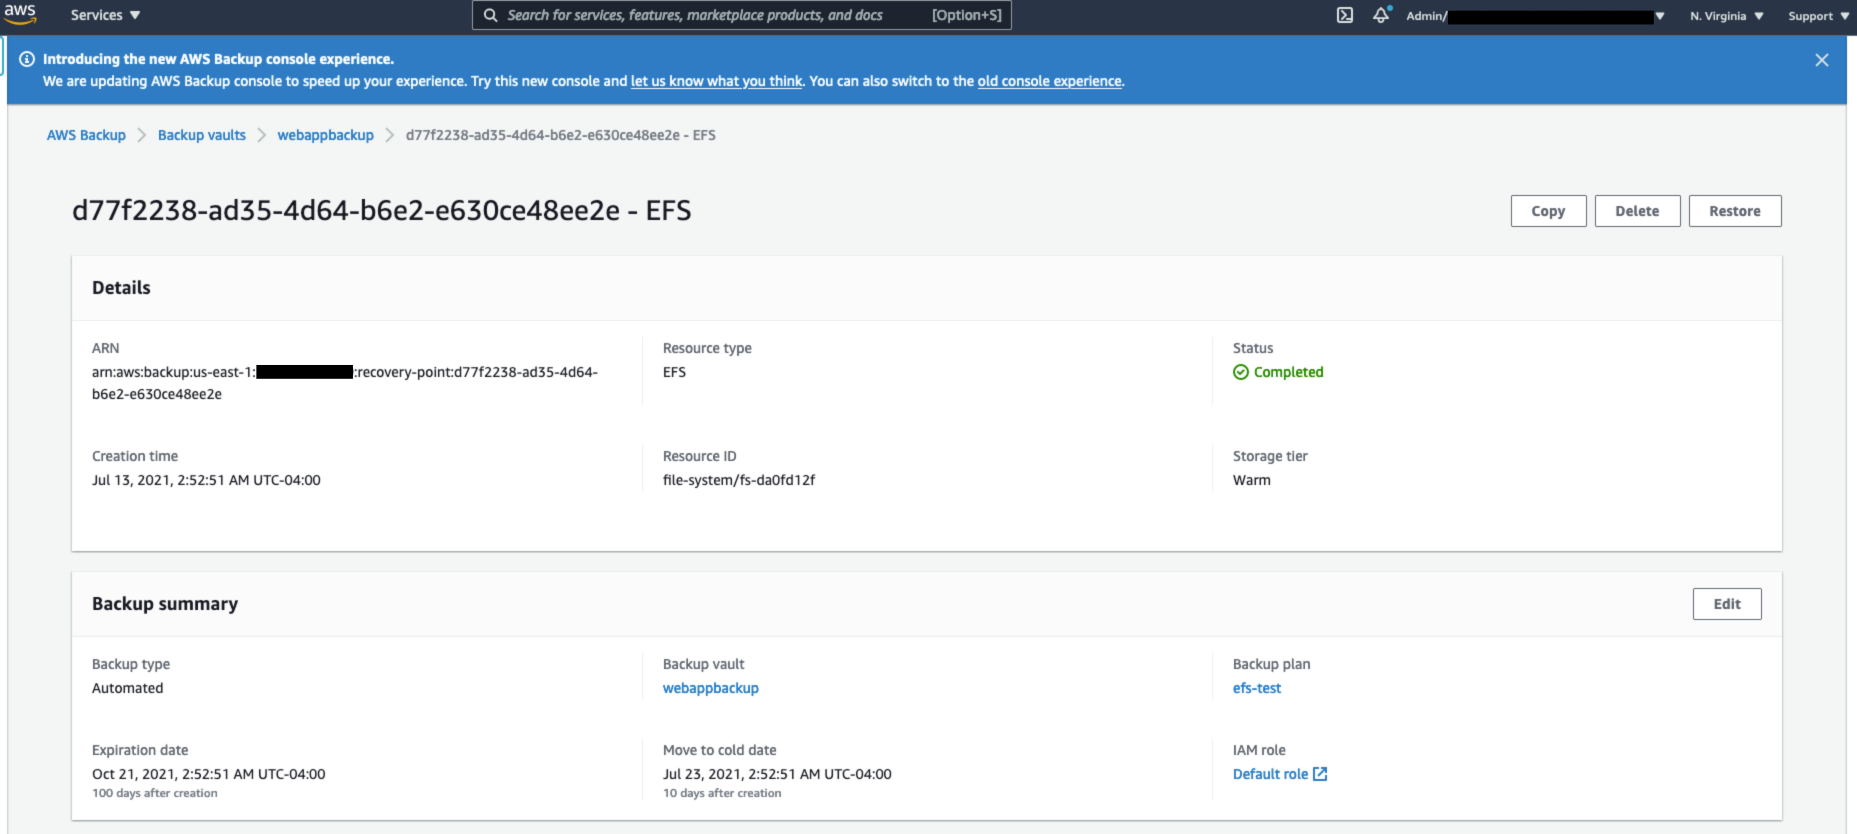
- A backup, or recovery point, represents the content of a resource, such as an Amazon EFS file system or Amazon RDS database, at a specified time. Recovery point is a term that refers generally to the different backups in AWS services, such as Amazon EBS snapshots and Amazon RDS backups. In AWS Backup, recovery points are saved in backup vaults, which you can organize according to your business needs. Each recovery point has a unique ID.
- Navigate to the AWS Backup console and select Jobs in the left navigation pane. Once there, you will be able to see your Backup jobs.

- 3.1 — Configure the services used with AWS Backup
-
Step 4: Restore an Amazon EFS file system using AWS Backup
- 4.1 — Restoring your Amazon EFS file system
- Navigate to the backup vault that was selected in the backup plan and select the latest completed backup. To restore the EFS file system, click on the recovery point ARN and select the Restore button.
- 4.1 — Restoring your Amazon EFS file system (continued)
- The restore of the ARN will bring you to a Restore backup screen that will have the snapshot ID, and other configurations.
- Resource Type: select Full restore.
- Choose the Full restore option to restore the file system in its entirety, including all root level folders and files. Choose the Item-level restore option to restore a specific file or directory. You can select and restore up to five items within your Amazon EFS file system.
- Restore Location: Select Restore to a new file system.
- Choose the Restore to directory in source file system option, if you want to restore to the source file system. Choose the Restore to a new file system option, if you want to restore to a different file system.
- File system type: Select Regional. It is the recommended option as it stores the data across multiple AZ’s.
- Performance: Select General purpose.

- 4.1 — Restoring your Amazon EFS file system (continued)
- Select Default role and the select the Restore backup button.
- Choose Enable encryption, if you want to encrypt your file system. Master key IDs and aliases appear in the list after they have been created using the AWS Key Management Service (AWS KMS) console.
- In the Master key text box, choose the key you want to use from the list.
- Select Default role and then select the Restore backup button.
- Afterward, the job will appear under Restore jobs in the Jobs section of the AWS Backup Console, found on the left navigation pane.
- Afterward, the job will appear under Restore jobs in the Jobs section of the AWS Backup Console, found on the left navigation pane.

- 4.2 — Checking for your restored Amazon EFS file system
- The restored backup job will appear under Restore jobs in the the AWS Backup console.

- 4.2 — Checking for your restored Amazon EFS file system (continued)
- Once the job status appears as completed, navigate to the Amazon EFS console and select File systems on the left navigation pane to see the restored EFS file system.

- 4.1 — Restoring your Amazon EFS file system
-
Step 5: Next steps
You can mount the restored Amazon EFS files system on an Amazon EC2 instance to access the files and directories that were restored from a backup of the EFS file system.
-
Step 6: Clean up
In the following steps, you clean up the resources you created in this tutorial. It is a best practice to delete instances and resources that you are no longer using so that you are not continually charged for them.
- 6.1 — Delete the Amazon EFS file system
- Open the Amazon EFS console.
- In the navigation pane on the left, choose File systems under Elastic File System.
- Select the restored EFS file system, and choose Delete. Confirm the deletion by entering the file system’s ID
- 6.2 — Delete the AWS Backup recovery point
- Open the AWS Backup console and navigate to the vault where the recovery point is stored.
- Select the recovery point, then select Delete.
Note: This process can take several seconds to complete.
- 6.1 — Delete the Amazon EFS file system
Congratulations!
You have created a backup of an Amazon EFS file system and performed a restore of an EFS file system using AWS Backup!