


Module 2: .NET Container Developer Tools on AWS
LEARNING MODULE
AWS provides free tools and integrated development environment toolkits that help with building and deploying containerized .NET and .NET Framework applications to Amazon ECS, Amazon ECR, and AWS Fargate. Besides the AWS Management Console, integrations with Visual Studio, JetBrains Rider, Visual Studio Code, and the dotnet CLI provide flexibility to choose the right tooling to meet development and continuous integration & deployment (CI/CD) requirements
In this module you will learn about working with Amazon ECS, AWS Fargate, and Amazon ECR using the AWS Toolkit for Visual Studio, and at the command-line using dotnet CLI extensions.
Time to Complete
60 minutes
Deploying .NET applications to containers on AWS with Visual Studio
The AWS Toolkit for Visual Studio is a free-to-use extension for Visual Studio on Windows (it does not support Visual Studio for Mac). The toolkit provides an explorer window onto several AWS services, including container services, and wizards that help build and publish applications into the AWS cloud. These wizards support deployment of .NET and .NET Framework applications to AWS Elastic Beanstalk, Amazon ECS and ECR, AWS Fargate, and AWS App Runner from within Visual Studio (this course focuses on deployment to ECS/ECR and Fargate).
Install the toolkit from the Visual Studio marketplace, https://marketplace.visualstudio.com/vs. Two supported versions are available for Visual Studio running on Windows:
The toolkit is installable in Visual Studio running on your local development machine, and also in the license-included Visual Studio images provided by Amazon Elastic Compute Cloud (EC2). These images are an ideal solution for development scenarios requiring occasional use of Visual Studio without needing long-term licensing commitments.
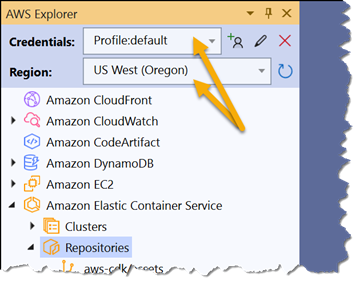
Once you’ve installed the toolkit, it needs a set of credentials to enable access to AWS services on your behalf. These are referred to as credential profiles, and the toolkit will guide you through the process should they need to be created. However, if you’ve previously used tools such as the AWS CLI or AWS Tools for PowerShell on your machine, then the toolkit will automatically detect the credential profiles used with them and will list them in the Profile: dropdown at the top of the AWS Explorer tool window.
If this window isn’t visible, use the AWS Explorer item in the IDE’s View menu to display it. Select a credential profile (or create one), and then select an AWS Region from the Region: drop down control in the explorer window to get started.
Working with Amazon ECS and Amazon ECR from the AWS Explorer view
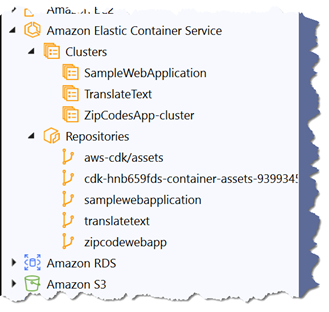
Having selected a credential profile and region in the explorer you can access your resources in Amazon ECS and Amazon ECR from within Visual Studio. In the AWS Explorer window, after expanding the Amazon Elastic Container Service item in the explorer, and its two sub-items, Clusters, and Repositories, you’ll be able to work with existing clusters and repositories in your ECR private registry that belong to the region you selected. The toolkit does not support working with your ECR public registry.
Review each item below to learn more about the functionality available from context menus on the Clusters group, each cluster, Repositories group, and each repository shown in the Explorer view.
Clusters context menu
The context menu on the Clusters group provides the following options:
- Refresh: updates the collection of clusters shown in the Explorer.
Clusters context menu
The context menu on each deployed cluster shown in the Explorer provides options to:
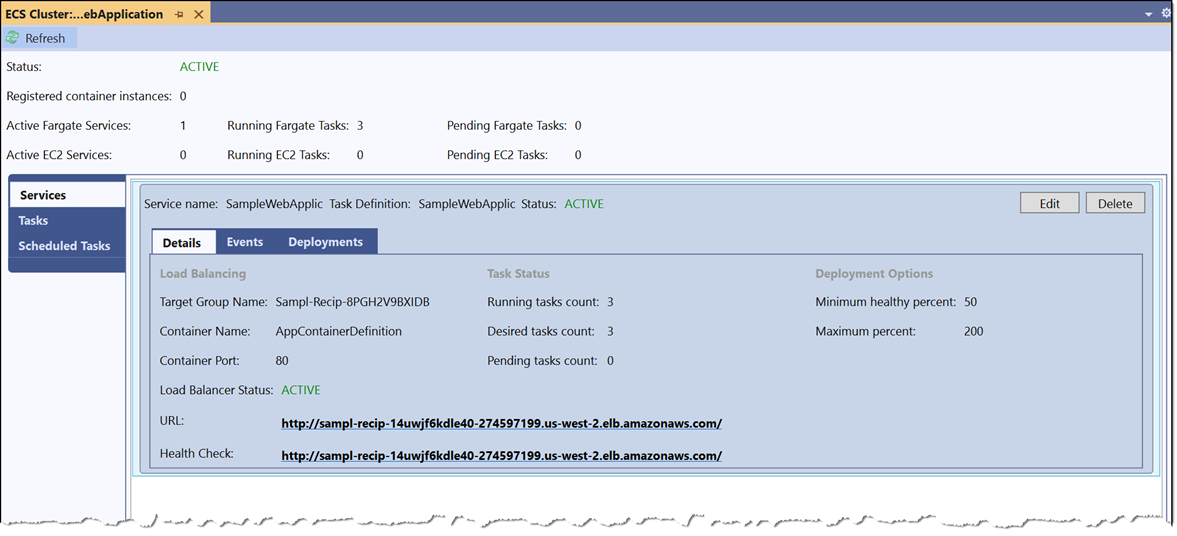
- View the cluster details (opens a new document window).
- Delete the cluster.
A cluster cannot be deleted while it has running tasks. Tasks can be drained from a cluster by first using the View menu option to open the details view for a cluster, then selecting Edit in the view, and setting the Desired Tasks value to 0. Once all running tasks have been drained, delete the cluster using either the Delete button in the view or the context menu entry. The cluster detail’s view is shown below:
Repositories context menu
The context menu on the Repositories group provides options to:
- Create repository: opens a dialog window to enter the name for the new repository. Note that new repositories can only be created in your private registry.
- Refresh: updates the collection of repositories shown in the Explorer.
Repositories context menu
The context menu on a repository listed under the Repositories group provides options to:
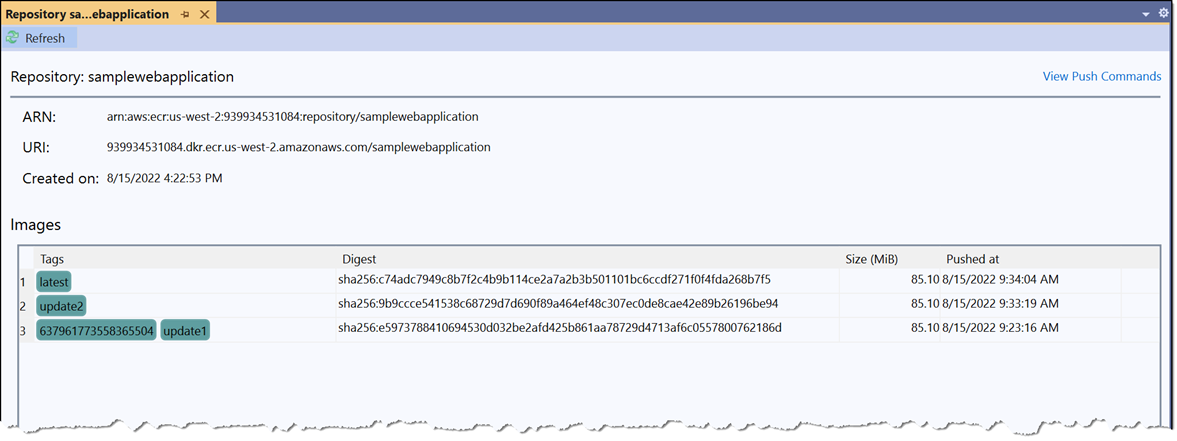
- View: opens a new document window listing the images contained within the repository. The specific commands required to push images to this repository can also be viewed here
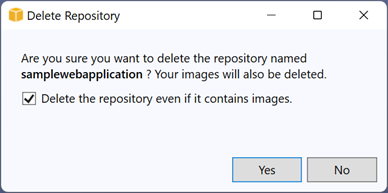
- Delete: opens a dialog window to confirm deletion of the repository. The toolkit can optionally delete all images contained in the repository, prior to deleting the repository itself (non-empty repositories cannot be deleted).
Deploying to Amazon ECS and Amazon ECR from Visual Studio
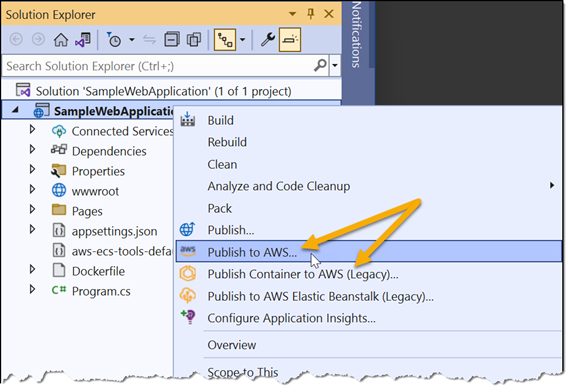
Besides working with clusters and repositories in the AWS Explorer the toolkit provides two deployment options to help you deploy your container applications and images to Amazon ECS, AWS Fargate, and Amazon ECR. Both options are available from your application project’s context menu in Solution Explorer: Publish to AWS and Publish Container to AWS (legacy).
The sections below describe each of these options, and when you might choose to use them.
Publish to AWS
Publish to AWS supports deployment of .NET applications to Amazon ECS with AWS Fargate, AWS App Runner, and virtual machines in AWS Elastic Beanstalk. It can also be used to publish container images to Amazon ECR. Besides offering deployment to multiple services, from a single IDE portal, Publish to AWS also offers:
- The ability to create custom deployment projects for an application. Custom deployment projects enable construction of additional AWS resources during deployment, and custom deployment UX settings. By checking the deployment project into source control, alongside the application, development teams all have access to the same custom settings and deployment resources applicable to the application when deploying it from within Visual Studio.
- A dotnet command-line experience, available after installing the AWS.Deploy.Tools package from NuGet. The command-line experience surfaces the same options, including those added using custom deployment projects. Using the command line tool is discussed later in this section.When deploying to AWS container services, applications do not need to have a pre-existing Dockerfile; a Dockerfile is generated if required.
Note: Publish to AWS supports .NET applications only; it does not support deployment of applications that use .NET Framework.
Note: Deployment to AWS App Runner is discussed in a separate course, .NET Workloads on AWS App Runner.
Publish to AWS has a couple of pre-requisite installations, and will prompt if either are missing. The AWS Cloud Deployment Kit (CDK) is used to provision and configure AWS resources to support the application deployment. The CDK requires Node.js be installed. Open a browser to https://nodejs.org/en/ and install either the latest long-term supported (LTS) or current version of Node.js. Once Node.js is installed, open a command shell and run the command npm install -g aws-cdk to install the CDK. Once these two pre-requisites are installed, deployments using Publish to AWS can be performed.
Start Publish to AWS from the context menu on the application project in Solution Explorer. The application is analyzed and a number of deployment options, called recipes, are displayed. For applications already configured with a Dockerfile, recipes to deploy the application to Amazon ECS with AWS Fargate, or to push a container image to Amazon ECR, are displayed first. For applications not yet configured with a Dockerfile, these options are displayed for ASP.NET Core web and Web API applications (including Blazor Server), and console applications.
Note: If the application has already been deployed (to any service) the publish UI will offer to re-deploy to the existing target(s) first. If this occurs, Select the Publish to New Target tab option to perform a new deployment, instead of redeployment.
The screenshot below shows the recipes available, at time of writing, for an ASP.NET Core 6 web application. If any custom deployment projects are available for the application, they will be listed above the AWS-provided recipes. In the screenshot the recipe to publish to Amazon ECS using AWS Fargate is selected. The right-side panel shows default deployment options for that recipe.
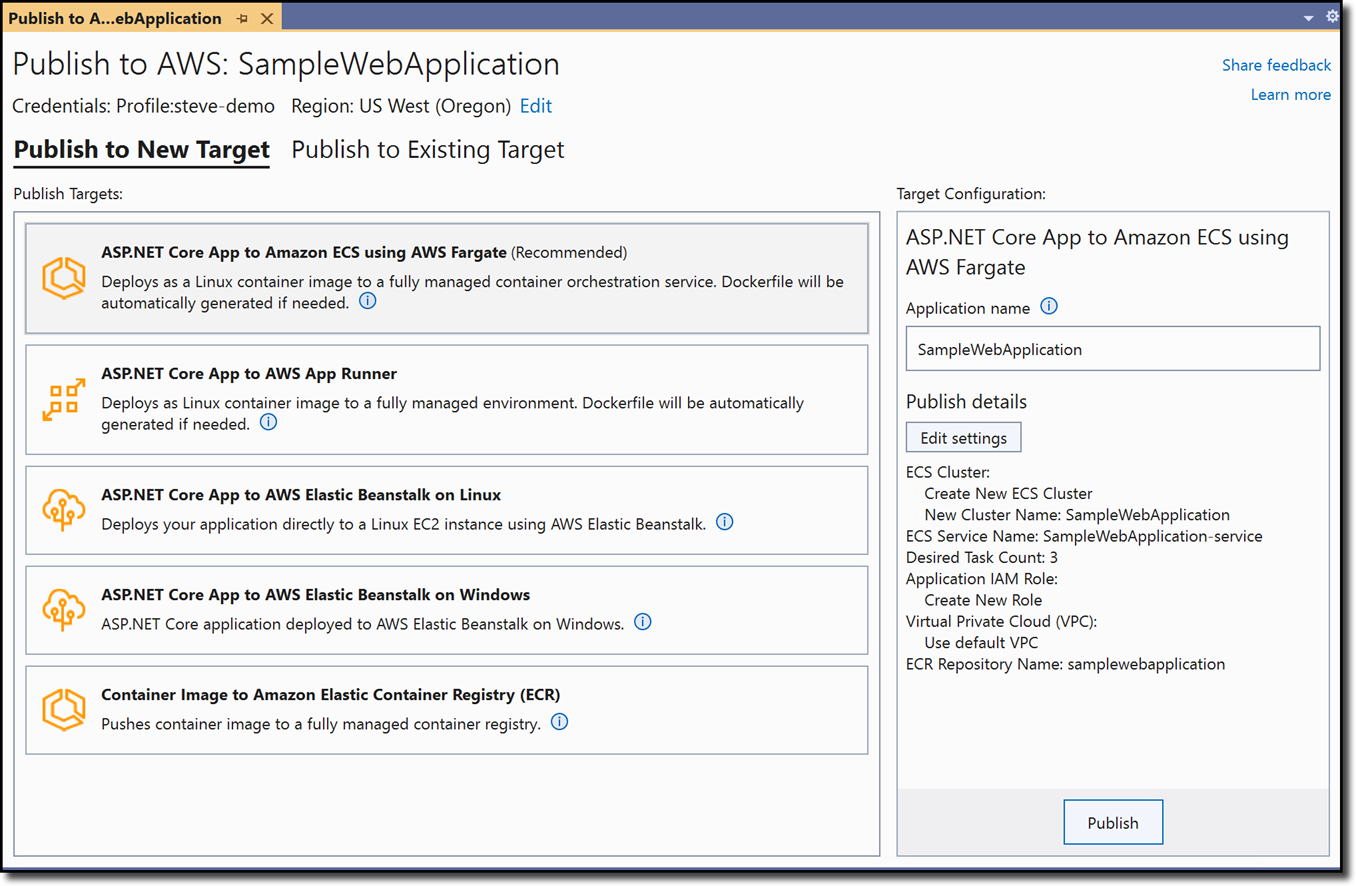
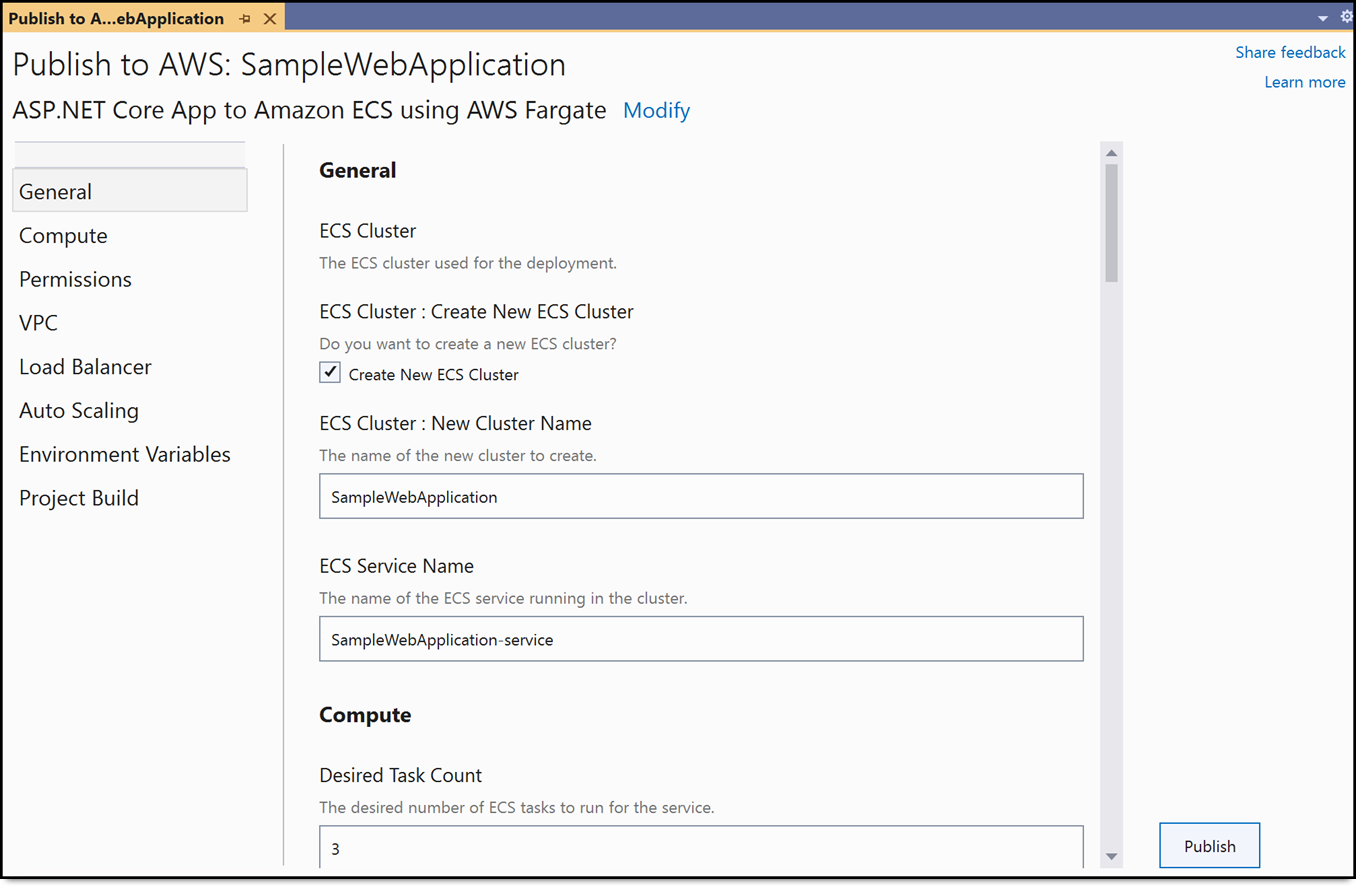
At a minimum an application name is required; the project name is used by default. Depending on the application, it may be possible to select the Publish button and start deployment immediately. However, if the application makes calls to AWS services, a custom role will need to be provided containing permissions allowing the application to access services and service APIs. Select the Edit settings button to specify, if needed, a role for the application and any desired infrastructure changes before deployment. For example, changes can be made to task memory and CPU, network setup, load balancing and scaling requirements. The screenshot below shows some of the options available for the selected recipe. The categories to the left (Compute, Permissions, VPC, etc.) illustrate the range of options that can be specified for the deployment.
Windows containers on Fargate can run both .NET Framework and .NET applications. Fargate currently supports two versions of Windows Server for applications: Windows Server 2019 Full and Windows Server 2019 Core. Whichever version you use, AWS manages the Windows operating system licenses for you.
Once the required options are set select the Publish button to start deployment.
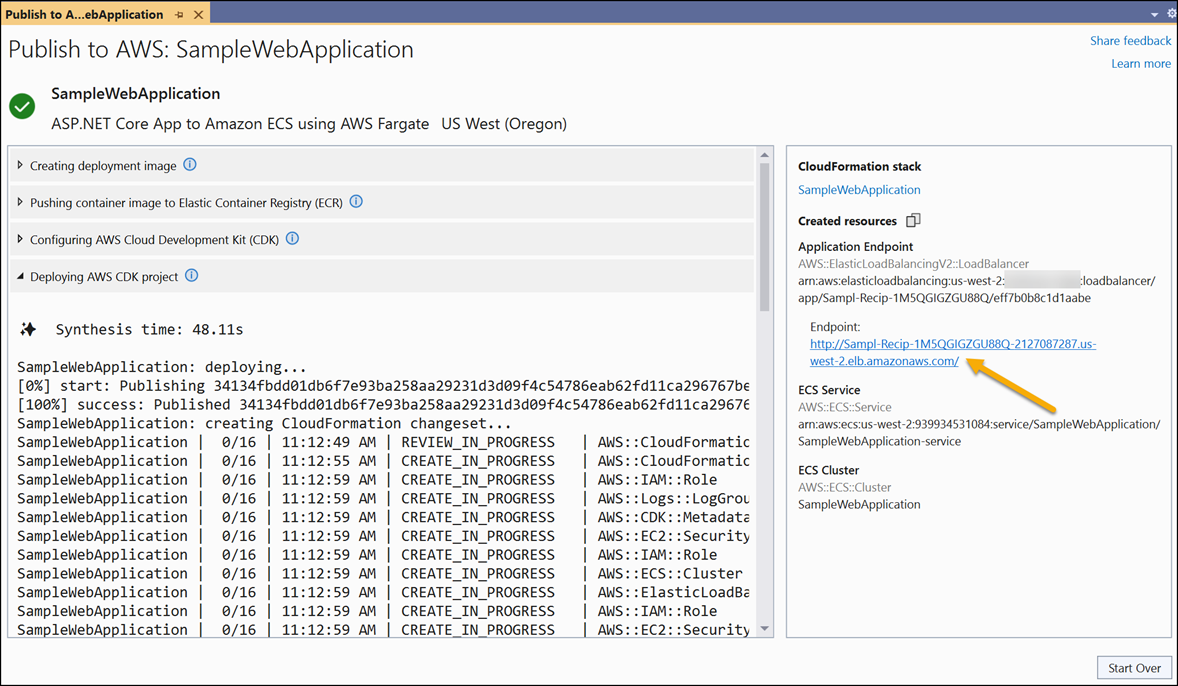
For the sample ASP.NET Core web application shown above, Publish to AWS will progress through several steps which can be followed in the deployment log output:
- The container image is built, using either an existing Dockerfile or an automatically-generated Dockerfile.
- Authentication is performed against your Amazon ECR private registry and the image pushed to a repository. By default, a repository with the same name as the application deployment is used but another repository can be selected prior to starting to publish, by editing the deployment settings (the repository name can be found in settings in the Project Build category).
- A temporary CDK project is generated, defining the resources needed to support the deployment, for example the task definition, cluster settings, network configuration, and other settings.
- Finally, the CDK project is used to deploy an AWS CloudFormation stack to launch and configure the resources, and the application deployed to those resources.
When deployment completes, summary information about the CloudFormation stack is displayed in the window, complete with a URL to the deployed application (if it was deployed as a service). Clicking the URL launches a browser onto the deployed application.
Deployment from CI/CD pipelines
Publish to AWS in Visual Studio is designed for developers iterating on an application without needing to leave the IDE. For CI/CD automation, or for use by developers not working on a Windows system, AWS provides a command-line version that extends the dotnet CLI. This tool is available on NuGet, in the package AWS.Deploy.Tools.
To install, open a command-line shell and run the command:
dotnet tool install -g aws.deploy.tools
Once installed, view the top-level command options by running:
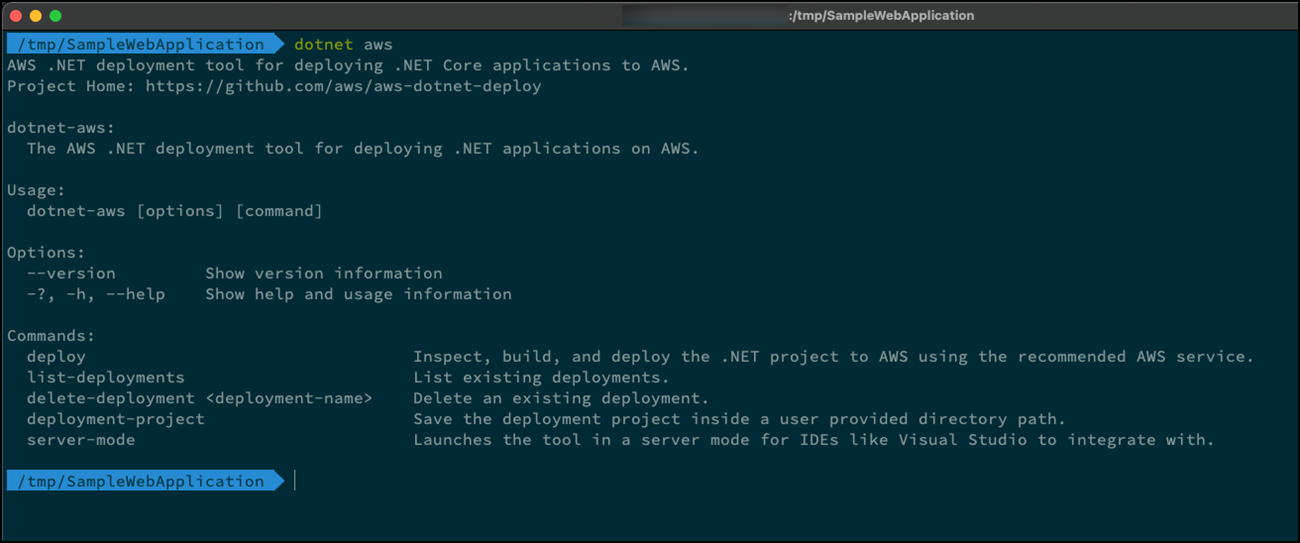
dotnet aws
To start a deployment from the folder that contains your application project, run:
dotnet aws deploy
Additional help on the tool, and all its commands, is available using the --help switch.
More details on deploying containerized applications to AWS using the AWS.Deploy.Tools dotnet CLI extension, including its use in CI/CD automation, will be discussed further later in this module, in the section titled Deploying .NET containers to AWS from the command line.
Deleting container deployments made with Publish to AWS
Deployments of applications made using Publish to AWS are simply AWS CloudFormation stacks. You can delete a deployment by either:
- Navigating to the CloudFormation dashboard in the AWS Management Console and deleting the associated stack.
- In Visual Studio expand the AWS CloudFormation entry in the AWS Explorer, select the stack, and choose Delete from the stack’s context menu.
- From a command line shell, using the AWS.Tools.Deploy package installed, run the command dotnet aws delete-deployment.
Also from a command line shell, you can use the AWS Tools for PowerShell command Remove-CFNStack, or the AWS CLI command aws cloudformation delete-stack, to delete stacks representing a deployed container-based application.
Summary
Publish to AWS offers an easy-to-use, and extensible, mechanism for deploying .NET applications suitable for running in a container onto AWS, without needing extensive knowledge of AWS or even cloud development. Built-in, and customizable, recipes enable developers to conveniently deploy and redeploy applications during development from within Visual Studio to Amazon ECS with AWS Fargate, and other container-based services. Publish to AWS is the recommended choice for deploying ASP.NET Core web and Web API applications, including server-side Blazor, to containers on AWS.
Publish Container to AWS
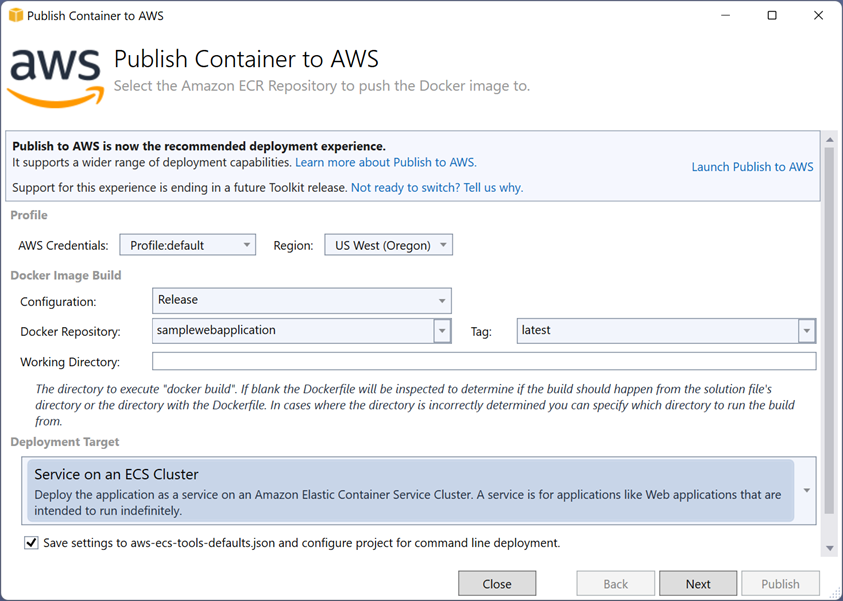
Publish Container to AWS is the original, wizard-based approach for deploying containerized .NET applications to AWS from within Visual Studio. Now considered a legacy approach, the wizard is still supported within Visual Studio as at the time of this writing, but may be removed in a future version.
Compared to Publish to AWS, Publish Container to AWS has these features and restrictions:
- Supports deployment to Amazon ECS (with or without AWS Fargate) only. Publish to AWS also supports AWS App Runner, and virtual machine services such as AWS Elastic Beanstalk
- Supports deployment of ASP.NET Core web and Web API applications, and console applications, to containers. This is similar to that offered by Publish to AWS.
- Requires a Dockerfile already exist in the application. Unlike Publish to AWS, a Dockerfile is not auto-generated. If the application’s project does not contain a Dockerfile, the option to Publish Container to ECS is not shown in the project’s context menu.
- Has no dependencies on the AWS Cloud Development Kit and Node.js.
- Deployment cannot be modified beyond the settings available in the wizard. Custom deployment projects like those offered by Publish to AWS are not available.
- Can be used with a dotnet CLI tool extension, Amazon.ECS.Tools, available on NuGet. By means of a simple JSON-format configuration file, aws-ecs-tools-defaults.json, configuration settings chosen in the wizard can be shared with a command line experience, started by running dotnet ecs in a command line shell. The command line option is suitable for developers who are not able to use Visual Studio or the AWS toolkit, or for automated deployments in a CI/CD system.
Note: the wizard contains a banner recommending switching to the new Publish to AWS experience. At some future point, the legacy wizard will be removed from the toolkit.
The wizard will pre-populate the AWS Credentials and Region fields based on current selections in the AWS Explorer window. By default, the Release configuration of a project is deployed, to a repository named after the project, which will be created when required.
The Deployment Target drop-down at the foot of the page contains four possible options:
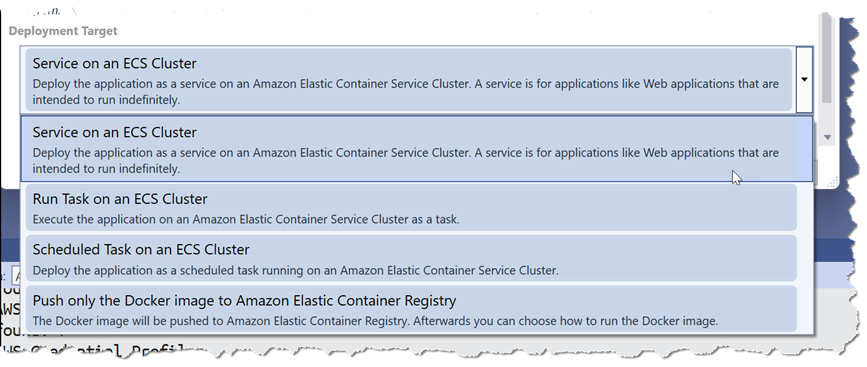
- Service on an ECS Cluster is suitable for applications that need to run 24x7, for example a web application or possibly a Web API.
- Run Task on an ECS Cluster is suitable for application code that runs once, then exits, for example a console-based application. Once the task exits, it can be manually re-run as needed.
- Scheduled Task on an ECS Cluster is suited to tasks that run periodically before exiting. Examples include batch processes, or overnight ETL jobs.
- Push only the Docker image to Amazon Elastic Container Registry builds the container image for the application, authenticates against your private registry, and pushes it to a repository in the private registry. Repositories in your public registry are not supported.
Having chosen the appropriate target, the Next button moves to a page in which the launch configuration is defined. Data selected here and in subsequent pages is populated into a task definition for you.
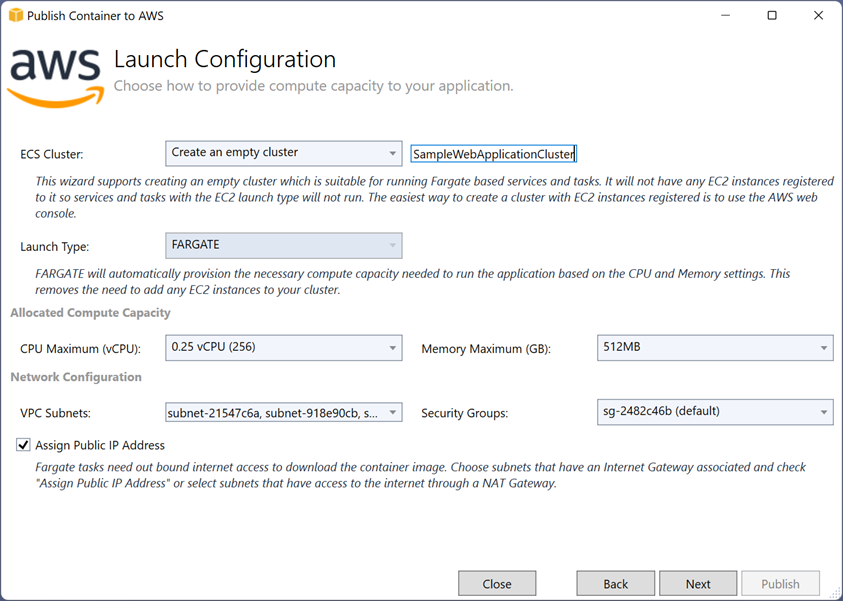
Choosing Create an empty cluster for the ECS Cluster field locks the wizard to a deployment using AWS Fargate. To deploy to Amazon ECS without using AWS Fargate, you must first create the necessary cluster resources using other tools such as the AWS Management Console, and then select the existing cluster in the wizard.
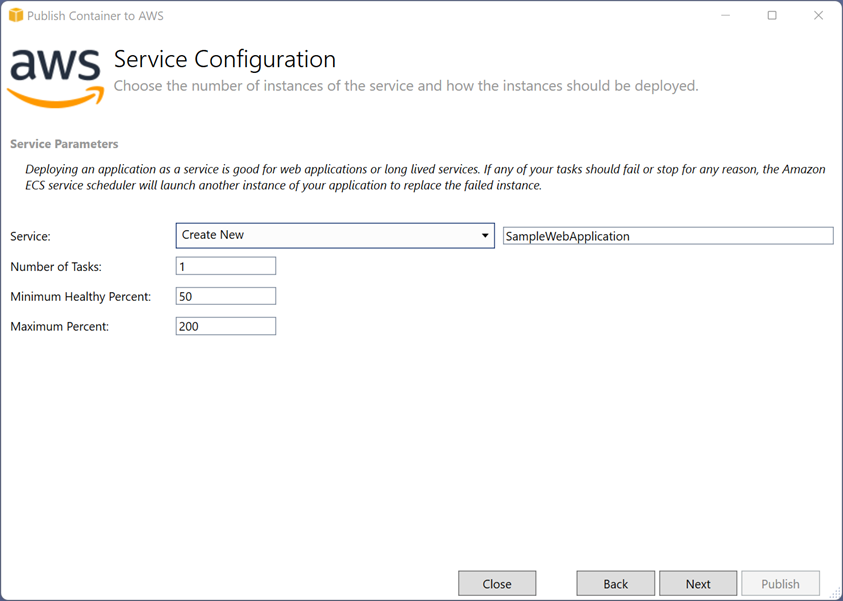
If Service on an ECS Cluster was selected at the start of the wizard, the next page asks for the number of tasks, container instances, to run (defaults to 1) and the minimum and maximum percent tasks that the service should maintain. To use an existing service, select its name here or set the name of a new service to be created. If Task on an ECS Cluster was selected, you’ll instead be asked to set the number of tasks and give the group of tasks a name. The screenshot below shows the option for Service on an ECS Cluster, when deploying a web application.
If the deployment target is a service, the next page of the wizard allows for an application load balancer to be configured, complete with health check page. By default, no load balancer is configured. For the task-based deployment targets, the load balancer page is not shown since the containers making up the task run once and exit.
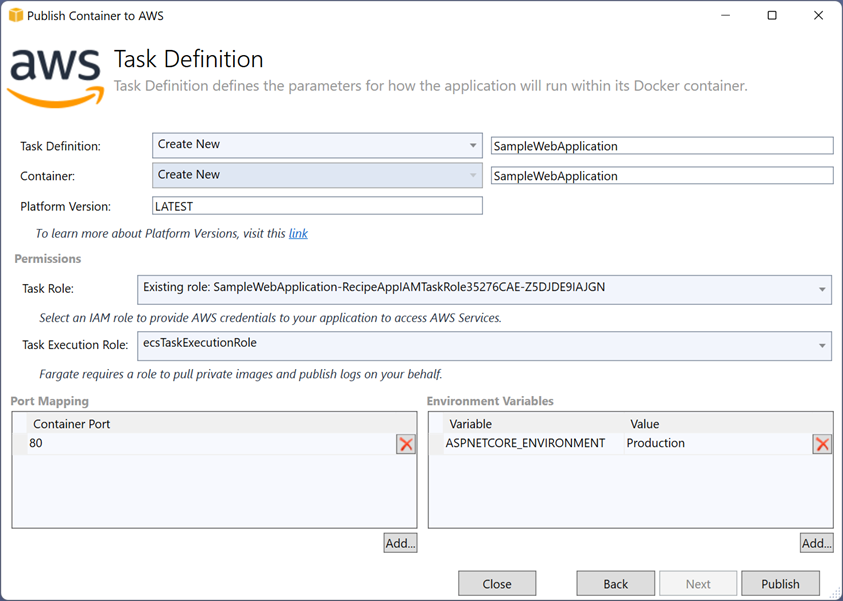
The final settings page of the wizard contains further options that will be included in the task definition, including whether to use an existing task definition or create a new one. Here, too, select the IAM role for the application code (Task Role) if the application makes calls to AWS services, and the execution role that will be assumed by Amazon ECS granting access to your private registry images and other resources needed to provision resources during deployment. Finally, specify the container port that should be exposed and any additional environment variables.
With all settings completed, selecting Publish starts the deployment. Similar to the newer Publish to AWS functionality the toolkit will walk through a number of steps to complete the deployment. These steps can be followed in the progress output in the wizard, or in the Amazon Web Services pane of the IDE’s Output Window.
- The application will be built and the container image created.
- Authentication is performed against your Amazon ECR private registry and the image pushed to a repository. The name of the repository to use was specified on the first page of the wizard, defaulted to the project name.
- Cluster and other resources appropriate to the settings chosen in the wizard are provisioned and configured.
Once resource provisioning is complete for the cluster, the toolkit opens a Cluster view. Here you can monitor progress of the tasks beginning to run to meet the number specified in the wizard, and for services find the URL to access the deployed application if a load balancer was selected during the wizard.
Deploying to containers from CI/CD pipelines
The Publish Container to AWS wizard in Visual Studio is designed for developers iterating on an application inside their IDE. For CI/CD automation, or for use by developers not working on a Windows system, AWS provides a NuGet tool package, Amazon.ECS.Tools, that extends the dotnet CLI. To install this tool, open a command line shell and run the command:
dotnet tool install -g Amazon.ECS.Tools.
To get started after install, to view top-level command options run the command:
dotnet ecs
To start a deployment, from inside your application’s project folder run:
dotnet ecs deploy
Additional help on the tool, and all its commands, is available using the --help switch.
For applications that were previously deployed using the wizard in Visual Studio, the settings selected in the wizard are available by default in a JSON-format text file, aws-ecs-tols-defaults.json. This file is found in the application project directory. These settings will be read by the command-line tool and can be overridden as needed.
More information on deploying containerized applications to AWS using the Amazon.ECS.Tools dotnet CLI extension, including its use in CI/CD automation, will be discussed further later in this module, in the section titled Deploying .NET containers to AWS from the command line.
Deleting deployments made with Publish Container to AWS
To delete deployments made using the Publish Container to AWS wizard, use one of the following methods:
- In the AWS Management Console, navigate to the ECS dashboard, select the cluster in the displayed list, and choose Delete Cluster in the cluster’s detail’s view.
- In Visual Studio, open the cluster view for the deployed application, choose Edit, and set Desired tasks count to 0. Once no tasks are running, select Delete in the Clusters view, or from the context menu on the cluster entry in the AWS Explorer view, to delete the cluster.
- Once the cluster has been deleted, you may also want to delete the repository containing the image(s) used during deployment.
Once the cluster has been deleted, you may also want to delete the repository containing the image(s) used during deployment.
Note: The Amazon.ECS.Tools command-line extension does not support deletion of deployments.
Summary
Publish Container to AWS offers a wizard-based approach to deploying applications to Amazon ECS (with or without AWS Fargate) and Amazon ECR. Unlike Publish to AWS, Publish Container to ECS supports only Amazon ECS, AWS Fargate, and Amazon ECR as deployment targets. Further, deployment options are limited to those provided in the wizard or command-line equivalent and cannot be customized. Publish to AWS is the preferred replacement tool for deployment to AWS for .NET applications. However, for those teams unable to adopt the new experience the older wizard and command-line extension are still supported and available for use.
Deploying .NET containers to AWS from the command line
AWS provides two free command-line tools for working with containerized .NET applications. Both are distributed on NuGet, and extend the dotnet CLI experience with extra commands enabling deployment of .NET applications to Amazon ECS, AWS Fargate, and Amazon ECR. These dotnet CLI extensions do not support deployment of .NET Framework applications.
Note: As of the time of this writing, while custom deployment projects can be used from both the command line and Visual Studio, they can only be created using the command line tool.
AWS.Deploy.Tools
The AWS.Deploy.Tools package on NuGet is the command-line equivalent of Publish to AWS in Visual Studio on Windows. The command-line version, which can be used on Windows, macOS, and Linux platforms, exposes the same deployment recipes available in Visual Studio. This includes the ability to select custom deployment projects defined for an application. The package is maintained as an open-source project on GitHub.
Note: As of the time of this writing, while custom deployment projects can be used from both the command line and Visual Studio, they can only be created using the command line tool.
To install the package, open a command line shell and run the command:
dotnet tool install -g aws.deploy.tools
New versions are released periodically, to update run the command:
dotnet tool update -g aws.deploy.tools
Like Publish to AWS in Visual Studio, the AWS.Deploy.Tools package has a dependency on Node.js and the AWS Cloud Development Kit, so be sure to install these also.
After installation, to verify the installation succeeded and view the available top-level command options, run:
dotnet aws
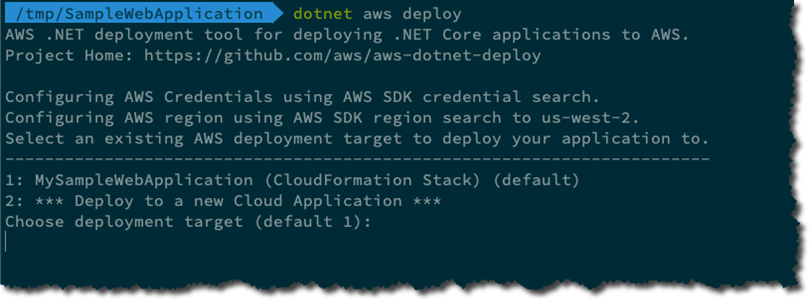
To begin a deployment at the command line, from the folder containing your application project file (.csproj file), run the command:
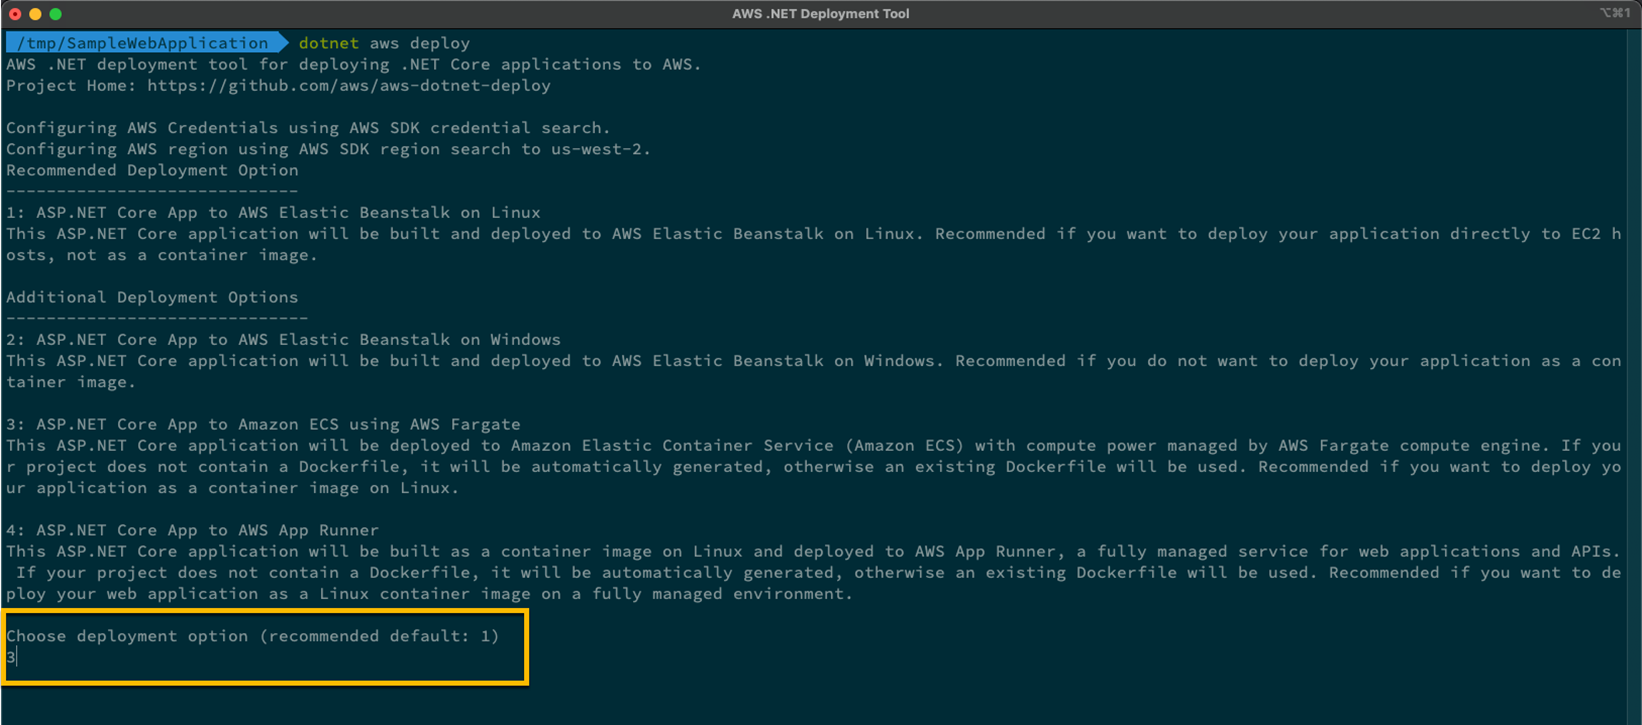
dotnet aws deploy
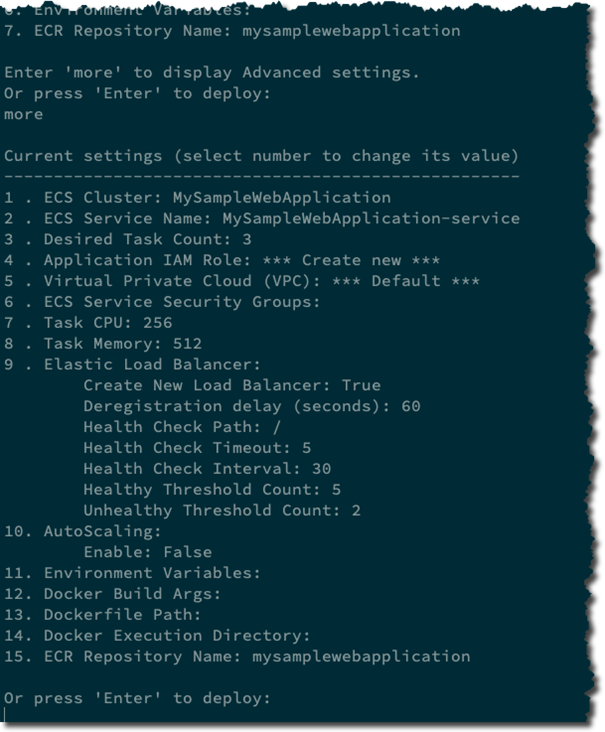
The application is analyzed and a set of numbered deployment recipes displayed to select from. In the screenshot below the tool has completed analysis of an application that does not currently have a Dockerfile and is recommending deployment to virtual machines in AWS Elastic Beanstalk. However, this can be changed by entering the desired recipe number, in this case 3, to deploy as containers using AWS Fargate. A Dockerfile will be created during deployment and added to the project.
Once the recipe has been selected a series of prompts gather required information, such as the deployment name (which defaults to the project name but can be changed). Other optional settings are adjustable using numbered sub-menus.
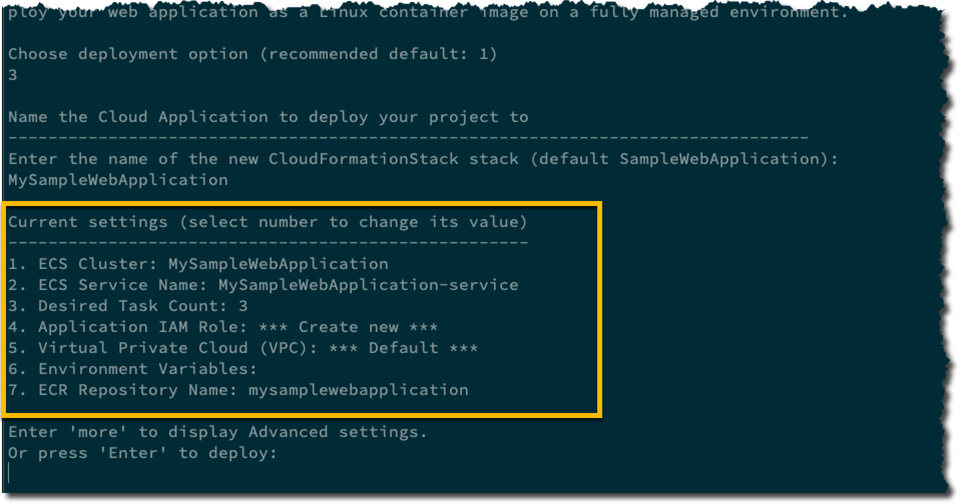
In the screenshot above, pressing ‘4’ would enable selection of a custom IAM role for the application to assume when it runs, instead of the deployment creating a new, empty, role. Additional, advanced options to configure for the deployment are available by entering ‘more’.
Once you’re satisfied with the settings, pressing the Enter key starts deployment. For scenarios where the application does not need a custom role to be specified, and the proposed default values are acceptable, it’s enough to simply press the Enter key twice, once to confirm the default deployment name, and once more to begin deployment of the application.
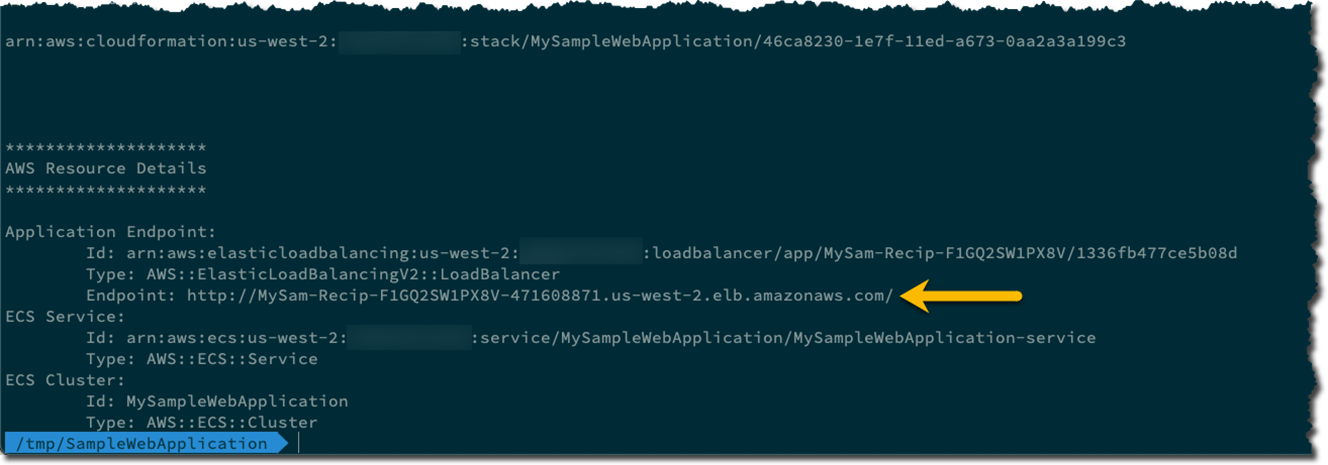
Like deployment from Visual Studio, if a container recipe has been selected a Dockerfile is generated if needed, the image built and pushed to Amazon ECR (the tool authenticates for you), and a CDK project created to provision the infrastructure, which is then deployed to AWS CloudFormation. Events and other status information from the deployment is echoed to the terminal. Finally, the application endpoint URL is output along with other summary information such as the cluster and service names.
Redeployment of applications is also supported at the command line. When dotnet aws deploy is run in the folder of a project that has been deployed previously, it will first list the existing deployment(s) for selection, followed by the option to select a recipe for a new deployment.
Deploying containers from CI/CD pipelines
AWS.Deploy.Tools can be used from within continuous integration & delivery pipelines. However, in these scenarios the prompts can be problematic. To disable prompting, add the switch --silent to your command.
With prompts disabled, the tool is unable to gather deployment settings when it runs. To supply all the required and optional settings, specify them in a JSON-format text file and supply the filename, optionally pathed, to the deployment command with the --apply option:
dotnet aws deploy --apply settings.json –-silent
Creating a settings file is outside the scope of this course. A link to the file definition in the tool’s GitHub repository is available in the section titled Creating a deployment setting file in the AWS .NET GitHub repo.
Creating custom deployment projects
While not the subject of this course, or discussed in further detail, be aware that you can create customized deployment projects for your containerized .NET applications. Creating a custom deployment project enables you to add additional infrastructure or other assets to support your deployed application, and customize the runtime environment. Custom deployment projects can be checked into source control, alongside with your application, and shared across the development team ensuring everyone deploys with the same settings and customizations, regardless of whether they are deploying from Visual Studio or at the command line.
See https://aws.github.io/aws-dotnet-deploy/docs/deployment-projects/cdk-project/ for more information on using custom deployment projects with Publish to AWS in Visual Studio, or AWS.Deploy.Tools at the command line.
Deleting container deployments made with AWS.Deploy.Tools
Application deployments performed using AWS.Deploy.Tools, and Publish to AWS in Visual Studio, can be easily deleted when working at the command line by running the command:
dotnet aws delete-deployment deployment-name
Replace deployment-name with the name of the AWS CloudFormation stack that was created for the deployment.
Amazon.ECS.Tools
The Amazon.ECS.Tools package on NuGet is the command-line equivalent of Publish Container to AWS in Visual Studio. The package can be used on Windows, macOS, and Linux platforms and is maintained as an open-source project on GitHub. That repository includes two other dotnet CLI extensions used to deploy to AWS Lambda and AWS Elastic Beanstalk.
To view top-level command options, run the command:
dotnet ecs
All commands have additional help, accessible by supplying the --help switch.
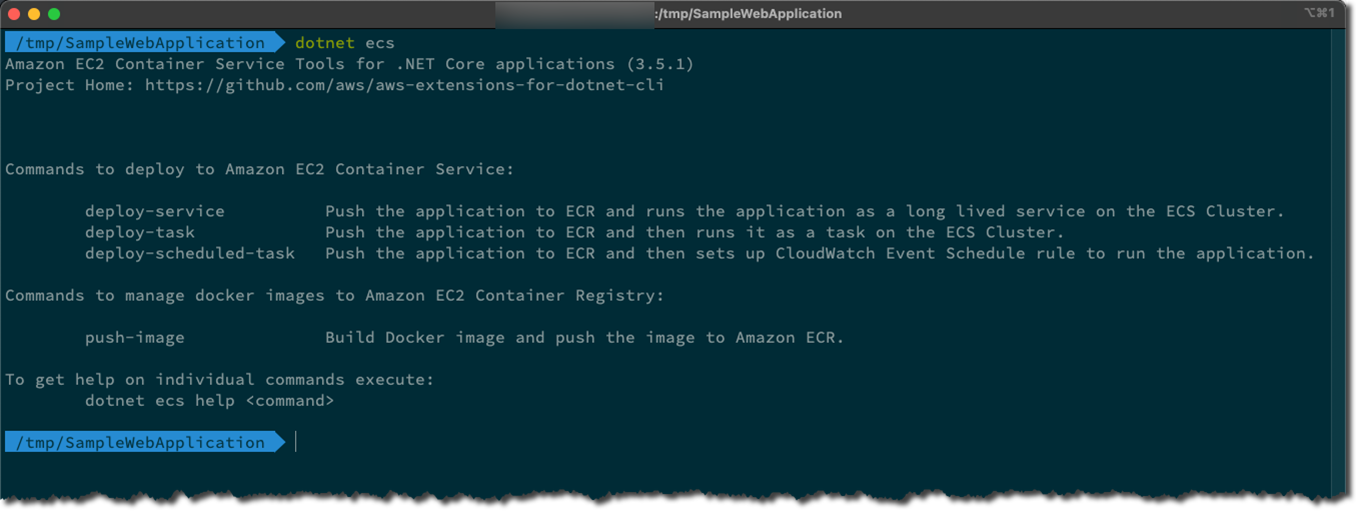
To begin a deployment, first decide whether you are deploying to a service (runs continuously), a task (runs once and exits), or a scheduled task (runs periodically, exiting after each run). Alternatively, the image can be built and pushed to a repository in your private Amazon ECR registry. For the sample web site used in this course, a continuously running service is the appropriate choice. Specifying the deploy-service command with the --help switch lists all of the settings you can apply.

Once the image is pushed, you’re prompted to supply the launch type, EC2 or FARGATE. For EC2 launch types, you must have already created the necessary cluster infrastructure. The FARGATE launch type does not require any pre-provisioning, but does require specifying the CPU and memory for the task. See https://docs.aws.amazon.com/AmazonECS/latest/userguide/task_definition_parameters.html for the latest valid combinations of values, which differ slightly between Linux and Windows container types.
In the screenshot below, FARGATE has been selected as the launch type, with 512MiB memory and corresponding 256 (.25 vCPU) CPU. The tool has also prompted for values for the cluster and service names, before completing the deployment. Once these values are entered and validated, deployment is requested and the command exits.
Note: Unlike Publish to AWS and AWS.Deploy.Tools, discussed earlier in this module, the Amazon.ECS.Tools commands do not wait for deployment to complete. You will need to visit the management console, or use the Cluster view in Visual Studio, to obtain data like the deployed application URL.
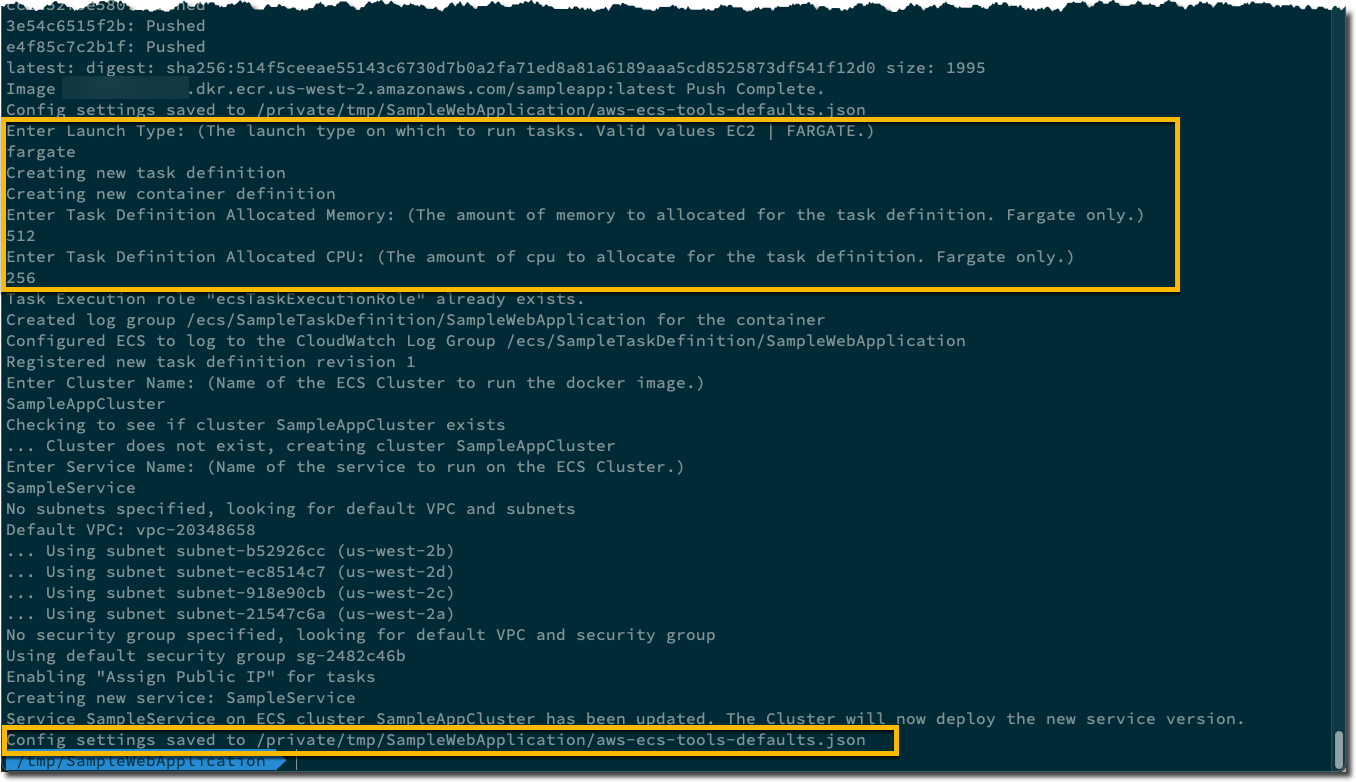
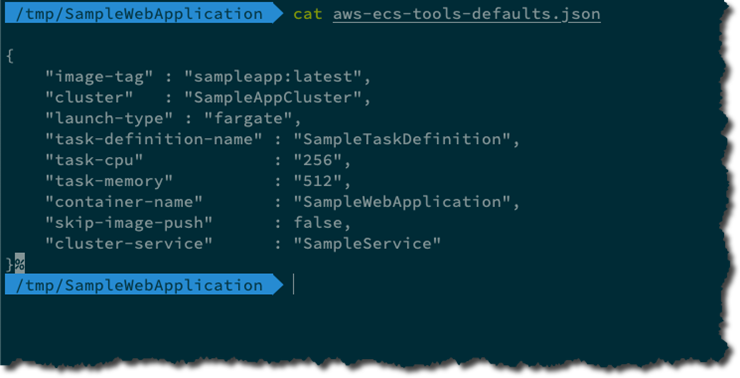
The settings file written by this deployment is shown in the screenshot below. It’s broadly similar to what would be written for a deployment started from Visual Studio (the IDE version writes slightly more settings). This file can be checked into a source code repository, along with the application code, and used with both Visual Studio on Windows and command-line deployments on Windows, macOS, and Linux. A much more extensive settings file can be curated by hand to provide values for all the command line options. For convenience, the names of the options correspond to the keys in the settings file.
Deploying containers from CI/CD pipelines
Amazon.ECS.Tools can be used from within continuous integration & delivery pipelines. However, in these scenarios the prompts can be problematic. To disable prompting, add the switch --disable-interactive to your command.
With prompts disabled, the tool is unable to gather deployment settings when it runs. To supply all the required and optional settings, specify them in the JSON-format settings file and supply the filename, optionally pathed, to the deployment command with the --config-file option
Deleting container deployments made with Amazon.ECS.Tools
Amazon.ECS.Tools does not support deleting deployed container applications from the command line. To delete a deployment, use one of the following options.
- In the AWS Management Console, navigate to the ECS dashboard, select the cluster in the displayed list, and choose Delete Cluster in the cluster’s detail’s view.
- In Visual Studio, open the cluster view for the deployed application, choose Edit, and set Desired tasks count to 0. Once no tasks are running, select Delete in the Clusters view, or from the context menu on the cluster entry in the AWS Explorer view, to delete the cluster.
Once the cluster has been deleted, you may also want to delete the repository containing the image(s) used during deployment
Deploying .NET containers to AWS from Azure DevOps
To deploy .NET applications to Amazon ECS and AWS Fargate from Azure DevOps pipelines, a choice of using the AWS.Deploy.Tools or Amazon.ECS.Tools dotnet CLI extensions, outlined earlier in this module, is available. In both cases, install the tool as shown during the pipeline and then run the appropriate deployment commands in a shell task, using settings configuration files to supply required and optional settings, together with the --silent (AWS.Deploy.Tools) or -disable-interactive- (Amazon.ECS.Tools) options to suppress prompting.
Alternatively, for scenarios where the build needs to simply push or pull images against a repository in your private Amazon ECR registry, the AWS Tools for Azure DevOps extension contains two tasks that you may find convenient.
The tools can be installed from the Azure DevOps marketplace. Once installed and configured with service credentials, add the Amazon ECR Push or Amazon ECR Pull tasks to your build pipeline. Below is a screenshot of the settings available in the push command.
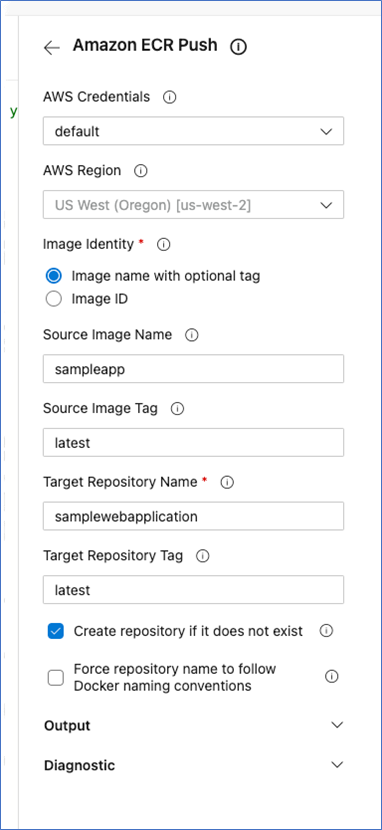
The tasks make configuring a push or pull operation for an image built previously in the pipeline simple and convenient, handling the required authorization process against the repository for you. The tools are maintained as an open-source project on GitHub, and more information on post-install configuration, and the individual tasks within the tools, can be found in the user guide.
Knowledge Check
You’ve now completed Module 2, .NET Container Development Tools on AWS. The following test will allow you to check what you’ve learned so far.
1. What services does the Publish to AWS tool publish to? (select two)
a. Lambda
b. ECS
c. EC2
d. ECR
2. What two prerequisites are required to use the Publish to AWS tool?
a. C# and Node.js
b. CDK and Node.js
c. Python and CDK
d. Python and Node.js
3. What operating systems can the AWS.Deploy.Tools package be used on?
a. Windows
b. macOS
c. Linuxs
d. All of the above
Answers: 1-b and d, 2-b, 3-d