


Module 3: Hands-on Lab: .NET Workloads on Amazon ECS and AWS Fargate
HANDS-ON LAB
Lab Objectives
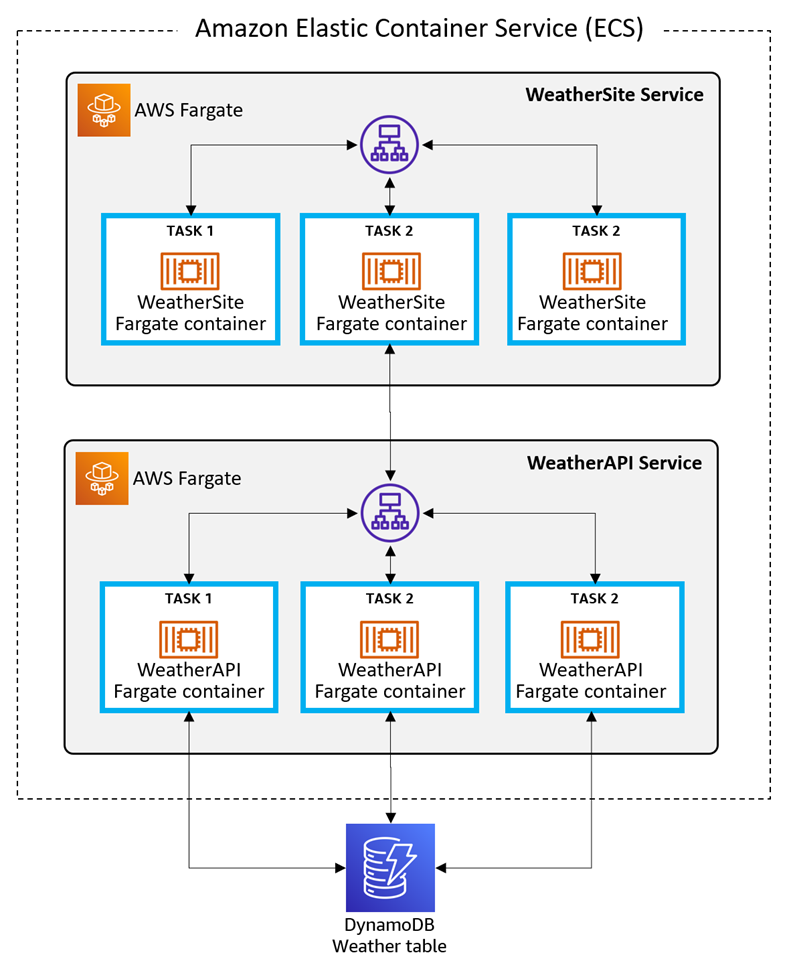
In this hands-on lab, you’ll create an ECS service named Weather that consists of an ASP.NET website and a .NET Web API. The API will use an Amazon DynamoDB table to retrieve weather data. The API will be deployed to an ECS service, and the website to another ECS service. You can perform this lab on a Windows PC, macOS, or Linux computer, or on a Cloud9 environment in the cloud.
This lab has 12 steps:
- Set up your AWS environment
- Set up your Development Environment
- Create Amazon DynamoDB Table
- Create WeatherAPI project
- Test WeatherAPI locally
- Deploy WeatherAPI to ECS
- Update ECS Task Role & Test API
- Create WeatherSite project
- Test WeatherSite locally
- Deploy WeatherSite to ECS
- Deploy an Update
- Shut it Down
Time to Complete
90 minutes
Implementation
Step 1: Set up your AWS environment
In this step, you’ll set up your AWS environment.
If you’re already developing and deploying to Amazon ECS using AWS Fargate, and have the AWS Deployment Tool for .NET CLI installed, you can fast-forward to Step 3.
1. Obtain an AWS Account
Use an existing AWS account or create an AWS account. Do not use a Production account.
2. Choose AWS region
Sign in to the AWS console and choose an AWS region to work in that supports Amazon ECS on AWS Fargate and supports DynamoDB.
3. Create a Development Environment
If using your local machine for this lab, proceed to Step 2.
If using Cloud9, continue below.
Optional: you can automate creation of your Cloud9 environment with most of the required development tools by following this AWS Quick Start.
Otherwise, continue below:
A. In the AWS console, navigate to Cloud9 and click Create environment.
B. Name the environment FargateLab and click Next step.
C. On the Configure settings page, leave the defaults for a free-tier eligible instance type, and click Next step.
D. Click Create environment.
E. Wait for the environment to be created, which will take several minutes.
Note: If environment creation fails because the t2.micro instance type is not available in the region, delete the environment and repeat the above steps, this time selecting a different small instance type. If the instance type is not in the free tier, be mindful of the rate you will be charged for the duration of the lab.


.85ca8f8dd11672ece69f6b57cd656638a5f5c16e.png)
Check Your Work
You should now have:
✓ An AWS account
✓ Know how to sign in to the AWS management console
✓ Selected a region to work in
✓ A local machine or Cloud9 environment available
Step 2: Set up your Development Environment
In this step, you will install software to set up a development environment. Skip over items you already have installed.
1. Install the AWS CLI
Install the AWS Command Line Interface (CLI).
2. Configure the AWS CLI
Configure the AWS CLI so it is linked to a user in your AWS account.
In a command/terminal window, configure the region with this command:aws configure
3. Set User Permissions
Give your AWS user the permissions needed to deploy applications to ECS:
A. In the AWS console, navigate to IAM
B. Go to Users and click on your AWS user.
C. Click Add permissions, then Attach existing policies directly
D. Search for and select the checkbox for each policy below:
- PowerUserAccess
- AWSCloudFormationFullAccess
- AmazonECS_FullAccessAmazonEC2ContainerRegistryFullAccess
- AmazonSSMFullAccess
- IAMFullAccess
4. Install the .NET 6 SDK
Install the .NET 6 SDK. Download and install the SDK for your operating system.
If you are using your local machine, download and install .NET 6 SDK for your operating system.
If using Cloud9, you can run these commands under Install Required Tools.
sudo rpm -Uvh https://packages.microsoft.com/config/centos/7/packages-microsoft-prod.rpm
sudo yum -y update
sudo yum install dotnet-sdk-6.0
5. Install the AWS Deploy Tool for .NET CLI
Install the AWS Deploy Tool for .NET CLI with this command:
dotnet tool install -g aws.deploy.tools
6. If using Cloud9, advance to Step 3
If you are using Cloud9, skip ahead to Step 3.
If using your local machine, continue below.
7. Install an IDE
Install an IDE, such as Microsoft Visual Studio 2022 (Windows), Visual Studio Code (Linux, macOS, Windows), or JetBrains Rider (Linux, macOS, Windows). Ensure you have installed the options or extensions for .NET web development in C#.
9. Install Docker Desktop
Check Your Work
You should now have:
✓ All prerequisite software installed
✓ Configured the AWS CLI for your AWS user and region
Step 3: Create DynamoDB Table
In this step, you'll create a DynamoDB table named Weather and create some data records.
1. Create DynamoDB table in AWS console
In the AWS console, navigate to Amazon DynamoDB and click Create table:
A. Table name: Weather
B. Partition key: Location
C. Sort key: Timestamp
D. Click Create table

2. Populate Table with Items
Click on the Weather table name to get to its detail page, then click Explore table items. Add these items:
A. Click Create item and JSON view. Enter the JSON below (Dallas, morning) and click Create Item.
{
  "Location": {
    "S": "Dallas"
  },
  "Timestamp": {
    "S": "2022-07-23T06:00:00"
  },
  "Summary": {
    "S": "Hot"
  },
  "TempC": {
    "N": "33"
  },
  "TempF": {
    "N": "92"
  }
}B. In the same way, add the second item (Dallas, mid-day) with this JSON:
{
  "Location": {
    "S": "Dallas"
  },
  "Timestamp": {
    "S": "2022-07-23T12:00:00"
  },
  "Summary": {
    "S": "Scorching"
  },
  "TempC": {
    "N": "43"
  },
  "TempF": {
    "N": "109"
  }
}C. Add the third item (Dallas, evening) with this JSON:.
{
  "Location": {
    "S": "Dallas"
  },
  "Timestamp": {
    "S": "2022-07-23T18:00:00"
  },
  "Summary": {
    "S": "Hot"
  },
  "TempC": {
    "N": "36"
  },
  "TempF": {
    "N": "97"
  }
}D. Add the fourth item (Minnesota, morning) with this JSON:
{
  "Location": {
    "S": "Minneapolis"
  },
  "Timestamp": {
    "S": "2022-07-23T06:00:00"
  },
  "Summary": {
    "S": "Cool"
  },
  "TempC": {
    "N": "13"
  },
  "TempF": {
    "N": "56"
  }
}E. Add the fifth item (Minnesota, mid-day) with this JSON
{
  "Location": {
    "S": "Minneapolis"
  },
  "Timestamp": {
    "S": "2022-07-23T12:00:00"
  },
  "Summary": {
    "S": "Balmy"
  },
  "TempC": {
    "N": "22"
  },
  "TempF": {
    "N": "72"
  }
}F. Add the sixth item (Minnesota, evening) with this JSON:
{
  "Location": {
    "S": "Minneapolis"
  },
  "Timestamp": {
    "S": "2022-07-23T18:00:00"
  },
  "Summary": {
    "S": "Balmy"
  },
  "TempC": {
    "N": "19"
  },
  "TempF": {
    "N": "67"
  }
}Check Your Work
You should now have:
✓ A DynamoDB table named Weather, populated with 6 items.


Step 4: Create WeatherAPI Project
In this step, you'll use the dotnet new command to create a .NET Web API project, and update its code to retrieve data from the DynamoDB table.
1. CD to a development folder
2. Create a .NET WebAPI Project
A. Run the dotnet new command below to create a new Web API project named WeatherAPI.
dotnet new webapi -n WeatherAPI
B. CD to the project folder.
C. Add the DynamoDB SDK package. Run the dotnet add package command below to add the AWSSDK.DynamoDBv2 package to the project. We will need this library to communicate with the Amazon DynamoDB service.
dotnet add package AWSSDK.DynamoDBv2


3. Open project in your IDE
Open the WeatherAPI project in your IDE.
4. Select Region
If you have an AWS Toolkit installed for your IDE, set the region in AWS Explorer to the region you selected in Step 1.
5. Disable HTTPS Redirection
Open Program.cs in the code editor, and remove or comment out this statement:
// app.UseHttpsRedirection();
6. Debug the project
The generated project is a WeatherForecast API, commonly used in .NET samples.
A. To try it, either 1) press F5 in your IDE, or 2) run dotnet run from the command line and browse to the endpoint address, with /swagger/index.html at the end of the path.
B. In the browser tab that opens, you see a Swagger interface. Notice the service has a /WeatherForecast action that returns mock weather data JSON. Test it, by clicking Get, Try it Out, and Execute. Note the JSON response. You may or may not see a “Not secure” indicator about HTTPS in the browser, depending on whether or not you accepted a local SSL certificate.
C. Stop the program from running.

7. Configure Ports
Our Web API will run at port 8080 (HTTP) and 8443 (SSL). Open Properties/launchSettings.json in the code editor. On line 17, change the applicationUrl values to:
"applicationUrl": "https://localhost:8443;http://localhost:8080",8. Code the Data Structure
Open WeatherForecast.cs and replace it with the code below. This record structure matches the DynamoDB items you created in Step 3.
namespace WeatherAPI;

public class WeatherForecast
{
    public string? Location { get; set; }

    public DateTime Date { get; set; }

    public int TemperatureC { get; set; }

    public int TemperatureF { get; set; }

    public string? Summary { get; set; }
}9. Code the Controller
Open WeatherForecastController.cs in the Controllers folder, and replace with the code below. On line 12, set RegionEndpoint to the region you are working in. This code implements a health check method at the root path of the service, and a WeatherForecast method at /WeatherForecast.
The /WeatherForecast method takes a location parameter and retrieves data for it from the DynamoDB Weather table. It performs a table scan to find records whose partition key matches the location. Matching DynamoDB items are stored in a List of WeatherForecast objects. The results are returned as an array of JSON records.
using System;
using System.Collections.Generic;
using System.Threading.Tasks;

using Amazon;
using Amazon.DynamoDBv2;
using Amazon.DynamoDBv2.DocumentModel;

using Microsoft.AspNetCore.Mvc;
using Microsoft.Extensions.Logging;

namespace WeatherAPI.Controllers;

[ApiController]
[Route("")]
public class WeatherForecastController : ControllerBase
{
    static readonly RegionEndpoint region = RegionEndpoint.USWest2;

    private readonly ILogger _logger;

    public WeatherForecastController(ILogger logger)
    {
        _logger = logger;
    }

    [HttpGet("")]
    public string GetHealthcheck()
    {
        return "Healthcheck: Healthy";
    }

    [HttpGet("WeatherForecast")]
    public async Task<WeatherForecast[]> GetWeatherForecast(string location = "Dallas")
    {
        List<WeatherForecast> forecasts = new List<WeatherForecast>();

        try
        {
            _logger.LogInformation($"00 enter GET, location = {location}");

            var client = new AmazonDynamoDBClient(region);
            Table table = Table.LoadTable(client, "Weather");

            var filter = new ScanFilter();
            filter.AddCondition("Location", ScanOperator.Equal, location);

            var scanConfig = new ScanOperationConfig()
            {
                Filter = filter,
                Select = SelectValues.SpecificAttributes,
                AttributesToGet = new List<String> { "Location", "Timestamp", "TempC", "TempF", "Summary" }
            };

            _logger.LogInformation($"10 table.Scan");

            Search search = table.Scan(scanConfig);
            List<Document> matches;
            do
            {
                _logger.LogInformation($"20 table.GetNextSetAsync");
                matches = await search.GetNextSetAsync();
                foreach (var match in matches)
                {
                    forecasts.Add(new WeatherForecast
                    {
                        Location = Convert.ToString(match["Location"]),
                        Date = Convert.ToDateTime(match["Timestamp"]),
                        TemperatureC = Convert.ToInt32(match["TempC"]),
                        TemperatureF = Convert.ToInt32(match["TempF"]),
                        Summary = Convert.ToString(match["Summary"])
                    });
                }
            } while (!search.IsDone);

            _logger.LogInformation($"30 exited results loop");

        }
        catch (Exception ex)
        {
            _logger.LogError(ex, "90 Exception");
        }

        _logger.LogInformation($"99 returning {forecasts.Count} results");

        return forecasts.ToArray();
    }
}10. Save Changes and Build
Save your changes and ensure the project builds.
Check Your Work
You should now have:
✓ A WeatherAPI project
✓ The AWSDK.DynamoDBv2 NuGet package installed
✓ HTTPS redirection commented out in Program.cs
✓ WeatherForecastController.cs updated with a root healthcheck method and WeatherForecast method that queries the DynamoDB weather tablec
✓ WeatherForecastController.cs region variable set to the region you’re working in
Step 5: Test WeatherAPI Locally
In this step, you'll test the Web API locally and confirm data retrieval from DynamoDB.
1. Debug the Project
In your IDE, press F5 and wait for the app to build and launch in a browser. You may receive a security risk warning about an invalid certificate. In the Swagger page, you now see your two methods and the WeatherForecast schema.

2. Test the Health Check action

3. Test the Weather Forecast action for Dallas
Set the URL path to /WeatherForecast?location=Dallas, and be sure your location value casing matches the table data. You should see weather forecast data JSON appear, with values you created in the DynamoDB table in Step 1.

4. Test the Weather Forecast action for Minneapolis
Set the URL path to /WeatherForecast?location=Dallas, and be sure your location value casing matches the table data. You should see weather forecast data JSON appear, with values you created in the DynamoDB table in Step 1.

5. Test an Invalid Location
Try a different location name, and you see an empty response because there is no data for it in the table.

6. Stop Debugging
Stop the program from running.
Check Your Work
You should now have:
✓ Tested the WeatherAPI project locally.
✓ Confirmed WeatherAPI can retrieve data from the DynamoDB table
Step 6: Deploy WeatherAPI to ECS
In this step, you’ll containerize and deploy the WeatherAPI project to Amazon ECS using the AWS deployment tool for .NET CLI.
1. Run the AWS deploy tool for .NET
A. In a command/terminal window, CD to the WeatherAPI folder.
B. Run dotnet aws deploy.
dotnet aws deployNote: The options list and order can vary each time you run dotnet aws deploy.
C. If you are prompted to Select an existing AWS deployment target, select the choice for Deploy to a new Cloud Application.
D. Select the choice for ASP.NET Core App to Amazon ECS using Fargate.
E. For name of new CloudFormation stack, press Enter to accept the default name of WeatherAPI.

2. Edit Settings
When Current settings are displayed, enter more to see advanced settings. A numbered list of settings is displayed. Enter 9 to select Elastic Load Balancer and respond to prompts as follows:
A. Create New Load Balancer: y
B. Deregistration delay: 180
C. Health check path: /
D. Health Check Timeout: 5
E. Health Check Interval: 120
F. Healthy Threshold Count: 2
G. Unhealthy Threshold Count: 2


3. Deploy
A. Press Enter to start deployment. The deployment will create a load balancer, 3 ECS tasks, and create new roles.
B. Wait while the service is containerized and deployed, which will take several minutes. When it completes, note the deployment details at the end of the output.
C. Record the details under Application Endpoint. You will need endpoint to test the service.


4. Review Dockerfile
In your project folder, notice that a Dockerfile file has been added. The AWS deploy tool created this and used Docker to containerize the project.
FROM mcr.microsoft.com/dotnet/aspnet:6.0 AS base
WORKDIR /app
EXPOSE 80
EXPOSE 443

FROM mcr.microsoft.com/dotnet/sdk:6.0 AS build
WORKDIR /src
COPY ["WeatherAPI.csproj", ""]
RUN dotnet restore "WeatherAPI.csproj"
COPY . .
WORKDIR "/src/"
RUN dotnet build "WeatherAPI.csproj" -c Release -o /app/build

FROM build AS publish
RUN apt-get update -yq \
&& apt-get install curl gnupg -yq \
&& curl -sL https://deb.nodesource.com/setup_14.x | bash \
&& apt-get install nodejs -yq
RUN dotnet publish "WeatherAPI.csproj" -c Release -o /app/publish

FROM base AS final
WORKDIR /app
COPY --from=publish /app/publish .
ENTRYPOINT ["dotnet", "WeatherAPI.dll"]5. Review in ECS Console
Examine what’s been deployed in the AWS console:
A. In the AWS console, navigate to ECS.
B. Select Clusters from the left pane, and the WeatherAPI cluster should be listed. You should see a cluster with 1 service and 3 running tasks. (Figure 1)
C. Click the WeatherAPI cluster name to view its detail. Explore the tabs to see what’s been deployed. On the Tasks tab, you should see 3 running tasks of Launch type FARGATE. (Figure 2)


6. Test ECS Endpoint
In another browser tab, visit the endpoint URL you recorded in Step 6-3c earlier. You should see a Healthy healthcheck response. This tells us our ECS-hosted service is responding.

Check Your Work
You should now have:
✓ Containerized and deployed the project to ECS with the AWS deployment tool for .NET CLI.
✓ Confirmed deployment in the ECS console.
✓ Confirmed the base endpoint URL is returning a health check.
Step 7: Update ECS Task Role & Test API
Although the WeatherAPI service is deployed and responding, it doesn’t yet have permissions to access the DynamoDB table. In this step, you’ll create an IAM policy for DynamoDB access, update the ECS task role permissions, and test the ECS service.
1. Test API and note missing permission
Test the API and note missing permission. In a browser, visit the endpoint URL with /WeatherForecast?location=Dallas to the end of the path. No data is returned. This is because the ECS task role that is running the WeatherAPI service does not have permissions to access the DynamoDB Weather table.
2. Create an IAM policy for DynamoDB access
Create an IAM policy that allows access to the Weather DynamoDB table:
A. In the AWS console, navigate to IAM.
B. Select Policies from the left pane and click Create policy.
C. Create the policy and enter the JSON below, replacing [account] with your 12-digit AWS account number, and [region] with your region (example: us-west-2).
{
    "Version": "2012-10-17",
    "Statement": [
        {
            "Sid": "",
            "Effect": "Allow",
            "Action": "dynamodb:*",
            "Resource": "arn:aws:dynamodb:[region]:[account]:table/Weather"
        }
    ]
}D. Click Next: Tags and Next: Review. Name the policy ddb-Weather and click Create policy.

3. Modify the task role
The ECS service doesn’t yet have permissions to access the Weather DynamoDB table. Update the role to add 2 policies:
A. In the AWS ECS console, click the WeatherAPI cluster to view its detail.
B. Click WeatherAPI-service to view the service detail.
C. Select the Configuration and tasks tab and click on the Task definition link.
D. Click on the Task role link. This takes you to the Role definition in the IAM console.
E. Click Add permissions > Attach policies.
F. Find and select the ddb-weather permission
G. Find and select the AmazonDynamoDBFullAccess permission.
H. Click Attach policies.


4. Re-test the API
Refresh the page that returned no results in Step 2. This time, you see JSON data returned. The role update has provided access to the DynamoDB table.

Check Your Work
You should now have:
✓ Tested the WeatherAPI ECS service.
✓ Created a policy named ddb-weather.
✓ Updated the ECS task role with 2 permissions attached for DynamoDB.
✓ Re-tested the WeatherAPI ECS service and saw data returned.
Step 8: Create WeatherSite project
In this step, you'll use the dotnet new command to create a .NET web project, and update its code to retrieve data from the API.
1. Generate a web project
A. Open a command/terminal window and CD to a development folder. You can use the same folder you used in Step 4-1.
B. Run the dotnet new command below to create a new Web API project named WeatherAPI.
dotnet new webapp -n WeatherSite
C. CD to the WeatherSite project folder.

2. Open Project in IDE
Open the WeatherSite project in your IDE.
3. Disable HTTPS Redirection
Open Program.cs in the code editor, and remove or comment out this statement:
// app.UseHttpsRedirection();4. Debug the Project
The generated project is a simple web application, commonly used in .NET samples.
A. To try it, either 1) press F5 in your IDE, or 2) run dotnet run from the command line and browse to the endpoint address.
B. In the browser tab that opens, you see a simple page with a welcome message.
C. Stop the program from running.

5. Add the WeatherAPI Configuration Setting
Open appsettings.json in the code editor and replace with the code below, replacing [service-address] with the endpoint address of the WeatherAPI ECS service. The WeatherAPI service address should NOT have a trailing slash.
{
  "Logging": {
    "LogLevel": {
      "Default": "Information",
      "Microsoft.AspNetCore": "Warning"
    }
  },
  "AllowedHosts": "*",
  "AppSettings": {
    "WeatherAPI": "http://[service-address]"
  }
}6.Code the Weather Record Structure
Add file WeatherForecast.cs to the project with the code below. This record structure matches the items returned by the Weather API.
namespace WeatherSite;

public class WeatherForecast
{
    public string? Location { get; set; }

    public DateTime Date { get; set; }

    public int TemperatureC { get; set; }

    public int TemperatureF { get; set; }

    public string? Summary { get; set; }
}7. Code the Service Client
Open Pages/Index.cshtml.cs in the code editor, and replace with the code below. This is the code-behind file for the Razor page Index.cshtml.
The URL for the WeatherAPI service is read from a setting in appSettings.json. The /WeatherForecast route takes a location parameter and retrieves data for it from the DynamoDB Weather table. The results are returned as an array of JSON records.
using Microsoft.AspNetCore.Mvc;
using Microsoft.AspNetCore.Mvc.RazorPages;

namespace WeatherSite.Pages;

public class IndexModel : PageModel
{
	[BindProperty(SupportsGet = true)]
	public string Location { get; set; } = "Dallas";

	public string Message { get; private set; } = "";
	public IEnumerable? Items { get; private set; }

	private readonly IConfiguration _configuration;
	private static readonly HttpClient _httpClient = new();

	public IndexModel(IConfiguration configuration)
	{
		_configuration = configuration;
	}

	public async Task OnGet()
	{
		try
		{
			var requestUri = $"{_configuration["AppSettings:WeatherAPI"]}/WeatherForecast?location={Location}";

			Items = await _httpClient.GetFromJsonAsync>(requestUri);
			Message = $"{Items?.Count()} forecast records found";
		}
		catch (HttpRequestException ex)
		{
			Message = ex.Message;
		}
	}
}8. Code the Page
Open Pages/Index.cshtml in the code editor, and replace with the code below. The Razor page displays some values from the code-behind model using @ notation: location, success/error message, and a table of weather forecast data.
@page
@model IndexModel
@{
    ViewData["Title"] = "Home page";
}

<style>
    .styled-table {
        border-collapse: collapse;
        font-size: 0.9em;
        font-family: sans-serif;
        min-width: 400px;
        box-shadow: 0 0 20px rgba(0, 0, 0, 0.15);
        margin-left: auto;
        margin-right: auto;
    }

        .styled-table thead tr {
            background-color: cornflowerblue;
            color: #ffffff;
            text-align: left;
        }

        .styled-table th,
        .styled-table td {
            padding: 12px 15px;
        }

        .styled-table tbody tr {
            border-bottom: 1px solid #dddddd;
        }

            .styled-table tbody tr:nth-of-type(even) {
                background-color: #f3f3f3;
            }

            .styled-table tbody tr:last-of-type {
                border-bottom: 2px solid cornflowerblue;
            }

            .styled-table tbody tr.active-row {
                font-weight: bold;
                color: cornflowerblue;
            }
</style>

<div class="text-center">
                                  <h1 class="display-4">@Model.Location Weather</h1>
                                  <p>Weather Forecast</p>
                                  <p>@Model.Message</p>

                                  <p><a href="/?location=Dallas">Dallas</a></p>
                                  <p><a href="/?location=Minneapolis">Minneapolis</a></p>

    @if (@Model.Items != null)
    {
                                  <table class="styled-table">
                                  <thead>
                                  <tr><th>Location</th><th>Time</th><th>Temp (°C)</th><th>Temp (°F)</th><th>Summary</th>
            </thead>
                                  <tbody>
                @foreach (var forecast in Model.Items)
                {
                                  <tr>
                                  <td>@forecast.Location</td>
                                  <td>@forecast.Date.ToString("yyyy-MM-ddHH:MM")</td>
                                  <td>@forecast.TemperatureC</td>
                                  <td>@forecast.TemperatureF</td>
                                  <td>@forecast.Summary</td>
                    </tr>
                }
            </tbody>
        </table>
    }
</div>9. Save and Build
Save your changes and ensure the project builds.
At this point, you have created all the components for our architecture: database table, API, and website.
Check Your Work
✓ A WeatherSite project
✓ Coded the Weather record structure
✓ Coded the main web page
✓ Coded the code-behind for the main page
Step 9: Test WeatherSite locally
1. Debug the Project
In your IDE, press F5 and wait for the web app to build and launch in a browser. The website should load and display weather data for Dallas.

2. Click the Minneapolis link
Click the Minneapolis link. The page refreshes with data for that city.

3. Stop debugging
Stop the WeatherSite debug in your IDE.
4. Configure Production Ports
Now we will set the production ports for the web site. In the IDE with the WeatherSite project open, open Properties/launchSettings.json in the code editor. On line 17, change the applicationUrl values to:
"applicationUrl": "https://localhost:443;http://localhost:80",5. Save and build
Save your changes and confirm the project builds
Check Your Work
You should now have:
✓ Tested the WeatherSite project locally.
✓ Confirmed data is retrieved from the WeatherAPI back-end ECS Service
Step 10: Deploy WeatherSite to ECS
In this step, you’ll containerize and deploy the WeatherAPI project to Amazon ECS using the AWS deploy tool for .NET CLI. This will be similar to Step 6, but this time we’re deploying the front-end website.
1. Run the AWS deploy tool for .NET
A. In a command/terminal window, CD to the WeatherAPI folder.
B. Run dotnet aws deploy.
dotnet aws deployD. Select the choice for ASP.NET Core App to Amazon ECS using Fargate.
E. For name of new CloudFormation stack, press Enter to accept the default name of WeatherSite.


2. Edit Settings
When Current settings are displayed, enter more to see advanced settings. A numbered list of settings is displayed. Enter 9 to select Elastic Load Balancer and respond to prompts as follows:
A. Create New Load Balancer: y
B. Deregistration delay: 180
C. Health check path: /
D. Health Check Timeout: 5
E. Health Check Interval: 120
F. Healthy Threshold Count: 2
G. Unhealthy Threshold Count: 2

3. Deploy
A. Press Enter to start deployment. The deployment will create a load balancer, 3 ECS tasks, and create new roles.
B. Wait while the website is containerized and deployed, which will take several minutes. When it completes, note the deployment details at the end of the output.
C. Record the details under Application Endpoint. You will need endpoint to test the website.

4. Review Dockerfile
In your project folder, notice that a Dockerfile file has been added. The AWS deployment tool created this and used it with Docker to containerize the project.
FROM mcr.microsoft.com/dotnet/aspnet:6.0 AS base
WORKDIR /app
EXPOSE 80
EXPOSE 443

FROM mcr.microsoft.com/dotnet/sdk:6.0 AS build
WORKDIR /src
COPY ["WeatherSite.csproj", ""]
RUN dotnet restore "WeatherSite.csproj"
COPY . .
WORKDIR "/src/"
RUN dotnet build "WeatherSite.csproj" -c Release -o /app/build

FROM build AS publish
RUN apt-get update -yq \
    && apt-get install curl gnupg -yq \
    && curl -sL https://deb.nodesource.com/setup_14.x | bash \
    && apt-get install nodejs -yq
RUN dotnet publish "WeatherSite.csproj" -c Release -o /app/publish

FROM base AS final
WORKDIR /app
COPY --from=publish /app/publish .
ENTRYPOINT ["dotnet", "WeatherSite.dll"]5. Review in ECS Console
A. In the AWS console, navigate to ECS.
B. Select Clusters from the left pane. The WeatherSite cluster should be listed. You should see a service with 3 running tasks. (Figure 1)
C. Click the WeatherSite cluster name to view its detail. Explore the tabs to see what’s been deployed. You should see 3 tasks of Launch type FARGATE. (Figure 2)


6. Test ECS endpoint
A. In another browser tab, visit the endpoint URL you recorded in Step 10-3c earlier. The website comes up, defaulting to location Dallas.
B. Click Minneapolis, and see the data change for that locale.
Congratulations, you have created a DynamoDB table and a website and API hosted in Amazon ECS on AWS Fargate.


Check Your Work
You should now have:
✓ Containerized and deployed the website to ECS with the AWS deployment tool for .NET CLI.
✓ Confirmed deployment in the ECS console.
✓ Confirmed the website is live and able to access the Weather API service.
✓ Seen the website, API, and DynamoDB table working together on AWS.
Step 11: Deploy an Update
In this step, you’ll add more data to your DynamoDB table, update the website with a third location, and deploy the updated website. We’ll also change the task count from 3 to 2.
1. Add data for another location to the DynamoDB weather table
A. In the AWS console, navigate to DynamoDB > Tables and click the Weather table.
B. Click Explore table items. Add 3 more items for a new location such as Seattle or a location of your choosing, by duplicating items, just as you did earlier in Step 3.

2. Update the website for the new location
A. Open the WeatherSite project in your IDE
B. Open Pages/Index.cshtml in the code editor, and insert the following after the link for Minneapolis:
<p><a href="/?location=Seattle">Seattle</a></p>C. Save your changes and build the project.
3. Deploy an update
A. Open a command/terminal window, and CD to the WeatherSite project folder.
B. Run the command dotnet aws deploy to deploy an update
dotnet aws deployD. When Current settings are displayed, select 1. Desired Task Count and change it from 3 to 2.
E. Press Enter to begin the deployment, which will take a few minutes.


4. Confirm the task count change in ECS
In the AWS console, navigate to ECS and select Clusters. Your WeatherSite task count, previously 3, should now be 2.

5. Test the updated website
A. In a browser, visit your website at the same endpoint you used previously in Step 10-6. Confirm the web page now shows the third location for Seattle. (Figure 1)
B. Click Seattle and confirm the data changes. (Figure 2)

Check Your Work
You should now have:
✓ Added Seattle weather data to the DynamoDB table.
✓ Updated the website project main page with a Seattle location link.
✓ Deployed the updated website to ECS with a reduced task count.
✓ Tested the updated website hosted in ECS.
Step 12: Shut it down
When you're all done with the lab, follow these steps to deallocate the resources. You don't want to accrue AWS charges for something you're no longer using.
1. Delete the deployment for WeatherSite
A. In a command/terminal window, CD to the WeatherSite project folder.
B. Run dotnet aws delete-deployment WeatherSite and confirm the deletion.
dotnet aws delete-deployment WeatherAPIC. Wait for completion.
D. In the AWS console, navigate to ECS and confirm the WeatherSite cluster is no longer listed.


2. Delete the deployment for WeatherAPI
A. In a command/terminal window, CD to the WeatherAPI project folder.
B. Run dotnet aws delete-deployment WeatherAPI and confirm the deletion.
dotnet aws delete-deployment WeatherAPI3. Delete the DynamoDB Weather table
In the AWS console, navigate to DynamoDB.
A. Select the Weather table and choose Delete from the Actions dropdown.
B. Confirm the delete and wait for it to complete.
4. Delete the Cloud9 environment
If using a Cloud9 environment,
A. In the AWS console, navigate to Cloud9.
B. Delete the FargateLab environment.
Check Your Work
You should now have:
✓ Deleted your 2 ECS deployments
✓ Deleted all other resources you manually allocated in the AWS console
Summary
In this lab, you achieved the following:
- You created a DynamoDB table and populated it with weather data.
- You developed a .NET Web API project that retrieves weather data from the DynamoDB table.
- You deployed the WeatherAPI project to Amazon ECS on AWS Fargate, using the AWS deployment tool for .NET CLI.
- You developed a website that retrieves data from WeatherAPI.
- You deployed the WeatherSite project to Amazon ECS on AWS Fargate, using the AWS deployment tool for .NET CLI.
- You updated weather data and the website, and deployed the updated website to ECS and modified its task count.
- You deleted the deployments for WeatherSite and WeatherAPI, and deleted the Weather DynamoDB table in the AWS console.