亚马逊AWS官方博客
在 AWS Cloud9 中构建和模拟机器人应用程序
Original URL: https://aws.amazon.com/blogs/robotics/robotics-development-in-aws-cloud9/
演练
在这篇博客中,我们将演练如何使用 ROS、Gazebo 和 NICE DCV 配置 AWS Cloud9 IDE,以便通过浏览器完成开发、调试和测试机器人及模拟应用程序的各项操作。这使您能够运行机器人和模拟应用程序,并通过 Gazebo、RViz 和其他工具直接与它们进行交互,就像它们在您自己的桌面上运行一样。
步骤 1:满足配置 AWS 账户的先决条件
步骤 2:构建 Amazon Elastic Compute Cloud(Amazon EC2)实例。要构建 ROS 应用程序,您可以构建我们自己的自定义 Amazon EC2 实例,然后在您的 AWS Cloud9 集成式开发环境中使用该实例。
步骤 3:(可选)配置 NICE DCV 以与您的模拟进行交互。
步骤 4:开始构建!
先决条件
在本演练中,您应该将一个 AWS 账户配置为使用 AWS Systems Manager 创建 Amazon EC2 实例。要配置 AWS 账户,请首先创建一个 AWS Identity and Access Management(IAM)角色以用于您的 Amazon EC2 实例配置文件。之后,您可以从 AWS Cloud9 控制台复制您的自定义 SSH 公钥。
- 导航到 AWS IAM 控制台主页(https://us-east-1.console.aws.amazon.com/iamv2/home?region=us-east-1#/home)。
- 在 AWS IAM 控制台中,选择侧边栏中的 Access Management(访问管理)下的 Roles(角色)以访问 AWS IAM 角色列表页面。(注意:如果您通过 AWS Academy 访问 AWS 管理控制台,则继续执行下面的步骤 20)
- 选择屏幕右上角附近的 Create Role(创建角色)以创建新角色。
- 在可信实体屏幕上,选择 AWS Service(AWS 服务),然后在 Common use cases(常见使用案例)下选择 EC2。
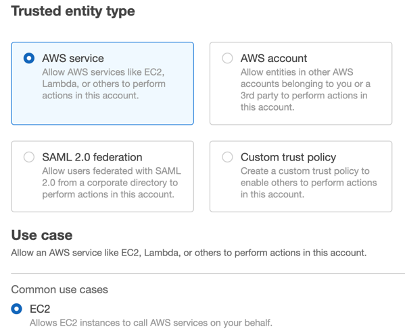
图 1:创建新的 IAM 角色。
- 选择 Next(下一步)继续。
- 在 Permission policies(权限策略)下搜索 AmazonEC2FullAccess,选择具有该名称的权限策略。
- 选择该权限策略后,清除筛选条件并搜索 AmazonSSMManagedInstanceCore,然后选择具有该名称的权限策略。
- 选择这两个权限策略后,选择 Next(下一步)继续。
- 在下一个屏幕上,为该角色添加角色名称和描述。在下图中,该角色被定义为 ec2-instance-builder,用于从 AWS Systems Manager 文档中构建 Amazon EC2 实例。
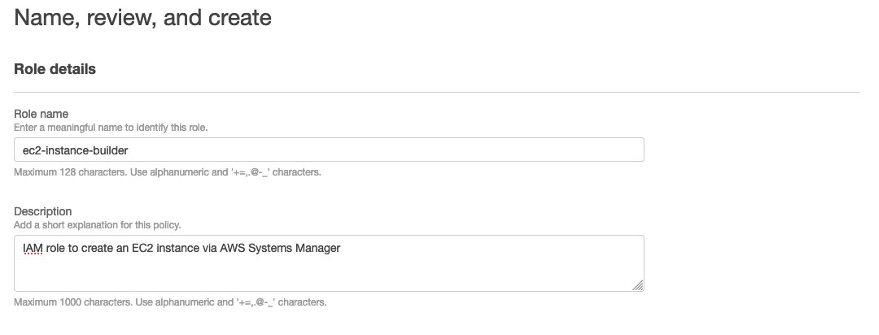
图 2:命名新的 IAM 角色。
- 选择 Create role(创建角色),继续创建角色。
- 查看刚刚创建的角色,导航到 Trust relationships(信任关系),然后选择 Edit trust policy(编辑信任策略)。
- 编辑信任策略以包括 ssm.amazonaws.com,然后选择 Update trust policy(更新信任策略)。
- 现在,该信任策略将允许 AWS Systems Manager 和 Amazon EC2 代入此角色及其权限策略。
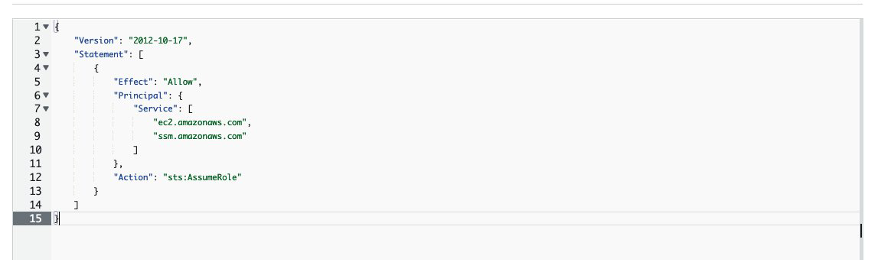
图 3:更新信任策略。
- 要找到您的自定义 SSH 公钥,请导航到 AWS Cloud9 控制台(https://us-east-1.console.aws.amazon.com/cloud9/home?region=us-east-1#)。
- 选择 Create Environment(创建环境),开始创建环境。
- 对于此步骤,可以使用占位符名称,您只需提供一个名称,即可继续进行下一步。
- 添加一个名称,博客中的示例使用“test”,然后选择 Next(下一步)继续。
- 在 Environment type(环境类型)下,选择 Create and run in remote server(SSH connection)[在远程服务器(SSH 连接)中创建并运行]。
- 在 SSH server connection(SSH 服务器连接)下,选择 Copy key to clipboard(将密钥复制到剪贴板)以复制您的自定义 SSH 密钥。将此密钥存储在所选的文本编辑器中,以便在下一步中使用。
- *此步骤仅适用于 AWS Academy 用户* 选择预先创建的 LabRole,然后选择 Add permissions(添加权限)和 Attach policies(附加策略)。
- *此步骤仅适用于 AWS Academy 用户* 搜索 AmazonEC2FullAccess,选择具有该名称的权限策略。选择该权限策略后,清除筛选条件并搜索 AmazonSSMManagedInstanceCore,然后选择具有该名称的权限策略。
构建 Amazon EC2 实例
要完成构建 Amazon EC2 实例的任务,您需要利用 AWS Systems Manager。通过向 AWS Systems Manager 提供文档,您将能够创建可随时集成到 AWS Cloud9 中的 Amazon EC2 实例。
- 导航到 AWS Systems Manager 控制台主页(https://us-east-1.console.aws.amazon.com/systems-manager/home?region=us-east-1)。博客中的示例使用了当前的 us-east-1(弗吉尼亚北部)区域,但要在不同的区域创建 Amazon EC2 实例,同样的说明将适用于所需的每个区域。
- 在 AWS Systems Manager 控制台主屏幕的 Shared Resources(共享资源)下,选择左侧导航栏中的 Documents(文档)子菜单。
- 在文档屏幕中,选择 Create document(创建文档),然后选择 Automation(自动化)开始自动化文档创建工作流。
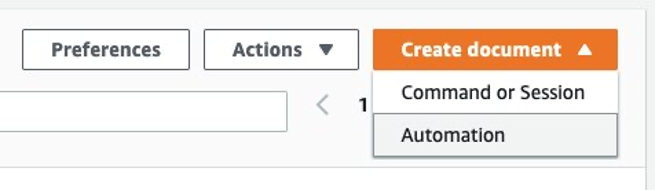
图 4:创建新的自动化文档工作流。
- 进入自动化文档创建向导后,在 Document details(文档详细信息)下添加一个描述文档用途的名称,以便稍后忆起。在下图中,使用的名称是 ROS1-Cloud9-Instance-Builder,因为本文档将构建一个 Amazon EC2 实例,以在 AWS Cloud9 中用于构建 ROS1 应用程序。

图 5:命名新的工作流。
- 在文档生成器工作流上方,选择 Editor(编辑器)视图,然后选择 Edit(编辑)。这将生成一条警告,告知您将无法返回到生成器视图。选择 OK(确定)可消除该警告。
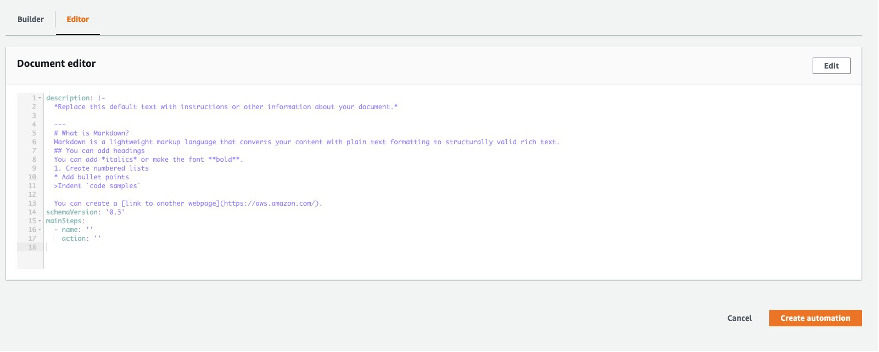
图 6:更新现有文档内容。
- 选择编辑器中的所有内容,然后删除这些内容。
- 在编辑器中,粘贴以下适用于 ROS Melodic 的文档。此文档将使用 Ubuntu 版本 18.04 创建一个 Amazon EC2 实例,安装一些依赖项和一些有用的软件包,包括 ROS Melodic。或者,您可以配置 ROS 2 Foxy 而不是 ROS Melodic。如果您想使用 ROS 2 Foxy 进行开发,请粘贴 选项 2.ROS 2 Foxy 中提供的文档。
选项 1.适用于 ROS Melodic 的 SSM
description: |-
  ### RoboMaker Cloud9 IDE
  ---
  This document produces an EC2 instance configured to be used in a Cloud9 IDE.
schemaVersion: '0.3'
outputs:
  - startInstances.InstanceIds
parameters:
  instanceType:
    type: String
    default: c5.2xlarge
    description: EC2 Instance type to be used
  volumeSize:
    type: Integer
    default: 50
    description: Volume size for the EBS mounted volume
  instanceProfileARN:
    type: String
    description: ARN of the instance profile to be used
  cloud9PublicKey:
    type: String
    description: The Cloud9 public key copied from the environment creation wizard in the Cloud9 console
mainSteps:
  - name: startInstances
    action: 'aws:runInstances'
    maxAttempts: 1
    onFailure: Abort
    inputs:
      ImageId: ami-0e472ba40eb589f49
      MinInstanceCount: 1
      MaxInstanceCount: 1
      InstanceType: '{{ instanceType }}'
      BlockDeviceMappings:
        - DeviceName: /dev/sda1
          Ebs:
            VolumeSize: '{{ volumeSize }}'
            VolumeType: gp2
      IamInstanceProfileArn: '{{ instanceProfileARN }}'
    description: Launch EC2 instance
  - name: runUpdateCommand
    action: 'aws:runCommand'
    maxAttempts: 1
    timeoutSeconds: 300
    inputs:
      InstanceIds:
        - '{{ startInstances.InstanceIds }}'
      DocumentName: AWS-RunShellScript
      Parameters:
        commands:
          - 'apt-get update && DEBIAN_FRONTEND=noninteractive apt-get -y -o Dpkg::Options::=''--force-confdef'' -o Dpkg::Options::=''--force-confold'' dist-upgrade -y'
  - name: stopInstanceBeforeReboot
    action: 'aws:changeInstanceState'
    maxAttempts: 1
    inputs:
      InstanceIds:
        - '{{ startInstances.InstanceIds }}'
      DesiredState: stopped
  - name: startInstanceAfterReboot
    action: 'aws:changeInstanceState'
    maxAttempts: 1
    onFailure: Abort
    inputs:
      InstanceIds:
        - '{{ startInstances.InstanceIds }}'
      DesiredState: running
  - name: installAWSCLI
    action: 'aws:runCommand'
    maxAttempts: 1
    timeoutSeconds: 300
    inputs:
      InstanceIds:
        - '{{ startInstances.InstanceIds }}'
      DocumentName: AWS-RunShellScript
      Parameters:
        commands:
          - apt-get install -y python3 python3-dev python3-pip && pip3 install --upgrade awscli
  - name: install_https_support
    action: 'aws:runCommand'
    maxAttempts: 1
    timeoutSeconds: 300
    inputs:
      InstanceIds:
        - '{{ startInstances.InstanceIds }}'
      DocumentName: AWS-RunShellScript
      Parameters:
        commands:
          - apt-get install -y apt-transport-https ca-certificates curl software-properties-common
  - name: install_build_essentials
    action: 'aws:runCommand'
    maxAttempts: 1
    timeoutSeconds: 300
    inputs:
      InstanceIds:
        - '{{ startInstances.InstanceIds }}'
      DocumentName: AWS-RunShellScript
      Parameters:
        commands:
          - apt-get install -y build-essential
  - name: configure_swap_file
    action: 'aws:runCommand'
    maxAttempts: 1
    timeoutSeconds: 300
    inputs:
      InstanceIds:
        - '{{ startInstances.InstanceIds }}'
      DocumentName: AWS-RunShellScript
      Parameters:
        commands:
          - fallocate -l 512MB /var/swapfile && sudo chmod 600 /var/swapfile && sudo mkswap /var/swapfile && echo '/var/swapfile swap swap defaults 0 0' >> /etc/fstab
  - name: configure_unattended_upgrades
    action: 'aws:runCommand'
    maxAttempts: 1
    timeoutSeconds: 300
    inputs:
      InstanceIds:
        - '{{ startInstances.InstanceIds }}'
      DocumentName: AWS-RunShellScript
      Parameters:
        commands:
          - 'sudo sed -i ''s|//Unattended-Upgrade::InstallOnShutdown "true";|Unattended-Upgrade::InstallOnShutdown "true";|'' /etc/apt/apt.conf.d/50unattended-upgrades'
  - name: install_ubuntu_desktop_and_lightdm
    action: 'aws:runCommand'
    maxAttempts: 1
    timeoutSeconds: 2400
    inputs:
      InstanceIds:
        - '{{ startInstances.InstanceIds }}'
      DocumentName: AWS-RunShellScript
      Parameters:
        commands:
          - DEBIAN_FRONTEND=noninteractive apt-get install -y --no-install-recommends ubuntu-desktop lightdm
  - name: install_desktop_utilities
    action: 'aws:runCommand'
    maxAttempts: 1
    timeoutSeconds: 300
    inputs:
      InstanceIds:
        - '{{ startInstances.InstanceIds }}'
      DocumentName: AWS-RunShellScript
      Parameters:
        commands:
          - DEBIAN_FRONTEND=noninteractive apt-get install -y --no-install-recommends firefox xterm
  - name: get_dcv_pkg
    action: 'aws:runCommand'
    maxAttempts: 1
    timeoutSeconds: 300
    inputs:
      InstanceIds:
        - '{{ startInstances.InstanceIds }}'
      DocumentName: AWS-RunShellScript
      Parameters:
        commands:
          - 'wget https://d1uj6qtbmh3dt5.cloudfront.net/2020.1/Servers/nice-dcv-2020.1-9012-ubuntu1804-x86_64.tgz && echo "7569c95465743b512f1ab191e58ea09777353b401c1ec130ee8ea344e00f8900 nice-dcv-2020.1-9012-ubuntu1804-x86_64.tgz" | sha256sum -c && tar -xvzf nice-dcv-2020.1-9012-ubuntu1804-x86_64.tgz && rm nice-dcv-2020.1-9012-ubuntu1804-x86_64.tgz'
  - name: install_dcv
    action: 'aws:runCommand'
    maxAttempts: 1
    timeoutSeconds: 300
    inputs:
      InstanceIds:
        - '{{ startInstances.InstanceIds }}'
      DocumentName: AWS-RunShellScript
      Parameters:
        commands:
          - cd nice-dcv-2020.1-9012-ubuntu1804-x86_64 && DEBIAN_FRONTEND=noninteractive apt-get install -y ./nice-dcv-server_2020.1.9012-1_amd64.ubuntu1804.deb ./nice-xdcv_2020.1.338-1_amd64.ubuntu1804.deb
  - name: create_dcv_conf
    action: 'aws:runCommand'
    maxAttempts: 1
    timeoutSeconds: 300
    inputs:
      InstanceIds:
        - '{{ startInstances.InstanceIds }}'
      DocumentName: AWS-RunShellScript
      Parameters:
        commands:
          - |-
            cat << 'EOF' >> ./dcv.conf
            [license]
            [log]
            [display]
            [connectivity]
            web-port=8080
            web-use-https=false
            [security]
            authentication="none"
            EOF
  - name: mv_dcv_conf
    action: 'aws:runCommand'
    maxAttempts: 1
    timeoutSeconds: 300
    inputs:
      InstanceIds:
        - '{{ startInstances.InstanceIds }}'
      DocumentName: AWS-RunShellScript
      Parameters:
        commands:
          - mv ./dcv.conf /etc/dcv/dcv.conf
  - name: install_python_and_pip
    action: 'aws:runCommand'
    maxAttempts: 1
    timeoutSeconds: 300
    inputs:
      InstanceIds:
        - '{{ startInstances.InstanceIds }}'
      DocumentName: AWS-RunShellScript
      Parameters:
        commands:
          - apt-get install -y python python-dev python-pip python3 python3-dev python3-pip
  - name: update_pip
    action: 'aws:runCommand'
    maxAttempts: 1
    timeoutSeconds: 300
    inputs:
      InstanceIds:
        - '{{ startInstances.InstanceIds }}'
      DocumentName: AWS-RunShellScript
      Parameters:
        commands:
          - pip install --upgrade pip
  - name: add_cloud9_ssh_key
    action: 'aws:runCommand'
    maxAttempts: 1
    timeoutSeconds: 300
    inputs:
      InstanceIds:
        - '{{ startInstances.InstanceIds }}'
      DocumentName: AWS-RunShellScript
      Parameters:
        commands:
          - 'echo {{ cloud9PublicKey }} >> /home/ubuntu/.ssh/authorized_keys'
  - name: setup_cloud9
    action: 'aws:runCommand'
    maxAttempts: 1
    timeoutSeconds: 300
    inputs:
      InstanceIds:
        - '{{ startInstances.InstanceIds }}'
      DocumentName: AWS-RunShellScript
      Parameters:
        commands:
          - 'chmod u=rwx,g=rx,o=rx /home/ubuntu'
          - apt-get -y install python
          - 'runuser -l ubuntu -c ''curl -o- https://raw.githubusercontent.com/creationix/nvm/v0.33.0/install.sh | bash'''
          - echo 'source /home/ubuntu/.nvm/nvm.sh' >> /home/ubuntu/.bash_profile
          - sudo -iu ubuntu nvm install v12.22.11
          - 'runuser -l ubuntu -c ''curl -L https://raw.githubusercontent.com/c9/install/master/install.sh | bash'''
  - name: install_ros_melodic
    action: 'aws:runCommand'
    maxAttempts: 1
    timeoutSeconds: 300
    inputs:
      InstanceIds:
        - '{{ startInstances.InstanceIds }}'
      DocumentName: AWS-RunShellScript
      Parameters:
        commands:
          - 'git clone https://github.com/aws-robotics/aws-robomaker-sample-application-helloworld.git -b ros1 && cd aws-robomaker-sample-application-helloworld/ && bash -c scripts/setup.sh --install-ros melodic'
          - rm -rf aws-robomaker-sample-application-helloworld/
          - 'echo "[[ -e /opt/ros/melodic/setup.sh ]] && source /opt/ros/melodic/setup.sh" >> /home/ubuntu/.bash_profile'
  - name: install_docker
    action: 'aws:runCommand'
    maxAttempts: 1
    timeoutSeconds: 300
    inputs:
      InstanceIds:
        - '{{ startInstances.InstanceIds }}'
      DocumentName: AWS-RunShellScript
      Parameters:
        commands:
          - 'curl -fsSL https://download.docker.com/linux/ubuntu/gpg | sudo gpg --dearmor -o /usr/share/keyrings/docker-archive-keyring.gpg'
          - 'echo "deb [arch=$(dpkg --print-architecture) signed-by=/usr/share/keyrings/docker-archive-keyring.gpg] https://download.docker.com/linux/ubuntu $(lsb_release -cs) stable" | sudo tee /etc/apt/sources.list.d/docker.list > /dev/null'
          - apt-get update
          - apt-get -y install docker-ce docker-ce-cli containerd.io
选项 2:适用于 ROS2 Foxy 的 SSM
注意:仅当您想用 ROS 2 Foxy 而不是 ROS Melodic 配置 IDE 时,才执行此步骤。如果您正使用 ROS Melodic,则跳过此 SSM 文档。
description: |-
  ### RoboMaker Cloud9 IDE
  ---
  This document produces an EC2 instance configured to be used in a Cloud9 IDE.
schemaVersion: '0.3'
outputs:
  - startInstances.InstanceIds
parameters:
  instanceType:
    type: String
    default: c5.2xlarge
    description: EC2 Instance type to be used
  volumeSize:
    type: Integer
    default: 50
    description: Volume size for the EBS mounted volume
  instanceProfileARN:
    type: String
    description: ARN of the instance profile to be used
  cloud9PublicKey:
    type: String
    description: The Cloud9 public key copied from the environment creation wizard in the Cloud9 console
mainSteps:
  - name: startInstances
    action: 'aws:runInstances'
    maxAttempts: 1
    onFailure: Abort
    inputs:
      ImageId: ami-04505e74c0741db8d
      MinInstanceCount: 1
      MaxInstanceCount: 1
      IamInstanceProfileArn: '{{ instanceProfileARN }}'
      InstanceType: '{{ instanceType }}'
      BlockDeviceMappings:
        - DeviceName: /dev/sda1
          Ebs:
            VolumeSize: '{{ volumeSize }}'
            VolumeType: gp2
    description: Launch EC2 instance
  - name: runUpdateCommand
    action: 'aws:runCommand'
    maxAttempts: 1
    timeoutSeconds: 300
    inputs:
      InstanceIds:
        - '{{ startInstances.InstanceIds }}'
      DocumentName: AWS-RunShellScript
      Parameters:
        commands:
          - 'apt-get update && DEBIAN_FRONTEND=noninteractive apt-get -y -o Dpkg::Options::=''--force-confdef'' -o Dpkg::Options::=''--force-confold'' dist-upgrade -y'
  - name: stopInstanceBeforeReboot
    action: 'aws:changeInstanceState'
    maxAttempts: 1
    inputs:
      InstanceIds:
        - '{{ startInstances.InstanceIds }}'
      DesiredState: stopped
  - name: startInstanceAfterReboot
    action: 'aws:changeInstanceState'
    maxAttempts: 1
    onFailure: Abort
    inputs:
      InstanceIds:
        - '{{ startInstances.InstanceIds }}'
      DesiredState: running
  - name: installAWSCLI
    action: 'aws:runCommand'
    maxAttempts: 1
    timeoutSeconds: 300
    inputs:
      InstanceIds:
        - '{{ startInstances.InstanceIds }}'
      DocumentName: AWS-RunShellScript
      Parameters:
        commands:
          - apt-get install -y python3 python3-dev python3-pip && pip3 install --upgrade awscli
  - name: install_https_support
    action: 'aws:runCommand'
    maxAttempts: 1
    timeoutSeconds: 300
    inputs:
      InstanceIds:
        - '{{ startInstances.InstanceIds }}'
      DocumentName: AWS-RunShellScript
      Parameters:
        commands:
          - apt-get install -y apt-transport-https ca-certificates curl software-properties-common
  - name: install_build_essentials
    action: 'aws:runCommand'
    maxAttempts: 1
    timeoutSeconds: 300
    inputs:
      InstanceIds:
        - '{{ startInstances.InstanceIds }}'
      DocumentName: AWS-RunShellScript
      Parameters:
        commands:
          - apt-get install -y build-essential
  - name: configure_swap_file
    action: 'aws:runCommand'
    maxAttempts: 1
    timeoutSeconds: 300
    inputs:
      InstanceIds:
        - '{{ startInstances.InstanceIds }}'
      DocumentName: AWS-RunShellScript
      Parameters:
        commands:
          - fallocate -l 512MB /var/swapfile && sudo chmod 600 /var/swapfile && sudo mkswap /var/swapfile && echo '/var/swapfile swap swap defaults 0 0' >> /etc/fstab
  - name: install_ubuntu_desktop_and_lightdm
    action: 'aws:runCommand'
    maxAttempts: 1
    timeoutSeconds: 2400
    inputs:
      InstanceIds:
        - '{{ startInstances.InstanceIds }}'
      DocumentName: AWS-RunShellScript
      Parameters:
        commands:
          - DEBIAN_FRONTEND=noninteractive apt-get install -y --no-install-recommends ubuntu-desktop lightdm
  - name: install_desktop_utilities
    action: 'aws:runCommand'
    maxAttempts: 1
    timeoutSeconds: 300
    inputs:
      InstanceIds:
        - '{{ startInstances.InstanceIds }}'
      DocumentName: AWS-RunShellScript
      Parameters:
        commands:
          - DEBIAN_FRONTEND=noninteractive apt-get install -y --no-install-recommends firefox xterm
  - name: get_dcv_pkg
    action: 'aws:runCommand'
    maxAttempts: 1
    timeoutSeconds: 300
    inputs:
      InstanceIds:
        - '{{ startInstances.InstanceIds }}'
      DocumentName: AWS-RunShellScript
      Parameters:
        commands:
          - 'wget https://d1uj6qtbmh3dt5.cloudfront.net/2021.0/Servers/nice-dcv-2021.0-10242-ubuntu2004-x86_64.tgz && echo "431e977dc936bd347146a57eb09033ff8945fe99ad85da64f5ce74c8de6e655c nice-dcv-2021.0-10242-ubuntu2004-x86_64.tgz" | sha256sum -c && tar -xvzf nice-dcv-2021.0-10242-ubuntu2004-x86_64.tgz && rm nice-dcv-2021.0-10242-ubuntu2004-x86_64.tgz'
  - name: install_dcv
    action: 'aws:runCommand'
    maxAttempts: 1
    timeoutSeconds: 300
    inputs:
      InstanceIds:
        - '{{ startInstances.InstanceIds }}'
      DocumentName: AWS-RunShellScript
      Parameters:
        commands:
          - cd nice-dcv-2021.0-10242-ubuntu2004-x86_64 && DEBIAN_FRONTEND=noninteractive apt-get install -y ./nice-dcv-server_2021.0.10242-1_amd64.ubuntu2004.deb ./nice-xdcv_2021.0.380-1_amd64.ubuntu2004.deb
  - name: create_dcv_conf
    action: 'aws:runCommand'
    maxAttempts: 1
    timeoutSeconds: 300
    inputs:
      InstanceIds:
        - '{{ startInstances.InstanceIds }}'
      DocumentName: AWS-RunShellScript
      Parameters:
        commands:
          - |-
            cat << 'EOF' >> ./dcv.conf
            [license]
            [log]
            [display]
            [connectivity]
            web-port=8080
            web-use-https=false
            [security]
            authentication="none"
            EOF
  - name: mv_dcv_conf
    action: 'aws:runCommand'
    maxAttempts: 1
    timeoutSeconds: 300
    inputs:
      InstanceIds:
        - '{{ startInstances.InstanceIds }}'
      DocumentName: AWS-RunShellScript
      Parameters:
        commands:
          - mv ./dcv.conf /etc/dcv/dcv.conf
  - name: install_python_and_pip
    action: 'aws:runCommand'
    maxAttempts: 1
    timeoutSeconds: 300
    inputs:
      InstanceIds:
        - '{{ startInstances.InstanceIds }}'
      DocumentName: AWS-RunShellScript
      Parameters:
        commands:
          - apt-get install -y python3 python3-dev python3-pip
  - name: update_pip
    action: 'aws:runCommand'
    maxAttempts: 1
    timeoutSeconds: 300
    inputs:
      InstanceIds:
        - '{{ startInstances.InstanceIds }}'
      DocumentName: AWS-RunShellScript
      Parameters:
        commands:
          - pip install --upgrade pip
  - name: add_cloud9_ssh_key
    action: 'aws:runCommand'
    maxAttempts: 1
    timeoutSeconds: 300
    inputs:
      InstanceIds:
        - '{{ startInstances.InstanceIds }}'
      DocumentName: AWS-RunShellScript
      Parameters:
        commands:
          - 'echo {{ cloud9PublicKey }} >> /home/ubuntu/.ssh/authorized_keys'
  - name: setup_cloud9
    action: 'aws:runCommand'
    maxAttempts: 1
    timeoutSeconds: 300
    inputs:
      InstanceIds:
        - '{{ startInstances.InstanceIds }}'
      DocumentName: AWS-RunShellScript
      Parameters:
        commands:
          - 'chmod u=rwx,g=rx,o=rx /home/ubuntu'
          - apt-get -y install python
          - 'runuser -l ubuntu -c ''curl -o- https://raw.githubusercontent.com/creationix/nvm/v0.33.0/install.sh | bash'''
          - echo 'source /home/ubuntu/.nvm/nvm.sh' >> /home/ubuntu/.bash_profile
          - sudo -iu ubuntu nvm install v12.22.11
          - 'runuser -l ubuntu -c ''curl -L https://raw.githubusercontent.com/c9/install/master/install.sh | bash'''
  - name: install_ros_foxy
    action: 'aws:runCommand'
    maxAttempts: 1
    timeoutSeconds: 300
    inputs:
      InstanceIds:
        - '{{ startInstances.InstanceIds }}'
      DocumentName: AWS-RunShellScript
      Parameters:
        commands:
          - 'git clone https://github.com/aws-robotics/aws-robomaker-sample-application-helloworld.git -b ros2 && cd aws-robomaker-sample-application-helloworld/ && bash -c scripts/setup.sh --install-ros foxy'
          - rm -rf aws-robomaker-sample-application-helloworld/
          - 'echo "[[ -e /opt/ros/foxy/setup.sh ]] && source /opt/ros/foxy/setup.sh" >> /home/ubuntu/.bash_profile'
  - name: install_docker
    action: 'aws:runCommand'
    maxAttempts: 1
    timeoutSeconds: 300
    inputs:
      InstanceIds:
        - '{{ startInstances.InstanceIds }}'
      DocumentName: AWS-RunShellScript
      Parameters:
        commands:
          - 'curl -fsSL https://download.docker.com/linux/ubuntu/gpg | sudo gpg --dearmor -o /usr/share/keyrings/docker-archive-keyring.gpg'
          - 'echo "deb [arch=$(dpkg --print-architecture) signed-by=/usr/share/keyrings/docker-archive-keyring.gpg] https://download.docker.com/linux/ubuntu $(lsb_release -cs) stable" | sudo tee /etc/apt/sources.list.d/docker.list > /dev/null'
          - apt-get update
- apt-get -y install docker-ce docker-ce-cli containerd.io- 粘贴此内容后,请选择屏幕右下角的 Create automation(创建自动化)。创建文档后,您就可以开始执行自动化了。
- 在 AWS Systems Manager 控制台的 Documents(文档)屏幕中,选择 Owned by me(由我拥有)选项卡以导航到您的文档。
- 选择在上一步中创建的文档的名称,您将转到文档详细信息屏幕。

图 7:执行自动化工作流。
- 选择 Execute automation(执行自动化)开始执行文档。
- 在执行自动化屏幕的 Input parameters(输入参数)下,您将找到四个可以配置的输入。第一个是 instanceType,这是您要用于开发环境的 EC2 实例类型。默认情况下,它设置为 c5.2xlarge*。(*注意:如果您通过 AWS Academy 访问 AWS,则需要更改为 c4.large)
- 下一个配置是 Amazon Elastic Block Store(EBS)卷存储大小,默认为 50。
- 第三个参数 Amazon 资源名称(ARN)没有默认值。这是在本文的 Prerequisites(先决条件)部分中创建的实例配置文件。您可以在 IAM 控制台的角色摘要中找到您的实例配置文件 ARN。
- 最后一个参数 cloud9PublicKey 是您之前复制的自定义 AWS Cloud9 SSH 公钥。将完整的 SSH 公钥粘贴到此输入中。

图 8:更新输入参数。
- 配置自动化后,请选择屏幕右下角的 Execute(执行)以开始自动化。
- 自动化大约需要 30 分钟才能完成所有步骤。
- 自动化完成后,下拉 Outputs(输出)部分,并复制创建的实例 ID 以供下一步使用。

图 9:复制输出详细信息。
将 Amazon EC2 实例集成到 AWS Cloud9 IDE 中
创建 Amazon EC2 实例后,您现在可以在 AWS Cloud9 中使用该实例。首先,您需要对 Amazon EC2 实例的安全组略作修改。
- 导航到您创建实例时所在区域中的 Amazon EC2 控制台。从左侧导航栏中选择 Instances(实例),导航到实例屏幕。
- 按您在上述步骤 18 中复制的 ID 筛选实例,然后选择已创建的实例。
- 从该屏幕复制详细信息屏幕中的 Public IPv4 DNS(公有 IPv4 DNS),并将其存储以备将来使用。
- 打开 Amazon EC2 实例的 Security(安全)选项卡,然后选择附加的 security group(安全组)以打开安全组控制台。
- 在 Inbound Rules(入站规则)下,您将需要允许端口 22 上的流量,以便 AWS Cloud9 能够通过 SSH 连接到您的实例。您可以通过参考本文的 AWS Cloud9 入站 SSH IP 地址范围来限制 IP。但是,如果您想从个人计算机通过 SSH 连接到此实例,则需要允许端口 22 上的所有流量。
- 或者,如果要连接到在主机上运行的 NICE DCV 会话,则需要允许端口 8080 上以及来自所有位置的入站流量。
- 选择 Edit inbound rules(编辑入站规则)以进行修改。
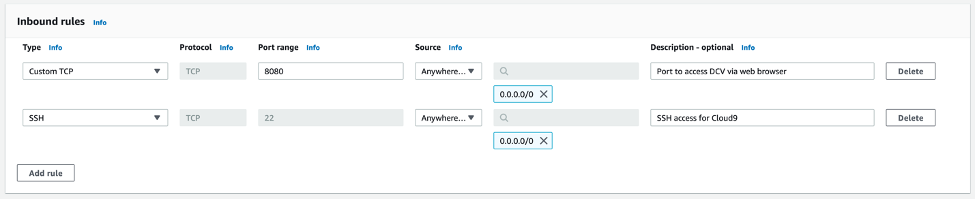
图 10:更新入站规则。
- 修改入站规则后,保存配置并导航到您创建实例时所在的区域中的 AWS Cloud9 控制台(https://us-east-1.console.aws.amazon.com/cloud9/home?region=us-east-1)。
- 从左侧导航栏中选择 Your environments(您的环境)。从环境列表屏幕中选择 Create environment(创建环境)。
- 命名您的环境,然后选择 Next step(下一步)。
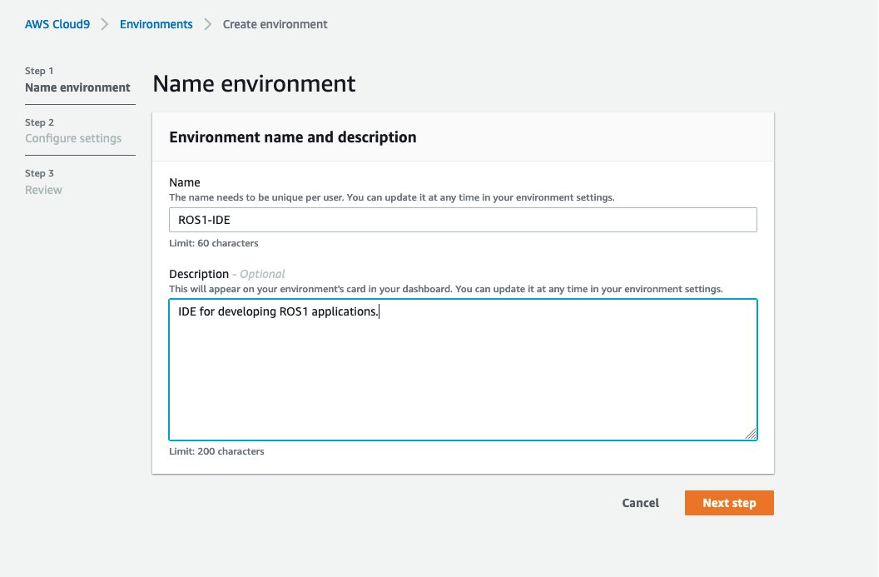
图 11:命名 AWS Cloud9 环境。
- 在 Environment type(环境类型)下,选择 Create and run-in remote server(SSH connection)[在远程服务器(SSH 连接)中创建并运行]。
- 在 User(用户)下输入 ubuntu,在 Host(主机)下输入之前复制的 EC2 实例的 Public IPv4 DNS(公有 IPv4 DNS),对于 port(端口),默认的 22 足够。
- 展开 Advanced settings(高级设置)部分。在 Node.js binary path(Node.js 二进制路径)下输入以下内容:/home/ubuntu/.nvm/versions/node/v12.22.11/bin/node
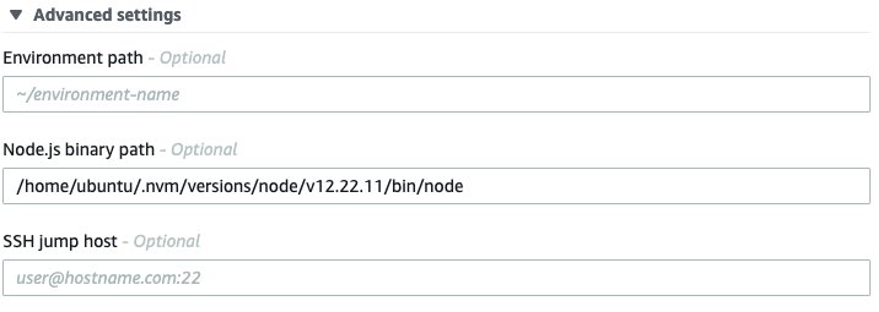
图 12:更新高级设置。
- 选择 Next step(下一步),然后在查看详细信息后选择 Create environment(创建环境)。
(可选)配置 NICE DCV
您创建的 Ubuntu 实例附带了完整的 Ubuntu 桌面安装,以及 NICE DCV 的安装。连接到 NICE DCV 将使您能够使用 Gazebo 等工具与您的模拟进行交互。要连接到 NICE DCV,每次重启实例时,都需要创建一个 NICE DCV 会话。使用此脚本,您可以启动和启用 NICE DCV 服务器,创建会话以及生成预览 URL。
cat << 'EOF' >> dcvsession
#!/bin/bash
dbus-launch gsettings set org.gnome.desktop.lockdown disable-lock-screen true
dbus-launch gsettings set com.ubuntu.update-notifier no-show-notifications true
dbus-launch gsettings set org.gnome.shell enabled-extensions "['ubuntu-dock@ubuntu.com']"
sudo  /sbin/iptables -A INPUT -p tcp ! -s localhost --dport 8080 -j DROP
sudo systemctl start dcvserver
sudo systemctl enable dcvserver
dcv create-session my-session --owner ubuntu &> /dev/null
sudo apt-get install -y jq &> /dev/null
echo DCV preview URL : https://$C9_PID.vfs.cloud9.$(curl --silent http://169.254.169.254/latest/dynamic/instance-identity/document | jq -r .region).amazonaws.com
EOF- 要使用此脚本,请将上述内容粘贴到 IDE 中的终端内,然后输入以下内容:
chmod 755 ./dcvsession - 之后,您可以运行:
./dcvsession - 这将输出一个可用来查看 NICE DCV 会话的 URL。在需要该 URL 的任何时候或在实例重启时运行此脚本。
- 复制该 URL,打开新的浏览器选项卡,将该 URL 粘贴到地址栏中,然后按 <Enter>。您应该会看到 Ubuntu 桌面出现在该选项卡中。
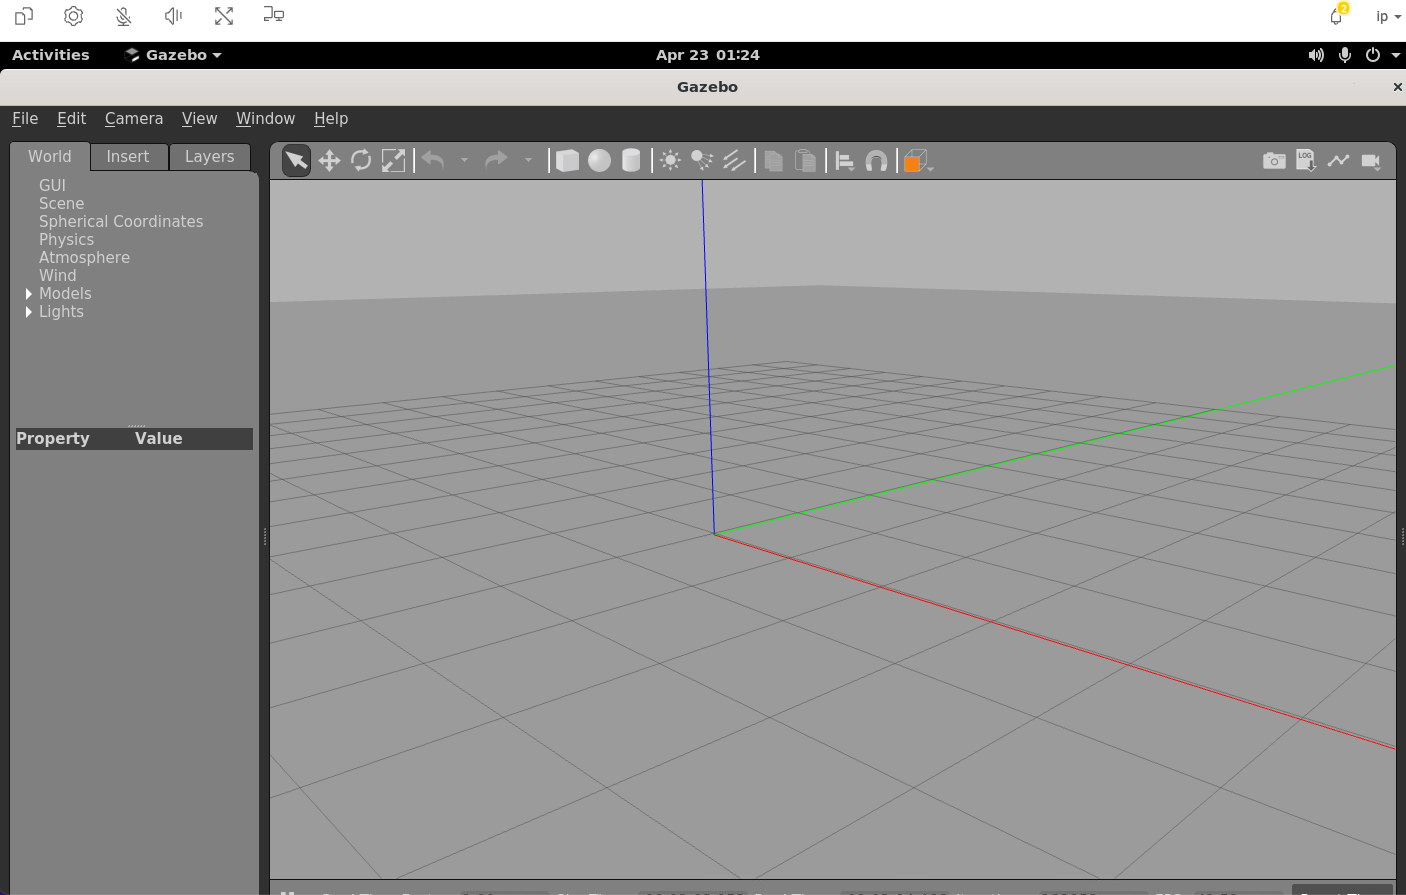
图 13:启动了采用 Gazebo 的 NICE DCV。
开始构建
完成这些步骤后,您可以开始使用参考应用程序快速开发机器人应用程序或上传自己的文件。然后,探索您的应用程序并使用虚拟桌面进行迭代,或使用 Gazebo 启动模拟,在 rqt 中可视化数据,或使用其他机器人工具在云中内省数据。
清理
使用完 IDE 后,要清理所有使用的资源,请打开 AWS Cloud9 控制台。
- 关闭开发环境浏览器选项卡。
- 您可以将其留待其他时间使用,也可以将其删除,方法是从 AWS Cloud9 菜单中选择 Your environments(您的环境),从列表中选择您的环境,然后选择 Delete(删除)。
结论
在这篇博客中,您现在可以为基于 ROS 的机器人开发配置 AWS Cloud9。AWS Cloud9 开发环境在云中构建,使您能够快速开始对模拟的机器人进行构建和迭代。要了解有关 AWS Cloud9 的更多信息,请访问 AWS Cloud9 网页。