이 글은 AWS Amplify 개발 도구를 사용하여 AWS 클라우드 기반 Android 모바일 앱을 제작하는 방법에 대한 실습 시리즈입니다.
이 글에서는 1부에 이어 Android 앱에 고급 기능을 추가합니다. 다루는 내용은 다음과 같습니다.
사전 조건
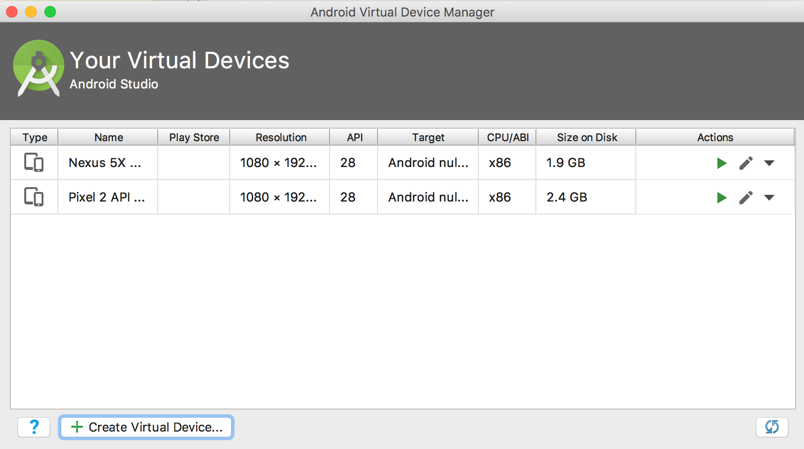
Android 프로젝트를 작성하려면 워크 스테이션에 Java JDK가 설치되어 있어야 합니다. Android Studio를 다운로드하여 설치하고 Android SDK 관리자에서 Android 6.0 SDK(API 레벨 23 이상)를 다운로드합니다.
또한 에뮬레이터 이미지도 다운로드합니다. 이를 위해 Android Studio에서 AVD Manager를 선택해야 합니다. + Create Virtual Device를 선택하고 지침에 따라 설치를 완료합니다.
1 부에서 계속
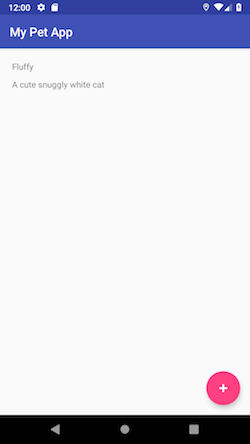
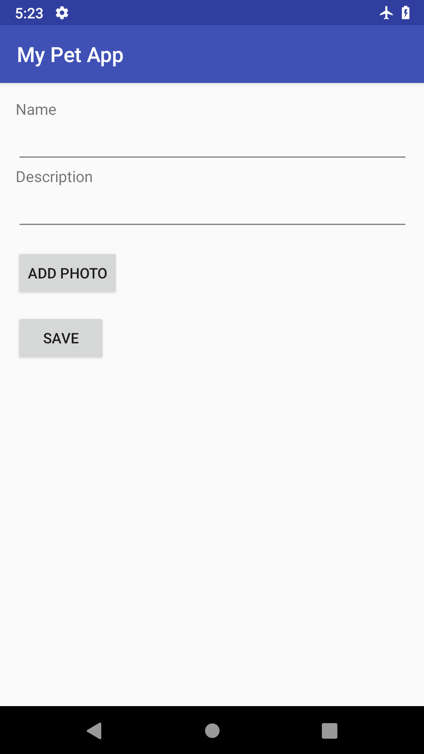
1부에서 우리는 애완 동물의 목록을 표시하고 새로운 애완 동물을 추가할 수 있는 Android 앱을 만들었습니다. 새 애완 동물을 추가하면 앱은 다음과 같은 형태가 됩니다.
최적 업데이트 및 오프라인 지원
최적 업데이트 기능을 통해 반응성이 뛰어난 최종 사용자 환경을 제공할 수 있습니다. 서버가 결국 우리가 기대하는 데이터를 반환하는 것처럼 동작하도록 UI를 구성합니다. 업데이트가 성공적이라는 것은 낙관적입니다.
이 섹션에서는 변형 이후에 메모리에 반환될 것으로 예상되는 데이터를 만들고 Android 디바이스가 관리하는 영구 SQL 저장소에 작성합니다. 그런 다음, 서버 업데이트가 반환되면 SDK가 데이터를 통합합니다.
이 접근법은 데이터 수정을 시도하는 동안 인터넷 연결이 끊기는 시나리오에 매우 적합합니다. AWS AppSync SDK는 앱이 온라인 상태가 되면 자동으로 다시 연결하여 변형을 전송합니다.
이제 실습해 봅시다. AddPetActivity.java를 열고 save()가 끝날 때 오프라인 지원을 추가하십시오.
private void save() {
      // ... Other code ...

      ClientFactory.appSyncClient().mutate(addPetMutation).
              refetchQueries(ListPetsQuery.builder().build()).
              enqueue(mutateCallback);

      // Enables offline support via an optimistic update
      // Add to event list while offline or before request returns
      addPetOffline(input);
}
이제 addPetOffline 메서드를 추가해 봅시다. 우리는 로컬 캐시에 기록한 후에 연결성을 확인하고 추가 작업이 성공적인 것처럼 활동을 종료합니다.
private void addPetOffline(CreatePetInput input) {

  final CreatePetMutation.CreatePet expected =
          new CreatePetMutation.CreatePet(
                  "Pet",
                  UUID.randomUUID().toString(),
                  input.name(),
                  input.description());


  final AWSAppSyncClient awsAppSyncClient = ClientFactory.appSyncClient();
  final ListPetsQuery listEventsQuery = ListPetsQuery.builder().build();


  awsAppSyncClient.query(listEventsQuery)
          .responseFetcher(AppSyncResponseFetchers.CACHE_ONLY)
          .enqueue(new GraphQLCall.Callback<ListPetsQuery.Data>() {
              @Override
              public void onResponse(@Nonnull Response<ListPetsQuery.Data> response) {
                  List<ListPetsQuery.Item> items = new ArrayList<>();
                  if (response.data() != null) {
                      items.addAll(response.data().listPets().items());
                  }

                  items.add(new ListPetsQuery.Item(expected.__typename(),
                          expected.id(),
                          expected.name(),
                          expected.description()));
                  ListPetsQuery.Data data = new ListPetsQuery.Data(new ListPetsQuery.ListPets("ModelPetConnection", items, null));
                  awsAppSyncClient.getStore().write(listEventsQuery, data).enqueue(null);
                  Log.d(TAG, "Successfully wrote item to local store while being offline.");

                  finishIfOffline();
              }

              @Override
              public void onFailure(@Nonnull ApolloException e) {
                  Log.e(TAG, "Failed to update event query list.", e);
              }
          });
    }

    private void finishIfOffline(){
        // Close the add activity when offline otherwise allow callback to close
        ConnectivityManager cm =
                (ConnectivityManager) getApplicationContext().getSystemService(Context.CONNECTIVITY_SERVICE);

        NetworkInfo activeNetwork = cm.getActiveNetworkInfo();
        boolean isConnected = activeNetwork != null &&
                activeNetwork.isConnectedOrConnecting();

        if (!isConnected) {
            Log.d(TAG, "App is offline. Returning to MainActivity .");
            finish();
        }
    }
query() 메서드가 CACHE_AND_NETWORK 방식을 사용하기 때문에 MainActivity를 변경할 필요가 없습니다. 네트워크 호출을 하는 동안 먼저 로컬 캐시에서 읽습니다. 이전에 추가한 애완 동물은 최적 업데이트 때문에 이미 로컬 캐시에 있습니다.
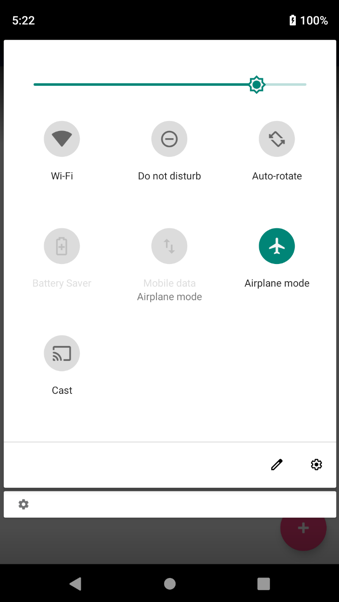
앱을 구축하고 실행합니다. 로그인 한 후 비행기 모드를 켭니다.
앱으로 돌아가서 새 항목을 추가하십시오. UI 환경은 이전에 온라인 상태였던 때와 동일해야 합니다. 이름 및 설명을 입력합니다.
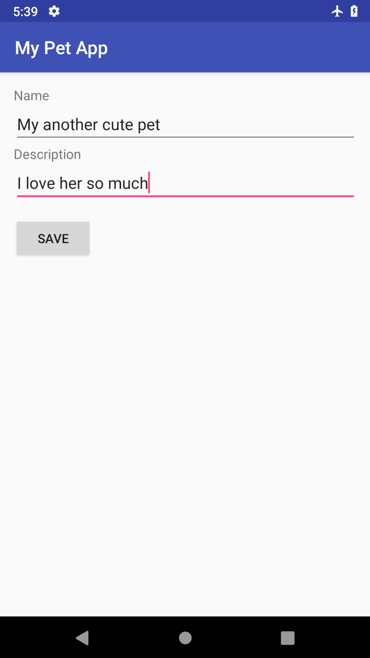
Save를 선택합니다. 앱에 목록의 두 번째 항목이 표시되어야 합니다.

이제 비행기 모드를 해제하십시오. 항목은 자동으로 저장되어야 합니다. 앱을 닫았다가 다시 열어서 동일한 두 항목이 계속 표시되는지 확인하면 저장이 완료되었는지 확인할 수 있습니다.
구독 기능
AWS AppSync를 사용하면 실시간 알림을 위해 구독을 사용할 수 있습니다.
이 섹션에서는 구독을 사용하여 다른 사람이 새 애완 동물을 추가할 때 즉시 알려줍니다. 이를 위해 MainActivity.java 클래스의 끝에 다음 블록을 추가해 보겠습니다.
private AppSyncSubscriptionCall subscriptionWatcher;

    private void subscribe(){
        OnCreatePetSubscription subscription = OnCreatePetSubscription.builder().build();
        subscriptionWatcher = ClientFactory.appSyncClient().subscribe(subscription);
        subscriptionWatcher.execute(subCallback);
    }

    private AppSyncSubscriptionCall.Callback subCallback = new AppSyncSubscriptionCall.Callback() {
        @Override
        public void onResponse(@Nonnull Response response) {
            Log.i("Response", "Received subscription notification: " + response.data().toString());

            // Update UI with the newly added item
            OnCreatePetSubscription.OnCreatePet data = ((OnCreatePetSubscription.Data)response.data()).onCreatePet();
            final ListPetsQuery.Item addedItem = new ListPetsQuery.Item(data.__typename(), data.id(), data.name(), data.description());

            runOnUiThread(new Runnable() {
                @Override
                public void run() {
                    mPets.add(addedItem);
                    mAdapter.notifyItemInserted(mPets.size() - 1);
                }
            });
        }

        @Override
        public void onFailure(@Nonnull ApolloException e) {
            Log.e("Error", e.toString());
        }

        @Override
        public void onCompleted() {
            Log.i("Completed", "Subscription completed");
        }
    };
그런 다음, onResume 메서드를 수정하여 마지막에 subscribe를 호출하여 새 애완 동물 생성을 구독하십시오. 또한 활동이 끝나면 구독을 취소해야 합니다.
@Override
public void onResume() {
      super.onResume();

      query();
      subscribe();
}

@Override
protected void onStop() {
    super.onStop();
    subscriptionWatcher.cancel();
}
이제 테스트해 봅시다. 에뮬레이터에서 앱을 구축하고 실행하십시오.
다음으로 두 번째 에뮬레이터를 시작합시다. 두 번째 에뮬레이터를 시작하려면 기본값을 선택 취소해야 합니다. (실행을 선택하고 구성 편집을 선택하십시오. Android 앱에서 앱을 선택하고 향후 출시시 같은 디바이스 사용 확인란의 선택을 해제하십시오.
또한 AVD 관리자에 다른 에뮬레이터 디바이스 유형이 있는지 확인하십시오. 앱을 실행하고 두 번째 에뮬레이터 디바이스를 선택한 다음 두 개의 에뮬레이터에서 앱을 나란히 실행하십시오. 두 디바이스에서 애완 동물의 목록을 확인하도록 두 기기에 모두 로그인해야 합니다.
앱 중 하나에 다른 애완 동물을 추가하고 다른 앱에 표시되는지 확인합니다. 짠!
스토리지를 이용한 작업
AWS Amplify를 사용하면 Amazon S3를 사용하여 객체 스토리지 지원을 쉽게 추가할 수 있습니다. AWS Amplify는 자동으로 버킷 프로비저닝 및 권한 구성을 관리합니다.
AWS Amplify 업데이트
시작하려면 ./amplify/backend/api/<PROJECTNAME>/schema.graphql에서 로컬 스키마를 수정하여 사진 문자열 속성을 추가하십시오.
type Pet @model {
  id: ID!
  name: String!
  description: String
  photo: String
}
그런 다음, 루트 디렉터리로 이동하여 명령줄에서 다음을 실행하십시오.
다음 질문에 답하십시오.
- 아래에 언급된 서비스 중 하나를 선택: 콘텐츠(이미지, 오디오, 비디오 등)
- 프로젝트에서 이 카테고리에 레이블을 지정하는 데 사용할 리소스에 친근한 이름 지정: MyPetAppResources
- 버킷 이름 입력: mypetapp1246e0cde8074f78b94363dbe73f8adfdsfds(또는 고유 한 항목)
- 액세스 권한: 인증 사용자만
- 인증된 사용자에게 필요한 액세스 유형: 읽기/쓰기
그런 다음, 아래와 같이 실행합니다.
코드를 업데이트하고 GraphQL 문을 재생성할지 여부를 묻는 메시지가 나타나면 네를 선택합니다. Enter를 선택하고 AWS CloudFormation 업데이트가 완료 될 때까지 기다립니다. 이 작업에는 몇 분이 걸립니다.
스토리지 종속성 추가
그 동안, 프런트엔드 클라이언트 코드를 업데이트해 봅시다.
AndroidManifest.xml을 열고 <application>에 TransferService를 추가합니다.
<application>
    <!-- ...other code... -->
    <service android:name="com.amazonaws.mobileconnectors.s3.transferutility.TransferService" />
</application>
앱의 build.gradle을 열고 Amazon S3에 대한 종속성을 추가합니다.
implementation 'com.amazonaws:aws-android-sdk-s3:2.7.+'
사진 선택 코드 추가
그런 다음, AddPetActivity.java를 열고 사진 선택 코드를 추가합니다.
 // Photo selector application code.
  private static int RESULT_LOAD_IMAGE = 1;
  private String photoPath;

  public void choosePhoto() {
      Intent i = new Intent(Intent.ACTION_PICK, android.provider.MediaStore.Images.Media.EXTERNAL_CONTENT_URI);
      startActivityForResult(i, RESULT_LOAD_IMAGE);
  }

  @Override
  protected void onActivityResult(int requestCode, int resultCode, Intent data) {
      super.onActivityResult(requestCode, resultCode, data);
      if (requestCode == RESULT_LOAD_IMAGE && resultCode == RESULT_OK && null != data) {
          Uri selectedImage = data.getData();
          String[] filePathColumn = {MediaStore.Images.Media.DATA};
          Cursor cursor = getContentResolver().query(selectedImage,
                  filePathColumn, null, null, null);
          cursor.moveToFirst();
          int columnIndex = cursor.getColumnIndex(filePathColumn[0]);
          String picturePath = cursor.getString(columnIndex);
          cursor.close();
          // String picturePath contains the path of selected Image
          photoPath = picturePath;
      }
  }
UI에서 업로드 사진을 호출해야 합니다. activity_add_pet.xml을 열고 Save 버튼 앞에 버튼을 추가하십시오.
<LinearLayout>
 <!-- ... other code... -->
  <Button
      android:layout_width="wrap_content"
      android:layout_height="wrap_content"
      android:id="@+id/btn_add_photo"
      android:layout_marginTop="15dp"
      android:text="Add Photo"/>

  <Button
      android:layout_width="wrap_content"
      android:layout_height="wrap_content"
      android:id="@+id/btn_save"
      android:layout_marginTop="15dp"
      android:text="Save"/>
</LinearLayout>
이제 choosePhoto() 메서드에 이 버튼을 연결합시다. AddPetActivity.java로 돌아가서 onCreate를 수정하여 클릭 리스너를 Save 버튼에 첨부합니다.
@Override
    protected void onCreate(Bundle savedInstanceState) {
        super.onCreate(savedInstanceState);
        setContentView(R.layout.activity_add_pet);

        Button btnAddItem = findViewById(R.id.btn_save);
        btnAddItem.setOnClickListener(new View.OnClickListener() {

            @Override
            public void onClick(View view) {
                    save();
            }
        });

        Button btnAddPhoto = findViewById(R.id.btn_add_photo);
        btnAddPhoto.setOnClickListener(new View.OnClickListener() {

            @Override
            public void onClick(View view) {
                choosePhoto();
            }
        });
    }
앱을 구축하고 실행하여 사진 선택 버튼이 작동하는지 확인합니다.
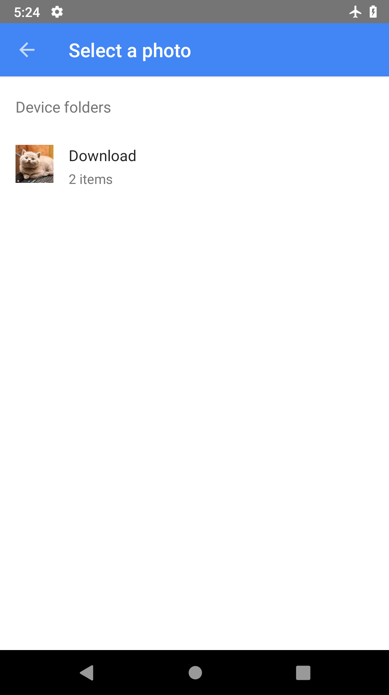
ADD PHOTO를 선택합니다. 갤러리에서 사진을 선택할 수 있어야 합니다. (에뮬레이터에 사진이 없으면 브라우저를 열고 인터넷에서 일부 사진을 다운로드하십시오.)
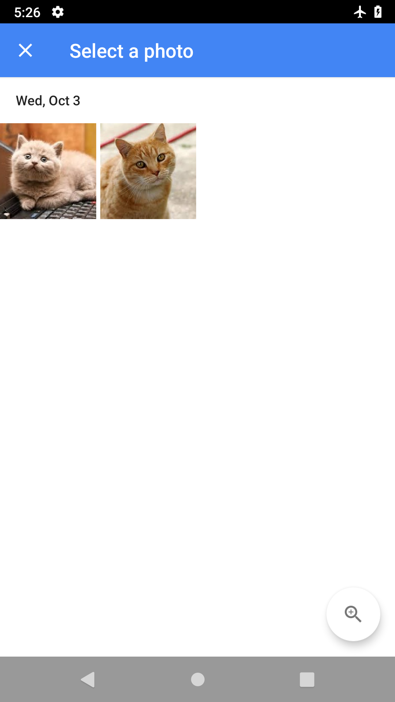
사진을 선택한 후에는 ADD 화면으로 다시 이동해야 합니다.
Amazon S3 사진 업로드 코드 추가
이제 사진을 선택할 수 있으므로 사진을 업로드하여 백엔드에 저장해야 합니다. TransferUtility를 사용하여 Amazon S3 파일 업로드 및 다운로드 작업을 처리할 것입니다. 초기화 코드를ClientFactory.java class에 추가합시다.
private static volatile TransferUtility transferUtility;

public static synchronized void init(final Context context) {
    // ... appsyncClient initialization code ...

    if (transferUtility == null) {
        transferUtility = TransferUtility.builder()
                .context(context)
                .awsConfiguration(AWSMobileClient.getInstance().getConfiguration())
                .s3Client(new AmazonS3Client(AWSMobileClient.getInstance()))
                .build();

    }
}
public static synchronized TransferUtility transferUtility() {
        return transferUtility;
}
그런 다음, AddPetActivity.java에서 TransferUtility를 이용해 사진을 업로드하는 코드를 추가해 보겠습니다.
private String getS3Key(String localPath) {
    //We have read and write ability under the public folder
    return "public/" + new File(localPath).getName();
}

public void uploadWithTransferUtility(String localPath) {
    String key = getS3Key(localPath);

    Log.d(TAG, "Uploading file from " + localPath + " to " + key);

    TransferObserver uploadObserver =
            ClientFactory.transferUtility().upload(
                    key,
                    new File(localPath));

    // Attach a listener to the observer to get state update and progress notifications
    uploadObserver.setTransferListener(new TransferListener() {

        @Override
        public void onStateChanged(int id, TransferState state) {
            if (TransferState.COMPLETED == state) {
                // Handle a completed upload.
                Log.d(TAG, "Upload is completed. ");

                // Upload is successful. Save the rest and send the mutation to server.
                save();
            }
        }

        @Override
        public void onProgressChanged(int id, long bytesCurrent, long bytesTotal) {
            float percentDonef = ((float) bytesCurrent / (float) bytesTotal) * 100;
            int percentDone = (int)percentDonef;

            Log.d(TAG, "ID:" + id + " bytesCurrent: " + bytesCurrent
                    + " bytesTotal: " + bytesTotal + " " + percentDone + "%");
        }

        @Override
        public void onError(int id, Exception ex) {
            // Handle errors
            Log.e(TAG, "Failed to upload photo. ", ex);

            runOnUiThread(new Runnable() {
                @Override
                public void run() {
                    Toast.makeText(AddPetActivity.this, "Failed to upload photo", Toast.LENGTH_LONG).show();
                }
            });
        }

    });
}
사진 저장
애완 동물 객체에 새 속성을 추가했으므로 이를 수용하도록 있도록 코드를 수정해야 합니다. AddPetActivity.java에서 다음과 같은 메서드를 추출하여 사진이 선택되었는지 여부에 따라 다른 유형의 CreatePetInput을 생성합니다.
private CreatePetInput getCreatePetInput() {
    final String name = ((EditText) findViewById(R.id.editTxt_name)).getText().toString();
    final String description = ((EditText) findViewById(R.id.editText_description)).getText().toString();

    if (photoPath != null && !photoPath.isEmpty()){
        return CreatePetInput.builder()
                .name(name)
                .description(description)
                .photo(getS3Key(photoPath)).build();
    } else {
        return CreatePetInput.builder()
                .name(name)
                .description(description)
                .build();
    }
}
그런 다음, 추출된 메소드를 호출하도록 save()를 수정합니다.
private void save() {
    CreatePetInput input = getCreatePetInput();

    CreatePetMutation addPetMutation = CreatePetMutation.builder()
            .input(input)
            .build();

    ClientFactory.appSyncClient().mutate(addPetMutation).
            refetchQueries(ListPetsQuery.builder().build()).
            enqueue(mutateCallback);

    // Enables offline support via an optimistic update
    // Add to event list while offline or before request returns
    addPetOffline(input);
}
CreatePet 변형을 변경했으므로 addPetOffline 코드도 수정해야 합니다.
private void addPetOffline(final CreatePetInput input) {

    final CreatePetMutation.CreatePet expected =
            new CreatePetMutation.CreatePet(
                    "Pet",
                    UUID.randomUUID().toString(),
                    input.name(),
                    input.description(),
                    input.photo());

    final AWSAppSyncClient awsAppSyncClient = ClientFactory.appSyncClient();
    final ListPetsQuery listPetsQuery = ListPetsQuery.builder().build();

    awsAppSyncClient.query(listPetsQuery)
            .responseFetcher(AppSyncResponseFetchers.CACHE_ONLY)
            .enqueue(new GraphQLCall.Callback<ListPetsQuery.Data>() {
                @Override
                public void onResponse(@Nonnull Response<ListPetsQuery.Data> response) {
                    List<ListPetsQuery.Item> items = new ArrayList<>();
                    if (response.data() != null) {
                        items.addAll(response.data().listPets().items());
                    }

                    items.add(new ListPetsQuery.Item(expected.__typename(),
                            expected.id(),
                            expected.name(),
                            expected.description(),
                            expected.photo()));
                    ListPetsQuery.Data data = new ListPetsQuery.Data(
                            new ListPetsQuery.ListPets("ModelPetConnection", items, null));
                    awsAppSyncClient.getStore().write(listPetsQuery, data).enqueue(null);
                    Log.d(TAG, "Successfully wrote item to local store while being offline.");

                    finishIfOffline();
                }

                @Override
                public void onFailure(@Nonnull ApolloException e) {
                    Log.e(TAG, "Failed to update event query list.", e);
                }
            });
    }
그런 다음, uploadAndSave()라는 새로운 메서드를 만들어 사진 및 사진 저장 작업을 모두 처리할 수 있습니다.
private void uploadAndSave(){

    if (photoPath != null) {
      // For higher Android levels, we need to check permission at runtime
      if (ContextCompat.checkSelfPermission(this, Manifest.permission.READ_EXTERNAL_STORAGE)
              != PackageManager.PERMISSION_GRANTED) {
          // Permission is not granted
          Log.d(TAG, "READ_EXTERNAL_STORAGE permission not granted! Requesting...");
          ActivityCompat.requestPermissions(this,
                  new String[]{Manifest.permission.READ_EXTERNAL_STORAGE},
                  1);
      }

      // Upload a photo first. We will only call save on its successful callback.
      uploadWithTransferUtility(photoPath);
    } else {
        save();
    }
}
이제 저장 버튼을 선택하면 uploadAndSave() 함수를 호출할 수 있습니다.
protected void onCreate(Bundle savedInstanceState) {
    // ... other code ...
    btnAddItem.setOnClickListener(new View.OnClickListener() {

        @Override
        public void onClick(View view) {
            uploadAndSave();
        }
    });
또한 photo 속성이 새로 추가되었기 때문에 MainActivity.java에서 구독 콜백을 업데이트해야 합니다.
private AppSyncSubscriptionCall.Callback subCallback = new AppSyncSubscriptionCall.Callback() {
        @Override
        public void onResponse(@Nonnull Response response) {
            Log.i("Response", "Received subscription notification: " + response.data().toString());

            // Update UI with the newly added item
            OnCreatePetSubscription.OnCreatePet data = ((OnCreatePetSubscription.Data)response.data()).onCreatePet();

            final ListPetsQuery.Item addedItem =
                    new ListPetsQuery.Item(data.__typename(), data.id(), data.name(), data.description(), data.photo());

            runOnUiThread(new Runnable() {
                @Override
                public void run() {
                    mPets.add(addedItem);
                    mAdapter.notifyItemInserted(mPets.size() - 1);
                }
            });
        }
        //...other event handlers ...
    };
사진 다운로드 및 표시
이제 사진을 저장하는 기능을 구현 했으므로 사진이 다운로드되고 표시되는지 확인합시다.
recyclerview_row.xml을 열고, <ImageView>를 추가한 후 레이아웃을 다음과 같이 수정합니다.
<?xml version="1.0" encoding="utf-8"?>
<LinearLayout
    xmlns:android="http://schemas.android.com/apk/res/android"
    android:layout_width="match_parent"
    android:layout_height="wrap_content"
    android:orientation="horizontal"
    android:padding="10dp"
    android:weightSum="100">

    <ImageView
        android:id="@+id/image_view"
        android:layout_width="0dp"
        android:layout_height="match_parent"
        android:maxHeight="200dp"
        android:layout_weight="30"
        />

    <LinearLayout
        android:layout_width="0dp"
        android:layout_height="match_parent"
        android:orientation="vertical"
        android:layout_weight="70"
        android:layout_marginTop="10dp">

        <TextView
            android:id="@+id/txt_name"
            android:layout_width="match_parent"
            android:layout_height="wrap_content"
            android:textSize="15dp"
            android:paddingLeft="10dp" />

        <TextView
            android:id="@+id/txt_description"
            android:layout_width="match_parent"
            android:layout_height="wrap_content"
            android:textSize="15dp"
            android:paddingLeft="10dp" />
    </LinearLayout>

</LinearLayout>
MyAdapter.java를 여십시오. 사진 속성에 해당하는 코드를 추가하고 사진이 있는 경우 사진을 다운로드하십시오.
public class MyAdapter extends RecyclerView.Adapter<MyAdapter.ViewHolder> {
    // ... other code ...

    // stores and recycles views as they are scrolled off screen
    class ViewHolder extends RecyclerView.ViewHolder {
        TextView txt_name;
        TextView txt_description;
        ImageView image_view;
        String localUrl;

        ViewHolder(View itemView) {
            super(itemView);
            txt_name = itemView.findViewById(R.id.txt_name);
            txt_description = itemView.findViewById(R.id.txt_description);
            image_view = itemView.findViewById(R.id.image_view);
        }

        void bindData(ListPetsQuery.Item item) {
            txt_name.setText(item.name());
            txt_description.setText(item.description());

            if (item.photo() != null) {
                if (localUrl == null) {
                    downloadWithTransferUtility(item.photo());
                } else {
                    image_view.setImageBitmap(BitmapFactory.decodeFile(localUrl));
                }
            }
            else
                image_view.setImageBitmap(null);
        }

        private void downloadWithTransferUtility(final String photo) {
            final String localPath = Environment.getExternalStoragePublicDirectory(
                    Environment.DIRECTORY_DOWNLOADS).getAbsolutePath() + "/" + photo;

            TransferObserver downloadObserver =
                    ClientFactory.transferUtility().download(
                            photo,
                            new File(localPath));

            // Attach a listener to the observer to get state update and progress notifications
            downloadObserver.setTransferListener(new TransferListener() {

                @Override
                public void onStateChanged(int id, TransferState state) {
                    if (TransferState.COMPLETED == state) {
                        // Handle a completed upload.
                        localUrl = localPath;
                        image_view.setImageBitmap(BitmapFactory.decodeFile(localPath));
                    }
                }

                @Override
                public void onProgressChanged(int id, long bytesCurrent, long bytesTotal) {
                    float percentDonef = ((float) bytesCurrent / (float) bytesTotal) * 100;
                    int percentDone = (int) percentDonef;

                    Log.d(TAG, "   ID:" + id + "   bytesCurrent: " + bytesCurrent + "   bytesTotal: " + bytesTotal + " " + percentDone + "%");
                }

                @Override
                public void onError(int id, Exception ex) {
                    // Handle errors
                    Log.e(TAG, "Unable to download the file.", ex);
                }
            });
        }
    }
}
사진을 다운로드하기 때문에 권한을 부여 받을 수 있어야 합니다. MainActivity.java로 이동하여 query()에서 권한 찾기 블록을 추가합니다.
public void query(){
    if (ContextCompat.checkSelfPermission(this, Manifest.permission.WRITE_EXTERNAL_STORAGE)
            != PackageManager.PERMISSION_GRANTED) {
        // Permission is not granted
        Log.d(TAG, "WRITE_EXTERNAL_STORAGE permission not granted! Requesting...");
        ActivityCompat.requestPermissions(this,
                new String[]{Manifest.permission.WRITE_EXTERNAL_STORAGE},
                2);
    }

    ClientFactory.appSyncClient().query(ListPetsQuery.builder().build())
            .responseFetcher(AppSyncResponseFetchers.CACHE_AND_NETWORK)
            .enqueue(queryCallback);
}
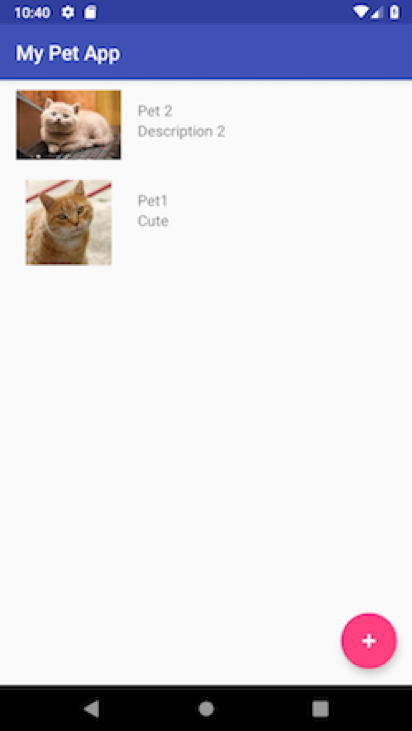
드디어 모든 작업을 마쳤습니다. 다시 앱을 구축하고 실행합니다. 사진을 추가하고 멋진 애완 동물을 볼 수 있는지 확인하십시오! 앱은 다음과 같은 형태로 나타날 것입니다.
기타 기능
앱의 기능을 강화할 수 있는 다른 기능도 있습니다. 다음 내용을 직접 연습해 보십시오.
- 애완 동물의 정보를 업데이트하는 기능을 추가하십시오.
- 애완 동물을 삭제하는 기능을 추가하십시오.
- 변형을 업데이트하고 삭제하려면 구독하십시오.
Android 앱에 오프라인 지원, 실시간 구독 및 객체 저장소를 추가 할 수 있게 되었습니다. 더 자세한 것은 AWS Amplify 웹 사이트에서 AWS Amplify에서 살펴 볼 수 있습니다.
– Channy (윤석찬);
혹시 만약 React를 사용하여 사용자들이 사진을 업로드하고 공유하는 data-driven 기반의 안전한 사진 갤러리 웹 애플리케이션 개발을 하고자 하신다면 단계별 실습 과정을 살펴 보시기 바랍니다.