Leveraging Elastic Cloud for RAG
Many organizations already rely on Elasticsearch for its powerful search and indexing capabilities on massive amounts of information. It is frequently used as a store for data that is made available interactively to users, commonly consumed through APIs.
As users start to leverage new and more natural ways to interact with data and applications thanks to the capabilities brought by large language models (LLMs), organizations are faced with the challenge of storing representations of all this data in a format that can be used by LLMs to query and enrich the context used to generate responses.
In this implementation walkthrough you will learn how to leverage Elastic Cloud’s vector storage and search capabilities integrated with leading frameworks such as LangChain for Retrieval-Augmented Generation (RAG) implementations.
Choosing to use Elastic Cloud for the use case allows you to achieve this without adding new data storage technologies into your stack. The ultimate objective is to be able to use all your existing data both for traditional searches through existing interfaces as well as for similarity searches and other new patterns required by machine learning (ML).
Before getting started
You must have an Amazon Web Services (AWS) account with enough permissions to deploy all required resources including Amazon Bedrock model access and AWS Marketplace offerings.
You must have an active Elastic Cloud account. You can sign up to use Elastic Cloud with your AWS account in AWS Marketplace.
Setup configuration
Before starting to build your solution, you will need to make sure that you have enabled the Amazon Bedrock models that will be used in this walkthrough and have access credentials to your Elastic Cloud account.
Enable Amazon Bedrock model
In your AWS Console, go to Amazon Bedrock and click on base models This will show a list of all the models available and the ones you have already been granted access to. If this is your first time using this service, you will not have any models granted by default and will need to request the models to be enabled.

Click on model access under Amazon Bedrock configuration to select the models you want to have access to. In this walkthrough you will only be using “Titan Text G1 – Express” under “Amazon.” Select it, press submit and follow the on-screen guidance.
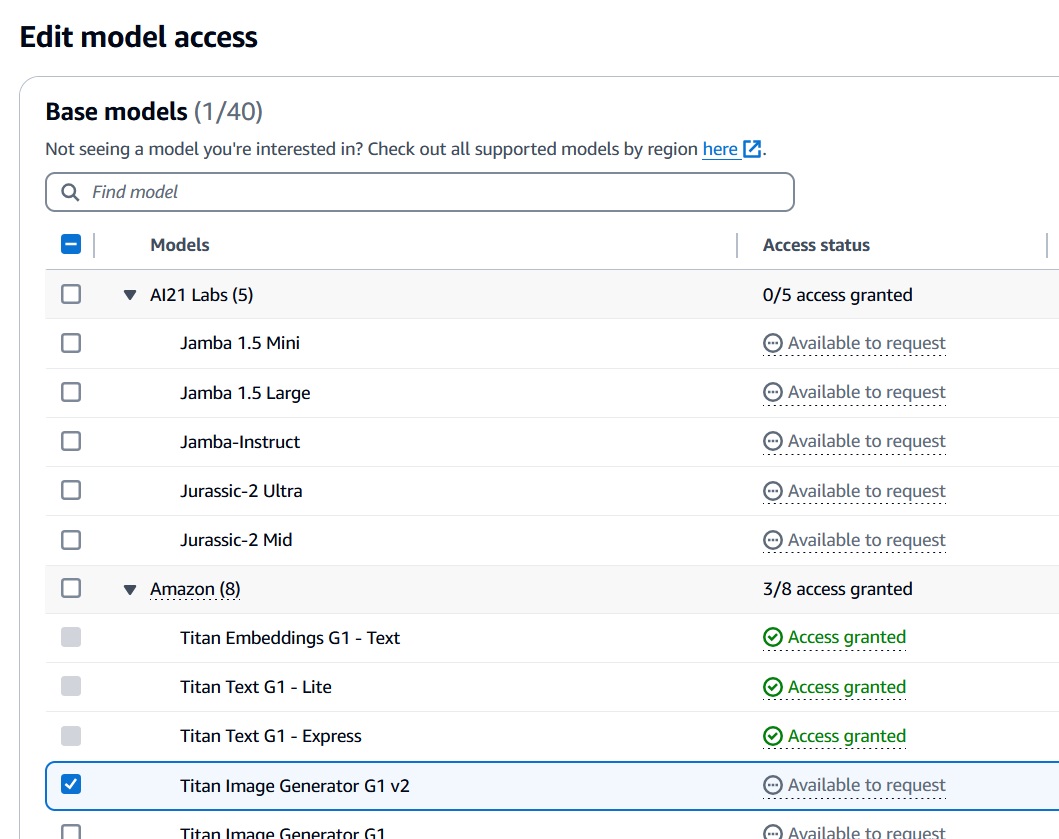
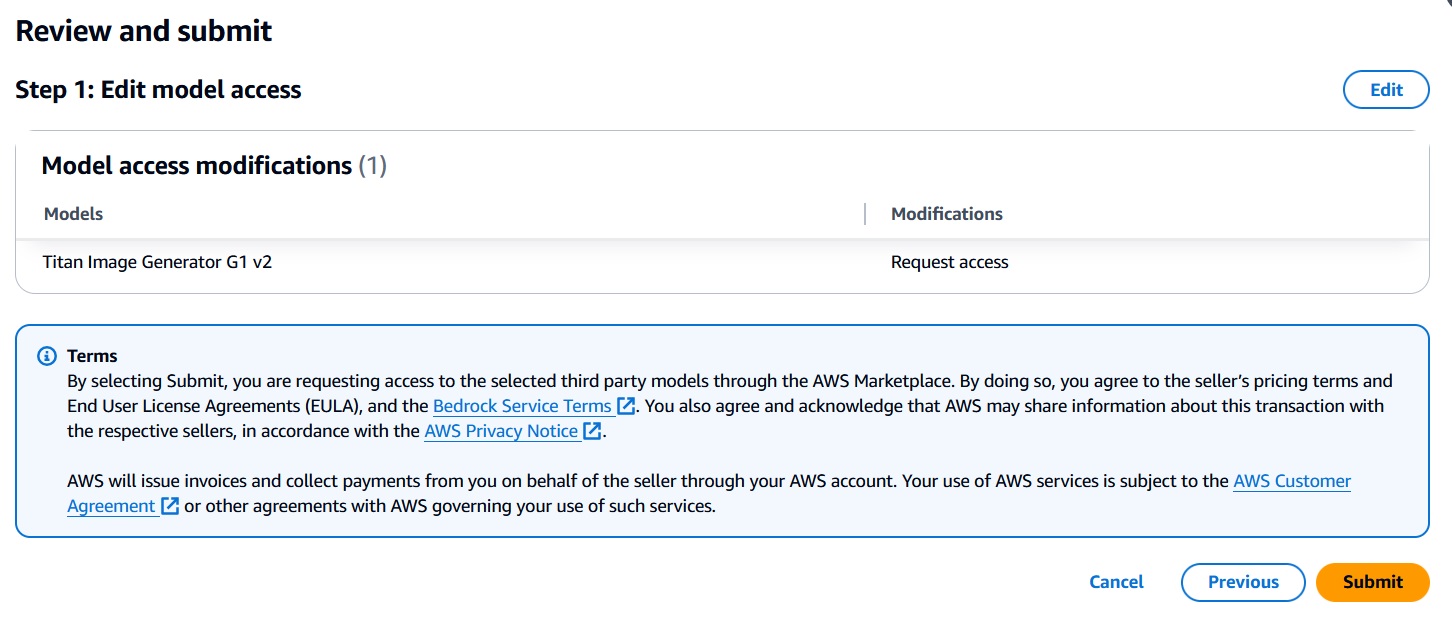
Approval may take a few minutes and once completed, you will see the model with a green check mark and access-granted status.
Get credentials for Elastic Cloud
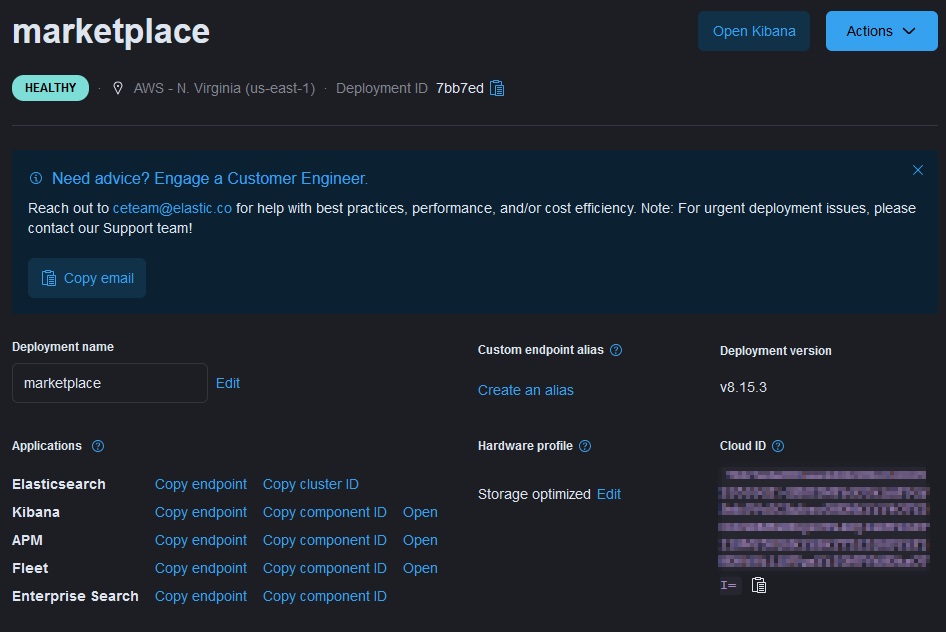
In order to use LangChain’s Elastic integrations, you must provide the ID of your Elastic Cloud instance as well as an API key. You can get the instance ID as well as generate the API key from Elastic’s management console.
To get the your Elastic Cloud ID click on “Manage Deployment” for the deployment you want to use and look for “Cloud ID.” Copy the value and store it somewhere since you will need to have it available in your environment:
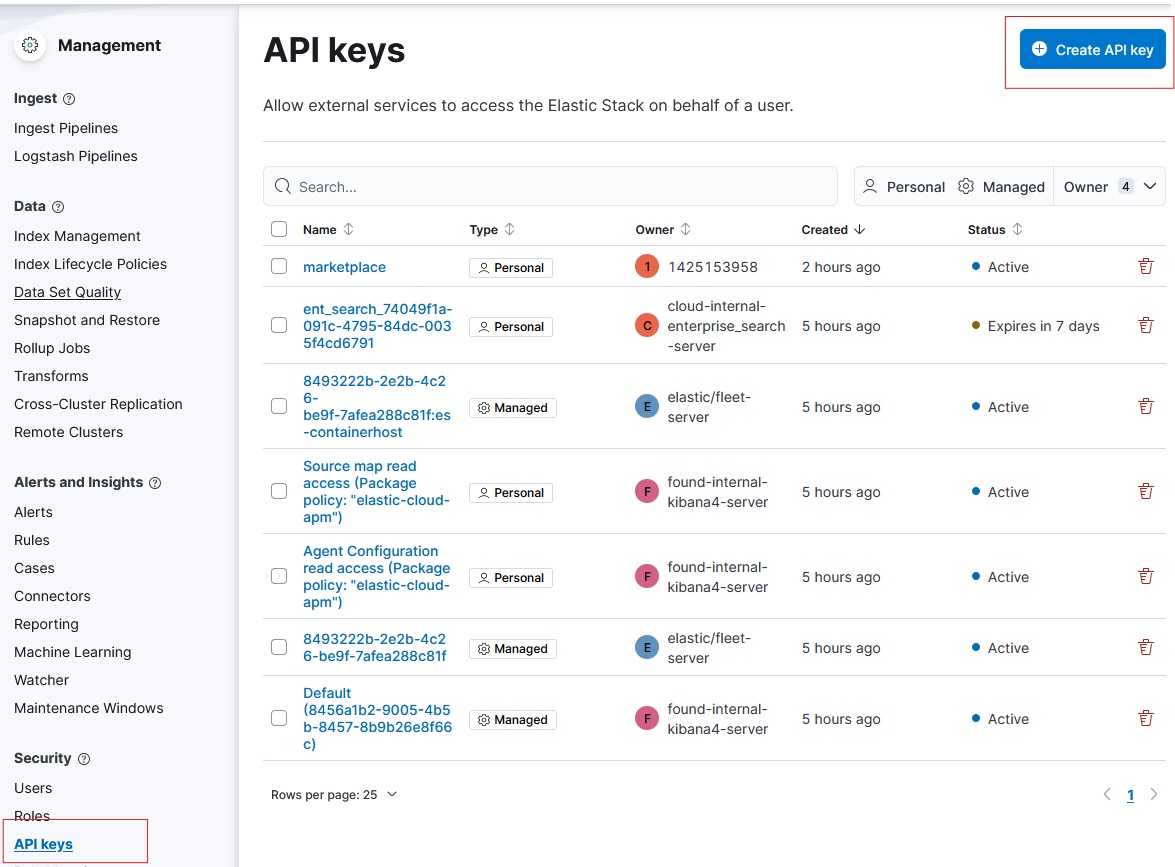
To generate your API key, use the “Stack Management” option under “Management” in your Elastic deployment:
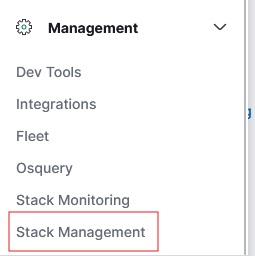
Look for API Keys and hit the “Create API key” button. Make sure to copy the key before moving on, since you will need it later on:
Let’s use Amazon Bedrock, Langchain, and Elastic to implement RAG
The codebase for this implementation can be found in this repository.
Langchain has very mature integrations to use Elastic for vector storage as well as integrations with AWS to use Bedrock LLM and vector embedding capabilities.
Start by importing the required packages:
from langchain_elasticsearch import ElasticsearchStore
from langchain_aws import BedrockEmbeddings, BedrockLLM
from langchain.chains import RetrievalQA
We’ll also be using dotenv to load our credentials into the environment as well as urllib to fetch some sample data. Since you’ll be running Amazon Bedrock in AWS, you will also need the boto3client library:
from dotenv import load_dotenv
from urllib.request import urlopen

import os
import boto3
import json
Put in a .env file your Elastic Cloud details, and load them using dotenv into corresponding variables:
load_dotenv()

ELASTIC_CLOUD_ID = os.getenv('ELASTIC_CLOUD_ID')
ELASTIC_API_KEY = os.getenv('ELASTIC_API_KEY')
AWS_ACCESS_KEY = os.getenv('AWS_ACCESS_KEY')
AWS_SECRET_KEY = os.getenv('AWS_SECRET_KEY')
Now create an Amazon Bedrock client using Boto3 and use this client to create a new BedrockEmbeddings object. We will default to authenticating using your local AWS configuration:
AWS_REGION = "us-east-1"

bedrock_client = boto3.client(
    service_name="bedrock-runtime",
    region_name=AWS_REGION
)

bedrock_embedding = BedrockEmbeddings(client=bedrock_client)
Now, let’s use the ElasticsearchStore class and the Amazon Bedrock embedding object you just created to prepare our vector store. Note that you need to specify a unique index name here, which will be automatically created when generating the vector embeddings.
bedrock_embedding = BedrockEmbeddings(client=bedrock_client)

vector_store = ElasticsearchStore(
    es_cloud_id=ELASTIC_CLOUD_ID,
    es_api_key=ELASTIC_API_KEY,
    index_name="marketplace_index",
    embedding=bedrock_embedding,
)
We’re going to use the sample data made available by Elastic for the example chatbot RAG app lab. We need to fetch this data and structure it for storage. We will create two separate objects, one for the content of each document and another to store its metadata:
url = "https://raw.githubusercontent.com/elastic/elasticsearch-labs/main/example-apps/chatbot-rag-app/data/data.json"

response = urlopen(url)

workplace_docs = json.loads(response.read())

from langchain.text_splitter import RecursiveCharacterTextSplitter

metadata = []
content = []

for doc in workplace_docs:
    content.append(doc["content"])
    metadata.append(
        {
            "name": doc["name"],
            "summary": doc["summary"],
            "rolePermissions": doc["rolePermissions"],
        }
    )
Finally, let’s split these documents in chunks, and store them in the vector store we configured earlier:
text_splitter = RecursiveCharacterTextSplitter.from_tiktoken_encoder(
    chunk_size=512, chunk_overlap=256
)
docs = text_splitter.create_documents(content, metadatas=metadata)

documents = vector_store.from_documents(
    docs,
    es_cloud_id=ELASTIC_CLOUD_ID,
    es_api_key=ELASTIC_API_KEY,
    index_name="marketplace_index",
    embedding=bedrock_embedding,
)
Now your data will be available in Elastic, ready for querying using traditional search mechanisms, as well as vectorized for similarity searches:

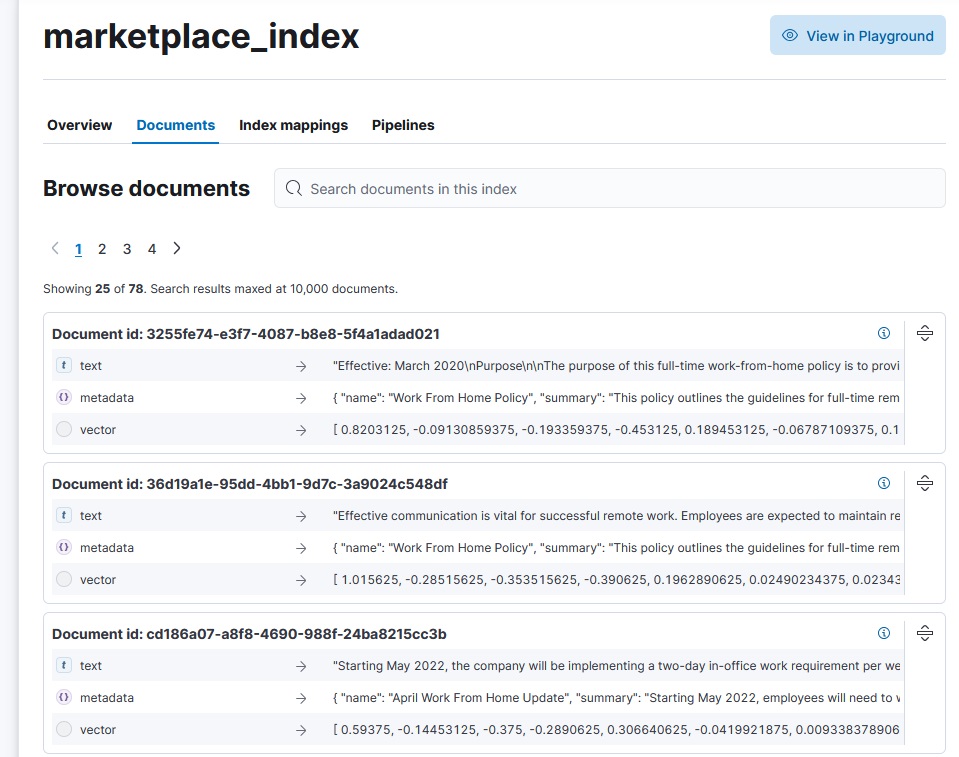
Now that your data is in Elastic, you can simply create a BedrockLLM object using the client previously created and specifying the model that you requested access to during configuration, and use the vector_store retriever to query the LLM:
AWS_MODEL_ID = "amazon.titan-text-express-v1"

llm = BedrockLLM(
    client=bedrock_client,
    model=AWS_MODEL_ID
)

retriever = vector_store.as_retriever()

qa = RetrievalQA.from_llm(
    llm=llm,
    retriever=retriever,
    return_source_documents=True
)
And with these simple steps now you can start asking questions to the LLM using the qa object and get responses using your Elastic data!
question = "What job openings do we have?"
ans = qa({"query": question})
print(ans["result"] + "\n")
Using Amazon Bedrock models via Elasticsearch's open inference API
Models hosted on Amazon Bedrock are also available via the Elasticsearch Open Inference API. Developers building RAG applications using the Elasticsearch vector database can store and use embeddings generated from models hosted on Amazon Bedrock (such as Amazon Titan, Anthropic Claude, Cohere Command R, and others). Bedrock integration with open inference API offers a consistent way of interacting with different AI models, such as text embeddings and chat completion, simplifying the development process with Elasticsearch.
pick a model from Amazon Bedrock
create and use an inference endpoint in Elasticsearch
use the model as part of an inference pipeline
As mentioned above you already have an AWS Account with access to Amazon Bedrock - a fully managed hosted models service that makes foundation models available through a unified API.
Amazon provides extensive IAM policies to control permissions and access to the models. From within IAM, you’ll also need to create a pair of access and secret keys that allow programmatic access to Amazon Bedrock for your Elasticsearch inference endpoint to communicate.
Creating an inference API endpoint in Elasticsearch
Once your model is deployed, we can create an endpoint for your inference task in Elasticsearch. For the examples below, we are using the Amazon Titan Text base model to perform inference for chat completion.
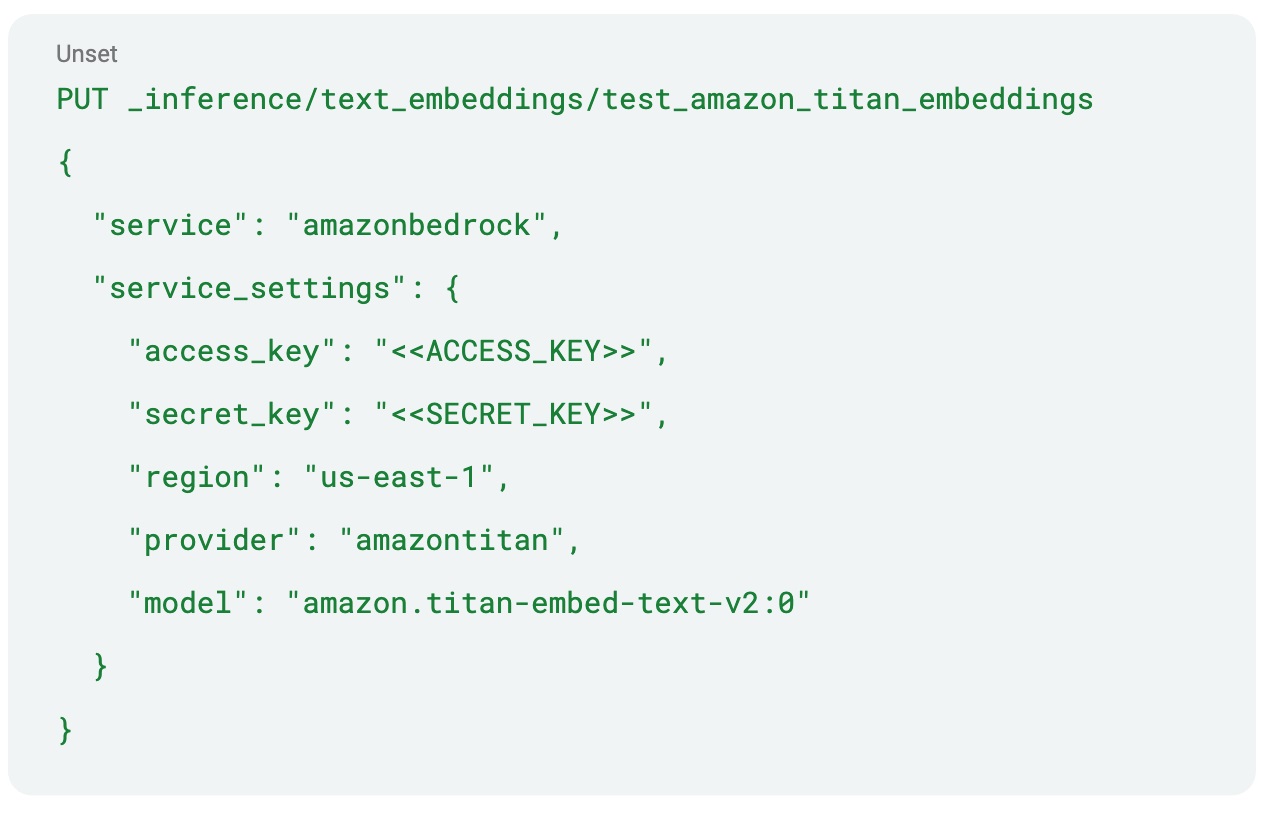
In Elasticsearch, create your endpoint by providing the service as “amazonbedrock”, and the service settings including your region, the provider, the model (either the base model ID, or if you’ve created a custom model, the ARN for it), and your access and secret keys to access Amazon Bedrock. In our example, as we’re using Amazon Titan Text, we’ll specify “amazontitan” as the provider, and “amazon.titan-text-premier-v1:0” as the model id.
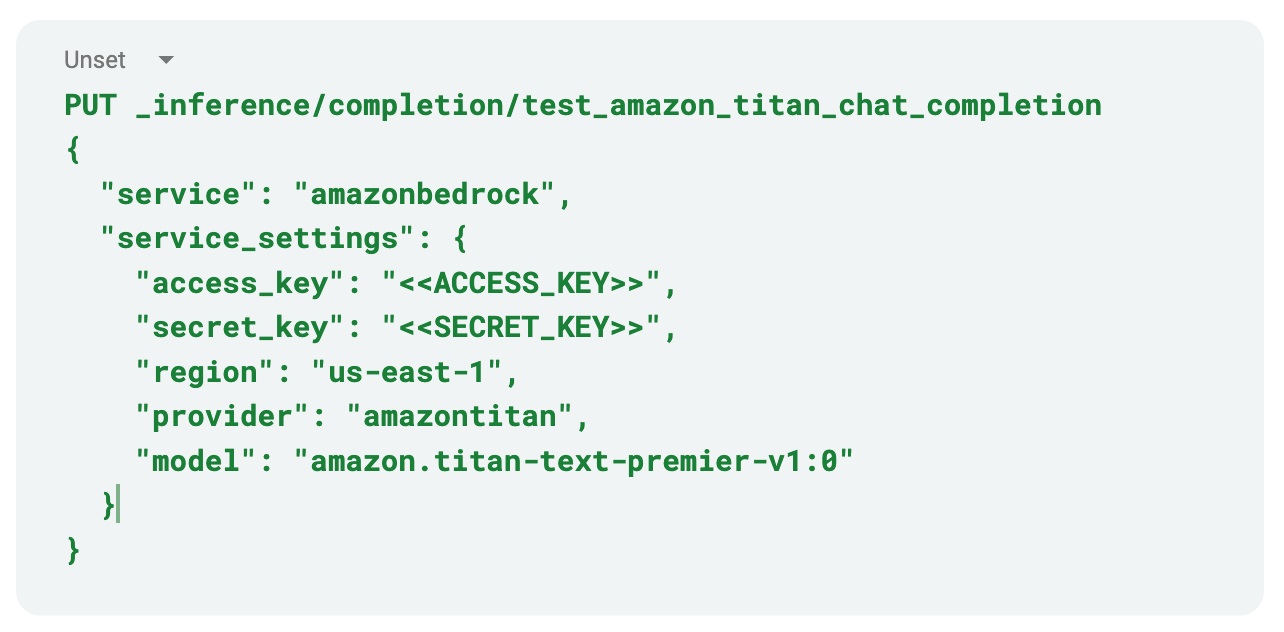
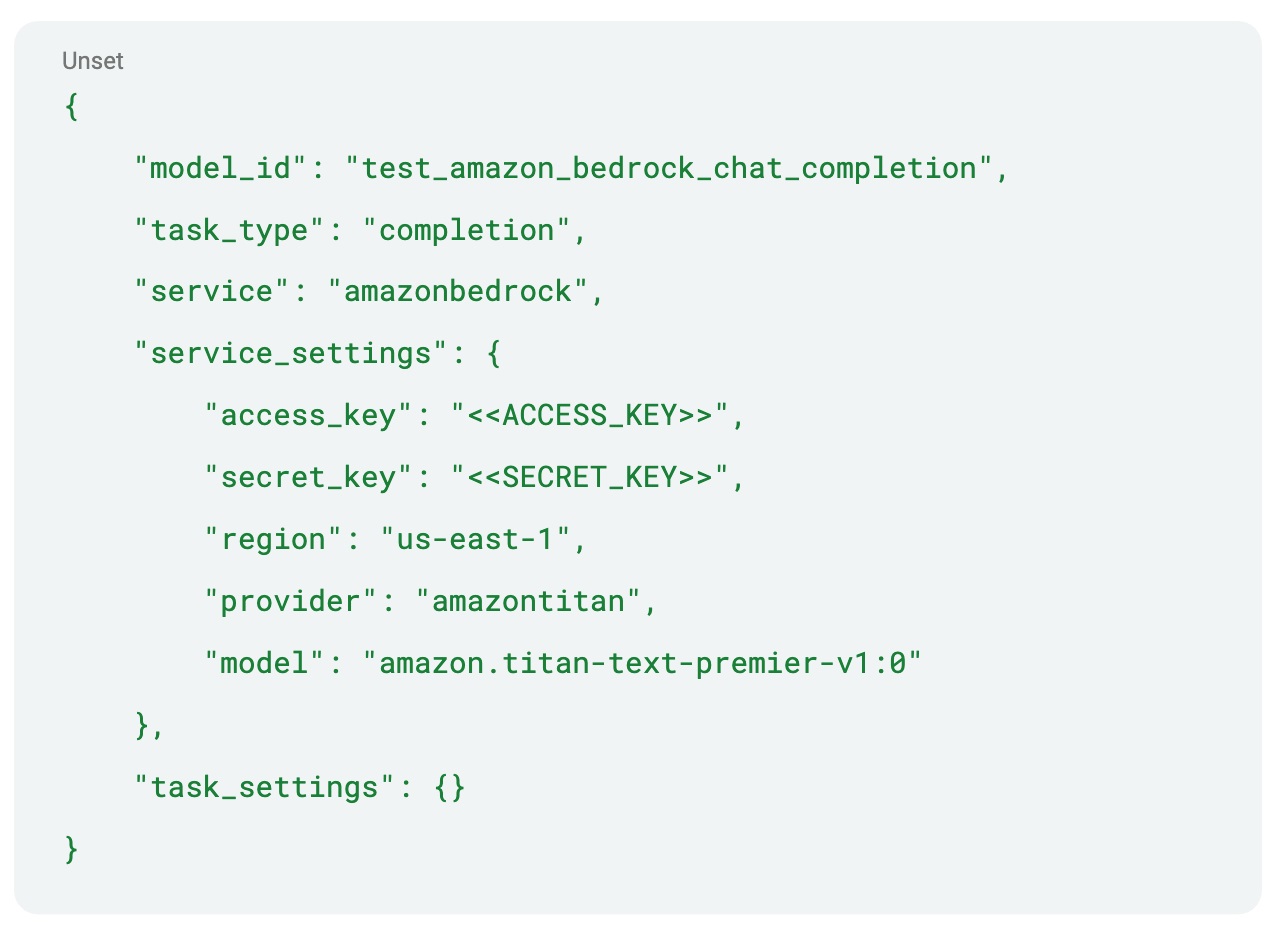
When you send Elasticsearch the command, it should return back the created model to confirm that it was successful. Note that the API key will never be returned and is stored in Elasticsearch’s secure settings.
Adding a model for using text embeddings is just as easy. For reference, if we use the Amazon Titan Embeddings Text base model, we can create our inference model in Elasticsearch with the “text_embeddings” task type by providing the appropriate API key and target URL from that deployment’s overview page:
Let’s perform some inference
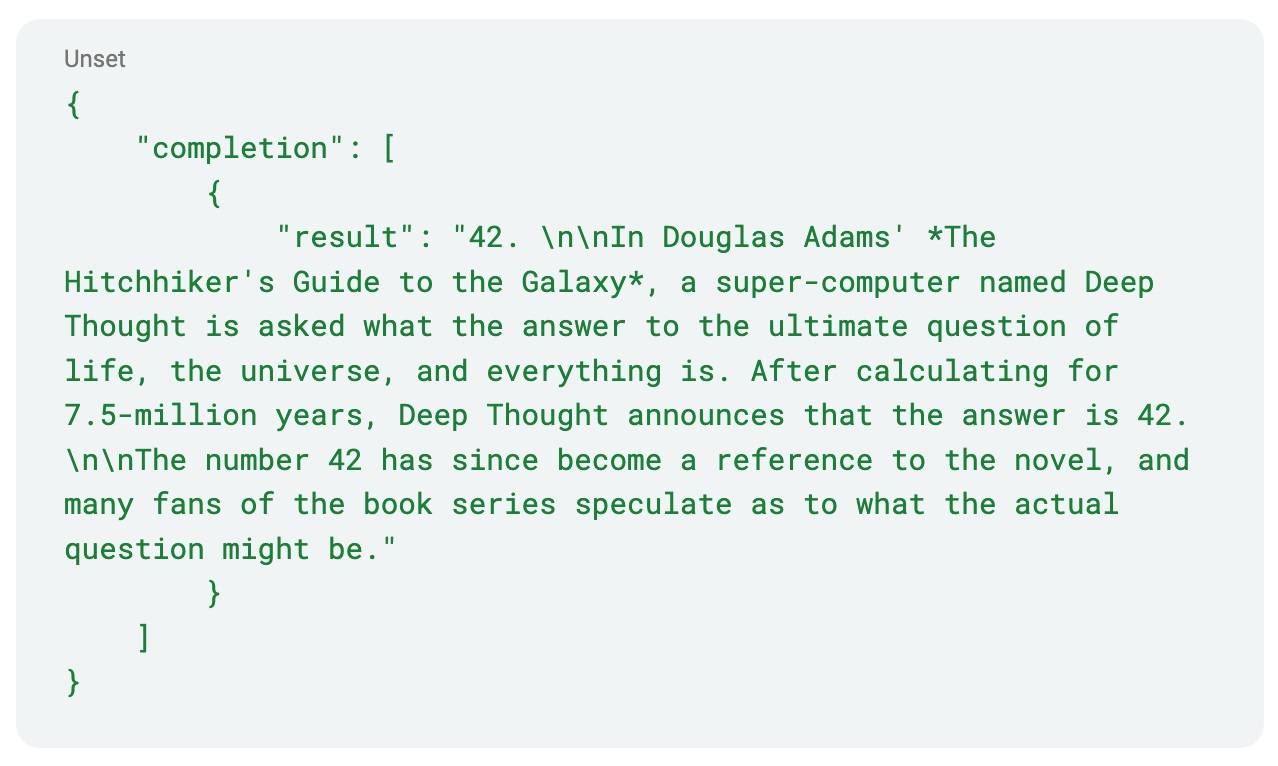
That’s all there is to setting up your model. Now that that’s out of the way, we can use the model. First, let’s test the model by asking it to provide some text given a simple prompt. To do this, we’ll call the _inference API with our input text:

And we should see Elasticsearch provide a response. Behind the scenes, Elasticsearch calls out to Amazon Bedrock with the input text and processes the results from the inference. In this case, we received the response:
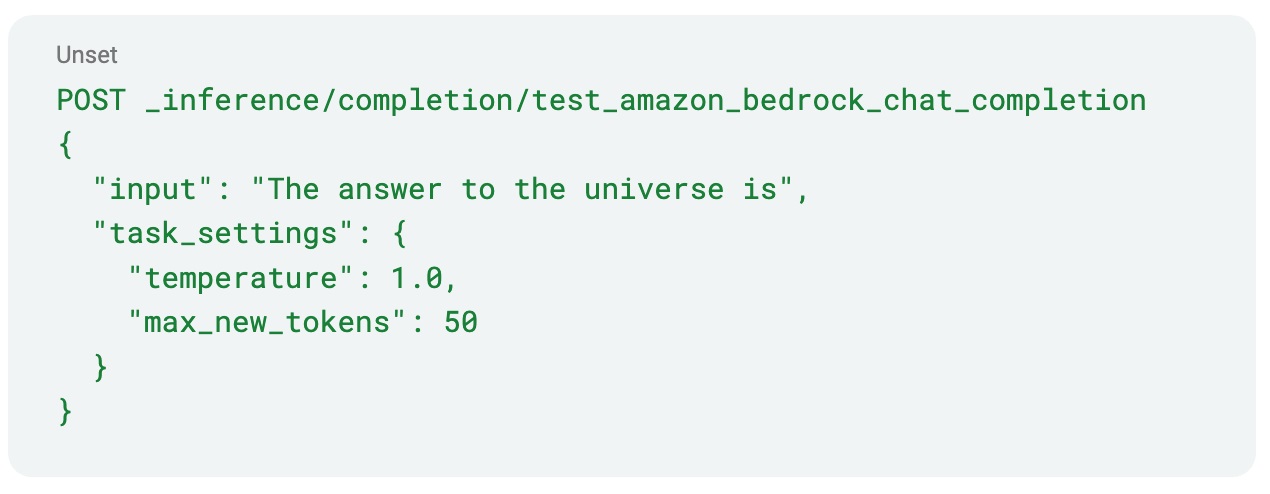
We’ve tried to make it easy for the end user to not have to deal with all the technical details behind the scenes, but we can also control our inference a bit more by providing additional parameters to control the processing, such as sampling temperature and requesting the maximum number of tokens to be generated:
Next steps
With this implementation walkthrough, you can see how simple it is to get the fundamental setup in place to start your own RAG implementation using Elastic Cloud. To get started, try Elastic Cloud free in AWS Marketplace. With AWS Marketplace you can sign up using your AWS account, expedite your integration process, and consolidate billing with AWS.
Disclaimer
This guide will help you understand implementation fundamentals and serve as a starting point. The reader is advised to consider security, availability and other production-grade deployment concerns and requirements that are not within scope of this implementation guide for a full scale, production-ready implementation.
Please refer to a few blogs for additional use cases, including Security and Observability, using Elastic AI Assistants.
Why AWS Marketplace for on-demand cloud tools
Free to try. Deploy in minutes. Pay only for what you use.