亚马逊AWS官方博客
新增功能 – 使用 AWS Glue 实现无服务器流式处理 ETL
当您将应用程序放入生产环境时,您将需要了解它的运行情况以及对应用程序的使用情况。要进行数据分析,第一种方法是使用批处理模式:采集一段时期的数据集,然后通过分析工具进行分析。要能够快速进行应对,您可以采用流式处理模式,也就是在数据到达时立即处理,一次处理一条记录或按照数十条、数百条或数千条记录的微型批次进行处理。
管理连续数据提取管道并处理动态数据,是一件非常复杂的工作,因为这是一种始终在线的系统,需要管理、安装补丁、进行扩展以及全面的照管。如今,通过扩展基于 Apache Spark 的 AWS Glue 作业来持续运行并从 Amazon Kinesis Data Streams 和 Apache Kafka(包括完全托管的 Amazon MSK)等流式处理平台提取数据,可以更轻松、更成本高效地实施这一方案。
采用这种方案时,Glue 可以预置、管理和扩展需要的基础设施,以将数据提取到 Amazon S3 上的数据湖、Amazon Redshift 等数据库或其他数据存储。例如,您可以将流数据存储在 DynamoDB 表中以便于快速查询,或存储在 Elasticsearch 中以找出特定的模式。这一过程通常被称为提取、转换和加载 (ETL)。
当您在 Glue 作业中处理流数据时,您将能够使用 Spark 结构化流的所有功能来实施数据转换,例如聚合、分区、格式化以及与其他数据集连接起来,从而丰富或清理数据以便分析。例如,您可以访问外部系统来实时甄别作弊,或使用机器学习算法来对数据分类或检测异常和界外值。
使用 AWS Glue 处理流数据
为了尝试这种新功能,我需要从 IoT 传感器采集数据并将所有数据点存储在一个 S3 数据湖中。我使用 Raspberry Pi 和 Sense HAT 来实时采集温度、湿度、气压及其空间位置数据(使用一体式陀螺仪、加速度计和磁力计)。我要构建的架构图如下:
首先,我将设备注册到 AWS IoT Core,然后运行以下 Python 代码以将一条 JSON 消息及传感器数据发送到 streaming-data MQTT 主题,每秒发送一次。在此设置中我只有一台设备,如果我有多台设备,我将每台设备使用一个子主题,例如 streaming-data/{client_id}。
import time
import datetime
import json
from sense_hat import SenseHat
from awscrt import io, mqtt, auth, http
from awsiot import mqtt_connection_builder

sense = SenseHat()

topic = "streaming-data"
client_id = "raspberrypi"

# Callback when connection is accidentally lost.


def on_connection_interrupted(connection, error, **kwargs):
    print("Connection interrupted. error: {}".format(error))


# Callback when an interrupted connection is re-established.
def on_connection_resumed(connection, return_code, session_present, **kwargs):
    print("Connection resumed. return_code: {} session_present: {}".format(
        return_code, session_present))

    if return_code == mqtt.ConnectReturnCode.ACCEPTED and not session_present:
        print("Session did not persist.Resubscribing to existing topics...")
        resubscribe_future, _ = connection.resubscribe_existing_topics()

        # Cannot synchronously wait for resubscribe result because we're on the connection's event-loop thread,
        # evaluate result with a callback instead.
        resubscribe_future.add_done_callback(on_resubscribe_complete)


def on_resubscribe_complete(resubscribe_future):
    resubscribe_results = resubscribe_future.result()
    print("Resubscribe results: {}".format(resubscribe_results))

    for topic, qos in resubscribe_results['topics']:
        if qos is None:
            sys.exit("Server rejected resubscribe to topic: {}".format(topic))


# Callback when the subscribed topic receives a message
def on_message_received(topic, payload, **kwargs):
    print("Received message from topic '{}': {}".format(topic, payload))


def collect_and_send_data():
    publish_count = 0
    while(True):

        humidity = sense.get_humidity()
        print("Humidity: %s %%rH" % humidity)

        temp = sense.get_temperature()
        print("Temperature: %s C" % temp)

        pressure = sense.get_pressure()
        print("Pressure: %s Millibars" % pressure)

        orientation = sense.get_orientation_degrees()
        print("p: {pitch}, r: {roll}, y: {yaw}".format(**orientation))

        timestamp = datetime.datetime.fromtimestamp(
            time.time()).strftime('%Y-%m-%d %H:%M:%S')

        message = {
            "client_id": client_id,
            "timestamp": timestamp,
            "humidity": humidity,
            "temperature": temp,
            "pressure": pressure,
            "pitch": orientation['pitch'],
            "roll": orientation['roll'],
            "yaw": orientation['yaw'],
            "count": publish_count
        }
        print("Publishing message to topic '{}': {}".format(topic, message))

        mqtt_connection.publish(
            topic=topic,
            payload=json.dumps(message),
            qos=mqtt.QoS.AT_LEAST_ONCE)
        time.sleep(1)
        publish_count += 1


if __name__ == '__main__':
    # Spin up resources
    event_loop_group = io.EventLoopGroup(1)
    host_resolver = io.DefaultHostResolver(event_loop_group)
    client_bootstrap = io.ClientBootstrap(event_loop_group, host_resolver)

    mqtt_connection = mqtt_connection_builder.mtls_from_path(
        endpoint="a1b2c3d4e5f6g7-ats.iot.us-east-1.amazonaws.com",
        cert_filepath="rapberrypi.cert.pem",
        pri_key_filepath="rapberrypi.private.key",
        client_bootstrap=client_bootstrap,
        ca_filepath="root-CA.crt",
        on_connection_interrupted=on_connection_interrupted,
        on_connection_resumed=on_connection_resumed,
        client_id=client_id,
        clean_session=False,
        keep_alive_secs=6)

    connect_future = mqtt_connection.connect()

    # Future.result() waits until a result is available
    connect_future.result()
    print("Connected!")

    # Subscribe
    print("Subscribing to topic '{}'...".format(topic))
    subscribe_future, packet_id = mqtt_connection.subscribe(
        topic=topic,
        qos=mqtt.QoS.AT_LEAST_ONCE,
        callback=on_message_received)

    subscribe_result = subscribe_future.result()
    print("Subscribed with {}".format(str(subscribe_result['qos'])))

    collect_and_send_data()
下面是设备发送的 JSON 消息示例:
{
    "client_id": "raspberrypi",
    "timestamp": "2020-04-16 11:33:23",
    "humidity": 39.35261535644531,
    "temperature": 30.10732078552246,
    "pressure": 1020.447509765625,
    "pitch": 4.044007304723748,
    "roll": 7.533848064912158,
    "yaw": 77.01560798660883,
    "count": 104
}
在 Kinesis 控制台中,我创建了 my-data-stream 数据流(对我的工作负载而言 1 个分片足够)。回到 AWS IoT 控制台,我创建了一条 IoT 规则,以将来自 MQTT 主题的所有数据发送到此 Kinesis 数据流。
现在所有的传感器数据都被发送到 Kinesis,我可以利用新的 Glue 集成以在数据达到时立即处理数据。在 Glue 控制台中,我手动在 Glue 数据目录中添加了一个表。 我将 Kinesis 选择为源类型,然后输入我的流名称以及 Kinesis Data Streams 服务的终端节点。 请注意对于 Kafka 流,您需要在创建表前创建一个 Glue 连接。

我选择将 JSON 作为数据格式,并定义了流数据的 schema。如果我在此处没有指定列,则在处理流时将被忽略。
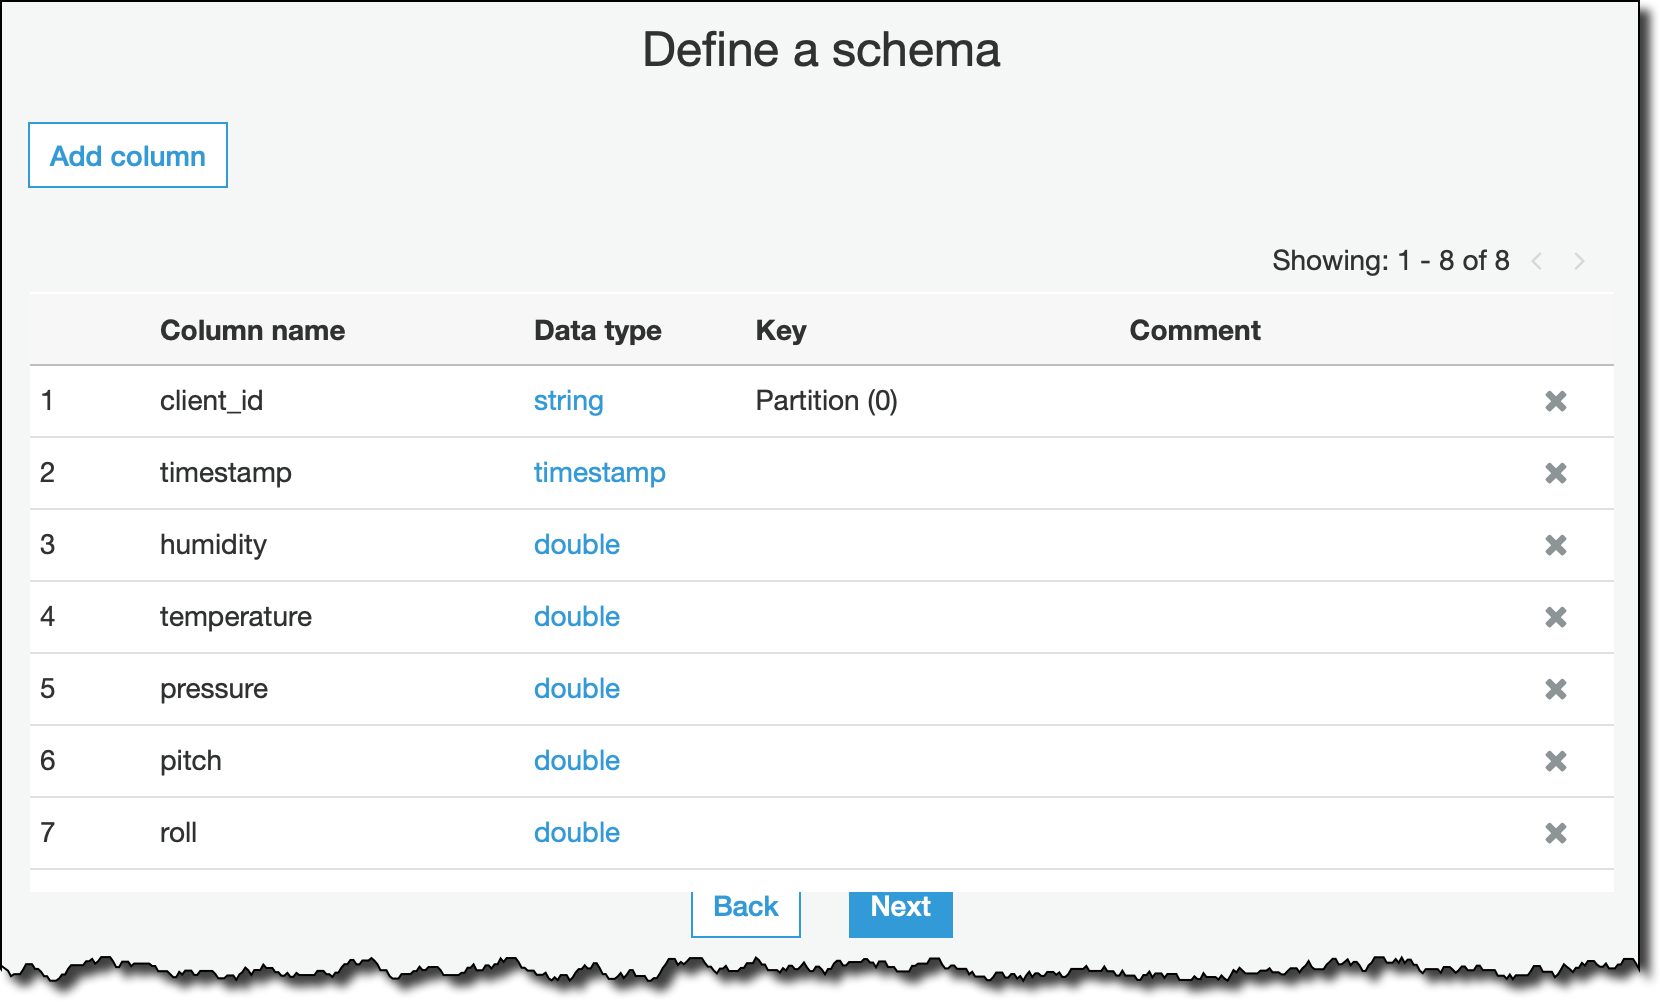
然后我会确认最终结束步骤,并创建 my_streaming_data 表。我们将尝试为流式 ETL 作业添加 schema 推理。因此无需事先指定完整的 schema。它会自动调整。
为了处理流数据,我创建了一个 Glue 作业。对于 IAM 角色,我创建了一个新角色并附加了 AWSGlueServiceRole 和 AmazonKinesisReadOnlyAccess 托管策略。根据您的使用案例和 AWS 账户设置的不同,您可能需要使用提供更精细访问权限的角色。

对于数据源,我选择了我刚刚创建的表,该表接收来自 Kinesis 流的数据。

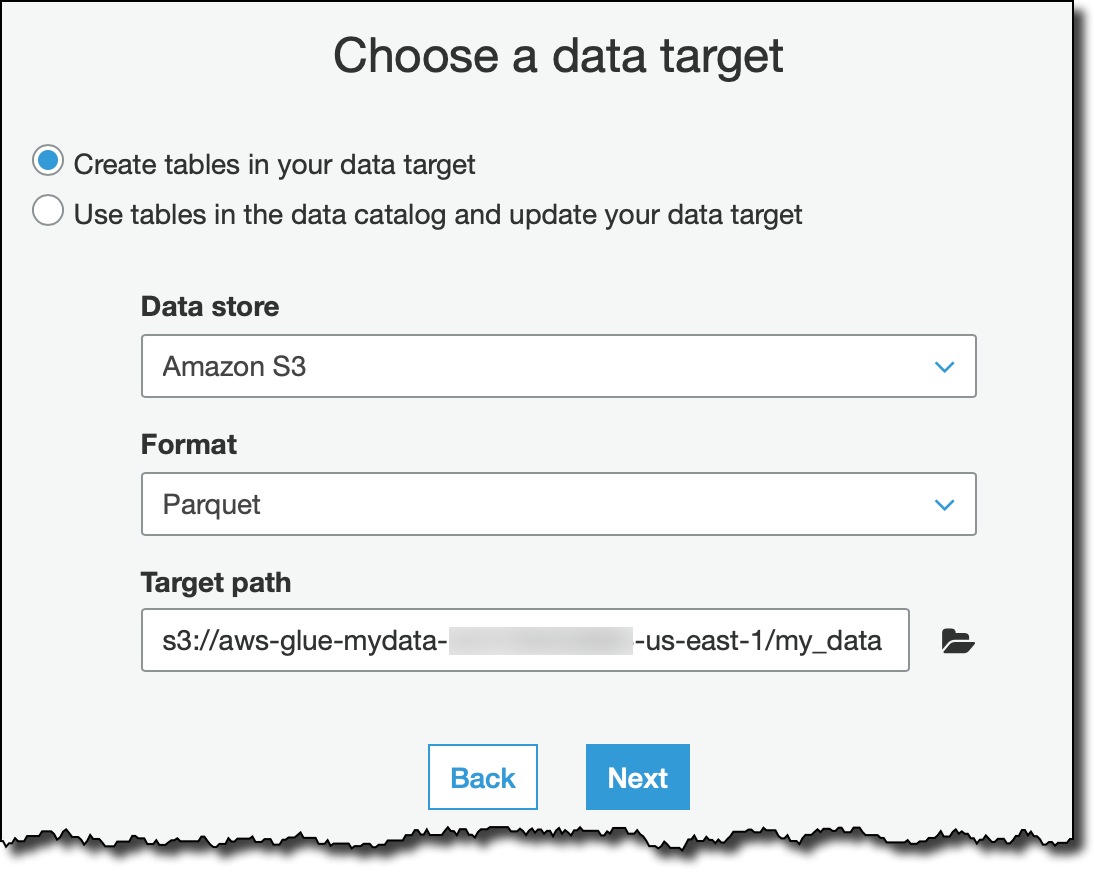
为了获取 Glue 生成的脚本,我选择了更改 schema 转换类型。对于目标,我使用 Apache Parquet 等高效格式在 Glue 数据目录中创建了一个新表。此作业生成的 Parquet 文件将存储在一个 S3 存储桶中,该存储桶的名称以 aws-glue- 开头(包括最后的连字符)。遵循 AWSGlueServiceRole 策略中指定资源的命名规则,此作业拥有访问这些资源所需的权限。
我保留默认的映射,这会在输出中保留源流的所有列。这样,我可以使用建议的脚本提取所有记录,无需编写任何一行代码。

我快速检查了以下建议的脚本并保存。每条记录都作为一个 DynamicFrame 处理,并且我可以使用任何 Glue PySpark 转换或 Spark 结构化流支持的任何转换。此配置默认情况下仅使用 ApplyMapping。

我启动作业,几分钟后我看到输出 S3 存储桶中出现了包含作业输出的 Parquet 文件。这些数据按照提取日期(年月日和小时)分隔。
为了使用基于 S3 存储桶内容的表填充 Glue 数据目录,我添加并运行了一个爬网程序。在爬网程序配置中,我排除了 Glue 使用的 checkpoint 文件夹,以确保能够跟踪已经处理的数据。不到一秒后,系统已经添加了一个新的表。
在 Amazon Athena 控制台中,我刷新了数据库和表,然后选择预览包含今年提取的数据的 output_my_data。这样,我看到表中的前十条记录,并确认我的设置是成功的!

由于数据在被持续提取,现在我可以运行更复杂的查询。 例如,我可以获取从设备传感器采集的最小和最大温度,以及 Parquet 文件中存储的记录总数。
观察结果,我看到已经处理了超过 8000 条记录,最大温度为 31 摄氏度(约 88 华氏度)。其实气温从没有这么热过。温度是由非常靠近设备的传感器测量的,并且由于设备会随着使用不断变热,温度也会持续上升。

在此设置中我仅使用了一台设备,但这里实施的解决方案也可以轻松扩展到使用多个数据源。
现已推出
对流式处理源的支持现已在提供 Glue 服务的所有区域开放,详见 AWS 区域表。有关更多信息,请参阅文档。
使用 Glue 来管理无服务器 ETL 管道,让您能够以更轻松、更经济高效的方式设置和管理流式提取流程,减少实施工作,从而让您可以专注于分析的业务结果。与我在本演练中描述的一样,您无需编写任何代码即可设置完整的提取管道,您也可根据自己的需要对建议的脚本进行自定义改编。
欢迎与我分享您将如何使用此新功能!
– Danilo