Amazon Web Services ブログ
Amazon Inspector でセキュリティ脆弱性テストを拡大
私の同僚である Eric Fitzgerald による次の記事は、AWS Lambda 関数を使用して Amazon Inspector による評価結果をお客様のチケット発行システムやワークフローシステムに転送する方法についてご説明しています。
—
Jeff
AWS Re:Invent 2015 にて、セキュリティ脆弱性評価サービスの Amazon Inspector をご紹介しました。同サービスは、お客様が早期かつ頻繁にセキュリティ脆弱性テストを実施できるようにサポートするものです。Amazon Inspector をご利用いただくと、お客様は開発環境、テスト環境、実稼働環境でセキュリティテストを自動化することができます。セキュリティ脆弱性をソフトウェア開発、デプロイ、運用ライフサイクル全体の一部として識別します。Amazon Inspector の自動セキュリティテストは、お客様から非常に高く評価されています。Amazon InspectorAnalyze Application Security により、セキュリティ評価を今まで以上に頻繁に実行できるようになったほか、以前に比べセキュリティ脆弱性の早期発見に繋がったと報告を受けています。けれども、セキュリティ脆弱性を識別するだけでは完全といえません。脆弱性を発見したら問題を修正する必要があります。多くのお客様は Amazon Inspector による評価結果に対応するためのワークフローを自動化そして加速するために、Amazon Inspector を自社のワークフローシステムやチケット発行システムと統合しています。Amazon Inspector はそうしたポイントを念頭にを設計しているので、Amazon Inspector による評価結果をメールやワークフローシステムまたはチケット発行システムで統合する方法のひとつを詳しくご説明することにいたしました。
AWS Lambda を使用して Amazon Inspector による評価結果をチケット発行システムにプッシュする
この例では AWS Lambda 関数を使用して、メール経由で作成するインシデントに対応できるシステムに Amazon Inspector を接続します。イベントのフローは次のとおりです。
- Amazon Inspector が実行しセキュリティ評価を行います。実行終了前に Amazon Simple Notification Service (SNS) トピックへメッセージを送信します。
- SNS メッセージが Lambda 関数を呼び出します。
- 関数がセキュリティ評価から結果を取得します。
- 別の SNS トピックを使用してフォーマットした評価結果をメールで送信します。
途中、この関数は宛先トピックを作成し、必要であればサブスクリプションをメールで送信します。
関数を設定する
Amazon Inspector からの評価を実行する AWS リージョンで、この関数を設定してください。複数のリージョンで Amazon Inspector を実行している場合は、各リージョンで同じステップを繰り返してください。ステップは次のとおりです。
- Amazon Inspector の SNS トピックを作成します。
- Amazon Inspector を設定して、新しく作成したトピックに評価結果を送信します。
- 評価結果を取得、フォーマット、メールで送信できるように Lambda 関数を設定します。
SNS トピックを設定する
まず、新しい結果報告がある場合に Amazon Inspector が通知する Amazon SNS トピックを設定します。Amazon SNS トピックがフォーマットした後、他のシステムにメールで評価結果を送信します。Amazon SNS コンソールにアクセスして新しい Amazon SNS トピックを作成します。このトピックが Amazon Inspector 通知の送信先になります。トピック名はお好きなものをお選びください。次のポリシーをトピックに指定します。トピックを選択してから [Other topic actions] をクリックし [Edit topic policy] を選択してください。アドバンスビューで既存のポリシーテキストを次のポリシーに置き換えます。
{
  "Version": "2008-10-17",
  "Id": "inspector-sns-publish-policy",
  "Statement": [
    {
      "Sid": "inspector-sns-publish-statement",
      "Effect": "Allow",
      "Principal": {
        "Service": "inspector.amazonaws.com"
      },
      "Action": "SNS:Publish",
      "Resource": "arn:aws:sns:*"
    }
  ]
}
AWS Identity and Access Management (IAM) ポリシーに詳しい方は、ポリシーの Resource の値が Amazon SNS トピックの ARN と同じになるように変更すると Amazon Inspector を制限することが可能になり、このトピックに対してのみ発行することができるので、セキュリティの視点からもこれがベストプラクティスになります。Amazon Inspector を設定する
Amazon Inspector コンソールにアクセスし、評価テンプレートのページで外部システムに送信したい評価結果の評価テンプレートを選択します。その行を展開すると SNS トピックのセクションが表示されます。Amazon SNS トピックの左側にある鉛筆アイコンをクリックすると、ドロップダウンリストから先ほど作成したばかりの Amazon SNS トピックを選択することができます。トピックを選択したら [Save] をクリックしてください。
Lambda 関数を設定する
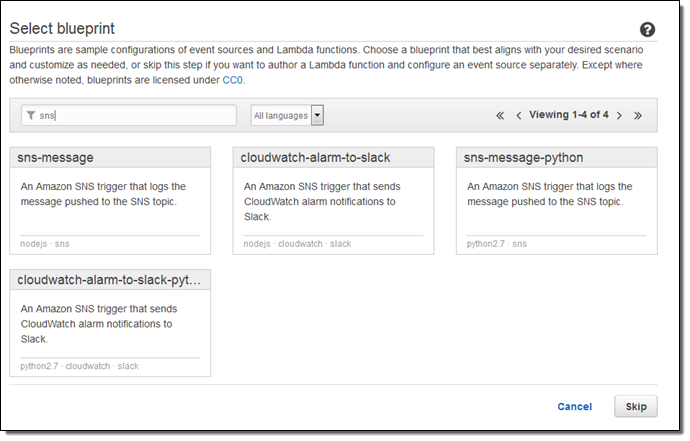
Lambda コンソールにアクセスし SNS-message-python 設計図を使用して新しい関数を作成します。

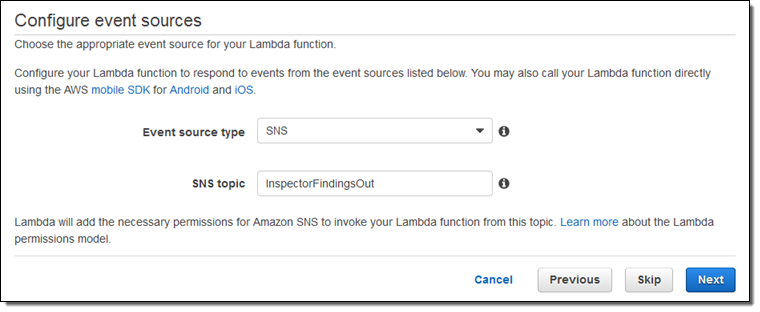
イベントソースの SNS を選択してから、ステップ 1 で作成した SNS トピックを選びます。

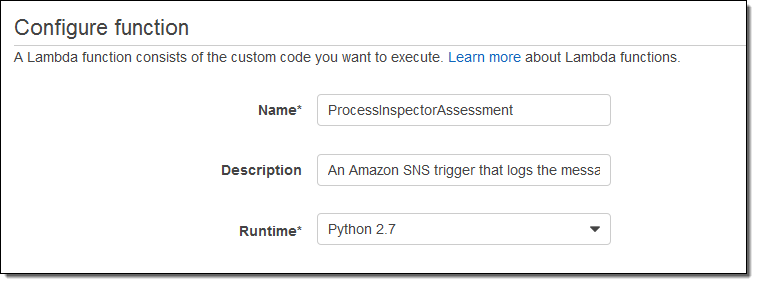
関数の設定を完了するには [Next] をクリックしてください。関数の名前と説明を入力し、Python 2.7 runtime を選択して関数のサンプルコードを次のコードに置き換えます。
from __future__ import print_function
import boto3
import json
import datetime

sns = boto3.client('sns')
inspector = boto3.client('inspector')

# SNS topic - will be created if it does not already exist
SNS_TOPIC = "Inspector-Finding-Delivery"

# Destination email - will be subscribed to the SNS topic if not already
DEST_EMAIL_ADDR = "eric@example.com"

# quick function to handle datetime serialization problems
enco = lambda obj: (
    obj.isoformat()
    if isinstance(obj, datetime.datetime)
    or isinstance(obj, datetime.date)
    else None
)

def lambda_handler(event, context):

    # extract the message that Inspector sent via SNS
    message = event['Records'][0]['Sns']['Message']

    # get inspector notification type
    notificationType = json.loads(message)['event']

    # skip everything except report_finding notifications
    if notificationType != "FINDING_REPORTED":
        print('Skipping notification that is not a new finding: ' + notificationType)
        return 1

    # extract finding ARN
    findingArn = json.loads(message)['finding']

    # get finding and extract detail
    response = inspector.describe_findings(findingArns = [ findingArn ], locale='EN_US')
    print(response)
    try:
        finding = response['findings'][0]
    except OSError as err:
        print("OS error: {0}".format(err))
    except:
        print("Unexpected error:", sys.exc_info()[0])
        raise

    # skip uninteresting findings
    title = finding['title']
    if title == "Unsupported Operating System or Version":
        print('Skipping finding: ', title)
        return 1

    if title == "No potential security issues found":
        print('Skipping finding: ', title)
        return 1

    # get the information to send via email
    subject = title[:100] # truncate @ 100 chars, SNS subject limit
    messageBody = "Title:\n" + title + "\n\nDescription:\n" + finding['description'] + "\n\nRecommendation:\n" + finding['recommendation']

    # un-comment the following line to dump the entire finding as raw json
    # messageBody = json.dumps(finding, default=enco, indent=2)

    # create SNS topic if necessary
    response = sns.create_topic(Name = SNS_TOPIC)
    snsTopicArn = response['TopicArn']

    # check to see if the subscription already exists
    subscribed = False
    response = sns.list_subscriptions_by_topic( TopicArn = snsTopicArn )

    # iterate through subscriptions array in paginated list API call
    while True:
        for subscription in response['Subscriptions']:
            if ( subscription['Endpoint'] == DEST_EMAIL_ADDR ):
                subscribed = True
                break

        if 'NextToken' not in response:
            break

        response = sns.list_subscriptions_by_topic(
            TopicArn = snsTopicArn,
            NextToken = response['NextToken']
            )

    # create subscription if necessary
    if ( subscribed == False ):
        response = sns.subscribe(
            TopicArn = snsTopicArn,
            Protocol = 'email',
            Endpoint = DEST_EMAIL_ADDR
            )

    # publish notification to topic
    response = sns.publish(
        TopicArn = snsTopicArn,
        Message = messageBody,
        Subject = subject
        )

    return 0
次の [ DEST_EMAIL_ADDR ] の値を必ず編集してください。次にインシデント管理システムにインシデントを送信する時に使用するメールアドレスを入力します。オプションとして、 Amazon Inspector が評価結果を送信する時に使用する SNS トピックの名前を変更することもできます。ハンドラー関数 (lambda_function.lambda_handler) はそのままにし、関数に名前を指定します。

Role のドロップダウンリストから [*Basic execution role] を選択します。Lambda が新しいページにアクセスしたら、ポリシードキュメントを表示して代わりに次を使用してください。
{
    "Version": "2012-10-17",
    "Statement": [
        {
            "Effect": "Allow",
            "Action": [
                "logs:CreateLogGroup",
                "logs:CreateLogStream",
                "logs:PutLogEvents"
            ],
            "Resource": "arn:aws:logs:*:*:*"
        },
        {
            "Effect": "Allow",
            "Action": [
                "inspector:DescribeFindings",
                "SNS:CreateTopic",
                "SNS:Subscribe",
                "SNS:ListSubscriptionsByTopic",
                "SNS:Publish"
            ],
            "Resource": "*"
        }
    ]
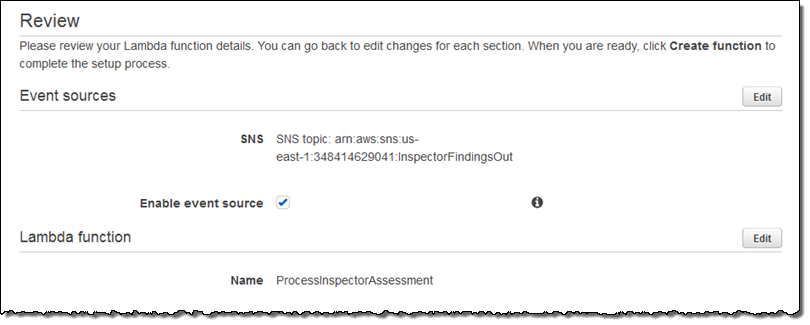
}[Allow] ボタンをクリックしロールを作成したら AWS Lambda に戻り、高度な設定はそのままにしておきます。Review ページで [Enable event source] を必ずクリックしてください。

[Create function] をクリックして関数を保存します。これでステップが完了しました。
準備完了
評価結果を別のシステムに送信する場合は、評価テンプレートに最初の Amazon SNS トピック (ここで紹介した手順で作成したもの) を追加し、新しい評価結果レポートがそのトピックに公開されるよう選択されていることを確認します。最初に評価を実行すると、Amazon Inspector が新しい評価結果について Lambda に通知します。作成した Lambda 関数が SNS トピックを作成し (まだ存在しない場合)、そのトピックに宛先のメールアドレスを受信登録して (登録されていない場合)、そのアドレスにメールで評価結果を送信します。Lambda がメールアドレスをそのトピックに受信登録する必要があった場合は、受信登録の希望を確認するためのリンクが含まれたメールが 1 件届きます。このリンクをクリックして確認すると、Amazon Inspector がそのメールアドレスに評価結果を送信します。Atlassian の Jira Service Desk に接続する手順は、非常に簡単になります。Jira ServiceDesk で、Customer Channels にアクセスします。メールを受信し、新しい問題を作成できるメールアドレスが表示されます。Lambda 関数の Python スクリプトにそのメールアドレスを入力します。このメールアドレスに Inspector から評価結果が送信されます。ServiceDesk によってこれらの問題が自動的に ServiceDesk 問題に変えられるため、ここでワークフローを管理できます。
最新情報
Amazon Inspector をご利用いただき、ありがとうございます。今後の最新情報にご期待ください。
— Eric Fitzgerald、Principal Security Engineer