This post was written by Alan Cranfield, Systems Engineer at Amazon Web Services
This is the first in a series of blog posts aimed at the enterprise SQL Server DBA. I’ll demonstrate how to administer your SQL Server workloads on Amazon EC2 using practical examples and best practices.
Using Run Command
In this post I’ll show you how to use Run Command from Amazon EC2 Systems Manager to update one or many of your SQL Servers to the latest service pack.
Microsoft SQL Server is a popular workload on Amazon EC2. Keeping your SQL Server instances up to date with the latest service pack is important for the stability and security of your critical data. If you need to support multiple versions and editions of SQL Server keeping track of all the latest service packs can be cumbersome.
Run Command provides a simple and secure way to remotely execute commands or run scripts against EC2 instances or on-premises servers. With Run Command, you can perform commands that make it easy to accomplish common administrative tasks like upgrading SQL service packs!
Pre-requisites
When you use EC2 Systems Manager you’ll need to first work through some prerequisites. The most important prerequisite is that you’ll need the SSM agent installed on your instances. The SSM agent is installed by default on Windows Server 2016 instances and instances created from Windows Server 2003-2012 R2 Amazon Machine Images (AMIs) published in November 2016 or later.
Another pre-requisite is that your instances need to be assigned an AWS Identity and Access Management (IAM) role. The IAM role is used to secure the permission policies needed to communicate with the Systems Manager API. Instances are usually added to an IAM role on launch, but you can also add existing instances using the AWS CLI.
Using PowerShell modules
For this exercise we’ll use the Run Command native support for PowerShell modules to download and import a PowerShell module from an Amazon S3 bucket. This module will be called to identify the version of SQL that is running and then download and install the latest service pack. I’ll walk you through updating the SQL service pack by using the AWS Management Console and by using AWS Tools for PowerShell.
Updating the SQL service pack from the EC2 console
- Sign In to the AWS Management Console. To confirm that your instances are in a state to be managed, make sure they are listed in the EC2 console under EC2 Dashboard\Managed Instances.
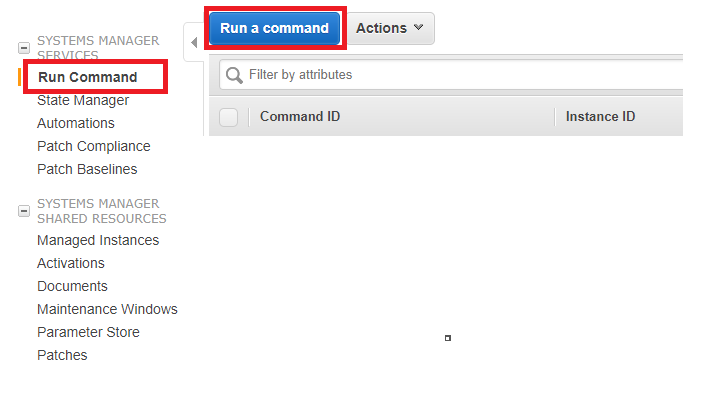
- Navigate to the Run Command and choose Run a command. Then select the AWS-InstallPowershellModule document, and the servers you’d like to upgrade.

- For Source enter the location of the S3 bucket that holds the PowerShell module: https://s3.amazonaws.com/sql-service-pack/InstallSqlServicePack.zip
- Paste the following PowerShell script into the Commands Window
Set-ExecutionPolicy -ExecutionPolicy Unrestricted -Force
Import-Module InstallSqlServicePack
Install-SQLUpdate -Action "Yes"
- Choose the Run button and check the Status column for the instance progress.

- Choose a specific Instance ID in the top pane, and then in the bottom pane choose the Output tab and then choose View Output.
- The results of the service pack upgrade are shown in the Output results window.

Updating the SQL service pack using the AWS Tools for PowerShell
For those who prefer a scripted solution you can call Run Command using the AWS Tools for Windows PowerShell.
- Download and install the latest AWS Tools for Windows PowerShell.
$AWSPSURL = "http://sdk-for-net.amazonwebservices.com/latest/AWSToolsAndSDKForNet.msi"
$AWSPSSetup = "C:\Windows\Temp\AWSPowerShellSetup.msi"
(New-Object System.Net.WebClient).DownloadFile($AWSPSURL, $AWSPSSetup)
Start-Process -FilePath msiexec.exe -Argument List "/i $AWSPSSetup"
Remove-Item $AWSPSSetup -Force
- Set your credentials and AWS Region
# set credentials
Set-AWSCredentials -StoreAs SQL -AccessKey <your access key> -SecretKey <your secret key>
Set-AWSCredentials -ProfileName SQL
Set-DefaultAWSRegion "us-west-2"
Get-IAMUser
- Confirm that your instances are managed by SSM
Get-SSMInstanceInformation -InstanceInformationFilterList @{Key="PingStatus";ValueSet="Online"} | select ComputerName, InstanceId
- Run a Command against your instances to upgrade the SQL service pack. (Tagging can also be used to group servers.)
$InstanceIds = (Get-SSMInstanceInformation).InstanceId

$InstanceIds.count

$source = 'https://s3.amazonaws.com/sql-service-pack/InstallSqlServicePack.zip'
$commands = @(
  'Set-ExecutionPolicy -ExecutionPolicy Unrestricted -Force',
  'Import-Module InstallSqlServicePack',
  'Install-SQLUpdate -Action "Yes"'
)
$parameter = @{
  source = $source;
  commands = $commands;
}

$document = 'AWS-InstallPowerShellModule'

$cmd = Send-SSMCommand –InstanceId $InstanceIds –DocumentName $document –Parameter $parameter
Get-SSMCommandInvocation -CommandId $cmd.CommandId -Details $true | select InstanceId, status
InstanceId          Status
----------          ------
i-0fff59f73e94a0449 InProgress
i-0f1f7afc2b605b4d1 Success
i-0ee0c157a87ede81f InProgress
i-0daa300d38d9c42b1 InProgress
i-0b861190458f9381f InProgress
i-09dc29e6a093ac14c InProgress
i-09aee29b50203cf3c Success
Get-SSMCommandInvocation -CommandId $cmd.CommandId -Details $true | select -ExpandProperty CommandPlugins
== Install SQL Update ==
2017-08-18 23:54:38.760 Test-SQLInstallation
2017-08-18 23:54:38.856 - SQL server service is installed and started
2017-08-18 23:54:38.866 - Importing SQLPS Module
2017-08-18 23:54:41.048 Check if Clustered
2017-08-18 23:54:41.227 - Not Clustered
2017-08-18 23:54:41.232 Get-InstallableUpdate
2017-08-18 23:54:41.245 - Read current installed version...
2017-08-18 23:54:41.254 - Found Microsoft SQL Server 2016 (RTM-CU3-GDR) (KB3194717) - 13.0.2186.6 (RTM)
2017-08-18 23:54:41.275 - Looking for latest Service Pack...
2017-08-18 23:54:41.351 - Found Microsoft SQL Server 2016 - 13.0.4001.0 (SP1)
2017-08-18 23:54:41.359 Test-DownloadDestinationFolder
2017-08-18 23:54:41.377 - Get disk information on C: drive
2017-08-18 23:54:41.400 - Free space is 27 GB
2017-08-18 23:54:41.410 - Destination folder C:\Windows\temp was successfully created.
2017-08-18 23:54:41.415 Downloading Microsoft SQL Server 2016 - 13.0.4001.0 (SP1) from Microsoft...
2017-08-18 23:54:49.100 - Downloading Update bits completed
2017-08-18 23:54:49.106 Installing Microsoft SQL Server 2016 - 13.0.4001.0 (SP1)
2017-08-18 23:59:01.504 - Installing Microsoft SQL Server 2016 - 13.0.4001.0 (SP1) Completed
2017-08-18 23:59:01.510 Verify SQL version after update
2017-08-18 23:59:01.525 - Version after update 13.0.4001.0
2017-08-18 23:59:01.530 Update Successful!
Conclusion
Amazon EC2 Systems Manager offers a suite of tools to help you manage both your EC2 and on-premises SQL Server instances. In this post, I showed you how to use the Run Command feature of Systems Manager to easily upgrade SQL Server to the latest service pack.
In a critical production environment, when you upgrade you might have extra steps to perform before and after, such as database backups, failovers, failbacks, etc. So, in the next post I’ll show you how to use the Automation feature of Systems Manager to achieve custom maintenance workflows.
About the Author
 Alan Cranfield is a Senior Systems Engineer on the EC2 Windows team where he uses his extensive experience managing critical enterprise environments to help make AWS the best cloud platform for running Windows workloads. He spends his spare time in the garage restoring and customizing old motorcycles.