AWS Cloud Operations Blog
Patching your Windows EC2 instances using AWS Systems Manager Patch Manager
Patch Manager automates the process of patching Windows and Linux managed instances. Use this feature of AWS Systems Manager to scan your instances for missing patches or scan and install missing patches. You can install patches individually or to large groups of instances by using Amazon EC2 tags.
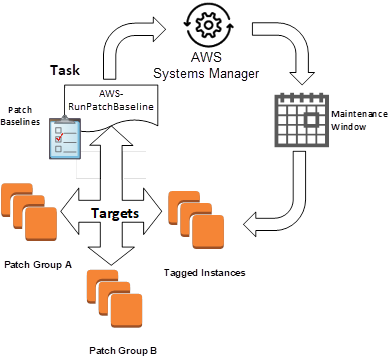
In this blog post, I show you how to use patch baselines to include rules for auto-approving patches within days of their release, as well to see a list of approved and rejected patches. I’ll demonstrate how to leverage patch groups to organize instances for patching. For example, you can create patch groups for different environments/tagged instances such as development, test, and production. I’ll show you how you can install patches on a regular basis by scheduling patching to run as a Maintenance Windows task. Don’t worry, by the end of this blog you will have a good understanding of what is shown in the following diagram.
In this blog post, I’ll show you how to run Patch Manager in the console, and then follow with how to use CLI commands to do the same thing. To use the AWS Systems Manager console, you need an AWS Account so you can leverage the available AWS services.
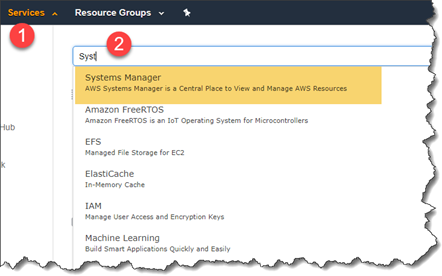
In the AWS Management Console, open the AWS Systems Manager console by choosing Services on the top menu (1), and then starting to type the service console you want in the search bar (2).
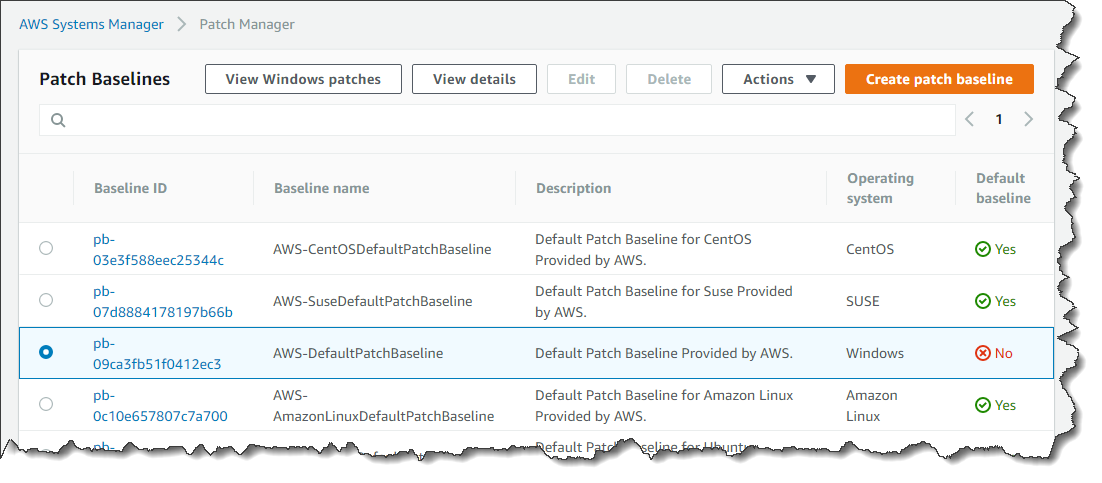
Using patch baselines
A patch baseline defines which patches should and shouldn’t be installed on your instances. You can individually specify approved or rejected patches, or you can use auto-approval rules to specify that certain types of updates (for example, critical updates), should automatically be approved for patching.
Patch Manager has a pre-defined patch baseline that approves all patches classified as critical updates or security updates with a severity of Critical or Important. These patches are automatically approved by this baseline seven days after they are released by Microsoft.
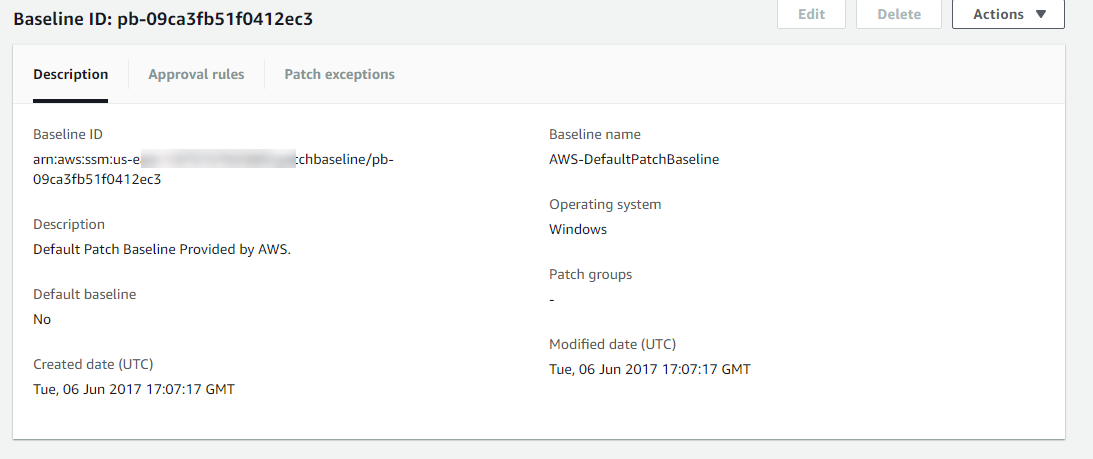
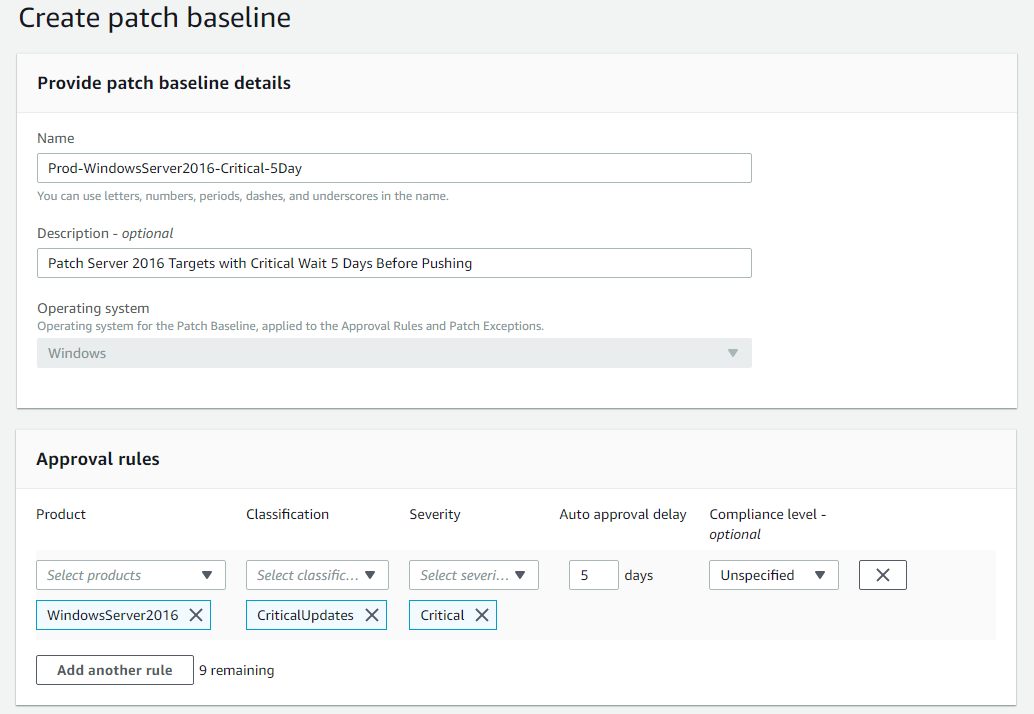
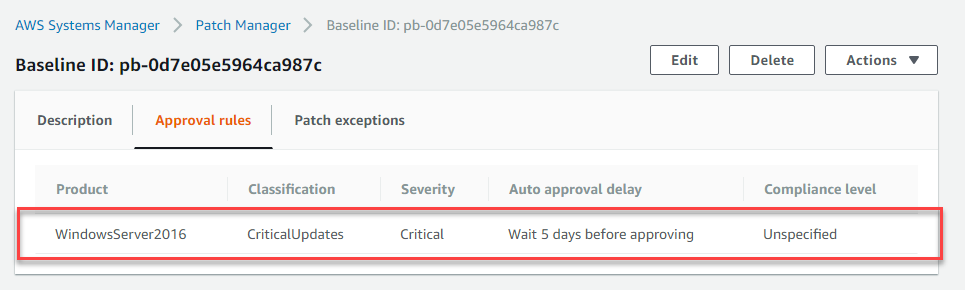
Creating a patch baseline
You can create your own custom patch baselines, here you can choose which patches to auto-approve by using the following categories.
- Operating system: Windows, Amazon Linux, Ubuntu Server, etc.
- Product name: For example, RHEL 6.5, Amazon Linux 2014.09, Windows Server 2012, Windows Server 2012 R2, etc.
- Classification: For example, critical updates, security updates, etc.
- Severity: For example, critical, important, etc.
For each auto-approval rule that you create, you can specify an auto-approval delay. This delay is the number of days to wait after the patch was released, before the patch is automatically approved for patching. For example, if you create a rule using the Critical Updates classification and configure it for five days auto-approval delay, then a new critical patch released on January 1 will automatically be approved on January 6.
Setting a baseline as a default
By default, the pre-defined patch baseline that ships with Patch Manager is designated as the default patch baseline. However, you can specify your own patch baseline as the default.

Multi-patching approaches
By using multiple patch baselines with different auto-approval delays, you can deploy patches at different rates to different instances. For example, you can create separate patch baselines and auto-approval delays for development and production environments. This enables you to test patches in your development environment before they get deployed in your production environment. Use the following CLI command:
Patch groups
A patch group is an optional means of defining which patch baseline should be used for what instances. For example, you can create patch groups for different environments such as development, test, and production. You can also create primary and secondary failover cluster groupings . Patch groups can be created based on server function, for example, web servers and databases. Patch groups can help you avoid deploying patches to the wrong set of instances.
After you’ve opened the AWS Systems Manager console select Patch Manager from the left menu. A patch group must be defined with the tag key Patch Group. In the example that follows an instance that we want to patch as a patch group has been tagged with Front-End Servers. A fleet of instances that have these tags can be patched using this approach.

CLI Command:
Maintenance Windows
AWS Systems Manager Maintenance Windows let you define a schedule for when to perform potentially disruptive actions on your instances such as patching an operating system (OS), updating drivers, or installing software. Each Maintenance Window has a schedule, a duration, a set of registered targets, and a set of registered tasks. Typically you want to apply your patches at a time when there is the least impact to your organization.
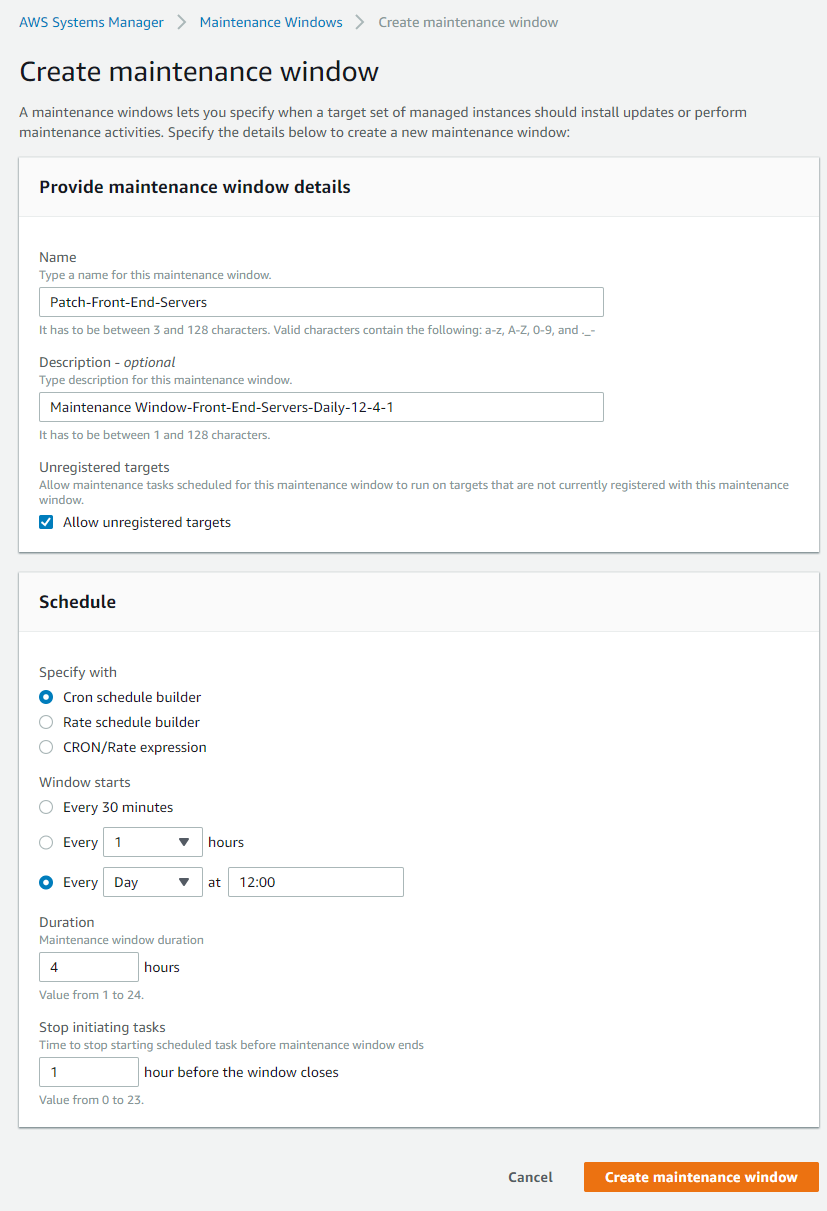
1. In the AWS Systems Manager console, go to the Create a maintenance window page to create a maintenance window with a schedule for your patching operations.
1) Duration: The duration of the Maintenance Window in hours.
2) Stop initialing tasks (cutoff): The number of hours before the end of the Maintenance Window that Systems Manager stops scheduling new tasks for execution.
CLI Command:
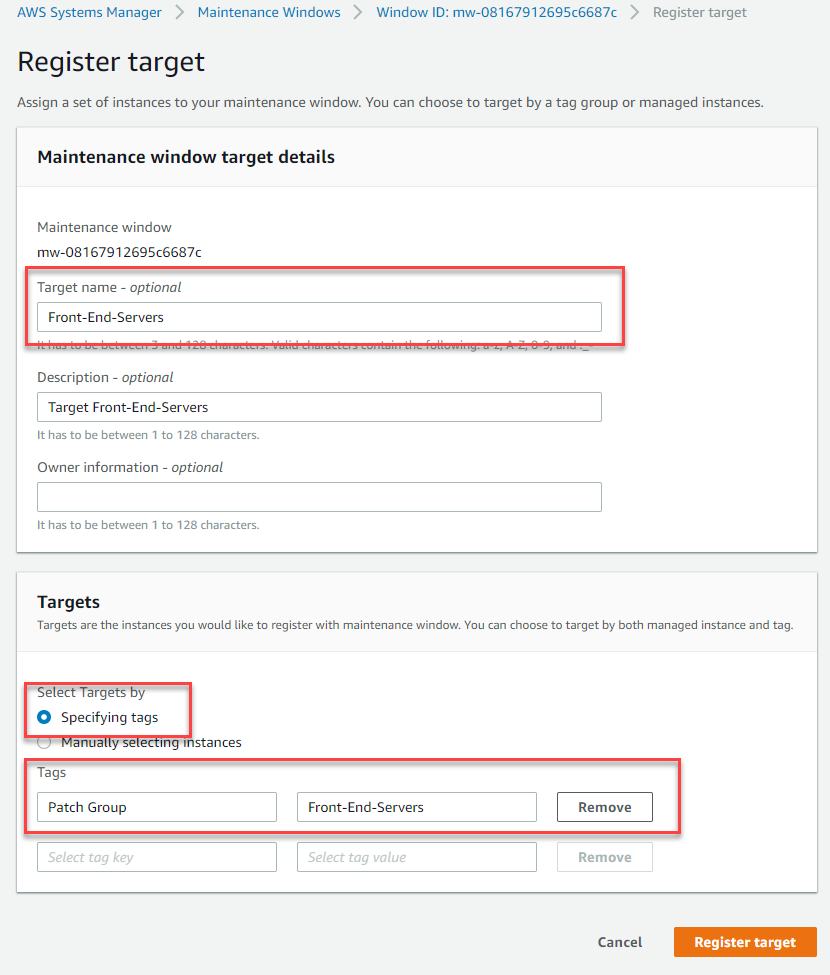
2. On the Register targets page in the console, create register targets for your Maintenance window by specifying the Patch Group tag for the tag name, and any value for which you have defined EC2 tags, (in our example it’s Front-End Servers). You don’t have to target by patch group, instead can use any tags defined for your instances, completely independent of the Patch Group tag. A common use case is that you may have a patch baseline for publicly accessible web servers that you use for all internet facing web servers, but you have many different applications so you may want to create a target for the web servers for one of these applications.
CLI Command:
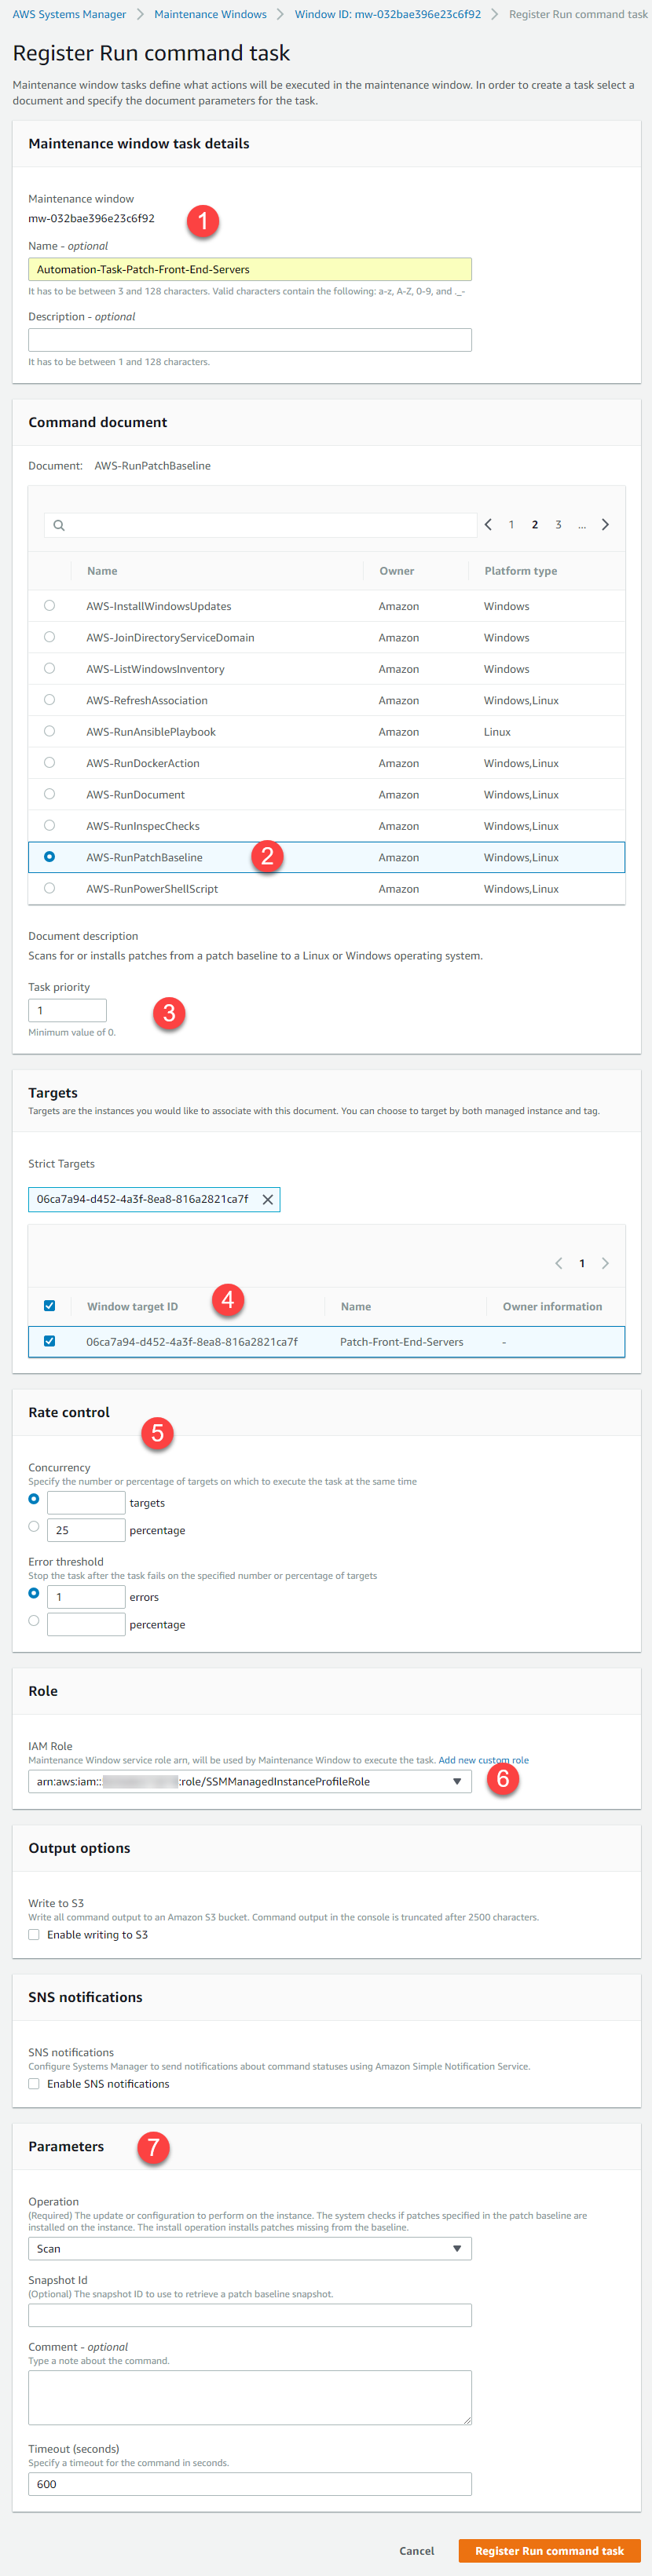
3. In the Register task pane in the console, do the following tasks.
1) Maintenance Window task details: add, name and description.
2) The Run Command document for this task is AWS-RunPatchBaseline. You can choose to either scan instances or scan and patch instances. If you choose to scan instances, then Patch Manager scans each instance and generates a list of missing patches for you to review. Note that AWS-RunPatchBaseline is cross-platform and works for both Windows and Linux.
3) Fill in the Document Version to use and the Task Priority that determines the order in which tasks are run, when multiple tasks are registered.
4) The Windows Target ID is the patch group defined earlier.
5) For Rate Control:
i. Concurrency: The maximum number of targets allowed to run this task in parallel. You can specify a number, such as 10, or a percentage, such as 10%. The default value is 10.
ii. Error Threshold: The number of errors that are allowed before the system stops running the automation on additional targets. You can specify either an absolute number of errors, for example 10, or a percentage of the target set, for example 10%.
6) IAM Role that has the AmazonSSMMaintenanceWindowRole policy attached to it, to perform the patching on the registered targets. Please refer to the following link for guidance on how to configure the role for Maintenance Windows.
7) Input Parameters: These are the parameters that are passed to the chosen Run Command document in step 2.
CLI Command:
Monitoring patch compliance
You can view results and patch compliance details on the Managed Instances page by selecting the Inventory tab and filtering by the AWS: PatchSummary and AWS: PatchCompliance. Note that the Configuration compliance section gives an aggregated high-level view of patch compliance from where you can dive deeper into details of compliance. You can also review a specific instance by choosing the instance and then choosing the Patch tab.

Conclusion
In this blog post I covered the key aspects of using AWS Systems Manager Patch Manager. I started by showing you how to create a patch baseline that defines which patches should and shouldn’t be installed on your instances. After you define your baselines, I showed you how to control the deployment of these baselines to patch groups for different environments such as development, test, and production. Finally, I showed you how to minimize the impact to your organization by using the Maintenance Window and scheduling the rollout of the patches.
I encourage you to use what you have learned here and consider leveraging AWS Systems Manager resources in your own organization. You might begin by using Patch Manager in a small part of the organization to demonstrate a proof of concept to your peers. I welcome your comments or questions.
About the Author
 Stefan Minhas is a senior consultant at Amazon Web Services. He is a subject matter expert in the Global Microsoft Specialty Practice, and works to provide guidance and technical assistance in the development and growth of specialty skills across the broader Professional Services community.