Amazon Web Services ブログ
AWS CodePipelineを利用したネストされたAWS CloudFormationスタックの継続的デリバリー
CodePipeline の更新 – CloudFormation スタックの継続的デリバリーワークフローの構築で、 Jeff BarrはInfrastructure as Codeについてと、AWS CodePipelineを継続的デリバリーに使用する方法について説明しています。 本ブログ記事では、ソースリポジトリとしてAWS CodeCommitを、ビルドおよびテストツールとしてAWS CodeBuildを使用した、AWS CodePipelineを使ったネストされたCloudFormationスタックの継続的デリバリーについて説明します。手動承認プロセスに従ってCloudFormationチェンジセットを使用してスタックをデプロイします。
AWS CodePipelineでは、次の4つのステージでパイプラインを作成します。
- Source (AWS CodeCommit)
- Build and Test (AWS CodeBuild および AWS CloudFormation)
- Staging (AWS CloudFormation および 手動承認)
- Production (AWS CloudFormation および 手動承認)
次の図に、パイプラインのステージと、各ステージのアクション、およびステージ間の遷移を示します。

CloudFormationテンプレート、テストスクリプト、およびビルドスペックファイルは、AWS CodeCommitリポジトリに格納されています。これらのファイルは、AWS CodePipelineのパイプラインのSourceステージで使用されます。
AWS::CloudFormation::Stackリソースタイプは、親スタックから子スタックを作成するために使用されます。 CloudFormationスタックリソースでは、S3バケットに格納される子スタックのテンプレートを必要とします。テンプレートファイルの場所は、リソース定義のPropertiesセクションにURLとして指定されます。
次のテンプレートは、3つの子スタックを作成します。
- Security (IAM, セキュリティグループ)
- Database (RDSインスタンス)
- Web stacks (Auto ScalingグループのEC2インスタンス, ELB)
Description: Master stack which creates all required nested stacks

Parameters:
  TemplatePath:
    Type: String
    Description: S3Bucket Path where the templates are stored
  VPCID:
    Type: "AWS::EC2::VPC::Id"
    Description: Enter a valid VPC Id
  PrivateSubnet1:
    Type: "AWS::EC2::Subnet::Id"
    Description: Enter a valid SubnetId of private subnet in AZ1
  PrivateSubnet2:
    Type: "AWS::EC2::Subnet::Id"
    Description: Enter a valid SubnetId of private subnet in AZ2
  PublicSubnet1:
    Type: "AWS::EC2::Subnet::Id"
    Description: Enter a valid SubnetId of public subnet in AZ1
  PublicSubnet2:
    Type: "AWS::EC2::Subnet::Id"
    Description: Enter a valid SubnetId of public subnet in AZ2
  S3BucketName:
    Type: String
    Description: Name of the S3 bucket to allow access to the Web Server IAM Role.
  KeyPair:
    Type: "AWS::EC2::KeyPair::KeyName"
    Description: Enter a valid KeyPair Name
  AMIId:
    Type: "AWS::EC2::Image::Id"
    Description: Enter a valid AMI ID to launch the instance
  WebInstanceType:
    Type: String
    Description: Enter one of the possible instance type for web server
    AllowedValues:
      - t2.large
      - m4.large
      - m4.xlarge
      - c4.large
  WebMinSize:
    Type: String
    Description: Minimum number of instances in auto scaling group
  WebMaxSize:
    Type: String
    Description: Maximum number of instances in auto scaling group
  DBSubnetGroup:
    Type: String
    Description: Enter a valid DB Subnet Group
  DBUsername:
    Type: String
    Description: Enter a valid Database master username
    MinLength: 1
    MaxLength: 16
    AllowedPattern: "[a-zA-Z][a-zA-Z0-9]*"
  DBPassword:
    Type: String
    Description: Enter a valid Database master password
    NoEcho: true
    MinLength: 1
    MaxLength: 41
    AllowedPattern: "[a-zA-Z0-9]*"
  DBInstanceType:
    Type: String
    Description: Enter one of the possible instance type for database
    AllowedValues:
      - db.t2.micro
      - db.t2.small
      - db.t2.medium
      - db.t2.large
  Environment:
    Type: String
    Description: Select the appropriate environment
    AllowedValues:
      - dev
      - test
      - uat
      - prod

Resources:
  SecurityStack:
    Type: "AWS::CloudFormation::Stack"
    Properties:
      TemplateURL:
        Fn::Sub: "https://s3.amazonaws.com/${TemplatePath}/security-stack.yml"
      Parameters:
        S3BucketName:
          Ref: S3BucketName
        VPCID:
          Ref: VPCID
        Environment:
          Ref: Environment
      Tags:
        - Key: Name
          Value: SecurityStack

  DatabaseStack:
    Type: "AWS::CloudFormation::Stack"
    Properties:
      TemplateURL:
        Fn::Sub: "https://s3.amazonaws.com/${TemplatePath}/database-stack.yml"
      Parameters:
        DBSubnetGroup:
          Ref: DBSubnetGroup
        DBUsername:
          Ref: DBUsername
        DBPassword:
          Ref: DBPassword
        DBServerSecurityGroup:
          Fn::GetAtt: SecurityStack.Outputs.DBServerSG
        DBInstanceType:
          Ref: DBInstanceType
        Environment:
          Ref: Environment
      Tags:
        - Key: Name
          Value:   DatabaseStack

  ServerStack:
    Type: "AWS::CloudFormation::Stack"
    Properties:
      TemplateURL:
        Fn::Sub: "https://s3.amazonaws.com/${TemplatePath}/server-stack.yml"
      Parameters:
        VPCID:
          Ref: VPCID
        PrivateSubnet1:
          Ref: PrivateSubnet1
        PrivateSubnet2:
          Ref: PrivateSubnet2
        PublicSubnet1:
          Ref: PublicSubnet1
        PublicSubnet2:
          Ref: PublicSubnet2
        KeyPair:
          Ref: KeyPair
        AMIId:
          Ref: AMIId
        WebSG:
          Fn::GetAtt: SecurityStack.Outputs.WebSG
        ELBSG:
          Fn::GetAtt: SecurityStack.Outputs.ELBSG
        DBClientSG:
          Fn::GetAtt: SecurityStack.Outputs.DBClientSG
        WebIAMProfile:
          Fn::GetAtt: SecurityStack.Outputs.WebIAMProfile
        WebInstanceType:
          Ref: WebInstanceType
        WebMinSize:
          Ref: WebMinSize
        WebMaxSize:
          Ref: WebMaxSize
        Environment:
          Ref: Environment
      Tags:
        - Key: Name
          Value: ServerStack

Outputs:
  WebELBURL:
    Description: "URL endpoint of web ELB"
    Value:
      Fn::GetAtt: ServerStack.Outputs.WebELBURL
Validateステージでは、AWS CodeBuildはAWS CodeCommitソースリポジトリの変更をチェックします。 ValidateTemplate APIを使用してCloudFormationテンプレートを検証し、子テンプレートと設定ファイルをS3バケットの適切な場所にコピーします。
次のAWS CodeBuildビルドスペックでは、TEMPLATE_FILES環境変数にリストされているCloudFormationテンプレートが検証され、AWS CodeBuildプロジェクトの環境変数TEMPLATE_BUCKETに指定されたS3バケットにコピーされます。 オプションとして、TEMPLATE_PREFIX環境変数を使用して、バケット内のパスを指定することもできます。これにより、構成ファイルの子テンプレートファイルの場所が更新されます。テンプレートファイルの場所は、親スタックのパラメータとして渡されます。
version: 0.1

environment_variables:
  plaintext:
    CHILD_TEMPLATES: |
      security-stack.yml
      server-stack.yml
      database-stack.yml
    TEMPLATE_FILES: |
      master-stack.yml
      security-stack.yml
      server-stack.yml
      database-stack.yml
    CONFIG_FILES: |
      config-prod.json
      config-test.json
      config-uat.json

phases:
  install:
    commands:
      npm install jsonlint -g
  pre_build:
    commands:
      - echo "Validating CFN templates"
      - |
        for cfn_template in $TEMPLATE_FILES; do
          echo "Validating CloudFormation template file $cfn_template"
          aws cloudformation validate-template --template-body file://$cfn_template
        done
      - |
        for conf in $CONFIG_FILES; do
          echo "Validating CFN parameters config file $conf"
          jsonlint -q $conf
        done
  build:
    commands:
      - echo "Copying child stack templates to S3"
      - |
        for child_template in $CHILD_TEMPLATES; do
          if [ "X$TEMPLATE_PREFIX" = "X" ]; then
            aws s3 cp "$child_template" "s3://$TEMPLATE_BUCKET/$child_template"
          else
            aws s3 cp "$child_template" "s3://$TEMPLATE_BUCKET/$TEMPLATE_PREFIX/$child_template"
          fi
        done
      - echo "Updating template configurtion files to use the appropriate values"
      - |
        for conf in $CONFIG_FILES; do
          if [ "X$TEMPLATE_PREFIX" = "X" ]; then
            echo "Replacing \"TEMPLATE_PATH_PLACEHOLDER\" for \"$TEMPLATE_BUCKET\" in $conf"
            sed -i -e "s/TEMPLATE_PATH_PLACEHOLDER/$TEMPLATE_BUCKET/" $conf
          else
            echo "Replacing \"TEMPLATE_PATH_PLACEHOLDER\" for \"$TEMPLATE_BUCKET/$TEMPLATE_PREFIX\" in $conf"
            sed -i -e "s/TEMPLATE_PATH_PLACEHOLDER/$TEMPLATE_BUCKET\/$TEMPLATE_PREFIX/" $conf
          fi
        done

artifacts:
  files:
    - master-stack.yml
    - config-*.json
テンプレートファイルがS3にコピーされると、CloudFormationはテストスタックを作成し、テストアクションとしてAWS CodeBuildをトリガーします。
AWS CodeBuildのビルドスペックでは、ネストされたCloudFormationスタックを使用して作成されたリソースが、CONFIG_FILEで指定された仕様に準拠しているかどうかをチェックするためのPythonスクリプト、validate-env.pyが実行されます。
version: 0.1

environment_variables:
  plaintext:
    CONFIG_FILE: env-details.yml

phases:
  install:
    commands:
      - pip install --upgrade pip
      - pip install boto3 --upgrade
      - pip install pyyaml --upgrade
      - pip install yamllint --upgrade
  pre_build:
    commands:
      - echo "Validating config file $CONFIG_FILE"
      - yamllint $CONFIG_FILE
  build:
    commands:
      - echo "Validating resources..."
      - python validate-env.py
      - exit $?
テストアクションが正常に完了すると、CloudFormationはテストスタックを削除し、パイプラインのUAT(訳者注:User Acceptance Test/ユーザ受け入れテスト)ステージに進みます。
このステージでは、CloudFormationはUATスタックに対して変更セットを作成し、変更セットを実行します。これにより、UAT環境が更新され、受け入れテストが可能になります。プロセスは手動承認アクションに進みます。 QAチームがUAT環境を検証して承認をおこなった後、プロセスはパイプラインのProductionステージに移行します。
このステージでは、CloudFormationはネストされた本番スタックの変更セットを作成し、プロセスは手動承認ステップに進みます。(通常は指定されたエグゼクティブによって)承認されると、変更セットが実行され、Productionデプロイメントが完了します。
継続的デリバリーパイプラインの設定
CloudFormationテンプレートを使用して、継続的デリバリーパイプラインを設定します。 GitHubから入手できるcodepipeline-cfn-codebuild.ymlテンプレートは、フル機能のパイプラインを設定します。
このテンプレートを使用してパイプラインを作成するときは、次の項目を指定します。
- AWS CodeCommitリポジトリ
- 承認通知を送信するSNSトピック
- アーティファクトが格納されるS3バケット名
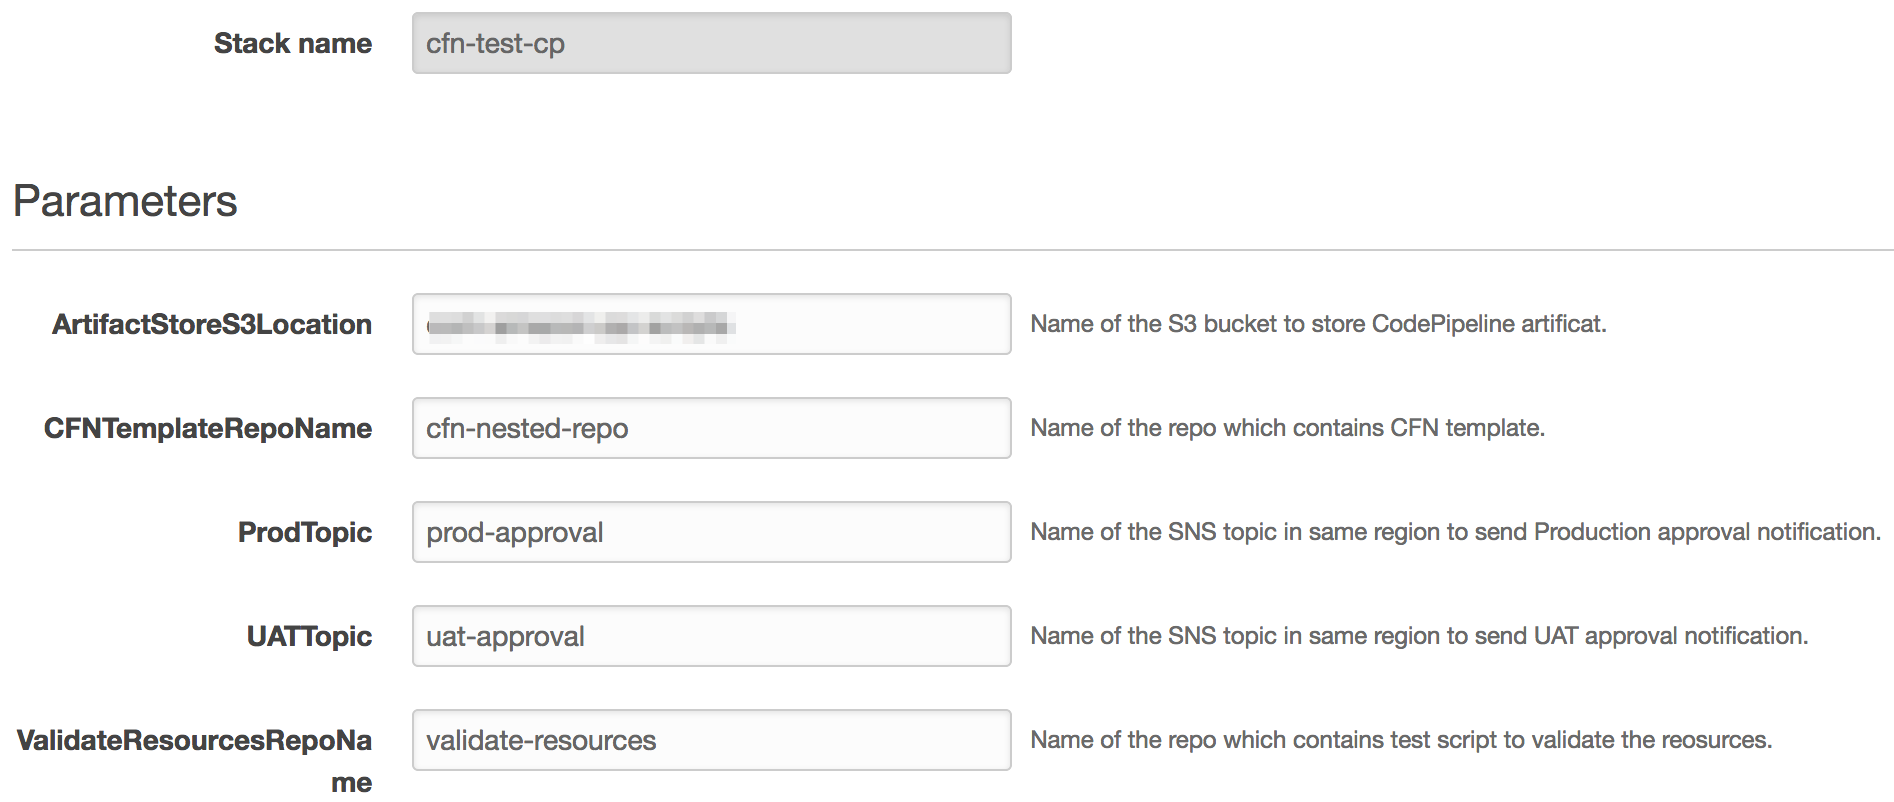
CFNTemplateRepoNameには、CloudFormationテンプレート、設定ファイル、およびビルドスペックファイルが格納されているAWS CodeCommitリポジトリを指定します。
私のリポジトリには以下のファイルが含まれています:

継続的デリバリーパイプラインは、Create Stackをクリックするとすぐに配備されます。作成後、パイプラインは各ステージを実行します。 UATおよびProductionステージの手動承認により、パイプラインは継続的デリバリーを可能にします。

ネストされたスタックの変更の実装
ネストしたスタック内の子スタックを変更するには(たとえば、パラメータ値を更新する、またはリソースを追加または変更するなど)、親スタックを更新します。変更は適切なテンプレートファイルまたは設定ファイルで行い、AWS CodeCommitリポジトリにチェックインする必要があります。これにより、次のデプロイプロセスがトリガーされます:

まとめ
この記事では、AWS CodePipeline、AWS CloudFormation、AWS CodeBuild、および手動承認プロセスを使用して、Infrastructure as Codeとアプリケーションデプロイメントの両方で継続的デリバリーパイプラインを作成する方法を示しました。
AWS CodePipelineの詳細については、AWS CodePipelineのドキュメントを参照してください。数回のクリックで始めることができます。 すべてのCloudFormationテンプレート、AWS CodeBuildビルドスペックファイル、および検証を実行するPythonスクリプトは、codepipeline-nested-cfn GitHubリポジトリに公開しています。
著者紹介
 Prakash PalanisamyはAmazon Web ServicesのSolutions Architectです。 Serverless、DevOps、Alexaを担当する他、Project Eulerでの問題解決をおこなっています。彼はまた、教育ドキュメンタリーを見て楽しんでいます。
(翻訳はSA千葉が担当しました。原文はこちら)