AWS Security Blog
How to migrate 3DES keys from a FIPS to a non-FIPS AWS CloudHSM cluster
On August 20, 2024, we announced the general availability of the new AWS CloudHSM hardware security module (HSM) instance type hsm2m.medium, referred to in this post as hsm2. This new type comes with additional features compared to the previous CloudHSM instance type hsm1.medium (hsm1). The new features include the following:
- Support for Federal Information Processing Standard (FIPS) 140-3 Level 3
- The ability to run CloudHSM clusters in non-FIPS mode
- Increased storage capacity of 16,666 total keys
- Support for Mutual Transport Layer Security (mTLS) between CloudHSM client SDKs and the CloudHSM cluster
In this blog post, I walk you through the steps to securely migrate Triple Data Encryption Algorithm (Triple DES or 3DES) keys from your hsm1 CloudHSM cluster to a new hsm2 cluster running in non-FIPS mode, without using backups.
CloudHSM and 3DES keys
On January 1, 2024, the National Institute of Standards and Technology (NIST) withdrew Special Publication 800-67 Revision 2. This means that 3DES is no longer a FIPS-approved block cipher for applying cryptographic protection (that is, encryption, key wrapping, and generation of Message Authentication Codes (MACs)).
Customers that don’t use 3DES can migrate keys to an hsm2 cluster by creating an hsm2 cluster running in FIPS mode from an hsm1 backup. For more information, see Creating AWS CloudHSM clusters from backups.
For customers that use 3DES keys in their workloads for applying cryptographic protection, AWS recommends that you do the following:
- Migrate your 3DES workloads to Advanced Encryption Standard (AES), which is a FIPS-approved, modern symmetric block cipher
- If you use 3DES for payment processing, consider migrating your workloads to the AWS Payment Cryptography service
However, if migrating to a different encryption algorithm or cryptography service isn’t feasible and you intend to continue to use 3DES, you can use an hsm2 cluster running in non-FIPS mode to manage your 3DES keys and take advantage of the new hsm2 benefits.
Note that moving to a non-FIPS CloudHSM cluster might change your compliance posture. If a regulatory standard or certification requires you to run FIPS-compliant cryptographic modules, this move might impact you. When you create a non-FIPS cluster, the underlying FIPS-certified HSM will be configured to run in non-FIPS mode. Give careful consideration to these issues before you move to a non-FIPS CloudHSM cluster. For details on what certification and compliance requirements apply to hsm1 and hsm2, see AWS CloudHSM cluster modes and HSM types.
Normally you can migrate keys from an existing CloudHSM cluster to a new one by creating the new cluster from an existing backup. But you cannot migrate keys to a non-FIPS hsm2 cluster by using an hsm1 cluster backup. This is because CloudHSM doesn’t allow you to change compliance modes from FIPS to non-FIPS. However, there is an alternate way to migrate keys between CloudHSM clusters without using backups. In the following solution guidance, I show you how to use an RSA-AES wrap mechanism to migrate keys without exposing the key material in plaintext outside the CloudHSM boundaries. The RSA-AES mechanism provides the benefit of migrating large-sized keys while avoiding the payload size limitation typically associated with asymmetric RSA key pairs.
Solution overview
The solution uses CloudHSM CLI to run the key migration commands against the source and target CloudHSM clusters. Figure 1 provides a summary of the steps involved in the solution.
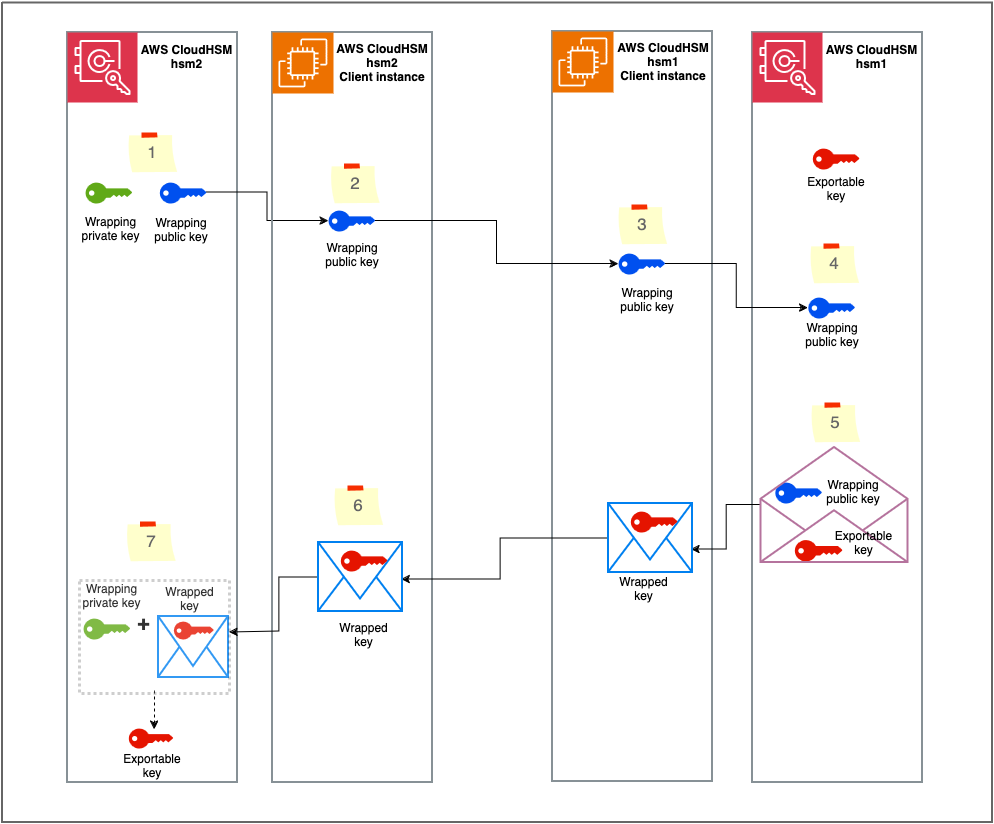
Figure 1: Solution overview
The workflow is as follows:
- Generate the RSA wrapping key pair on CloudHSM hsm2.
- Export the RSA public key to the hsm2 CloudHSM client instance.
- Move the RSA public key to the CloudHSM hsm1 client instance.
- Import the RSA public key into CloudHSM hsm1.
- Wrap the designated key using the imported RSA public key.
- Move the wrapped key to the CloudHSM hsm2 client instance.
- Unwrap the key into CloudHSM hsm2 with the RSA private key.
Although the steps in this post are specific to CloudHSM CLI, the same procedure can be used with other CloudHSM SDKs such as the Java Cryptographic Extension (JCE) and the PKCS #11 library. With JCE, the RSAWrappingRunner example code demonstrates how to wrap and unwrap keys by using the RSA-AES mechanism. Similarly, with PKCS #11, the rsa_wrapping.c example code demonstrates how to wrap and unwrap keys by using RSA-AES.
Important considerations
There are a few important things that you need to keep in mind when migrating cryptographic keys:
- Exportable keys – This solution only works for exportable keys (keys with the attribute
extractableset to “true”). If non-extractable keys need to be migrated, you must rotate them: Generate a new key on the CloudHSM hsm2 cluster, use the old key from hsm1 to decrypt the data, and then use the new key in hsm2 to re-encrypt the data. If possible, use advanced keys like AES for re-encryption. - Key ownership – When a key is migrated to a new cluster, the crypto user who unwraps the key becomes the key owner. You need to have a plan to make sure the appropriate crypto users are migrating keys and the applications that rely on those keys are updated with the right crypto user credentials. You can also share the unwrapped keys with the appropriate crypto users after migration. This helps to prevent the availability of your applications from being impacted due to the key migration. You can use one of the following strategies to manage key ownership during migration:
- The recommended strategy is to first create the required crypto users in the hsm2 cluster by using CloudHSM CLI and then use each user to migrate the required keys they currently own in hsm1. You can either create separate wrapping key pairs per crypto user or have one wrapping key pair that is shared with required crypto users to migrate their keys.
- Another strategy is to employ one crypto user to migrate the required keys and then share the migrated keys with the appropriate crypto users after migration. Note that shared keys have limitations such that the recipient crypto user cannot modify or share the key.
- Key attributes – When a key is migrated, only the attributes that are specified during the unwrap operation are set on the key. Make sure to identify the key attributes from hsm1 and set them on the key when unwrapping to hsm2. Note that some attributes like
extractablecan only be set while the key is being created or unwrapped, but that others can be set after creation by using the key set-attribute See Key attributes for CloudHSM CLI for a list of attributes and when can they be set. You can use the CloudHSM CLI key list command with theverboseargument to list keys owned by a crypto user, along with the attributes of those keys. Additionally, you can use unwrap templates to specify attributes that must be set while unwrapping. Note that this feature is only supported by the PKCS #11 SDK. - HSM backup – It is recommended to keep a backup of hsm1 until you have confirmed that all the required keys have been migrated to hsm2. You can configure a CloudHSM backup retention policy to manage backups. Note that CloudHSM doesn’t delete a cluster’s last backup. See Configuring AWS CloudHSM backup retention policy for more information. You can also share the CloudHSM backups with other AWS accounts as described in Working with shared backups.
Prerequisites
You need to have the following prerequisites in place to implement the solution:
- An active CloudHSM hsm1 cluster with at least one active HSM.
- The credentials of crypto users in hsm1 who are the owners of the keys that need to be migrated.
- An Amazon Elastic Compute Cloud (Amazon EC2) instance with CloudHSM CLI installed and configured to connect to the CloudHSM cluster. For instructions on how to configure and connect the client instance, see Getting started with AWS CloudHSM.
- An active CloudHSM hsm2 cluster with at least one active HSM and a valid crypto user As I mentioned in the Key ownership notes, make sure to create crypto users in hsm2 who will own the migrated keys.
- A second EC2 instance with CloudHSM CLI installed and configured to connect to the hsm2 cluster. For instructions on how to configure and connect the client instance, see Getting started with AWS CloudHSM.
- A list of exportable keys with their attributes that you want to migrate from hsm1. You can use the key list command with the
verboseargument to list the keys owned by a crypto user. The output will contain the key attributes, includinglabel,extractable, andkey-type. You can also pass thefilterargument to the command to list specific keys based onlabelorkey-type, such as3des. The CloudHSM CLI command to list 3DES keys with their attributes is as follows:As I mentioned in the Key attributes note, some attributes like
extractablecan only be set while the key is being created or unwrapped, but others can be set after creation using the key set-attribute command.
Note the following:
- You can configure CloudHSM CLI to connect to multiple clusters. You can use a single EC2 instance with CloudHSM CLI to migrate keys from one cluster to another, provided that you can set up a network path to both clusters from the client instance.
- You can run CloudHSM CLI commands using a bash script or similar by running the commands in interactive mode.
Step 1: Generate the RSA wrapping key pair on hsm2
The first step in the solution is to create a wrapping key pair on your new CloudHSM hsm2 cluster by using CloudHSM CLI. The public key from the key pair will be used to wrap and the private key to unwrap. Label the key pair accordingly and note down the labels.
Note: As mentioned in the Key ownership notes, choose an appropriate strategy to migrate the keys. The crypto user who generates the wrapping key pair in this step or with whom this key pair is shared will be required to unwrap the key in the final step.
To generate the RSA wrapping key pair:
- Sign in to your hsm2 client instance that has CloudHSM CLI installed. Run the following command to use CloudHSM CLI in interactive mode, as described in Getting started with CloudHSM Command Line Interface (CLI):
- Sign in with your crypto user credential. Make sure to replace
<CryptoUserName>with your own information and supply your password when prompted. - Run the following key generate-asymmetric-pair rsa command to create an RSA key pair. Make sure to replace
<rsa_wrapping_key_label>and<rsa_unwrapping_key_label>with your own labels for the public and private key that are being generated. Note down the public and private key labels because this data is required in the following steps. - (Optional) You can list the keys by filtering using the label, as described in Using CloudHSM CLI to filter keys:
Step 2: Export the RSA public key to the hsm2 client instance
In this step, you export the RSA public key from hsm2 to the EC2 instance file system.
To export the RSA public key to the hsm2 client instance:
- Run the following key generate-file command to export the RSA public key you created in the previous step. Make sure to replace
<file_path>and<rsa_wrapping_key_label>with your own data. You noted down the public key label in the previous step. The exported RSA public key bytes are written in PEM format into the<file_path>you provide.
Step 3: Move the RSA public key to the hsm1 client instance
Now you need to copy the exported public key PEM file from the hsm2 client instance to the hsm1 client instance. You can use your enterprise file transfer solution or secure copy protocol (SCP). However, if you’ve configured CloudHSM CLI to connect to both hsm1 and hsm2 clusters by using the connect to multiple clusters feature, you can skip this step.
Step 4: Import the RSA public key to hsm1
In this step, you import the RSA public key that was copied to the hsm1 client instance into the hsm1 cluster.
On the hsm1 client instance, sign in to CloudHSM CLI as a crypto user. Run the following key import pem command to import the public key. Replace the <file_path> and <rsa_wrapping_key_label> with your own values for the public key PEM file path and label, respectively.
Step 5: Wrap the key using the imported RSA public key
In this step, you wrap the key that you have identified as part of the prerequisites from hsm1. Note that only the crypto user who owns the key can wrap it out. Therefore, you need to sign in to CloudHSM CLI on hsm1 as that crypto user.
Run the following key wrap rsa-aes command to wrap the key out. Make sure to replace <exportable_key_label> and <rsa_wrapping_key_label> with your own values for the label of the key being wrapped out and the wrapping RSA public key, respectively.
The wrapped key data, in binary format, is saved on the file system at the file path specified in the --path argument. Note down the key type of the wrapped key. This value will be required in step 7 while unwrapping.
Step 6: Move the wrapped key to the hsm2 client instance
Copy the wrapped binary key from the hsm1 client instance to the hsm2 client instance using the same method that you used in Step 3. Note down the file path to the copied file.
Step 7: Unwrap the wrapped key to the hsm2 cluster using the RSA private key
In this step, you unwrap the wrapped key into hsm2 using the RSA private key associated with the RSA public key that was used to wrap the key. You noted down the RSA private key label in Step 1 and the key type in Step 5. There are some important points to keep in mind before unwrapping:
- The crypto user who created the wrapping key pair in step 1, or with whom the wrapping key pair is shared, must sign in to CloudHSM CLI to run the unwrap command.
- As mentioned in the prerequisites section, some of the key attributes can only be set during creation. Make sure you have a list of attributes that you want to set on the key.
Run the following key unwrap rsa-aes command to unwrap the key into hsm2. Make sure to replace these command arguments with your own values:
<key_type_of_wrapped_key>: The key type of the wrapped key, for example, AES, 3DES.
<label_of_unwrapped_key>: The label for the new unwrapped key. Choose an appropriate label to identify the key.
<rsa_unwrapping_key_label>: The RSA private key label from step 1.
<path_to_the_wrapped_binary_file>: The path to the wrapped key binary file from Step 6.
<list_of_attributes_for_unwrapped>: A space-separated list of key attributes in the form KEY_ATTRIBUTE_NAME=KEY_ATTRIBUTE_VALUE for the unwrapped key. This is optional.
(Optional) Step 8: Update the attributes of the unwrapped key
If you didn’t set all the required attributes while unwrapping the key, you can update the key attributes key now by using the key set-attribute command.
Test whether your 3DES key was migrated successfully
In symmetric cryptography, the same key is used for encryption and decryption. 3DES is a symmetric key algorithm. To verify that your migrated 3DES key functions the same in hsm2, you can do the following test:
- Encrypt a simple message by using the 3DES key in hsm1 to create ciphertext
- Decrypt the ciphertext by using the migrated 3DES key in hsm2 to obtain plaintext
The decrypted plaintext should match the original message.
You can use the CloudHSM JCE or PKCS #11 SDKs to run the test. With JCE, the DESedeECBEncryptDecryptRunner example code demonstrates how to encrypt and decrypt using a 3DES key. Similarly, for PKCS #11, the des_ecb.c example code demonstrates how to encrypt and decrypt using a 3DES key.Conclusion
In this blog post, you learned how to migrate cryptographic keys from a CloudHSM hsm1 cluster to an hsm2 cluster by using CloudHSM CLI. We recommend that you migrate keys using a backup whenever possible, but you can use the approach described in this post in cases where using a backup isn’t possible.
Although this post focused on migrating keys between CloudHSM hsm1 and hsm2, you can use the same methodology to migrate keys between many AWS CloudHSM cluster pairs. The methodology can also be extended to other CloudHSM SDKs, like JCE and PKCS #11, to automate the migration process.
To migrate keys from on-premises or other non AWS HSMs to AWS CloudHSM, you can also apply the same principle of wrap and unwrap.
If you have feedback about this post, submit comments in the Comments section below. If you have questions about this post, contact AWS Support.