AWS Security Blog
Signing executables with Microsoft SignTool.exe using AWS CloudHSM-backed certificates
Code signing is the process of digitally signing executables and scripts to confirm the software author and to demonstrate that the code has not been altered or corrupted since it was signed. Packaged software uses branding and trusted sales outlets to assure users of its integrity, but these guarantees are not available when code is transmitted on the internet. Additionally, the internet itself cannot provide any guarantee about the identity of the software creator.
To solve this issue, many companies turn to Microsoft SignTool, a command-line tool that digitally signs files, verifies signatures in files, or time stamps files. The certificate allows end users to trust that software is signed by the author, so long as the private key that is used to sign is only available to that author. A common problem, however, is that the private key and the certificate used in the signing process are located on the same machine. If an attacker compromises the server and steals both the private key and certificate, they can sign malicious code while posing as the trusted author. To protect against this, some companies move their private keys to offline devices. But this means that the keys need to be brought online for each new signing request, or in batches, prolonging the amount of time it takes to sign. The offline devices also need to be stored and backed up in separate, physically secure locations to prevent tampering. A more efficient solution is to use AWS CloudHSM to provide secure storage and backup for these private keys. In this post, I’ll show you how.
Prerequisites and assumptions
This walkthrough assumes that you have a working knowledge of Amazon EC2, AWS CloudHSM, the administration of Windows Server, as well as the basics of certificates and public key infrastructure.
Before you follow this walkthrough, you should first complete the steps in the walkthrough Configure Windows Server as a certificate authority (CA) with Client SDK 5, and have an example unsigned Windows PowerShell script .ps1 file. After you’ve completed the set-up of your Windows Server CA, you’ll have all the major components ready to start signing your code: the AWS CloudHSM cluster in an Active state, Crypto Users (CU) created on your CloudHSM to manage keys, and the necessary client packages installed on the Windows instance within the same VPC as your AWS CloudHSM.
Important: You will incur charges for the services used in this example. You can find the cost of each service on the corresponding service pricing page. For more information, see
AWS CloudHSM Pricing and Amazon EC2 Pricing.
Out of scope
The focus of this blog post is how to use AWS CloudHSM to store the keys that are used by certificates that will sign binaries used by Microsoft SignTool.exe. It is not intended to represent any best practices for implementing code signing or running a Certificate Authority. For more information, see the NIST Cybersecurity Whitepaper
Security Considerations for Code Signing.
Architectural Overview
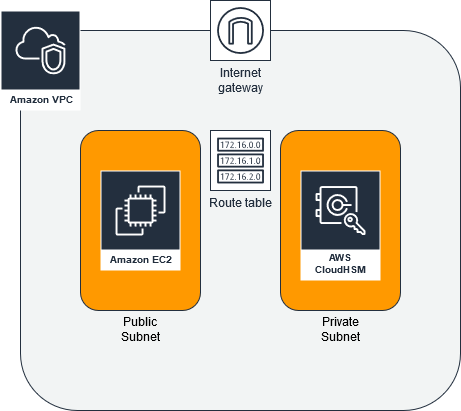
Figure 1: Architectural overview
This diagram shows a virtual private cloud (VPC) containing an Amazon EC2 instance running Windows Server 2012 R2 that resides on a public subnet. This instance will run both the CloudHSM client software and Windows Server CA. The instance can be accessed via the Internet Gateway. It will also have security groups that enable RDP access for your IP. The private subnet hosts the Elastic Network Interface (ENI) for CloudHSM cluster that has a single HSM.
Step 1: Install SignTool.exe as part of the Microsoft Windows SDK
Download and install one of the following versions of the Microsoft Windows Software Development Kit (SDK):
You should install the latest applicable Windows SDK package for your operating system. For example, for Microsoft Windows 2012 R2 or later versions, you should install the Microsoft Windows SDK 10.
SignTool.exe is part of the Windows SDK Signing Tools for Desktop Apps installation feature. You can omit the other features to be installed if you don’t need them. The default installation location is:
C:\Program Files (x86)\Windows Kits\<SDK version>\bin\<version number>\<CPU architecture>\signtool.exe
Step 2: Create a signing certificate using the KSP integration
Now that you’ve installed the software required to sign your files, you can start creating a key pair in AWS CloudHSM, along with the corresponding certificate. You can do this with the Certreq application that’s included with Windows Server. The end result from Certreq is a Certificate Signing Request (CSR) that you can submit to a CA. In this example, you’ll submit it to the Microsoft Windows CA you created in the prerequisite section. Certreq supports the KSP (Key Storage Provider) standards, which allows you to specify the name of the KSP created by Cavium specifically for AWS CloudHSM. This is included and installed as part of the AWS CloudHSM client installation.
- Create a file named request.inf that contains the lines below. Note that the Subject line may wrap onto the following line. It begins with Subject and ends with Washington and a closing quotation mark (“). Replace the Subject information with your own company information. See Microsoft’s Documentation for an explanation of the sections, keys, and values.
- Create a certificate request with certreq.exe:
certreq.exe -new request.inf request.csr
Certreq will return a message saying that the certificate request has been created. Internally, a new key pair has also been generated on your HSM instance, and that private key has been used on the HSM instance to generate the CSR. The following screenshot shows the output from certreq.exe, confirming that the CSR has been created.

Figure 2: The output of certreq.exe
- Submit the CSR you just created to the Windows Server CA:
- Open the Certification Authority tool using the command certsrv.msc.
- After the Certification Authority tool opens, right-click the CA server name, choose All Tasks, then choose Submit a new request, as shown in the following screenshot.

Figure 3: Select “Submit a new request”
- Submit the new request using the CSR you just created by navigating to its saved location and selecting Open.
- You can now issue the certificate from your CA. Navigate to the Pending Requests view, right-click on the certificate you just submitted, and under All Tasks, select Issue. This will move your certificate to Issued Certificates.

Figure 4: Select “Issue” to move your certificate to “Issued Certificates”
- Now you can export the issued certificate from your CA to a file, so that the certificate can be imported into your local computer store for use by applications.
- Navigate to the Issued Certificates view, and right-click on your newly issued certificate.
- Select Open to view the certificate, then select the Details tab.
- Choose Copy to File to start the Certificate Export Wizard, and copy as a DER encoded binary X.509 file to a location you choose. In my example, I’ve saved mine in the same location as my other files on the Desktop with the file name “signedCertificate.cer.” You should store your certificates in a secure and redundant storage location.

Figure 5: Store your certificates in a secure and redundant storage location
- After you’ve copied the certificate file to the instance where you’ll sign your code, run the command certreq.exe -accept signedCertificate.cer, as shown in the following screen shot. This moves the certificate from the file into the Personal Certificate Store in Windows so that it can be used by applications. You can verify it exists by running certlm.msc and viewing the Personal Certificates.

Figure 6: Run certlm.msc to view the Personal Certificates
Step 3: Using the imported certificate with Microsoft SignTool.exe
You should have already installed SignTool.exe as part of the Windows SDK, and you should have an example .ps1 file that’s unsigned.
To use the certificate you created and stored with SignTool.exe, you’ll need the SHA-1 hash of the certificate. This is used as an input parameter and ensures that Windows doesn’t automatically use a certificate that isn’t backed by AWS CloudHSM. While you could use certutil.exe or the Certificate Manager’s graphical user interface to get the SHA-1 hash of the certificate, PowerShell provides a clean interface for obtaining this information.
- Open PowerShell as an administrator, then run the command Get-ChildItem -path cert:\LocalMachine\My, as shown in the following screenshot. This will display the thumbprints without spaces, unlike other available methods. Copy the thumbprint associated with your imported certificate.
- Navigate to the directory within PowerShell that contains SignTool.exe. The default location is under C:\Program Files (x86)\Windows Kits\10\bin\10.0.17763.0\x64
- Finally, sign your binary with your newly generated certificate by using the following command:
signtool.exe sign /v /fd sha256 /sha1 0BECF08706C86997B5ED5AD0BB896BD0271A26ED /sm C:\Users\Administrator\Desktop\exec.ps1

Figure 8: Sign your binary with your newly generated certificate
- Optionally, to verify the signature on the file, you can use SignTool.exe with the verify option by using the following command:
signtool.exe verify /v /pa C:\Users\Administrator\Desktop\exec.ps1
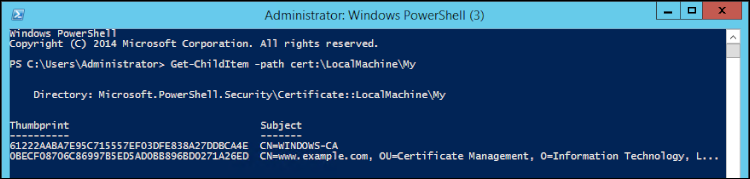
Figure 7: Run the command Get-ChildItem -path cert:\LocalMachine\My
Conclusion
For code signing jobs where the integrity of your signature is important to your business, AWS CloudHSM supports the Microsoft CNG/KSP standard that enables you to store the private key of a Digital Signature certificate within an HSM. Since the private key no longer has to reside on the server, it’s no longer at risk if the server itself were to be compromised.
Want more AWS Security how-to content, news, and feature announcements? Follow us on Twitter.