Amazon Web Services ブログ
AWS CloudFormation と AWS SAM を使用したサーバーレスアプリケーションの開発とデプロイ
お客様は、それぞれの市場で競争力を維持するために、常にイノベーションを求めています。これを達成するための1つの方法は、サービスとアプリケーションを迅速かつ効率よく構築し、それによってコストを削減しながら市場投入までの時間を短縮することです。より具体的には、アプリケーション全体をゼロから構築するよりも、サーバーレスや AI/ML などのクラウドネイティブな機能を活用して管理コストを削減したり、目的別に作られたサービスを組み合わせたり、すでに構築済みのアプリケーションを再利用したりすることが有効です。
このブログ記事では、AWS Serverless Application Model (AWS SAM) と AWS CloudFormation を使用して、サーバーレスアプリケーションをビルドしてデプロイする方法を説明します。また、AWS Serverless Application Repository を使用して既存のアプリケーションを再利用し、開発時間を短縮します。
このブログ記事で紹介されているデモアプリケーションは、Amazon Rekognition を使用して、Amazon Simple Storage Service (Amazon S3) バケットに格納した画像ファイルから機械学習を使用した有名人の分析を実行します。Amazon Rekognition は、エンターテイメント、メディア、スポーツ、ビジネス、政治などのカテゴリの有名人を画像や動画から認識できます。
デモアプリケーションの概要
アプリケーションは、ユーザーが有名人の画像ファイルをドラッグアンドドロップできるウェブページを提供します。画像ファイルは Amazon Rekognition によって分析され、検出された有名人の名前が Amazon CloudWatch Logs に書き込まれます。
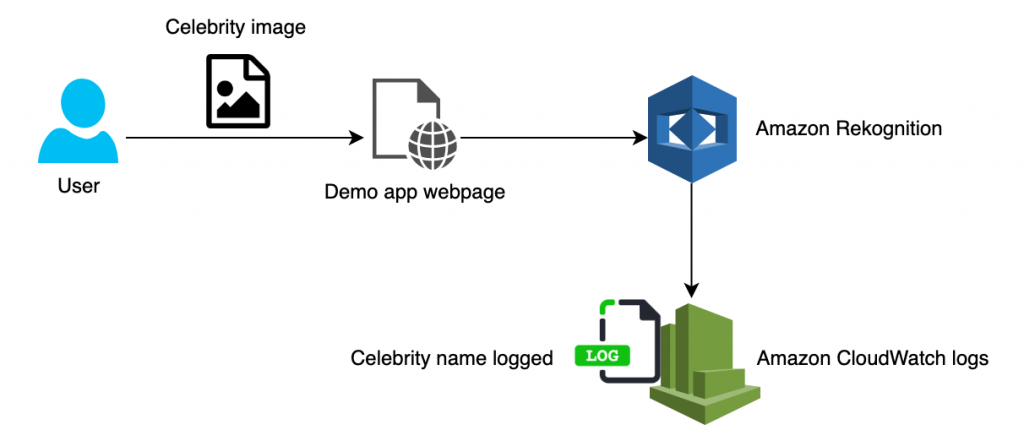
図 1: Amazon Rekognition と AWS Serverless Application Repository で提供されるアップローダーを使用した、有名人の画像認識アプリケーション
デモアプリケーションのアーキテクチャ
このアプリケーションのユースケースは、有名人の画像認識です。2 つのアプリケーションを組み合わせて、必要な機能を提供します。開発する必要があるコンポーネントは画像認識アプリケーションだけです。これを AWS Lambda 関数を使用して実装します。次に、別の開発者が AWS Serverless Application Repository に公開しているアップローダーアプリケーションを取り込みます。このアプリケーションは一般に公開されており、S3 バケットに画像ファイルをアップロードする重要な機能を提供します。
まず、アプリケーションの機能を分解してみましょう。個別の機能は、自己完結型コンポーネントまたはマイクロサービスと呼ばれ、これらを結合してサーバーレスアプリケーションを構成します。デモアプリケーションが実行する主なステップは次のとおりです。
- S3 バケットに画像ファイルをアップロードする
- 画像を処理する
- 結果(有名人の名前)を出力する
これらの機能をすべて実装してアプリケーションに組み込むこともできますが、時間がかかります。それはこのアプリケーションの顧客にとって、コストが高くなり、市場投入までの時間が長くなることを意味します。このため、S3 バケットへの画像ファイルのアップロードなど、一般的な機能を実行する既存のアプリケーションを使用したいと考えています。解決策は AWS Serverless Application Repository です。これは、サーバーレスアプリケーションのためのマネージドリポジトリです。このリポジトリは、チーム、組織、または個人の開発者が再利用可能なアプリケーションの保存と共有を行い、サーバーレスアーキテクチャを簡単に組み立ててデプロイする強力で新しい方法を提供します。
アーキテクチャ図
次の図は、画像認識アプリケーションのアーキテクチャを示しています。

図 2: アプリケーションには、AWS Serverless Application Repository から提供されるアップローダーアプリケーションと、今回開発する画像認識アプリケーションが含まれています
前提条件
このデモアプリケーションを実装するには、次のものが必要です。
- AWS アカウント
- AWS コマンドラインインターフェイス (AWS CLI)。この記事は AWS CLI v2.2.13 を使用しています
- AWS SAM CLI 。この記事では AWS SAM CLI v1.24.1 を使用しています
- AWS CloudFormation Linter (cfn-lint)。この記事では cfn-lint v0.49.2 を使用しています
- Python 3.8 (
sam build使用時) または Docker (sam build --use-container使用時)
実装
プロジェクトを作成する
次のコマンドを実行してプロジェクトを作成します。
$ sam init --runtime python3.8 --name amazon-celeb-rekognition
Which template source would you like to use?
        1 - AWS Quick Start Templates
        2 - Custom Template Location
Choice: 1
What package type would you like to use?
        1 - Zip (artifact is a zip uploaded to S3)
        2 - Image (artifact is an image uploaded to an ECR image repository)
Package type: 1

Cloning from https://github.com/aws/aws-sam-cli-app-templates

AWS quick start application templates:
        1 - Hello World Example
        2 - EventBridge Hello World
        3 - EventBridge App from scratch (100+ Event Schemas)
        4 - Step Functions Sample App (Stock Trader)
        5 - Elastic File System Sample App
Template selection: 1

    -----------------------
    Generating application:
    -----------------------
    Name: amazon-celeb-rekognition
    Runtime: python3.8
    Dependency Manager: pip
    Application Template: hello-world
    Output Directory: .

    Next steps can be found in the README file at ./amazon-celeb-rekognition/README.md
次のコマンドを実行して、プロジェクトが正常に作成されたことを確認します。tree コマンドがインストールされていない環境の場合は、ファイルエクスプローラを使用してフォルダ構造をご確認ください。
$ tree amazon-celeb-rekognition
amazon-celeb-rekognition
├── README.md
├── __init__.py
├── events
│   └── event.json
├── hello_world
│   ├── __init__.py
│   ├── app.py
│   └── requirements.txt
├── template.yaml
└── tests
    ├── __init__.py
    ├── integration
    │   ├── __init__.py
    │   └── test_api_gateway.py
    ├── requirements.txt
    └── unit
        ├── __init__.py
        └── test_handler.py

5 directories, 13 files
プロジェクトはサンプルの Hello World アプリケーションを含んだ状態で作成されるため、app.py および template.yaml ファイルを編集して、このユースケースのコンテンツを追加する必要があります。これが、次のセクションで行うことになります。今回は events, hello_world および tests ディレクトリ配下のファイルは使用しません。これらを削除したあと、 imganalyzer というディレクトリを画像認識アプリケーションのために作成します。
cd amazon-celeb-rekognition
rm -rf ./events
rm -rf ./hello_world
rm -rf ./tests
mkdir imganalyzer
サンプルプログラムの中身に興味がある方は、別のディレクトリで sam init を実行して確認してみてください。
Serverless Application Repository を検索する
AWS Serverless Application Repository でアプリケーションを検索し、その設定を template.yaml ファイルに埋め込みます。
まず、AWS マネジメントコンソールで AWS Serverless Application Repository を検索して開きます。
次に、[利用可能なアプリケーション] をクリックします。
[パブリックアプリケーション] のタブで uploader を検索し、表示されたアプリケーションをクリックします (図 3) 。

図 3: Severless Application Repository コンソールでアプリケーションを検索する
詳細ページで [SAM リソースとしてコピーする] をクリックします。

図 4: uploader アプリケーションの詳細ページ
AWS SAM テンプレートを作成する
AWS Serverless Application Repository のアプリケーションを利用する
template.yaml ファイルを編集します。sam init コマンドによってサンプルの内容が生成されていますが、最初の2行を残してすべて削除し、Resources: セクションを追加します。そこに図4でコピーした SAM リソースを貼り付けます(uploader: 以下の部分になります)。この時点で、コード全体は以下のようになります。
AWSTemplateFormatVersion: '2010-09-09'
Transform: 'AWS::Serverless-2016-10-31'
Resources:
  uploader:
    Type: AWS::Serverless::Application
    Properties:
      Location:
        ApplicationId: arn:aws:serverlessrepo:us-east-1:233054207705:applications/uploader
        SemanticVersion: 1.1.0
      Parameters:
        # Name of the S3 Bucket to put uploaded files into (must exist prior to deployment)
        destBucket: YOUR_VALUE
では、このテンプレートの内容を詳しく見ていきましょう。
AWSTemplateFormatVersion: '2010-09-09'
Transform: 'AWS::Serverless-2016-10-31'
最初の2行は、 CloudFormation テンプレートのフォーマットバージョンと、 Transform を定義しています。Transform とは、CloudFormation がテンプレートの処理に用いるマクロです。この AWS::Serverless Transform は、AWS SAM テンプレート構文で書かれたテンプレート全体を CloudFormation テンプレートに変換することを宣言しています。
Resources:
  uploader:
   Type: AWS::Serverless::Application
   Properties:
     Location:
       ApplicationId: arn:aws:serverlessrepo:us-east-1:233054207705:applications/uploader
       SemanticVersion: 1.1.0
     Parameters:
       # Name of the S3 Bucket to put uploaded files into (must exist prior to deployment)
       destBucket: YOUR_VALUE
Resources セクションは、CloudFormation のメインとなる部分です。ここで実際に構築したい AWS リソースを宣言していきます。最初のリソースとして uploader アプリケーション、すなわち図 4 でコピーした SAM リソースの内容が貼り付けられています。このリソースは AWS::Serverless::Application 型として宣言され、AWS Serverless Application Repository でホストされているアプリケーションであることを示しています。これはネストされた CloudFormation スタックを作成します。なお、SAM テンプレート内にネストされたサーバーレスアプリケーションを定義する方法については、AWS Serverless Application Model (AWS SAM) 開発者ガイドの AWS::Serverless::Application を参照してください。Location を見ると、アプリケーションのIDとバージョンを確認することができます。 Parameters 配下の destBucket は、AWS Serverless Application Repository からコピーしてきた段階では YOUR_VALUE というプレースホルダになっています。この後の手順で S3 バケットへの参照に置き換えます。
新しい AWS Lambda 関数と Amazon S3 バケットを追加する
画像認識のための imganalyzerという AWS Lambda 関数と、画像ファイルをアップロードする S3 バケットを Resources セクションに追加します。※インデントにご注意ください。
  imganalyzer:
    Type: AWS::Serverless::Function
    Properties:
      CodeUri: imganalyzer/
      Handler: app.lambda_handler
      Runtime: python3.8
      Description: An Amazon S3 trigger that uses rekognition APIs to detect faces
      MemorySize: 128
      Timeout: 3
      Policies:
        - AmazonRekognitionReadOnlyAccess
        - S3ReadPolicy:
            BucketName: !Sub "${AWS::StackName}-${AWS::Region}-${AWS::AccountId}"
      Events:
        BucketEvent1:
          Type: S3
          Properties:
            Bucket: !Ref Bucket1
            Events:
              - 's3:ObjectCreated:*'
  Bucket1:
    Type: 'AWS::S3::Bucket'
    Properties:
      BucketName: !Sub "${AWS::StackName}-${AWS::Region}-${AWS::AccountId}"
では、ここで追加した部分を詳しく見ていきましょう。
imganalyzer という名前で AWS::Serverless::Function 型のリソースを宣言しています。これは AWS Lambda 関数 を作成します。 Properties の下には、Lambda ハンドラーを含むプロパティの指定が続きます。
Handler… 実行の開始時にコード内のどの関数が呼び出されるか。ここでは app.py ファイルのlambda_handler関数を指定Runtime… どのランタイムを使用するか。ここではPython 3.8を指定CodeURI… コードの場所。ここでは、AWS CloudFormation または AWS SAM にカレントディレクトリ配下のimganalyzerディレクトリでコードを見つけるように指示
詳細については、『AWS Serverless Application Model 開発者ガイド』の AWS SAM リソースおよびプロパティのリファレンス を参照してください。
      Description: An Amazon S3 trigger that uses rekognition APIs to detect faces
      MemorySize: 128
      Timeout: 3
ここでは、 imganalyzer 関数の説明と、メモリサイズ、タイムアウト秒数を指定しています。
      Policies:
        - AmazonRekognitionReadOnlyAccess
        - S3ReadPolicy:
            BucketName: !Sub "${AWS::StackName}-${AWS::Region}-${AWS::AccountId}"
ここでは、 imganalyzer 関数に与える IAM ロールの権限を定義しています。この関数は Amazon Rekognition を呼び出して有名人を識別するためにマネージドポリシー AmazonRekognitionReadOnlyAccess を必要とします。また、アップロードされた画像ファイルを Amazon S3 から取得するために、特定の S3 バケットへの読み取り権限が必要です。ここでは、 AWS SAM ポリシーテンプレート を使用して、IAMポリシーの定義を簡単にしています。なお、ここで BucketName: !Ref Bucket1 と定義していないのは、循環参照を避けるためです。詳細は『AWS CloudFormation の AWS SAM テンプレートを使用した循環依存関係の解決』をご参照ください。
  Events:
    BucketEvent1:
      Type: S3
      Properties:
        Bucket: !Ref Bucket1
        Events:
          - 's3:ObjectCreated:*'
目標は、画像ファイルが S3 バケットにアップロードされるたびに、imganalyzer Lambda 関数をトリガーすることでした。この Events プロパティは、この Lambda 関数をトリガーするイベントを指定しています。イベントは、型とタイプに依存する一連のプロパティで構成されます。詳細については、『AWS Serverless Application Model 開発者ガイド』の EventSource を参照してください。
SAM テンプレート構造の詳細については、『AWS Serverless Application Model 開発者ガイド』の AWS SAM テンプレートの構造 を参照してください。
  Bucket1:
    Type: 'AWS::S3::Bucket'
    Properties:
      BucketName: !Sub "${AWS::StackName}-${AWS::Region}-${AWS::AccountId}"
最後に、 AWS::S3::Bucket リソースを追加しています。これは、AWS CloudFormation または AWS SAM に Bucket1 という論理名の S3 バケットを作成するように指示します。S3 バケットの名前は BucketName プロパティで指定されており、これは実際には celebrityrekognition-ap-northeast-1-123456789012 のような値に置換されます。
uploader 関数に S3 バケットへの参照を設定する
テンプレートで定義した S3 バケットを参照するように uploader関数のパラメータで YOUR_VALUE というプレースホルダになっている箇所を置き換えます。
        # Name of the S3 Bucket to put uploaded files into (must exist prior to deployment)
destBucket: !Ref Bucket1最終的に、template.yamlは次のようになります。
AWSTemplateFormatVersion: '2010-09-09'
Transform: 'AWS::Serverless-2016-10-31'
Description: An Amazon S3 trigger that uses Amazon Rekognition APIs to detect faces
Resources:
  uploader:
    Type: AWS::Serverless::Application
    Properties:
      Location:
        ApplicationId: arn:aws:serverlessrepo:us-east-1:233054207705:applications/uploader
        SemanticVersion: 1.1.0
      Parameters:
        # Name of the S3 Bucket to put uploaded files into (must exist prior to deployment)
        destBucket: !Ref Bucket1
  imganalyzer:
    Type: AWS::Serverless::Function
    Properties:
      CodeUri: imganalyzer/
      Handler: app.lambda_handler
      Runtime: python3.8
      Description: An Amazon S3 trigger that uses rekognition APIs to detect faces
      MemorySize: 128
      Timeout: 3
      Policies:
        - AmazonRekognitionReadOnlyAccess
        - S3ReadPolicy:
            BucketName: !Sub "${AWS::StackName}-${AWS::Region}-${AWS::AccountId}"
      Events:
        BucketEvent1:
          Type: S3
          Properties:
            Bucket: !Ref Bucket1
            Events:
              - 's3:ObjectCreated:*'
  Bucket1:
    Type: 'AWS::S3::Bucket'
    Properties:
      BucketName: !Sub "${AWS::StackName}-${AWS::Region}-${AWS::AccountId}"
AWS Lambda 関数の実装
S3 バケットにアップロードされた画像ファイルで有名人の識別を実行するには、imganalyzer Lambda 関数を実装する必要があります。 imganalyzer ディレクトリの中に app.py ファイルを作成し、次のコードを貼り付けます。
touch imganalyzer/app.pyimport boto3
import urllib
#print('Loading function')
rekognition = boto3.client('rekognition')
# --------------- Main handler ------------------
def lambda_handler(event, context):
# Get the object from the event
bucket = event['Records'][0]['s3']['bucket']['name']
key = urllib.parse.unquote_plus(event['Records'][0]['s3']['object']['key'])
try:
response = rekognition.recognize_celebrities(Image={"S3Object": {"Bucket": bucket, "Name": key}})
for celebrity in response['CelebrityFaces']:
print('Name: {}'.format(celebrity['Name']))
print('Id: {}'.format(celebrity['Id']))
print('Position:')
print(' Left: {:.2f}'.format(celebrity['Face']['BoundingBox']['Height']))
print(' Top: {:.2f}'.format(celebrity['Face']['BoundingBox']['Top']))
print('Info')
for url in celebrity['Urls']:
print(' {}'.format(url))
# Print response to console.
print(response)
#return response
except Exception as e:
#print(e)
print("Error processing object {} from bucket {}. ".format(key, bucket) +
"Make sure your object and bucket exist and your bucket is in the same region as this function.")
raise eこのコードは、Amazon Rekognition の RecognizeCelebrities API を呼び出します。このAPIは、画像を分析し、識別された有名人の名前と、一致の信頼度などのその他のパラメータを含む有名人オブジェクトを返します。
次に、空の imganalyzer/requirements.txt ファイルを作成します。
touch imganalyzer/requirements.txtこの時点で、ディレクトリは次のような構造になっています。
$ tree
.
├── README.md
├── __init__.py
├── imganalyzer
│   ├── app.py
│   └── requirements.txt
└── template.yaml

1 directory, 5 files
アプリケーションをビルドしてデプロイする
デプロイを始める前に、コマンドを実行して、AWS CloudFormation Linter (cfn-lint) を使用してテンプレートを検証してみましょう。問題が見つからなかった場合、コマンドは何も出力しません。
cfn-lint template.yaml問題がなければ、次のコマンドを実行してアプリケーションのビルドを開始します。
sam buildローカルマシンの環境変数
PATHにpython3.8が存在しない場合、ビルドに失敗します。この場合、Python 3.8 をインストールするか、Dockerを使用することでビルド可能です。Dockerを使用する場合は以下のコマンドを実行してください。sam build --use-container
次の出力が表示されるはずです。
Build Succeeded

Built Artifacts  : .aws-sam/build
Built Template   : .aws-sam/build/template.yaml

Commands you can use next
=========================
[*] Invoke Function: sam local invoke
[*] Deploy: sam deploy --guided

Running PythonPipBuilder:ResolveDependencies
Running PythonPipBuilder:CopySource
テンプレートと Lambda 関数の準備ができたので、次の AWS SAM CLI コマンドを使用して AWS SAM テンプレートを AWS アカウントにデプロイし、アプリケーションに必要なリソースを作成します。コマンドはインタラクティブな入力を要求します。以下のように指定します。デプロイ先のリージョンは任意です。
SAM CLI の古いバージョンでは、
sam packageコマンドまたはaws cloudformation packageコマンドを実行する前に、パッケージングされた AWS CloudFormation テンプレートを格納するための S3 バケットを作成する必要があります。SAM CLI の最新バージョンでは、この手順は不要になっています。sam deployコマンドは、パッケージング用の S3 バケットが存在しない場合は自動的に作成します。
$ sam deploy --guided --capabilities CAPABILITY_IAM CAPABILITY_AUTO_EXPAND

Configuring SAM deploy
======================

        Looking for config file [samconfig.toml] :  Not found

        Setting default arguments for 'sam deploy'
        =========================================
        Stack Name [sam-app]: celebrityrekognition
        AWS Region [ap-northeast-1]:
        ...
        #Shows you resources changes to be deployed and require a 'Y' to initiate deploy
        Confirm changes before deploy [y/N]: y
        #SAM needs permission to be able to create roles to connect to the resources in your template
        Allow SAM CLI IAM role creation [Y/n]: Y
        ...
        Save arguments to configuration file [Y/n]: Y
        SAM configuration file [samconfig.toml]:
        SAM configuration environment [default]:

        Looking for resources needed for deployment: Not found.
        Creating the required resources...
        Successfully created!

                Managed S3 bucket: aws-sam-cli-managed-default-samclisourcebucket-xxxxxxxxxxxxxx
                A different default S3 bucket can be set in samconfig.toml

        Saved arguments to config file
        Running 'sam deploy' for future deployments will use the parameters saved above.
        The above parameters can be changed by modifying samconfig.toml
        Learn more about samconfig.toml syntax at
        https://docs.aws.amazon.com/serverless-application-model/latest/developerguide/serverless-sam-cli-config.html

        ...
        Deploying with following values
        ===============================
        Stack name                   : celebrityrekognition
        Region                       : ap-northeast-1
        Confirm changeset            : True
        Deployment s3 bucket         : aws-sam-cli-managed-default-samclisourcebucket-xxxxxxxxxxxxxx
        Capabilities                 : ["CAPABILITY_IAM", "CAPABILITY_AUTO_EXPAND"]
        Parameter overrides          : {}
        Signing Profiles             : {}

Initiating deployment
=====================
...

Waiting for changeset to be created..

CloudFormation stack changeset
-------------------------------------------------------------------------------------------------
Operation                LogicalResourceId        ResourceType             Replacement
-------------------------------------------------------------------------------------------------
+ Add                    Bucket1                  AWS::S3::Bucket          N/A
+ Add                    imganalyzerBucketEvent   AWS::Lambda::Permissio   N/A
                         1Permission              n
+ Add                    imganalyzerRole          AWS::IAM::Role           N/A
+ Add                    imganalyzer              AWS::Lambda::Function    N/A
+ Add                    uploader                 AWS::CloudFormation::S   N/A
                                                  tack
-------------------------------------------------------------------------------------------------

Changeset created successfully. arn:aws:cloudformation:ap-northeast-1:123456789012:changeSet/samcli-deploy....


Previewing CloudFormation changeset before deployment
======================================================
Deploy this changeset? [y/N]: y

2021-06-24 22:10:25 - Waiting for stack create/update to complete

CloudFormation events from changeset
-------------------------------------------------------------------------------------------------
ResourceStatus           ResourceType             LogicalResourceId        ResourceStatusReason
-------------------------------------------------------------------------------------------------
CREATE_IN_PROGRESS       AWS::IAM::Role           imganalyzerRole          -
CREATE_IN_PROGRESS       AWS::IAM::Role           imganalyzerRole          Resource creation
                                                                           Initiated
CREATE_COMPLETE          AWS::IAM::Role           imganalyzerRole          -
CREATE_IN_PROGRESS       AWS::Lambda::Function    imganalyzer              -
CREATE_IN_PROGRESS       AWS::Lambda::Function    imganalyzer              Resource creation
                                                                           Initiated
CREATE_COMPLETE          AWS::Lambda::Function    imganalyzer              -
CREATE_IN_PROGRESS       AWS::Lambda::Permissio   imganalyzerBucketEvent   -
                         n                        1Permission
CREATE_IN_PROGRESS       AWS::Lambda::Permissio   imganalyzerBucketEvent   Resource creation
                         n                        1Permission              Initiated
CREATE_COMPLETE          AWS::Lambda::Permissio   imganalyzerBucketEvent   -
                         n                        1Permission
CREATE_IN_PROGRESS       AWS::S3::Bucket          Bucket1                  -
CREATE_IN_PROGRESS       AWS::S3::Bucket          Bucket1                  Resource creation
                                                                           Initiated
CREATE_COMPLETE          AWS::S3::Bucket          Bucket1                  -
CREATE_IN_PROGRESS       AWS::CloudFormation::S   uploader                 -
                         tack
CREATE_IN_PROGRESS       AWS::CloudFormation::S   uploader                 Resource creation
                         tack                                              Initiated
CREATE_COMPLETE          AWS::CloudFormation::S   uploader                 -
                         tack
CREATE_COMPLETE          AWS::CloudFormation::S   celebrityrekognition     -
                         tack
-------------------------------------------------------------------------------------------------

Successfully created/updated stack - celebrityrekognition in ap-northeast-1
おめでとうございます!デプロイに成功しました。AWS アカウントにサインインし、パッケージが正常にデプロイされたことを確認します。次に、AWS CloudFormation コンソールを開き、celebityrekognition スタックのイベントを確認します。次に示すように、CREATE_COMPLETE と表示されているはずです。

図 5: AWS CloudFormation コンソールでの celebityrekognition スタックの詳細
図 6 は、アップローダーアプリケーションのネストされたスタックが sam deploy コマンドによって作成されたことを示しています。

図 6: AWS CloudFormation コンソールでの celebityrekogniton-uploader アプリケーションの詳細
これで、有名人の画像を認識するためのアプリケーションが作成されました。これには、メインのアプリケーションである画像認識 Lambda 関数が含まれます。次に、AWS Serverless Application Repository からダウンロードした別のアプリケーションであるアップローダーをネストしました。アップローダーアプリケーションは API エンドポイントを作成します。API エンドポイントは、S3 に画像ファイルをアップロードするためのフロントエンドアプリケーションを提供します。
アプリケーションのテスト
AWS Lambda コンソール に移動し、左側のナビゲーションペインから [アプリケーション] を選択します。
アップローダーアプリケーションのリンクを選択します。 “Serverless web application for uploading files to S3” という説明がついています。

図 7: AWS Lambda コンソールのアプリケーションページ
詳細ページで、API エンドポイント URL を選択します。
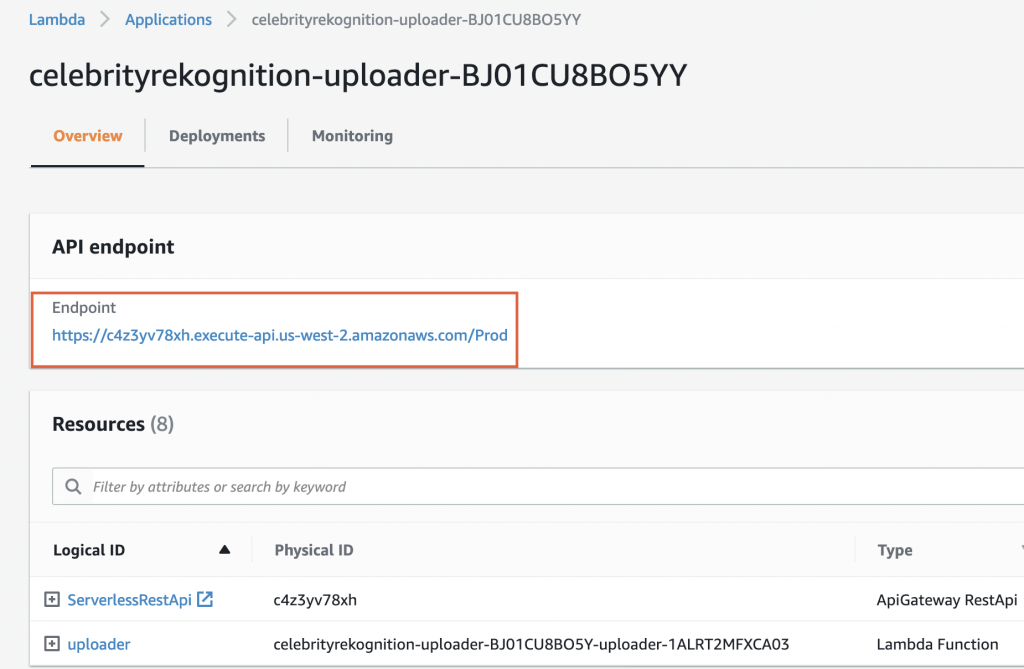
図 8: AWS Lambda コンソールでの API エンドポイント URL
画像ファイルをアップロードするには、オレンジ色の円の中にファイルをドラッグアンドドロップします。サンプルとして、こちらのファイル ( img1, img2 )を使用可能です。
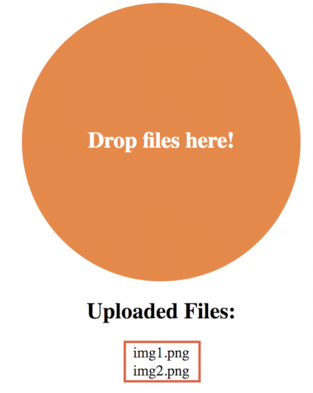
図 9: アップローダーアプリケーションのインターフェイス
図 9 では、2 つの画像ファイル (img1.png と img2.png) がアップロードされたことがわかります。
AWS Lambda コンソールに移動し、Lambda 関数を選択します ( celebrityrekognition-imganalyzer-1xqhvjc5rjdkp のような名前です)。
次に、[モニタリング] タブで、[CloudWatch のログを表示] を選択します。

図 10: Lambda 関数に表示される CloudWatch メトリクス
対応するログストリームを選択して、画像認識結果のログを表示します。

図 11: 画像認識結果のログ
img1, img2 の有名人は、それぞれ Jeff Bezos と Andy Jassy (AmazonのCEO) でした。
クリーンアップ
AWS アカウントでの継続的な請求を回避するには、作成したリソースを削除します。
- Amazon S3 コンソールに移動します
- 作成された S3 バケット (
celebrityrekognition-ap-northeast-1-123456789012のような名前) を選択します - [空にする] をクリックし、 テキストボックスに
完全に削除と入力後、 [空にする] をクリックします - AWS CloudFormation コンソールに移動します
- 作成したスタックを選択します
- AWS CloudFormation パッケージによってデプロイされたすべてのリソースを削除するには、[削除] を選択します
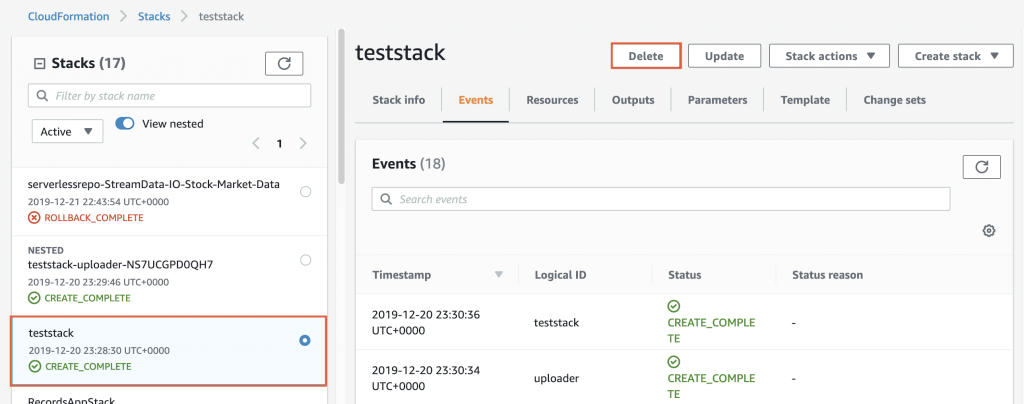
図 12: AWS CloudFormation コンソールで選択されたテストスタック
まとめ
このブログ記事では、AWS Serverless Application Model (AWS SAM) と AWS CloudFormation を使用してサーバーレスアプリケーションを構築する方法を紹介しました。その中で、 AWS Serverless Application Repository で既存のサーバーレスアプリケーションを使用しました。これにより、開発時間とコストが削減されます。サーバーレスアプリケーションは、S3 バケットに保存されている画像ファイルから有名人を認識します。AWS SAM と AWS Serverless Application Repositoryのパワーのおかげで、アップローダーを SAM テンプレートにネストするだけでした。次に、AWS CloudFormation を使用してデモアプリケーションをデプロイしました。
要約すると、このブログでは、AWS クラウドのパワーと、既存のビルディングブロックを活用してクラウドネイティブアプリケーションを構築することで、AWS クラウドでのイノベーションをお客様にどのように役立つかについて説明しました。これにより、最終的に市場投入までの時間を短縮し、コストを削減できます。
この記事は Georges Leschener による “Building and deploying a serverless app using AWS Serverless Application Model and AWS CloudFormation” を翻訳したものです。
翻訳は Solutions Architect の高野 賢司が担当しました。