AWS Cloud Operations Blog
Building and deploying a serverless app using AWS Serverless Application Model and AWS CloudFormation
Customers are constantly looking to innovate in order to remain competitive in their respective markets. One way to achieving such competitiveness is through the ability to build services and applications fast and cost effectively, thereby reducing time to market while driving down costs. One of the feedback we regularly get from customers is that, applications development can be a costly and resource-intensive process with lots of duplicate efforts as developers have the tendency to build parts or entire applications from scratch instead of leveraging what already exists to simply add new functionalities to existing services. AWS provides customers with the platform to build and deploy applications fast, at scale and innovate by taking advantage of cloud native capabilities such as serverless, and AI/ML to name but a few.
In this blog post, I will show you how to build and deploy a serverless application using the AWS Serverless Application Model (AWS SAM) and AWS CloudFormation. You will also use the AWS Serverless Application Repository to expand the capability of the demo application, significantly reducing development time. The demo application showcased in this blog post also uses Amazon Rekognition to perform machine learning-based celebrity analysis from an image that is stored in an Amazon Simple Storage Service (Amazon S3) bucket. Amazon Rekognition can recognize thousands of celebrities in categories such as entertainment and media, sports, business, and politics from images and store videos.
Demo application
The demo application provides a webpage where the user can drag and drop celebrity image files. The files are analyzed by Amazon Rekognition and the names of celebrities that are detected in the image file are written to an Amazon CloudWatch log.
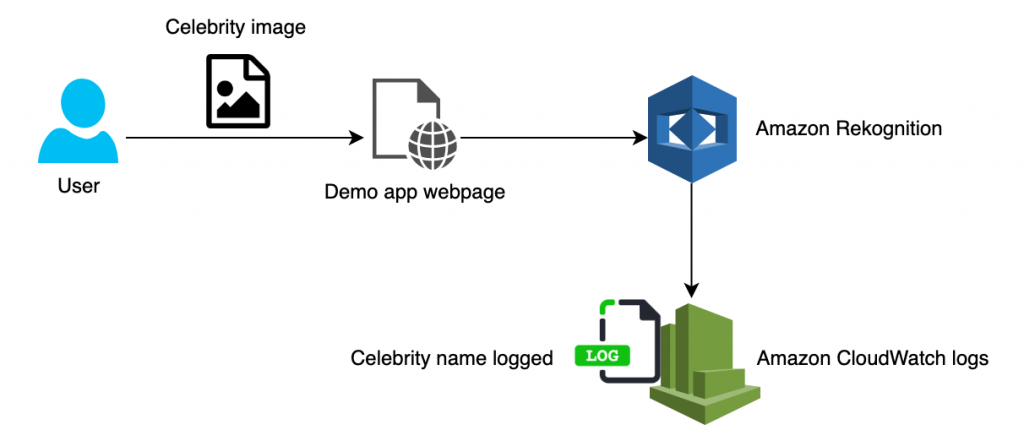
Figure 1: Celebrity image recognition using Amazon Rekognition and an uploader application from AWS Serverless Application Repository
Application architecture
The use case for the demo application is celebrity image recognition. I combine two applications to provide the required functionality. The only component that I am going to build is the image recognition application, which I will implement using a Lambda function. I will then nest another application, uploader, that has been published by another developer to the AWS Serverless Application Repository. This application is publicly available and provides critical functionality: it uploads an image to an S3 bucket.
Let’s start by breaking down the application functionalities that could be mapped to self-contained components or microservices. They must be combined into the serverless application.
The key steps to perform:
- Upload an image to an S3 bucket.
- Process the image.
- Output the result (the name of the celebrity).
Although I could build all of these capabilities into the application, it would take more time. For customers, time translates into higher costs and a slower time to market. For this reason, I want to use an existing application that performs common functions, such as uploading an image to an S3 bucket. The solution is the AWS Serverless Application Repository, a managed repository for serverless applications that can be used by teams, organizations, and individual developers to store and share reusable applications and easily assemble and deploy serverless architectures in powerful new ways.
Architecture diagram
The following diagram shows the architecture of the image recognition application:

Figure 2: Demo application includes the uploader application from AWS Serverless Application Repository and an image recognition application
Prerequisites
To implement this demo application, you need the following:
- An AWS account.
- The latest version of the AWS Command Line Interface (AWS CLI).
- The AWS SAM CLI (version 1.0.0 or later).
- The AWS CloudFormation linter (cfn-lint).
Create a project
- Run the following command to create a project:
sam init --runtime python3.8 –-name amazon-celeb-rekognition
Run the following command to check that your project has been created successfully:
tree amazon-celeb-rekognition
You should see the following folder structure:

Figure 3: Folder structure
- Because the project is created with the sample Hello World application, you need to edit the
app.pyandtemplate.yamlfiles to add content for this use case. This is what you will be doing in the following sections. For your reference, the updatedapp.pyandtemplate.yamlfiles are available from this GitHub repo. - Run the following command to start building your application:
cd amazon-celeb-rekognition
sam build
You should see the following output:
Build Succeeded
Built Artifacts : .aws-sam/build Built Template : .aws-sam/build/template.yaml Commands you can use next ========================= [*] Invoke Function: sam local invoke [*] Deploy: sam deploy --guided
Search the AWS Serverless Application Repository
Before you deploy the demo application, search for an application in the AWS Serverless Application Repository and embed its configuration into the template.yaml file.
- In the AWS Serverless Application Repository, search for an uploader app and copy its configuration into an AWS SAM template.
- Go to the AWS Lambda console and choose Create function.
- Choose Browse serverless app repository and in the search field, enter
upload to S3. - Choose the uploader application, as shown here:

Figure 4: Create function page of the AWS Lambda console
- Choose the uploader app and on its details page, choose Copy as SAM Resource, as shown here:

Figure 5: Uploader details page
Create the AWS SAM template
Edit the template.yaml file by pasting the SAM resource contents you copied in step 5 into it. The uploader section of the template is defined as follows:
uploader:
    Type: AWS::Serverless::Application
    Properties:
      Location:
        ApplicationId: arn:aws:serverlessrepo:us-east-1:233054207705:applications/uploader
        SemanticVersion: 1.1.0
      Parameters:
        # Name of the S3 Bucket to put uploaded files into (must exist prior to deployment)
        destBucket: YOUR_VALUE
The Type: AWS::Serverless::Application section of the template embeds a serverless application from the AWS Serverless Application Repository (in this case, the uploader application), which will be deployed as nested AWS::CloudFormation::Stack resources. For information about how to define a nested serverless application inside a SAM template, see AWS::Serverless::Application in the AWS Serverless Application Model Developer Guide.
Now, define all of the resources and dependencies in the template.
In older versions of the SAM CLI, you would need to create an S3 bucket to store the AWS CloudFormation template when running the commandSAM package or AWS CloudFormation package. In the latest versions of the SAM CLI, this step is no longer required. The sam deploy command creates the S3 bucket for packaging if it does not exist.
Add resources to the template
- Add a bucket resource.
Under the Resources section of the template, add the following entries, which instruct AWS CloudFormation or AWS SAM to create an S3 bucket named Bucket1.
  Bucket1:
Type: 'AWS::S3::Bucket'- Under the Parameters section, replace the placeholder for the destination bucket with the value of the bucket you defined in step 1:
destBucket: YOUR_VALUE change to: destBucket: !Ref Bucket1
Under the Resources section, add the AWS::Serverless::Function resource.
In the following code snippet, the serverless function is imganalyzer. The line underneath it tells AWS CloudFormation or AWS SAM that this is a Lambda function type resource. Underneath are the function properties, including the Lambda handler. The handler indicates:
- Which function in your code is called to begin execution.
- Which runtime is used (in this case, Python 3.8).
- Where to find the code specified by the value of the CodeUri property, which in this example is a dot (.) to tell AWS CloudFormation or AWS SAM to find the code in the current path.
  imganalyzer:
    Type: AWS::Serverless::Function
    Properties:
      Handler: lambda_function.lambda_handler
      Runtime: python3.8
      CodeUri: .
For more information, see AWS SAM resource and property reference in the AWS Serverless Application Model Developer Guide.
At this point, your template should look like this:
AWSTemplateFormatVersion: '2010-09-09'
Transform: 'AWS::Serverless-2016-10-31'
Description: An Amazon S3 trigger that uses Amazon Rekognition APIs to detect faces
Resources:
  uploader:
    Type: AWS::Serverless::Application
    Properties:
      Location:
        ApplicationId: arn:aws:serverlessrepo:us-east-1:233054207705:applications/uploader
        SemanticVersion: 1.1.0
      Parameters:
        # Name of the S3 Bucket to put uploaded files into (must exist prior to deployment)
        destBucket: !Ref Bucket1
  imganalyzer:
    Type: AWS::Serverless::Function
    Properties:
      Handler: lambda_function.lambda_handler
      Runtime: python3.8
      CodeUri: .
      Description: An Amazon S3 trigger that uses rekognition APIs to detect faces
      MemorySize: 128
      Timeout: 3
      Policies:
        - AmazonRekognitionReadOnlyAccess
      Events:
        BucketEvent1:
          Type: S3
          Properties:
            Bucket: !Ref Bucket1
            Events:
              - 's3:ObjectCreated:*'
  Bucket1:
    Type: 'AWS::S3::Bucket'
You’ll see that the AWS account ID is displayed under Resources as part of the ApplicationId attribute of the uploader application.
ApplicationId: arn:aws:serverlessrepo:us-east-1:233054207705:applications/uploader
The goal is that whenever an image is uploaded to the S3 bucket, the image analyzer Lambda function is triggered. It is implemented in the AWS SAM template using the following lines of code:
  Events:
    BucketEvent1:
      Type: S3
      Properties:
        Bucket: !Ref Bucket1
        Events:
          - 's3:ObjectCreated:*'
The Events: section in the template specifies the events that trigger the Lambda function. Events consist of a type and a set of properties that depend on the type. For more information, see EventSource in the AWS Serverless Application Model Developer Guide. For information about the SAM template structure, see AWS SAM template anatomy in the AWS Serverless Application Model Developer Guide.
Run the following command to validate your template using the AWS CloudFormation linter (cfn-lint):
cfn-lint template.yaml
Next, to perform celebrity recognition on the images uploaded to the S3 bucket, use the following code for the Lambda function.
The code calls the Amazon Rekognition RecognizeCelebrities API, which analyzes an image and returns a celebrity object that contains the identified celebrity name and other parameters, such as the match confidence.
import boto3
import urllib

#print('Loading function')
rekognition = boto3.client('rekognition')

# --------------- Main handler ------------------
def lambda_handler(event, context):
    # Get the object from the event
    bucket = event['Records'][0]['s3']['bucket']['name']
    key = urllib.parse.unquote_plus(event['Records'][0]['s3']['object']['key'])
    try:
        response = rekognition.recognize_celebrities(Image={"S3Object": {"Bucket": bucket, "Name": key}})
        for celebrity in response['CelebrityFaces']:
            print('Name: {}'.format(celebrity['Name']))
            print('Id: {}'.format(celebrity['Id']))
            print('Position:')
            print('   Left: {:.2f}'.format(celebrity['Face']['BoundingBox']['Height']))
            print('   Top: {:.2f}'.format(celebrity['Face']['BoundingBox']['Top']))
            print('Info')
            for url in celebrity['Urls']:
                print('   {}'.format(url))
        # Print response to console.
        print(response)
        #return response
    except Exception as e:
        #print(e)
        print("Error processing object {} from bucket {}. ".format(key, bucket) +
              "Make sure your object and bucket exist and your bucket is in the same region as this function.")
        raise e
You can copy paste the preceding code or download from the GitHub repo.
Deploy the application
Now that the template and Lambda function are ready, use the following AWS SAM CLI command to deploy the AWS SAM template into the AWS account to create the resources required for the application:
sam deploy --guided --capabilities

 CAPABILITY_IAM CAPABILITY_AUTO_EXPAND
Provide the arguments for the SAM deploy interactive menu, as shown here:
You should see the following message:

Figure 6: AWS CloudFormation stack changeset
Sign in to your AWS account and confirm that the package has been deployed successfully. Then, open the AWS CloudFormation console and check the events for your stack, celebrityrekognition. Look for CREATE_COMPLETE, as shown here:

Figure 7: Details for celebrityrekognition stack in the AWS CloudFormation console
Figure 7 shows that the stack for the nested stack for the uploader app was created by the sam deploy command.

Figure 8: Details for celebrityrekogniton-uploader app in the AWS CloudFormation console
You’ve now created an application for recognizing celebrity images. This includes building the main application, the image recognition Lambda function. Then you nested another application, uploader, which you downloaded from the AWS Serverless Application Repository. The uploader application creates the API endpoint, which provides the frontend application for uploading images to S3.
Testing the application
- Go to the AWS Lambda console, and from the left navigation pane, choose Applications.
- Choose the link for the uploader app. Its description says Serverless web application for uploading files to S3.

Figure 9: Applications page of the AWS Lambda console
- On the details page, choose the API endpoint URL.

Figure 10: API endpoint URL in the AWS Lambda console
- To upload an image, drag and drop it inside the orange circle. You’ll see in Figure 10 that two images (img1.png and img2.png) have been dropped. They are listed under Uploaded Files.

Figure 11: Uploader application interface
- Now go to the AWS Lambda console and choose your Lambda function (in this example, celebrityrekognition-imganalyzer-1XQHVJC5RJDKP).
- From the Monitoring tab, choose View logs in CloudWatch.

Figure 12: CloudWatch metrics displayed for the Lambda function
- Choose the corresponding logstream to view the log results.

Figure 13: Log results
The celebrities in img1 and img2 are Jeff Bezos (CEO of Amazon) and Andy Jassy (CEO of AWS), respectively.
Cleanup
To avoid ongoing charges in your AWS account, delete the resources you created. Before you follow these steps to delete the AWS CloudFormation package, the S3 bucket must be empty.
- Go to the AWS CloudFormation console.
- Choose the stack you created.
- To delete all of the resources deployed by the AWS CloudFormation package, choose Delete.

Figure 14: teststack selected in the AWS CloudFormation console
Conclusion
In this blog post, I showed you how to build a serverless application using the AWS Serverless Application Model (SAM) and AWS CloudFormation. You used an existing serverless application in the AWS Serverless Application Repository, which significantly reduces development time and costs. The serverless application recognizes celebrities from images stored in an S3 bucket. Thanks to the power of AWS SAM and the AWS Serverless Application Repository, all you had to do was nest the uploader into the SAM template. Then you deployed the demo application using AWS CloudFormation.
In summary, this blog demonstrates the power of AWS cloud and how it helps customers how to innovate on AWS cloud by building cloud native applications leveraging existing building blocks, which ultimately help to reduce time to market and reduce costs.